


打通任督二脉:让你的 GitHub Copilot 瞬间学会 Claude Code 的所有绝招
目标读者:希望在 VSCode/Zed 编辑器中直接复用 Claude Code 强大本地能力的开发者、DevOps 工程师、AI 工具流搭建者。
核心价值:通过自动化映射机制,打破 Claude Code CLI 与编辑器 Copilot 之间的"生殖隔离",实现一套 Skills/Agents 双端复用。
阅读时间:8 分钟

引言
你是否遇到过这种割裂的体验:在终端里,Claude Code 配置了强大的 tech-blog 技能,能一键生成高质量博客;配置了 code-review Agent,能深度审查代码。但在 VSCode 编辑器里,面对 GitHub Copilot,你却只能用最基础的自然语言对话,Copilot 对你精心调教的那些本地技能一无所知。
这就像是你拥有一本绝世武功秘籍(Claude Code Skills),但你的随身保镖(Copilot)却是个只会打直拳的门外汉。
如果我们能建立一种机制,自动将 Claude Code 的所有能力"注册"给 Copilot,会发生什么?
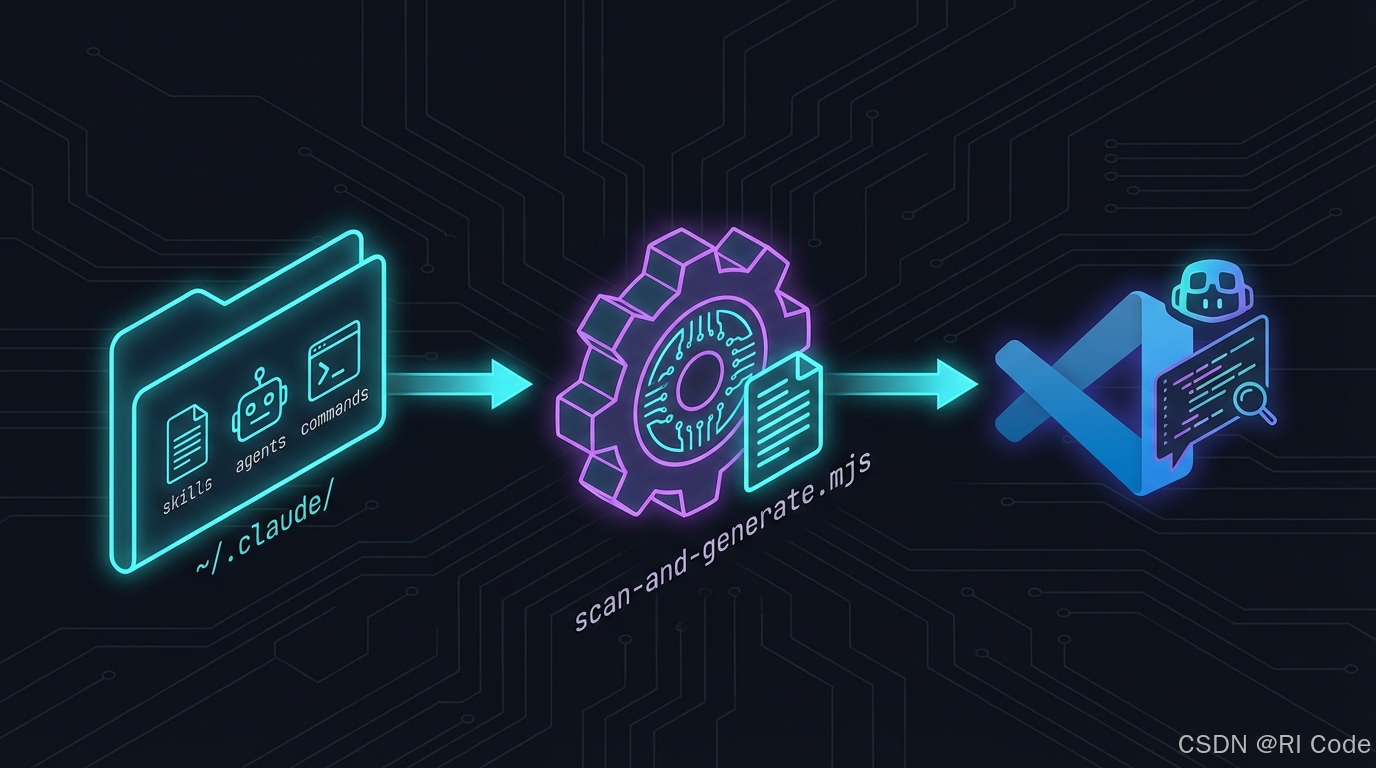
本文将深度解析如何通过一个 Node.js 扫描脚本,自动生成"能力映射表",让 Copilot 瞬间"读取"并掌握你所有的本地 Skills、Agents 和 Commands。
为什么需要"能力映射"?
Claude Code 的核心优势在于其高度可定制的 Local Skills(本地技能)和 Agents(智能体)。这些定义通常以 Markdown 文件的形式存储在 ~/.claude/skills 或 ~/.claude/agents 目录中。
然而,GitHub Copilot 运行在编辑器的上下文中,它无法直接通过系统路径去"扫描"和"理解"这些散落在文件系统中的技能定义。
我们需要一个"中间层"——Mapping Files(映射文件)。
这就像是给 Copilot 准备的一份"技能菜单"。菜单上不仅列出了有什么菜(Skill Name),还写明了这道菜是什么味道(Description),以及大厨在哪里(File Path)。Copilot 拿到这份菜单,就能根据你的需求点菜了。
核心实现:自动化扫描脚本
为了实现这一目标,我 Vibe 了一个名为 scan-and-generate.mjs 的自动化脚本。它的核心职责是:遍历目录 -> 提取元数据 -> 生成 Markdown。
1. 灵活的配置策略
脚本的设计必须足够通用,以支持 Skills、Agents、Commands 以及插件(Plugins)中的各种资源。我们在代码中定义了一个强大的 CONFIG 对象:
const CONFIG = {
  mappings: [
    {
      id: "skills",
      name: "Local Skills",
      outputFile: "skills-mapping.md",
      sourceDir: ROOT_DIR + "/skills/",
      sourcePattern: "*/SKILL.md", // 锁定 SKILL.md 文件
      frontmatterFields: ["description", "name"], // 提取关键元数据
      groupBy: (file) => {
        // 智能分组逻辑,按功能类别归档
        const relative = file.replace(ROOT_DIR + "/skills/", "");
        const skillName = relative.split("/")[0];
        return getSkillCategory(skillName);
      },
    },
    // ... 其他映射配置(Agents, Commands等)
  ],
};
这段配置定义了"去哪找"(sourceDir)、“找什么”(sourcePattern)以及"怎么展示"(groupBy)。特别是 frontmatterFields,它直接从 Markdown 的头部元数据(Frontmatter)中提取技能描述,这是 Copilot 理解技能用途的关键。
2. 智能提取与分组
脚本不仅是简单的列表生成,还包含了智能的分类逻辑。例如,getSkillCategory 函数维护了一个映射表,将杂乱的技能归类为 “Content & Writing”、“Development”、“Project Management” 等类别。
// 示例:将技能映射到类别
const categories = {
  "tech-blog": "Content & Writing",
  "code-review": "Code Analysis",
  zustand: "Development",
  // ...
};
这种结构化的输出对于 LLM(大语言模型)非常友好。当 Copilot 阅读这份文档时,它能建立起结构化的认知:“哦,如果用户要写文章,我应该去 Content & Writing 分类下找找。”
3. 生成 Copilot 可读的指令
仅仅列出文件是不够的,我们还需要告诉 Copilot 如何使用 这些技能。脚本会读取 templates 目录下的指令模版,并将其嵌入到生成的 Markdown 头部。
以 skills-mapping.md 为例,生成的头部包含这样的指令:
“当用户激活本地技能时… 1. 识别技能引用… 3. 使用 Read 工具读取 SKILL.md 文件… 4. 将技能规则应用到当前会话…”
这相当于给 Copilot 植入了一段"元指令"(Meta-Prompt),教它如何加载和执行外部技能。
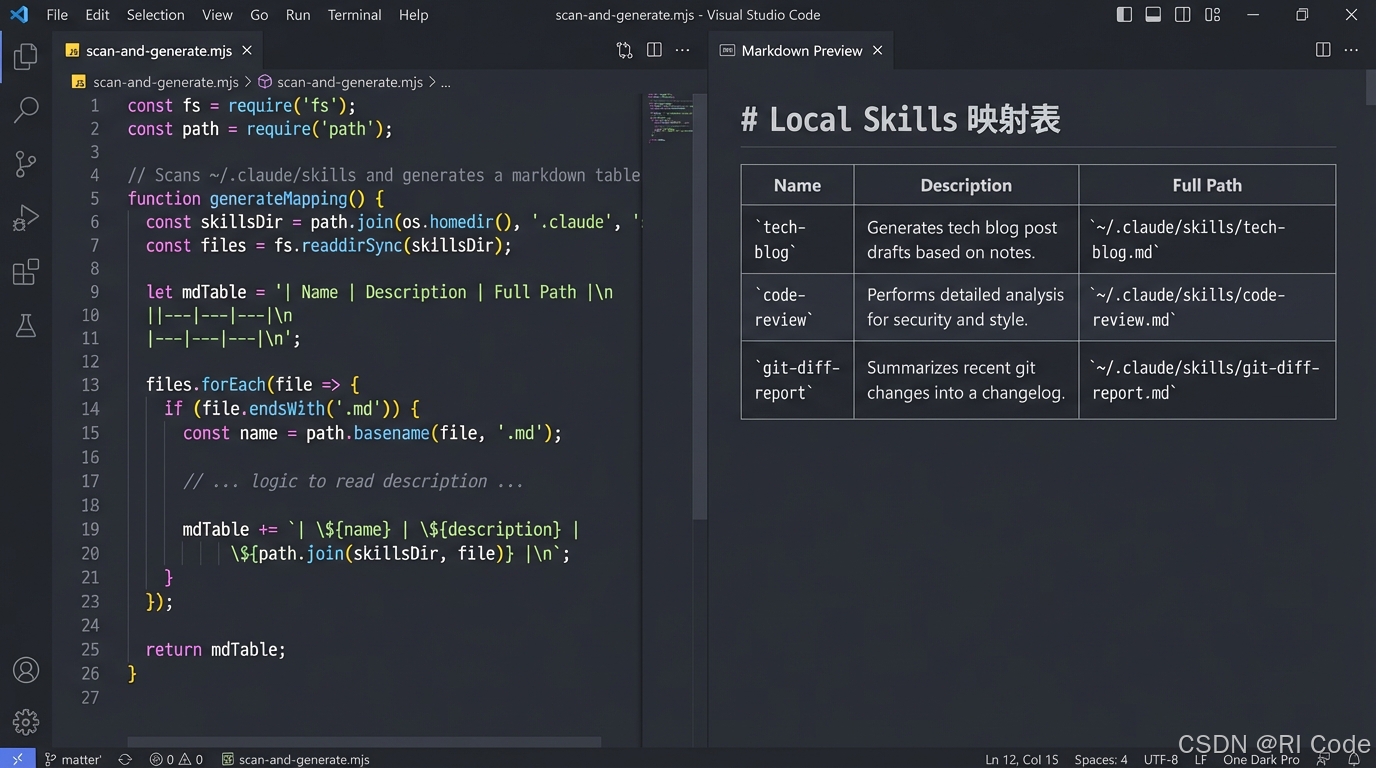
4. 完整实现
1. scan-and-generate.mjs
#!/usr/bin/env node
/**
 * Scan and Generate Mapping Documents
 * 扫描 ~/.claude/ 目录并生成映射文档
 */

import {
  readFileSync,
  writeFileSync,
  mkdirSync,
  existsSync,
  lstatSync,
  readdirSync,
} from "fs";
import { globSync } from "glob";
import { dirname, basename, join } from "path";
import { fileURLToPath } from "url";

const __dirname = dirname(fileURLToPath(import.meta.url));
const ROOT_DIR = process.env.HOME + "/.claude";
const OUTPUT_DIR = join(__dirname, "output");
const TEMPLATES_DIR = join(__dirname, "templates");

// 确保输出目录存在
if (!existsSync(OUTPUT_DIR)) {
  mkdirSync(OUTPUT_DIR, { recursive: true });
}

// 扫描配置
const CONFIG = {
  mappings: [
    {
      id: "commands",
      name: "Local Commands",
      outputFile: "commands-mapping.md",
      sourceDir: ROOT_DIR + "/commands/",
      sourcePattern: "**/*.md",
      exclude: ["CLAUDE.md"],
      frontmatterFields: ["description", "argument-hint", "allowed-tools"],
      groupBy: (file) => {
        const relative = file.replace(ROOT_DIR + "/commands/", "");
        const parts = relative.split("/");
        return parts.length > 1 ? capitalize(parts[0]) : "General";
      },
      getShortcut: (file, frontmatter) => {
        const relative = file
          .replace(ROOT_DIR + "/commands/", "")
          .replace(".md", "")
          .replace(/\//g, ":");
        return relative ? "/" + relative : "/";
      },
      getName: (frontmatter, title, file) => {
        return frontmatter.name || title || basename(file, ".md");
      },
    },
    {
      id: "plugins-commands",
      name: "Plugin Commands",
      outputFile: "plugins-commands-mapping.md",
      sourceDir: ROOT_DIR + "/plugins/cache/",
      sourcePattern: ["**/commands/*.md", "**/.claude/commands/*.md"],
      exclude: ["CLAUDE.md"],
      frontmatterFields: ["description", "name"],
      groupBy: (file) => {
        const match = file.match(/plugins\/cache\/([^\/]+)\/([^\/]+)/);
        if (match) {
          return formatPluginName(match[1], match[2]);
        }
        return "Unknown";
      },
      getShortcut: (file, frontmatter) => {
        const cmdMatch = file.match(/[\/\.](claude\/)commands\/([^\/]+)\.md$/);
        const cmdName = cmdMatch ? cmdMatch[2] : basename(file, ".md");
        const orgMatch = file.match(/plugins\/cache\/([^\/]+)\//);
        const org = orgMatch ? orgMatch[1] : "";
        return "/" + (org ? org.replace("-plugins", "") + ":" : "") + cmdName;
      },
      getName: (frontmatter, title, file) => {
        const match = file.match(/[\/\.](claude\/)commands\/([^\/]+)\.md$/);
        return frontmatter.name || match?.[2] || basename(file, ".md");
      },
    },
    {
      id: "plugins-agents",
      name: "Plugin Agents",
      outputFile: "plugins-agents-mapping.md",
      sourceDir: ROOT_DIR + "/plugins/cache/",
      sourcePattern: ["**/agents/**/*.md", "**/.claude/agents/**/*.md"],
      exclude: ["CLAUDE.md"],
      frontmatterFields: ["description", "name"],
      groupBy: (file) => {
        const match = file.match(/plugins\/cache\/([^\/]+)\/([^\/]+)/);
        if (match) {
          return formatPluginName(match[1], match[2]);
        }
        return "Unknown";
      },
      subgroupBy: (file) => {
        const relative = file.split(/agents\//)[1];
        if (!relative) return "Agents";
        const parts = relative.split("/");
        return parts.length > 1 ? capitalize(parts[0]) : "Agents";
      },
      getShortcut: null,
      getName: (frontmatter, title, file) => {
        return frontmatter.name || title || basename(file, ".md");
      },
    },
    {
      id: "plugins-skills",
      name: "Plugin Skills",
      outputFile: "plugins-skills-mapping.md",
      sourceDir: ROOT_DIR + "/plugins/cache/",
      sourcePattern: "**/.claude/skills/*.md",
      exclude: ["CLAUDE.md", "SKILL.md"],
      frontmatterFields: ["description", "name"],
      groupBy: (file) => {
        const match = file.match(/plugins\/cache\/([^\/]+)\/([^\/]+)/);
        if (match) {
          return formatPluginName(match[1], match[2]);
        }
        return "Unknown";
      },
      getShortcut: null,
      getName: (frontmatter, title, file) => {
        return frontmatter.name || title || basename(file, ".md");
      },
    },
    {
      id: "skills",
      name: "Local Skills",
      outputFile: "skills-mapping.md",
      sourceDir: ROOT_DIR + "/skills/",
      sourcePattern: "*/SKILL.md",
      exclude: [],
      frontmatterFields: ["description", "name"],
      groupBy: (file) => {
        const relative = file.replace(ROOT_DIR + "/skills/", "");
        const skillName = relative.split("/")[0];
        return getSkillCategory(skillName);
      },
      getShortcut: null,
      getName: (frontmatter, title, file) => {
        return frontmatter.name || title || basename(file, ".md");
      },
    },
    {
      id: "agents",
      name: "Local Agents",
      outputFile: "agents-mapping.md",
      sourceDir: ROOT_DIR + "/agents/",
      sourcePattern: "**/*.md",
      exclude: ["CLAUDE.md"],
      frontmatterFields: ["description", "name"],
      groupBy: (file) => {
        const relative = file.replace(ROOT_DIR + "/agents/", "");
        const parts = relative.split("/");
        return parts.length > 1 ? capitalize(parts[0]) : "General";
      },
      getShortcut: null,
      getName: (frontmatter, title, file) => {
        return frontmatter.name || title || basename(file, ".md");
      },
    },
  ],
};

// 工具函数
function formatPluginName(org, plugin) {
  const displayNames = {
    thedotmack: "Claude Mem",
    "nyldn-plugins": "Claude Octopus",
    "claude-plugins-official": "Official Plugins",
    "planning-with-files": "Planning With Files",
  };
  const orgDisplay = displayNames[org] || org;
  const pluginDisplay = plugin === org ? "" : ` (${org})`;
  return orgDisplay + pluginDisplay;
}

function capitalize(str) {
  if (!str) return "";
  return str.charAt(0).toUpperCase() + str.slice(1);
}

function getSkillCategory(skillName) {
  const categories = {
    "eslint-auto-fix": "Development",
    "ast-grep": "Development",
    "frontend-design": "Development",
    "code-refactor-flow": "Development",
    zustand: "Development",
    "migrating-js-to-ts": "Development",
    "logging-best-practices": "Development",
    "code-analyze": "Code Analysis",
    "code-review": "Code Analysis",
    "git-diff-report": "Code Analysis",
    "prompt-optimizer": "AI & Prompt",
    codeagent: "AI & Prompt",
    "codex-subagent": "AI & Prompt",
    claudeception: "Skill Management",
    "skill-creator": "Skill Management",
    "skill-validator": "Skill Management",
    "skill-review": "Skill Management",
    "tech-blog": "Content & Writing",
    "stop-slop": "Content & Writing",
    "task-manager": "Project Management",
    figma2code: "Project Management",
  };
  return categories[skillName] || "Other";
}

function parseFrontmatter(content) {
  const result = {};
  const match = content.match(/^---\n([\s\S]*?)\n---/);
  if (!match) return result;

  const yamlContent = match[1];
  const lines = yamlContent.split("\n");
  let currentKey = null;
  let multilineValue = [];
  let isMultiline = false;

  for (let i = 0; i < lines.length; i++) {
    const line = lines[i];
    const colonIndex = line.indexOf(":");

    // 检查是否是新的键值对
    if (colonIndex > 0 && !line.startsWith(" ") && !line.startsWith("\t")) {
      // 保存之前的多行值
      if (isMultiline && currentKey) {
        result[currentKey] = multilineValue.join(" ").trim();
        multilineValue = [];
        isMultiline = false;
      }

      const key = line.slice(0, colonIndex).trim();
      const value = line.slice(colonIndex + 1).trim();

      // 检查是否是多行格式 (> 或 |)
      if (value === ">" || value === "|") {
        currentKey = key;
        isMultiline = true;
        multilineValue = [];
      } else {
        // 单行值
        currentKey = key;
        result[key] = value.replace(/^\[|\]$/g, "").replace(/,\s*/g, ", ");
      }
    } else if (isMultiline && line.trim()) {
      // 多行值的内容行(忽略空行)
      multilineValue.push(line.trim());
    }
  }

  // 保存最后一个多行值
  if (isMultiline && currentKey) {
    result[currentKey] = multilineValue.join(" ").trim();
  }

  return result;
}

function getTitle(content) {
  const lines = content.split("\n");
  for (const line of lines) {
    if (line.startsWith("# ")) {
      return line.replace("# ", "").trim();
    }
  }
  return null;
}

function scanFiles(pattern, exclude = []) {
  const patterns = Array.isArray(pattern) ? pattern : [pattern];
  let files = [];
  for (const p of patterns) {
    files = files.concat(globSync(p, { ignore: exclude }));
  }
  return [...new Set(files.filter((f) => !lstatSync(f).isDirectory()))];
}

// 获取插件目录下的最新版本号
function getLatestVersion(versions) {
  if (versions.length === 0) return null;

  // 分离语义版本和非语义版本
  const semverVersions = [];
  const nonSemverVersions = [];

  for (const v of versions) {
    // 语义版本格式: x.y.z (可能带有 pre-release 标签)
    if (/^\d+\.\d+(\.\d+)?(-[a-zA-Z0-9.-]+)?$/.test(v)) {
      semverVersions.push(v);
    } else {
      nonSemverVersions.push(v);
    }
  }

  // 如果有语义版本,使用 semver 比较
  if (semverVersions.length > 0) {
    // 简单的 semver 比较函数
    const compareSemver = (a, b) => {
      const parse = (v) => {
        const parts = v.split("-")[0].split(".").map(Number);
        const preRelease = v.split("-")[1] || "";
        return {
          major: parts[0] || 0,
          minor: parts[1] || 0,
          patch: parts[2] || 0,
          preRelease,
        };
      };
      const pa = parse(a);
      const pb = parse(b);

      if (pa.major !== pb.major) return pb.major - pa.major;
      if (pa.minor !== pb.minor) return pb.minor - pa.minor;
      if (pa.patch !== pb.patch) return pb.patch - pa.patch;

      // 处理 pre-release: 正式版 > pre-release
      if (!pa.preRelease && pb.preRelease) return -1;
      if (pa.preRelease && !pb.preRelease) return 1;
      return 0;
    };

    return semverVersions.sort(compareSemver)[0];
  }

  // 否则使用字母序最后一个
  return nonSemverVersions.sort().pop();
}

// 获取插件目录下所有版本目录
function getPluginVersions(pluginPath) {
  if (!existsSync(pluginPath)) return [];

  const entries = readdirSync(pluginPath, { withFileTypes: true });
  return entries
    .filter((entry) => entry.isDirectory())
    .map((entry) => entry.name);
}

// 过滤文件,只保留每个插件最新版本的内容
function filterLatestVersionFiles(files, patterns, exclude = []) {
  if (files.length === 0) return files;

  // 解析文件路径,提取插件标识和版本
  // 格式: plugins/cache/{org}/{plugin}/{version}/...
  const pluginVersions = new Map(); // key: "org/plugin", value: version

  for (const file of files) {
    const match = file.match(/plugins\/cache\/([^\/]+)\/([^\/]+)\/([^\/]+)/);
    if (match) {
      const org = match[1];
      const plugin = match[2];
      const version = match[3];
      const key = `${org}/${plugin}`;

      if (!pluginVersions.has(key)) {
        pluginVersions.set(key, version);
      } else {
        const currentLatest = pluginVersions.get(key);
        const candidateVersions = [currentLatest, version];
        const latest = getLatestVersion(candidateVersions);
        pluginVersions.set(key, latest);
      }
    }
  }

  // 重新扫描获取最新版本的实际文件
  const latestFiles = new Set();
  const sourceDir = ROOT_DIR + "/plugins/cache/";

  for (const [key, version] of pluginVersions) {
    const [org, plugin] = key.split("/");
    const versionPath = join(sourceDir, org, plugin, version);

    if (existsSync(versionPath)) {
      for (const pattern of patterns) {
        const fullPattern = join(versionPath, pattern);
        const matched = globSync(fullPattern, {
          ignore: exclude,
        });
        matched.forEach((f) => latestFiles.add(f));
      }
    }
  }

  return [...latestFiles];
}

function groupFiles(files, groupBy, subgroupBy = null) {
  const groups = {};
  for (const file of files) {
    const category = groupBy(file);
    if (!groups[category]) {
      groups[category] = subgroupBy ? {} : [];
    }

    if (subgroupBy) {
      const subcategory = subgroupBy(file);
      if (!groups[category][subcategory]) {
        groups[category][subcategory] = [];
      }
      groups[category][subcategory].push(file);
    } else {
      groups[category].push(file);
    }
  }
  return groups;
}

function getAgentUsageInstructions(mappingId) {
  // 模板文件映射
  const templateFiles = {
    commands: "commands-usage.md",
    "plugins-commands": "plugins-commands-usage.md",
    "plugins-agents": "plugins-agents-usage.md",
    "plugins-skills": "plugins-skills-usage.md",
    skills: "skills-usage.md",
    agents: "agents-usage.md",
  };

  const templateFile = templateFiles[mappingId];
  if (!templateFile) {
    return "";
  }

  const templatePath = join(TEMPLATES_DIR, templateFile);
  if (!existsSync(templatePath)) {
    console.warn(`Warning: Template file not found: ${templatePath}`);
    return "";
  }

  try {
    return readFileSync(templatePath, "utf-8");
  } catch (error) {
    console.warn(
      `Warning: Failed to read template file: ${templatePath}`,
      error,
    );
    return "";
  }
}

function generateMarkdown(mapping, groups) {
  let md = `---\nversion: 1.0\nlastUpdated: ${new Date().toISOString().split("T")[0]}\n---\n\n`;
  md += `# ${mapping.name} 映射表\n\n`;
  md += `本文件从 \`${mapping.sourceDir}\` 目录自动扫描生成。\n\n`;

  // 添加 Agent 使用流程说明
  const usageInstructions = getAgentUsageInstructions(mapping.id);
  if (usageInstructions) {
    md += usageInstructions;
  }

  md += `---\n\n`;

  const categories = Object.keys(groups).sort();
  let totalCount = 0;

  for (const category of categories) {
    const group = groups[category];
    md += `## ${category}\n\n`;

    if (mapping.subgroupBy && typeof group === "object") {
      const subcategories = Object.keys(group).sort();
      for (const subcategory of subcategories) {
        const files = group[subcategory];
        md += `### ${subcategory}\n\n`;
        md += generateTable(mapping, files, totalCount);
        totalCount += files.length;
      }
    } else {
      const files = Array.isArray(group) ? group : group[category] || [];
      md += generateTable(mapping, files, totalCount);
      totalCount += files.length;
    }
  }

  md += `---\n\n`;
  md += `*最后更新:${new Date().toLocaleDateString("zh-CN")}*\n`;

  return md;
}

function generateTable(mapping, files, startIndex) {
  if (files.length === 0) return "";

  let md = "";
  const hasShortcut = mapping.getShortcut !== null;

  if (hasShortcut) {
    md += `| 快捷方式 | 名称 | 描述 | 完整路径 |\n`;
    md += `|----------|------|------|----------|\n`;
  } else {
    md += `| 名称 | 描述 | 完整路径 |\n`;
    md += `|------|------|----------|\n`;
  }

  for (const file of files.sort()) {
    md += generateRow(mapping, file) + "\n";
  }
  md += "\n";

  return md;
}

function generateRow(mapping, filePath) {
  const content = readFileSync(filePath, "utf-8");
  const frontmatter = parseFrontmatter(content);
  const title = getTitle(content);

  const shortPath = filePath.replace(process.env.HOME, "~");
  const name = mapping.getName(frontmatter, title, filePath);
  const shortcut = mapping.getShortcut
    ? mapping.getShortcut(filePath, frontmatter)
    : "";
  let description = frontmatter.description || "-";
  // Clean up description - remove surrounding quotes if present
  if (description.startsWith('"') && description.endsWith('"')) {
    description = description.slice(1, -1);
  }

  if (shortcut) {
    return `| ${shortcut} | ${name} | ${description} | \`${shortPath}\` |`;
  }
  return `| ${name} | ${description} | \`${shortPath}\` |`;
}

function run() {
  console.log("Scanning and generating mapping documents...\n");

  for (const mapping of CONFIG.mappings) {
    console.log(`  Processing: ${mapping.name}...`);

    const patterns = Array.isArray(mapping.sourcePattern)
      ? mapping.sourcePattern
      : [mapping.sourcePattern];

    let files = [];
    for (const pattern of patterns) {
      // Prepend sourceDir to all patterns
      const fullPattern = join(mapping.sourceDir, pattern);
      files = files.concat(globSync(fullPattern, { ignore: mapping.exclude }));
    }
    files = [...new Set(files.filter((f) => !lstatSync(f).isDirectory()))];

    // 插件 mapping 需要过滤只保留最新版本
    if (mapping.id.startsWith("plugins-")) {
      files = filterLatestVersionFiles(files, patterns, mapping.exclude);
    }

    if (files.length === 0) {
      console.log(`    Warning: No files found for ${mapping.name}`);
      continue;
    }

    const groups = groupFiles(files, mapping.groupBy, mapping.subgroupBy);

    const markdown = generateMarkdown(mapping, groups);
    const outputPath = join(OUTPUT_DIR, mapping.outputFile);
    writeFileSync(outputPath, markdown, "utf-8");

    const totalItems = Object.values(groups).reduce((sum, group) => {
      if (mapping.subgroupBy && typeof group === "object") {
        return sum + Object.values(group).reduce((s, f) => s + f.length, 0);
      }
      return sum + (Array.isArray(group) ? group.length : 0);
    }, 0);

    console.log(`    Generated: ${mapping.outputFile} (${totalItems} items)`);
  }

  console.log("\nAll mapping documents generated successfully!");
}

run();
2. Agent Template 格式
## Agent 使用流程

当用户输入命令时,按以下步骤执行:

1. **解析命令快捷方式**
   - 顶层命令:直接查找表格(格式:`/command`)
   - 嵌套命令:解析 category:command 格式(格式:`/category:command`)

2. **查找映射表**
   - 在对应分类表格中查找快捷方式列
   - 获取完整路径字段

3. **读取命令文件**
   - 使用 Read 工具读取完整路径对应的 .md 文件
   - 解析 frontmatter 获取 allowed-tools 和其他元数据

4. **执行命令**
   - 按照命令文件中的指令执行
   - 严格使用 frontmatter 中指定的 allowed-tools
   - 如果未指定 allowed-tools,使用默认工具集

---
实战演练:在 Copilot 中调用 tech-blog
万事俱备,现在的核心问题是:体验如何?
假设你已经运行了脚本,生成了 skills-mapping.md。
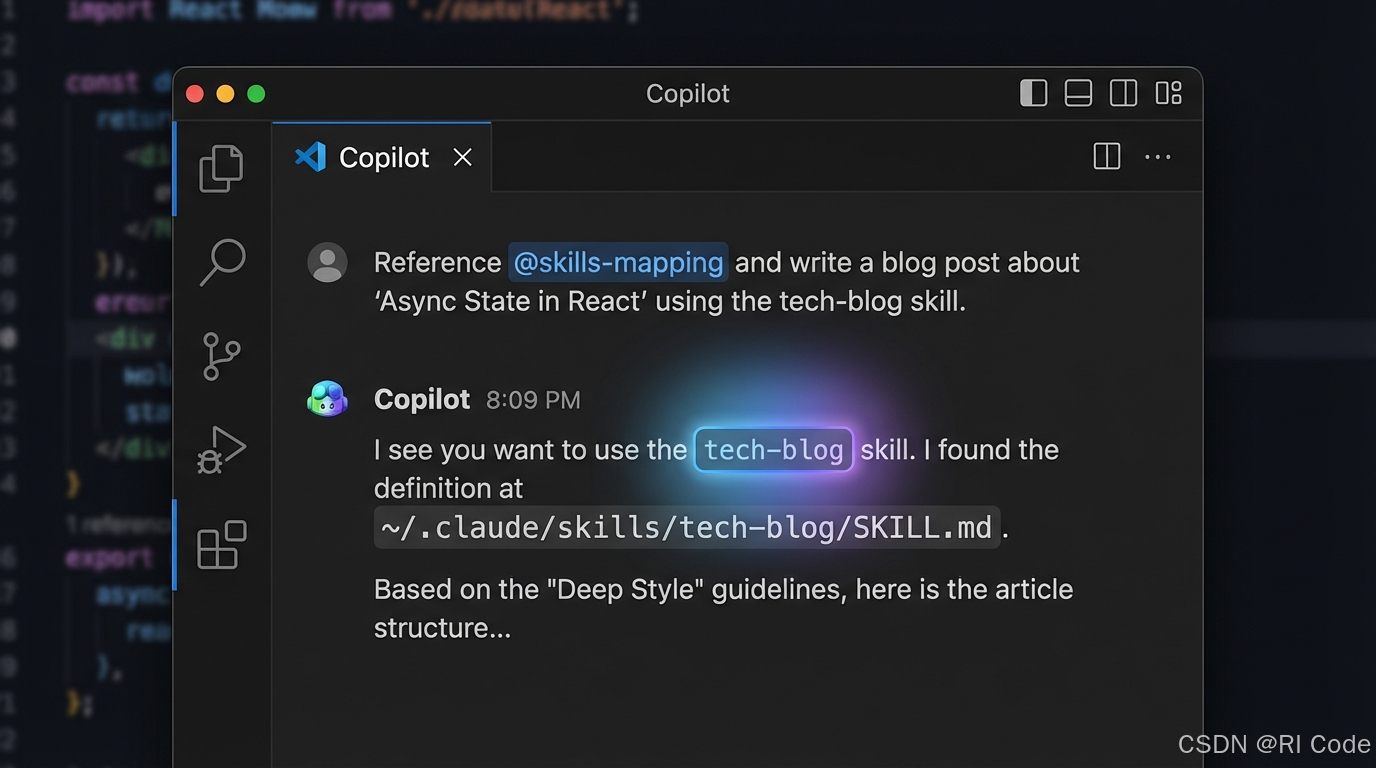
- 加载上下文:在 VSCode Copilot Chat 中,通过
@workspace或直接打开skills-mapping.md文件,让 Copilot 读取这个文件。 - 下达指令:输入 “我想写一篇关于 Zustand 状态管理的博客,使用 tech-blog 技能的深度风格。”
- Copilot 的思考链:
- 扫描
skills-mapping.md。 - 发现
tech-blog条目,描述匹配 “技术博客文章创作工具”。 - 获取路径
~/.claude/skills/tech-blog/SKILL.md。 - (关键一步) Copilot 会读取该路径下的文件内容(前提是你允许它读取,或者你将内容复制到了 Context 中)。
- Copilot 学习到
tech-blog的 Prompt 规则(如 3W 框架、金句要求)。 - 执行输出:Copilot 按照
tech-blog的深度版风格,生成了一篇结构完美的文章。
- 扫描
这通过一次简单的映射,打破了工具间的壁垒。 你在 Claude Code 里沉淀的每一次 Prompt 优化、每一个 Agent 调教,现在都能无缝同步给编辑器里的 Copilot。
总结
“工欲善其事,必先利其器”。但在 AI 时代,我们面临的问题往往不是器不够利,而是"器"太多且互不相通。
通过 scan-and-generate.mjs 这样一个小巧的胶水脚本,我们不仅仅是生成了一份文档,更是建立了一座桥梁。它连接了 CLI 的灵活性与 IDE 的便捷性,连接了系统级的能力与编辑器级的交互。
现在,去运行你的扫描脚本,把你的 Claude Code 变成 Copilot 的最强外脑吧。
参考资料
- Claude Code 官方文档
- VSCode GitHub Copilot 扩展指南
- 项目源码:
@mappings/scan-and-generate.mjs
 6275


 扫一扫


 被折叠的 条评论
为什么被折叠?
 到【灌水乐园】发言


