


MCP 是一个由 Anthropic 发起并开源的协议,旨在标准化 AI 模型(尤其是 LLM)与外部数据源和工具交互的方式。可以将其理解为 AI 应用的 "USB-C 接口",让不同的 LLM 能够以统一的方式连接和使用各种外部资源。
高德地图已经提出了MCP服务器的解决方案,这意味着DeepSeek等LLM能够实现对地图的操作,包括路径规划、地点搜索等,这将进一步的扩展LLM的能力,不久将会出现更多的DeepSeek导航应用等。未来也会出现更多MCP服务,让AI操作更多的软件,实现更多的功能。

作为AI时代的开发者,我们需要快速地掌握MCP开发技术,以适应越来越多的MCP服务。
但现在大多数的MCP教程,都是通过Claude Desktop、Cursor、Cline等MCP客户端实现的。在实际开发中,我们需要通过代码构建自己的客户端,而不是通过现有的客户端软件。
接下来,我们将从开发者的角度,介绍如何用MCP实现DeepSeek的工具调用。(文末附完整代码)
首先,我们来看一MCP的实现效果:
我们在MCP服务器中定义了两个工具:
@mcp.tool()
def get_time() -> str:
    """获取当前系统时间"""
    return str(datetime.datetime.now())


@mcp.tool()
def calculate_bmi(weight_kg: float, height_m: float) -> float:
    """根据体重(kg)和身高(m)计算BMI"""
    return weight_kg / (height_m ** 2)
我们希望通过MCP服务,LLM能够实现对这两个函数工具的调用。
效果如下:
服务器中可用的工具: ['get_time', 'calculate_bmi']

MCP 客户端启动

输入 /bye 退出

>>> 今天天气怎么样

我无法获取天气信息,因为我没有相关的工具。如果您需要了解天气情况,可以查看天气预报应用或网站。

>>> 现在几点了

```json

{

    "tool": "get_time",

    "arguments": {}

}

```

[提示]:正在执行函数

[执行结果]: meta=None content=[TextContent(type='text', text='2025-04-06 22:59:58.898244', annotations=None)] isError=False

现在的时间是2025年4月6日晚上10点59分。
DeepSeek将会直接调用MCP服务中的get_time工具,查询当前时间,并告诉用户当前的时间。
接下来是计算BMI的例子:
>>> 我想知道我的身高和体重是否符合标准

请告诉我您的体重(kg)和身高(m),我可以帮您计算BMI指数来判断是否符合标准。例如:"我身高1.75米,体重70公斤"。

>>> 身高180,体重80

```json

{

    "tool": "calculate_bmi",

    "arguments": {

        "weight_kg": 80,

        "height_m": 1.80

    }

}

```

[提示]:正在执行函数

[执行结果]: meta=None content=[TextContent(type='text', text='24.691358024691358', annotations=None)] isError=False

您的BMI指数是24.69,属于正常范围(18.5-24.9为正常)。您的身高体重比例是健康的。
当向DeepSeek提问“我想知道我的身高和体重是否符合标准”时,DeepSeek将会引导用户说出身高与体重,DeepSeek还能够根据用户说出的数字,自动将厘米单位转为为米,随后调用MCP服务中的calculate_bmi,实现BMI的计算,在计算完成后,DeepSeek将会根据计算结果,判断BMI是否为正常范围。
1.环境配置
MCP官方推荐使用uv来管理环境。
uv 是由 Astral 公司(也是著名 Python Linter 工具 Ruff 的开发者)开发的一款用 Rust 编写的高性能 Python 包安装器和虚拟环境管理器。它的目标是成为 pip, pip-tools, venv, virtualenv 等工具的统一、快速替代品。
我们可以通过下面的pip命令安装uv:
pip install uvuv的基本使用:
介绍uv工具主要使用的两个文件:
pyproject.toml:定义项目的主要依赖,包括项目名称、版本、描述、支持的 Python 版本等信息
uv.lock:记录项目的所有依赖,包括依赖的依赖,且跨平台,确保在不同环境下安装的一致性。这个文件由 uv 自动管理,不要手动编辑
添加依赖:
uv add <依赖名称>安装依赖(不更新配置文件)
uv pip install <依赖名称>运行代码
uv run 文件名.pyMCP环境配置过程如下:
(1).创建一个uv项目:
uv init mcp-server-demo
cd mcp-server-demo
(2).将 MCP 添加到项目依赖项中:
uv add "mcp[cli]"或者,对于使用 pip 进行依赖项的项目:
pip install "mcp[cli]"接下来,我们将分别从服务端和客户端两个方面,来介绍如何实现MCP开发。
2.MCP服务端
MCP服务端是为LLM提供工具、资源等功能的场所。
MCP能够提供的功能包括:
(1)资源Resources
MCP服务中可提供的资源包括:文件内容、数据库记录、图像等。这意味着LLM可以通过MCP服务,读取文件、数据库等等。
(2)提示Prompt
包括可重复使用的提示模板和工作流程。提示使服务器能够定义可重用的提示模板和工作流程,客户端可以轻松地向用户和大型语言模型展示这些模板和工作流程。
(3)工具Tools
LLM可用直接调用MCP中提供的工具,工具一般来说就是函数实现,MCP服务将会提供函数的描述和参数的描述给LLM,LLM将会判断应该执行哪个函数,并填写参数,最后在服务端执行函数。
(4)采样Sampling
让MCP 服务器请求 LLM的生成结果。 采样是MCP的一个强大功能,它允许 MCP 服务器通过客户端请求LLM的生成结果,从而实现复杂的智能行为,同时保持安全性和隐私性。
在Python SDK中,不同的功能可通过@修饰符来实现,下面是一个简单的工具调用的MCP服务器的例子:
from mcp.server.fastmcp import FastMCP
import datetime

mcp = FastMCP()


@mcp.tool()
def get_time() -> str:
    """获取当前系统时间"""
    return str(datetime.datetime.now())


@mcp.tool()
def calculate_bmi(weight_kg: float, height_m: float) -> float:
    """根据体重(kg)和身高(m)计算BMI"""
    return weight_kg / (height_m ** 2)


if __name__ == "__main__":
    mcp.run(transport='stdio')
在实现工具时,有几个需要注意的地方:
(1)要给每个函数工具写好注释
MCP服务将会自动解析这些注释,作为工具的描述。
(2)定义好每个参数的类型
例如:weight_kg: float,MCP将自动解析参数的类型,作为参数的描述,并且会将LLM的输出结果自动转为相应的类型。
(3)定义好返回值的类型
例如:-> float,这表示函数将返回一个float类型的值。
3.MCP客户端
MCP客户端是用户与LLM交互的场所,处理流程如下
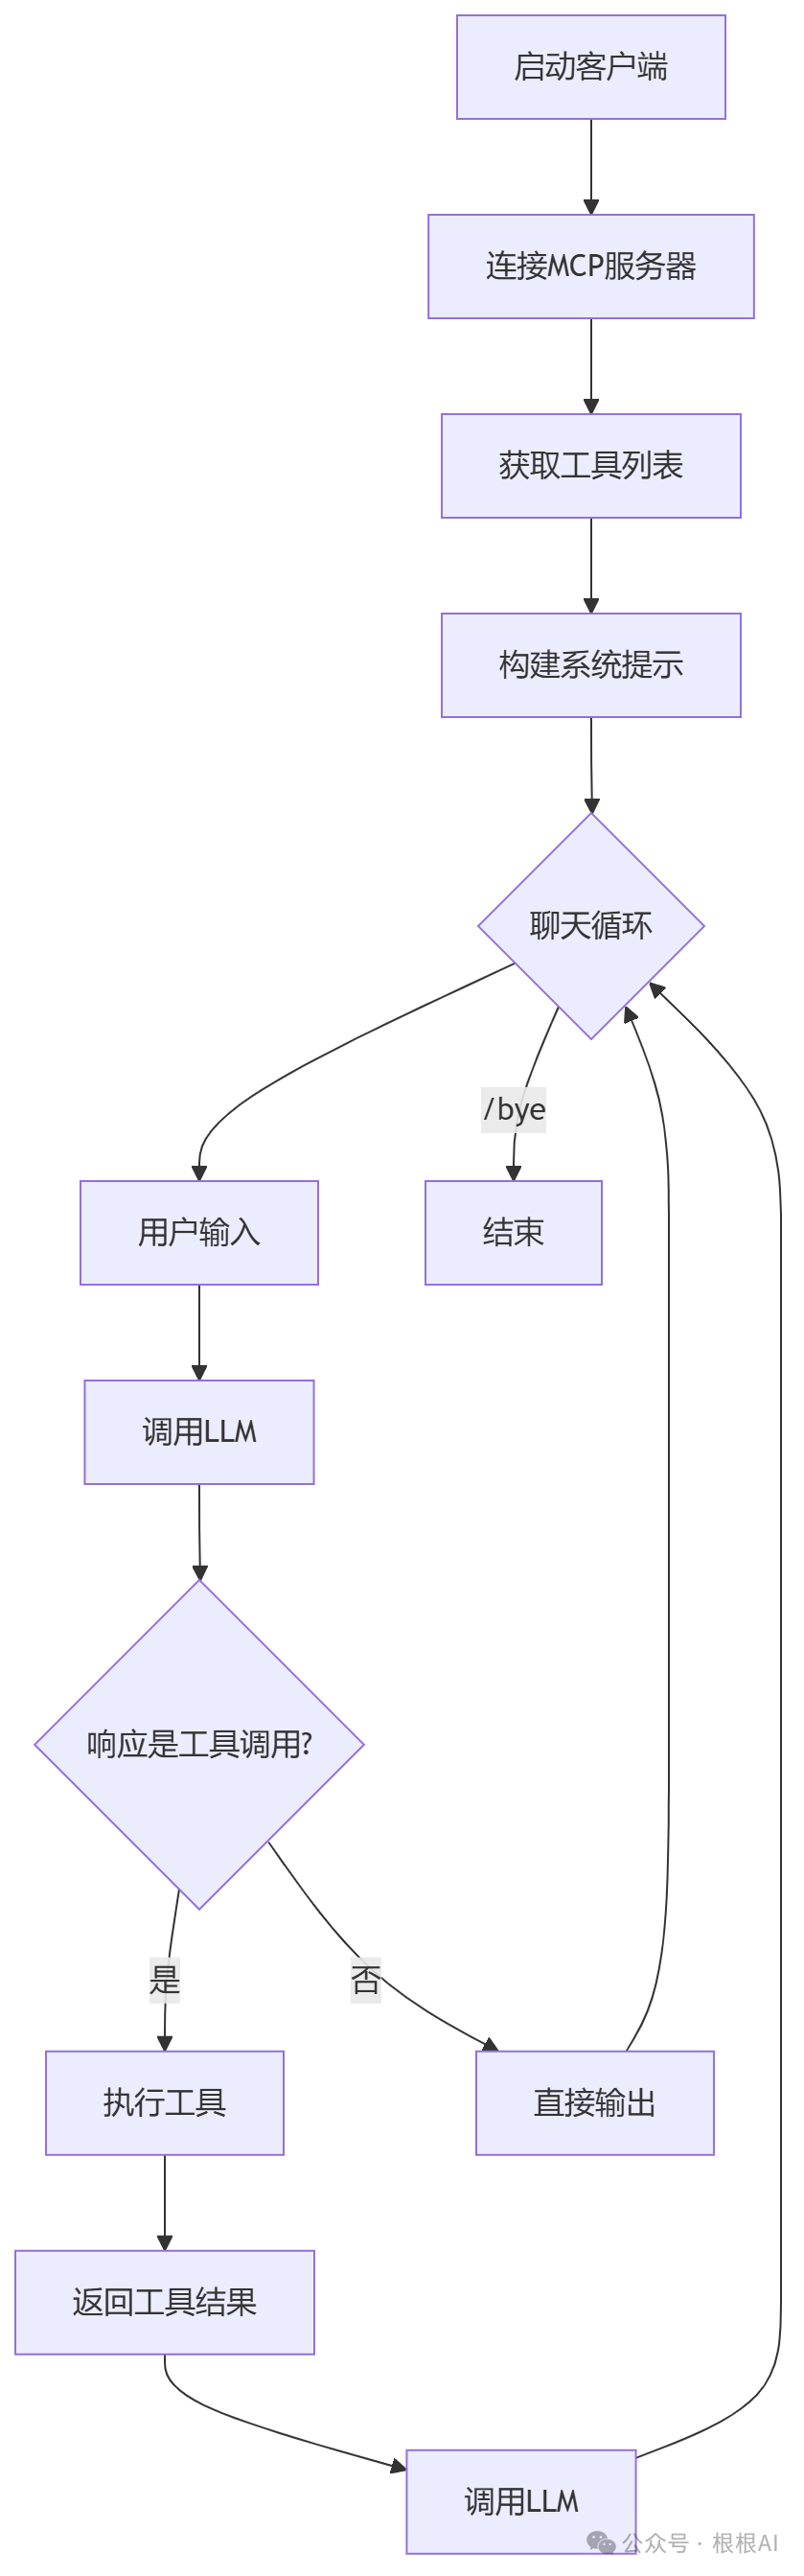
在客户端中,首先要连接服务端。连接好服务端后,查看服务端中有哪些可以调用的工具,并将这些工具解析到系统提示中。
    async def connect_to_server(self, server_script_path: str):
        """连接MCP服务器"""
        server_params = StdioServerParameters(
            command="python",
            args=[server_script_path],
            env=None
        )

        self.stdio, self.write = await self.exit_stack.enter_async_context(stdio_client(server_params))
        self.session = await self.exit_stack.enter_async_context(ClientSession(self.stdio, self.write))
        await self.session.initialize()

        # 列出可用工具
        response = await self.session.list_tools()
        tools = response.tools
        print("\n服务器中可用的工具:", [tool.name for tool in tools])

        tools_description = "\n".join([format_tools_for_llm(tool) for tool in tools])
        # 修改系统提示
        system_prompt = (
            "You are a helpful assistant with access to these tools:\n\n"
            f"{tools_description}\n"
            "Choose the appropriate tool based on the user's question. "
            "If no tool is needed, reply directly.\n\n"
            "IMPORTANT: When you need to use a tool, you must ONLY respond with "
            "the exact JSON object format below, nothing else:\n"
            "{\n"
            '    "tool": "tool-name",\n'
            '    "arguments": {\n'
            '        "argument-name": "value"\n'
            "    }\n"
            "}\n\n"
            '"```json" is not allowed'
            "After receiving a tool's response:\n"
            "1. Transform the raw data into a natural, conversational response\n"
            "2. Keep responses concise but informative\n"
            "3. Focus on the most relevant information\n"
            "4. Use appropriate context from the user's question\n"
            "5. Avoid simply repeating the raw data\n\n"
            "Please use only the tools that are explicitly defined above."
        )
        self.messages.append({"role": "system", "content": system_prompt})
接下来,就是对话的过程:
核心代码如下:
    async def chat_loop(self):
        """运行交互式聊天循环"""
        print("MCP 客户端启动")
        print("输入 /bye 退出")

        while True:
            prompt = input(">>> ").strip()
            if prompt.lower() == '/bye':
                break

            llm_response = await self.chat(prompt)
            print(llm_response)

            result = await self.execute_tool(llm_response)

            if result != llm_response:
                self.messages.append({"role": "assistant", "content": llm_response})

                final_response = await self.chat(result, "system")
                print(final_response)
                self.messages.append(
                    {"role": "assistant", "content": final_response}
                )
            else:
                self.messages.append({"role": "assistant", "content": llm_response})
步骤主要分为:
1.用户输入
2.LLM响应,并输出
3.判断LLM的响应是否为工具调用
4.若结果为工具调用,执行工具,再将执行的结果发送给LLM,再次获得响应,并输出。
至此,实现了LLM通过MCP的工具调用。在此代码的基础上,我们后续可以扩展出更多的应用,丰富LLM的能力。
完整代码
server.py
from mcp.server.fastmcp import FastMCP
import datetime

mcp = FastMCP()


@mcp.tool()
def get_time() -> str:
    """获取当前系统时间"""
    return str(datetime.datetime.now())


@mcp.tool()
def calculate_bmi(weight_kg: float, height_m: float) -> float:
    """根据体重(kg)和身高(m)计算BMI"""
    return weight_kg / (height_m ** 2)


if __name__ == "__main__":
    mcp.run(transport='stdio')
client.py
import asyncio
import sys
from typing import Optional
from contextlib import AsyncExitStack

from mcp import ClientSession, StdioServerParameters
from mcp.client.stdio import stdio_client

from dotenv import load_dotenv
from openai import AsyncOpenAI, OpenAI
import json

load_dotenv()  # load environment variables from .env


def format_tools_for_llm(tool) -> str:
    """对tool进行格式化

    Returns:
        格式化之后的tool描述
    """
    args_desc = []
    if "properties" in tool.inputSchema:
        for param_name, param_info in tool.inputSchema["properties"].items():
            arg_desc = (
                f"- {param_name}: {param_info.get('description', 'No description')}"
            )
            if param_name in tool.inputSchema.get("required", []):
                arg_desc += " (required)"
            args_desc.append(arg_desc)

    return f"Tool: {tool.name}\nDescription: {tool.description}\nArguments:\n{chr(10).join(args_desc)}"


class MCPClient:
    def __init__(self):
        self.session: Optional[ClientSession] = None
        self.exit_stack = AsyncExitStack()
        self.client = AsyncOpenAI(
            base_url="https://api.deepseek.com",
            api_key="sk-a6b8911a79874f599a2e85281bce8614",
        )
        self.model = "deepseek-chat"
        self.messages = []

    async def connect_to_server(self, server_script_path: str):
        """连接MCP服务器"""
        server_params = StdioServerParameters(
            command="python",
            args=[server_script_path],
            env=None
        )

        self.stdio, self.write = await self.exit_stack.enter_async_context(stdio_client(server_params))
        self.session = await self.exit_stack.enter_async_context(ClientSession(self.stdio, self.write))
        await self.session.initialize()

        # 列出可用工具
        response = await self.session.list_tools()
        tools = response.tools
        print("\n服务器中可用的工具:", [tool.name for tool in tools])

        tools_description = "\n".join([format_tools_for_llm(tool) for tool in tools])
        # 修改系统提示
        system_prompt = (
            "You are a helpful assistant with access to these tools:\n\n"
            f"{tools_description}\n"
            "Choose the appropriate tool based on the user's question. "
            "If no tool is needed, reply directly.\n\n"
            "IMPORTANT: When you need to use a tool, you must ONLY respond with "
            "the exact JSON object format below, nothing else:\n"
            "{\n"
            '    "tool": "tool-name",\n'
            '    "arguments": {\n'
            '        "argument-name": "value"\n'
            "    }\n"
            "}\n\n"
            '"```json" is not allowed'
            "After receiving a tool's response:\n"
            "1. Transform the raw data into a natural, conversational response\n"
            "2. Keep responses concise but informative\n"
            "3. Focus on the most relevant information\n"
            "4. Use appropriate context from the user's question\n"
            "5. Avoid simply repeating the raw data\n\n"
            "Please use only the tools that are explicitly defined above."
        )
        self.messages.append({"role": "system", "content": system_prompt})

    async def chat(self, prompt, role="user"):
        """与LLM进行交互"""
        self.messages.append({"role": role, "content": prompt})

        # 初始化 LLM API 调用
        response = await self.client.chat.completions.create(
            model=self.model,
            messages=self.messages,
        )
        llm_response = response.choices[0].message.content
        return llm_response

    async def execute_tool(self, llm_response: str):
        """Process the LLM response and execute tools if needed.

        Args:
            llm_response: The response from the LLM.

        Returns:
            The result of tool execution or the original response.
        """
        import json

        try:
            tool_call = json.loads(llm_response.replace("```json\n", "").replace("```", ""))
            if "tool" in tool_call and "arguments" in tool_call:
                # result = await self.session.call_tool(tool_name, tool_args)
                response = await self.session.list_tools()
                tools = response.tools

                if any(tool.name == tool_call["tool"] for tool in tools):
                    try:
                        print("[提示]:正在执行函数")
                        result = await self.session.call_tool(
                            tool_call["tool"], tool_call["arguments"]
                        )

                        if isinstance(result, dict) and "progress" in result:
                            progress = result["progress"]
                            total = result["total"]
                            percentage = (progress / total) * 100
                            print(f"Progress: {progress}/{total} ({percentage:.1f}%)")
                        print(f"[执行结果]: {result}")
                        return f"Tool execution result: {result}"
                    except Exception as e:
                        error_msg = f"Error executing tool: {str(e)}"
                        print(error_msg)
                        return error_msg

                return f"No server found with tool: {tool_call['tool']}"
            return llm_response
        except json.JSONDecodeError:
            return llm_response


    async def chat_loop(self):
        """运行交互式聊天循环"""
        print("MCP 客户端启动")
        print("输入 /bye 退出")

        while True:
            prompt = input(">>> ").strip()
            if prompt.lower() == '/bye':
                break

            llm_response = await self.chat(prompt)
            print(llm_response)

            result = await self.execute_tool(llm_response)

            if result != llm_response:
                self.messages.append({"role": "assistant", "content": llm_response})

                final_response = await self.chat(result, "system")
                print(final_response)
                self.messages.append(
                    {"role": "assistant", "content": final_response}
                )
            else:
                self.messages.append({"role": "assistant", "content": llm_response})


async def main():
    if len(sys.argv) < 2:
        print("Usage: uv run client.py <path_to_server_script>")
        sys.exit(1)

    client = MCPClient()

    await client.connect_to_server(sys.argv[1])
    await client.chat_loop()


if __name__ == "__main__":
    asyncio.run(main())
运行命令
uv run client.py ./server.py ./server.py 为MCP服务的路径


 408
408

 被折叠的 条评论
为什么被折叠?
被折叠的 条评论
为什么被折叠?
 到【灌水乐园】发言


