


数据来源:https://www.bilibili.com/video/BV1Wt411C75s?p=44&vd_source=5b26ae39f288c1978c47c005497bf0aa
数据格式
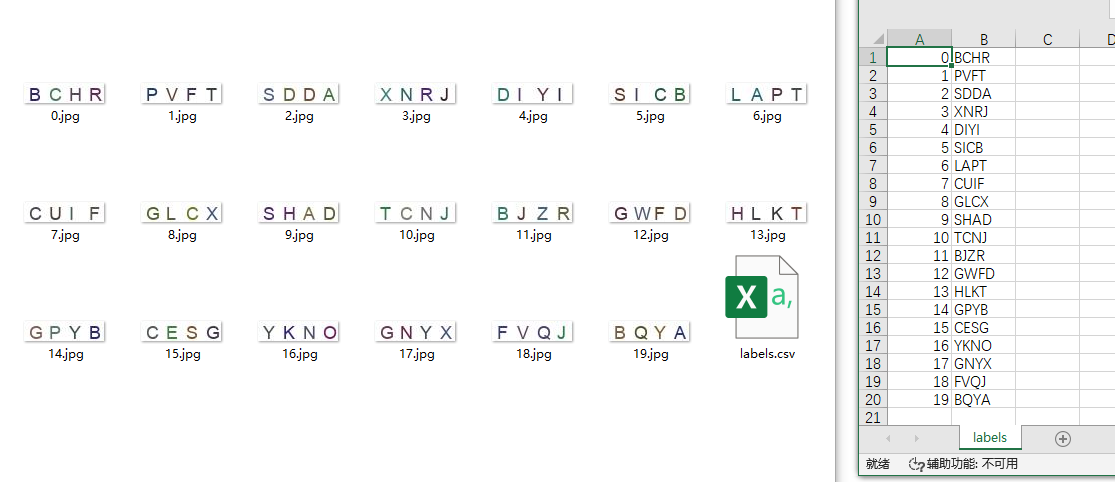
数据格式如下图所示,每张图片包含四个字母,labels.csv中存放着图片对应的标签。总共有6000张图片。
2.代码
2.1使用的库
import torch
from torch.utils.data import DataLoader
from torch import optim
from torch import nn
import numpy as np
import cv2 as cv
from torch.utils.data import Dataset
2.2定义数据集
class myDataSet(Dataset):
    '''
    定义训练集
    '''
    def __init__(self):
        #读入标签并转化onehot
        labels = np.loadtxt('GenPics/labels.csv', delimiter=',', dtype=str)
        self.labels = str2onehot(labels)

    def __len__(self):
        # 返回数据集长度
        return len(self.labels)

    def __getitem__(self, index):
        label=self.labels[index]
        label = torch.tensor(label)
        #标签无法接收2维,所以将[4,26]的标签转化成[4*26]
        label=label.reshape(4*26)
        img=cv.imread('GenPics/'+str(index)+'.jpg',0)/255
        img = torch.tensor(img)
        #读取的img图像为灰度图,是[20,80]的,需要变成[1,20,80]
        img = torch.unsqueeze(img, 0)
        img=img.to(torch.float32)

        return img,label

class myDataSet_test(Dataset):
    '''
    定义测试集
    '''
    def __init__(self):
        #读取标签
        labels = np.loadtxt('GenPics_test/labels.csv', delimiter=',', dtype=str)
        self.labels = labels[:,1]

    def __len__(self):
        # 返回数据集长度
        return len(self.labels)
    def __getitem__(self, index):

        label=self.labels[index]
        data=cv.imread('GenPics_test/'+str(index)+'.jpg',0)/255
        data = torch.tensor(data)
        data = torch.unsqueeze(data, 0)
        data=data.to(torch.float32)

        return data,label
3.网络模型
class Lenet5(nn.Module):

    def __init__(self):
        super(Lenet5, self).__init__()

        self.conv_unit = nn.Sequential(
            # 输入大小为:[batchsize,1,20,80]
            nn.Conv2d(1, 6, kernel_size=3, stride=1, padding=0),
            nn.MaxPool2d(kernel_size=2, stride=2, padding=0),
            nn.Conv2d(6, 16, kernel_size=3, stride=1, padding=0),
            nn.MaxPool2d(kernel_size=2, stride=2, padding=0),
        )
        self.fc_unit = nn.Sequential(
            #将上面的卷积层展平后是864
            nn.Linear(864, 120),
            nn.ReLU(),
            nn.Linear(120, 240),
            nn.ReLU(),
            nn.Linear(240, 104)
        )

    def forward(self, x):
        '''
        :param x:[b,ch,h,w]
        :return:
        '''
        batchsz = x.size(0)
        # 卷积层
        x = self.conv_unit(x)
        # 展平的函数
        x = x.view(batchsz, 864)
        # 全连接层
        logits = self.fc_unit(x)

        return logits
4.训练
def train():
    '''
    训练模型
    :return:
    '''
    train_dataset = myDataSet()
    train_iter = DataLoader(train_dataset, batch_size=32, shuffle=True)

    device = torch.device('cuda')
    model = Lenet5().to(device)
    # 损失函数用这个,可以对标签分类使用
    criteon = nn.MultiLabelSoftMarginLoss().to(device)
    # 优化器
    optipizer = optim.Adam(model.parameters(), lr=1e-3)
    for epoch in range(20):
        #做训练
        model.train()
        for x, label in train_iter:
            x, label = x.to(device), label.to(device)
            logits = model(x)
            loss = criteon(logits, label)
            #每次进行反向传播的时候先把他清零,他不会自动清零,不清零的话这个值会一直叠加
            optipizer.zero_grad()
            loss.backward()
            optipizer.step()

        #做测试,用eval可以防止对训练的参数造成干扰
        model.eval()
        with torch.no_grad():
            total_correct = 0
            total_num = 0

            for x, label in train_iter:
                x, label = x.to(device), label.to(device)
                logits = model(x)
                # 变成[4,26]后对每行求最大值,相当于对四个位置分别求其对应的字母
                logits = logits.reshape([-1, 4, 26])
                pred = logits.argmax(dim=2)
                label = label.reshape([-1, 4, 26])
                label = label.argmax(dim=2)
                #比较正确率
                total_correct += (torch.eq(pred, label).float().sum().item())/4
                total_num += x.size(0)

            acc = total_correct / total_num

        print(f'第{epoch}轮后的loss为{loss},acc为{acc}')
    torch.save(model.state_dict(), 'model_parameter.pkl')
5.测试
def test():
    '''
    测试模型
    :return:
    '''
    test_dataset=myDataSet_test()
    test_iter = DataLoader(test_dataset, batch_size=1, shuffle=False)
    device = torch.device('cpu')
    model = Lenet5().to(device)
    model.load_state_dict(torch.load("model_parameter.pkl"))  # 加载模型参数
    model.eval()
    for x, label in test_iter:
        x= x.to(device)
        logits = model(x)
        logits = logits.reshape([4, 26])
        pred = logits.argmax(dim=1)
        pred=pred.numpy().tolist()

        str_pred= ''
        for i in pred:
            str_pred= str_pred + chr(ord('A') + i)
        label=str(label[0])
        print(f'实际值是{label},预测值是{str_pred},',end='')
        if label==str_pred:
            print('预测准确')
        else:
            print('预测错误')
3.小结
算是第一个自己完成的深度学习模型,虽然也是在教学视频案例的基础上缝缝补补,但是自己过一遍下来收货不小。
感觉这个模型中还有挺多疑惑的地方,比如读取图片那里,不知道是这样用一次读一次合适,还是先把所有图片都读进来,然后直接用合适;另外还有关于onehot编码的地方,看教程说pytorch可以自动转换,但是对于这种多标签的分类的话他能按照想要的那种方式转换吗,他每一张图片都有4个字母也就是4个标签。
总之先把这个代码记录下来,后面再慢慢学慢慢改


 被折叠的 条评论
为什么被折叠?
被折叠的 条评论
为什么被折叠?
 到【灌水乐园】发言


