


参考博客:【深度学习】实现DETR模型预测+保存每个图片中的检测框的txt文件+代码-优快云博客
但我自己跑会报一些错误,大家可以把错误放进gpt里面让gpt帮忙修改一下代码。
上述博客的预测代码只能够实现带有预测框结果的图片保存以及预测框信息的保存,如下:

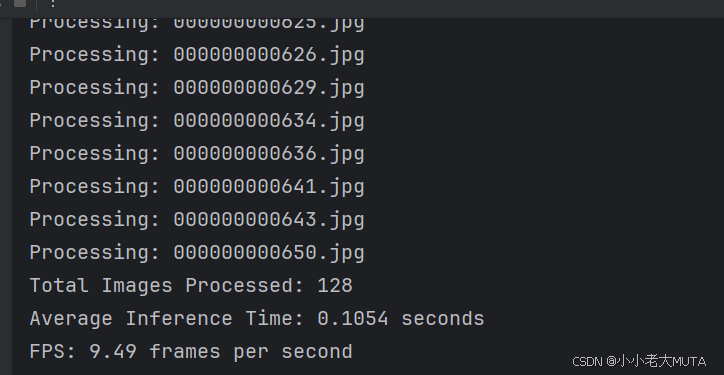
所以我在上述基础上又添加了inference time 和 FPS 的计算,最后会打印结果:
参考代码
import math
import os.path
from PIL import Image
import requests
import matplotlib.pyplot as plt
import torch
from torch import nn
from torchvision.models import resnet50
import torchvision.transforms as T
from hubconf import *
from util.misc import nested_tensor_from_tensor_list
import time
torch.set_grad_enabled(False)
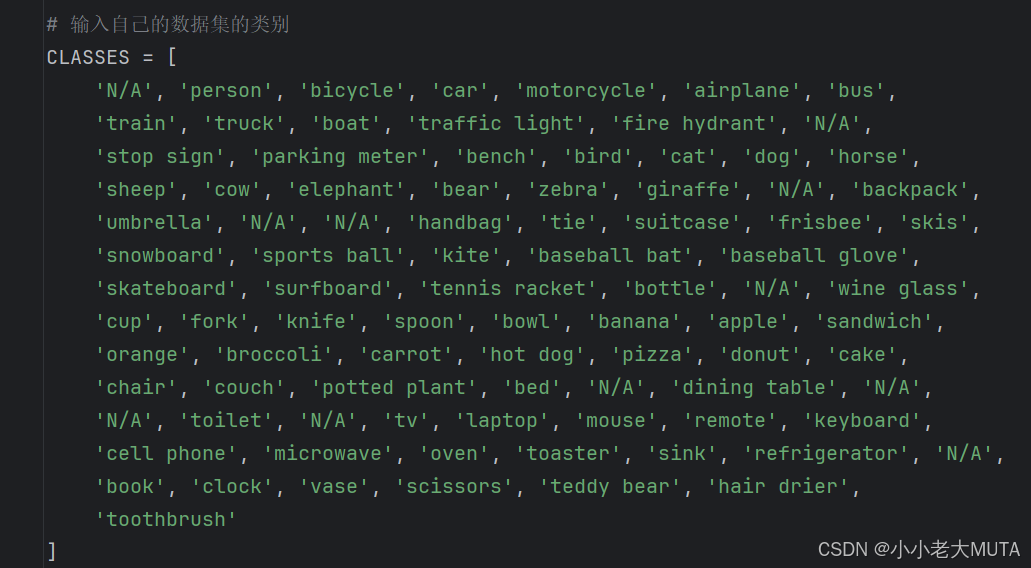
# 输入自己的数据集的类别
CLASSES = [
'N/A', 'person', 'bicycle', 'car', 'motorcycle', 'airplane', 'bus',
'train', 'truck', 'boat', 'traffic light', 'fire hydrant', 'N/A',
'stop sign', 'parking meter', 'bench', 'bird', 'cat', 'dog', 'horse',
'sheep', 'cow', 'elephant', 'bear', 'zebra', 'giraffe', 'N/A', 'backpack',
'umbrella', 'N/A', 'N/A', 'handbag', 'tie', 'suitcase', 'frisbee', 'skis',
'snowboard', 'sports ball', 'kite', 'baseball bat', 'baseball glove',
'skateboard', 'surfboard', 'tennis racket', 'bottle', 'N/A', 'wine glass',
'cup', 'fork', 'knife', 'spoon', 'bowl', 'banana', 'apple', 'sandwich',
'orange', 'broccoli', 'carrot', 'hot dog', 'pizza', 'donut', 'cake',
'chair', 'couch', 'potted plant', 'bed', 'N/A', 'dining table', 'N/A',
'N/A', 'toilet', 'N/A', 'tv', 'laptop', 'mouse', 'remote', 'keyboard',
'cell phone', 'microwave', 'oven', 'toaster', 'sink', 'refrigerator', 'N/A',
'book', 'clock', 'vase', 'scissors', 'teddy bear', 'hair drier',
'toothbrush'
]
# colors for visualization
COLORS = [[0.000, 0.447, 0.741], [0.850, 0.325, 0.098], [0.929, 0.694, 0.125],
[0.494, 0.184, 0.556], [0.466, 0.674, 0.188], [0.301, 0.745, 0.933]]
# # 输入自己的数据集的类别
# CLASSES = [
# 'N/A','ball','fakeperson','frustum','ironball','octaheron','polyhedron','uuv' # 只有一个类别
# ]
#
# # colors for visualization
# # COLORS = [[0.000, 0.447, 0.741]] # 为 'person' 类别分配一种颜色
# COLORS = [[0.000, 0.447, 0.741], [0.850, 0.325, 0.098], [0.929, 0.694, 0.125],
# [0.494, 0.184, 0.556], [0.466, 0.674, 0.188], [0.301, 0.745, 0.933]]
# standard PyTorch mean-std input image normalization
transform = T.Compose([
T.Resize(800),
T.ToTensor(),
T.Normalize([0.485, 0.456, 0.406],
[0.229, 0.224, 0.225])
])
# for output bounding box post-processing
def box_cxcywh_to_xyxy(x):
x_c, y_c, w, h = x.unbind(1)
b = [(x_c - 0.5 * w), (y_c - 0.5 * h),
(x_c + 0.5 * w), (y_c + 0.5 * h)]
return torch.stack(b, dim=1)
def rescale_bboxes(out_bbox, width, height):
# img_w, img_h = size
# b = box_cxcywh_to_xyxy(out_bbox)
box_coords = box_cxcywh_to_xyxy(out_bbox)
scale_tensor = torch.Tensor(
[width, height, width, height]).to(
torch.cuda.current_device()
)
return box_coords * scale_tensor
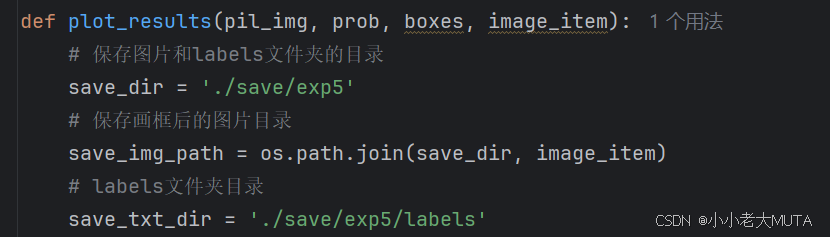
def plot_results(pil_img, prob, boxes, image_item):
# 保存图片和labels文件夹的目录
save_dir = './save/exp5'
# 保存画框后的图片目录
save_img_path = os.path.join(save_dir, image_item)
# labels文件夹目录
save_txt_dir = './save/exp5/labels'
# 创建目录(如果不存在)
os.makedirs(save_dir, exist_ok=True)
os.makedirs(save_txt_dir, exist_ok=True)
plt.figure(figsize=(16, 10))
plt.imshow(pil_img)
ax = plt.gca()
colors = COLORS * 100
for p, (xmin, ymin, xmax, ymax), c in zip(prob, boxes.tolist(), colors):
ax.add_patch(plt.Rectangle((xmin, ymin), xmax - xmin, ymax - ymin,
fill=False, color=c, linewidth=3))
cl = p.argmax()
text = f'{CLASSES[cl]}: {p[cl]:0.2f}'
# 获取每个图片相应的txt文件的名字
# 如xxx.jpg,此处txt_id为xxx
txt_id = image_item[:-4]
# 获取每个txt的绝对路径 /home/exp1/xxx.txt
filename = os.path.join(save_txt_dir, f"{txt_id}.txt")
with open(filename, "a", encoding="utf-8") as f:
# 此处我只需要保存预测类别的序号和概率即可,
# 所以保存在txt文件里为cl-1即可,
# -1是因为我这里不需要N/A这个类别的序号
results = f"{cl - 1} {p[cl]} \n"
f.writelines(results)
ax.text(xmin, ymin, text, fontsize=15,
bbox=dict(facecolor='yellow', alpha=0.5))
plt.axis('off')
# 保存画好的图片
plt.savefig(save_img_path, format='jpeg')
plt.close("all")
def detect(im, model, transform):
device = torch.cuda.current_device()
width = im.size[0]
height = im.size[1]
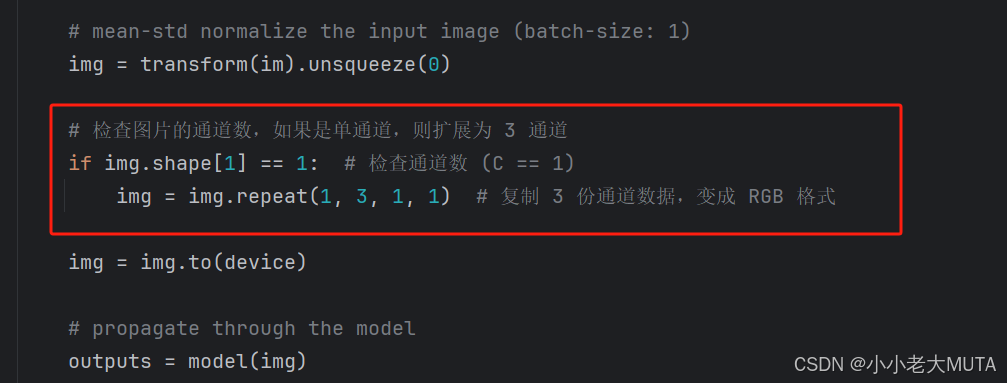
# mean-std normalize the input image (batch-size: 1)
img = transform(im).unsqueeze(0)
# 检查图片的通道数,如果是单通道,则扩展为 3 通道
if img.shape[1] == 1: # 检查通道数 (C == 1)
img = img.repeat(1, 3, 1, 1) # 复制 3 份通道数据,变成 RGB 格式
img = img.to(device)
# propagate through the model
outputs = model(img)
# keep only predictions with 0.7+ confidence
probas = outputs['pred_logits'].softmax(-1)[0, :, :-1]
keep = probas.max(-1).values > 0.7
# convert boxes from [0; 1] to image scales
bboxes_scaled = rescale_bboxes(outputs['pred_boxes'][0, keep], width, height)
return probas[keep], bboxes_scaled
if __name__ == "__main__":
device = torch.device('cuda:0')
model = detr_resnet50(pretrained=False, num_classes=91)
state_dict = torch.load(r"detr-r50-e632da11.pth", map_location='cuda')
model.load_state_dict(state_dict["model"])
model.to(device)
model.eval()
image_file_path = os.listdir("E:/CODE/python/datasets/coco128/images/train2017")
total_images = len(image_file_path)
total_time = 0 # 总推理时间统计
for image_item in image_file_path:
print("Processing:", image_item)
image_path = os.path.join("E:/CODE/python/datasets/coco128/images/train2017", image_item)
# 加载图片并转换为 RGB
im = Image.open(image_path).convert("RGB")
# 记录推理开始时间
start_time = time.time()
scores, boxes = detect(im, model, transform)
# 记录推理结束时间
end_time = time.time()
# 累积推理时间
total_time += (end_time - start_time)
# 保存检测结果
plot_results(im, scores, boxes, image_item)
# 计算 FPS 和平均推理时间
avg_inference_time = total_time / total_images
fps = 1 / avg_inference_time
print(f"Total Images Processed: {total_images}")
print(f"Average Inference Time: {avg_inference_time:.4f} seconds")
print(f"FPS: {fps:.2f} frames per second")
代码修改注意事项
1. 使用自己的数据集修改数据集类别
2. 修改结果的保存路径
3. 可能会存在单通道的图片,需要添加部分代码以防报错
·
4. 置信度的调整

5. 类别数的修改(类别个数+1)

6. 权重文件的修改,如果是自己的数据集,训练结束后从生成的outputs文件夹中选择checkpoints.pth的路径添加在此处;或者使用官方给的预训练权重。


 6917
6917

 被折叠的 条评论
为什么被折叠?
被折叠的 条评论
为什么被折叠?
 到【灌水乐园】发言


