


前言
本文续接上一篇文章,之前我们已经搭建好了esp32的开发环境,以及初始工程。接下来我们开始实现can驱动相关,以及使用c++封装can接口。
一、编程之前先看原理图
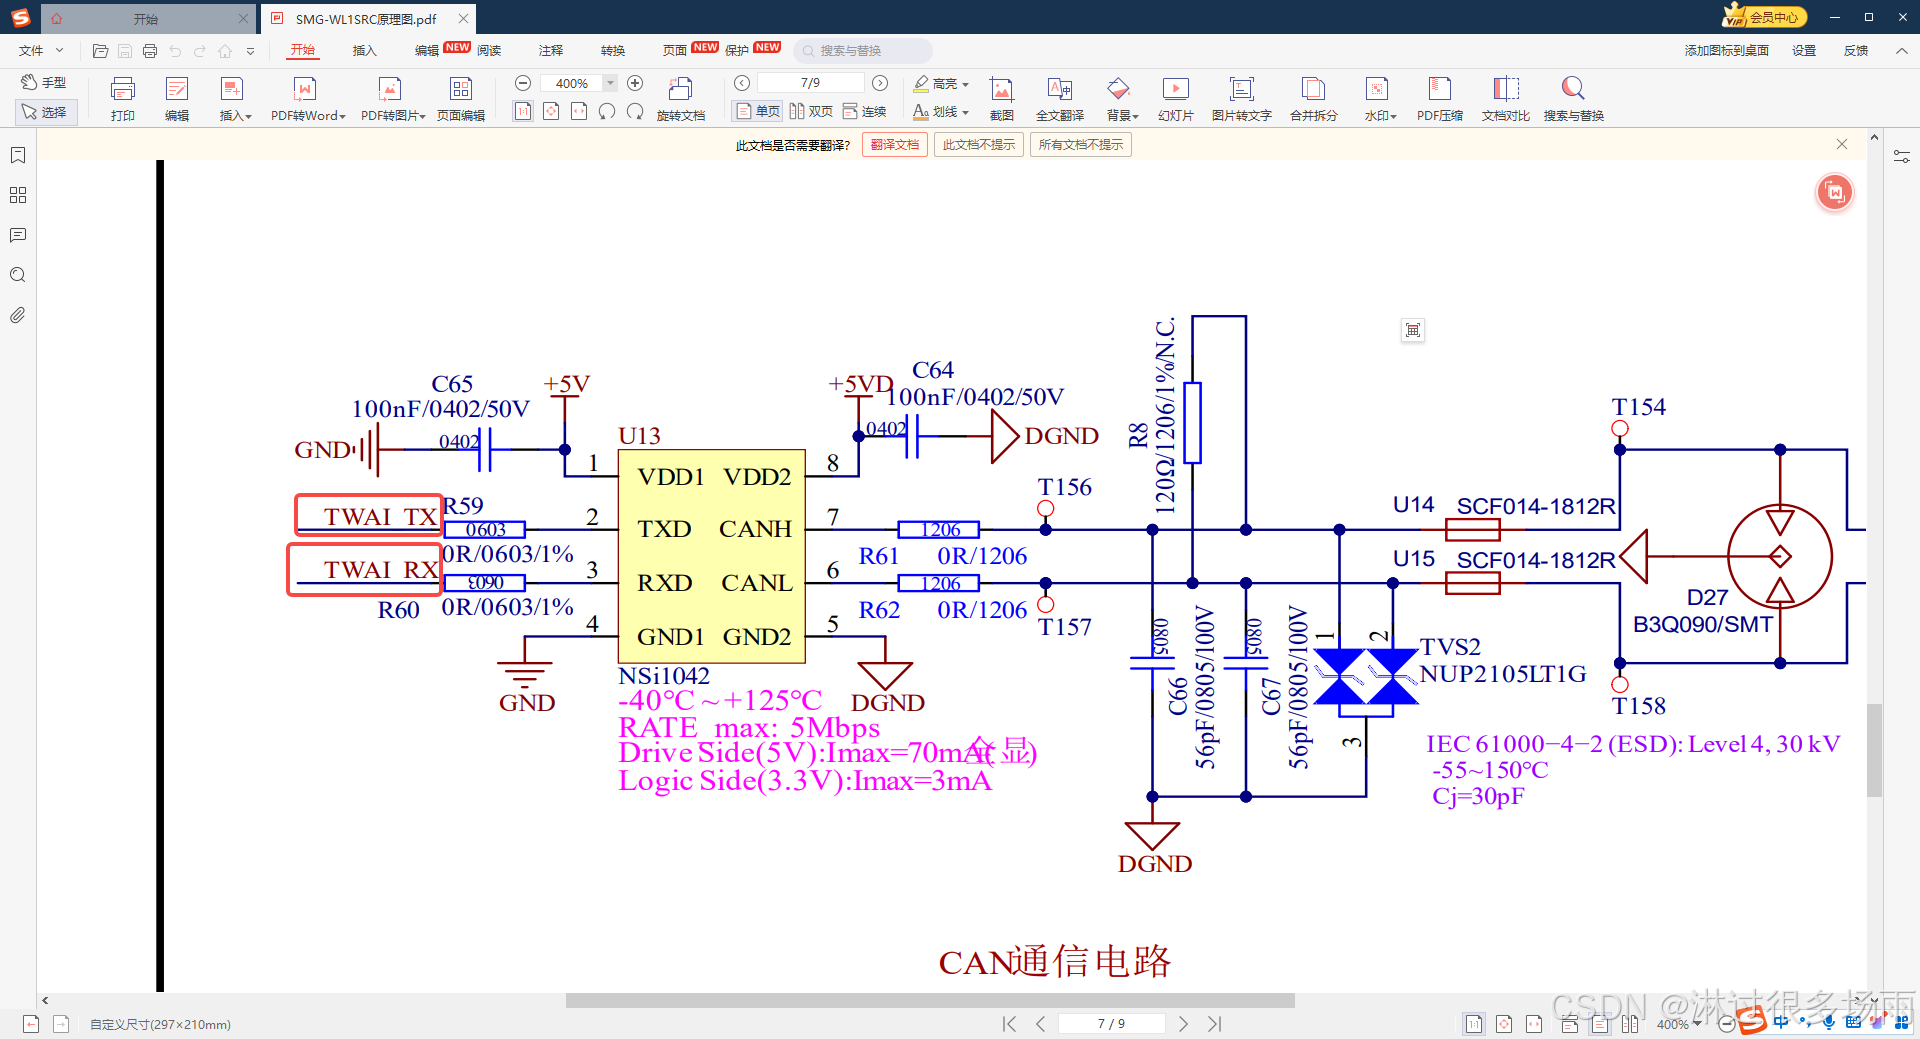
can转换芯片的tx与rx分别接在TWAI_TX, TWAI_RX上,再看主控部分原理图
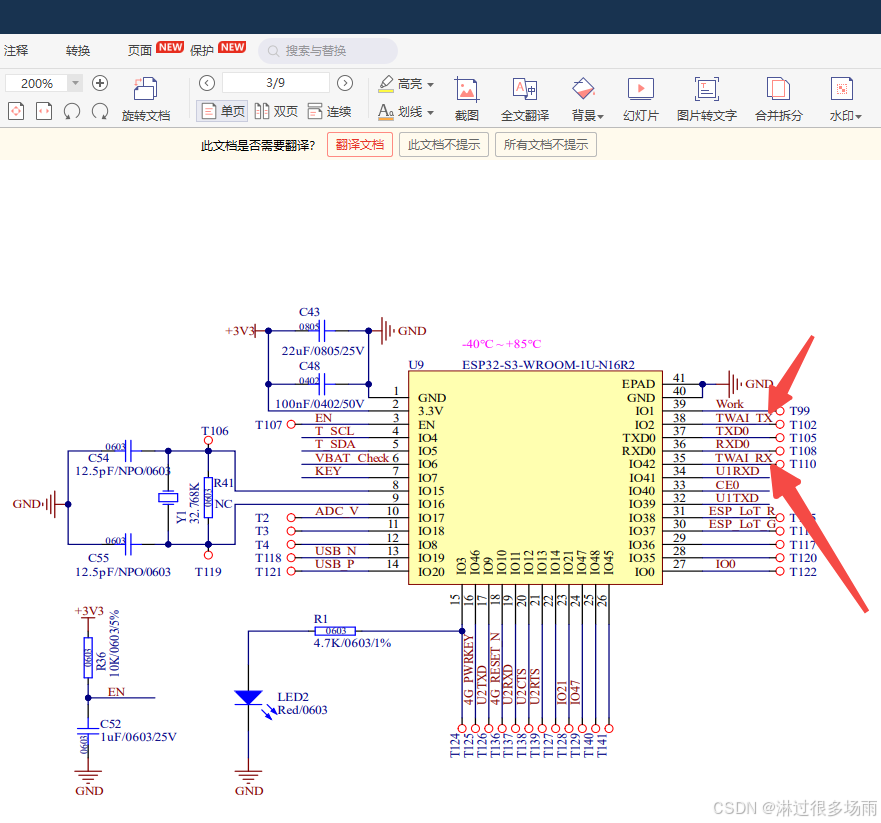
从原理图上看到
tx --> IO2 --> GPIO_NUM_2
rx --> IO42 --> GPIO_NUM_42
二、封装can驱动
先看下我们基础工程的目录结构
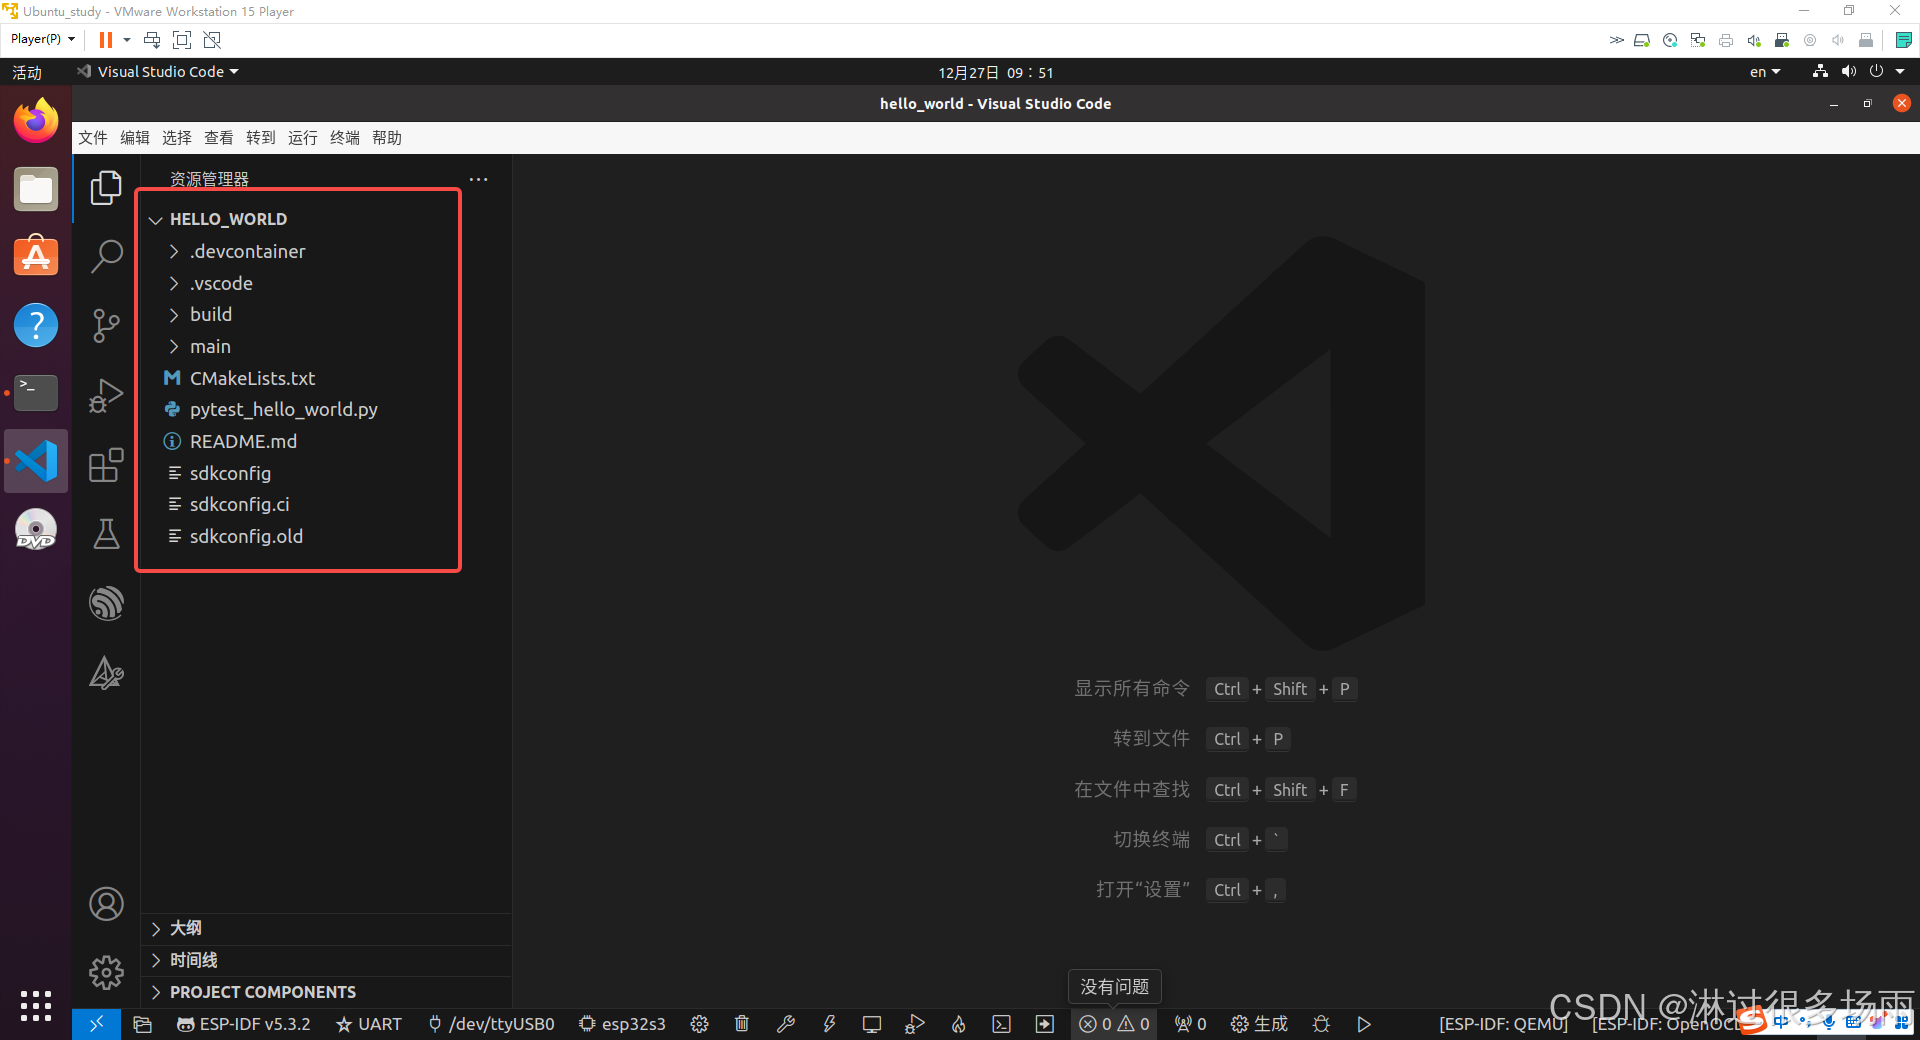
我们需要创建一个新的文件夹来存放我们的can驱动(他们一般叫组件),我们在项目根目录下创建一个名为components的文件夹,创好后的目录结构如下
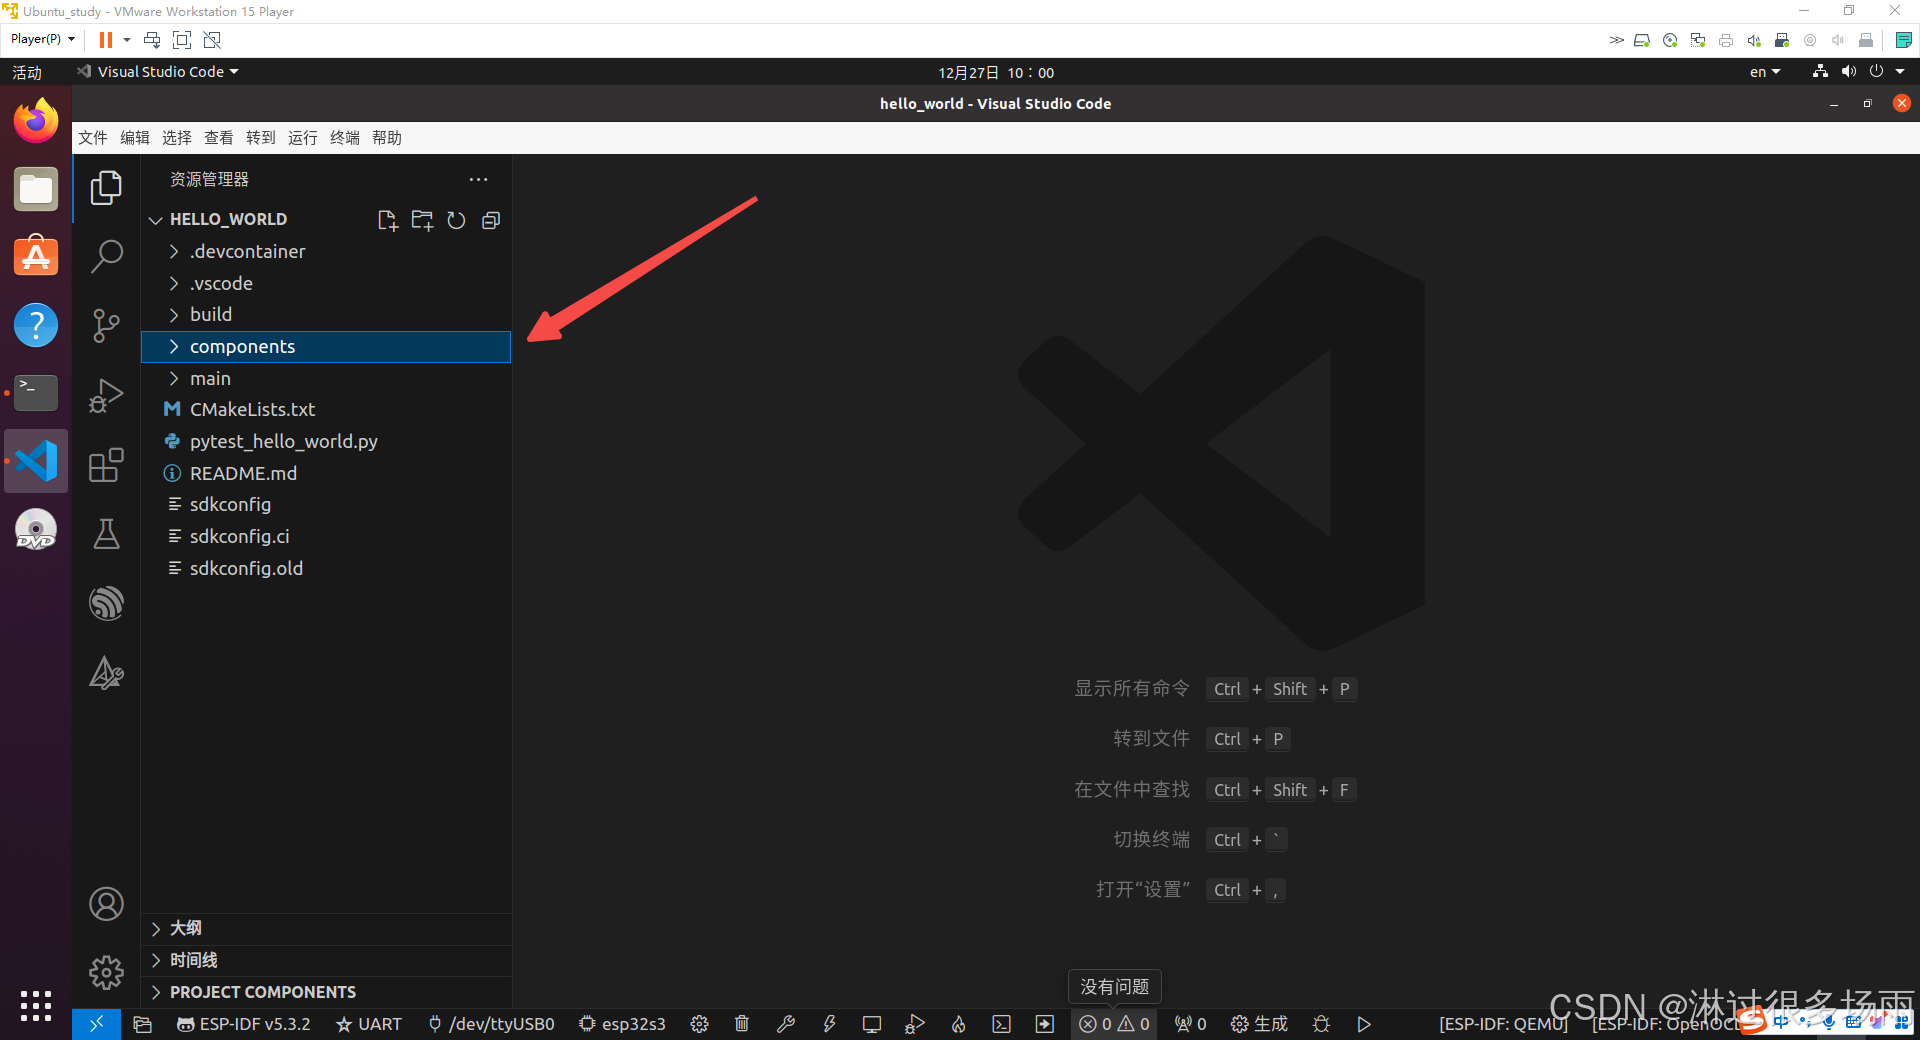
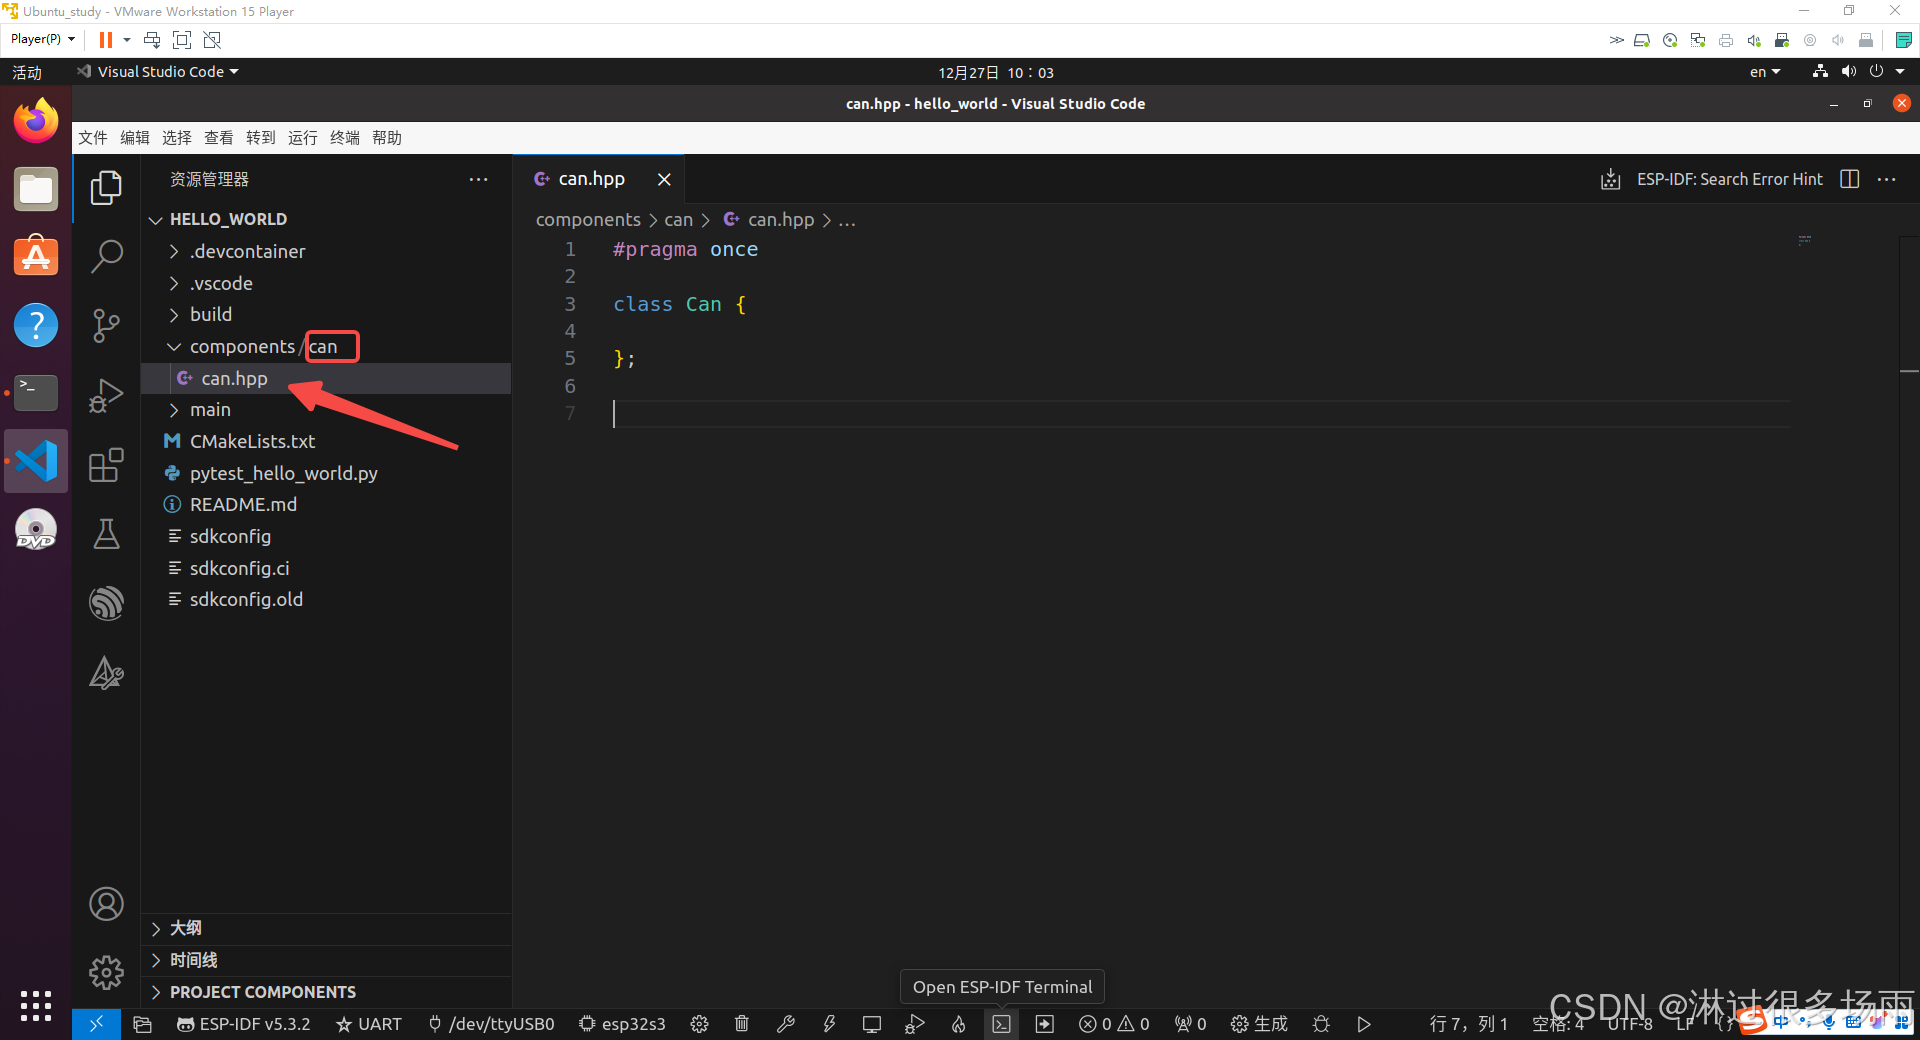
我们在这个components组件目录下创建一个can文件夹,用来存放我们得can驱动。
然后在can文件夹下,创建一个can.hpp的c++文件,.hpp可以把源码和声明放在一起。可以先写成下图所示
此时假如我们编译,应该是要报错,报错原因是找不到can.hpp
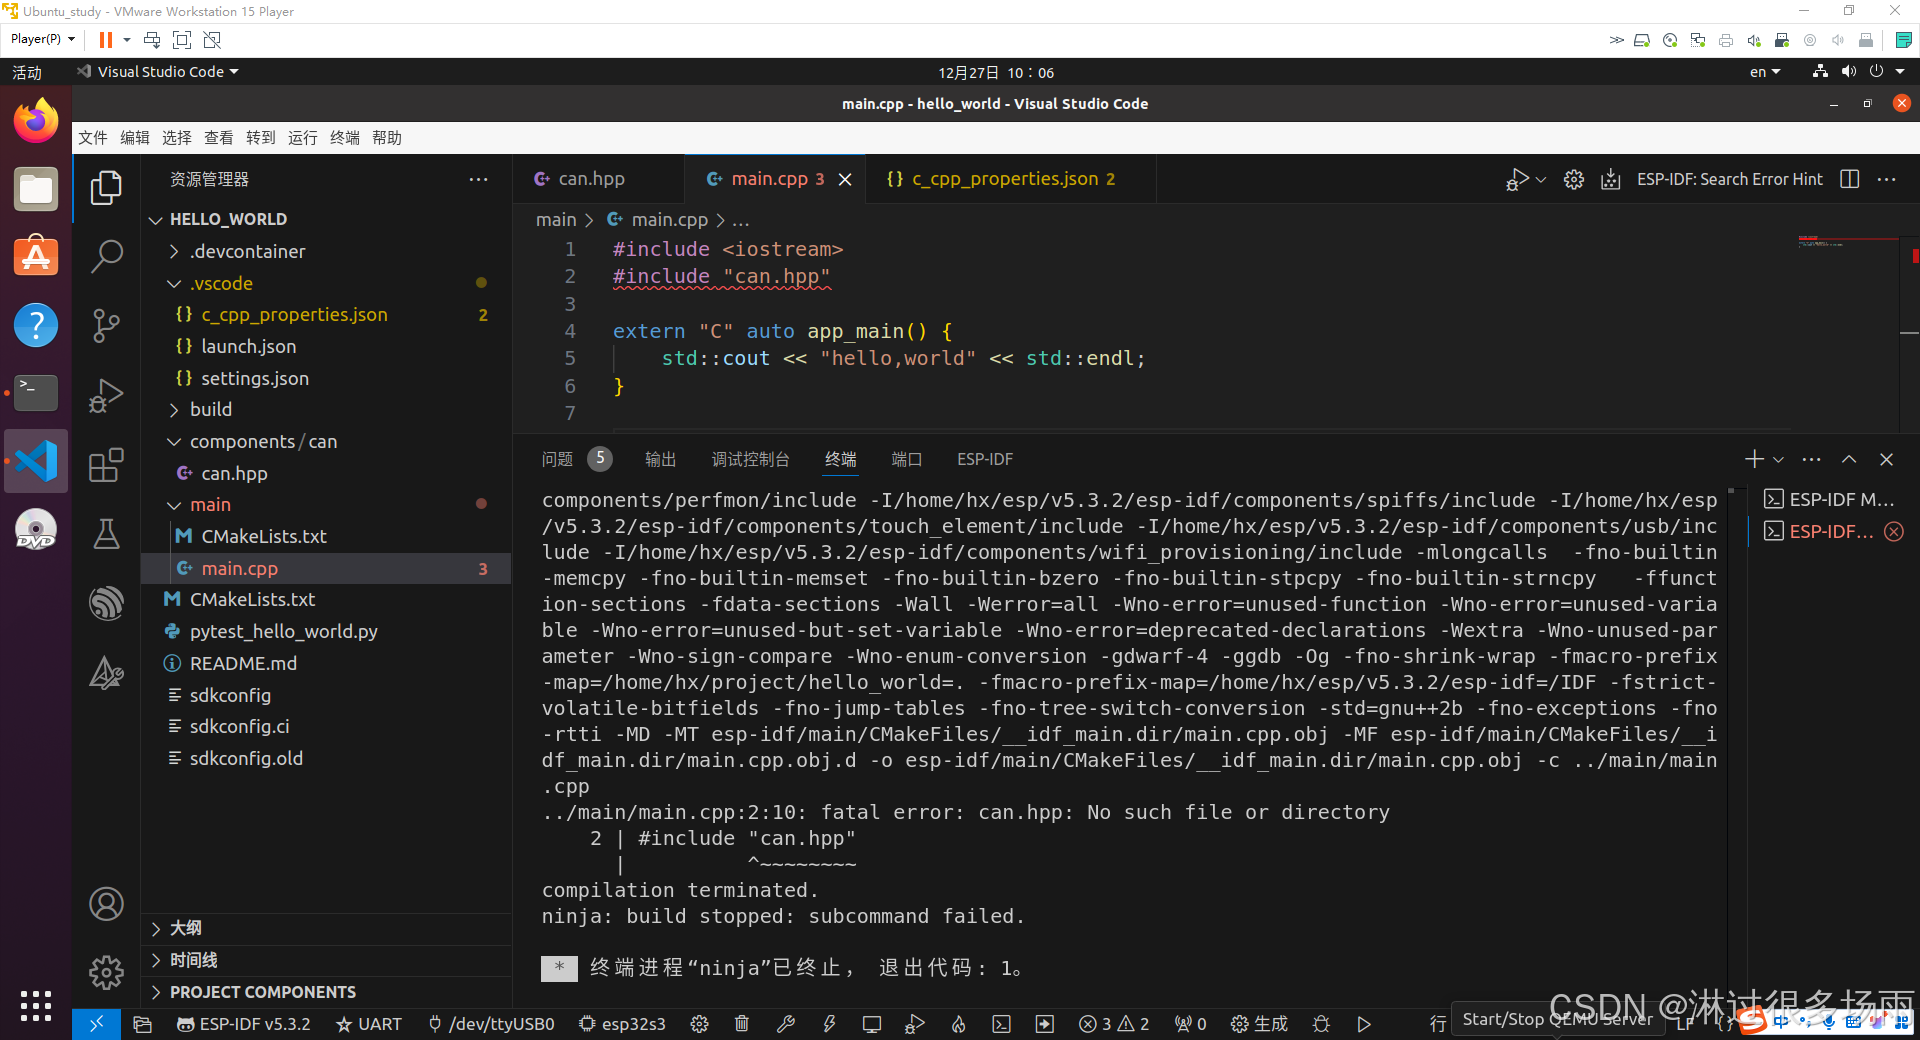
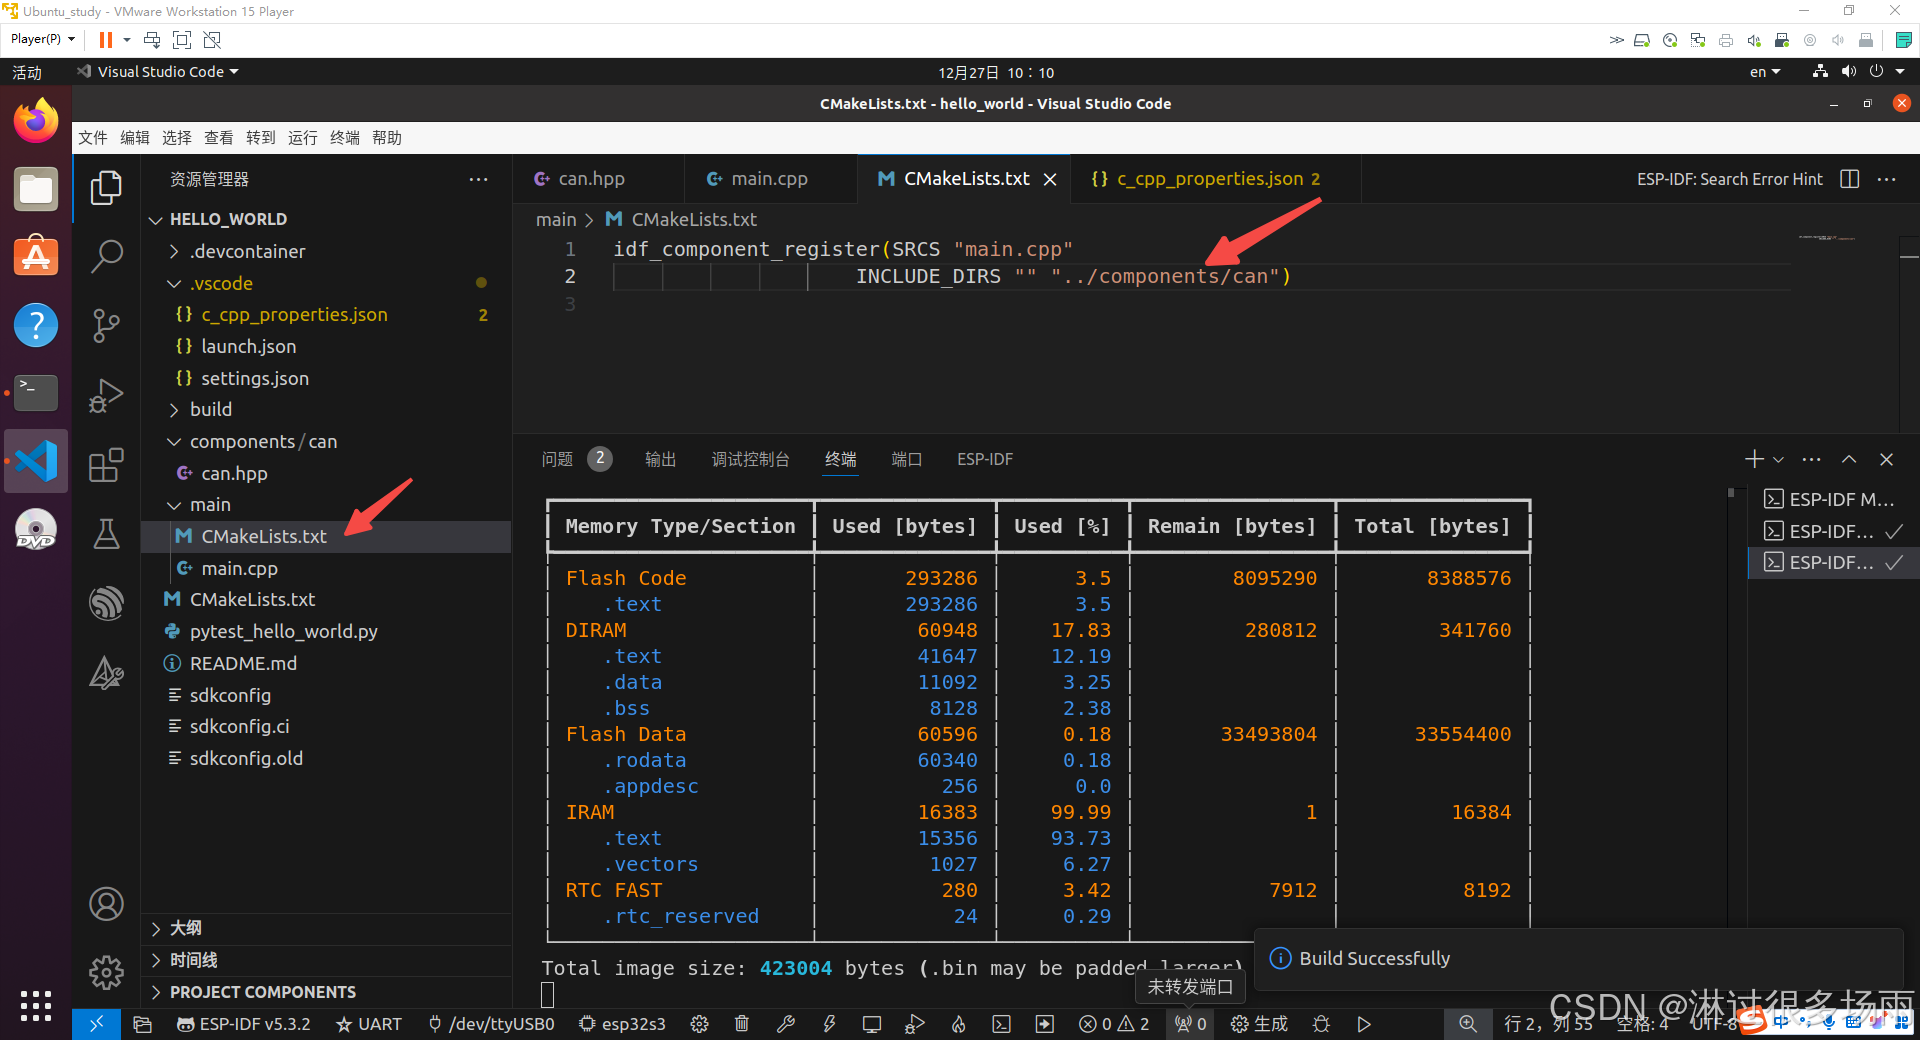
我们在main目录下的CMakeLists.txt中加入can.hpp的路径,便可以编译通过
接下来我们接着封装can驱动
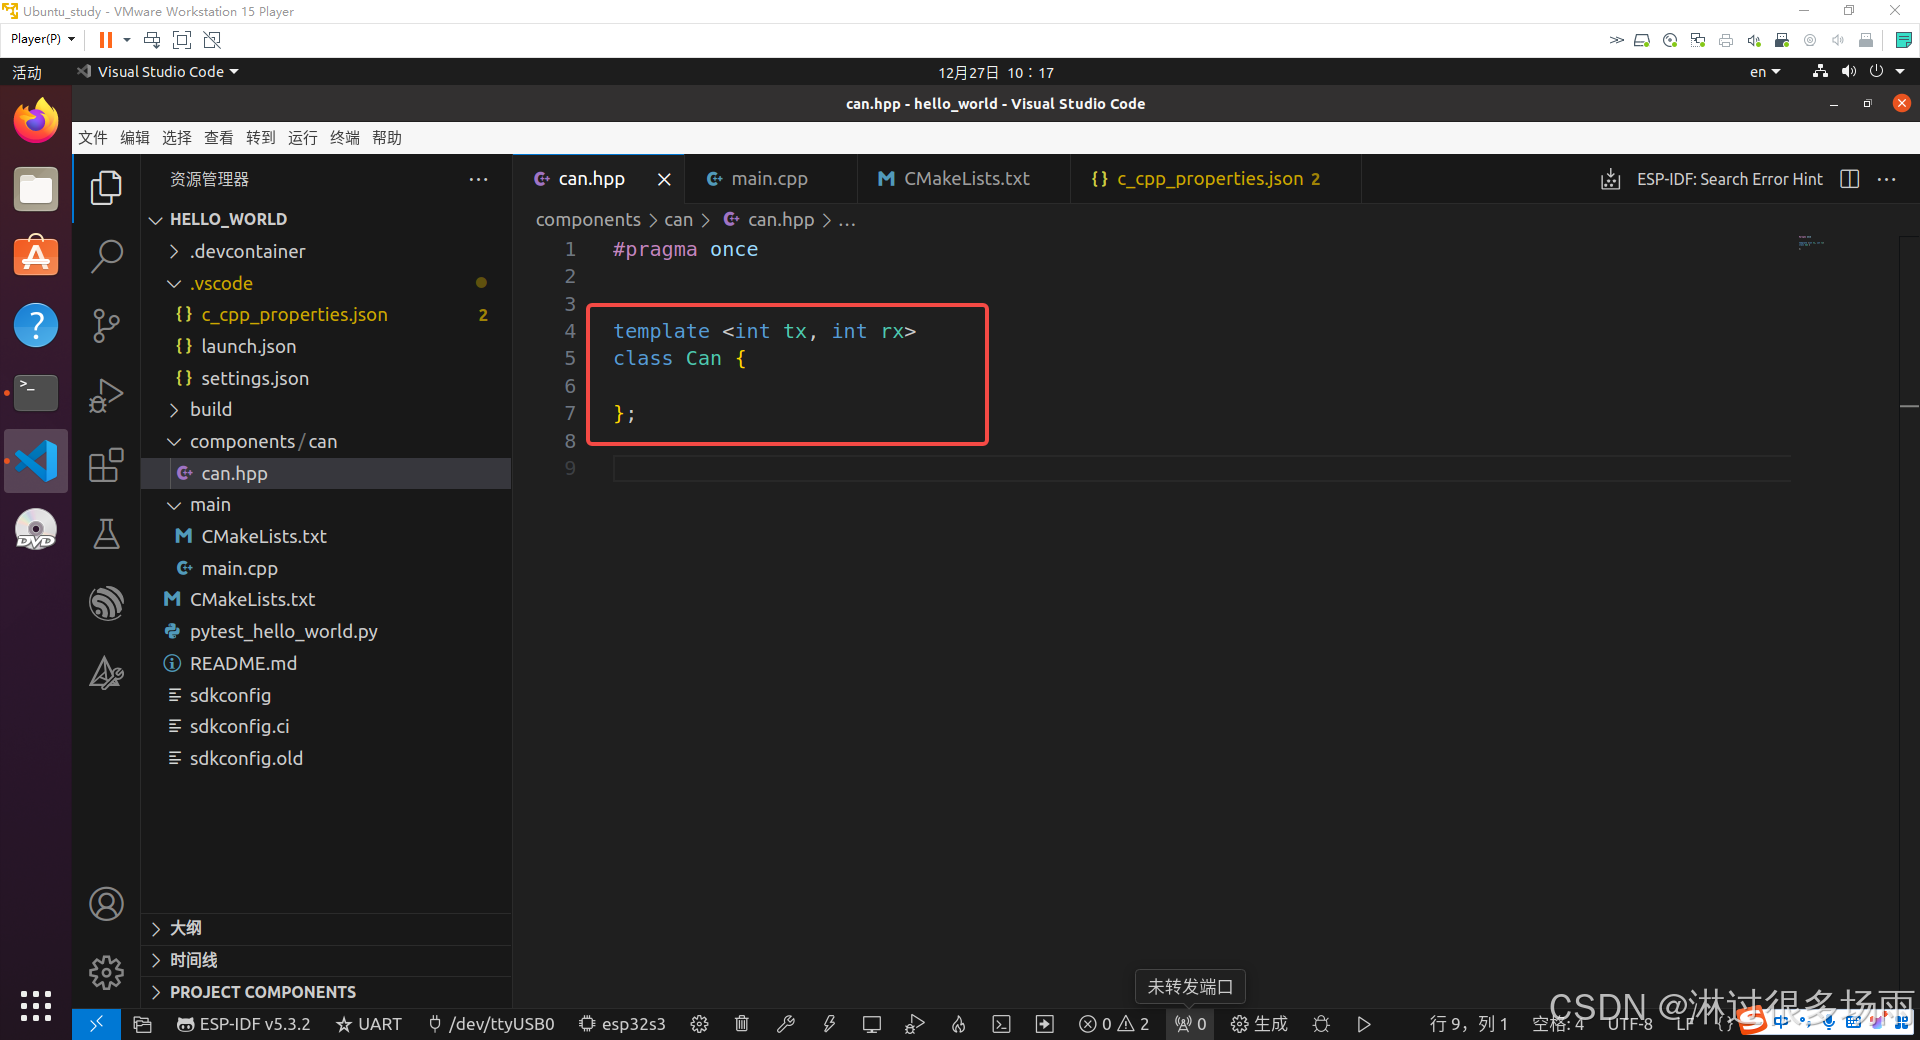
一般来说can需要指定TX,RX两个引脚,而在我们编程阶段这两个引脚一定是写死的,因为这个时候开发板都已经出来了,can的引脚也改变不了,这非常符合常量的定义,且是编译期常量,联系到c++,说到编译期,第一个想到的关键字是constexpr,然后就是模板。因为模板的参数可以是常量,与该场景非常契合,且效率无敌。于是我们可以将can类改为模板类,如下图所示
我们接下来封装can驱动,按照基本接口来,我们应该是需要4个接口,分别是
init, read, write, deinit。
init对应构造函数,deinit对应析构函数,read从总线读取数据,write为向can总线写入数据。
我们首先来写构造函数(init),在构造函数中我们需要传入can的速率,需要有参构造。
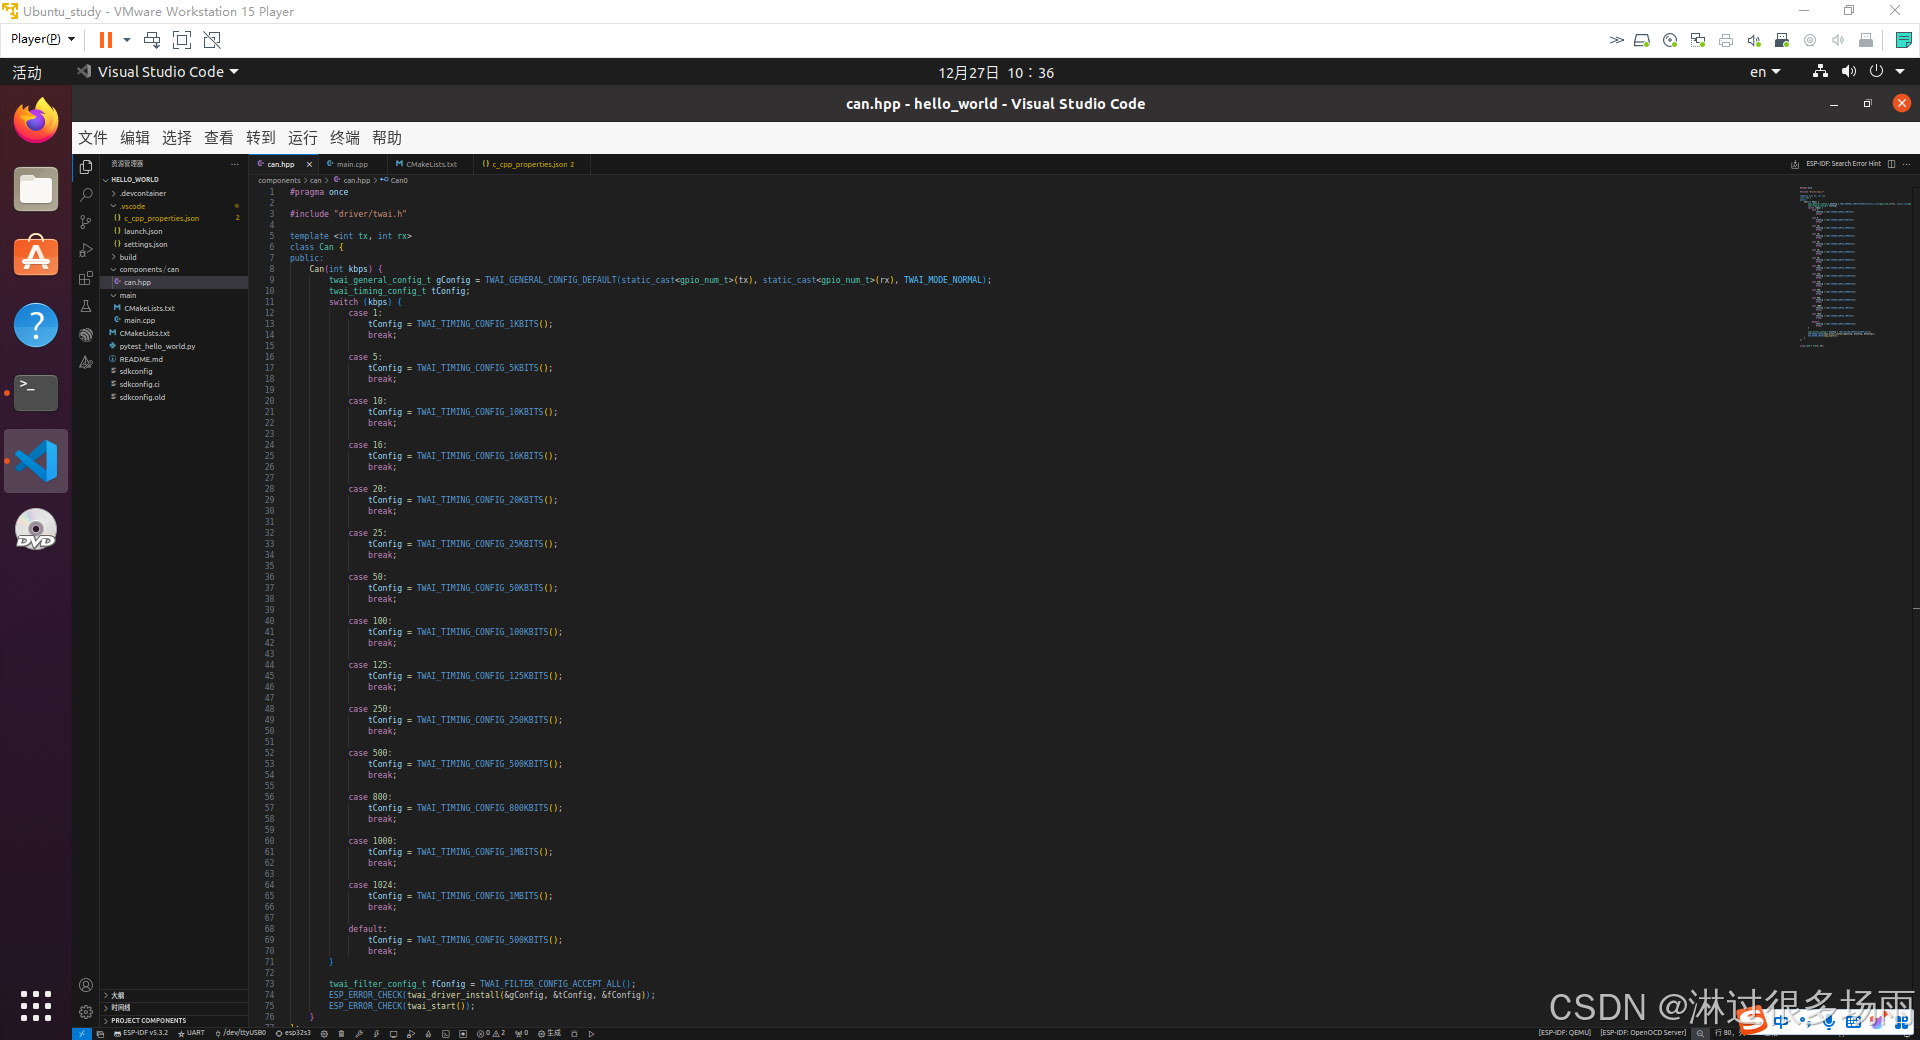
#pragma once

#include "driver/twai.h"

template <int tx, int rx>
class Can {
private:
    twai_handle_t _handler {nullptr};
public:
    explicit Can(int kbps) {
        twai_general_config_t gConfig = TWAI_GENERAL_CONFIG_DEFAULT(static_cast<gpio_num_t>(tx), static_cast<gpio_num_t>(rx), TWAI_MODE_NORMAL);
        twai_timing_config_t tConfig;
        switch (kbps) {
            case 1:
                tConfig = TWAI_TIMING_CONFIG_1KBITS();
                break;

            case 5:
                tConfig = TWAI_TIMING_CONFIG_5KBITS();
                break;

            case 10:
                tConfig = TWAI_TIMING_CONFIG_10KBITS();
                break;

            case 16:
                tConfig = TWAI_TIMING_CONFIG_16KBITS();
                break;

            case 20:
                tConfig = TWAI_TIMING_CONFIG_20KBITS();
                break;

            case 25:
                tConfig = TWAI_TIMING_CONFIG_25KBITS();
                break;

            case 50:
                tConfig = TWAI_TIMING_CONFIG_50KBITS();
                break;

            case 100:
                tConfig = TWAI_TIMING_CONFIG_100KBITS();
                break;

            case 125:
                tConfig = TWAI_TIMING_CONFIG_125KBITS();
                break;

            case 250:
                tConfig = TWAI_TIMING_CONFIG_250KBITS();
                break;

            case 500:
                tConfig = TWAI_TIMING_CONFIG_500KBITS();
                break;

            case 800:
                tConfig = TWAI_TIMING_CONFIG_800KBITS();
                break;

            case 1000:
                tConfig = TWAI_TIMING_CONFIG_1MBITS();
                break;

            case 1024:
                tConfig = TWAI_TIMING_CONFIG_1MBITS();
                break;

            default:
                tConfig = TWAI_TIMING_CONFIG_500KBITS();
                break;
        }

        twai_filter_config_t fConfig = TWAI_FILTER_CONFIG_ACCEPT_ALL();
        ESP_ERROR_CHECK(twai_driver_install_v2(&gConfig, &tConfig, &fConfig, &_handler));
        ESP_ERROR_CHECK(twai_start_v2(_handler));
    }
};
把拷贝构造,拷贝赋值删除,不允许拷贝, 但允许移动操作。移动使用默认的就行。
	Can(const Can &) = delete;
    Can &operator=(const Can &) = delete;
    Can(Can &&) noexcept = default;
    Can &operator=(Can &&) noexcept = default;
这样初始化接口就写好了。
接下来我们写析构函数。
因为之前我们维护了一个_handler的一个变量作为can操作的句柄,初始化时是为空指针的状态,我们先判断这个指针是否非空,就能知道是否初始化成功。如果成功,我们需要反初始化。
    ~Can() {
        if (_handler) {
            twai_stop_v2(_handler);
            twai_driver_uninstall_v2(_handler);
        }
    }
接下来我们需要实现write接口,也就是向can总线发送数据。
由于write接口需要构建一个can协议的message发送,我们可以在can协议的基础上封装我们自己的消息包,这样也方便canopen消息与esp32 can驱动消息的转换。我们新建一个名为canMessage.hpp的文件,然后我们新建一个类名为CanMessage
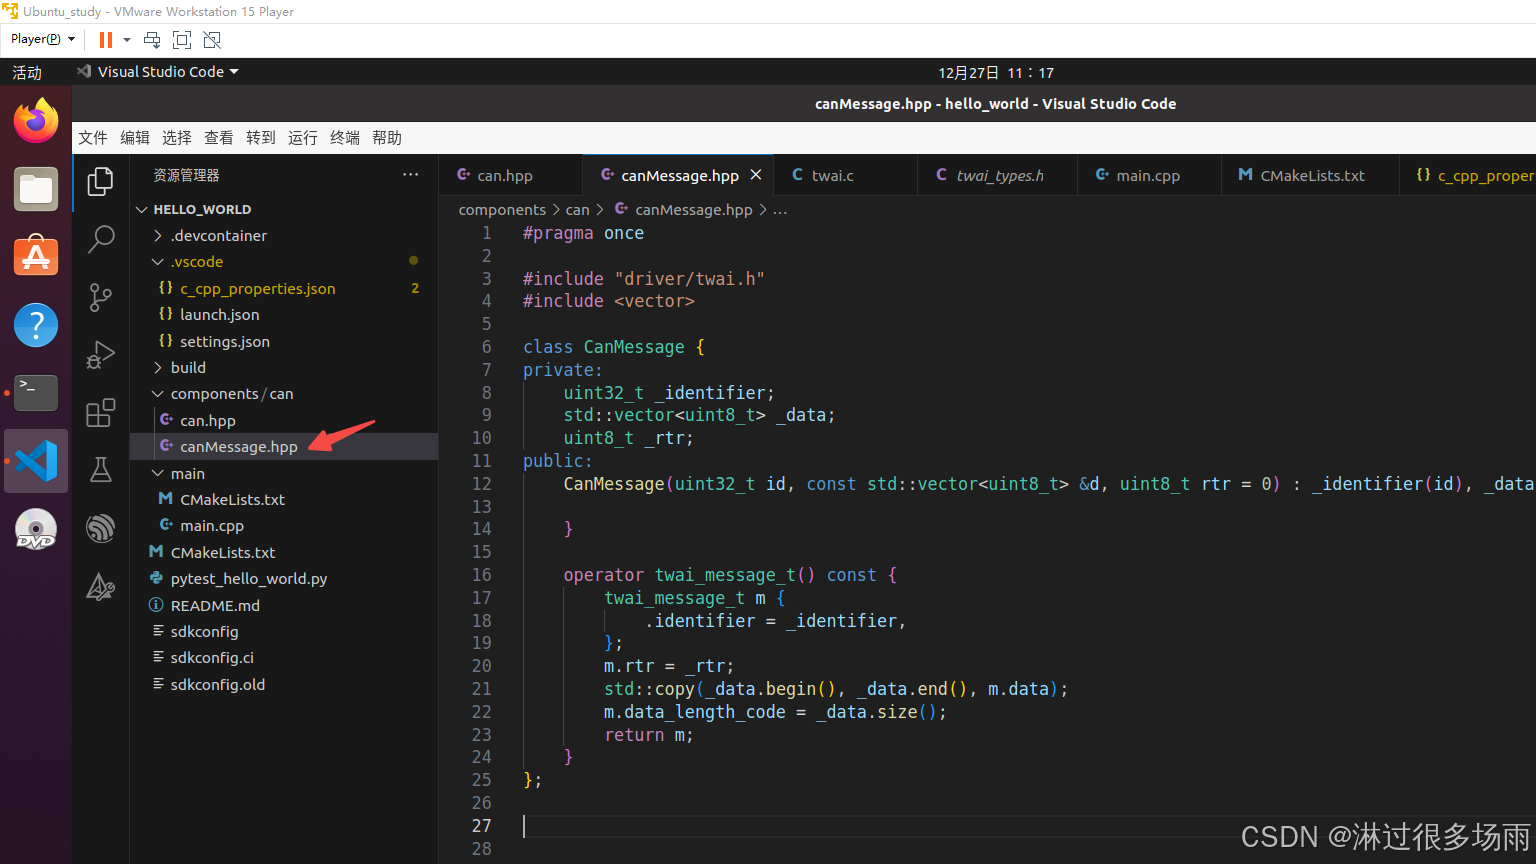
#pragma once

#include "driver/twai.h"
#include <vector>

class CanMessage {
private:
    uint32_t _identifier;
    std::vector<uint8_t> _data;
    uint8_t _rtr;
public:
    CanMessage(uint32_t id, const std::vector<uint8_t> &d, uint8_t rtr = 0) : _identifier(id), _data(std::move(d)), _rtr(rtr){

    }

    operator twai_message_t() const {
        twai_message_t m {
            .identifier = _identifier,
        };
        m.rtr = _rtr;
        std::copy(_data.begin(), _data.end(), m.data);
        m.data_length_code = _data.size();
        return m;
    }
};
接着完善我们得write函数
    bool write(const CanMessage &m, uint32_t timeout = portMAX_DELAY) {
        if (!_handler) {
            return false;
        }
        twai_message_t message = m;
        return  twai_transmit_v2(_handler, &message, timeout) == ESP_OK;
    }
接下来我们完善我们得read函数。
read意为从can总线上获取一个can_message,可能返回一个读到数据,(如果非组塞的话)也可能读超时,这个时候我们返回一个空对象,这个场景非常的契合 现代c++的optional(c++17) std::optional, 如果读到数据我们返回canMessage消息对象,如果没有得到数据我们返回std::nullopt。
  std::optional<CanMessage> read(uint32_t timeout = portMAX_DELAY) {

        twai_message_t message{};

        if (auto ret = twai_receive_v2(_handler, &message, timeout); ret == ESP_OK) {
            return message;
        }

        return std::nullopt;
    }
这里twai_message_t对象是不能直接转成CanMessage对象的,因此我们要在CanMessage类中加入由twai_message_t 来构造出CanMessage的方法。
#pragma once

#include "driver/twai.h"
#include <vector>

class CanMessage {
private:
    uint32_t _identifier;
    std::vector<uint8_t> _data;
    uint8_t _rtr;
public:
    CanMessage(uint32_t id, const std::vector<uint8_t> &d, uint8_t rtr = 0) : _identifier(id), _data(std::move(d)), _rtr(rtr) {

    }

    CanMessage(const twai_message_t &t) : _identifier(t.identifier), _data(t.data, t.data + t.data_length_code), _rtr(t.rtr) {

    }


    operator twai_message_t() const {
        twai_message_t m {
            .identifier = _identifier,
        };
        m.rtr = _rtr;
        std::copy(_data.begin(), _data.end(), m.data);
        m.data_length_code = _data.size();
        return m;
    }
};
三、验证can驱动
为了实例化方便
我们可以定义引脚相关的宏
static constexpr auto canTx = 2;
static constexpr auto canRx = 42;
constexpr 是c++关键字,定义编译期的常量(和#define差不多),且有检查功能,比#define好,而且都使用现在c++了,当然要用现代c++的语法啦。
using Can0 = Can<canTx, canTx>;
static constexpr auto canTx = 2;
static constexpr auto canRx = 42;
using Can0 = Can<canTx, canRx>;
在main函数中写下如下代码
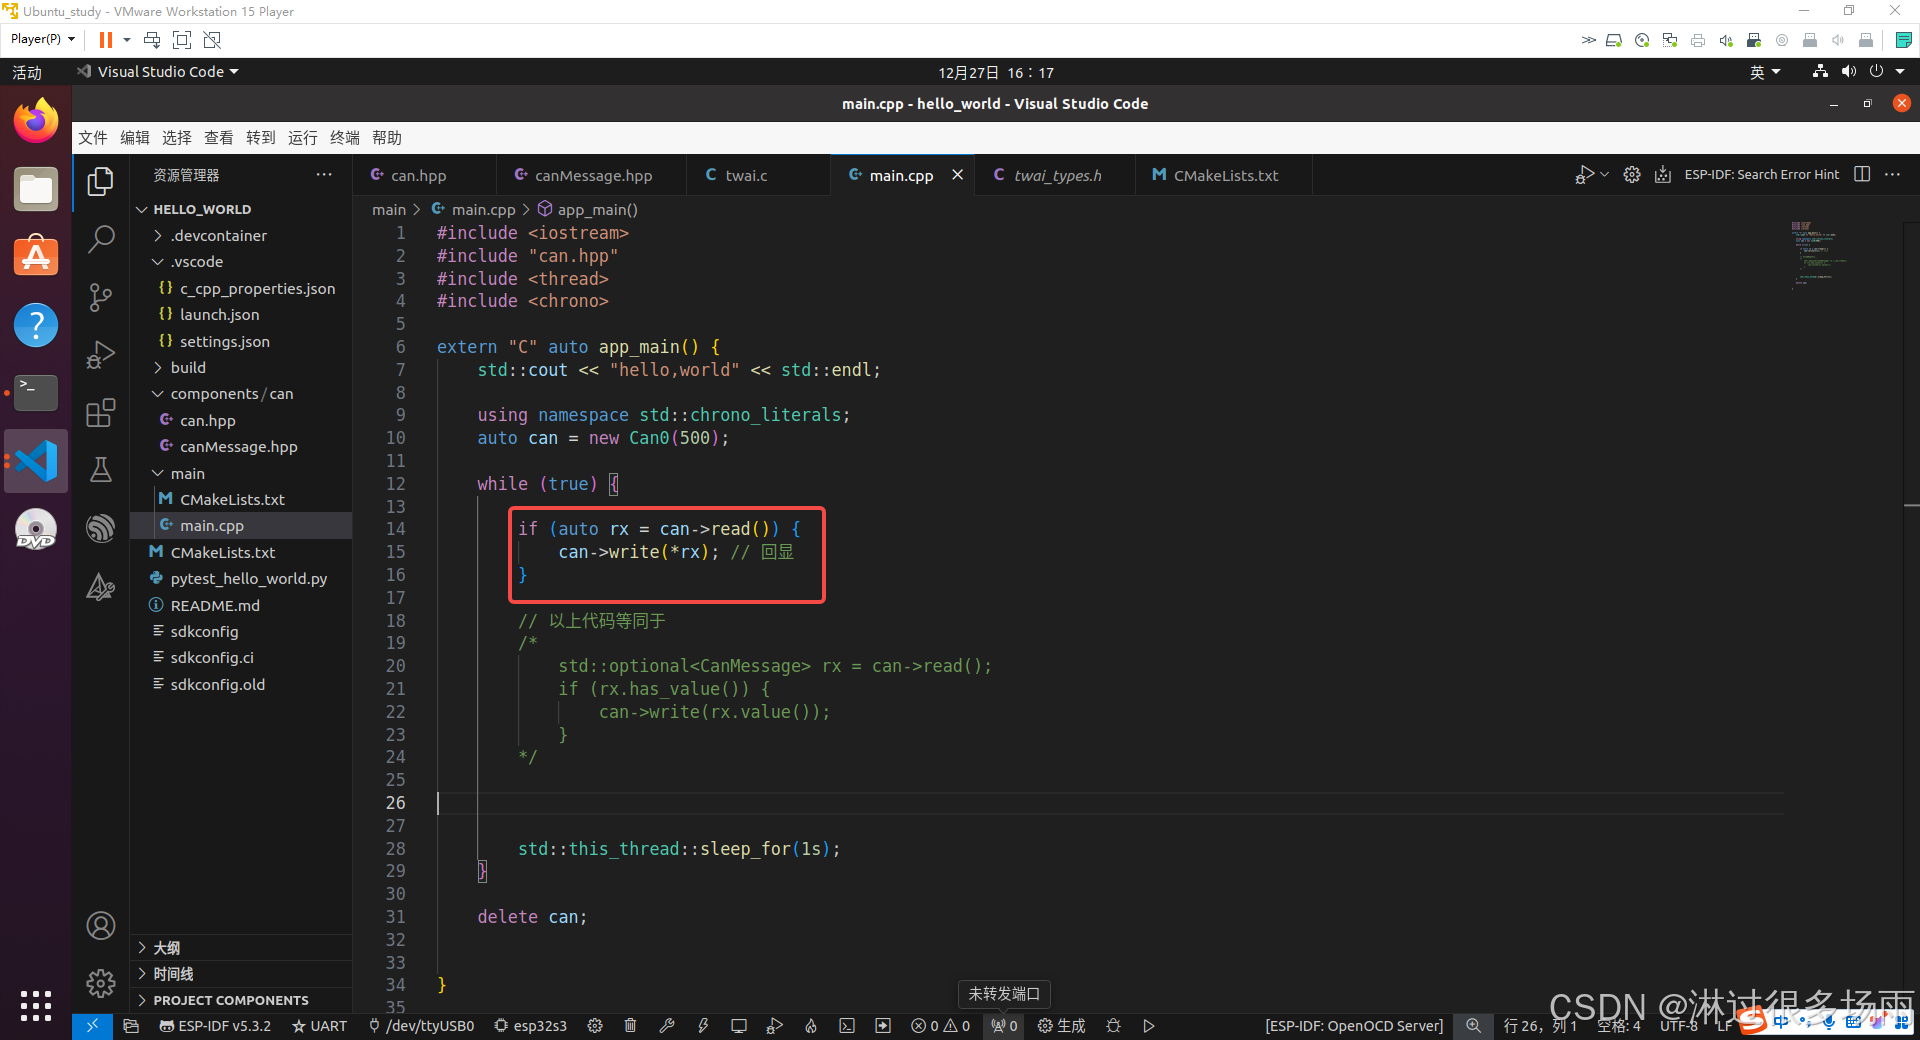
#include <iostream>
#include "can.hpp"
#include <thread>
#include <chrono>

extern "C" auto app_main() {
    std::cout << "hello,world" << std::endl;

    using namespace std::chrono_literals;
    auto can = new Can0(500);

    while (true) {

        if (auto rx = can->read()) {
            can->write(*rx); // 回显
        }

        // 以上代码等同于
        /*
            std::optional<CanMessage> rx = can->read();
            if (rx.has_value()) {
                can->write(rx.value());
            }
        */

        std::this_thread::sleep_for(1s);
    }

    delete can;
}
同时打开usbcan 上位机进行测试

回显成功哦

四、文件源码如下
can.hpp
#pragma once

#include "driver/twai.h"
#include "canMessage.hpp"
#include <optional>

template <int tx, int rx>
class Can {
private:
    twai_handle_t _handler {nullptr};
public:
    explicit Can(int kbps) {
        twai_general_config_t gConfig = TWAI_GENERAL_CONFIG_DEFAULT(static_cast<gpio_num_t>(tx), static_cast<gpio_num_t>(rx), TWAI_MODE_NORMAL);
        twai_timing_config_t tConfig;
        switch (kbps) {
            case 1:
                tConfig = TWAI_TIMING_CONFIG_1KBITS();
                break;

            case 5:
                tConfig = TWAI_TIMING_CONFIG_5KBITS();
                break;

            case 10:
                tConfig = TWAI_TIMING_CONFIG_10KBITS();
                break;

            case 16:
                tConfig = TWAI_TIMING_CONFIG_16KBITS();
                break;

            case 20:
                tConfig = TWAI_TIMING_CONFIG_20KBITS();
                break;

            case 25:
                tConfig = TWAI_TIMING_CONFIG_25KBITS();
                break;

            case 50:
                tConfig = TWAI_TIMING_CONFIG_50KBITS();
                break;

            case 100:
                tConfig = TWAI_TIMING_CONFIG_100KBITS();
                break;

            case 125:
                tConfig = TWAI_TIMING_CONFIG_125KBITS();
                break;

            case 250:
                tConfig = TWAI_TIMING_CONFIG_250KBITS();
                break;

            case 500:
                tConfig = TWAI_TIMING_CONFIG_500KBITS();
                break;

            case 800:
                tConfig = TWAI_TIMING_CONFIG_800KBITS();
                break;

            case 1000:
                tConfig = TWAI_TIMING_CONFIG_1MBITS();
                break;

            case 1024:
                tConfig = TWAI_TIMING_CONFIG_1MBITS();
                break;

            default:
                tConfig = TWAI_TIMING_CONFIG_500KBITS();
                break;
        }

        twai_filter_config_t fConfig = TWAI_FILTER_CONFIG_ACCEPT_ALL();
        ESP_ERROR_CHECK(twai_driver_install_v2(&gConfig, &tConfig, &fConfig, &_handler));
        ESP_ERROR_CHECK(twai_start_v2(_handler));
    }

    Can(const Can &) = delete;
    Can &operator=(const Can &) = delete;
    Can(Can &&) noexcept = default;
    Can &operator=(Can &&) noexcept = default;

    ~Can() {
        if (_handler) {
            twai_stop_v2(_handler);
            twai_driver_uninstall_v2(_handler);
        }
    }

public:
    bool write(const CanMessage &m, uint32_t timeout = portMAX_DELAY) {
        if (!_handler) {
            return false;
        }
        twai_message_t message = m;
        return  twai_transmit_v2(_handler, &message, timeout) == ESP_OK;
    }

    std::optional<CanMessage> read(uint32_t timeout = portMAX_DELAY) {

        twai_message_t message{};

        if (auto ret = twai_receive_v2(_handler, &message, timeout); ret == ESP_OK) {
            return message;
        }

        return std::nullopt;
    }

};

static constexpr auto canTx = 2;
static constexpr auto canRx = 42;

using Can0 = Can<canTx, canRx>;
canMessage.hpp
#pragma once

#include "driver/twai.h"
#include <vector>

class CanMessage {
private:
    uint32_t _identifier;
    std::vector<uint8_t> _data;
    uint8_t _rtr;
public:
    CanMessage(uint32_t id, const std::vector<uint8_t> &d, uint8_t rtr = 0) : _identifier(id), _data(std::move(d)), _rtr(rtr) {

    }

    CanMessage(const twai_message_t &t) : _identifier(t.identifier), _data(t.data, t.data + t.data_length_code), _rtr(t.rtr) {

    }

    operator twai_message_t() const {
        twai_message_t m {
            .identifier = _identifier,
        };
        m.rtr = _rtr;
        std::copy(_data.begin(), _data.end(), m.data);
        m.data_length_code = _data.size();
        return m;
    }

    friend std::ostream &operator<<(std::ostream &out, const CanMessage &c) {
        out << "len --> " << c._data.size() << "\n";
        for (auto &item : c._data) {
            out << (int)item << ",";
        }

        return out << "id --> " << c._identifier << "\n";
    }
};
main.cpp
#include <iostream>
#include "can.hpp"
#include <thread>
#include <chrono>

extern "C" auto app_main() {
    std::cout << "hello,world" << std::endl;

    using namespace std::chrono_literals;
    auto can = new Can0(500);

    while (true) {

        if (auto rx = can->read()) {
            can->write(*rx); // 回显
        }

        // 以上代码等同于
        /*
            std::optional<CanMessage> rx = can->read();
            if (rx.has_value()) {
                can->write(rx.value());
            }
        */

        // std::this_thread::sleep_for(1s);
    }

    delete can;
}
五、总结
本文使用esp32使用c++实现can驱动层的封装。下一步移植canopen!!!嘻嘻。


 2861
2861

 被折叠的 条评论
为什么被折叠?
被折叠的 条评论
为什么被折叠?
 到【灌水乐园】发言


