


文章目录
前言
本文主要介绍线程的概念并总结进程与线程之间的区别等。
一、线程
1.线程是什么?
一个线程就是一个“执行流”,每个线程之间都可以按照顺序执行自己的代码,多个线程之间“同时”执行着多份代码。
线程比进程创建、销毁、调度更快,可实现“并发编程”。
2.进程和线程的区别(面试必考)
上一篇文章讲述了进程的概念,这里主要说明线程与进程的区别主要有以下几点:
(1)进程包含线程;
(2)线程比进程更轻量,创建更快,销毁也更快;
(3)同一个进程的多个线程之间共用同一份内存/文件资源;进程和进程之间,则是独立的内存/文件资源;
(4)进程是资源分配的基本单位,线程是调度执行的基本单位。
二、线程创建的基本方式
1.继承Thread,重写run
代码如下(示例):
class MyThread extends Thread {
    @Override
    public void run() {
        while (true) {
            System.out.println("hello thread");
            try {
                sleep(1000);
            } catch (InterruptedException e) {
                e.printStackTrace();
            }
        }
    }
}

public class Demo1 {
    public static void main(String[] args) {
        MyThread t = new MyThread();
        t.start();

        while (true) {
            System.out.println("hello main");
            try {
                sleep(1000);
            } catch (InterruptedException e) {
                e.printStackTrace();
            }
        }
    }
}
2.实现Runnable,重写run
代码如下(示例):
class MyRunnable implements Runnable {
    @Override
    public void run() {
        while (true) {
            System.out.println("hello thread");
            try {
                Thread.sleep(1000);
            } catch (InterruptedException e) {
                e.printStackTrace();
            }
        }
    }
}
public class Demo2 {
    public static void main(String[] args) {
        MyRunnable runnable = new MyRunnable();
        Thread t1 = new Thread(runnable);//不同线程执行同样的任务
        Thread t2 = new Thread(runnable);
        t1.start();
        t2.start();
        while (true) {
            System.out.println("hello main");
            try {
                Thread.sleep(1000);
            } catch (InterruptedException e) {
                e.printStackTrace();
            }
        }
    }
}
3.使用匿名内部类,继承Thread
代码如下(示例):
public class Demo3 {
    public static void main(String[] args) {
        Thread t = new Thread(){
            @Override
            public void run() {
                System.out.println("hello thread");
                try {
                    sleep(1000);
                } catch (InterruptedException e) {
                    e.printStackTrace();
                }
            }
        };
        t.start();

        while (true) {
            System.out.println("hello main");
            try {
                Thread.sleep(1000);
            } catch (InterruptedException e) {
                e.printStackTrace();
            }
        }
    }
}
4.使用匿名内部类,实现Runnable
代码如下(示例):
public class Demo4 {
    public static void main(String[] args) {
        Thread t = new Thread(new Runnable() {
            @Override
            public void run() {
                while (true) {
                    System.out.println("hello thread");
                    try {
                        Thread.sleep(1000);
                    } catch (InterruptedException e) {
                        e.printStackTrace();
                    }
                }
            }
        });
        t.start();

        while (true) {
            System.out.println("hello main");
            try {
                Thread.sleep(1000);
            } catch (InterruptedException e) {
                e.printStackTrace();
            }
        }
    }
}
5.lambda表达式
代码如下(示例):
public class Demo5 {
    public static void main(String[] args) {
        Thread t = new Thread(()->{
            while (true) {
                System.out.println("hello thread");
                try {
                    Thread.sleep(1000);
                } catch (InterruptedException e) {
                    e.printStackTrace();
                }
            }
        });
        t.start();

        while (true) {
            System.out.println("hello main");
            try {
                Thread.sleep(1000);
            } catch (InterruptedException e) {
                e.printStackTrace();
            }
        }
    }
}
6.使用Callable
代码如下(示例):
public class Demo6 {
    public static void main(String[] args) throws ExecutionException, InterruptedException {

        Callable<Integer> callable = new Callable<Integer>() {
            @Override
            public Integer call() throws Exception {
                int sum = 0;
                for (int i = 1; i <= 1000; i++) {
                    sum += i;
                }
                return sum;
            }
        };

        FutureTask<Integer> futureTask = new FutureTask<>(callable);

        Thread thread = new Thread(futureTask);
        thread.start();

        System.out.println(futureTask.get());
    }
}
三、线程的基本用法
Thread的几个常见属性的获取方法:
ID:getId()
名称:getName()
状态:getState()
优先级:getPriority()
是否后台线程:isDaemon()
是否存活:isAlive()
是否被中断:isInterrupted()
1.线程中断
(1)设置标志位
代码如下(示例):
public class Demo7 {
    public static boolean isQuit = false;
    public static void main3(String[] args) {
        Thread t = new Thread(()->{
            while (!isQuit) {
                System.out.println("my thread");
                try {
                    Thread.sleep(1000);
                } catch (InterruptedException e) {
                    e.printStackTrace();
                }
            }
        });
        t.start();
        try {
            Thread.sleep(3000);
        } catch (InterruptedException e) {
            e.printStackTrace();
        }
        isQuit = true;
        System.out.println("over!");
    }
}
(2)使用currentThread().isInterrupted()
代码如下(示例):
public class Demo8 {
    public static void main(String[] args) {
        Thread t = new Thread(()->{
            while (!Thread.currentThread().isInterrupted()) {
                System.out.println("my thread");
                try {
                    Thread.sleep(1000);
                } catch (InterruptedException e) {
                    //e.printStackTrace();
                    break;
                }
            }
        });
        t.start();
        try {
            Thread.sleep(3000);
        } catch (InterruptedException e) {
            e.printStackTrace();
        }
        t.interrupt();
        System.out.println("over!");
    }
}
2.线程等待
join方法
代码如下(示例):
public class Demo9 {
    public static void main(String[] args) {
        Thread t = new Thread(()->{
            for (int i = 0; i < 5; i++) {
                System.out.println("hello thread");
                try {
                    Thread.sleep(1000);
                } catch (InterruptedException e) {
                    e.printStackTrace();
                }
            }
        });
        t.start();
        System.out.println("join前");
        try {
            t.join();
        } catch (InterruptedException e) {
            e.printStackTrace();
        }
        System.out.println("join后");
        System.out.println("over!");
    }
}
4.获取线程引用
currentThread()方法。
代码如下(示例):
public class Demo10 {
    public static void main(String[] args) {
        //获取当前线程
        Thread t = Thread.currentThread();
        System.out.println(t.getName());
    }
}
3.线程休眠
Sleep():单位是毫秒。
四、线程的状态
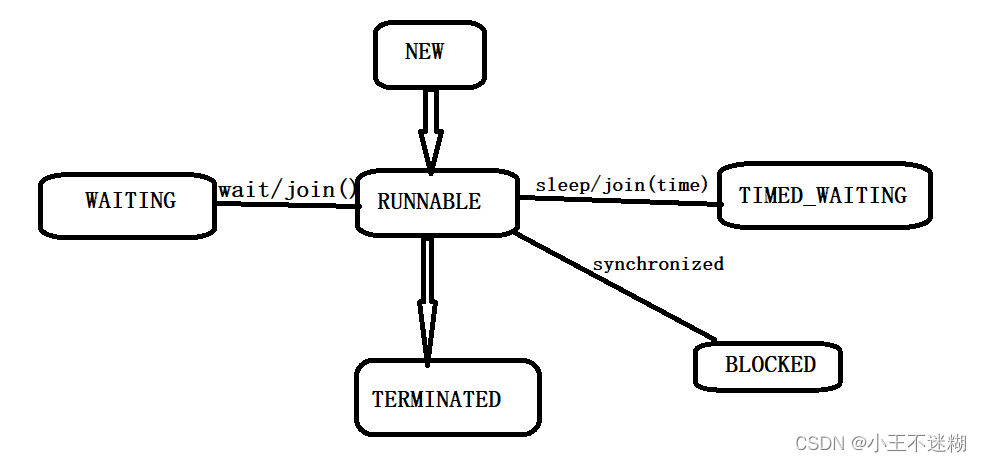
1.线程状态一共有几种?
线程总的来说有两种状态就绪和阻塞,而阻塞又可以根据其阻塞的原因分为三种。
2.每种状态表示的含义?
NEW:Thread对象创建的对象,还未真正创建线程;
TERMINATED:内核的PCB销毁了,但Thread对象还在;
Runnable:就绪状态(正在CPU上运行+在就绪队列中排队)
按照阻塞的原因将阻塞状态分为三个:
TIMED_WAITING:按照一定时间进行阻塞。(sleep/join())
WAITING:特殊的阻塞状态。(调用wait/join(time))
BLOCKED:等待锁的时候进入的阻塞状态。(synchronized)
3.状态之间的切换条件。
代码如下(示例):
public class Demo11 {
    public static void main(String[] args) {
        Thread t = new Thread(()->{
            int n = 0;
            for (int i = 0; i < 1_0000_0000; i++) {
                n++;
            }
            try {
                Thread.sleep(1000);
            } catch (InterruptedException e) {
                e.printStackTrace();
            }
        });
        System.out.println(t.getState());
        t.start();
        System.out.println(t.getState());

        try {
            Thread.sleep(50);
        } catch (InterruptedException e) {
            e.printStackTrace();
        }

        System.out.println(t.getState());
        System.out.println("over!");
    }
}


 4066
4066

 被折叠的 条评论
为什么被折叠?
被折叠的 条评论
为什么被折叠?
 到【灌水乐园】发言


