


OSPF实验
实验拓扑图:
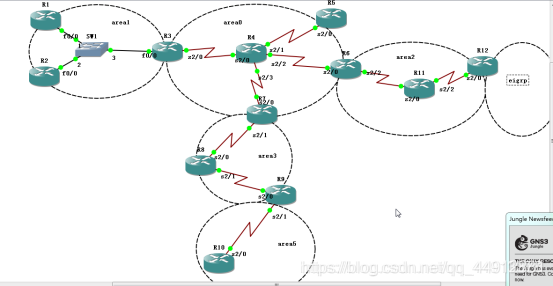
实验要求:
1、R4为ISP,其上只能配置IP地址;R4与其它所有直连设备间使用公有IP;
2、R3——R5/6/7为MGRE环境,R3为中心站点;
3、整个OSPF环境IP地址为172.16.0.0/16;
4、所有设备均可访问R4的环回;
5、减少LSA的更新量,加快收敛,保证更新安全;
6、全网可达。
OSPF的工作过程:
启动配置完成后,本地收发hello包,建立邻居关系,生成邻居表;再进行条件的匹配,匹配失败将停留于邻居关系,仅hello包周期保活即可;匹配成功者间可以建立邻接(毗邻)关系,需要DBD共享数据库目录,LSR/LSU/LSack来获取未知的LSA信息,当收集完网络中所有的LSA后,生成数据表–LSDBLSDB建立完成后,本地基于SPF选路规则,计算本地到达所有未知网段的最短路径,然后将其加载到路由表中;完成收敛收敛完成后–hello包周期保活 – 30min周期的DBD比对,若不一致将使用LSR/LSU/LSack重新获取。
结构突变:1、新增网段—直连新增网段的设备使用DBD告知邻居,邻居再使用LSR/LSU/LSack来获取2、断开网段—直连断开网段的设备使用DBD告知邻居,邻居再使用LSR/LSU/LSack来获取3、无法沟通—dead time 计时到后,邻居关系断开,删除所有从该邻接处学习到的所有LSA信息;
一、IP地址规划:
area1:
172.16.32.0/21
172.16.40.0/21
172.16.48.0/21
172.16.56.0/21
area 0:
172.16.64.0/21
172.16.72.0/21
172.16.80.0/21
172.16.88.0/21
area 2
172.16.96.0/21
172.16.104.0/21
172.16.112.0/21
area 3:
172.16.128.0/21
172.16.136.0/21
172.16.144.0/21
area 4:
172.16.160.0/21
172.16.168.0/21
172.16.176.0/21
eigrp :
172.16.192.0/20
172.16.208.0/20
二、配置:
R1的配置:
R1#conf t
Enter configuration commands, one per line. End with CNTL/Z.
R1(config)#interface loopback 1
R1(config-if)#ip address 172.16.32.1 255.255.248.0
R1(config-if)#int f0/0
R1(config-if)#ip address 172.16.40.0 255.255.248.0
R1(config-if)#no shutdown
R1(config-if)#exit
R2的配置:
R2#conf t
Enter configuration commands, one per line. End with CNTL/Z.
R2(config)#interface loopback 1
R2(config-if)#ip address 172.16.48.1 255.255.248.0
R2(config-if)#int f0/0
R2(config-if)#ip address 172.16.40.2 255.255.248.0
R2(config-if)#no shutdown
R2(config-if)#exit
R3的配置:
Enter configuration commands, one per line. End with CNTL/Z.
R3(config)#interface serial 2/0
R3(config-if)#ip address 34.1.1.1 255.255.255.0
R3(config-if)#no shutdown
R3(config-if)#exit
R4的配置:
R4#conf t
Enter configuration commands, one per line. End with CNTL/Z.
R4(config)#interface loopback 1
R4(config-if)#ip address 4.4.4.4 255.255.255.0
R4(config-if)#end
R5的配置:
R5#conf t
Enter configuration commands, one per line. End with CNTL/Z.
R5(config)#interface serial 2/0
R5(config-if)#ip address 45.1.1.1 255.255.255.0
R5(config-if)#no shutdown
R5(config-if)#int lo 1
R5(config-if)#ip address 172.16.72.1 255.255.248.0
R5(config-if)#end
R6的配置:
R6#conf t
Enter configuration commands, one per line. End with CNTL/Z.
R6(config)#int s2/0
R6(config-if)#ip address 46.1.1.1 255.255.255.0
R6(config-if)#int lo 1
R6(config-if)#ip address 172.16.80.1 255.255.248.0
R6(config-if)#no shutdown
R6(config-if)#int s2/2
R6(config-if)#ip address 172.16.96.1 255.255.248.0
R6(config-if)#no shutdown
R7的配置:
R7(config)#int s2/0
R7(config-if)#ip address 47.1.1.1 255.255.255.0
R7(config-if)#no shutdown
R7(config-if)#int lo 1
R7(config-if)#ip address 172.16.88.1 255.255.248.0
R7(config-if)#int s2/1
R7(config-if)#ip address 172.16.128.1 255.255.248.0
R7(config-if)#no shutdown
R7(config-if)#end
R8的配置:
R8#conf t
Enter configuration commands, one per line. End with CNTL/Z.
R8(config)#int s2/0
R8(config-if)#ip address 172.16.136.1 255.255.248.0
R8(config-if)#no shutdown
R8(config-if)#int s2/1
R8(config-if)#ip address 172.16.144.1 255.255.248.0
R8(config-if)#no shutdown
R8(config-if)#end
R9的配置:
R9#conf t
Enter configuration commands, one per line. End with CNTL/Z.
R9(config)#int s2/0
R9(config-if)#ip address 172.16.144.2 255.255.248.0
R9(config-if)#no shutdown
R9(config-if)#int s2/1
R9(config-if)#ip address 172.16.168.1 255.255.248.0
R9(config-if)#no shutdown
R9(config-if)#int lo 1
R9(config-if)#ip address 172.16.160.1 255.255.248.0
R9(config-if)#end
R10的配置:
R10#conf t
Enter configuration commands, one per line. End with CNTL/Z.
R10(config)#int s2/0
R10(config-if)#ip address 172.16.168.2 255.255.248.0
R10(config-if)#no shutdown
R10(config-if)#int lo 1
R10(config-if)#ip address 172.16.176.1 255.255.248.0
R10(config-if)#end
R11的配置:
R11#conf t
Enter configuration commands, one per line. End with CNTL/Z.
R11(config)#int s2/0
R11(config-if)#ip address 172.16.96.2 255.255.248.0
R11(config-if)#no shutdown
R11(config-if)#int lo 1
R11(config-if)#ip address 172.16.104.1 255.255.248.0
R11(config-if)#int s2/2
R11(config-if)#ip address 172.16.112.1 255.255.248.0
R11(config-if)#no shutdown
R12的配置:
R12#conf t
Enter configuration commands, one per line. End with CNTL/Z.
R12(config)#int s2/0
R12(config-if)#ip address 172.16.112.2 255.255.248.0
R12(config-if)#no shutdown
R12(config-if)#int lo 1
R12(config-if)#ip address 172.16.192.1 255.255.240.0
R12(config-if)#int lo 2
R12(config-if)#ip address 172.16.208.1 255.255.240.0
R12(config-if)#end
三、打隧道:
普通tunnel—在两台ABR上建立隧道,然后将其宣告于OSPF协议中
缺点:周期的保活和更新,触发的信息均需要通过中间的穿越区域,对中间区域影响较大
配置:
R3(config)#ip route 0.0.0.0 0.0.0.0 34.1.1.2
R3为中心站点:
R3(config)#interface tunnel 1
R3(config-if)#ip address 172.16.64.1 255.255.248.0
R3(config-if)#tunnel source 34.1.1.1
R3(config-if)#tunnel mode gre multipoint
R3(config-if)#ip nhrp map multicast dynamic
R3(config-if)#ip nhrp network-id 100
R5隧道的配置:
R5(config)#ip route 0.0.0.0 0.0.0.0 45.1.1.2
R5(config)#interface tunnel 1
R5(config-if)#ip address 172.16.64.2 255.255.248.0
R5(config-if)#tunnel source serial 2/0
R5(config-if)#tunnel mode gre multipoint
R5(config-if)#ip nhrp nhs 172.16.64.1
R5(config-if)#ip nhrp map 172.16.64.1 34.1.1.1
R5(config-if)#ip nhrp network-id 100
R6的隧道配置:
R6(config)#ip route 0.0.0.0 0.0.0.0 46.1.1.2
R6(config)#interface tunnel 1
R6(config-if)#ip address 172.16.64.3 255.255.248.0
R6(config-if)#tunnel source s2/0
R6(config-if)#tunnel mode gre multipoint
R6(config-if)#ip nh nhs 172.16.64.1
R6(config-if)#ip nhrp map 172.16.64.1 34.1.1.1
R6(config-if)#ip nhrp network-id 100
R7的隧道配置:
R7(config)#ip route 0.0.0.0 0.0.0.0 47.1.1.2
R7(config)#interface tunnel 1
R7(config-if)#ip address 172.16.64.4 255.255.248.0
R7(config-if)#tunnel source s2/0
R7(config-if)#tunnel mode gre multipoint
R7(config-if)#ip nhrp nhs 172.16.64.1
R7(config-if)#ip nh map 172.16.64.1 34.1.1.1
R7(config-if)#ip nhrp network-id 100
四、启OSPF
R1的配置:
R1(config)#router ospf 1
R1(config-router)#router-id 1.1.1.1
R1(config-router)#network 172.16.0.0 0.0.255.255 a 1
R2的配置:
R2(config)#router ospf 1
R2(config-router)#router-id 2.2.2.2
R2(config-router)#network 172.16.0.0 0.0.255.255 a 1
R3配置:
R3(config)#router ospf 1
R3(config-router)#router-id 3.3.3.3
R3(config-router)#network 172.16.40.3 0.0.0.0 a 1
R3(config-router)#network 172.16.64.1 0.0.0.0 a 0
R3(config-router)#network 172.16.56.1 0.0.0.0 a 1
R5的配置:
R5(config)#router ospf 1
R5(config-router)#router-id 5.5.5.5
R5(config-router)#network 172.16.0.0 0.0.255.255 a 0
R6的配置:
R6(config)#router ospf 1
R6(config-router)#router-id 6.6.6.6
R6(config-router)#network 172.16.64.3 0.0.0.0 a 0
R6(config-router)#network 172.16.80.1 0.0.0.0 a 0
R6(config-router)#network 172.16.96.1 0.0.0.0 a 2
R7的配置:
R7(config)#router ospf 1 //启动协议时需要配置进程号,进程号仅具有本地意义
R7(config-router)#router-id 7.7.7.7
R7(config-router)#network 172.16.64.4 0.0.0.0 a 0
R7(config-router)#network 172.16.88.1 0.0.0.0 a 0
R7(config-router)#network 172.16.128.1 0.0.0.0 a 3
R8的配置:
R8(config)#router ospf 1
R8(config-router)#router-id 8.8.8.8
R8(config-router)#network 172.16.0.0 0.0.255.255 a 3
R8(config-router)#end
R11的配置:
R11(config)#router ospf 1
R11(config-router)#router-id 11.11.11.11 //手工配置RID。不配置时,环回最大>物理接口最大
R11(config-router)#network 172.16.0.0 0.0.255.255 a 2
R11(config-router)#end
R12的配置:
R12(config)#router ospf 1
R12(config-router)#router-id 12.12.12.12
R12(config-router)#network 172.16.112.2 0.0.0.0 a 2
R12(config-router)#exit
R12(config)#router eigrp 90
R12(config-router)#network 172.16.192.1 0.0.0.0
R12(config-router)#network 172.16.208.1 0.0.0.0
R12(config-router)#no auto-summary
R12(config-router)#end
分别在R5、R6、R7上开启伪广播
R5(config)#interface tunnel 1
R5(config-if)#ip nhrp map multicast 34.1.1.1
R6(config)#interface tunnel 1
R6(config-if)#ip nhrp map multicast 34.1.1.1
R7(config)#interface tunnel 1
R7(config-if)#ip nhrp map multicast 34.1.1.1
此时R3就全通了
将R5、R6、R7改为点到多点
点到点的工作方式,仅适用于一个网段两个节点的网络;
故在MGRE环境下若适用tunnel口默认的工作方式,那么一个网段内若存在两个以上节点将出现邻居关系翻滚。
点到多点的工作:hello time30;无DR选举;生成访问各个节点的精确路由
R5的配置:
R5(config)#interface tunnel 1
R5(config-if)#ip ospf network point-to-multipoint
R6的配置:
R6(config)#interface tunnel 1
R6(config-if)#ip ospf network point-to-multipoint
R7的配置:
R7(config)#interface tunnel 1
R7(config-if)#ip ospf network point-to-multipoint
R3的配置:
R3(config)#interface tunnel 1
R3(config-if)#ip ospf network point-to-multipoint
五、宣告
R9的配置:
R9(config)#router ospf 1
R9(config-router)#router-id 9.9.9.9
R9(config-router)#network 172.16.144.2 0.0.0.0 a 3
R9(config)#router ospf 2
R9(config-router)#router-id 99.9.9.9
R9(config-router)#network 172.16.160.1 0.0.0.0 a 4
R9(config-router)#network 172.16.168.1 0.0.0.0 a 4
R9(config-router)#exit
R9(config)#router ospf 1
一台设备上若同时运行多个进程,那么不同进程拥有不同的RID,生成各自的数据库,当数据库不共享;仅将各自计算所得路由加载于同一张路由表内;若多个进程工作于同一个接口上,仅最新启动的进程生效;在解决不规则区域时,让连接两个非骨干区域的ABR设备,将不同区域宣告到本地的不同进程下,之后使用重发布技术,进行路由共享即可
R9(config-router)#redistribute ospf 2 subnets
R9(config-router)#exit
R9(config)#router ospf 2
R9(config-router)#redistribute ospf 1 subnets
R12的配置:
R12(config)#router ospf 1
R12(config-router)#router-id 12.12.12.12
R12(config-router)#network 172.16.112.2 0.0.0.0 a 2
R12(config-router)#exit
R12(config)#router eigrp 90
R12(config-router)#network 172.16.192.1 0.0.0.0
R12(config-router)#network 172.16.208.1 0.0.0.0
R12(config-router)#no auto-summary
R12(config-router)#end
R12(config)#router ospf 1
R12(config-router)#redistribute eigrp 90 subnets
R10的配置:
R10(config)#router ospf 1
R10(config-router)#router-id 10.10.10.10
R10(config-router)#network 172.16.0.0 0.0.255.255 a 4
已实现全网可达
NAT
R3的配置:
R3(config)#interface serial 2/0
R3(config-if)#ip nat outside
R3(config-if)#int f0/0
R3(config-if)#ip nat inside
R3(config)#access-list 1 permit 172.16.0.0 0.0.255.255
R3(config)#ip nat inside source list 1 interface serial 2/0
R5的配置:
R5(config)#access-list 1 permit 172.16.0.0 0.0.255.255
R5(config)#int s2/0
R5(config-if)#ip nat outside
R5(config-if)#exit
R5(config)#ip nat inside source list 1 interface s2/0
R6的配置:
R6(config)#int s2/0
R6(config-if)#ip nat outside
R6(config-if)#int s2/2
R6(config-if)#ip nat inside
R6(config-if)#exit
R6(config)#access-list 1 permit 172.16.0.0 0.0.255.255
R6(config)#ip nat inside source list 1 interface s2/0
R7的配置:
R7(config)#access-list 1 permit 172.16.0.0 0.0.255.255
R7(config)#int s2/0
R7(config-if)#ip nat outside
R7(config-if)#int s2/1
R7(config-if)#ip nat inside
R7(config-if)#exit
R7(config)#ip nat inside source list 1 interface s2/0
缺省路由:
使用专用命令:
R3的配置:
R3(config)#router ospf 1
R3(config-router)#default-information originate
R6(config)#router ospf 1
R6(config-router)#default-information originate
R7的配置:
R7(config)#router ospf 1
R7(config-router)#default-information originate
R9的配置:
R9(config)#router ospf 2
R9(config-router)#default-information originate
R9(config-router)#end
手工汇总:减少骨干区域LSA量
area 0上的汇总:
R3(config)#router ospf 1
R3(config-router)#area 1 range 172.16.32.0 255.255.224.0
通过该区域的1/2类LSA计算所得路由才能汇总成功
area 2上的汇总:
R6(config)#router ospf 1
R6(config-router)#area 2 range 172.16.96.0 255.255.224.0
area 3上的汇总:
R7(config)#router ospf 1
R7(config-router)#area 3 range 172.16.128.0 255.255.224.0
域外汇总:
eigrp上的汇总
R12(config)#router ospf 1
R12(config-router)#summary-address 172.16.192.0 255.255.224.0
area 4上的汇总:
R9(config)#router ospf 1
R9(config-router)#summary-address 172.16.160.0 255.255.224.0
注:以上汇总均会自动生成空接口防环路由
完全末梢
特殊区域:
该类在area 1 上:
R1(config)#router ospf 1
R1(config-router)#area 1 stub
stub,末梢区域—拒绝4/5类的LSA,ABR自动产生3类缺省发向该区域
R2(config)#router ospf 1
R2(config-router)#area 1 stub
R3(config)#router ospf 1
R3(config-router)#area 1 stub
仅在ABR
完全末梢:
R3(config-router)#area 1 stub
R3(config-router)#area 1 stub no-summary
totally-stub,完全末梢区域–在末梢区域的基础上进一步拒绝3的LSA,仅保留一条3类的缺省,先将该区域配置为末梢区域,然后仅在ABR上定义完全即可
在area2上:
R6(config-router)#area 2 nssa //该区域所有设备配置
R6(config-router)#area 2 nssa no-summary
完全NSSA–在NSSA的基础上进一步拒绝3的LSA,自动产生3类缺省
先将该区域配置为NSSA,然后仅在ABR上定义完全即可
R11(config-router)#area 2 nssa
R12(config-router)#area 2 nssa
在R3上:
R7(config-router)#area 3 nssa
R7(config-router)#area 3 nssa no-summary
R8(config-router)#area 3 nssa
R9(config-router)#area 3 nssa
实验完成!!


 2177
2177

 被折叠的 条评论
为什么被折叠?
被折叠的 条评论
为什么被折叠?
 到【灌水乐园】发言


