


 本文围绕Halcon开发展开机器视觉学习。介绍了Blob分析用于区分连通点与背景,还给出进阶分析步骤。通过结晶匹配、粒子分析等进阶代码案例,讲解图像处理方法,如填充镂空图像、灰度阈值处理等,最后总结常用套路,指出深入分析需更完善方案。
文章目录
文章专栏
前言
今天来看第三章内容,既然是零基础,而且我还有大概3-4个月的时间准备,我还是老老实实从头开始学机器视觉好了。
专业内容
Halcon [fill_up_shape],[close_circle],[dilation_circle]和[shape_trans]图像处理时填充区别
文章解析
开头
- Blob 解析非常简单。
- Blob通过亮度,将连通点和背景进行区分
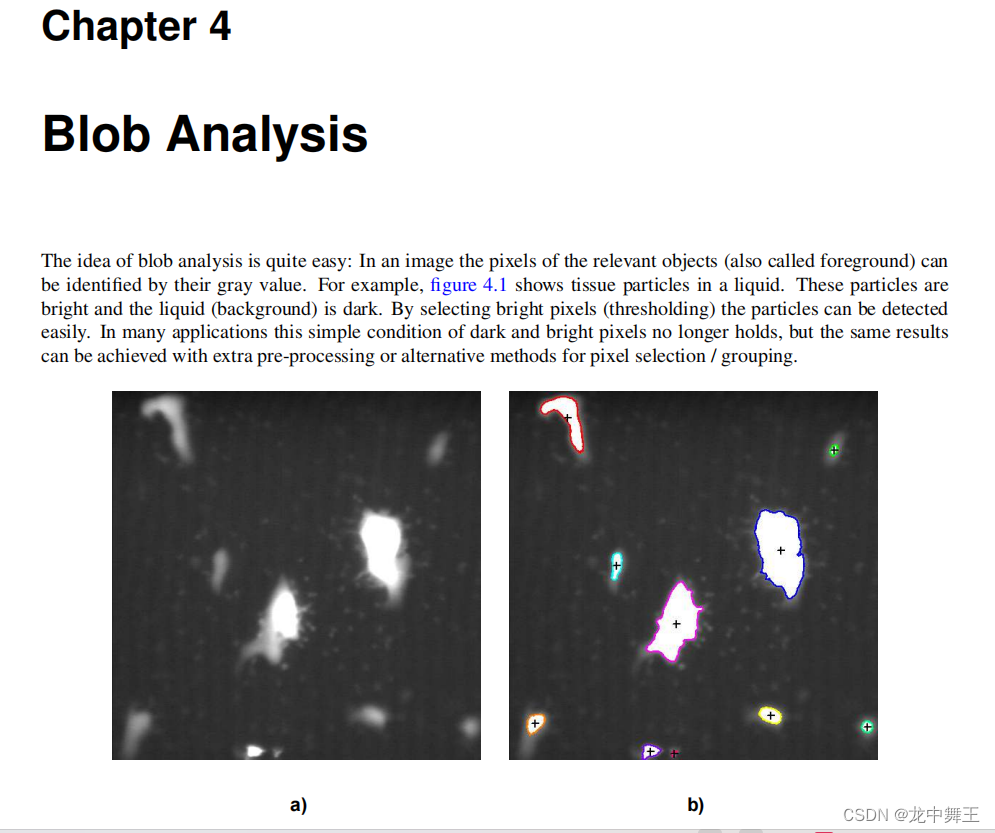
Blob分析具有特别好的效果,经常用于机器视觉的各种需求中。

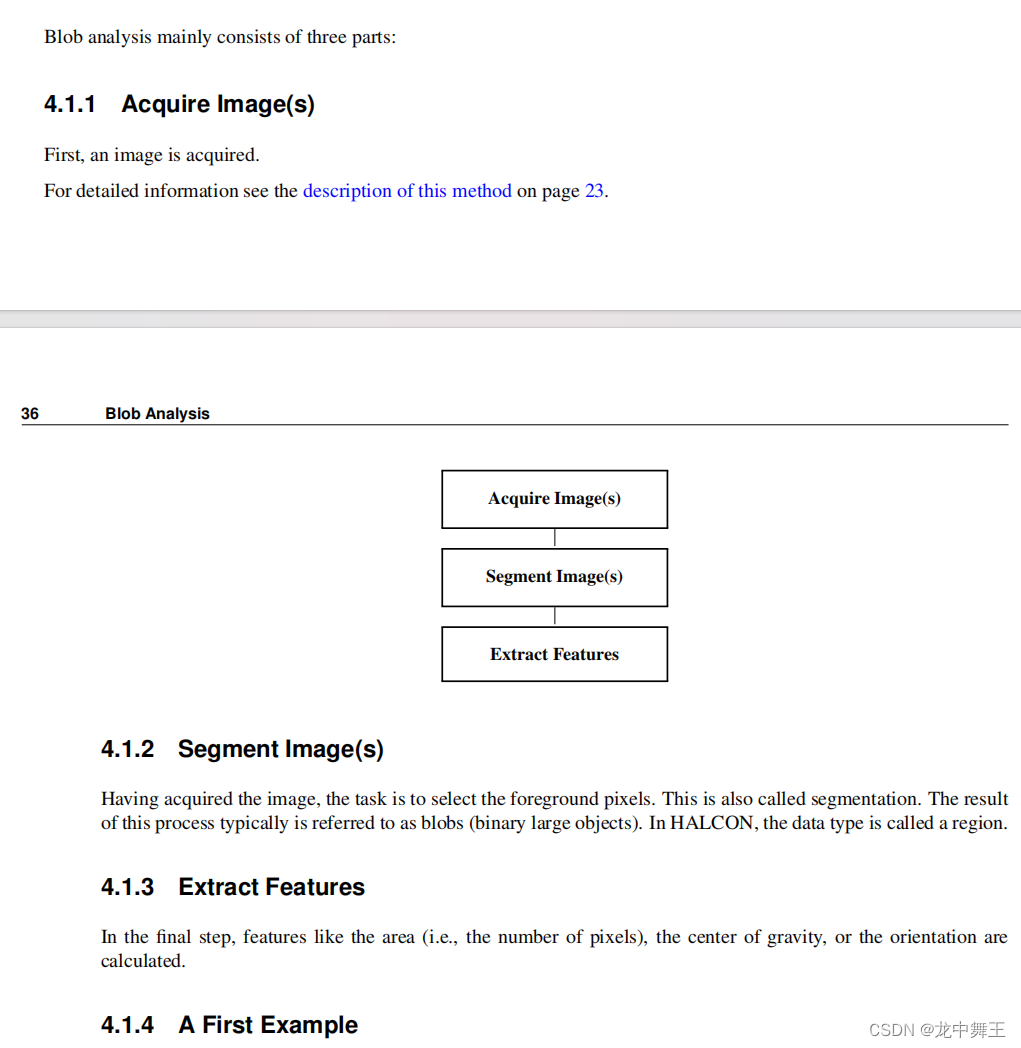
步骤分析
- 获取图片
- 图片特征性分割
- 特征获取
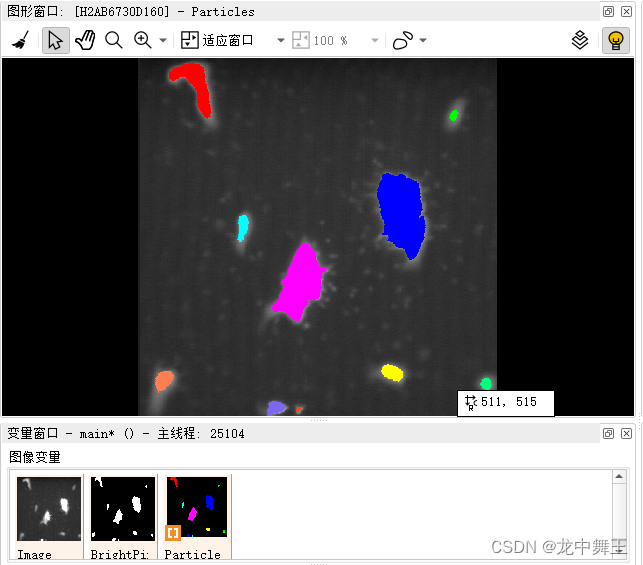
简单案例
* 读取案例图片
read_image (Image, 'particle')
* 灰度获取,灰度范围:120-255
threshold (Image, BrightPixels, 120, 255)
* 按照连通性对图像进行区分
connection (BrightPixels, Particles)
* 将分割好的图转化为对应的坐标数组(面积,中心点x,中心点y)
area_center (Particles, Area, Row, Column)
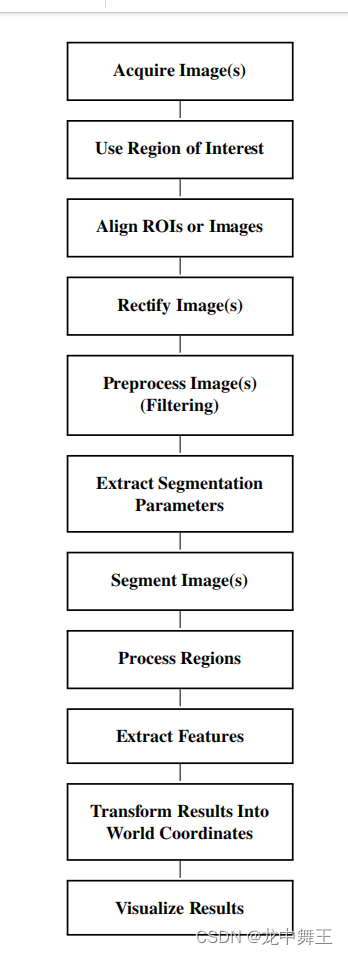
进阶方案
由于某些图像的复杂性要远远高于简单示例,所以可以按照一下步骤来进行机器视觉分析

- Acquire Image(s):获取图片
- Use ROI
- 调整图片的ROI
- 矫正图片
- 选取用于区分的特性,例如:灰度,面积,形状
- 区分图片
- 匹配图像特性
- 将所有匹配的图像转换为世界坐标
- 可视化结果
进阶代码案例
crystal,结晶匹配
示例路径: %HALCONEXAMPLES%/solution_guide/basics/crystal.hdev
模板,找到如下三个结晶块
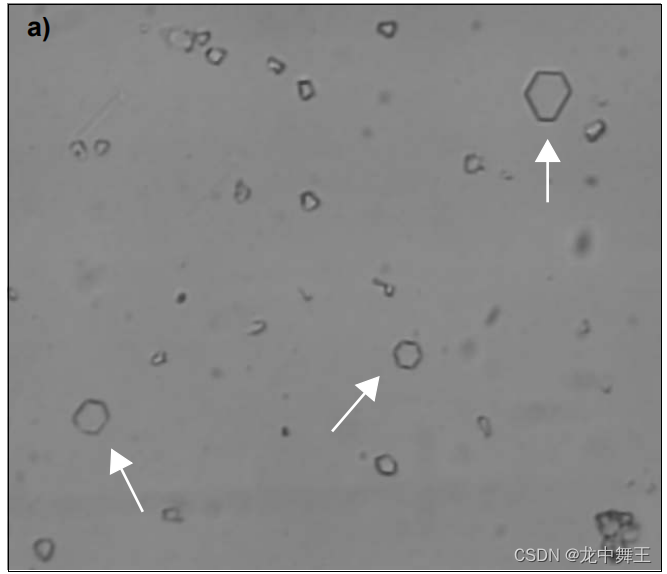
需求分析
- 我们需要找到结晶体。结晶体和气泡的区别就是结晶体有明显的六边形结构
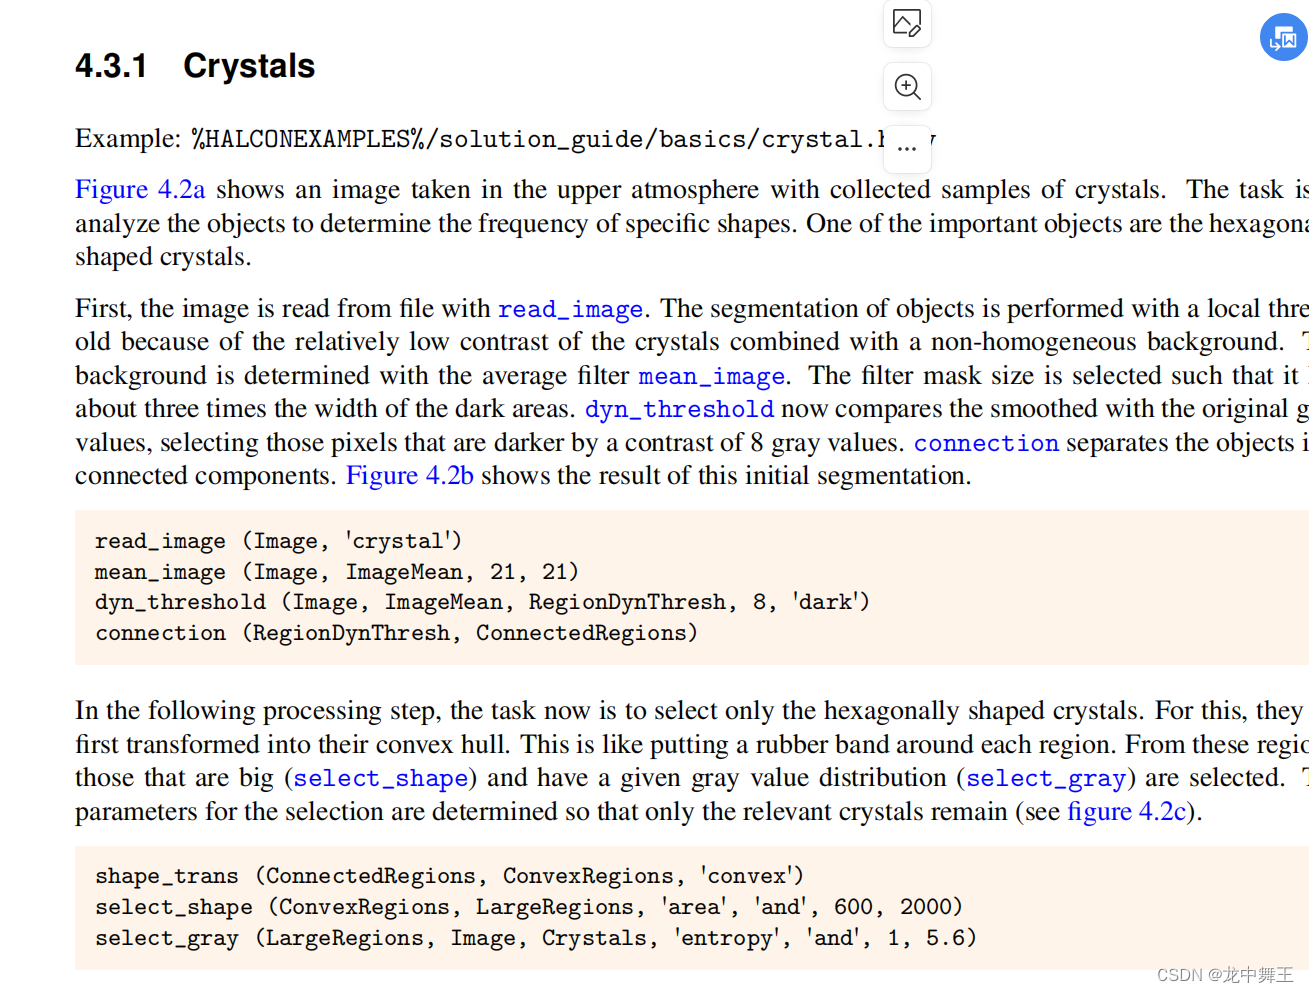
- 再对低区分度的图片进行区分的时候,我们用到mean_image来获得一个模糊的背景
- 将原图片和模糊图片进行dyn_threshold,获取到高8个灰度的区域。因为图片的特点就是白背景,灰物体。灰物体涂抹后,亮度变高。叠放之后区域就是物体区域。

- 下一步我们就选择六边形的区域即可。因为结晶体是镂空图形,将所有的镂空图形转换为凸多边形。即填充空洞。
- 然后进行图像面积匹配,面积必须是填充图形才可以。后面就是灰度匹配。
* crystal.hdev: extraction of hexagonally shaped crystals via local thresholding and region post-processing
*
dev_close_window ()
dev_update_window ('off')
* ****
* 添加图片,设置图像填充格式,线条宽度等设置
* ****
read_image (Image, 'crystal')
get_image_size (Image, Width, Height)
dev_open_window_fit_image (Image, 0, 0, Width, Height, WindowID)
set_display_font (WindowID, 12, 'mono', 'true', 'false')
dev_set_draw ('margin')
dev_set_line_width (2)
dev_display (Image)
disp_continue_message (WindowID, 'black', 'true')
stop ()
* ****
* 区分图像
* ****
* -> 使用灰度进行区分
* 涂抹处理,将灰度范围变大
mean_image (Image, ImageMean, 21, 21)
* 叠放对比,获取灰度高8个单位的部分。
dyn_threshold (Image, ImageMean, RegionDynThresh, 8, 'dark')
* -> 将ROI连通区域区分
connection (RegionDynThresh, ConnectedRegions)
dev_display (ConnectedRegions)
disp_continue_message (WindowID, 'black', 'true')
stop ()
* ****
* 处理Region
* ****
* 将镂空图形空洞填充,变成凸多边形
shape_trans (ConnectedRegions, ConvexRegions, 'convex')
* 选择图片面积区域在600 - 2000的图像
select_shape (ConvexRegions, LargeRegions, 'area', 'and', 600, 2000)
* 选择[交叉熵]为1-5.6的区域。简单来说就是不重叠的区域
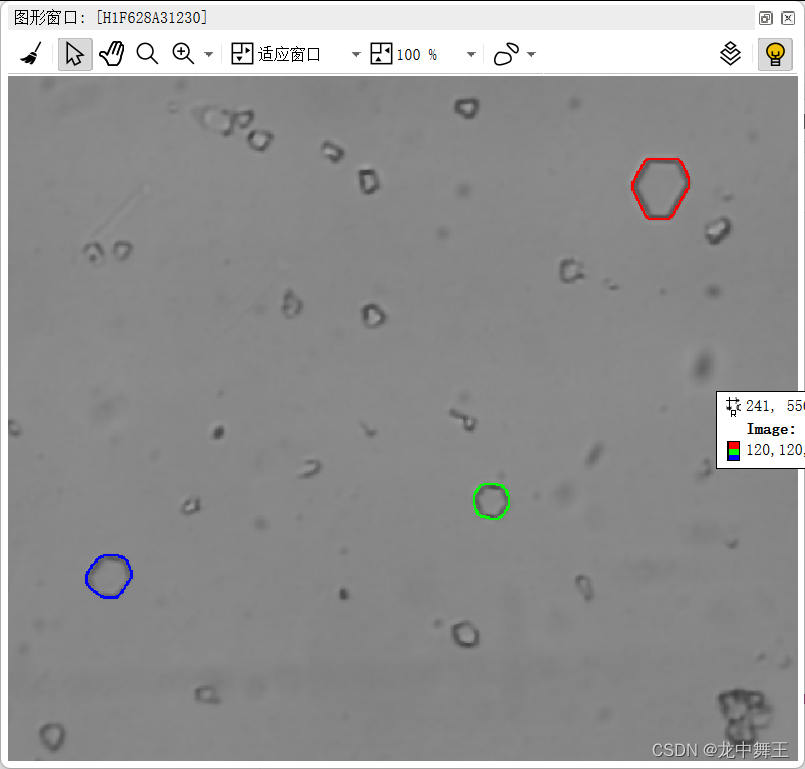
select_gray (LargeRegions, Image, Crystals, 'entropy', 'and', 1, 5.6)
dev_display (Image)
dev_display (Crystals)
我感觉我单纯的翻译原文没啥好写的。还是直接上代码注释好了
套路分析:
处理细微差异
> Image:需要处理的图片

* 涂抹处理,获取模糊背景。width一般等于height,值越大,越模糊
* mean_image (Image, ImageMean, width, height)
mean_image (Image, ImageMean, 21, 21)
* 叠放对比。Offset越大,叠放差异越大。LightDark选择高灰度还是低灰度区域。
* dyn_threshold (Image, ImageMean, RegionDynThresh,Offset , LightDark)
dyn_threshold (Image, ImageMean, RegionDynThresh, 8, 'dark')
填充镂空图像
因为我们需要进行面积分析,需要的是封闭图形的面积,所以需要填充镂空
* 将镂空图形空洞填充,变成凸多边形
shape_trans (ConnectedRegions, ConvexRegions, 'convex')
原子分析
一个讲的是用电子显微镜,找点原子。然后找到需要的原子。我感觉这个也太高端了吧。这个我先跳过。感觉用不到
Analyzing Particles,粒子分析
这个我感觉用得到。我们需要找到图片的中的微小粒子,我感觉这个用在缺陷检测中用的会比较频繁。难点如下:
- 微粒和背景的区别极小,区分度不高
- 需要将微粒和大型光斑区别开来
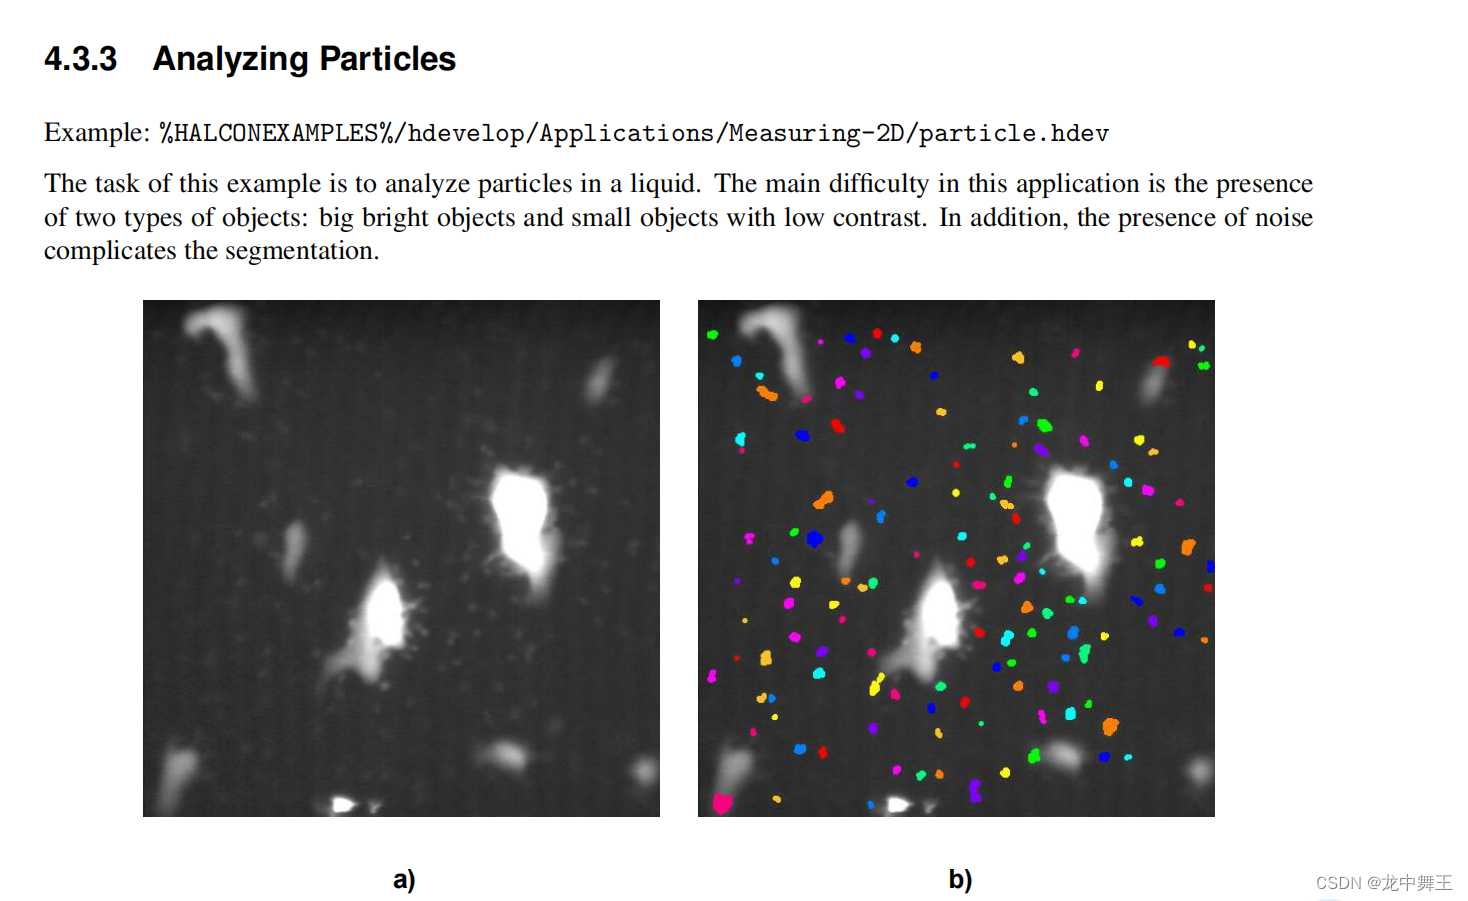
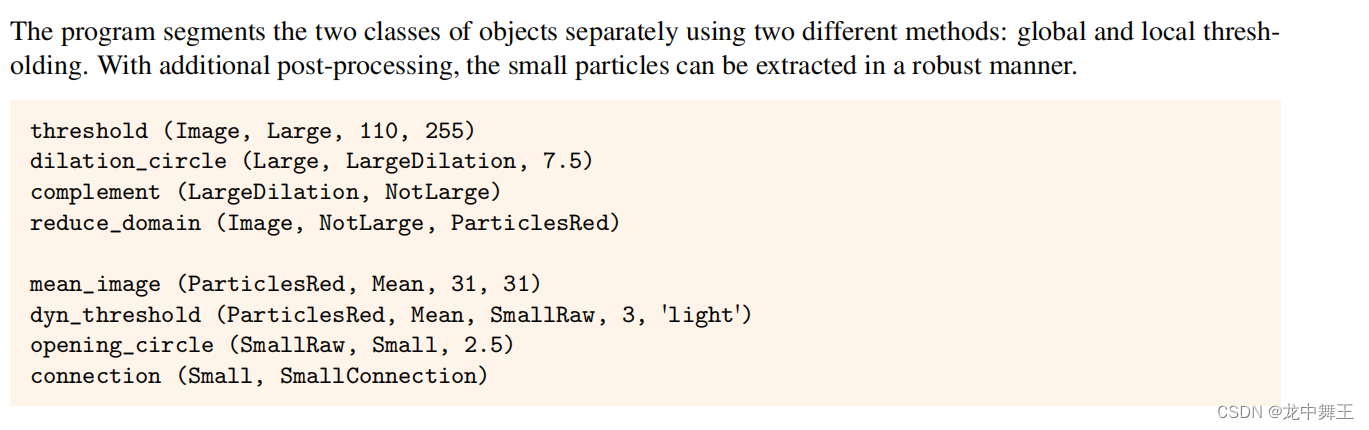
这个图片需要进行两次灰度阈值处理。全局阈值处理,筛掉大光斑。在剩下的地方进行局部灰度阈值处理,找到小光斑。
代码解析
* 微小光斑处理
* ----读取image
dev_update_off ()
dev_close_window ()
dev_open_window (0, 0, 512, 512, 'black', WindowID)
set_display_font (WindowID, 14, 'mono', 'true', 'false')
read_image (Image, 'particle')
dev_display (Image)
dev_disp_text ('Original image', 'window', 12, 12, 'black', [], [])
dev_disp_text ('Press Run (F5) to continue', 'window', 'bottom', 'right', 'black', [], [])
stop ()
* 全局灰度阈值处理,获取亮度在110-255的值。找到高亮光斑
threshold (Image, Large, 110, 255)
* 将高亮光斑区域进行[圆形膨胀],因为高亮光斑的边缘较暗,但是仍属于高亮光斑
dilation_circle (Large, LargeDilation, 7.5)
dev_display (Image)
dev_set_draw ('margin')
dev_set_line_width (3)
dev_set_color ('red')
* 显示扩散高亮光斑区域
dev_display (LargeDilation)
dev_set_draw ('fill')
dev_disp_text ('Exclude large areas from processing', 'window', 12, 12, 'black', [], [])
dev_disp_text ('Press Run (F5) to continue', 'window', 'bottom', 'right', 'black', [], [])
stop ()
* 获取非高亮光斑区域
complement (LargeDilation, NotLarge)
* 在原图中去掉高亮光斑区域。分析剩余区域中的微粒
reduce_domain (Image, NotLarge, ParticlesRed)
* 套路:涂抹背景+叠放灰度处理。
mean_image (ParticlesRed, Mean, 31, 31)
* 因为微粒区别太小
dyn_threshold (ParticlesRed, Mean, SmallRaw, 3, 'light')
* 圆形腐蚀,去掉毛刺和噪点
opening_circle (SmallRaw, Small, 2.5)
* 连通性分割,得到所需要的点
connection (Small, SmallConnection)
* ----剩下的是图形显示逻辑,只是为了更好的展示数据结果,不需要理解。
dev_display (Image)
dev_set_colored (12)
dev_display (SmallConnection)
dev_disp_text ('Extracted small particles', 'window', 12, 12, 'black', [], [])
dev_disp_text ('Press Run (F5) to continue', 'window', 'bottom', 'right', 'black', [], [])
stop ()
* Continue to select several regions and to get information
dev_set_color ('green')
dev_display (Image)
dev_set_draw ('margin')
dev_display (SmallConnection)
Button := 1
* Define limits for the displayed message at the end of the while-loop.
MaxRow := 450
MaxColumn := 440
MinRow := 40
MinColumn := 100
while (Button == 1)
    dev_disp_text (['Select object with left mouse button','Right button to quit'], 'window', 12, 12, 'black', 'box_color', '#fce9d4dd')
    dev_set_color ('green')
    get_mbutton (WindowID, Row, Column, Button)
    dev_display (Image)
    dev_display (SmallConnection)
    dev_set_color ('red')
    select_region_point (SmallConnection, SmallSingle, Row, Column)
    dev_display (SmallSingle)
    count_obj (SmallSingle, NumSingle)
    if (NumSingle == 1)
        intensity (SmallSingle, Image, MeanGray, DeviationGray)
        area_center (SmallSingle, Area, Row, Column)
        * Limit the message so that it is displayed entirely inside the graphics window.
        if (Row > MaxRow)
            Row := MaxRow
        endif
        if (Column > MaxColumn)
            Column := MaxColumn
        endif
        if (Row < MinRow)
            Row := MinRow
        endif
        if (Column < MinColumn)
            Column := MinColumn
        endif
        dev_disp_text (['Area = ' + Area,'Intensity = ' + MeanGray$'.3'], 'image', Row + 10, Column - 90, 'black', 'box_color', '#fce9d4dd')
    endif
endwhile
dev_set_line_width (1)
dev_update_on ()
套路学习
反选选取
> LargeDilation :需要去除的区域
* 获得反选区域
complement (LargeDilation, NotLarge)
* 交集图像和区域
reduce_domain (Image, NotLarge, ParticlesRed)
ROI+膨胀+反选:反向ROI
* 找到需要去除的ROI,进行方向处理
* 全局灰度阈值处理。比如找到高亮光斑,获取亮度在110-255的值
threshold (Image, Large, 110, 255)
* 将高亮光斑区域进行[圆形膨胀],因为高亮光斑的边缘较暗,但是仍属于高亮光斑
dilation_circle (Large, LargeDilation, 7.5)
* 获取非高亮光斑区域
complement (LargeDilation, NotLarge)
* 在原图中去掉高亮光斑区域。分析剩余区域中的微粒
reduce_domain (Image, NotLarge, ParticlesRed)
去掉小噪点
* 圆形腐蚀,去掉毛刺和噪点
opening_circle (SmallRaw, Small, 2.5)
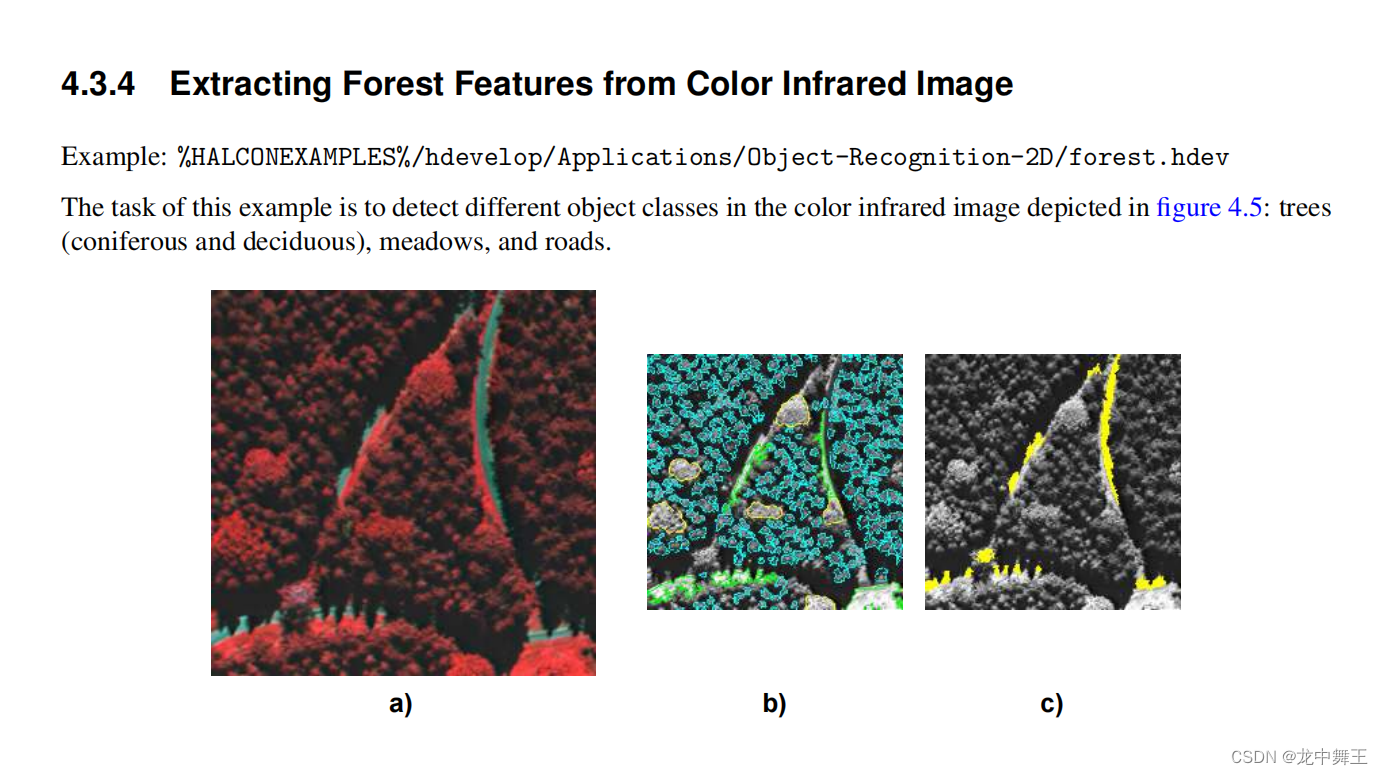
Extracting Forest Features from Color Infrared Image:获取图片中的森林元素
用不到,跳过
Checking a Boundary for Fins:边缘毛刺检测
- 这次处理的图像较为简单
- 黑白有明显的区分
- 我们将使用到膨胀和腐蚀的概念
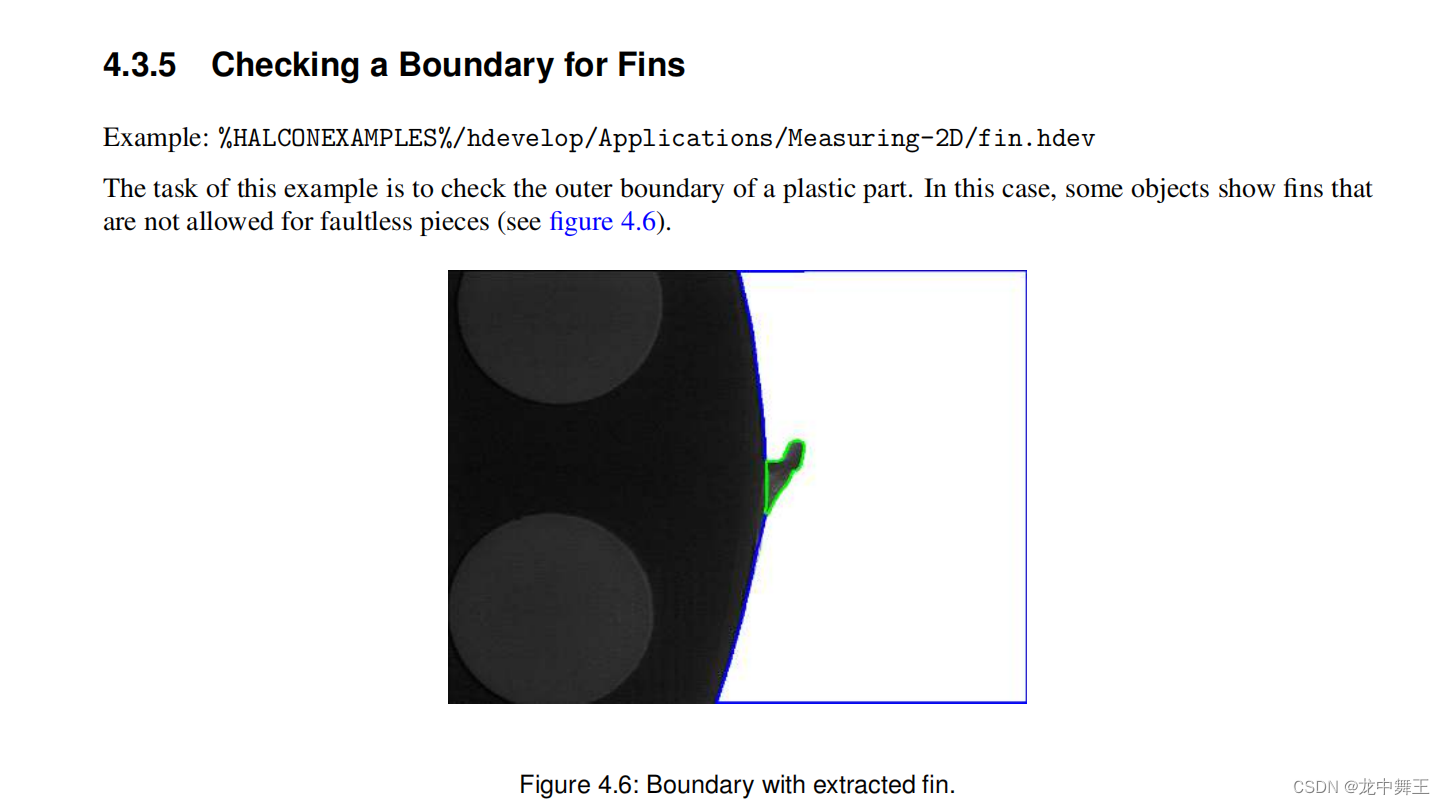
这次的算子较为简单
* fin.hdev: Detection of a fin
*----添加图片
dev_update_window ('off')
read_image (Fins, 'fin' + [1:3])
get_image_size (Fins, Width, Height)
dev_close_window ()
dev_open_window (0, 0, Width[0], Height[0], 'black', WindowID)
set_display_font (WindowID, 14, 'mono', 'true', 'false')
for I := 1 to 3 by 1
    * 案例有三张图片,选择第一张图片
    select_obj (Fins, Fin, I)
    dev_display (Fin)
    * 因为明暗对比过强,直接自动灰度切割。'max_separability'只是个算法,区别不大
    binary_threshold (Fin, Background, 'max_separability', 'light', UsedThreshold)
    dev_set_color ('blue')
    dev_set_draw ('margin')
    dev_set_line_width (4)
    dev_display (Background)
    disp_continue_message (WindowID, 'black', 'true')
    stop ()
    * [圆形膨胀],将半径小于250的缺口进行膨胀处理
    closing_circle (Background, ClosedBackground, 250)
    dev_set_color ('green')
    dev_display (ClosedBackground)
    disp_continue_message (WindowID, 'black', 'true')
    stop ()
    * [差集],获取两者区别,找到毛刺
    difference (ClosedBackground, Background, RegionDifference)
    * [1型矩形腐蚀],也可以用圆形腐蚀。腐蚀都差不多
    * opening_circle (RegionDifference, FinRegion, 3.5)
    opening_rectangle1 (RegionDifference, FinRegion, 5, 5)

    dev_display (Fin)

    dev_set_color ('red')
    dev_display (FinRegion)
    * 获取中心的面积,坐标
    area_center (FinRegion, FinArea, Row, Column)
    disp_message (WindowID, 'FinArea:'+FinArea+',Row:'+Row+',Column:'+Column, 'window', Row, Column, 'black', 'true')
    if (I < 3)
        disp_continue_message (WindowID, 'black', 'true'))        stop ())
    endif
endfor
套路总结
常用的圆形膨胀,腐蚀
closing_circle
opening_circle
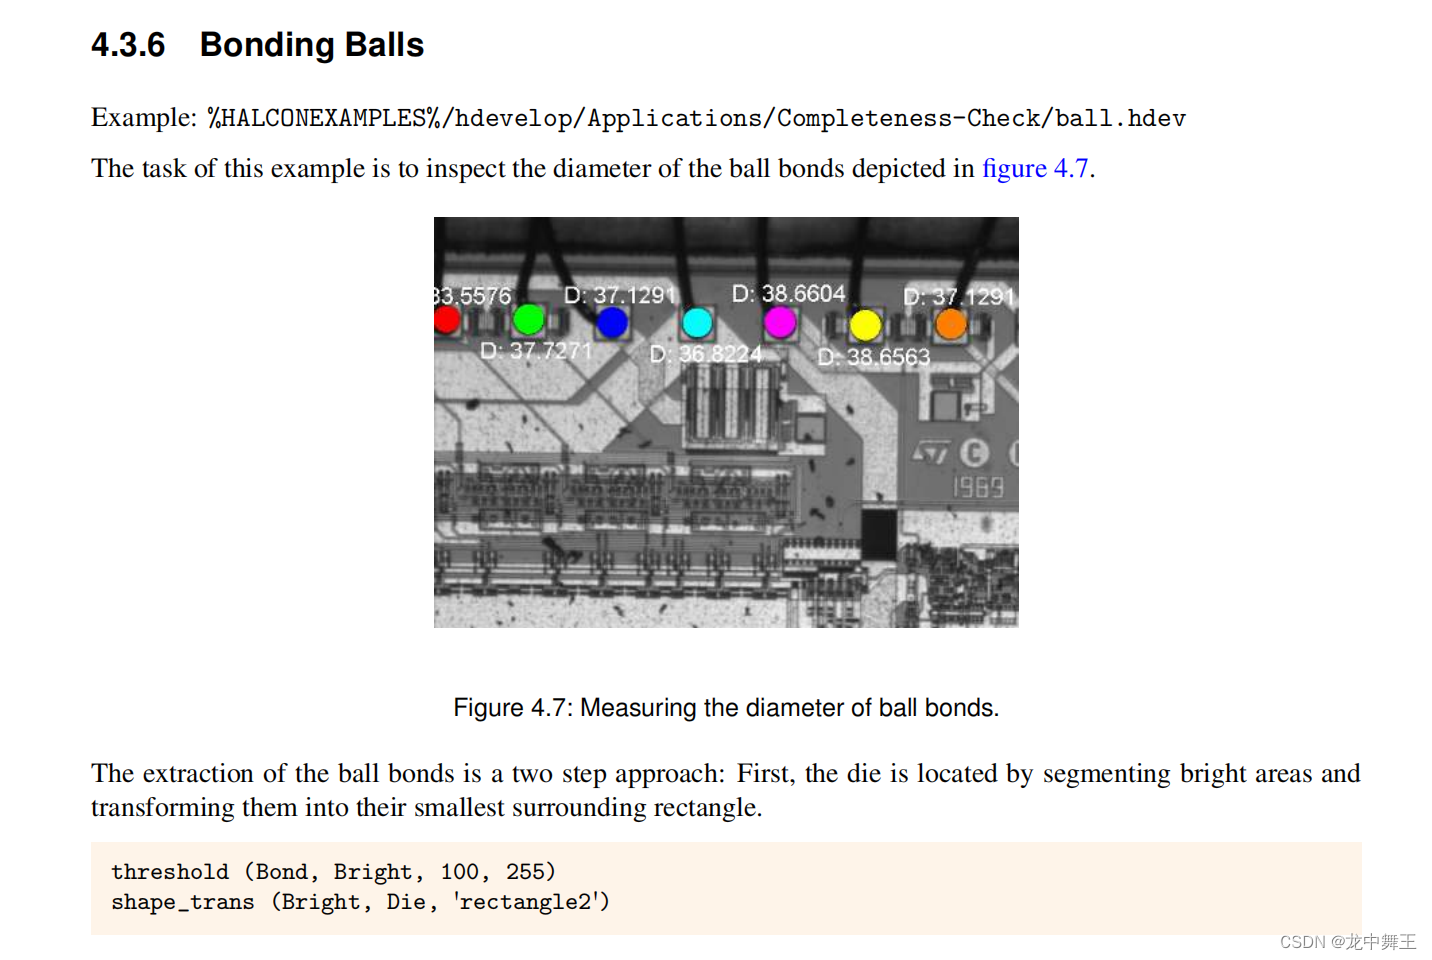
Bonding Balls :圆形判断
* ball.hdev: Inspection of Ball Bonding
*
dev_update_window ('off')
dev_close_window ()
dev_open_window (0, 0, 728, 512, 'black', WindowID)
read_image (Bond, 'die/die_03')
dev_display (Bond)
set_display_font (WindowID, 14, 'mono', 'true', 'false')
disp_continue_message (WindowID, 'black', 'true')
stop ()
* 套路:灰度阈值+镂空填充+原图处理
threshold (Bond, Bright, 100, 255)
shape_trans (Bright, Die, 'rectangle2')
reduce_domain (Bond, Die, DieGrey)
dev_set_color ('green')
dev_set_line_width (3)
dev_set_draw ('margin')
dev_display (Die)
disp_continue_message (WindowID, 'black', 'true')
stop ()
threshold (DieGrey, Wires, 0, 50)
* fill_up_shape也是填充,和shape_trans不同
connection (Wires, ConnectedRegions)
dilation_circle (ConnectedRegions, RegionDilation, 3.5)
fill_up_shape (Wires, WiresFilled, 'area', 1, 100)

dev_display (Bond)
dev_set_draw ('fill')
dev_set_color ('red')
dev_display (WiresFilled)
disp_continue_message (WindowID, 'black', 'true')

stop ()
* 圆形腐蚀
opening_circle (WiresFilled, Balls, 15.5)
dev_set_color ('green')

dev_display (Balls)
disp_continue_message (WindowID, 'black', 'true')
stop ()
* 连通度分割
connection (Balls, SingleBalls)
* 图像过略,[圆形]+权重[0.85,1.0]
select_shape (SingleBalls, IntermediateBalls, 'circularity', 'and', 0.85, 1.0)
* 并集,获取图像信息
sort_region (IntermediateBalls, FinalBalls, 'first_point', 'true', 'column')
dev_display (Bond)
dev_set_colored (12)
dev_display (FinalBalls)
disp_continue_message (WindowID, 'black', 'true')
stop ()
* 智能圆形长宽计算
smallest_circle (FinalBalls, Row, Column, Radius)
NumBalls := |Radius|
Diameter := 2 * Radius
meanDiameter := mean(Diameter)
minDiameter := min(Diameter)
dev_display (Bond)
* 完美圆形半径打印
disp_circle (WindowID, Row, Column, Radius)
dev_set_color ('white')
disp_message (WindowID, 'D: ' + Diameter$'.4', 'image', Row - 2 * Radius, Column, 'white', 'false')
dev_update_window ('on')
套路总结:
Halcon [fill_up_shape],[close_circle],[dilation_circle]和[shape_trans]图像处理时填充区别
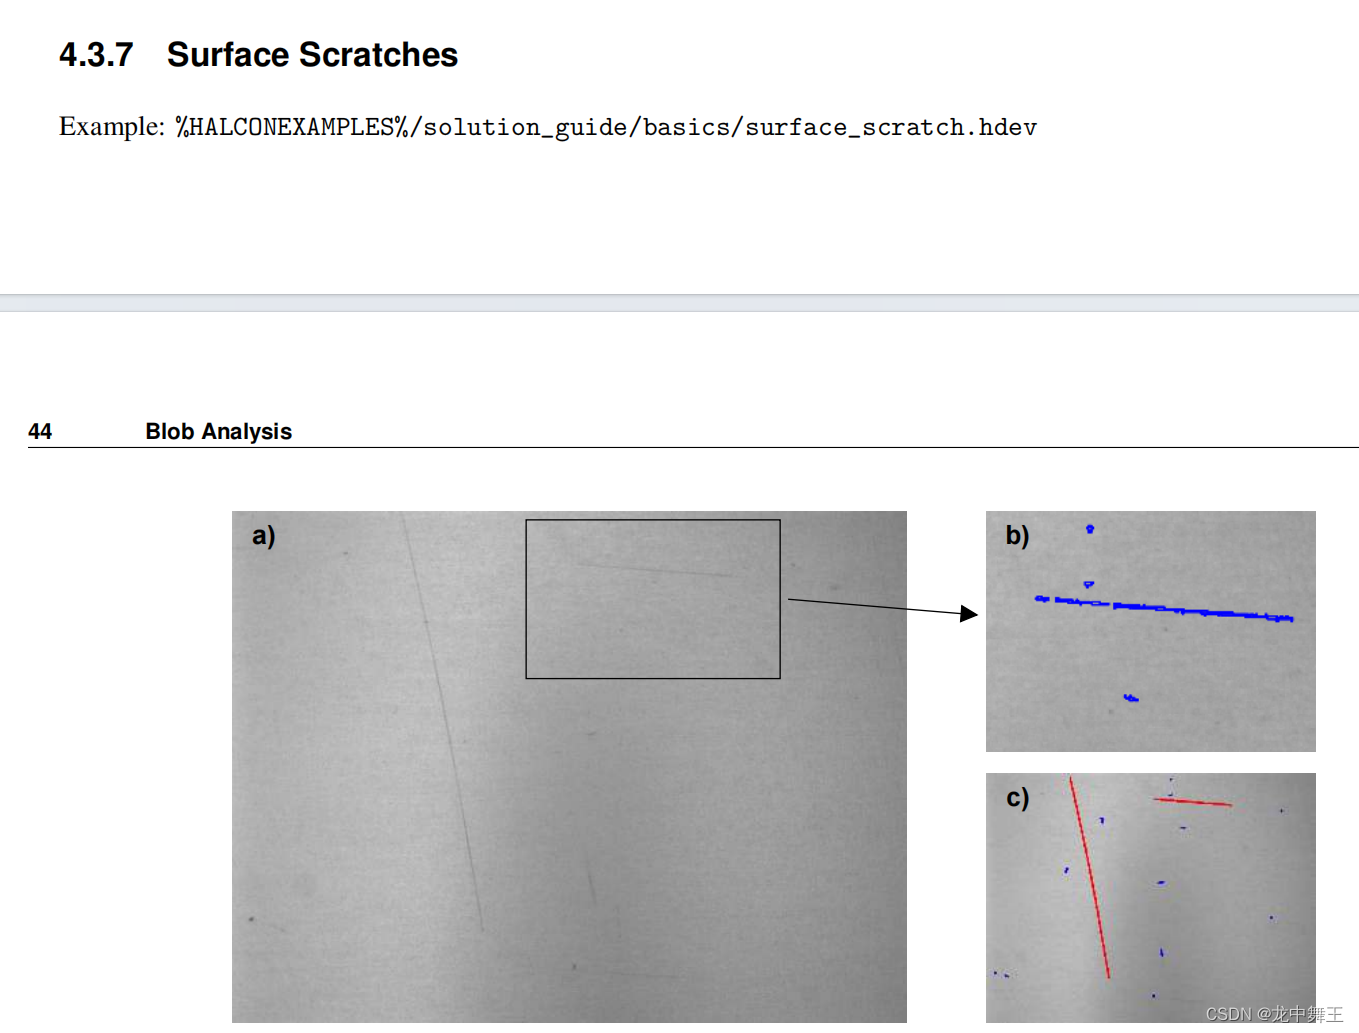
Surface Scratches:划痕检测
根据我们之前写的案例的套路,可以直接用上微粒检测里面的弱背景对比查找
* This programm shows the extraction of surface scratches via
* local thresholding and morphological post-processing
*
dev_update_off ()
dev_close_window ()
*
* Step 1: Acquire image
*
read_image (Image, 'surface_scratch')
get_image_size (Image, Width, Height)
dev_open_window_fit_image (Image, 0, 0, Width, Width, WindowID)
set_display_font (WindowID, 16, 'mono', 'true', 'false')
dev_set_draw ('margin')
dev_set_line_width (4)
dev_display (Image)
Message := 'This program shows the extraction of'
Message[1] := 'surface scratches via local thresholding'
Message[2] := 'and morphological post-processing'
disp_message (WindowID, Message, 'window', 12, 12, 'black', 'true')
disp_continue_message (WindowID, 'black', 'true')
stop ()
*
* Step 2: Segment image
*
* 套路:背景涂抹+叠放灰度阈值+连通分区
mean_image (Image, ImageMean, 7, 7)
dyn_threshold (Image, ImageMean, DarkPixels, 5, 'dark')
connection (DarkPixels, ConnectedRegions)
dev_set_colored (12)
dev_display (Image)
dev_display (ConnectedRegions)
Message := 'Connected components after image segmentation'
Message[1] := 'using a local threshold.'
disp_message (WindowID, Message, 'window', 12, 12, 'black', 'true')
disp_continue_message (WindowID, 'black', 'true')
stop ()
*
* Step 3: Process regions
*
* 由于没有镂空点,直接图像过滤[面积]
select_shape (ConnectedRegions, SelectedRegions, 'area', 'and', 10, 1000)
dev_display (Image)
dev_display (SelectedRegions)
disp_message (WindowID, 'Large Regions', 'window', 12, 12, 'black', 'true')
disp_continue_message (WindowID, 'black', 'true')
stop ()
*
* Visualize fractioned scratch
open_zoom_window (0, round(Width / 2), 2, 303, 137, 496, 3, WindowHandleZoom)
dev_set_color ('blue')
dev_display (Image)
dev_display (SelectedRegions)
set_display_font (WindowHandleZoom, 16, 'mono', 'true', 'false')
disp_message (WindowHandleZoom, 'Fractioned scratches', 'window', 12, 12, 'black', 'true')
disp_continue_message (WindowHandleZoom, 'black', 'true')
stop ()
*
* 离散数组变组合
union1 (SelectedRegions, RegionUnion)
* 圆形膨胀,其实也可以直接对数组进行膨胀
dilation_circle (RegionUnion, RegionDilation, 3.5)
dev_display (Image)
dev_display (RegionDilation)
Message := 'Region of the scratches after dilation'
disp_message (WindowHandleZoom, Message, 'window', 12, 12, 'black', 'true')
disp_continue_message (WindowHandleZoom, 'black', 'true')
stop ()
* 获得线性骨架,我感觉倒是没有啥必要
skeleton (RegionDilation, Skeleton)
connection (Skeleton, Errors)
dev_set_colored (12)
dev_display (Image)
dev_display (Errors)
Message := 'Fractioned scratches merged via morphology'
disp_message (WindowHandleZoom, Message, 'window', 12, 12, 'black', 'true')
disp_continue_message (WindowHandleZoom, 'black', 'true')
stop ()
*
* Distinguish small and large scratches
close_zoom_window (WindowHandleZoom, Width, Height)
select_shape (Errors, Scratches, 'area', 'and', 50, 10000)
select_shape (Errors, Dots, 'area', 'and', 1, 50)
dev_display (Image)
dev_set_color ('red')
dev_display (Scratches)
dev_set_color ('blue')
dev_display (Dots)
Message := 'Extracted surface scratches'
Message[1] := 'Not categorized as scratches'
disp_message (WindowID, Message, 'window', 440, 310, ['red','blue'], 'true')
套路总结
缺陷检测,没有什么有意思的套路
套路总结
反选选取
> LargeDilation :需要去除的区域
* 获得反选区域
complement (LargeDilation, NotLarge)
* 交集图像和区域
reduce_domain (Image, NotLarge, ParticlesRed)
ROI+膨胀+反选:反向ROI
* 找到需要去除的ROI,进行方向处理
* 全局灰度阈值处理。比如找到高亮光斑,获取亮度在110-255的值
threshold (Image, Large, 110, 255)
* 将高亮光斑区域进行[圆形膨胀],因为高亮光斑的边缘较暗,但是仍属于高亮光斑
dilation_circle (Large, LargeDilation, 7.5)
* 获取非高亮光斑区域
complement (LargeDilation, NotLarge)
* 在原图中去掉高亮光斑区域。分析剩余区域中的微粒
reduce_domain (Image, NotLarge, ParticlesRed)
去掉小噪点
* 圆形腐蚀,去掉毛刺和噪点
opening_circle (SmallRaw, Small, 2.5)
常用的圆形膨胀,腐蚀
closing_circle
opening_circle
Halcon [fill_up_shape],[close_circle],[dilation_circle]和[shape_trans]图像处理时填充区别
总结
Blob是用于查找连通的点,本文主要讲解了常用的几个图像处理的方法。Blob是最常用的图像预处理方式。用于找到对应的图像位置,区域,面积大小和坐标。如果要对图像进行更加深入的分析,则需要更加深入的机器视觉解决方案。


 被折叠的 条评论
为什么被折叠?
被折叠的 条评论
为什么被折叠?
 到【灌水乐园】发言


