


Nginx(“engine x”)是一款是由俄罗斯的程序设计师Igor Sysoev所开发高性能的Web和反向代理服务器,也是一个 IMAP/POP3/SMTP 代理服务器。它的cpu、内存等资源消耗较低,运行非常稳定,因稳定性、丰富的功能集、简单的配置文件和低系统资源的消耗而闻名。在高连接并发的情况下,Nginx是Apache服务器不错的替代品。
目录
一、应用场景
- HTTP服务器:Nginx本身是一个静态资源服务器,当只有静态资源的时候可以用作服务器,如果一个网站只有静态页面的话,可以通过该方式进行部署。
- 静态服务器:部分静态服务器通常会提供一个上传功能,其他应用如果需要静态资源就从该服务器中获取。
- 反向代理(Reverse Proxy):以代理服务器来接受 Internet 上的连接请求,然后将请求转发给内部网络上的服务器,并将从服务器上得到的结果返回给Internet上请求连接的客户端,此时代理服务器对外表现为一个反向代理服务器。简单说就是真实的服务器不能被外部网络直接访问,需要一台代理服务器,该服务器能被外网访问且跟真实服务器在同一个网络环境,代理服务器和真实服务器可以是同一台,设置不同端口即可,可以通过指令proxy_pass指令实现。
- 负载均衡:分摊到多个操作单元上进行执行,例如Web服务器、FTP服务器、企业关键应用服务器和其它关键任务服务器等,从而共同完成工作任务,当有2台及以上服务器时,根据规则随机将请求分发到指定服务器上处理,负载均衡配置一般都需要同时配置反向代理,再通过反向代理跳转到负载均衡,目前自带3种负载均衡策略(轮询、权重、ip_hash),还有2种常用的第三方策略(fair、url_hash),通过upstream指令来实现。
- 动静分离:动态网站的动态网页根据特定规则把不变的资源和经常变的资源区分开,做好拆分之后可以根据静态资源的特点将其做缓存操作,这也是网站静态化处理的核心思路。
二、安装教程
2.1 环境安装
2.1.1 安装gcc环境
# yum install gcc-c++
2.1.2 第三方开发包
- PERE(Perl Compatible Regular Expressions)是一个Perl库,包括 perl 兼容的正则表达式库,nginx的http模块使用pcre来解析正则表达式,所以需要在linux上安装pcre库。pcre-devel是使用pcre开发的一个二次开发库。
# yum install -y pcre pcre-devel - zlib库提供了很多种压缩和解压缩的方式,nginx使用zlib对http包的内容进行gzip,所以需要在linux上安装zlib库。
# yum install -y zlib zlib-devel - OpenSSL 是一个强大的安全套接字层密码库,囊括主要的密码算法、常用的密钥和证书封装管理功能及SSL协议,并提供丰富的应用程序供测试或其它目的使用。nginx不仅支持http协议,还支持https(即在ssl协议上传输http),所以需要在linux安装openssl库。
# yum -y install pcre pcre-devel zlib zlib-devel openssl openssl-devel
2.2 安装Nginx
2.2.1 下载安装包并解压
从Nginx官网http://nginx.org/en/download.html下载安装包并解压到/usr/local下面。

2.2.2 创建MakeFile文件
进入安装后的nginx目录中,使用cofigure命令创建一个MakeFile文件。
./configure \
--prefix=/usr/local/nginx \
--pid-path=/var/run/nginx/nginx.pid \
--lock-path=/var/lock/nginx.lock \
--error-log-path=/var/log/nginx/error.log \
--http-log-path=/var/log/nginx/access.log \
--with-http_gzip_static_module \
--http-client-body-temp-path=/var/temp/nginx/client \
--http-proxy-temp-path=/var/temp/nginx/proxy \
--http-fastcgi-temp-path=/var/temp/nginx/fastcgi \
--http-uwsgi-temp-path=/var/temp/nginx/uwsgi \
--http-scgi-temp-path=/var/temp/nginx/scgi \--with-http_stub_status_module \--with-http_ssl_module \--with-file-aio \--with-http_realip_module

2.2.3 指定临时文件目录
在/var下创建temp及nginx目录,-p 表示级联创建的意思。
# mkdir /var/temp/nginx -p
2.2.4 编译并安装
执行make命令进行编译
# make
执行make install 命令进行安装
# make install
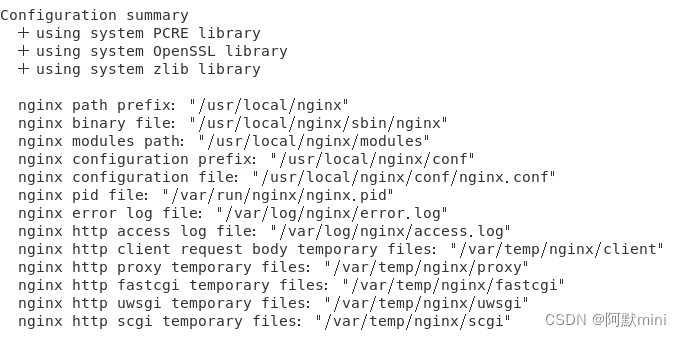
查看安装位置/usr/local/nginx目录结构

其中html是里面首页html文件,conf里面是配置文件,sbin里面可执行文件。
2.3 启动Nginx
进入sbin目录,执行命令./nginx
# ./nginx
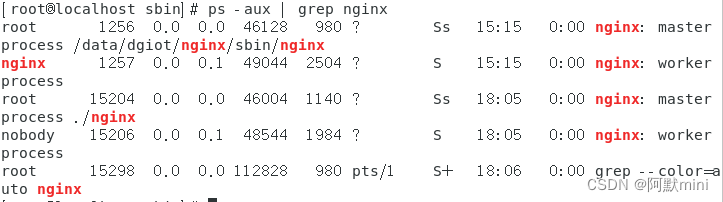
查看nginx是否启动
# ps -aux | grep nginx
2.4 关闭并重启Nginx
# ./nginx -s quit(/stop)		# 关闭 Nginx
# ./nginx 		# 启动 Nginx
# ./nginx -s reload				# 刷新配置文件
# ./nginx -s reopen            # 重启 Nginx
2.5 关闭防火墙,开启远程访问
- 方法一:永久开放80端口
/sbin/iptables -I INPUT -p tcp --dport 80 -j ACCEPT /etc/rc.d/init.d/iptables save - 方法二:临时关闭系统防火墙
# service iptables stop - 方法三:永久关闭修改配置开机不启动防火墙
# chkconfig iptables off
三、配置虚拟主机
在一台服务器启动多个网站,如何区分主要有两种方式:端口不同、域名不同。
3.1 通过端口区分不同主机
配置文件路径:/usr/local/nginx/conf/nginx.conf
原始配置文件内容如下所示
#user  nobody;
worker_processes  1;

#error_log  logs/error.log;
#error_log  logs/error.log  notice;
#error_log  logs/error.log  info;

#pid        logs/nginx.pid;


events {
    worker_connections  1024;
}


http {
    include       mime.types;
    default_type  application/octet-stream;

    #log_format  main  '$remote_addr - $remote_user [$time_local] "$request" '
    #                  '$status $body_bytes_sent "$http_referer" '
    #                  '"$http_user_agent" "$http_x_forwarded_for"';

    #access_log  logs/access.log  main;

    sendfile        on;
    #tcp_nopush     on;

    #keepalive_timeout  0;
    keepalive_timeout  65;

    #gzip  on;

    server {
        listen       80;
        server_name  localhost;

        #charset koi8-r;

        #access_log  logs/host.access.log  main;

        location / {
            root   html;
            index  index.html index.htm;
        }

        #error_page  404              /404.html;

        # redirect server error pages to the static page /50x.html
        #
        error_page   500 502 503 504  /50x.html;
        location = /50x.html {
            root   html;
        }

        # proxy the PHP scripts to Apache listening on 127.0.0.1:80
        #
        #location ~ \.php$ {
        #    proxy_pass   http://127.0.0.1;
        #}

        # pass the PHP scripts to FastCGI server listening on 127.0.0.1:9000
        #
        #location ~ \.php$ {
        #    root           html;
        #    fastcgi_pass   127.0.0.1:9000;
        #    fastcgi_index  index.php;
        #    fastcgi_param  SCRIPT_FILENAME  /scripts$fastcgi_script_name;
        #    include        fastcgi_params;
        #}

        # deny access to .htaccess files, if Apache's document root
        # concurs with nginx's one
        #
        #location ~ /\.ht {
        #    deny  all;
        #}
    }


    # another virtual host using mix of IP-, name-, and port-based configuration
    #
    #server {
    #    listen       8000;
    #    listen       somename:8080;
    #    server_name  somename  alias  another.alias;

    #    location / {
    #        root   html;
    #        index  index.html index.htm;
    #    }
    #}


    # HTTPS server
    #
    #server {
    #    listen       443 ssl;
    #    server_name  localhost;

    #    ssl_certificate      cert.pem;
    #    ssl_certificate_key  cert.key;

    #    ssl_session_cache    shared:SSL:1m;
    #    ssl_session_timeout  5m;

    #    ssl_ciphers  HIGH:!aNULL:!MD5;
    #    ssl_prefer_server_ciphers  on;

    #    location / {
    #        root   html;
    #        index  index.html index.htm;
    #    }
    #}

}
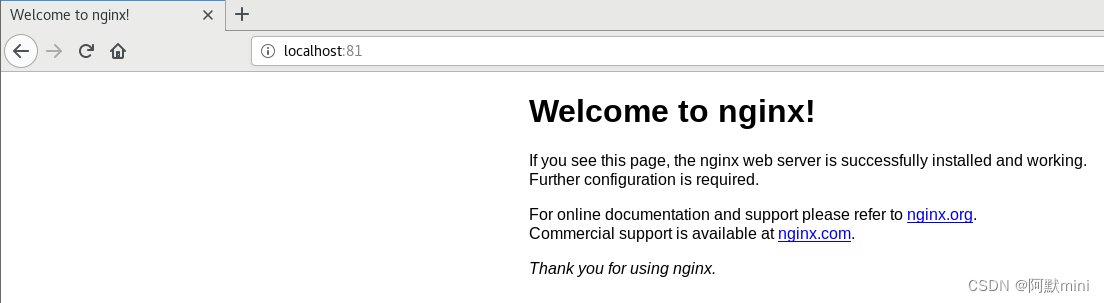
可以通过新增配置多个server,从而配置多个虚拟机。
    server {
        listen       81;
        server_name  localhost;

        #charset koi8-r;

        #access_log  logs/host.access.log  main;

        location / {
            root   html-new;
            index  index.html index.htm;
        }
3.2 通过域名区分不同主机
首先对nginx进行相应配置,将server_name和root进行修改,然后修改本地hosts配置文件(新增行:当前ip地址 www.baidu.com),复制html目录并进行修改,刷新配置文件后访问域名即可。
    server {
        listen       80;
        server_name  www.baidu.com;

        #charset koi8-r;

        #access_log  logs/host.access.log  main;

        location / {
            root   html-baidu;
            index  index.html index.htm;
        }
# 当前ip地址 www.baidu.com		#在hosts配置文件中修改
# cp -r html html-baidu		#复制目录
# 可选择修改index.html文件方便区分
# ./nginx -s reload
总结
之前由于项目原因安装了docker镜像,使用起来还是相对简洁易用的,这次准备安装之后好好体验一下Nginx的各大功能,所以又重新安装了正式版本,之后会将遇到的问题和后续的使用体验继续在本文进行更新。
【参考链接】


 4666
4666

 被折叠的 条评论
为什么被折叠?
被折叠的 条评论
为什么被折叠?
 到【灌水乐园】发言


