


 本文详细介绍了如何从零开始搭建WebSocket服务,包括在Spring Boot中添加依赖、配置WebSocket,创建服务端连接,并在前端HTML页面中实现WebSocket连接。通过这个过程,读者可以了解到WebSocket的基本用法以及在实际应用中的消息传递方式。同时,文章提到了在Tomcat部署时可能遇到的问题以及解决方案。
1.添加pom依赖
        <!--websocket依赖包-->
        <dependency>
            <groupId>org.springframework.boot</groupId>
            <artifactId>spring-boot-starter-websocket</artifactId>
        </dependency>
2.添加配置文件
@Configuration
public class WebSocketConfig {
    /**
     * 注入ServerEndpointExporter之后,
     *
     * 这个bean会自动注册使用了@ServerEndpoint注解声明的websocket
     * @return
     */
    @Bean
    public ServerEndpointExporter serverEndpointExporter() {
        return new ServerEndpointExporter();
    }
}
3.服务端webSocket连接
@ServerEndpoint(value = "/websocket/{name}/{password}")// websocket连接点映射.
@Component
public class ChatSocket {
//静态变量,用来记录当前在线连接数。应该把它设计成线程安全的。
private static int onlineCount = 0;
//concurrent包的线程安全Set,用来存放每个客户端对应的MyWebSocket对象。
private static CopyOnWriteArraySet<ChatSocket> webSocketSet = new CopyOnWriteArraySet<ChatSocket>();
//与某个客户端的连接会话,需要通过它来给客户端发送数据
private Session session;
//接收sid
private String sid = "";
/**
* 成功建立连接调用的方法.
*/
@OnOpen
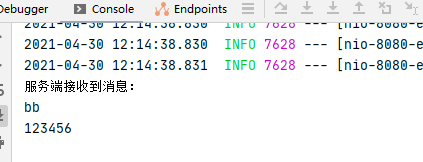
public void onOpen(Session session, @PathParam("name") String name, @PathParam("password") String password) {
System.out.println("服务端接收到消息:");
System.out.println(name);
System.out.println(password);
}
/**
* 连接关闭调用的方法.
*/
@OnClose
public void onClose() {
}
/*
* 收到客户端消息后调用的方法.
*/
@OnMessage
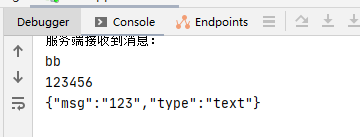
public void onMessage(String message, Session session) {
System.out.println(message);
}
/**
* 发生错误时调用.
*/
@OnError
public void onError(Session session, Throwable error) {
}
}
4.html页面websocket编写
<!DOCTYPE html>
<html lang="en">
<head>
<meta charset="UTF-8">
<title>Title</title>
<script src="http://libs.baidu.com/jquery/2.1.4/jquery.min.js"></script>
</head>
<style>
.clearfix {
zoom: 1;
}
.clearfix:after {
display: block;
content: '';
clear: both;
height: 0;
visibility: hidden;
}
.header, .footer {
height: 70px;
text-align: center;
}
.content {
margin: 0 auto;
width: 1000px;
}
.side {
float: left;
height: 500px;
width: 280px;
}
.main {
float: right;
height: 500px;
width: 700px;
}
</style>
<body>
<div class="content clearfix">
<div class="side">
<p>聊天列表</p>
<!-- <div style="width: 100px;height: 200px;outline: 1px darkkhaki solid;"></div>-->
<div id="ownerchatList" style="width: 200px;height: 300px;border: 1px solid black">
</div>
</div>
<div class="main">
<div style="overflow-y:auto; overflow-x:auto; width:400px; height:400px;outline: 1px darkkhaki solid;margin-top: 20px"
id="message">
</div>
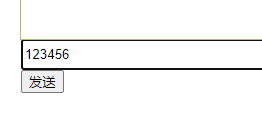
<div style="width: 450px;height: 30px;">
<div style="width: 450px;height: 30px;">
<input type="text" id="text" style="width: 397px;height: 25px" name="text"/>
<button onclick="send()" id="btnAdd" >发送</button>
</div>
</div>
<div></div>
</div>
<table>
<tbody id="tbody"></tbody>
</table>
</div>
<div class="footer">
<p>消息提醒</p>
<div id="tixing" style="width: 350px;height: 150px;border: 1px solid black;margin-left: 620px">
</div>
</div>
<script>
var websocket = null;
var name = 'bb'
var passwords = '123456'
var serverPaths = 'localhost:8080'
window.onload = conectWebSocket()
//连接对象.
function conectWebSocket() {
//判断当前的浏览器是否支持websocket.
if ("WebSocket" in window) {
url = "ws://" + serverPaths + "/websocket/" + name + "/" + passwords;
websocket = new WebSocket(url);
} else {
alert("Not support websocket");
return false;
}
//连接成功的方法.
websocket.onopen = function (event) {
setMessgeHtml("Loc MSG:连接成功");
}
//连接关闭.
websocket.onclose = function (event) {
setMessgeHtml("Loc MSG:连接关闭");
}
//连接异常.
websocket.onerror = function (event) {
setMessgeHtml("Loc MSG:连接异常");
}
websocket.onmessage = function (event) {
setMessgeHtml(event.data);
}
}
function closeWebSocket() {
this.websocket.close();
}
function setMessgeHtml(msg) {
var message = document.getElementById("message");
message.innerHTML += msg + "<br/>";
}
/**
发送消息.
*/
function send(){
var message = document.getElementById("text").value;
var socketMsg = {'msg':message ,'type':"text"}
websocket.send(JSON.stringify(socketMsg));//将json对象转换为json字符串.
$(" #text").val("");
}
</script>
</body>
</html>
websocket初步搭建完成
运行系统后,
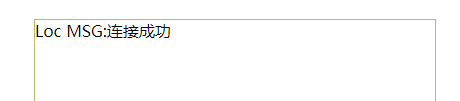
证明与服务端连接成功。
websocket是长连接,通过页面向服务端发送信息.
前端通过send()方法,将信息发送给服务器,其中将信息用json形式处理。因为一条正常的消息,可能是文本,可能是图片,可能是视频,我们必然需要一个type,如果每条消息都要保存进数据库,那么这条消息是谁发的,发送给谁,等等一系列字段都需要传入服务端。
用json序列化,就能很好的保存这些数据。
这样,websocket连接就基本搭建成功了。
注意这里还有一个小坑,如果项目是在tomcat种部署,也就是war包发布,必须要将WebSocketConfig 上的 @Configuration 和 @Bean注解注释掉。
因为新版的tomcat中已经集成了websocket,两者会冲突,注释掉后,系统就会直接使用tomcat的websocket。
第二个坑就是如果这里有使用 @Autowired 注解,注入service层,会报错。
一般的service注入是这样的
@Autowired
ServiceA serviceA;
但是在这里,要换一种写法:
private static ServiceA  serviceA;
@Autowired
public void setServiceA(ServiceA  serviceA) {
    ChatWebsocket.serviceA= serviceA;
}
源码会放在下一章,


 1061
1061


 到【灌水乐园】发言


