


1,Tracing系统
1.1基本概念:
(1)Tracing Sources、Tracing Sink以及前二者连接在一起的统一机制
(2)在Tracing模块中提供了Helper类,其已经定义好了Tracing Sources和Tracing Sink,如:AsciiTracingHelper:
1)ASCII Tracing:以ASCII格式的信息输出。在脚本程序的Simulator::Run()代码前添加如下代码:
AsciiTraceHelper ascii;
pointToPoint.EnableAsciiAll(ascii.CreateFileStream("myfirst.tr"));//“myfirst”可以改为具体的文件路径,就可以直接输出在那个地方。
其中,EnableAcsiiAll的作用是通知helper将所有关于point-ti-point设备的仿真信息都打印成ASCII Tracing格式。
下面运行改过的脚本:
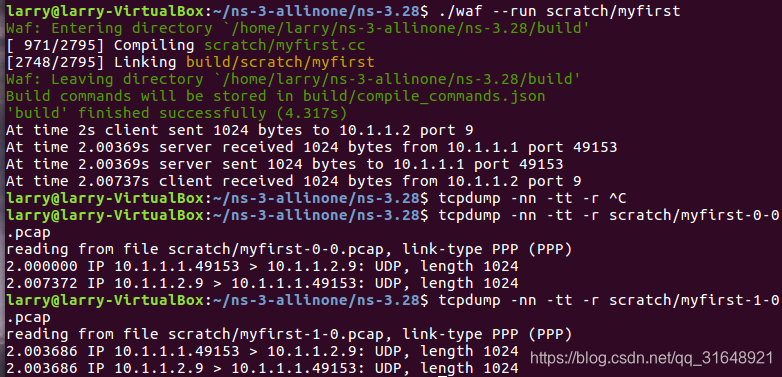
./waf --run scratch/myfirst
2)PCAP Tracing:以.pcap为后缀的格式文件,可使用Wireshark工具打开并分析,也还有其他工具可以,后续了解。只需要一句代码:
pointToPoint.EnablePcapAll("scratch/myfirst");
2,Logging系统
2,1 Logging系统的7个等级,由低到高
- LOG_ERROR——记录错误信息
- LOG_WARN——记录警告信息
- LOG_DEBUG——记录一些调试信息
- LOG_INFO——记录一些程序相关的信息
- LOG_FUNCTION——当有函数被调用时,该调用信息就被记录
- LOG_LOGIC——对于整体逻辑的描述
- LOG_ALL——包含上述的所有信息
注:每个LOG_TYPE对应一个LOG_LEVEL_TYPE,即LOG_FUNCTION和LOG_LEVEL_FUNCTION的功能是一样的
1)有效化系统记录模块
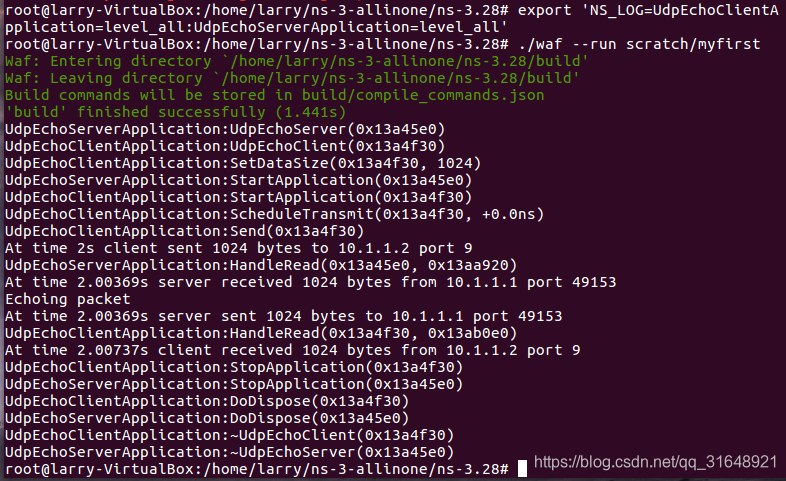
LogComponetEnable(agr1,agr2)函数的作用是使记录模块有效。参数1是具有一定行为能力的类组件字符串(如:UdpEchoClientApplication,),参数2是显示等级(如:LOG_LEVEL_INFO)。等级越高,输出信息详细
2)通过环境变量修改系统等级
export 'NS_LOG=UdpEchoClientApplication=level_all:UdpEchoServerApplication=level_all'
注:进入root用户
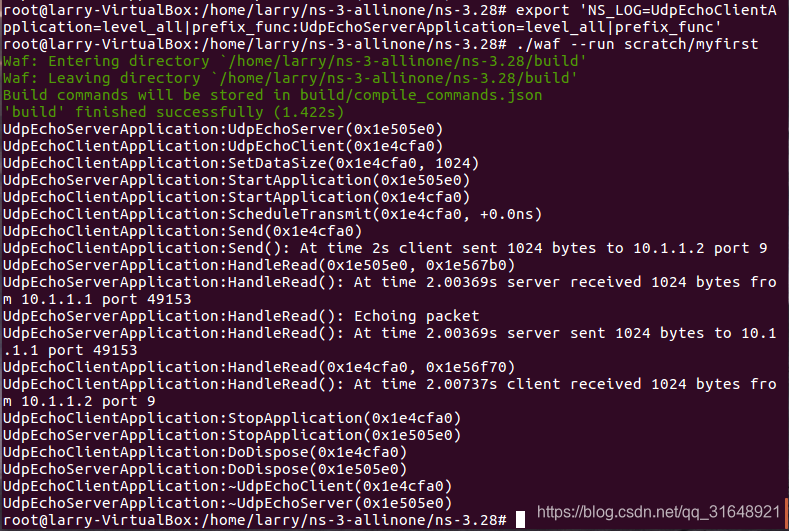
3)添加附加前缀
想知道信息是在何时由什么函数生成的,以便调试代码以达到想要的效果。
可使用NS_LOG环境变量增加更多的字符串参数来实现这一效果
- 添加prefix_func为每条信息显示其产生函数,(每条信息前多了函数名)
export 'NS_LOG=UdpEchoClientApplication=level_all|prefix_func:UdpEchoServerApplication=level_all|prefix_func'
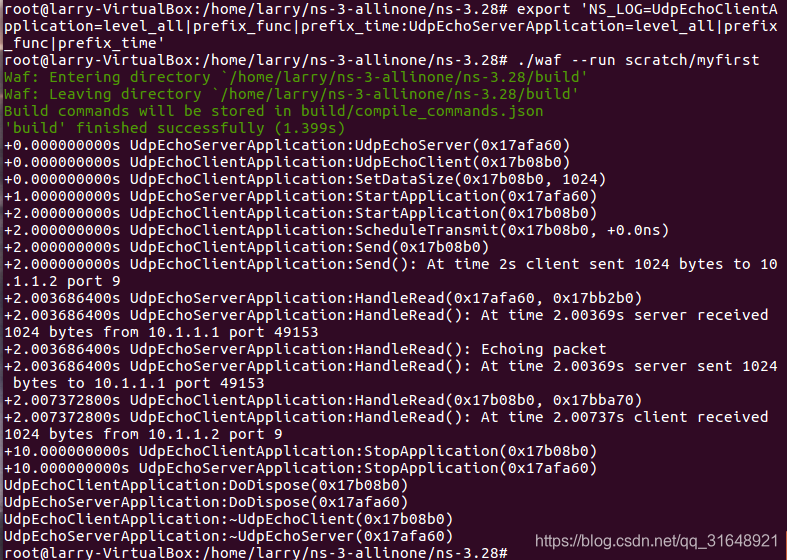
- 函数调用时间以及各事件发生时间,增加prefix_time;(每条信息前多了时间)
export 'NS_LOG=UdpEchoClientApplication=level_all|prefix_func|prefix_time:UdpEchoServerApplication=level_all|prefix_func|prefix_time'
4)自定义Logging代码
在first.cc脚本中,有一句代码:
NS_LOG_COMPONENT_DEFINE (“FirstScriptExample”);
作用:向ns-3系统注册一个名为“FirstScriptExample”的记录组件。只有定义了记录组件,才能在仿真脚本中使用Logging系统来自定义输出语句。
在first.cc中,
- 添加语句:NS_LOG_INFO(“Creating Topology”)(这条语句要在创建节点之前添加),
- 同时需要激活有效化这个自定义的记录组件,有以下两个方法:
(1)在脚本中添加代码:(此方法测试失败)
LogComponentEnable("FirstScriptExample",NS_LOG_INFO);
(2)通过设置环境变量(可行)
export 'NS_LOG=FirstScriptExample=info'
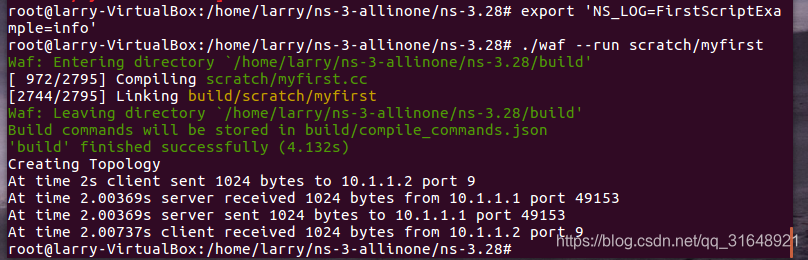
备注:(1)一定要想系统注册自己的组件,(2)激活已注册好的组件,建议使用环境变量的方法
3, 命令行参数
1)修改系统已有参数
通过命令行传递参数来改变脚本中的变量
//用户可用命令行来访问代码中全局变量和NS3的属性
  CommandLine cmd;
  cmd.Parse (argc, argv);
在编译脚本时附加一些额外信息:
--PrintHelper //Print this help message
--PrintGroups //print the list of groups
--PrintTypeIds //print all TypeIds
--PrintGroup=[group] //print all typeIds of group
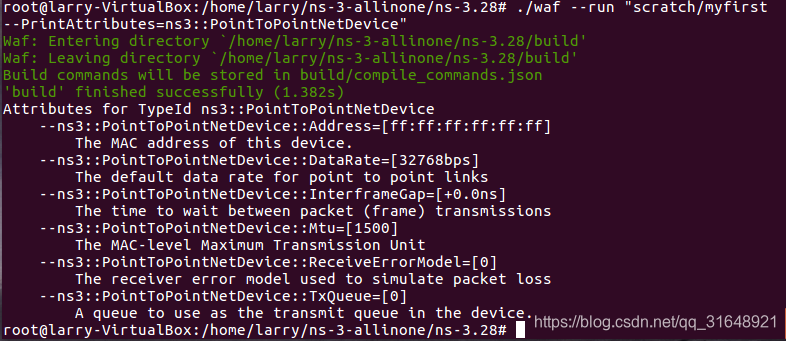
--PrintAttributes=[typeid] //print all attributes of typeid
--PrintGlobals //print the list of globals
2) 钩挂自定义变量
在ns3中添加自己的变量,通过钩挂将其与命令行相关联。
- 要确定要挂钩的变量
echoClient.SetAttribute (“MaxPackets”, UintegerValue (1));
此代码限制了MaxPackets属性是固定的,若想实现在命令行编译脚本时自定义,那么可做如下改动:
int
main (int argc, char *argv[])
{
//添加一个变量
uint32_t nPackets = 1;

  //用户可用命令行来访问代码中全局变量和NS3的属性
  CommandLine cmd;
  cmd.AddValue("nPackets","Number of packets to echo",nPackets);  //使nPackets可以在命令行修改

  cmd.Parse (argc, argv);//此代码一定要放在前三行代码之后

 echoClient.SetAttribute ("MaxPackets", UintegerValue (nPackets));//可以在命令行中修改变量nPackets值来随意改变分组的数量
结果输出:
root@larry-VirtualBox:/home/larry/ns-3-allinone/ns-3.28# ./waf --run "scratch/myfirst --PrintHelp"
Waf: Entering directory `/home/larry/ns-3-allinone/ns-3.28/build'
[ 972/2795] Compiling scratch/myfirst.cc
[2728/2795] Linking build/scratch/myfirst
Waf: Leaving directory `/home/larry/ns-3-allinone/ns-3.28/build'
Build commands will be stored in build/compile_commands.json
'build' finished successfully (4.127s)
myfirst [Program Arguments] [General Arguments]

Program Arguments:
    --nPackets:  Number of packets to echo [1]

General Arguments:
    --PrintGlobals:              Print the list of globals.
    --PrintGroups:               Print the list of groups.
    --PrintGroup=[group]:        Print all TypeIds of group.
    --PrintTypeIds:              Print all TypeIds.
    --PrintAttributes=[typeid]:  Print all attributes of typeid.
    --PrintHelp:                 Print this help message.
注:“cmd.AddValue(“nPackets”,“Number of packets to echo”,nPackets)”,其中,参数1对应nPackets;参数2对应解释;参数3对应的变量
下面是测试结果:
root@larry-VirtualBox:/home/larry/ns-3-allinone/ns-3.28# ./waf --run "scratch/myfirst --nPackets=2"
Waf: Entering directory `/home/larry/ns-3-allinone/ns-3.28/build'
Waf: Leaving directory `/home/larry/ns-3-allinone/ns-3.28/build'
Build commands will be stored in build/compile_commands.json
'build' finished successfully (1.620s)
Creating Topology
At time 2s client sent 1024 bytes to 10.1.1.2 port 9
At time 2.00369s server received 1024 bytes from 10.1.1.1 port 49153
At time 2.00369s server sent 1024 bytes to 10.1.1.1 port 49153
At time 2.00737s client received 1024 bytes from 10.1.1.2 port 9
At time 3s client sent 1024 bytes to 10.1.1.2 port 9
At time 3.00369s server received 1024 bytes from 10.1.1.1 port 49153
At time 3.00369s server sent 1024 bytes to 10.1.1.1 port 49153
At time 3.00737s client received 1024 bytes from 10.1.1.2 port 9
root@larry-VirtualBox:/home/larry/ns-3-allinone/ns-3.28#
注:这里发送了两次分组
4 网络分析工具
4.1 TcpDump (dump the traffic on a network)
(1)TcpDump读取pcap文件,基本输出格式:
系统时间来源主机.端口 > 目标主机.端口数据分组
(2)TcpDump采用命令行方式,详细命令格式为:
TcpDump[-adeflnNOpqStvx][-c数量][-F文件名][-i网络接口][-r文件名][-s snaplen][-T 类型][-w 文件名][表达式]
TcpDump选项简介
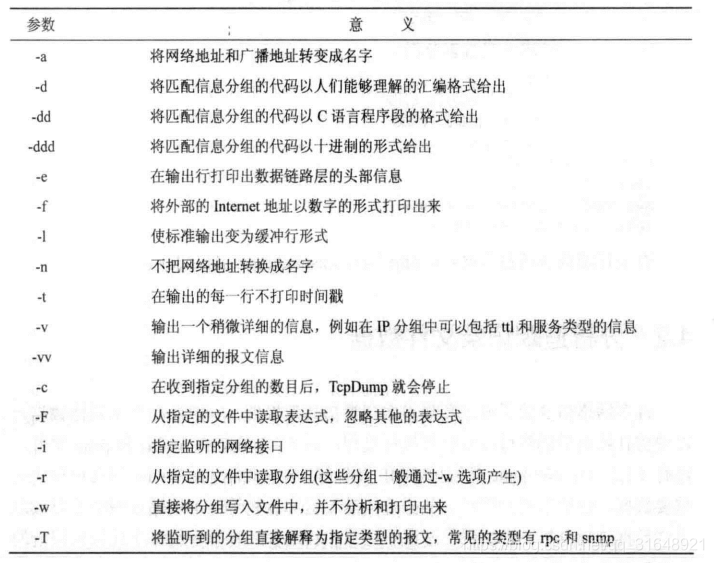
TcpDump事例
4.2 Wireshark
Wireshark比TcpDump更强大,界面友好,又称Ethereal,是一个图形用户界面的网络分组封装分析软件
装了windows版本的
5,统计模块status
5.1 status目的与概述


 2078
2078

 被折叠的 条评论
为什么被折叠?
被折叠的 条评论
为什么被折叠?
 到【灌水乐园】发言


