


 本文深入讲解Canvas绘图技术,涵盖坐标系统变换、矩形绘制、颜色应用、渐变色与图案填充,以及阴影效果实现。从基本概念到高级技巧,全方位解析Canvas绘图的奥秘。
1 坐标体系
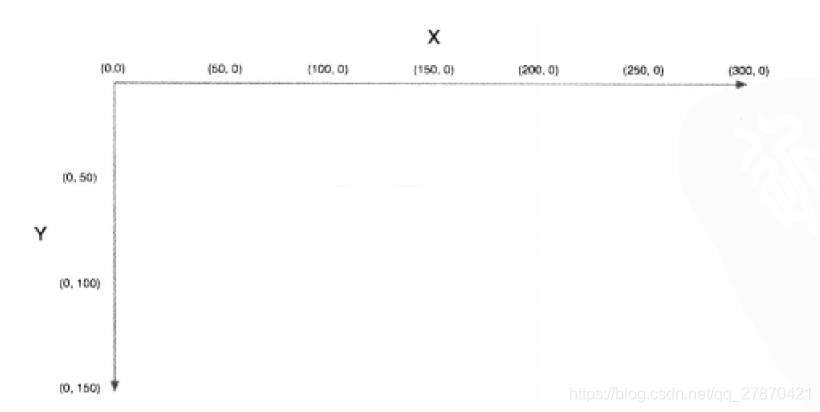
在默认愔况下,Canvas的坐标系统如下图所示,它以canvas的左上角为原点,X坐标向 右方增长,而Y坐标则向下方延伸。下图所画的,是一个具有默认300X 150像素大小的 canvas坐标系。
然而,Canvas的坐标系并不是固定的。正如图2-3中所示,可以对坐标系统进行平移及旋转。 事实上,可以采用如下方式来变换坐标系统:
•平移(translate)
•旋转(rotate)
•缩放(scale)
•创建自定义的变换方式,例如切变
2 矩形的绘制
Canvas的API提供T如下三个方法,分别用于矩形的清除、描边及填充:
- clearRect(double x, double y, double w, double h)
- strokeRect(double x, double y, double w, double h)
- fillRect(double x,double y, double w, double h)
| 方法 | 描述 |
|---|---|
| clearRect(double x, double y, double w, double h) | 将指定矩形与当前剪辑区域相交范阑内的所有像索清除。 在默认情况下,剪辑区域的大小就是整个个canvas。所 以,如果你没有改动剪辑区域的话,那么在参数所指范围内的所有像素部会被清除。 所谓“淸除像素”,指的是将其颜色设置为全透明的黑色。这在实际效果上就等同于“擦除” (erase)或者 “渚除"(clear) 了某个像素,从而使得canvas的背景可以透过该像素显示出来 |
| strokeRect(double x, double y, double w, double h) | 使用如下属性,为指定的矩形描边: •strokeStyle •lineWidth •lineJoin •miterLimit 如果宽度(w参数)或高度(h参数〉有一个为0的 话,那么该方法将会分别绘制一条竖线或横线。如果两者都是0,则不会绘制任何东西 |
| fillRect(double x, double y, double w, double h) | 使用fillStyle属性填允指定的矩形。如果宽度或髙度都为0的话,那么该方法会以为调用者办了件傻事,所 以它不会进行任何绘制 |
实例:
<!DOCTYPE html>
<html>
<head>
    <title>A Simple Canvas Example</title>
</head>
<body>
    <!-- 通过设置width和height属性会改变canvas本身大小以及绘图大小 -->
    <!-- 通过css设置width和height只会改变canvas本身大小-->
    <canvas id="canvas" width="600" height="600">
        Canvas not supported(浏览器在不支持canvas元素时显示)
    </canvas>

<script>
    var canvas = document.getElementById('canvas'),
        context = canvas.getContext('2d');

        context.lineJoin = 'round';
        context.lineWidth = 30;

        context.font = '24px Helvetica';
        context.fillText('Click anywhere to erase', 175,40);

        context.strokeRect(75, 100, 200, 200);
        context.fillRect(325, 100, 200, 200);

        context.canvas.onmousedown = function () {
            context.clearRect(0, 0, canvas.width, canvas.height);
        }

</script>
</body>
</html>
3 颜色与透明色
可以向下面的这些例子一样设置颜色
#ff0fff
#642
rgb(100,100,100,0.8)
rgb(55,255,0)
hsl(0,62%,28%)
hsla(0,82%,33%,0.6)
antiquewhite(古董白)
burlywood(硬木色或实木色)
cadetblue(军服蓝)
context.strokeStyle = "rgb(100,100,100,0.8);"
4 渐变色与图案
除了颜色值之外,也可以为strokeStyle与fillStyle属性指定渐变色与图案。
4.1 渐变色
Canvas元素支持线性(linear)渐变与放射(radial)渐变。
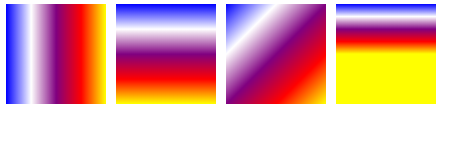
线性渐变
createLinearGradient()用来创建线性渐变。
需要向该方 法传入两个点的x、y坐标,两点之间的连线就是canvas建立颜色渐变效果的依据。调用 createLinearGradient()方法之后,该方法会返回一个CanvasGradient实例。最后,应用程序将该渐变色设置为fillStyle属性的值,这样的话,接下来调用fill()方法时,都会使用此渐变色进行填充,直到将填充属性设置成其他值为止。
在创建好渐变色之后,该段代码通过调用CanvasGradient之中唯一的方法addColorStop()来向 渐变色中增加5个“颜色停止点”(color stop)。该方法接受两个参数:一个是位于0〜1.0之间的 double值,代表颜色停止点在渐变线上的位置:另一个是DOMString类型的CSS3颜色字串值。
<!DOCTYPE html>
<html>
<head>
    <title>A Simple Canvas Example</title>
</head>
<body>
    <!-- 通过设置width和height属性会改变canvas本身大小以及绘图大小 -->
    <!-- 通过css设置width和height只会改变canvas本身大小-->
    <canvas id="canvas" width="600" height="600">
        Canvas not supported(浏览器在不支持canvas元素时显示)
    </canvas>

<script>
    var canvas = document.getElementById('canvas'),
    context = canvas.getContext('2d');

    // 第一个
    var gradient = context.createLinearGradient(0, 0,100, 0);
    gradient.addColorStop(0,	'blue');
    gradient.addColorStop(0.25, 'white');
    gradient.addColorStop(0.5, 'purple');
    gradient.addColorStop(0.75, 'red');
    gradient.addColorStop(1,'yellow');

    context.fillStyle = gradient;
    context.fillRect(0, 0, 100, 100);

    // 第二个
    gradient = context.createLinearGradient(0, 0, 0, 100);
    gradient.addColorStop(0,	'blue');
    gradient.addColorStop(0.25, 'white');
    gradient.addColorStop(0.5, 'purple');
    gradient.addColorStop(0.75, 'red');
    gradient.addColorStop(1,'yellow');

    context.fillStyle = gradient;
    context.fillRect(110, 0, 100, 100);

    // 第三个
    var gradient0 = context.createLinearGradient(220, 0, 320, 100);
    gradient0.addColorStop(0,	'blue');
    gradient0.addColorStop(0.25, 'white');
    gradient0.addColorStop(0.5, 'purple');
    gradient0.addColorStop(0.75, 'red');
    gradient0.addColorStop(1,'yellow');

    context.fillStyle = gradient0;
    context.fillRect(220, 0, 100, 100);

    // 第四个
    gradient = context.createLinearGradient(0, 0, 0, 50);
    gradient.addColorStop(0,	'blue');
    gradient.addColorStop(0.25, 'white');
    gradient.addColorStop(0.5, 'purple');
    gradient.addColorStop(0.75, 'red');
    gradient.addColorStop(1,'yellow');

    context.fillStyle = gradient;
    context.fillRect(330, 0, 100, 100);

</script>
</body>
</html>
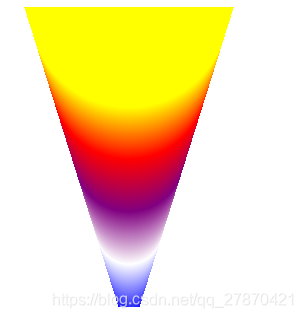
放射渐变
createRadialGradient()用来创建线性渐变。
创建线性渐变时需要指定一条渐变线。要创建放射渐变,必须指定两个圆形,它们表示某个圆锥的起止部位。
如下代码在canvas底部指定/一个半径为10像素的小圆,又在顶部指定了一个半径为100 像素的大圆,然后根据这两个圆来创建放射渐变效果。这两个圆在水平方向上都与canvas呈居中 对齐的关系。
与 createLinearGradient()方法一样,createRadialGradient()方法也会返回一个 CanvasGradient 的实例。应用程序的代码在渐变色中加入了 4个颜色停止点,然后将该渐变色设置为fillStyle属 性的值。
请注意,该段代码是要将整个canvas都以该渐变色来填充。然而,与线性渐变不同,放射渐变的填充范围仅局限于由传递给createRadialGradient()方法的那两个圆形所定义的圆锥区域内, 而不是像线性渐变那样,使用最后一个渐变色来填充渐变线以外的区域。
<!DOCTYPE html>
<html>
<head>
    <title>A Simple Canvas Example</title>
</head>
<body>
    <!-- 通过设置width和height属性会改变canvas本身大小以及绘图大小 -->
    <!-- 通过css设置width和height只会改变canvas本身大小-->
    <canvas id="canvas" width="600" height="600">
        Canvas not supported(浏览器在不支持canvas元素时显示)
    </canvas>

<script>
    var canvas = document.getElementById('canvas'),
    context = canvas.getContext('2d');

    var gradient = context.createRadialGradient(canvas.width/2, canvas.height, 10, canvas.width/2, 0, 100);
    gradient.addColorStop(0,	'blue');
    gradient.addColorStop(0.25, 'white');
    gradient.addColorStop(0.5, 'purple');
    gradient.addColorStop(0.75, 'red');
    gradient.addColorStop(1,'yellow');

    context.fillStyle = gradient;
    context.rect(0, 0, canvas.width, canvas.height);
    context.fill();

</script>
</body>
</html>
4.2 图案
使用createPattera()方法来创建图案。
除了颜色与渐变色,Canvas元素也允许使用图案来对图形和文本进行描边与填充。这里的图 案可以是以下三种之一:image元素、canvas元素或video元素。
可以用createPattera()方法来创建图案,该方法接收两个参数:图案本身,以及一个用来告 知浏览器应该如何重复图案的字符串。第二个参数可以取如下的值:repeat, repeat-x, repeat-y或no-repeat。
<!DOCTYPE html>
<html>
<body>

<img src="pwx.png" id="lamp" />
<p>Canvas:</p>

<button onclick="draw('repeat')">Repeat</button>
<button onclick="draw('repeat-x')">Repeat-x</button>
<button onclick="draw('repeat-y')">Repeat-y</button>
<button onclick="draw('no-repeat')">No-repeat</button>

<canvas id="myCanvas" width="300" height="150" style="border:1px solid #d3d3d3;">
    Your browser does not support the HTML5 canvas tag.</canvas>

<script type="text/javascript">
    function draw(direction) {
        var c=document.getElementById("myCanvas");
        var ctx=c.getContext("2d");
        ctx.clearRect(0,0,c.width,c.height);
        var img=document.getElementById("lamp")
        var pat=ctx.createPattern(img,direction);
        ctx.rect(0,0,150,100);
        ctx.fillStyle=pat;
        ctx.fill();
    }
</script>

</body>
</html>
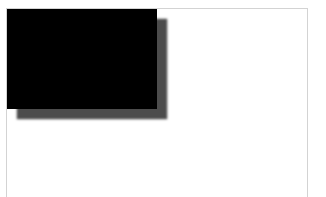
5 阴影
在canvas之中进行绘制时,不管要画的是图形、文本,还是图像,都可以通过修改绘图环境 中的如下4个属性值来指定阴影效果:
| 参数 | 描述 |
|---|---|
| shadowBlur | 表示阴影效果如果延伸的double值。浏览器在阴影之上运用高斯模糊时,将会用到该值。 它与像素无关,只会被用在高斯模糊方程之中。其默认值为0 |
| shadowColor | CSS3格式的颜色字符。默认值是rgba(0,0,0,0),意思是完全透明的黑色 |
| shadowOffsetX | 阴影在X轴方向的偏移量,以像素为单位。默认值是0 |
| shadowOffsetY | 阴影在Y轴方向的偏移量,以像素为单位。默认值是0 |
如果满足以下条件,那么使用Canvas的绘图环境对象就可以绘制出阴影效果了:
1.指定的shadowColor值不是全透明的。
2.在其余的阴影厲性之中,存在一个非0的值。
var c = document.getElementById("myCanvas");
var context = c.getContext("2d");

context.shadowColor = "rgb(0,0,0,0.7)";
context.shadowOffsetX = 10;
context.shadowOffsetY = 10;
context.shadowBlur = 2;

context.rect(0,0,150,100);
context.fillStyle="with";
context.fill();


 3918
3918

 被折叠的 条评论
为什么被折叠?
被折叠的 条评论
为什么被折叠?
 到【灌水乐园】发言


