


 本文详细介绍了使用Go语言Martini框架开发Web服务的过程,包括环境搭建、代码实现、使用curl和ab工具进行测试的方法及结果分析,适合初学者快速掌握Go语言Web开发。
项目地址
一、概述
开发简单 web 服务程序 cloudgo,了解 web 服务器工作原理。
任务目标
- 熟悉 go 服务器工作原理
- 基于现有 web 库,编写一个简单 web 应用类似 cloudgo。
- 使用 curl 工具访问 web 程序
- 对 web 执行压力测试
相关知识
课件:http://blog.youkuaiyun.com/pmlpml/article/details/78404838
二、任务要求
基本要求
- 编程 web 服务程序 类似 cloudgo 应用。
- 要求有详细的注释
- 是否使用框架、选哪个框架自己决定 请在 README.md 说明决策的依据
- 使用 curl 测试,将测试结果写入 README.md。
- 使用 ab 测试,将测试结果写入 README.md。并解释重要参数。
扩展要求
选择以下一个或多个任务,以博客的形式提交。
- 选择 net/http 源码,通过源码分析、解释一些关键功能实现
- 选择简单的库,如 mux 等,通过源码分析、解释它是如何实现扩展的原理,包括一些 golang 程序设计技巧。
- 在 docker hub 申请账号,从 github 构建 cloudgo 的 docker 镜像,最后在 Amazon 云容器服务中部署。
- 实现 Github - Travis CI - Docker hub - Amazon “不落地"云软件开发流水线
- 其他 web 开发话题
三、实验过程
编程 cloudgo
选择使用 Martini 框架,Martini 是一个非常新的 Go 语言的 Web 框架,使用 Go 的 net/http 接口开发,类似 Sinatra 或者 Flask 之类的框架,也可使用自己的 DB 层、会话管理和模板。其特性如下:
- 使用极其简单
- 无侵入式的设计
- 很好的与其他的 Go 语言包协同使用
- 超赞的路径匹配和路由
- 模块化的设计 - 容易插入功能插件,也容易将其拔出来
- 已有很多的中间件可以直接使用
- 框架内已拥有很好的开箱即用的功能支持
- 完全兼容 http.HandleFunc 接口
安装 Martini 的包:
go get github.com/go-martini/martini
在 cloudgo 文件夹中创建 main.go 和 service 文件夹(内有 service.go)。具体代码如下:
main.go
package main

import (
	"os"

	"github.com/github-user/cloudgo/service"
	flag "github.com/spf13/pflag"
)

const (
	PORT string = "8080" //设置默认端口为8080
)

func main() {
	//如果没有监听到端口,则设为默认端口
	port := os.Getenv("PORT")
	if len(port) == 0 {
		port = PORT
	}

	//允许用户可以通过-p来设置端口
	pPort := flag.StringP("port", "p", "PORT", "PORT for httpd listening")
	flag.Parse()
	if len(*pPort) != 0 {
		port = *pPort
	}

	service.NewServer(port) //新建服务
	//server.Run(":" + port) //服务启动
}
service.go
package service

import "github.com/go-martini/martini"

func NewServer(port string) {
	m := martini.Classic() //创建一个martini实例

	m.Get("/", func(params martini.Params) string { //接受对\的GET方法请求,第二个参数是对请求的处理方法
		return "Hello world!"
	})

	m.RunOnAddr(":" + port)
}
运行程序:
go run main.go -p8080

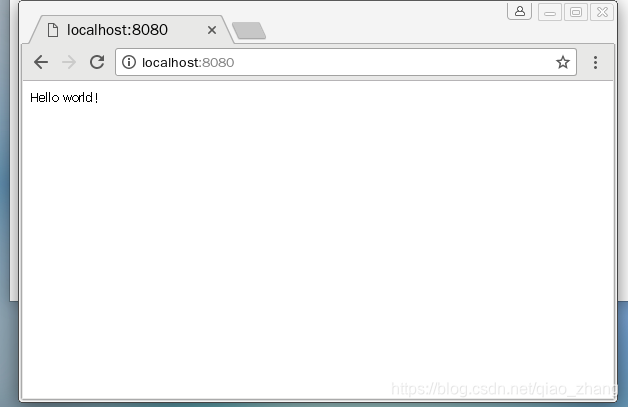
打开网页 http://localhost:8080,可以看到“Hello world!”显示在网页上。
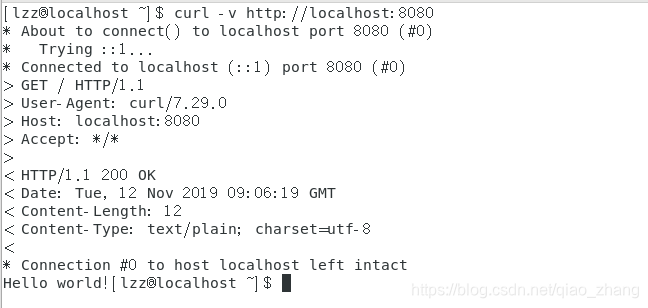
使用 curl 测试
在另一个终端输入命令:
curl -v http://localhost:8080
使用 ab 测试
安装 Apache web 压力测试程序:
sudo yum -y install httpd-tools
执行压力测试:
ab -n 1000 -c 100 http://localhost:8080/
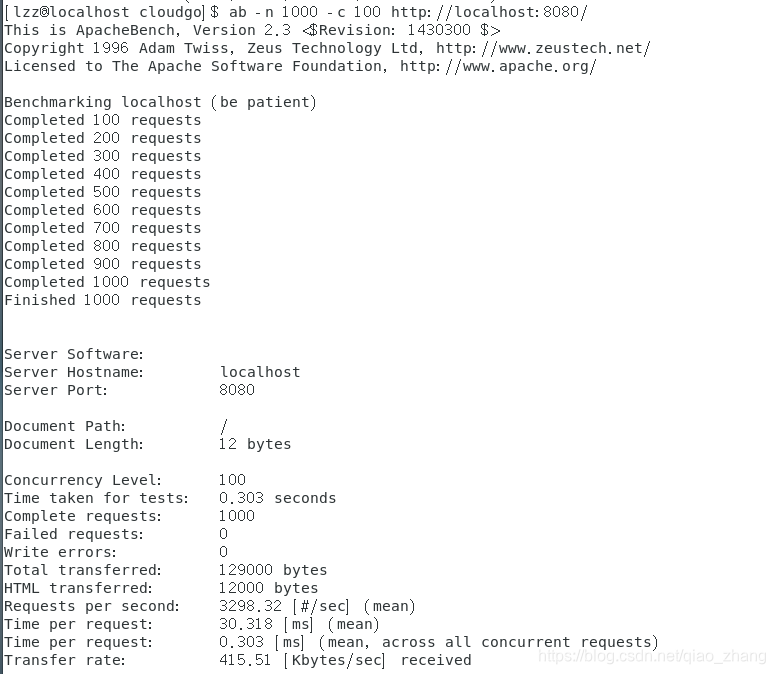
ab 命令最基本的参数是 -n 和 -c:
- -n:执行的请求数量
- -c:并发请求个数
其他参数:
- -t:测试所进行的最大秒数
- -p:包含了所需要 POST 的数据的文件
- -T:POST 数据所使用的 Content-type 头信息
- -k:启用 HTTP KeepAlive 功能,即在一个 HTTP 会话中执行多个请求,默认时,不启用 KeepAlive 功能
测试结果解释如下:
Document Path: / ###请求的资源
Document Length: 12 bytes ###文档返回的长度
Concurrency Level: 100 ###并发个数
Time taken for tests: 0.303 seconds ###总请求时间
Complete requests: 1000 ###总请求数
Failed requests: 0 ###失败的请求数
Write errors: 0
Total transferred: 129000 bytes
HTML transferred: 12000 bytes
Requests per second: 3298.32 [#/sec] (mean) ###平均每秒的请求数
Time per request: 30.318 [ms] (mean) ###平均每个请求消耗的时间
Time per request: 0.303 [ms] (mean, across all concurrent requests) ###上面的请求除以并发数
Transfer rate: 415.51 [Kbytes/sec] received ###传输速率
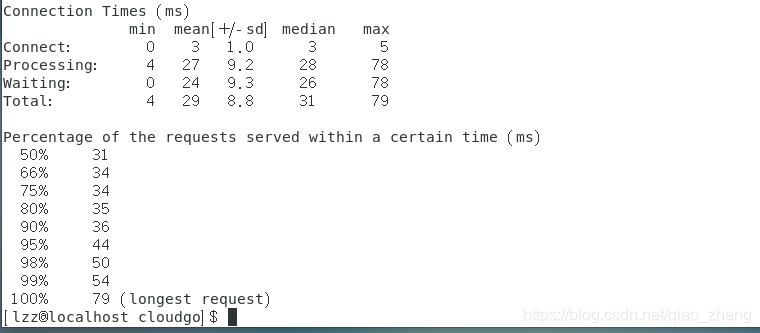
Connection Times (ms)
min mean[+/-sd] median max
Connect: 0 3 1.0 3 5
Processing: 4 27 9.2 28 78
Waiting: 0 24 9.3 26 78
Total: 4 29 8.8 31 79
Percentage of the requests served within a certain time (ms)
50% 31 ###50%的请求都在31ms内完成
66% 34
75% 34
80% 35
90% 36
95% 44
98% 50
99% 54
100% 79 (longest request)
对压力测试结果重点关注指标:
- 吞吐率(Requests per second):服务器并发处理能力的量化描述,单位是 reqs/s,指的是在某个并发用户数下单位时间内处理的请求数。某个并发用户数下单位时间内能处理的最大请求数,称之为最大吞吐率。计算公式:总请求数/处理完成这些请求数所花费的时间,即 Request per second = Complete requests / Time taken for tests。
- 用户平均请求等待事件(Time per request):计算公式:处理完成所有请求数所花费的时间/(总请求数/并发用户数),即 Time per request = Time taken for tests / (Complete requests/Concurrency Level)。
- 服务器平均请求等待时间(Time per request: across all concurrent requests):计算公式:处理完成所有请求数所花费的时间/总请求数,即 Time taken for / testsComplete requests。可以看到,它是吞吐率的倒数。同时,它也等于用户平均请求等待时间/并发用户数,即 Time per request / Concurrency Level。


 520
520

 被折叠的 条评论
为什么被折叠?
被折叠的 条评论
为什么被折叠?
 到【灌水乐园】发言


