


在这个故事中,我提供了一个超快速的教程,展示如何使用本地 GraphRAG、Langchain 和本地 LLM 创建一个 AI,以便为您的 PDF 制作一个强大的代理聊天机器人,供您商业或个人使用。
GraphRAG 是一种 RAG,它结合了知识图谱和生成 AI 技术,以回答传统 RAG 难以处理的查询。
在我上一个 视频 中,我们使用 API 开发了一个知识图谱,但这次我们正在创建一个高级算法,我们可以完全控制我们的数据。这听起来很棒。
但这里有一个关键点:通过这种方法,您可以完全调整和自定义您的应用程序,以完美符合您的需求。
我想创建这个故事,带您了解我找到的最简单的方法,以便您可以设置并提升您的 AI 聊天机器人知识。
让我给您演示一个实时聊天机器人的简单示例,让您了解我的意思。
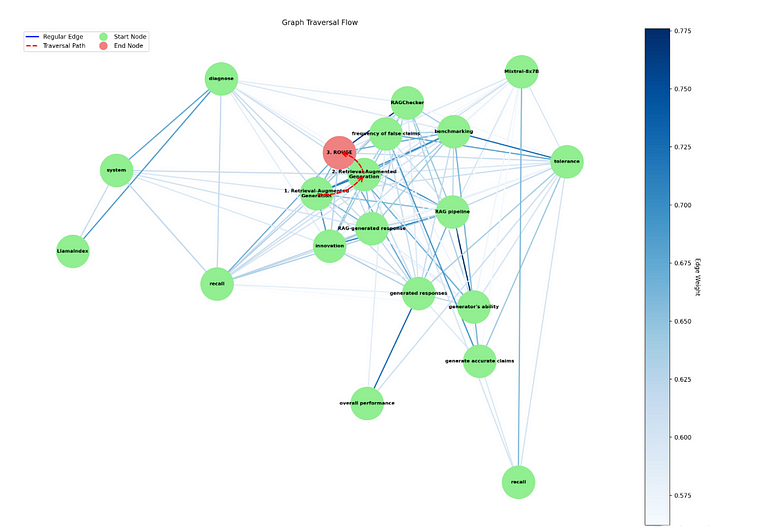
让我给您一个简单的例子:什么是 RagChecker?如果您还没有看过这个 视频,我强烈推荐您观看。RagChecker 比 Ragas 好得多。如果您查看本地 Raggraph 如何生成输出,您会发现当用户提出问题时,它会将问题转换为向量,并在存储的向量中搜索,以找到最相关的信息块。我们使用 Dijkstra 算法,它可以找到点之间的最短路径,来探索知识图谱。我们从与用户问题最相关的节点开始。
在探索每个节点时,它会将信息添加到不断增长的上下文中。如果这个上下文没有完全回答问题,它会查看相邻节点,并根据连接强度更新它们的重要性。它会继续这个过程,直到找到完整的答案。如果它无法从图中找到完整的答案,它会使用大型语言模型根据累积的上下文生成一个答案。知识图谱然后通过节点表示文本块,边表示它们之间的关系进行可视化。边缘用浅蓝色着色,以指示连接的强度。用于找到答案的路径用弯曲的虚线箭头突出显示,该路径的起点和终点分别用绿色和红色标记。
现在,让我们开始如何使用本地 Graphrag 构建 AI 聊天机器人的指南。在创建这个聊天机器人时,我有很多选择。我花了几周时间提升技能,探索各种可用技术。我已经熟悉了 Langchain、spacy、sklearn、自然语言工具包和其他库,这些库使我们能够轻松定义和与不同类型的抽象进行交互,从而使构建强大的聊天机器人变得简单。
import networkx as nx
from langchain_community.vectorstores import FAISS
from langchain_text_splitters import RecursiveCharacterTextSplitter
from langchain_core.prompts import PromptTemplate
from langchain.retrievers import ContextualCompressionRetriever
from langchain.retrievers.document_compressors import LLMChainExtractor
from langchain_community.callbacks import get_openai_callback
from langchain_community.document_loaders import PyPDFLoader
from sklearn.metrics.pairwise import cosine_similarity
import matplotlib.pyplot as plt
import matplotlib.patches as patches
import os
import sys
from dotenv import load_dotenv
from langchain_openai import ChatOpenAI
from langchain_ollama.chat_models import ChatOllama
from typing import List, Tuple, Dict
from nltk.stem import WordNetLemmatizer
from langchain_core.pydantic_v1 import BaseModel, Field
import nltk
import spacy
import heapq
from langchain_openai import OpenAIEmbeddings
import streamlit as st
from concurrent.futures import ThreadPoolExecutor, as_completed
from tqdm import tqdm
import numpy as np
from streamlit_chat import message
from spacy.cli import
我定义了一个文档处理器,它通过将文档拆分成较小的部分、创建嵌入并比较这些嵌入来查找相似性。我们创建一个函数来处理文档。然后,它创建一个“向量存储”,其中每个文本块与其嵌入一起存储,这使得以后搜索和比较不同块变得更加容易。有时,你需要处理大量文本,而一次性处理所有文本的速度较慢。
它有助于将文本分成较小的批次,为每个批次创建嵌入,并将它们合并成一个大的列表。然后,它比较所有这些嵌入,以查看它们彼此的相似程度。我使用余弦相似度,这是一种测量两个事物在数学意义上接近程度的高级方法。
# Define the DocumentProcessor class
class DocumentProcessor:
    def __init__(self):
        """
        Initializes the DocumentProcessor with a text splitter and OpenAI embeddings.

        Attributes:
        - text_splitter: An instance of RecursiveCharacterTextSplitter with specified chunk size and overlap.
        - embeddings: An instance of OpenAIEmbeddings used for embedding documents.
        """
        self.text_splitter = RecursiveCharacterTextSplitter(chunk_size=1000, chunk_overlap=200)
        self.embeddings = OpenAIEmbeddings()

    def process_documents(self, documents):
        """
        Processes a list of documents by splitting them into smaller chunks and creating a vector store.

        Args:
        - documents (list of str): A list of documents to be processed.

        Returns:
        - tuple: A tuple containing:
          - splits (list of str): The list of split document chunks.
          - vector_store (FAISS): A FAISS vector store created from the split document chunks and their embeddings.
        """
        splits = self.text_splitter.split_documents(documents)
        vector_store = FAISS.from_documents(splits, self.embeddings)
        return splits, vector_store

    def create_embeddings_batch(self, texts, batch_size=32):
        """
        Creates embeddings for a list of texts in batches.

        Args:
        - texts (list of str): A list of texts to be embedded.
        - batch_size (int, optional): The number of texts to process in each batch. Default is 32.

        Returns:
        - numpy.ndarray: An array of embeddings for the input texts.
        """
        embeddings = []
        for i in range(0, len(texts), batch_size):
            batch = texts[i:i+batch_size]
            batch_embeddings = self.embeddings.embed_documents(batch)
            embeddings.extend(batch_embeddings)
        return np.array(embeddings)

    def compute_similarity_matrix(self, embeddings):
        """
        Computes a cosine similarity matrix for a given set of embeddings.

        Args:
        - embeddings (numpy.ndarray): An array of embeddings.

        Returns:
        - numpy.ndarray: A cosine similarity matrix for the input embeddings.
        """
        return cosine_similarity(embeddings)
接下来,我创建了一个知识图谱,以组织信息并展示不同想法之间的联系。可以想象成构建一张地图,其中每个想法或信息都是一个点(节点),而如果这些想法相似或相关,则用线(边)连接这些点。在这个类的核心是一个使用 networkx 构建的图结构。
我还使用了一个词形还原器,将单词简化为其基本形式,确保能够准确识别和比较相似的概念。concept_cache 充当内存库,存储先前识别的概念,以防止冗余处理,从而加快操作。edges_threshold 确定两个概念在图中连接之前需要多相似。
接下来,我创建了一个 build_graph 函数来集成所有这些组件。它将每个文档拆分作为节点添加到图中,创建嵌入以帮助系统分析和识别相似性,使用大型语言模型从每个拆分中提取关键概念,并最终在概念足够相似时用边连接节点。
# Define the KnowledgeGraph class
class KnowledgeGraph:
    def __init__(self):
        """
        Initializes the KnowledgeGraph with a graph, lemmatizer, and NLP model.

        Attributes:
        - graph: An instance of a networkx Graph.
        - lemmatizer: An instance of WordNetLemmatizer.
        - concept_cache: A dictionary to cache extracted concepts.
        - nlp: An instance of a spaCy NLP model.
        - edges_threshold: A float value that sets the threshold for adding edges based on similarity.
        """
        self.graph = nx.Graph()
        self.lemmatizer = WordNetLemmatizer()
        self.concept_cache = {}
        self.nlp = self._load_spacy_model()
        self.edges_threshold = 0.8

    def build_graph(self, splits, llm, embedding_model):
        """
        Builds the knowledge graph by adding nodes, creating embeddings, extracting concepts, and adding edges.

        Args:
        - splits (list): A list of document splits.
        - llm: An instance of a large language model.
        - embedding_model: An instance of an embedding model.

        Returns:
        - None
        """
        self._add_nodes(splits)
        embeddings = self._create_embeddings(splits, embedding_model)
        self._extract_concepts(splits, llm)
        self._add_edges(embeddings)

    def _add_nodes(self, splits):
        """
        Adds nodes to the graph from the document splits.

        Args:
        - splits (list): A list of document splits.

        Returns:
        - None
        """
        for i, split in enumerate(splits):
            self.graph.add_node(i, content=split.page_content)
在这一部分,我创建了 create_embedding 函数,该函数接受文档部分并为每个文档创建嵌入。我们从每个部分收集文本,并使用嵌入模型将这些文本转换为数值嵌入。
然后,它返回这些嵌入的数组,每个条目代表一个文档部分。接下来,我们创建一个 compute 函数来计算这些嵌入之间的相似性。测量余弦相似度可以确定文档不同部分的相似程度。
余弦相似度比较两个数字或向量集,值接近 1 表示高度相似。最后,我使用 Spacy 模型函数来加载 spaCy 的特定 NLP 模型,如果需要,这是一个用于理解和处理文本的工具。
def _create_embeddings(self, splits, embedding_model):
        """
        Creates embeddings for the document splits using the embedding model.

        Args:
        - splits (list): A list of document splits.
        - embedding_model: An instance of an embedding model.

        Returns:
        - numpy.ndarray: An array of embeddings for the document splits.
        """
        texts = [split.page_content for split in splits]
        return embedding_model.embed_documents(texts)

    def _compute_similarities(self, embeddings):
        """
        Computes the cosine similarity matrix for the embeddings.

        Args:
        - embeddings (numpy.ndarray): An array of embeddings.

        Returns:
        - numpy.ndarray: A cosine similarity matrix for the embeddings.
        """
        return cosine_similarity(embeddings)

    def _load_spacy_model(self):
        """
        Loads the spaCy NLP model, downloading it if necessary.

        Args:
        - None

        Returns:
        - spacy.Language: An instance of a spaCy NLP model.
        """
        try:
            return spacy.load("en_core_web_sm")
        except OSError:
            print("Downloading spaCy model...")
            download("en_core_web_sm")
            return spacy.load("en_core_web_sm")
让我们创建 extract_concepts_and_entities 函数,该函数负责从给定文本中提取重要概念和命名实体,例如人名或地名。它同时使用 spaCy 和大型语言模型(LLM)来实现这一目标。它检查内容是否已经被处理和缓存,以避免重复工作。如果没有,它会使用 spaCy 查找命名实体。
然后,我们使用 _extract_concepts 函数同时从多个文档部分提取概念,以加快处理速度。它使用 ThreadPoolExecutor 同时处理各种任务,每个任务涉及调用 _extract_concepts_and_entities 函数以处理不同的文档部分。当每个任务完成时,它会更新图形中找到的概念,并使用 tqdm 显示进度。
接下来,我们创建 _add_edges,它根据文档部分之间的相似性和共享概念在图中添加连接或边。它使用嵌入计算每个部分与其他部分的相似性。
如果每对部分的相似性分数超过某个阈值,它会找到共享概念,并根据相似性和共享概念计算边的权重。最后,它使用这些连接更新图,详细说明相似性分数、边权重和共享概念,同时使用 tqdm 跟踪进度。
def _extract_concepts_and_entities(self, content, llm):
        """
        Extracts concepts and named entities from the content using spaCy and a large language model.

        Args:
        - content (str): The content from which to extract concepts and entities.
        - llm: An instance of a large language model.

        Returns:
        - list: A list of extracted concepts and entities.
        """
        if content in self.concept_cache:
            return self.concept_cache[content]

        # Extract named entities using spaCy
        doc = self.nlp(content)
        named_entities = [ent.text for ent in doc.ents if ent.label_ in ["PERSON", "ORG", "GPE", "WORK_OF_ART"]]

        # Extract general concepts using LLM
        concept_extraction_prompt = PromptTemplate(
            input_variables=["text"],
            template="Extract key concepts (excluding named entities) from the following text:\n\n{text}\n\nKey concepts:"
        )
        concept_chain = concept_extraction_prompt | llm.with_structured_output(Concepts)
        general_concepts = concept_chain.invoke({"text": content}).concepts_list

        # Combine named entities and general concepts
        all_concepts = list(set(named_entities + general_concepts))

        self.concept_cache[content] = all_concepts
        return all_concepts

    def _extract_concepts(self, splits, llm):
        """
        Extracts concepts for all document splits using multi-threading.

        Args:
        - splits (list): A list of document splits.
        - llm: An instance of a large language model.

        Returns:
        - None
        """
        with ThreadPoolExecutor() as executor:
            future_to_node = {executor.submit(self._extract_concepts_and_entities, split.page_content, llm): i
                              for i, split in enumerate(splits)}

            for future in tqdm(as_completed(future_to_node), total=len(splits), desc="Extracting concepts and entities"):
                node = future_to_node[future]
                concepts = future.result()
                self.graph.nodes[node]['concepts'] = concepts

    def _add_edges(self, embeddings):
        """
        Adds edges to the graph based on the similarity of embeddings and shared concepts.

        Args:
        - embeddings (numpy.ndarray): An array of embeddings for the document splits.

        Returns:
        - None
        """
        similarity_matrix = self._compute_similarities(embeddings)
        num_nodes = len(self.graph.nodes)

        for node1 in tqdm(range(num_nodes), desc="Adding edges"):
            for node2 in range(node1 + 1, num_nodes):
                similarity_score = similarity_matrix[node1][node2]
                if similarity_score > self.edges_threshold:
                    edge_weight = self._calculate_edge_weight(node1, node2, similarity_score, shared_concepts)
                    self.graph.add_edge(node1, node2, weight=edge_weight,
                                        similarity=similarity_score,
                                        shared_concepts=list(shared_concepts))
然后,我们创建一个边权重函数来计算最大可能的共享概念和实际共享概念的比例。它将这些与相似性分数结合,使用 alpha 和 beta 来权衡它们的重要性。
最终的边权重表示两个部分之间的连接强度。接下来,lemmatize_concept 函数通过将概念转换为小写、将其拆分为单词并使用词形还原器将每个单词简化为其根形式来简化概念。然后,它将这些根单词组合回一个字符串中。
  def _calculate_edge_weight(self, node1, node2, similarity_score, shared_concepts, alpha=0.7, beta=0.3):
        """
        Calculates the weight of an edge based on similarity score and shared concepts.

        Args:
        - node1 (int): The first node.
        - node2 (int): The second node.
        - similarity_score (float): The similarity score between the nodes.
        - shared_concepts (set): The set of shared concepts between the nodes.
        - alpha (float, optional): The weight of the similarity score. Default is 0.7.
        - beta (float, optional): The weight of the shared concepts. Default is 0.3.

        Returns:
        - float: The calculated weight of the edge.
        """
        max_possible_shared = min(len(self.graph.nodes[node1]['concepts']), len(self.graph.nodes[node2]['concepts']))
        normalized_shared_concepts = len(shared_concepts) / max_possible_shared if max_possible_shared > 0 else 0
        return alpha * similarity_score + beta * normalized_shared_concepts

    def _lemmatize_concept(self, concept):
        """
        Lemmatizes a given concept.

        Args:
        - concept (str): The concept to be lemmatized.

        Returns:
        - str: The lemmatized concept.
        """
        return ' '.join([self.lemmatizer.lemmatize(word) for word in concept.lower().split()])
我们定义了 QueryEngine 类,以帮助使用各种信息源回答问题。它依赖于三个主要组件:vector_store,保存文本的数值表示;knowledge_graph,一个用于存储和连接不同主题信息的结构;以及一个帮助理解和生成文本的大型语言模型。
我初始化了 QueryEngine,存储这些组件并设置限制,以控制它同时可以处理的上下文量(max_context_length)。它还创建了一个专门的工具 answer_check_chain,以验证答案的完整性。
_create_answer_check_chain 方法建立一个系统,以确定提供的上下文是否完全回答查询,通过一个提示询问上下文是否完成答案。
_check_answer 使用此链评估提供的上下文是否回答了查询。它将查询和上下文发送到链中,然后评估上下文是否完全回答问题,并返回一个元组,指示答案是否完整。
# Define the QueryEngine class
class QueryEngine:
    def __init__(self, vector_store, knowledge_graph, llm):
        self.vector_store = vector_store
        self.knowledge_graph = knowledge_graph
        self.llm = llm
        self.max_context_length = 4000
        self.answer_check_chain = self._create_answer_check_chain()

    def _create_answer_check_chain(self):
        """
        Creates a chain to check if the context provides a complete answer to the query.

        Args:
        - None

        Returns:
        - Chain: A chain to check if the context provides a complete answer.
        """
        answer_check_prompt = PromptTemplate(
            input_variables=["query", "context"],
            template="Given the query: '{query}'\n\nAnd the current context:\n{context}\n\nDoes this context provide a complete answer to the query? If yes, provide the answer. If no, state that the answer is incomplete.\n\nIs complete answer (Yes/No):\nAnswer (if complete):"
        )
        return answer_check_prompt | self.llm.with_structured_output(AnswerCheck)

    def _check_answer(self, query: str, context: str) -> Tuple[bool, str]:
        """
        Checks if the current context provides a complete answer to the query.

        Args:
        - query (str): The query to be answered.
        - context (str): The current context.

        Returns:
        - tuple: A tuple containing:
          - is_complete (bool): Whether the context provides a complete answer.
          - answer (str): The answer based on the context, if complete.
        """
        response = self.answer_check_chain.invoke({"query": query, "context": context})
        return response.is_complete, response.answer
因此,让我们创建 _expand_context 函数,通过探索知识图谱和收集相关文档中的额外信息来改善查询理解。
它首先设置一些关键变量,以跟踪扩展的上下文、检查节点以及它找到的任何答案或概念。该函数使用优先队列查看和探索与初始文档最相似的节点,根据它们的连接强度将它们添加到队列中。然后,它查看优先级最高的节点,将其内容添加到上下文中,并检查这些新信息是否回答了查询。
如果答案不完整,它会继续探索带来新概念的邻近节点并更新它们的优先级。如果仍然没有找到完整的答案,它会使用大型语言模型(LLM)根据所有收集到的上下文生成答案。总之,_expand_context 通过仔细探索和扩展知识图谱中的相关信息来改善理解。
  def _expand_context(self, query: str, relevant_docs) -> Tuple[str, List[int], Dict[int, str], str]:
        """
        通过使用类似Dijkstra的方法遍历知识图谱来扩展上下文。

        此方法实现了Dijkstra算法的修改版本,以探索知识图谱,优先考虑最相关和强连接的信息。算法的工作方式如下:

        1. 初始化:
           - 从与最相关文档对应的节点开始。
           - 使用优先队列来管理遍历顺序,优先级基于连接强度。
           - 维护一个最佳已知“距离”(连接强度的逆)到每个节点的字典。

        2. 遍历:
           - 始终下一个探索优先级最高的节点(最强连接)。
           - 对于每个节点,检查是否已找到完整答案。
           - 探索节点的邻居,如果找到更强的连接,则更新它们的优先级。

        3. 概念处理:
           - 跟踪已访问的概念,以引导探索新相关信息。
           - 仅在引入新概念时扩展到邻居。

        4. 终止:
           - 如果找到完整答案,则停止。
           - 继续直到优先队列为空(所有可达节点已探索)。

        这种方法确保:
        - 我们优先考虑最相关和强连接的信息。
        - 我们系统地探索新概念。
        - 通过遵循知识图谱中的最强连接找到最相关的答案。

        参数:
        - query (str): 要回答的查询。
        - relevant_docs (List[Document]): 开始遍历的相关文档列表。

        返回:
        - tuple: 包含以下内容的元组:
          - expanded_context (str): 从遍历节点累积的上下文。
          - traversal_path (List[int]): 访问的节点索引序列。
          - filtered_content (Dict[int, str]): 节点索引到其内容的映射。
          - final_answer (str): 找到的最终答案(如果有)。
        """
        # 初始化变量
        expanded_context = ""
        traversal_path = []
        visited_concepts = set()
        filtered_content = {}
        final_answer = ""

        priority_queue = []
        distances = {}  # 存储到每个节点的最佳已知“距离”(连接强度的逆)

        print("\n遍历知识图谱:")

        # 用相关文档中的最近节点初始化优先队列
        for doc in relevant_docs:
            # 为每个相关文档找到知识图谱中最相似的节点
            closest_nodes = self.vector_store.similarity_search_with_score(doc.page_content, k=1)
            closest_node_content, similarity_score = closest_nodes[0]

            # 获取知识图谱中对应的节点
            closest_node = next(n for n in self.knowledge_graph.graph.nodes if self.knowledge_graph.graph.nodes[n]['content'] == closest_node_content.page_content)

            # 初始化优先级(相似度分数的逆以实现最小堆行为)
            priority = 1 / similarity_score
            heapq.heappush(priority_queue, (priority, closest_node))
            distances[closest_node] = priority

        step = 0
        while priority_queue:
            # 获取优先级最高的节点(距离值最低)
            current_priority, current_node = heapq.heappop(priority_queue)

            # 如果已经找到更好的路径到此节点,则跳过
            if current_priority > distances.get(current_node, float('inf')):
                continue

            if current_node not in traversal_path:
                step += 1
                traversal_path.append(current_node)
                node_content = self.knowledge_graph.graph.nodes[current_node]['content']
                node_concepts = self.knowledge_graph.graph.nodes[current_node]['concepts']

                # 将节点内容添加到我们的累积上下文中
                filtered_content[current_node] = node_content
                expanded_context += "\n" + node_content if expanded_context else node_content

                # 记录当前步骤以进行调试和可视化
                st.write(f"<span style='color:red;'>步骤 {step} - 节点 {current_node}:</span>", unsafe_allow_html=True)
                st.write(f"内容: {node_content[:100]}...")
                st.write(f"概念: {', '.join(node_concepts)}")
                print("-" * 50)


                    # 探索邻居
                    for neighbor in self.knowledge_graph.graph.neighbors(current_node):
                        edge_data = self.knowledge_graph.graph[current_node][neighbor]
                        edge_weight = edge_data['weight']

                        # 计算到邻居的新距离(优先级)
                        # 注意:我们使用1 / edge_weight,因为较高的权重意味着更强的连接
                        distance = current_priority + (1 / edge_weight)

                        # 如果找到到邻居的更强连接,则更新其距离
                        if distance < distances.get(neighbor, float('inf')):
                            distances[neighbor] = distance
                            heapq.heappush(priority_queue, (distance, neighbor))

                            # 如果邻居节点尚未在我们的遍历路径中,则处理该邻居节点
                            if neighbor not in traversal_path:
                                step += 1
                                traversal_path.append(neighbor)
                                neighbor_content = self.knowledge_graph.graph.nodes[neighbor]['content']
                                neighbor_concepts = self.knowledge_graph.graph.nodes[neighbor]['concepts']

                                filtered_content[neighbor] = neighbor_content
                                expanded_context += "\n" + neighbor_content if expanded_context else neighbor_content

                                # 记录邻居节点信息
                                st.write(f"<span style='color:red;'>步骤 {step} - 节点 {neighbor}({current_node}的邻居):</span>", unsafe_allow_html=True)
                                st.write(f"内容: {neighbor_content[:100]}...")
                                print(f"概念: {', '.join(neighbor_concepts)}")
                                print("-" * 50)

                                # 检查在添加邻居的内容后是否有完整答案
                                is_complete, answer = self._check_answer(query, expanded_context)
                                if is_complete:
                                    final_answer = answer
                                    break

                                # 处理邻居的概念
                                neighbor_concepts_set = set(self.knowledge_graph._lemmatize_concept(c) for c in neighbor_concepts)
                                if not neighbor_concepts_set.issubset(visited_concepts):
                                    visited_concepts.update(neighbor_concepts_set)

                # 如果找到最终答案,则跳出主循环
                if final_answer:
                    break

        # 如果未找到完整答案,则使用LLM生成一个
        if not final_answer:
            print("\n生成最终答案...")
            response_prompt = PromptTemplate(
                input_variables=["query", "context"],
                template="根据以下上下文,请回答查询。\n\n上下文: {context}\n\n查询: {query}\n\n答案:"
            )
            response_chain = response_prompt | self.llm
            input_data = {"query": query, "context": expanded_context}
            final_answer = response_chain.invoke(input_data)

        return expanded_context, traversal_path, filtered_content, final_answer
我们使查询函数处理回答查询的整个过程。它开始使用 _retrieve_relevant_documents 函数来获取与查询相关的文档。一旦获得这些文档,它就扩展上下文以更好地理解查询并寻找答案。
该函数跟踪通过知识图谱的路径并过滤内容,以关注重要内容。如果在此过程中未找到答案,它使用语言模型根据扩展的上下文生成最终答案。它打印有关使用的令牌和操作成本的信息。然后返回最终答案、通过知识图谱的路径和过滤后的内容。
_retrieve_relevant_documents 函数则专注于查找相关文档。它使用向量存储将查询与存储的文档进行比较,并识别最相关的文档。它使用压缩工具对这些文档进行精炼,以提供更集中的上下文,然后返回相关文档的列表。
 def query(self, query: str) -> Tuple[str, List[int], Dict[int, str]]:
        """
        通过检索相关文档、扩展上下文和生成最终答案来处理查询。

        参数:
        - query (str): 要回答的查询。

        返回:
        - tuple: 包含以下内容的元组:
          - final_answer (str): 查询的最终答案。
          - traversal_path (list): 知识图谱中节点的遍历路径。
          - filtered_content (dict): 节点的过滤内容。
        """
        with get_openai_callback() as cb:
            st.write(f"\n处理查询: {query}")
            relevant_docs = self._retrieve_relevant_documents(query)
            expanded_context, traversal_path, filtered_content, final_answer = self._expand_context(query, relevant_docs)

            if not final_answer:
                st.write("\n生成最终答案...")
                response_prompt = PromptTemplate(
                    input_variables=["query", "context"],
                    template="根据以下上下文,请回答查询。\n\n上下文: {context}\n\n查询: {query}\n\n答案:"
                )

                response_chain = response_prompt | self.llm
                input_data = {"query": query, "context": expanded_context}
                response = response_chain.invoke(input_data)
                final_answer = response
            else:
                st.write("\n在遍历过程中找到完整答案。")

            st.write(f"\n最终答案: {final_answer}")
            print(f"\n总令牌数: {cb.total_tokens}")
            print(f"提示令牌数: {cb.prompt_tokens}")
            print(f"完成令牌数: {cb.completion_tokens}")
            print(f"总成本(美元): ${cb.total_cost}")

        return final_answer, traversal_path, filtered_content

    def _retrieve_relevant_documents(self, query: str):
        """
        基于查询使用向量存储检索相关文档。

        参数:
        - query (str): 要回答的查询。

        返回:
        - list: 相关文档的列表。
        """
        print("\n检索相关文档...")
        retriever = self.vector_store.as_retriever(search_type="similarity", search_kwargs={"k": 5})
        compressor = LLMChainExtractor.from_llm(self.llm)
        compression_retriever = ContextualCompressionRetriever(base_compressor=compressor, base_retriever=retriever)
        return compression_retriever.invoke(query)
然后,我在Visualizer类中创建了visualize_traversal函数,以创建图的详细可视化图,并突出显示特定路径。它首先创建一个新图,复制原始图的节点和边。然后,它使用Matplotlib制作一个大型绘图区域来绘制图形。
该函数使用布局算法计算每个节点的位置,并以表示其权重的颜色绘制边,较重的边以不同的颜色显示。节点以浅蓝色显示。
该函数使用红色曲线箭头突出显示图中的路径,计算以确保节点之间的平滑曲线。它为每个节点标记其在路径中的位置和任何相关概念,并将这些标签放置在图上。路径的起始节点和结束节点分别以浅绿色和浅珊瑚色突出显示,以便于识别。
最后,该函数使用Streamlit显示此互动和信息丰富的图,以便于理解复杂的图形数据。
# Define the Visualizer class
class Visualizer:
    @staticmethod
    def visualize_traversal(graph, traversal_path):
        traversal_graph = nx.DiGraph()

        # Add nodes and edges from the original graph
        for node in graph.nodes():
            traversal_graph.add_node(node)
        for u, v, data in graph.edges(data=True):
            traversal_graph.add_edge(u, v, **data)

        fig, ax = plt.subplots(figsize=(16, 12))

        # Generate positions for all nodes
        pos = nx.spring_layout(traversal_graph, k=1, iterations=50)

        # Draw regular edges with color based on weight
        edges = traversal_graph.edges()
        edge_weights = [traversal_graph[u][v].get('weight', 0.5) for u, v in edges]
        nx.draw_networkx_edges(traversal_graph, pos,
                               edgelist=edges,
                               edge_color=edge_weights,
                               edge_cmap=plt.cm.Blues,
                               width=2,
                               ax=ax)

        # Draw nodes
        nx.draw_networkx_nodes(traversal_graph, pos,
                               node_color='lightblue',
                               node_size=3000,
                               ax=ax)

        # Draw traversal path with curved arrows
        edge_offset = 0.1
        for i in range(len(traversal_path) - 1):
            start = traversal_path[i]
            end = traversal_path[i + 1]
            start_pos = pos[start]
            end_pos = pos[end]

            # Calculate control point for curve
            mid_point = ((start_pos[0] + end_pos[0]) / 2, (start_pos[1] + end_pos[1]) / 2)
            control_point = (mid_point[0] + edge_offset, mid_point[1] + edge_offset)

            # Draw curved arrow
            arrow = patches.FancyArrowPatch(start_pos, end_pos,
                                            connectionstyle=f"arc3,rad={0.3}",
                                            color='red',
                                            arrowstyle="->",
                                            mutation_scale=20,
                                            linestyle='--',
                                            linewidth=2,
                                            zorder=4)
            ax.add_patch(arrow)

        # Prepare labels for the nodes
        labels = {}
        for i, node in enumerate(traversal_path):
            concepts = graph.nodes[node].get('concepts', [])
            label = f"{i + 1}. {concepts[0] if concepts else ''}"
            labels[node] = label

        for node in traversal_graph.nodes():
            if node not in labels:
                concepts = graph.nodes[node].get('concepts', [])
                labels[node] = concepts[0] if concepts else ''

        # Draw labels
        nx.draw_networkx_labels(traversal_graph, pos, labels, font_size=8, font_weight="bold", ax=ax)

        # Highlight start and end nodes
        start_node = traversal_path[0]
        end_node = traversal_path[-1]

        nx.draw_networkx_nodes(traversal_graph, pos,
                               nodelist=[start_node],
                               node_color='lightgreen',
                               node_size=3000,
                               ax=ax)

        nx.draw_networkx_nodes(traversal_graph, pos,
                               nodelist=[end_node],
                               node_color='lightcoral',
                               node_size=3000,
                               ax=ax)

        ax.set_title("Graph Traversal Flow")
        ax.axis('off')

        # Add colorbar for edge weights
        sm = plt.cm.ScalarMappable(cmap=plt.cm.Blues, norm=plt.Normalize(vmin=min(edge_weights), vmax=max(edge_weights)))
        sm.set_array([])
        cbar = fig.colorbar(sm, ax=ax, orientation='vertical', fraction=0.046, pad=0.04)
        cbar.set_label('Edge Weight', rotation=270, labelpad=15)

        # Add legend
        regular_line = plt.Line2D([0], [0], color='blue', linewidth=2, label='Regular Edge')
        traversal_line = plt.Line2D([0], [0], color='red', linewidth=2, linestyle='--', label='Traversal Path')
        start_point = plt.Line2D([0], [0], marker='o', color='w', markerfacecolor='lightgreen', markersize=15, label='Start Node')
        end_point = plt.Line2D([0], [0], marker='o', color='w', markerfacecolor='lightcoral', markersize=15, label='End Node')
        legend = plt.legend(handles=[regular_line, traversal_line, start_point, end_point], loc='upper left', bbox_to_anchor=(0, 1), ncol=2)
        legend.get_frame().set_alpha(0.8)

        plt.tight_layout()

        # Streamlit display
        st.pyplot(fig)
我们创建的GraphRAG类旨在以复杂的方式处理文档处理和查询。
当您创建一个实例时,它初始化所有必要的工具:一个大型语言模型来生成响应,一个嵌入模型将文本转换为数值格式,一个文档处理器来拆分和处理文档,以及一个知识图谱来组织和连接信息。
在处理文档时,该类将其拆分为块,将这些块转换为嵌入,然后构建一个连接所有信息片段的图。一旦文档被处理,我们可以提出问题,该类将搜索图以获取相关信息。它显示了如何找到答案并提供响应。
class GraphRAG:
    def __init__(self):
        """
        Initializes the GraphRAG system with components for document processing, knowledge graph construction,
        querying, and visualization.

        Attributes:
        - llm: An instance of a large language model (LLM) for generating responses.
        - embedding_model: An instance of an embedding model for document embeddings.
        - document_processor: An instance of the DocumentProcessor class for processing documents.
        - knowledge_graph: An instance of the KnowledgeGraph class for building and managing the knowledge graph.
        - query_engine: An instance of the QueryEngine class for handling queries (initialized as None).
        - visualizer: An instance of the Visualizer class for visualizing the knowledge graph traversal.
        """
        self.llm = ChatOpenAI(temperature=0, model_name="gpt-4o-mini", max_tokens=4000)
        self.embedding_model = OpenAIEmbeddings()
        self.document_processor = DocumentProcessor()
        self.knowledge_graph = KnowledgeGraph()
        self.query_engine = None
        self.visualizer = Visualizer()

    def process_documents(self, documents):
        """
        Processes a list of documents by splitting them into chunks, embedding them, and building a knowledge graph.

        Args:
        - documents (list of str): A list of documents to be processed.

        Returns:
        - None
        """
        splits, vector_store = self.document_processor.process_documents(documents)
        self.knowledge_graph.build_graph(splits, self.llm, self.embedding_model)
        self.query_engine = QueryEngine(vector_store, self.knowledge_graph, self.llm)

    def query(self, query: str):
        """
        Handles a query by retrieving relevant information from the knowledge graph and visualizing the traversal path.

        Args:
        - query (str): The query to be answered.

        Returns:
        - str: The response to the query.
        """
        response, traversal_path, filtered_content = self.query_engine.query(query)

        if traversal_path:
            self.visualizer.visualize_traversal(self.knowledge_graph.graph, traversal_path)
        else:
            print("No traversal path to visualize.")

        return response
最后,我们创建一个主函数,设置一个Streamlit应用程序,让用户通过聊天界面与PDF文档交互。
用户可以上传他们的PDF文件。上传文件后,应用程序会暂时保存它并处理它。如果PDF成功处理,应用程序会用欢迎消息初始化聊天历史,并设置显示聊天消息和输入表单的容器。
用户可以在文本输入框中输入有关PDF的问题。当他们提交查询时,应用程序使用GraphRAG处理文档并作出响应。
def main():
    # Streamlit setup
    st.title("Chat with PDF using local RagGraph 🕸️🦜")

    # Load PDF and process documents
    if 'ready' not in st.session_state:
        st.session_state['ready'] = False

    uploaded_file = st.file_uploader("Upload your PDF here 👇:", type="pdf")

    if uploaded_file is not None:
        with st.spinner("Processing..."):
            # Save the uploaded file to a temporary location
            with tempfile.NamedTemporaryFile(delete=False) as tmp_file:
                tmp_file.write(uploaded_file.read())
                tmp_file_path = tmp_file.name

            # Load the PDF using PyPDFLoader
            loader = PyPDFLoader(tmp_file_path)
            documents = loader.load()
            documents = documents[:10]
            st.session_state['ready'] = True

    st.divider()

    if st.session_state['ready']:
        if 'generated' not in st.session_state:
            st.session_state['generated'] = ["Welcome! You can now ask any questions regarding " + uploaded_file.name]

        if 'past' not in st.session_state:
            st.session_state['past'] = ["Hey!"]

        # Container for chat history
        response_container = st.container()

        # Container for text box
        container = st.container()

        with container:
            with st.form(key='my_form', clear_on_submit=True):
                query = st.text_input("Enter your query:", key='input')
                submit_button = st.form_submit_button(label='Send')
            if submit_button and query:
                graph_rag = GraphRAG()
                graph_rag.process_documents(documents)
                output = graph_rag.query(query)
                st.session_state.past.append(query)
                st.session_state.generated.append(output)

            if st.session_state['generated']:
                with response_container:
                    for i in range(len(st.session_state['generated'])):
                        message(st.session_state["past"][i], is_user=True, key=str(i) + '_user', avatar_style="thumbs")
                        message(st.session_state["generated"][i], key=str(i), avatar_style="fun-emoji")

if __name__ == "__main__":
    main()
结论:
本文解释了GraphRAG技术如何帮助我们更准确地回答全球性和复杂的问题,这对于许多应用场景至关重要。此外,结合llama3:8b模型,我们提高了处理效率和速度,有效降低了成本。这对个人用户、研究人员和企业来说都是好消息。请亲自尝试一下。
如何学习大模型
现在社会上大模型越来越普及了,已经有很多人都想往这里面扎,但是却找不到适合的方法去学习。
作为一名资深码农,初入大模型时也吃了很多亏,踩了无数坑。现在我想把我的经验和知识分享给你们,帮助你们学习AI大模型,能够解决你们学习中的困难。
下面这些都是我当初辛苦整理和花钱购买的资料,现在我已将重要的AI大模型资料包括市面上AI大模型各大白皮书、AGI大模型系统学习路线、AI大模型视频教程、实战学习,等录播视频免费分享出来,需要的小伙伴可以扫取。

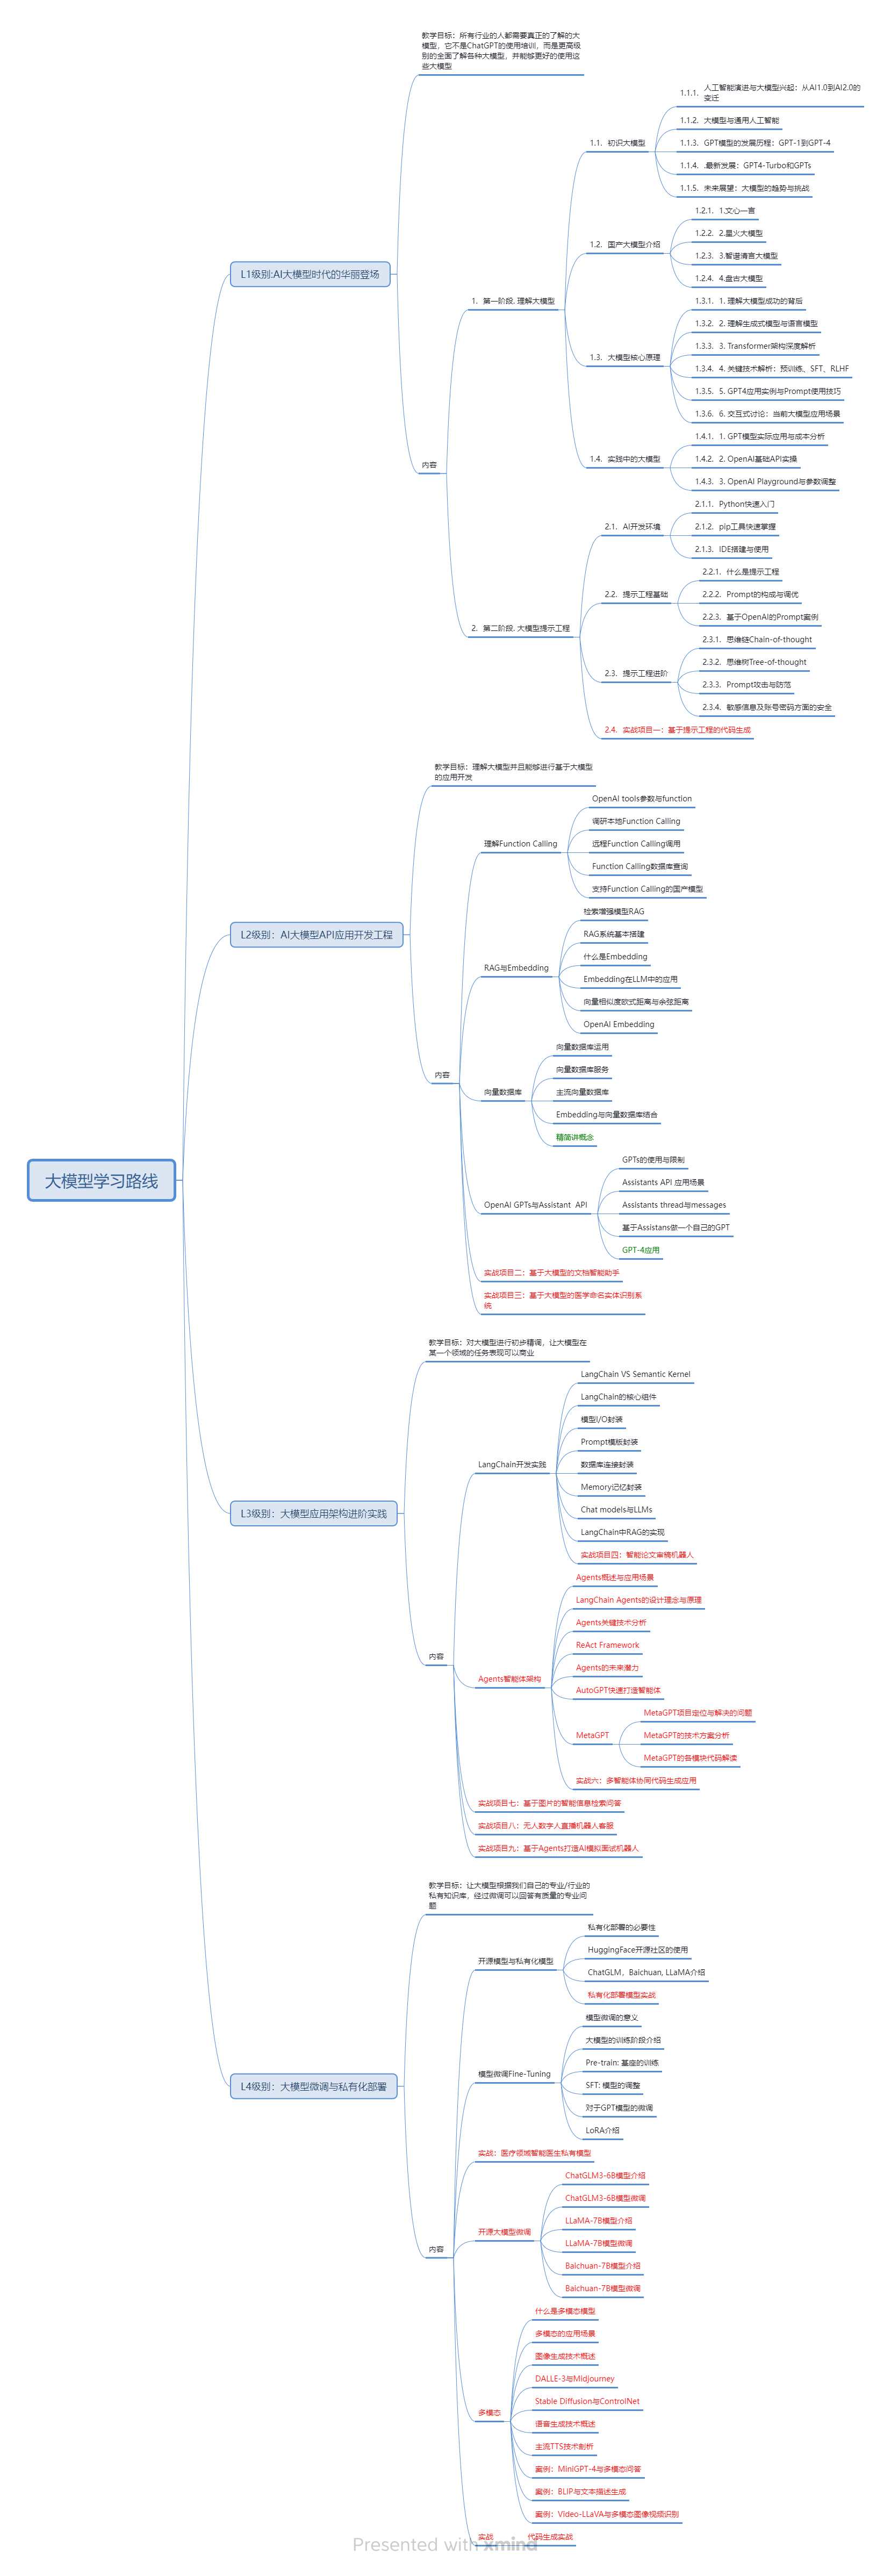
一、AGI大模型系统学习路线
很多人学习大模型的时候没有方向,东学一点西学一点,像只无头苍蝇乱撞,我下面分享的这个学习路线希望能够帮助到你们学习AI大模型。
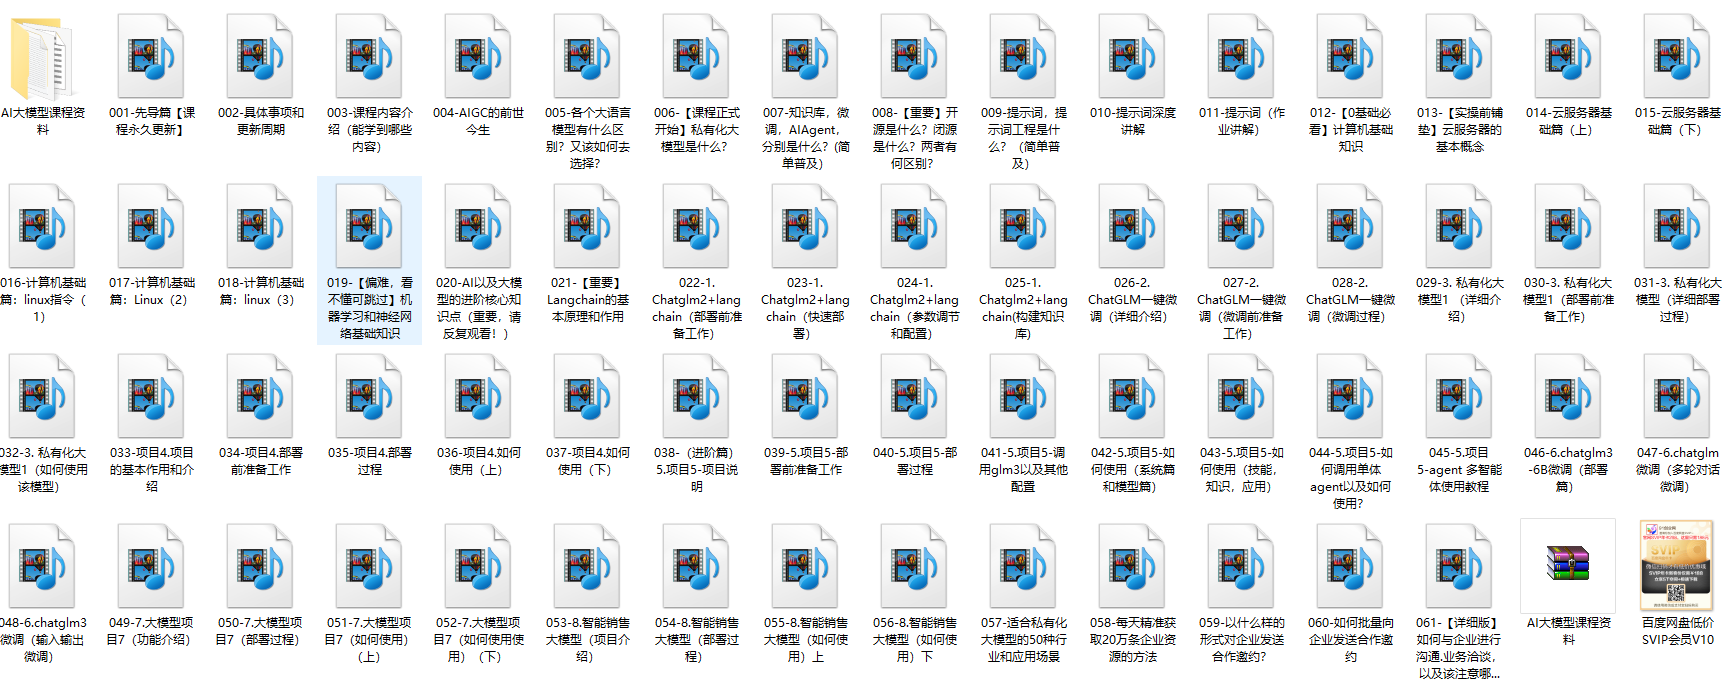
二、AI大模型视频教程
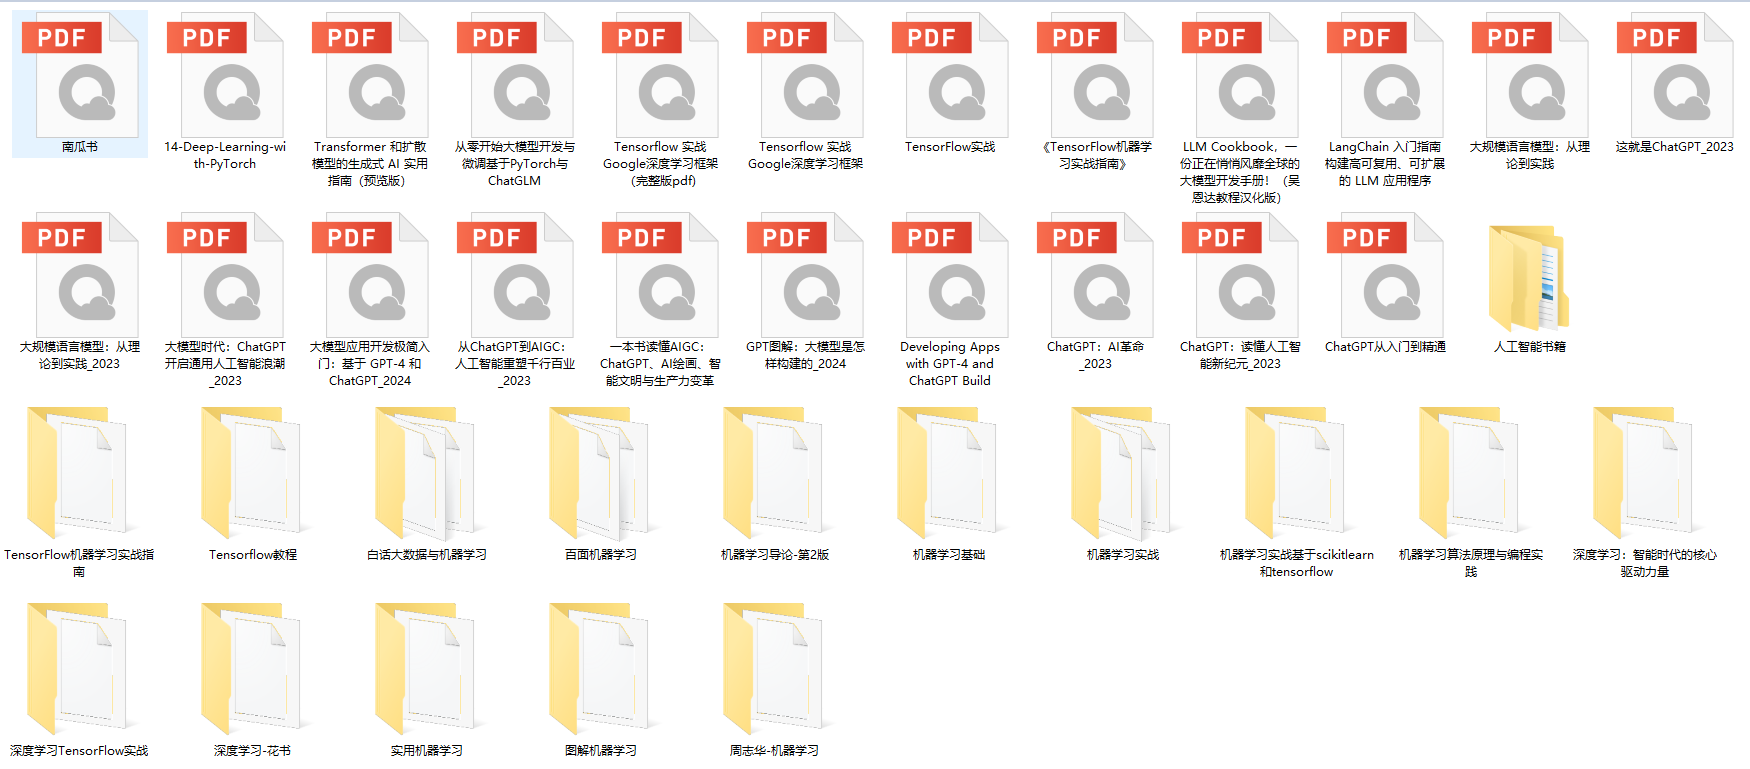
三、AI大模型各大学习书籍
四、AI大模型各大场景实战案例
五、结束语
学习AI大模型是当前科技发展的趋势,它不仅能够为我们提供更多的机会和挑战,还能够让我们更好地理解和应用人工智能技术。通过学习AI大模型,我们可以深入了解深度学习、神经网络等核心概念,并将其应用于自然语言处理、计算机视觉、语音识别等领域。同时,掌握AI大模型还能够为我们的职业发展增添竞争力,成为未来技术领域的领导者。
再者,学习AI大模型也能为我们自己创造更多的价值,提供更多的岗位以及副业创收,让自己的生活更上一层楼。
因此,学习AI大模型是一项有前景且值得投入的时间和精力的重要选择。


 758
758

 被折叠的 条评论
为什么被折叠?
被折叠的 条评论
为什么被折叠?
 到【灌水乐园】发言


