


使用 Ollama 进行结构化 LLM 输出
有效控制模型响应
随着 Ollama 0.5 版本的发布,Ollama 对其 LLM API 进行了重大增强。通过引入结构化输出,Ollama 现在可以约束模型的输出为特定格式,该格式由 JSON 模式定义。在底层,大多数系统使用 Pydantic 的功能来实现这一点。
结构化输出解决了许多开发人员在系统或过程需要进一步处理 LLM 输出时面临的一个棘手问题。该系统需要“知道”预期的输入是什么,以便每次都能准确处理并获得可重复的结果。
同样,您希望每次向用户显示模型输出时都使用相同的格式,以避免混淆和错误。
到目前为止,确保大多数模型的输出格式一致一直很麻烦,但 Ollama 的新功能使这一过程变得相当简单,我希望通过我的示例代码片段展示这一点。
Ollama 可以在 Windows、Linux 和 macOS 上运行,您可以通过导航到https://ollama.com/[1] 并点击屏幕上的大黑色下载按钮来安装最新版本。我将使用 Linux 系统,并通过运行以下命令来安装它,
$ curl -fsSL https://ollama.com/install.sh | sh
下载完成后,运行安装程序。接下来,我们需要设置开发环境。
设置开发环境
在编码之前,我总是创建一个单独的 Python 开发环境,以便安装任何需要的软件。现在,我在这个环境中所做的任何事情都是隔离的,不会影响我的其他项目。
我使用 Miniconda 来实现这一点,但您可以使用任何您熟悉且适合您的方法。
如果您想使用 Miniconda 并且还没有安装它,您必须先安装 Miniconda。使用此链接获取它,
Miniconda - Anaconda 文档[2]
1. 创建新的开发环境并安装所需的库
(base) $ conda create -n ollama_test python=3.12 -y
(base) $ conda activate ollama_test
(ollama_test) $ pip install ollama --upgrade
(ollama_test) $ pip install pydantic bs4
# 检查安装的版本是否 >= 0.5
(ollama_test) $ ollama --version
ollama version is 0.5.1
(ollama_test) $
2.决定使用 Ollama 的模型
Ollama 可以访问数百个开源模型。选择您想要使用的模型并从 Ollama 中拉取它们。Meta 最近发布了他们最新的 llama 模型(版本 3.3),因此我将使用它。此外,由于我将尝试一个基于图像的任务,我将使用 Meta 的 Lama3.2 视觉模型。
(ollama_test) $ ollama pull llama3.2-vision
(ollama_test) $ ollama pull llama3.3
我通常在 Jupyter Notebook 中编写我的示例代码。然而,目前尝试使用最新版本的 Jupyter 与 Ollama 运行时存在一个问题,因为与第三方库不兼容。
Jupyter 期望存在某个版本的库,而 Ollama 期望存在另一个版本的库。
因此,这次我只是在 Python 文件中保存我的代码,并通过命令行使用 Python 运行它。
示例代码 1 — 图像解释
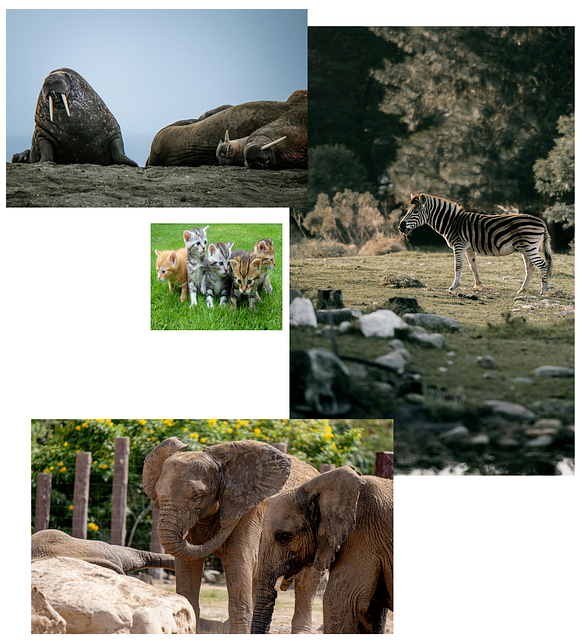
在这个示例中,我要求模型识别 PNG 图像中的不同动物类型。这是该图像。
None
以下是代码。它有大量注释且简短,因此我不会详细介绍它的作用。
from ollama import chat
from pydantic import BaseModel

# 定义一个 Pydantic 模型来表示单个动物及其类型。
class Animal(BaseModel):
    animal: str

# 定义一个 Pydantic 模型来表示动物列表。
# 该模型包含一个 Animal 对象列表。
class AnimalList(BaseModel):
    animals: list[Animal]

# 函数分析图像并识别其中的所有动物。
# 使用 Ollama `chat` 函数与基于视觉的模型(`llama3.2-vision`)交互。
# 返回结果为 AnimalList 对象。
def analyze_animals_in_image(image_path: str) -> AnimalList:
    # 使用指定模型、格式和参数调用 `chat` 函数。
    response = chat(
        model='llama3.2-vision',
        format=AnimalList.model_json_schema(),
        messages=[\
            {\
                'role': 'user',\
                'content': '''分析此图像并识别所有动物。对于每个动物,提供:\
                - 动物类型\
                返回图像中所有可见动物类型的信息。''',\
                'images': [image_path],\
            },\
        ],
        options={'temperature': 0}  # 通过将温度设置为 0 确保确定性输出
    )
    # 验证并将响应 JSON 解析为 AnimalList 对象。
    animals_data = AnimalList.model_validate_json(response.message.content)
    return animals_data

# 主块执行脚本。
if __name__ == "__main__":
    # 要分析的图像路径。
    image_path = "D:/photos/2024/animals.png"

    # 开始分析前打印初始消息。
    print("\nAnalyzing image for animals...")

    # 调用函数分析图像并获取结果。
    animals_result = analyze_animals_in_image(image_path)

    # 打印分析结果。
    print("Animal Analysis Results:")
    print(f"Found {len(animals_result.animals)} animals in the image:")

    # 遍历动物列表并打印每个动物的详细信息。
    for i, animal in enumerate(animals_result.animals, 1):
        print(f"Animal #{i}:")
        print(animal.model_dump_json)
这产生了以下输出。
Analyzing image for animals...
Animal Analysis Results:
Found 5 animals in the image:]
Animal #1:
<bound method BaseModel.model_dump_json of Animal(animal='Walrus')>
Animal #2:
<bound method BaseModel.model_dump_json of Animal(animal='Elephant Seal')>
Animal #3:
<bound method BaseModel.model_dump_json of Animal(animal='Zebra')>
Animal #4:
<bound method BaseModel.model_dump_json of Animal(animal='Elephants')>
Animal #5:
<bound method BaseModel.model_dump_json of Animal(animal='Kittens')>
这还不错。模型可能对左上角的图像感到困惑。我不确定它是海象还是象海豹。我认为是前者。
示例代码 2— 文本摘要
如果您有一堆不同的文本想要摘要,但希望摘要具有相同的结构,这很有用。在这个示例中,我们将处理一些著名科学家的维基百科条目,并以高度组织的方式检索有关他们的某些关键事实。
在我们的摘要中,我们希望为每位科学家输出以下结构,
科学家的名字出生时间和地点他们的主要成就他们获得诺贝尔奖的年份死亡时间和地点
以下是代码。
from pydantic import BaseModel
import requests
from bs4 import BeautifulSoup
from ollama import chat
from typing import List
import json  # 用于解析响应中的 JSON 内容

# 维基百科 URL 列表
urls = [\
    "https://en.wikipedia.org/wiki/Albert_Einstein",\
    "https://en.wikipedia.org/wiki/Richard_Feynman",\
    "https://en.wikipedia.org/wiki/James_Clerk_Maxwell",\
    "https://en.wikipedia.org/wiki/Alan_Guth"\
]

# 从 URL 中提取的科学家名称以进行验证
specified_scientists = ["Albert Einstein", "Richard Feynman", "James Clerk Maxwell", "Alan Guth"]

# 函数抓取维基百科内容
def get_article_content(url):
    try:
        print(f"Scraping URL: {url}")  # 调试打印
        response = requests.get(url)
        soup = BeautifulSoup(response.content, "html.parser")
        article = soup.find("div", class_="mw-body-content")
        if article:
            content = "\n".join(p.text for p in article.find_all("p"))
            print(f"Successfully scraped content from: {url}")  # 调试打印
            return content
        else:
            print(f"No content found in: {url}")  # 调试打印
            return""
    except requests.exceptions.RequestException as e:
        print(f"Error scraping {url}: {e}")
        return""

# 从每个 URL 获取内容
print("Fetching content from all URLs...")  # 调试打印
contents = [get_article_content(url) for url in urls]
print("Finished fetching content from all URLs.")  # 调试打印

# 摘要任务的提示
summarization_prompt = '''
    您将获得一篇关于著名科学家的文章的内容。
    您的目标将是对文章进行摘要,遵循提供的模式。
    仅关注文章中指定的科学家。
    以下是参数的描述:
    - name: 科学家的名字
    - born: 科学家出生的时间和地点
    - fame: 他们的主要成就摘要
    - prize: 他们获得诺贝尔奖的年份
    - death: 他们死亡的时间和地点
'''

# Pydantic 模型类
class ArticleSummary(BaseModel):
    name: str
    born: str
    fame: str
    prize: int
    death: str

class ArticleSummaryList(BaseModel):
    articles: List[ArticleSummary]

# 函数对文章进行摘要
def get_article_summary(text: str):
    try:
        print("Sending content to chat model for summarization...")  # 调试打印
        completion = chat(
            model='llama3.3',
            messages=[\
                {"role": "system", "content": summarization_prompt},\
                {"role": "user", "content": text}\
            ],
            format=ArticleSummaryList.model_json_schema(),
        )
        print("Chat model returned a response.")  # 调试打印

        # 解析并验证 JSON 响应
        articles = ArticleSummaryList.model_validate_json(completion.message.content)
        print("Successfully validated and parsed articles.")  # 调试打印
        return articles
    except Exception as e:
        print(f"Error during summarization: {e}")
        return None

# 函数格式化和过滤摘要
def format_summary(summary: ArticleSummaryList):
    formatted = []
    for article in summary.articles:  # 直接访问 'articles' 属性
        # 过滤掉不在指定列表中的科学家
        if article.name in specified_scientists:
            formatted.append(
                f"The name of the Scientist: {article.name}\n"
                f"When and where they were born: {article.born}\n"
                f"Their main claim to fame: {article.fame}\n"
                f"The year they won the Nobel Prize: {article.prize}\n"
                f"When and where they died: {article.death}\n"
            )
    print("Finished formatting summary.")  # 调试打印
    return"\n".join(formatted)

# 主函数处理所有文章
def main():
    summaries = []
    for i, content in enumerate(contents):
        print(f"Processing content {i+1}/{len(contents)}...")  # 调试打印
        if content.strip():  # 跳过空文章
            summary = get_article_summary(content)
            if summary:
                formatted_summary = format_summary(summary)
                if formatted_summary:  # 仅在过滤后不为空时添加
                    summaries.append(formatted_summary)

    # 打印所有格式化的摘要
    print("Final Summaries:")
    print("\n\n".join(summaries))

if __name__ == '__main__':
     main()
以下是最终输出。它大约需要 5 分钟才能完全运行,我的系统配置相当高,因此请注意。此外,响应的质量在很大程度上取决于您使用的 LLM 的质量。我尝试使用 Llama3.2,输出明显比使用 3.3 版本时差。
(ollama_test) C:\Users\thoma\ollama-test>python tomtest.py
Fetching content from all URLs...
Scraping URL: https://en.wikipedia.org/wiki/Albert_Einstein
Successfully scraped content from: https://en.wikipedia.org/wiki/Albert_Einstein
Scraping URL: https://en.wikipedia.org/wiki/Richard_Feynman
Successfully scraped content from: https://en.wikipedia.org/wiki/Richard_Feynman
Scraping URL: https://en.wikipedia.org/wiki/James_Clerk_Maxwell
Successfully scraped content from: https://en.wikipedia.org/wiki/James_Clerk_Maxwell
Scraping URL: https://en.wikipedia.org/wiki/Alan_Guth
Successfully scraped content from: https://en.wikipedia.org/wiki/Alan_Guth
Finished fetching content from all URLs.
Processing content 1/4...
Sending content to chat model for summarization...
Chat model returned a response.
Successfully validated and parsed articles.
Finished formatting summary.
Processing content 2/4...
Sending content to chat model for summarization...
Chat model returned a response.
Successfully validated and parsed articles.
Finished formatting summary.
Processing content 3/4...
Sending content to chat model for summarization...
Chat model returned a response.
Successfully validated and parsed articles.
Finished formatting summary.
Processing content 4/4...
Sending content to chat model for summarization...
Chat model returned a response.
Successfully validated and parsed articles.
Finished formatting summary.
Final Summaries:
The name of the Scientist: Albert Einstein
When and where they were born: 14 March 1879
Their main claim to fame: Einstein became one of the most famous scientific celebrities after the confirmation of his general theory of relativity in 1919.
The year they won the Nobel Prize: 1921
When and where they died: 18 April 1955

The name of the Scientist: Richard Feynman
When and where they were born: May 11, 1918
Their main claim to fame: Physicist and mathematician
The year they won the Nobel Prize: 1965
When and where they died: February 15, 1988

The name of the Scientist: James Clerk Maxwell
When and where they were born: 13 June 1831
Their main claim to fame: Scottish physicist and mathematician
The year they won the Nobel Prize: 0
When and where they died: 5 November 1879

The name of the Scientist: Alan Guth
When and where they were born:
Their main claim to fame: theoretical physics
The year they won the Nobel Prize: 2014
When and where they died:
请注意,Alan Guth 仍然健在;因此,他的死亡时间和地点部分为空白。James Clerk Maxwell 没有获得诺贝尔奖,因为在他的一生中没有诺贝尔奖。此外,请注意,模型无法提取任何科学家的死亡地点,尽管该信息包含在维基百科的摘录中。
总结
在本文中,我提供了代码并展示了使用 Ollama 进行结构化输出的两个关键能力。第一个示例展示了结构化输出在图像处理中的应用,而第二个示例则专注于文本摘要。
指定 LLM 的结构化输出是 Ollama 的一大进步,具有许多应用。通过以可预测的 JSON 格式组织信息,结构化输出提高了清晰度,并使 LLM 的响应更加一致,减少了歧义。这种结构化方法使 LLM 能够无缝集成到下游应用程序中,如 API、数据库或可视化工具,而无需大量预处理,同时简化了数据解析和自动化。
验证预定义规则变得更加容易,最大限度地减少了错误,并确保符合预期的标准。最终,结构化输出将 LLM 转变为适用于各种现实世界用例的高度实用工具。
如何学习大模型
现在社会上大模型越来越普及了,已经有很多人都想往这里面扎,但是却找不到适合的方法去学习。
作为一名资深码农,初入大模型时也吃了很多亏,踩了无数坑。现在我想把我的经验和知识分享给你们,帮助你们学习AI大模型,能够解决你们学习中的困难。
下面这些都是我当初辛苦整理和花钱购买的资料,现在我已将重要的AI大模型资料包括市面上AI大模型各大白皮书、AGI大模型系统学习路线、AI大模型视频教程、实战学习,等录播视频免费分享出来,需要的小伙伴可以扫取。

一、AGI大模型系统学习路线
很多人学习大模型的时候没有方向,东学一点西学一点,像只无头苍蝇乱撞,我下面分享的这个学习路线希望能够帮助到你们学习AI大模型。
二、AI大模型视频教程
三、AI大模型各大学习书籍
四、AI大模型各大场景实战案例
五、结束语
学习AI大模型是当前科技发展的趋势,它不仅能够为我们提供更多的机会和挑战,还能够让我们更好地理解和应用人工智能技术。通过学习AI大模型,我们可以深入了解深度学习、神经网络等核心概念,并将其应用于自然语言处理、计算机视觉、语音识别等领域。同时,掌握AI大模型还能够为我们的职业发展增添竞争力,成为未来技术领域的领导者。
再者,学习AI大模型也能为我们自己创造更多的价值,提供更多的岗位以及副业创收,让自己的生活更上一层楼。
因此,学习AI大模型是一项有前景且值得投入的时间和精力的重要选择。


 1万+
1万+

 被折叠的 条评论
为什么被折叠?
被折叠的 条评论
为什么被折叠?
 到【灌水乐园】发言


