


一、BusyBox 构建根文件系统
1. 获取 busybox
BusyBox 可以在其官网下载到,官网地址为:https://busybox.net/。在官网左侧的“Get BusyBox”栏有一行“Download Source”,点击“Download Source”即 可打开 BusyBox 的下载页。
2. 编译 BusyBox 构建根文件系统
在 nfs 服务器目录中 创建 rootfs 的子目录。
创建 busybox 目录,将 busybox-1.29.0.tar.bz2 解压。
2.1 修改 Makefie,添加编译器
修改 busybox 的顶层 Makefile。
164 CROSS_COMPILE ?= /usr/local/arm/gcc-linaro-4.9.4-2017.01-x86_64_arm-linux-gnueabihf/bin/arm-linux-gnueabihf-

190 ARCH ?= arm
2.2 busybox 中文字符支持
打开文件 busybox1.29.0/libbb/printable_string.c,找到函数 printable_string,修改的函数内容如下:
const char* FAST_FUNC printable_string(uni_stat_t *stats, const char *str)
{
	char *dst;
	const char *s;

	s = str;
	while (1) {
		unsigned char c = *s;
		if (c == '\0') {
			/* 99+% of inputs do not need conversion */
			if (stats) {
				stats->byte_count = (s - str);
				stats->unicode_count = (s - str);
				stats->unicode_width = (s - str);
			}
			return str;
		}
		if (c < ' ')
			break;
		//注释
		/*if (c >= 0x7f)
			break;*/
		s++;
	}

#if ENABLE_UNICODE_SUPPORT
	dst = unicode_conv_to_printable(stats, str);
#else
	{
		char *d = dst = xstrdup(str);
		while (1) {
			unsigned char c = *d;
			if (c == '\0')
				break;
			//修改
			/*if (c < ' ' || c >= 0x7f)*/
			if( c < ' ')
				*d = '?';
			d++;
		}
		if (stats) {
			stats->byte_count = (d - dst);
			stats->unicode_count = (d - dst);
			stats->unicode_width = (d - dst);
		}
	}
#endif
	return auto_string(dst);
}
接着打开文件 busybox-1.29.0/libbb/unicode.c,修改如下:
static char* FAST_FUNC unicode_conv_to_printable2(uni_stat_t *stats, const char *src, unsigned width, int flags)
{
	char *dst;
	unsigned dst_len;
	unsigned uni_count;
	unsigned uni_width;

	if (unicode_status != UNICODE_ON) {
		char *d;
		if (flags & UNI_FLAG_PAD) {
			d = dst = xmalloc(width + 1);
			while ((int)--width >= 0) {
				unsigned char c = *src;
				if (c == '\0') {
					do
						*d++ = ' ';
					while ((int)--width >= 0);
					break;
				}
				//修改
				/**d++ = (c >= ' ' && c < 0x7f) ? c : '?';*/
				*d++ = (c >= ' ') ? c : '?';
				src++;
			}
			*d = '\0';
		} else {
			d = dst = xstrndup(src, width);
			while (*d) {
				unsigned char c = *d;
				//修改
				/*if (c < ' ' || c >= 0x7f)*/
				if(c < ' ')
					*d = '?';
				d++;
			}
		}
		if (stats) {
			stats->byte_count = (d - dst);
			stats->unicode_count = (d - dst);
			stats->unicode_width = (d - dst);
		}
		return dst;
	}
2.3 编译 busybox
make defconfig

make menuconfig

make install CONFIG_PREFIX=/home/*/linux/nfs/rootfs
2.4 向根文件系统添加 lib 库
我们向根文件中添加动态库。
在 rootfs 中 创建 lib 文件夹。
cd /usr/local/arm/gcc-linaro-4.9.4-2017.01-x86_64_arm-linux-gnueabihf/arm-linuxgnueabihf/libc/lib


cp *so* *.a /home/*/linux/nfs/rootfs/lib/ -d
后面的“-d”表示拷贝符号链接,这里有个比较特殊的库文件:ld-linux-armhf.so.3,此库文件也是个符号链接,相当于 Windows 下的快捷方式。
会链接到库 ld-2.19-2014.08-1-git.so 上,“ls ld-linux-armhf.so.3 -l”查看此文件详细信息

先将 rootfs/lib 中的 ld-linux-armhf.so.3 文件删除掉,然 后 重 新 进 入 到 /usr/local/arm/gcc-linaro-4.9.4-2017.01-x86_64_arm-linux-gnueabihf/armlinux-gnueabihf/libc/lib 目录中,重新拷贝 ld-linux-armhf.so.3

/usr/local/arm/gcc-linaro-4.9.4-2017.01-x86_64_arm-linux-gnueabihf/arm-linux-gnueabihf/lib
在 rootfs 的 usr 目录下创建一个名为 lib 的目录
/usr/local/arm/gcc-linaro-4.9.4-2017.01-x86_64_arm-linux-gnueabihf/arm-linux-gnueabihf/libc/usr/lib

cp *so* *.a /home/zuozhongkai/linux/nfs/rootfs/usr/lib/ -d 
在根文件系统中创建其他文件夹,如 dev、proc、mnt、sys、tmp 和 root 等,创建完成以后 如图 38.2.4.1 所示:

2.5 根文件系统初步测试
使用 NFS 挂载 rootfs 。
uboot 里面的 bootargs 环境变量会设置“root”的值,所以我们将 root 的值改为 NFS 挂载即可。
setenv bootargs 'console=ttymxc0,115200 root=/dev/nfs \
 nfsroot=192.168.10.100:/home/alientek/linux/nfs/rootfs,nfsever=3,proto=tcp rw \
 ip=192.168.10.50:192.168.10.100:192.168.10.1:255.255.255.0::eth0:off'
saveenv
这边需要注意,如果ubuntu版本过高,nfs是无法挂载的。nfsever=3是需要写在路径后门。
然后启动开发板。
二、完善根文件系统
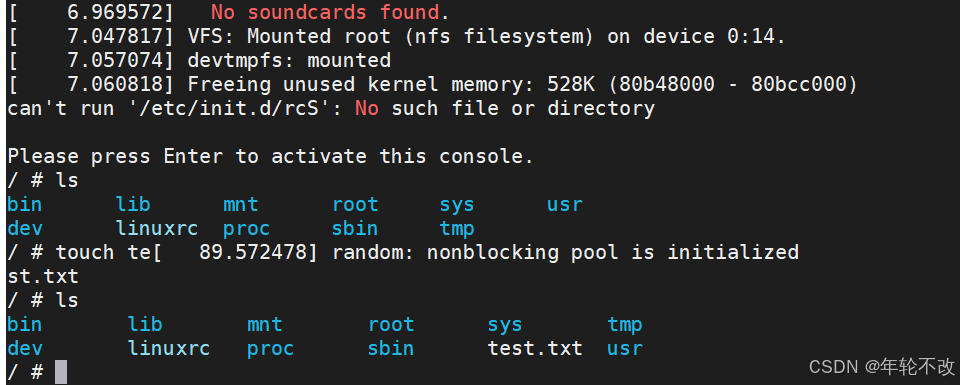
1. 创建/etc/init.d/rcS
在 rootfs 中创建/etc/init.d/rcS 文件,然后在 rcS 中输入如下所示内容:
#!/bin/sh

PATH=/sbin:/bin:/usr/sbin:/usr/bin:$PATH
LD_LIBRARY_PATH=$LD_LIBRARY_PATH:/lib:/usr/lib
export PATH LD_LIBRARY_PATH

mount -a
mkdir /dev/pts
mount -t devpts devpts /dev/pts

echo /sbin/mdev > /proc/sys/kernel/hotplug
mdev -s
重启后,会发现有一些错误

2. 创建/etc/fstab
在 rootfs 中创建/etc/fstab 文件,fstab 在 Linux 开机以后自动配置哪些需要自动挂载的分区, 格式如下:
<file system> <mount point> <type> <options> <dump> <pass> 在 fstab 文件中输入如下内容
#<file system> <mount point> <type> <options> <dump> <pass>
proc /proc proc defaults 0 0
tmpfs /tmp tmpfs defaults 0 0
sysfs /sys sysfs defaults 0 0
3. 创建/etc/inittab
init 程序会读取/etc/inittab 这个文件,inittab 由若干条指令组成。每条指令的结构都是一样的,由以“:”分隔的 4 个段组 成,格式如下:
<id>:<runlevels>:<action>:<process> #etc/inittab
::sysinit:/etc/init.d/rcS
console::askfirst:-/bin/sh
::restart:/sbin/init
::ctrlaltdel:/sbin/reboot
::shutdown:/bin/umount -a -r
::shutdown:/sbin/swapoff -a三、功能测试
1.软件运行测试
在ubuntu中简单写个测试 hello.c
#include <stdio.h>
int main(void)
{
    while(1) {
    printf("hello world!\r\n");
    sleep(2);
    }
    return 0;
}
然后运行命令
arm-linux-gnueabihf-gcc hello.c -o hello
hello 是个 32 位的 LSB 可执行文件,ARM 架构的,并且是动态链接的。所以我们编译出 来的 hello 文件没有问题。将其拷贝到 rootfs/drivers 目录下。然后执行。
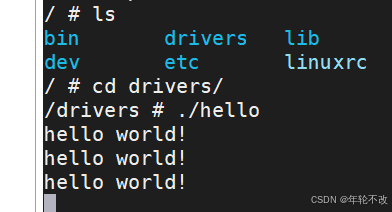
如果让其后台运行,则在后门添加&,比如“./hello &”
ps命令查看后台:
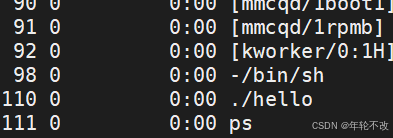
要想关掉,则输入 kill -9 110,这里的110是其ID。
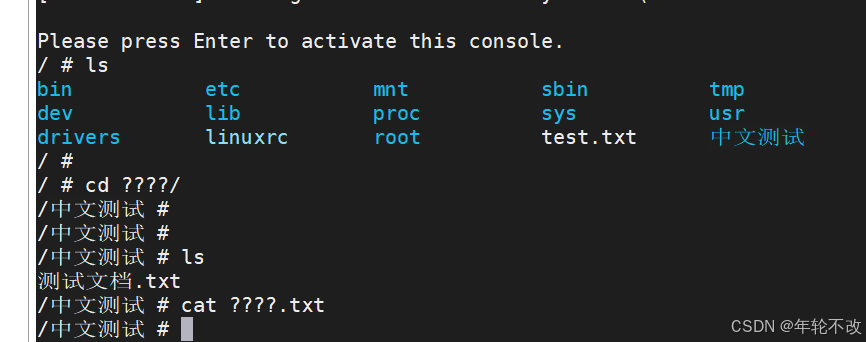
2. 中文字符测试
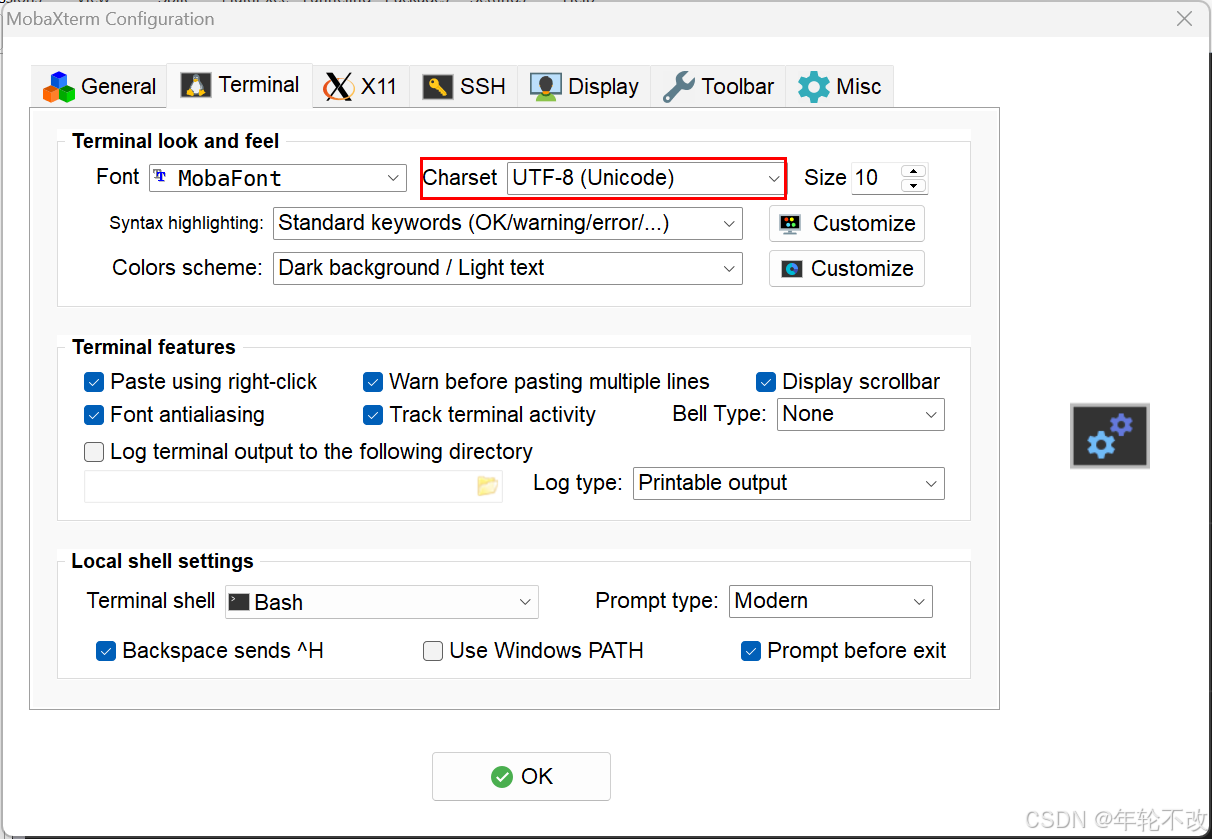
显然设置了UTF-8,但是终端还是输不了中文。
3. 开机自启动设置
刚才测试的 hello 是手动输入命令 ./hello 完成的。平时有些软件是需要自启动的。
hello 这个软件为例,讲解一下如何实现开机自启动。
进入根文件系统的时候 会运行/etc/init.d/rcS 这个 shell 脚本,因此我们可以在这个脚本里面添加自启动相关内容。
那么添加下面内容:
#!/bin/sh

PATH=/sbin:/bin:/usr/sbin:/usr/bin:$PATH
LD_LIBRARY_PATH=$LD_LIBRARY_PATH:/lib:/usr/lib
export PATH LD_LIBRARY_PATH

mount -a
mkdir /dev/pts
mount -t devpts devpts /dev/pts

echo /sbin/mdev > /proc/sys/kernel/hotplug
mdev -s

#开机自启动
cd /drivers
./hello &
cd /
4. 外网连接测试
ping www.baidu.com 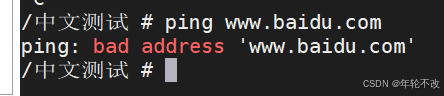
在 rootfs 中新建文件/etc/resolv.conf,然后在里面输入如下内容:
nameserver 114.114.114.114
nameserver 192.168.1.1
虽然添加了,但是还是ping不通,需要解决。
小结
Uboot,Linux以及rootfs都解决了差不多了,还有些小问题需要解决。后面就继续驱动的学习了。


 6595
6595

 被折叠的 条评论
为什么被折叠?
被折叠的 条评论
为什么被折叠?
 到【灌水乐园】发言


