


欢迎来到 Agent2Agent (A2A) Python 快速入门教程!
在本教程中,您将使用 Python SDK 探索一个简单的“回声” A2A 服务器。这将向您介绍 A2A 服务器的基本概念和组件。然后,您将看到一个集成了大型语言模型 (LLM) 的更高级示例。
本实践指南将帮助您理解:
- A2A 协议背后的基本概念。
- 如何使用 SDK 为 A2A 开发设置 Python 环境。
- Agent Skills (智能体技能) 和 Agent Cards (智能体名片) 如何描述一个智能体。
- A2A 服务器如何处理任务。
- 如何使用客户端与 A2A 服务器进行交互。
- 流式传输能力和多轮交互是如何工作的。
- 如何将 LLM 集成到 A2A 智能体中。
在本教程结束时,您将对 A2A 智能体有功能性的理解,并为构建或集成兼容 A2A 的应用程序奠定坚实的基础。
教程章节
本教程分为以下几个步骤:
- 简介 (本页)
- 环境设置: 准备您的 Python 环境和 A2A SDK。
- Agent Skills & Agent Card: 定义您的智能体能做什么以及它如何描述自己。
- The Agent Executor (智能体执行器): 理解智能体逻辑是如何实现的。
- 启动服务器: 运行 Helloworld A2A 服务器。
- 与服务器交互: 向您的智能体发送请求。
- 流式传输 & 多轮交互: 通过 LangGraph 示例探索高级功能。
- 后续步骤: 探索 A2A 的更多可能性。
让我们开始吧!
2. 设置您的环境
前提条件
- Python 3.10 或更高版本。
- 能够访问终端或命令提示符。
- Git,用于克隆代码仓库。
- 推荐使用代码编辑器 (例如,Visual Studio Code)。
克隆代码仓库
如果您还没有克隆 A2A Samples 代码仓库,请执行以下命令:
git clone https://github.com/google-a2a/a2a-samples.git -b main --depth 1
cd a2a-samples
Python 环境与 SDK 安装
我们建议为 Python 项目使用虚拟环境。A2A Python SDK 使用 uv 进行依赖管理,但您也可以使用 pip 和 venv。
创建并激活虚拟环境:
使用 venv (标准库):
Mac/Linux
python -m venv .venv
source .venv/bin/activate
Windows
python -m venv .venv
.venv\Scripts\activate
安装所需的 Python 依赖项以及 A2A SDK 及其依赖项:
pip install -r samples/python/requirements.txt
验证安装
安装后,您应该能够在 Python 解释器中导入 a2a 包:
python -c "import a2a; print('A2A SDK imported successfully')"
如果此命令运行没有错误并打印成功消息,则您的环境已正确设置。
3. Agent Skills & Agent Card
在 A2A 智能体执行任何操作之前,它需要定义它能做什么 (它的技能) 以及其他智能体或客户端如何了解这些能力 (它的 Agent Card)。
我们将使用位于 a2a-samples/samples/python/agents/helloworld/ 的 helloworld 示例。
Agent Skills (智能体技能)
Agent Skill 描述了智能体可以执行的特定能力或功能。它是一个构建块,告诉客户端该智能体擅长处理哪类任务。
AgentSkill 的关键属性 (在 a2a.types 中定义):
id: 技能的唯一标识符。name: 人类可读的名称。description: 对技能作用的更详细解释。tags: 用于分类和发现的关键字。examples: 示例提示或用例。inputModes/outputModes: 支持的输入和输出媒体类型 (例如,“text/plain”, “application/json”)。
在 __main__.py 中,您可以看到 Helloworld 智能体的技能是如何定义的:
skill = AgentSkill(
    id='hello_world',
    name='Returns hello world',
    description='just returns hello world',
    tags=['hello world'],
    examples=['hi', 'hello world'],
)
这个技能非常简单:它名为 “Returns hello world”,并且主要处理文本。
Agent Card (智能体名片)
Agent Card 是一个 A2A 服务器提供的 JSON 文档,通常位于 .well-known/agent.json 端点。它就像智能体的数字名片。
AgentCard 的关键属性 (在 a2a.types 中定义):
name,description,version: 基本身份信息。url: 可以访问 A2A 服务的端点。capabilities: 指定支持的 A2A 功能,如流式传输或推送通知。defaultInputModes/defaultOutputModes: 智能体的默认媒体类型。skills: 智能体提供的一系列AgentSkill对象列表。
helloworld 示例这样定义其 Agent Card:
# 这将是面向公众的智能体名片
public_agent_card = AgentCard(
    name='Hello World Agent',
    description='Just a hello world agent',
    url='http://localhost:9999/',
    version='1.0.0',
    defaultInputModes=['text'],
    defaultOutputModes=['text'],
    capabilities=AgentCapabilities(streaming=True),
    skills=[skill],  # 公开名片只包含基本技能
    supportsAuthenticatedExtendedCard=True,
)
这张名片告诉我们,该智能体名为 “Hello World Agent”,运行在 http://localhost:9999/,支持文本交互,并拥有 hello_world 技能。它还表明支持公共认证,意味着不需要特定凭据。
理解 Agent Card至关重要,因为它是客户端发现智能体并学习如何与其交互的方式。
4. The Agent Executor (智能体执行器)
A2A 智能体如何处理请求并生成响应/事件的核心逻辑由 Agent Executor 处理。A2A Python SDK 提供了一个抽象基类 a2a.server.agent_execution.AgentExecutor 供您实现。
AgentExecutor 接口
AgentExecutor 类定义了两个主要方法:
async def execute(self, context: RequestContext, event_queue: EventQueue): 处理期望得到响应或事件流的传入请求。它处理用户的输入 (通过context获取) 并使用event_queue发回Message、Task、TaskStatusUpdateEvent或TaskArtifactUpdateEvent对象。async def cancel(self, context: RequestContext, event_queue: EventQueue): 处理取消正在进行的任务的请求。
RequestContext 提供有关传入请求的信息,例如用户的消息和任何现有的任务详情。EventQueue 被执行器用来将事件发送回客户端。
Helloworld Agent Executor
让我们看一下 agent_executor.py。它定义了 HelloWorldAgentExecutor。
The Agent (HelloWorldAgent): 这是一个简单的辅助类,封装了实际的“业务逻辑”。
class HelloWorldAgent:
    """Hello World Agent."""

    async def invoke(self) -> str:
        return 'Hello World'
它有一个简单的 invoke 方法,返回字符串 “Hello World”。
The Executor (HelloWorldAgentExecutor): 这个类实现了 AgentExecutor 接口。
__init__:
class HelloWorldAgentExecutor(AgentExecutor):
    """Test AgentProxy Implementation."""

    def __init__(self):
        self.agent = HelloWorldAgent()
它实例化了 HelloWorldAgent。
execute:
async def execute(
    self,
    context: RequestContext,
    event_queue: EventQueue,
) -> None:
    result = await self.agent.invoke()
    await event_queue.enqueue_event(new_agent_text_message(result))
当 message/send 或 message/stream 请求进来时 (在这个简化的执行器中都由 execute 处理):
- 它调用
self.agent.invoke()来获取 “Hello World” 字符串。 - 它使用
new_agent_text_message工具函数创建一个 A2AMessage对象。 - 它将此消息加入
event_queue。底层的DefaultRequestHandler随后会处理此队列以将响应发送给客户端。对于像这样的单个消息,它将为message/send生成单个响应,或为message/stream生成单个事件,然后流关闭。
cancel: Helloworld 示例的 cancel 方法只是抛出一个异常,表明这个基本智能体不支持取消操作。
async def cancel(
    self, context: RequestContext, event_queue: EventQueue
) -> None:
    raise Exception('cancel not supported')
Agent Executor 充当了 A2A 协议 (由请求处理器和服务器应用程序管理) 与您智能体特定逻辑之间的桥梁。它接收有关请求的上下文,并使用事件队列来传达结果或更新。
5. 启动服务器
现在我们有了 Agent Card 和 Agent Executor,我们可以设置并启动 A2A 服务器了。
A2A Python SDK 提供了一个 A2AStarletteApplication 类,它简化了运行兼容 A2A 的 HTTP 服务器的过程。它使用 Starlette 作为 Web 框架,并且通常与 ASGI 服务器(如 Uvicorn)一起运行。
Helloworld 中的服务器设置
让我们再次查看 __main__.py,看看服务器是如何初始化和启动的。
import uvicorn

from a2a.server.apps import A2AStarletteApplication
from a2a.server.request_handlers import DefaultRequestHandler
from a2a.server.tasks import InMemoryTaskStore
from a2a.types import (
    AgentCapabilities,
    AgentCard,
    AgentSkill,
)
from agent_executor import (
    HelloWorldAgentExecutor,  # type: ignore[import-untyped]
)


if __name__ == '__main__':
    skill = AgentSkill(
        id='hello_world',
        name='Returns hello world',
        description='just returns hello world',
        tags=['hello world'],
        examples=['hi', 'hello world'],
    )

    extended_skill = AgentSkill(
        id='super_hello_world',
        name='Returns a SUPER Hello World',
        description='A more enthusiastic greeting, only for authenticated users.',
        tags=['hello world', 'super', 'extended'],
        examples=['super hi', 'give me a super hello'],
    )

    # 这将是面向公众的智能体名片
    public_agent_card = AgentCard(
        name='Hello World Agent',
        description='Just a hello world agent',
        url='http://localhost:9999/',
        version='1.0.0',
        defaultInputModes=['text'],
        defaultOutputModes=['text'],
        capabilities=AgentCapabilities(streaming=True),
        skills=[skill],  # 公开名片只包含基本技能
        supportsAuthenticatedExtendedCard=True,
    )

    # 这将是经过身份验证的扩展智能体名片
    # 它包含了额外的 'extended_skill'
    specific_extended_agent_card = public_agent_card.model_copy(
        update={
            'name': 'Hello World Agent - Extended Edition',  # 不同的名称以便区分
            'description': 'The full-featured hello world agent for authenticated users.',
            'version': '1.0.1',  # 甚至可以是不同的版本
            # capabilities 和其他字段如 url, defaultInputModes, defaultOutputModes,
            # supportsAuthenticatedExtendedCard 除非在此处指定,否则从 public_agent_card 继承。
            'skills': [
                skill,
                extended_skill,
            ],  # 扩展名片包含两个技能
        }
    )

    request_handler = DefaultRequestHandler(
        agent_executor=HelloWorldAgentExecutor(),
        task_store=InMemoryTaskStore(),
    )

    server = A2AStarletteApplication(
        agent_card=public_agent_card,
        http_handler=request_handler,
        extended_agent_card=specific_extended_agent_card,
    )

    uvicorn.run(server.build(), host='0.0.0.0', port=9999)
让我们分解一下这个过程:
-
DefaultRequestHandler:- SDK 提供了
DefaultRequestHandler。这个处理器接收您的AgentExecutor实现 (这里是HelloWorldAgentExecutor) 和一个TaskStore(这里是InMemoryTaskStore)。 - 它将传入的 A2A RPC 调用路由到您执行器上的相应方法 (如
execute或cancel)。 DefaultRequestHandler使用TaskStore来管理任务的生命周期,特别是对于有状态的交互、流式传输和重新订阅。即使您的智能体执行器很简单,处理器也需要一个任务存储。
- SDK 提供了
-
A2AStarletteApplication:A2AStarletteApplication类使用agent_card和request_handler(在其构造函数中称为http_handler) 进行实例化。agent_card至关重要,因为服务器会默认在/.well-known/agent.json端点上暴露它。request_handler负责通过与您的AgentExecutor交互来处理所有传入的 A2A 方法调用。
-
uvicorn.run(server.build(), ...):A2AStarletteApplication有一个build()方法,用于构建实际的 Starlette 应用程序。- 然后使用
uvicorn.run()运行此应用程序,使您的智能体可以通过 HTTP 访问。 host='0.0.0.0'使服务器在您机器上的所有网络接口上都可访问。port=9999指定了监听的端口。这与AgentCard中的url相匹配。
运行 Helloworld 服务器
在您的终端中导航到 a2a-samples 目录 (如果还没在该目录),并确保您的虚拟环境已激活。
要运行 Helloworld 服务器:
# 从 a2a-samples 目录
python samples/python/agents/helloworld/__main__.py
您应该会看到类似以下的输出,表明服务器正在运行:
INFO:     Started server process [xxxxx]
INFO:     Waiting for application startup.
INFO:     Application startup complete.
INFO:     Uvicorn running on http://0.0.0.0:9999 (Press CTRL+C to quit)
您的 A2A Helloworld 智能体现在已经上线并正在监听请求!在下一步中,我们将与它进行交互。
6. 与服务器交互
在 Helloworld A2A 服务器运行的情况下,让我们向它发送一些请求。SDK 包含一个客户端 (A2AClient),可以简化这些交互。
Helloworld 测试客户端
test_client.py 脚本演示了如何:
- 从服务器获取 Agent Card。
- 创建一个
A2AClient实例。 - 发送非流式 (
message/send) 和流式 (message/stream) 请求。
打开一个新的终端窗口,激活您的虚拟环境,并导航到 a2a-samples 目录。
激活虚拟环境 (请确保在您创建虚拟环境的同一目录中执行此操作):
Mac/Linux
source .venv/bin/activate
Windows
.venv\Scripts\activate
运行测试客户端:
# 从 a2a-samples 目录
python samples/python/agents/helloworld/test_client.py
理解客户端代码
让我们看一下 test_client.py 的关键部分:
获取 Agent Card & 初始化客户端:
base_url = 'http://localhost:9999'

async with httpx.AsyncClient() as httpx_client:
    # 初始化 A2ACardResolver
    resolver = A2ACardResolver(
        httpx_client=httpx_client,
        base_url=base_url,
        # agent_card_path 使用默认值, extended_agent_card_path 也使用默认值
    )
A2ACardResolver 是一个方便的类。它首先根据提供的基本 URL 从服务器的 /.well-known/agent.json 端点获取 AgentCard,然后用它来初始化客户端。
发送非流式消息 (send_message):
client = A2AClient(
    httpx_client=httpx_client, agent_card=final_agent_card_to_use
)
logger.info('A2AClient initialized.')

send_message_payload: dict[str, Any] = {
    'message': {
        'role': 'user',
        'parts': [
            {'kind': 'text', 'text': 'how much is 10 USD in INR?'}
        ],
        'messageId': uuid4().hex,
    },
}
request = SendMessageRequest(
    id=str(uuid4()), params=MessageSendParams(**send_message_payload)
)

response = await client.send_message(request)
print(response.model_dump(mode='json', exclude_none=True))
send_message_payload构建了MessageSendParams的数据。- 这被包装在一个
SendMessageRequest中。 - 它包含一个
message对象,其role设置为 “user”,内容在parts中。 - Helloworld 智能体的
execute方法会将一条 “Hello World” 消息加入队列。DefaultRequestHandler将检索此消息并将其作为响应发送。 - 响应将是一个
SendMessageResponse对象,其中包含一个SendMessageSuccessResponse(其result是智能体的Message) 或一个JSONRPCErrorResponse。
处理任务 ID (Helloworld 的说明性注释):
Helloworld 客户端 (test_client.py) 不会直接尝试 get_task 或 cancel_task,因为简单的 Helloworld 智能体的 execute 方法,在通过 message/send 调用时,会导致 DefaultRequestHandler 直接返回一个 Message 响应,而不是一个 Task 对象。更复杂的智能体(如 LangGraph 示例)会明确管理任务,它们会从 message/send 返回一个 Task 对象,然后其 id 可用于 get_task 或 cancel_task。
发送流式消息 (send_message_streaming):
streaming_request = SendStreamingMessageRequest(
    id=str(uuid4()), params=MessageSendParams(**send_message_payload)
)

stream_response = client.send_message_streaming(streaming_request)

async for chunk in stream_response:
    print(chunk.model_dump(mode='json', exclude_none=True))
- 此方法调用智能体的
message/stream端点。DefaultRequestHandler将调用HelloWorldAgentExecutor.execute方法。 execute方法将一条 “Hello World” 消息入队,然后事件队列关闭。- 客户端将收到这个单一消息作为一个
SendStreamingMessageResponse事件,然后流将终止。 stream_response是一个AsyncGenerator。
预期输出
当您运行 test_client.py 时,您将看到以下内容的 JSON 输出:
- 非流式响应 (一条 “Hello World” 消息)。
- 流式响应 (一条作为单个块的 “Hello World” 消息,之后流结束)。
输出中的 id 字段每次运行都会不同。
// 非流式响应
{"jsonrpc":"2.0","id":"xxxxxxxx","result":{"type":"message","role":"agent","parts":[{"type":"text","text":"Hello World"}],"messageId":"yyyyyyyy"}}
// 流式响应 (一个块)
{"jsonrpc":"2.0","id":"zzzzzzzz","result":{"type":"message","role":"agent","parts":[{"type":"text","text":"Hello World"}],"messageId":"wwwwwwww","final":true}}
(实际的 ID 如 xxxxxxxx, yyyyyyyy, zzzzzzzz, wwwwwwww 将是不同的 UUID/请求 ID)
这确认了您的服务器正在使用更新后的 SDK 结构正确处理基本的 A2A 交互!
现在,您可以在运行 __main__.py 的终端窗口中按 Ctrl+C 来关闭服务器。
7. 流式传输 & 多轮交互 (LangGraph 示例)
Helloworld 示例展示了 A2A 的基本机制。对于更高级的功能,如稳健的流式传输、任务状态管理以及由 LLM 驱动的多轮对话,我们将转向位于 a2a-samples/samples/python/agents/langgraph/ 的 LangGraph 示例。
此示例包含一个“货币智能体”,它使用 Gemini 模型通过 LangChain 和 LangGraph 来回答货币转换问题。
设置 LangGraph 示例
-
创建一个 Gemini API 密钥,如果您还没有的话。
-
环境变量:
在a2a-samples/samples/python/agents/langgraph/目录中创建一个.env文件:echo "GOOGLE_API_KEY=YOUR_API_KEY_HERE" > .env将
YOUR_API_KEY_HERE替换为您的实际 Gemini API 密钥。 -
安装依赖项 (如果尚未安装):
langgraph 示例有自己的pyproject.toml,其中包括langchain-google-genai和langgraph等依赖项。当您使用pip install -e .[dev]从a2a-samples根目录安装 SDK 时,应该也安装了工作区示例的依赖项,包括langgraph-example。如果遇到导入错误,请确保您从根目录的主 SDK 安装是成功的。
运行 LangGraph 服务器
在您的终端中导航到 a2a-samples/samples/python/agents/langgraph/app 目录,并确保您的虚拟环境 (来自 SDK 根目录) 已激活。
启动 LangGraph 智能体服务器:
python __main__.py
这将在 http://localhost:10000 上启动服务器。
与 LangGraph 智能体交互
打开一个新的终端窗口,激活您的虚拟环境,并导航到 a2a-samples/samples/python/agents/langgraph/app。
运行其测试客户端:
python test_client.py
现在,您可以在运行 __main__.py 的终端窗口中按 Ctrl+C 来关闭服务器。
展示的关键特性
langgraph 示例展示了几个重要的 A2A 概念:
-
LLM 集成:
agent.py定义了CurrencyAgent。它使用ChatGoogleGenerativeAI和 LangGraph 的create_react_agent来处理用户查询。- 这演示了如何使用真正的 LLM 来驱动智能体的逻辑。
-
任务状态管理:
samples/langgraph/__main__.py使用InMemoryTaskStore初始化一个DefaultRequestHandler。
httpx_client = httpx.AsyncClient() request_handler = DefaultRequestHandler( agent_executor=CurrencyAgentExecutor(), task_store=InMemoryTaskStore(), push_notifier=InMemoryPushNotifier(httpx_client), ) server = A2AStarletteApplication( agent_card=agent_card, http_handler=request_handler ) uvicorn.run(server.build(), host=host, port=port)CurrencyAgentExecutor(在samples/langgraph/agent_executor.py中),当其execute方法被DefaultRequestHandler调用时,会与包含当前任务 (如果有) 的RequestContext交互。- 对于
message/send,DefaultRequestHandler使用TaskStore来持久化和检索跨交互的任务状态。如果智能体的执行流程涉及多个步骤或导致一个持久性任务,message/send的响应将是一个完整的Task对象。 test_client.py的run_single_turn_test演示了如何获取返回的Task对象,然后使用get_task查询它。
-
使用
TaskStatusUpdateEvent和TaskArtifactUpdateEvent进行流式传输:CurrencyAgentExecutor中的execute方法负责处理由DefaultRequestHandler协调的非流式和流式请求。- 当 LangGraph 智能体处理请求时 (可能涉及调用
get_exchange_rate等工具),CurrencyAgentExecutor会将不同类型的事件加入EventQueue:TaskStatusUpdateEvent: 用于中间更新 (例如,“正在查找汇率…”,“正在处理汇率…”)。这些事件的final标志为False。TaskArtifactUpdateEvent: 当最终答案准备好时,它会作为一个工件 (artifact) 入队。lastChunk标志为True。- 一个
state=TaskState.completed且final=True的最终TaskStatusUpdateEvent会被发送,以表示流式任务的结束。
test_client.py的run_streaming_test函数将在从服务器接收到这些单独的事件块时打印它们。
-
多轮对话 (
TaskState.input_required):- 如果查询含糊不清 (例如,用户问“100 美元是多少?”),
CurrencyAgent可以要求澄清。 - 发生这种情况时,
CurrencyAgentExecutor会将一个TaskStatusUpdateEvent入队,其中status.state是TaskState.input_required,status.message包含智能体的问题 (例如,“您想转换成哪种货币?”)。此事件对于当前交互流的final标志将为True。 test_client.py的run_multi_turn_test函数演示了这一点:- 它发送一个初始的模糊查询。
- 智能体响应一个状态为
input_required的Task(通过DefaultRequestHandler处理入队的事件)。 - 然后,客户端发送第二条消息,其中包括第一轮
Task响应中的taskId和contextId,以提供缺失的信息 (“in GBP”)。这会继续同一个任务。
- 如果查询含糊不清 (例如,用户问“100 美元是多少?”),
探索代码
花些时间查看这些文件:
__main__.py: 使用A2AStarletteApplication和DefaultRequestHandler进行服务器设置。注意AgentCard定义包括capabilities.streaming=True。agent.py: 带有 LangGraph、LLM 模型和工具定义的CurrencyAgent。agent_executor.py: 实现execute(和cancel) 方法的CurrencyAgentExecutor。它使用RequestContext来理解正在进行的任务,并使用EventQueue来发回各种事件 (TaskStatusUpdateEvent,TaskArtifactUpdateEvent,以及在没有任务时通过第一个事件隐式创建的新Task对象)。test_client.py: 演示各种交互模式,包括检索任务 ID 并将其用于多轮对话。
这个例子更丰富地说明了 A2A 如何促进智能体之间复杂的、有状态的和异步的交互。
后续步骤
恭喜您完成 A2A Python SDK 教程!您已经学会了如何:
- 为 A2A 开发设置您的环境。
- 使用 SDK 的类型定义 Agent Skills 和 Agent Cards。
- 实现一个基本的 Helloworld A2A 服务器和客户端。
- 理解并实现流式传输功能。
- 集成一个使用 LangGraph 的更复杂的智能体,展示任务状态管理和工具使用。
您现在已经为构建和集成自己的 A2A 兼容智能体奠定了坚实的基础。
接下来去哪里?
这里有一些想法和资源可以继续您的 A2A 之旅:
探索其他示例:
- 查看 A2A GitHub 仓库中
a2a-samples/samples/目录下的其他示例,了解更复杂的智能体集成和功能。 - 主要的 A2A 仓库也有针对其他语言和框架的示例。
加深您的协议理解:
- 📚 阅读完整的 A2A 协议文档网站以获得全面的概述。
- 📝 查看详细的 A2A 协议规范以了解所有数据结构和 RPC 方法的细微差别。
回顾关键 A2A 主题:
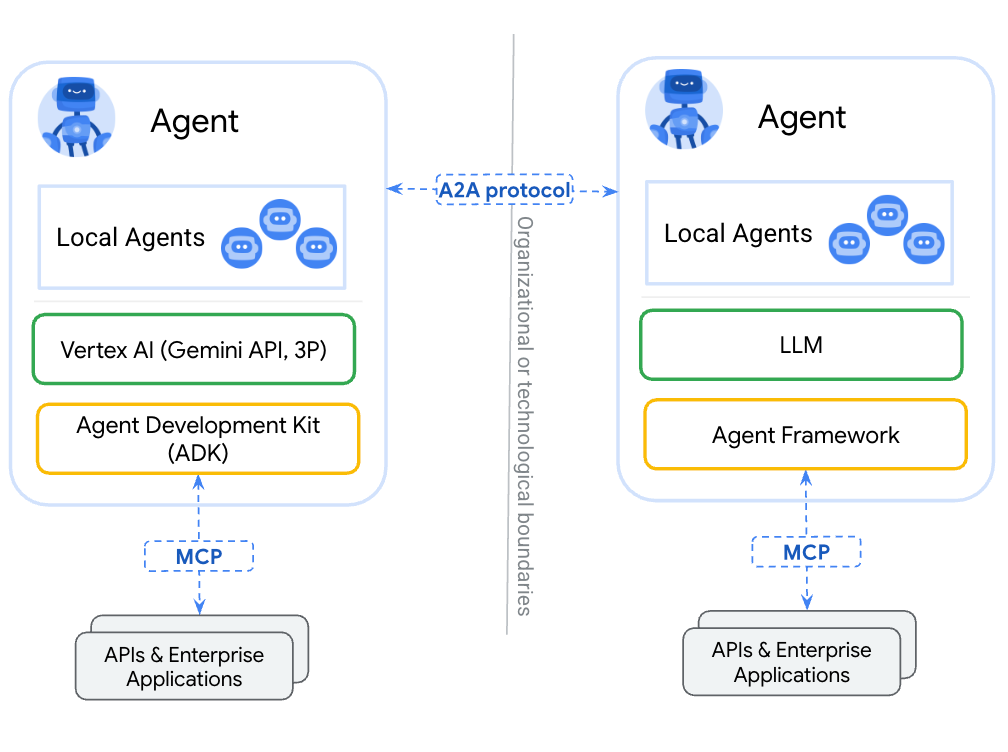
- A2A 和 MCP: 理解 A2A 如何补充模型上下文协议 (Model Context Protocol) 以进行工具使用。
- 企业级功能: 了解安全性、可观察性和其他企业级考量。
- 流式传输 & 异步操作: 获取有关 SSE 和推送通知的更多详细信息。
- 智能体发现: 探索智能体可以相互发现的不同方式。
构建您自己的智能体:
- 尝试使用您喜欢的 Python 智能体框架 (如 LangChain, CrewAI, AutoGen, Semantic Kernel 或自定义解决方案) 创建一个新的 A2A 智能体。
- 实现
a2a.server.AgentExecutor接口,以将您智能体的逻辑与 A2A 协议连接起来。 - 思考您的智能体可以提供哪些独特的技能,以及它的 Agent Card 将如何表示它们。
实验高级功能:
- 如果您的智能体处理长时间运行或多会话任务,请使用持久化的
TaskStore实现稳健的任务管理。 - 如果您的智能体任务生命周期非常长,可以探索实现推送通知。
- 考虑更复杂的输入和输出模式 (例如,通过
DataPart处理文件上传/下载或结构化数据)。
为 A2A 社区做贡献:
- 加入 A2A GitHub Discussions 页面上的讨论。
- 通过 GitHub Issues 报告问题或提出改进建议。
- 考虑贡献代码、示例或文档。请参阅 CONTRIBUTING.md 指南。
A2A 协议旨在培育一个可互操作的 AI 智能体生态系统。通过构建和共享兼容 A2A 的智能体,您可以成为这一激动人心发展的一部分!


 434
434

 被折叠的 条评论
为什么被折叠?
被折叠的 条评论
为什么被折叠?
 到【灌水乐园】发言


