


 本文探讨了通过基于卷积神经网络(CNN)的U-Net架构训练的模型实现文档二值化。介绍了开源数据集及数据增强方法,阐述了U-Net模型架构、卷积操作和工作原理,还提及改进算法以突破输入局限,最后说明了环境安装、训练、测试及转成onnx模型的过程。
1. 引言
阈值分割可以被视为一个分类问题,通常涉及两个类别,这也是为什么阈值分割也被称为二值化。对于文档图像,我们期望阈值算法能够正确地将墨水分类为黑色,将纸张分类为白色,从而得到二值化图像。对于数字灰度图像,最简单的实现方法是选择一个阈值值,比如图像二值化,并将高于这个值的灰度级别分配为白色,将剩余的级别分配为黑色。问题在于正确找到这个值,以便能够完美匹配前景和背景元素。

对于文档图像,我们知道预期的结果,尽管存在一些问题使得这个领域变得非常具有挑战性,比如老化退化。老化伪影包括斑点(出现在纸面上的棕褐色斑点)、前后墨水干扰、皱褶纸、胶带标记、折叠痕迹等。
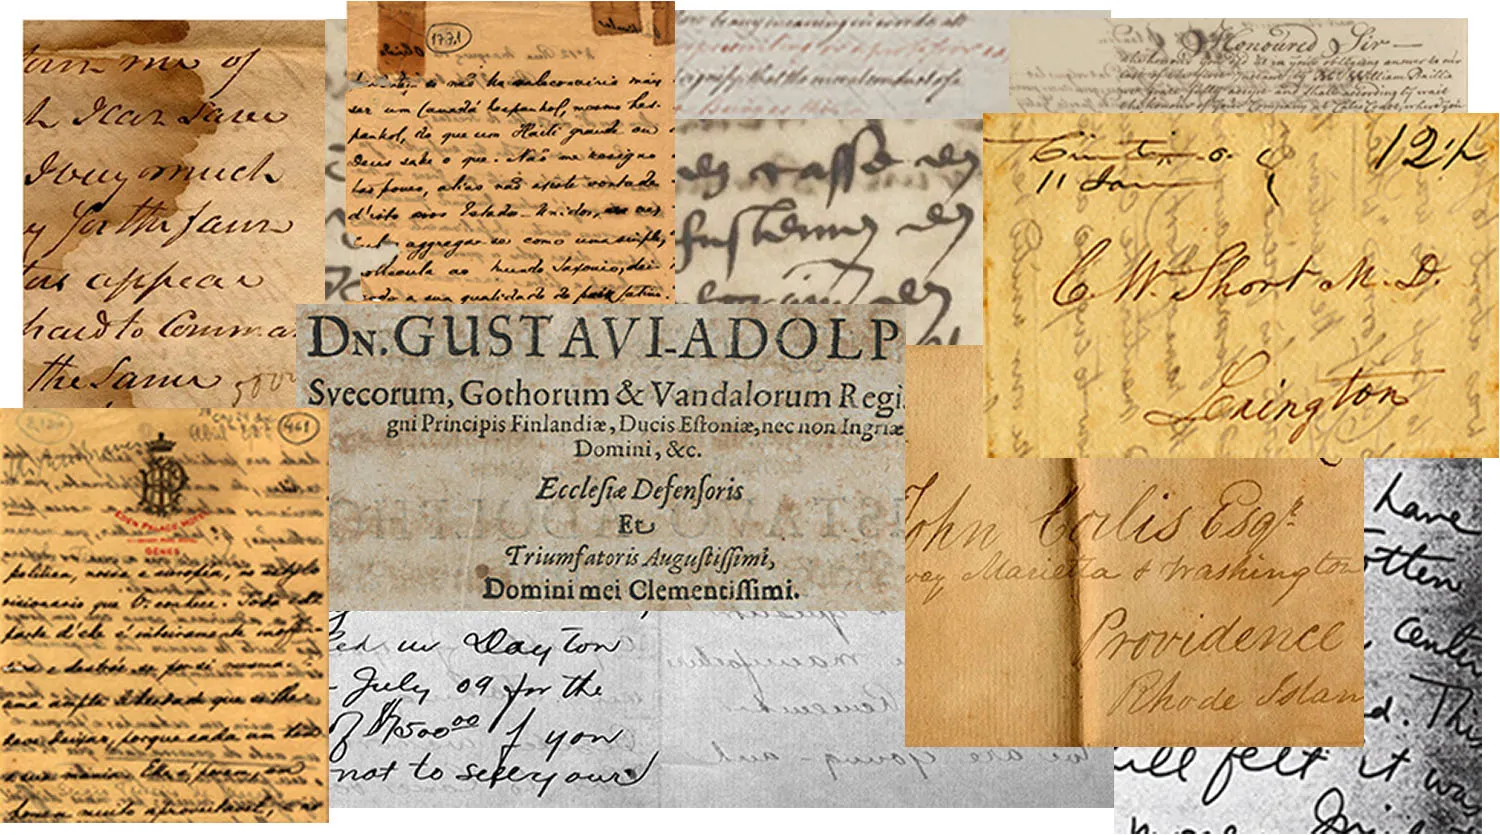
老化过程引起的许多问题的例子,如(右上和右下)老化,(左下和右中)背对前方的干扰和(左上)人为操纵作为胶带和(右下)皱纸造成的问题
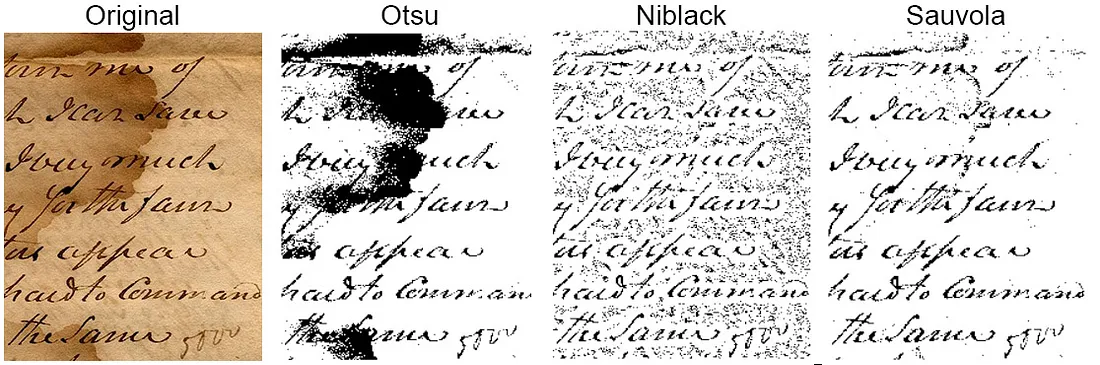
一些二值化技术,如 Otsu[2]、Sauvola[3] 和 Niblack[4],但它们在处理如图 1.2 所示的文档时效果并不理想:
在这里将探讨如何通过使用基于卷积神经网络(CNN)的U-Net架构训练的模型进行分类,来实现具有不同类型问题的文档二值化。CNN的典型用途在于分类任务,其中对图像的输出是一个单一的类别标签。然而,在许多视觉任务中,期望的结果不仅包括图像中物体是否存在,还包括其定位,即每个像素都应该被分配到一个类别标签。
训练代码地址:https://download.youkuaiyun.com/download/matt45m/89112642
2.开源数据集
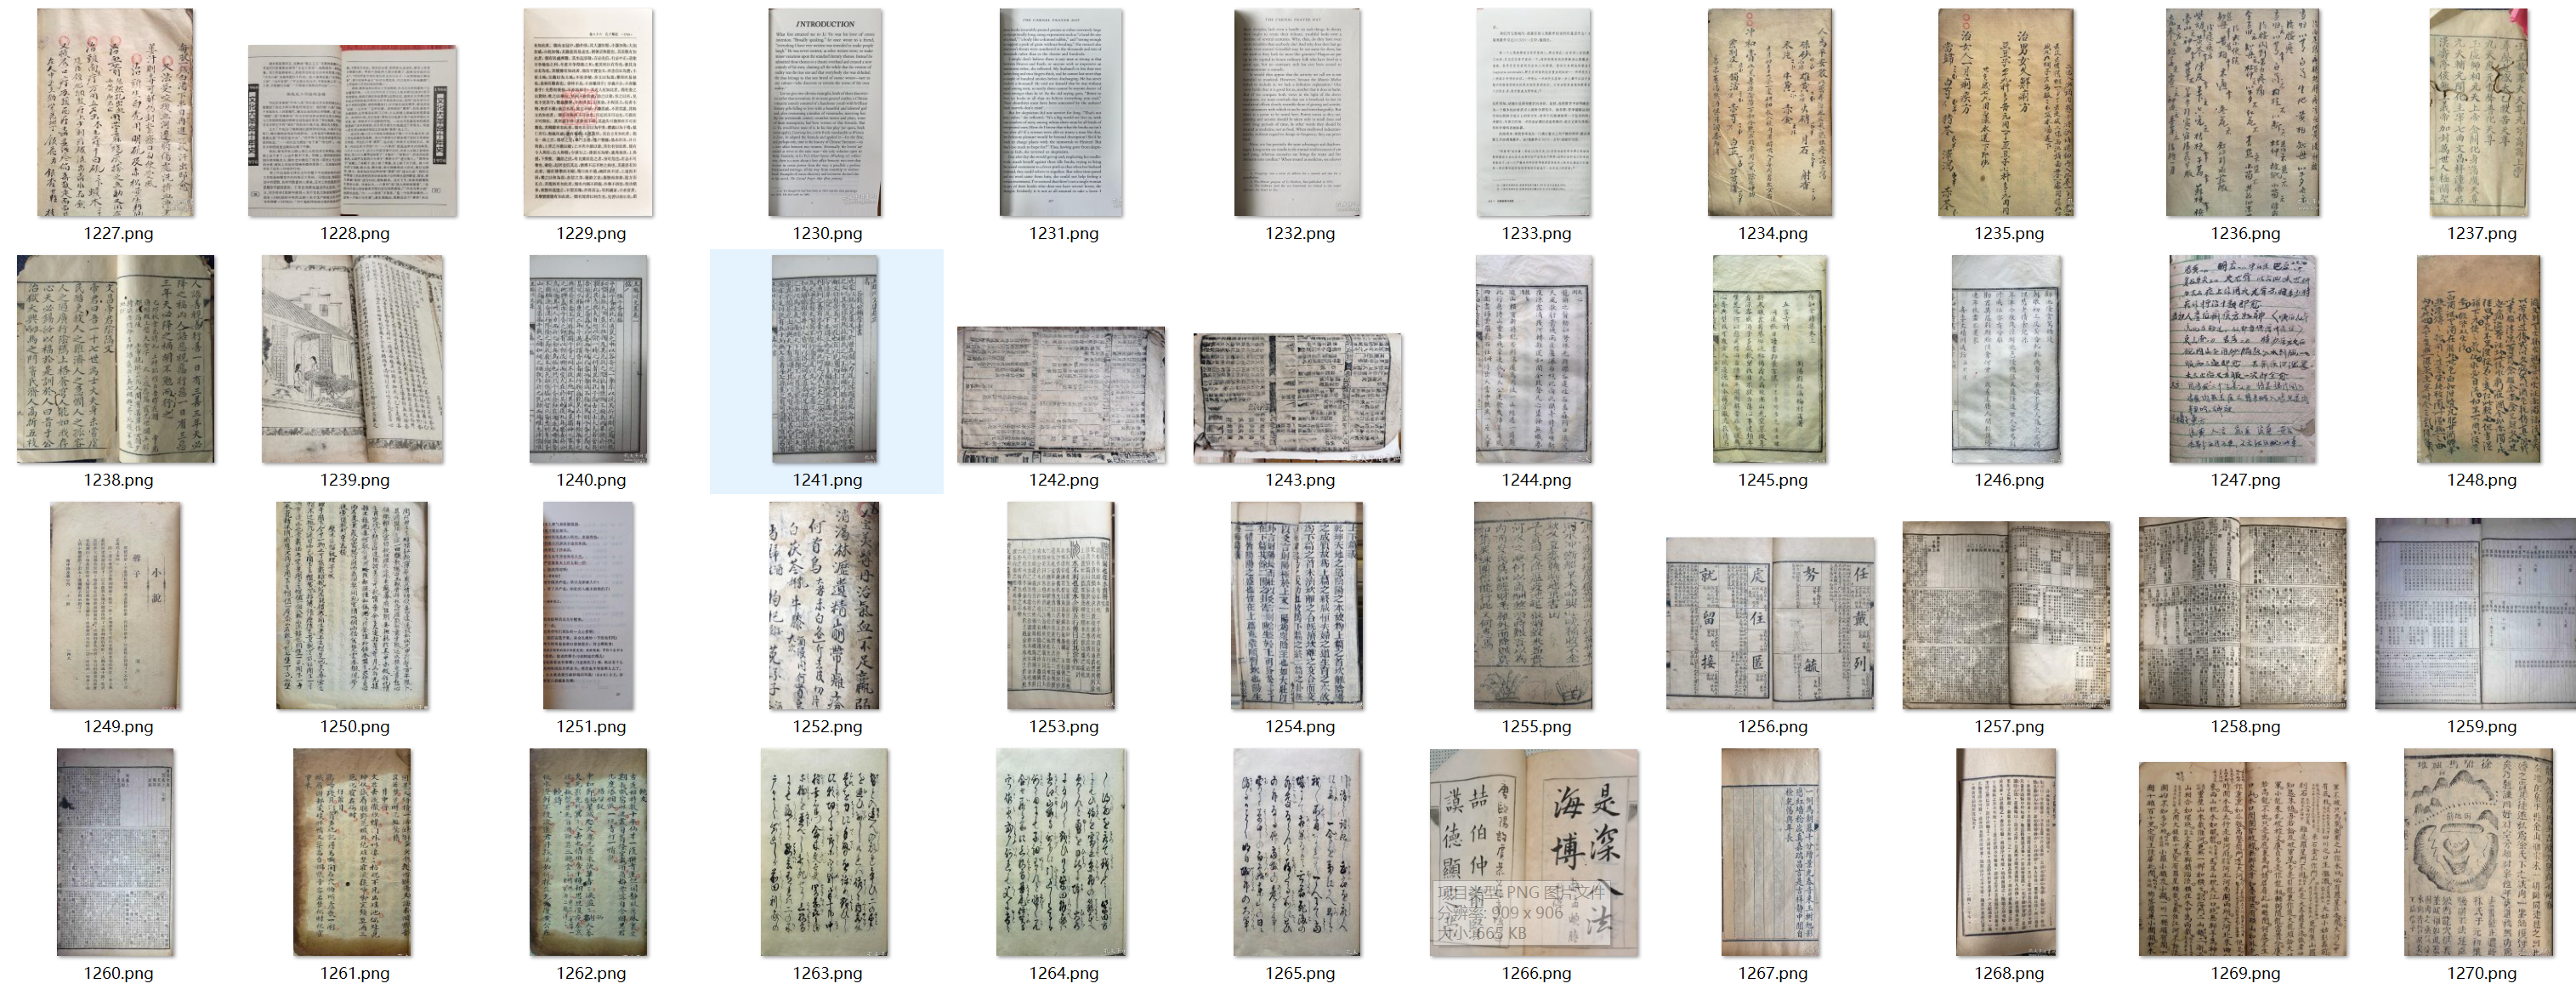
数据集由总共 5,027 张图像及其相应的真实情况(二值参考图像)组成。所使用的图像来自以下数据集:
- 文档图像二值化 (DIB) - Nabuco 数据集:15 张图像 [5]
- DIBCO 和 H-DIBCO (年份: 2009, 2010, 2011, 2012, 2013, 2014, 2016, 2017):116 张图像 [6]
- ICFHR 2016 棕榈叶手稿图像二值化挑战赛:99 张图像 [7]
- ICDAR2017 历史文档作家识别竞赛:4,782 张图像 [8]
- PHIBD 2012 波斯遗产图像二值化数据集:15 张图像 [9]
为了增加样本数量,将对原始图像和二值参考图像应用数据增强。由于模型只接受 256×256 尺寸的图像,将对图像进行分割而不是调整大小;这样,即不丢失信息,并且增加训练样本的数量。
2.1 数据增强
数据增强过程从对原始图像和其真实情况进行转换开始。选择了仅翻转(垂直和水平)和旋转(90°, 180° 和 270°)增强转换。其他转换也是可能的,例如模糊、添加噪声、改变亮度和对比度等。只是要记住,对于这些类型的转换,相应的真实情况不应接受它们。
应用转换后,结果图像和原始图像经过切割过程,产生 256×256 像素的图像。在生成增强的代码中,有可能增加结果图像的数量,使切割步骤小于 256,生成重叠的切割。
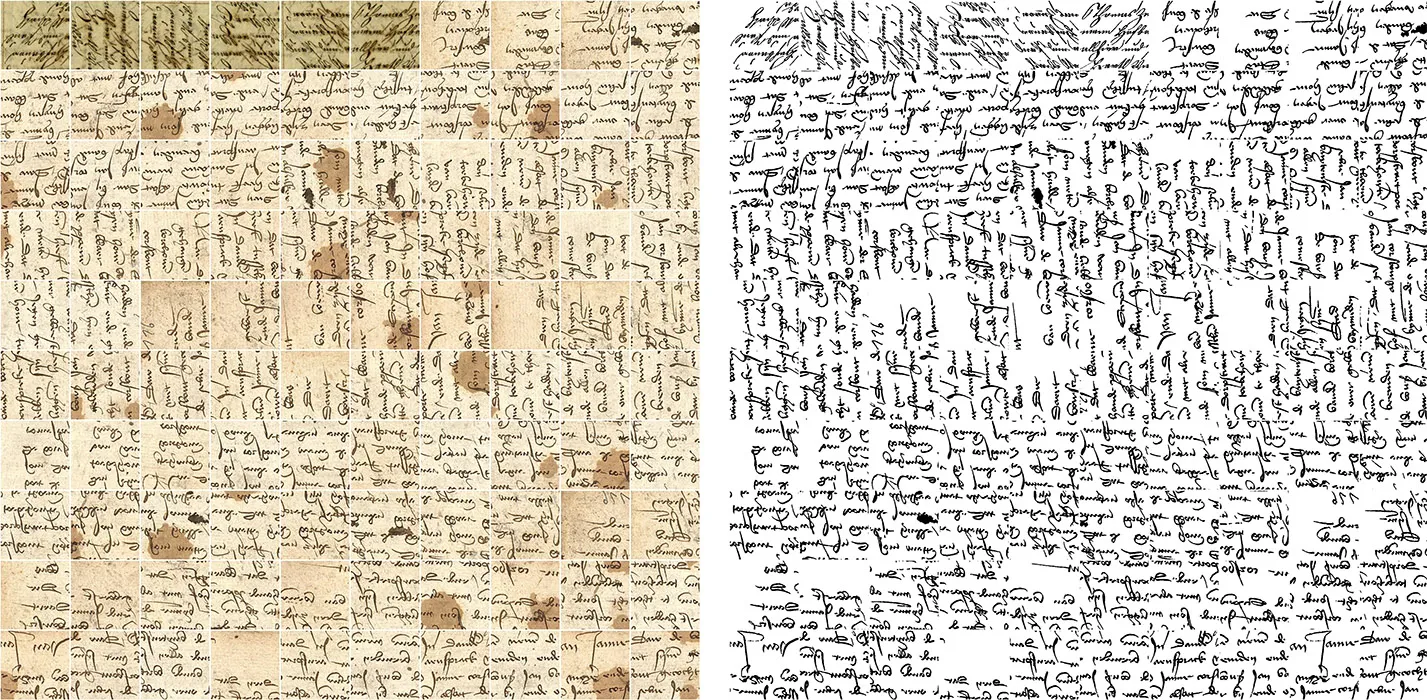
下图通过动画展示了切割过程。灰色线条显示了切割器将如何分割图像。左侧图像的步长为 256,而右侧为 128。请注意,在两种情况下裁剪图像的最终大小都是相同的(256×256),如白色方框中所示。


使用 5,027 张图像的数据集,步长为 256 的切割产生 27,630 张图像,而步长为 128 产生 97,146 张图像。请注意,这个数字甚至不到四倍,原因是接近图像边缘时的原因,不需要处理。
3. U-Net 模型架构
U-Net 是从传统的卷积神经网络演变而来的,最初由 Olaf Ronneberger 等人在 2015 年为生物医学图像分割设计和应用。一般的卷积神经网络专注于图像分类,其中输入是一张图像,输出是一个或多个模式标签。然而,在许多视觉任务中,期望的结果不仅包括图像中物体是否存在,还包括其定位,即每个像素都应该被分配到一个类别标签。
3.1 卷积
更正式地说,卷积是一个积分,它表示一个函数 g 在另一个函数 f 上移动时的重叠量,但在数字图像处理和深度学习中,卷积是将两个图像结合起来形成第三个图像的数学方法。通常,两个结合的图像中有一个不是图像,而是一个滤波器(或核心),一个值矩阵,其大小和值决定了卷积过程的效果类型。主要思想是将核心放置在每个像素上(横跨整个图像),并将其值与目标像素及其局部邻居相乘并求和。

卷积在数字图像处理中最常见的用途是边缘检测、模糊和去噪。虽然在 CNN 中卷积的中间层的效果众所周知,但可以通过展示最终应用来使其更加明显。

卷积在数字图像处理中最常见的用途是边缘检测、模糊和去噪。虽然在 CNN 中卷积的中间层的效果众所周知,但可以通过展示最终应用来使其更加明显。
上图 显示了在左侧图像上应用的不同核心的卷积,首先是模糊,然后是 Sobel 边缘检测。我使用了这两个卷积在原始图像的灰度版本上。使用 CNN 时,卷积分别应用于每个 RGB 通道,这在图像处理中并不常见,因为它会产生奇怪的结果。
填充:如上例所示,结果图像比原始图像小,差距与核心大小有关;核心越大,中心离图像边缘越远。为了产生与输入相同大小的输出,在边缘添加额外的像素进行填充。这样,当滑动时,核心可以让原始边缘像素位于其中心,同时延伸到边缘之外的额外像素。

如上图显示了使用 OpenCV 的 copyMakeBorder 函数的一些填充方法。原始图像来自核心滤波器,每个角落有四个颜色点以帮助展示每种方法的差异。

步幅:步幅是核心窗口在输入矩阵上每次移动的像素数。步幅为一意味着每次滑动间隔一个像素,因此每个单独的滑动都作为一个标准卷积。步幅为二意味着每次滑动间隔两个像素,在此过程中跳过每隔一个滑动,大致缩小了两倍。步幅为三意味着跳过每两个滑动,大致缩小了三倍,以此类推。
3.2 U-Net 的工作原理
该架构包含两条路径,如下图所示。第一条路径是收缩路径(也称为编码器),用于捕捉图像中的上下文。编码器只是传统的卷积和最大池化层堆栈。第二条路径是对称的扩展路径(也称为解码器),用于使用转置卷积进行精确定位,以对输入特征图进行上采样。它是一个端到端的全卷积网络,没有任何密集层。
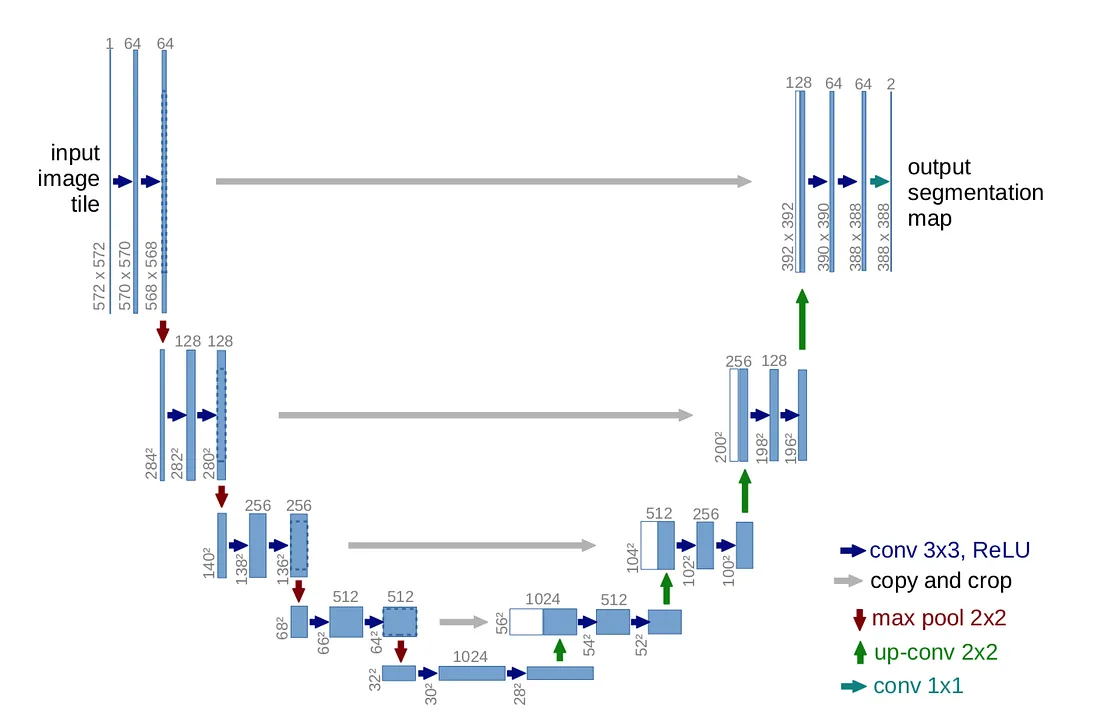
U-Net 架构(以最低分辨率的 32x32 像素为例)。每个蓝色框对应一个多通道特征图。通道数在框的顶部标注。x-y 大小在框的左下角提供。白色框表示复制的特征图。箭头表示不同的操作
每个编码器块接收输入,与相应裁剪的特征图进行连接,应用两个 3×3 卷积(无填充),每个卷积后跟一个修正线性单元(ReLu),然后是一个 2×2 最大池化操作,步幅为 2 进行下采样,如图 3.7 详细说明。
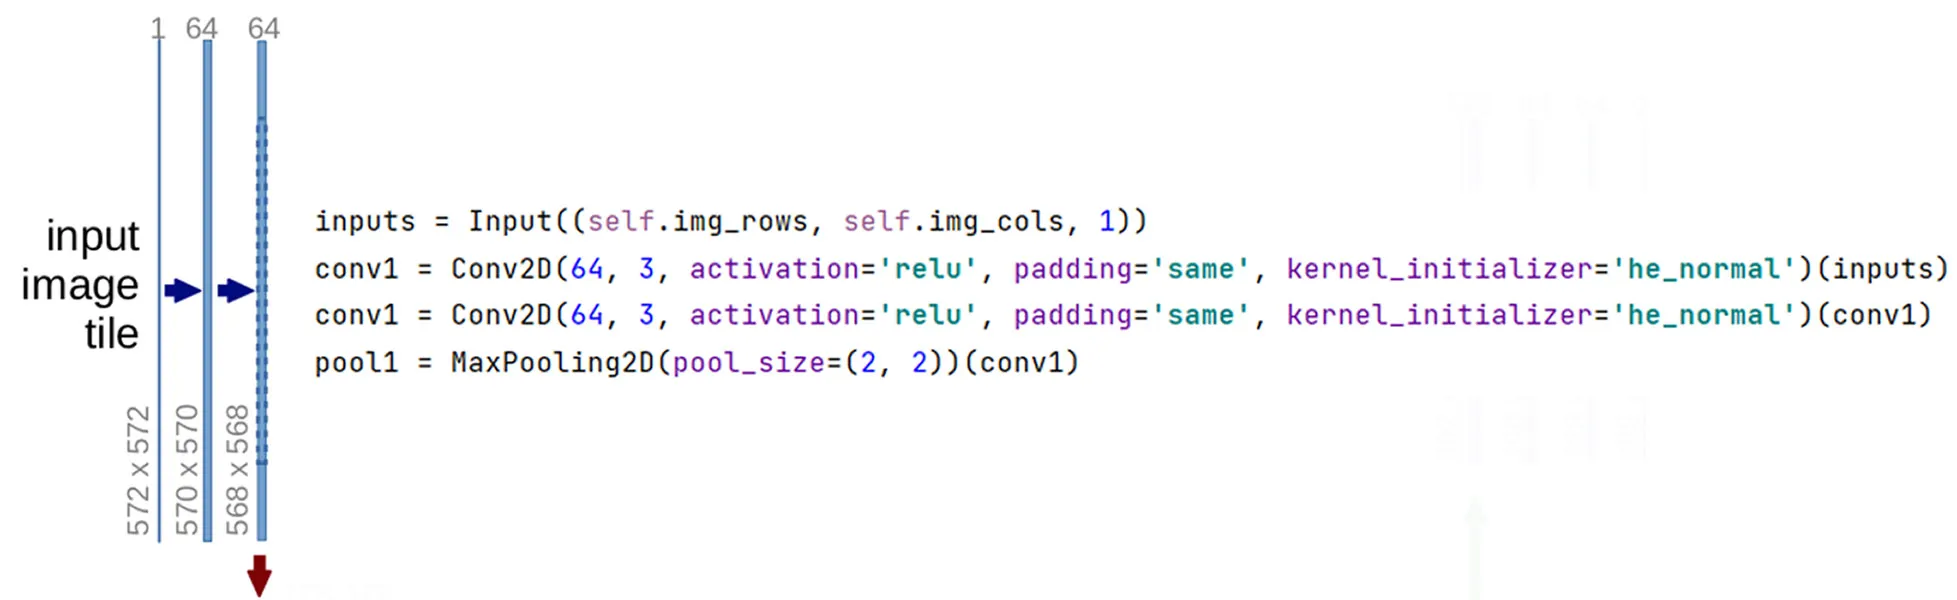
每个解码器块由两个卷积层组成,在本项目中,输入图像的形状从 256×256×1 变为 256×256×64,在第一个卷积过程中,特征通道的深度增加了 64 倍。请注意,在上图所示的代码中,使用了 padding=’same’(用零填充额外的边界,但可以在使用 padding=’valid’ 的 Keras 中进行非填充卷积);这样,卷积过程不会减小图像尺寸。Ronneberger 等人使用了非填充卷积,原因如下:‘由于每次卷积都会丢失边界像素,所以裁剪是必要的’ 。在 U-Net 的原始实现中,输入是一张 128×128×1 图像,编码器输出一个 8×8×256 形状。

解码器由扩展块组成,每个块包括使用 2×2 上采样层(转置卷积)对特征图进行上采样,该层将特征通道的数量减半,与编码器路径中相应裁剪的特征图进行连接,以及两个 3×3 卷积,每个卷积后跟一个 ReLU,如上图像所示。由于每次卷积都会丢失边界像素,裁剪是必要的。由于我在编码器中采用了填充卷积(padding=’same’),因此裁剪过程是不必要的。
在 U-Net 的原始实现中,解码器将形状从 8×8×256 增加到 128×128×1。该过程以一个 1×1 卷积结束,将每个 64 个组件的特征向量映射到所需的类别数。
4. 改进算法
在算法实现的过程中,发现很多文档图像都是整张A4左右的大小,而Unet的模型的输入最大为256,为了改进输入的局限,这里模型结构借签了Enet,代码使用的框架是Pytorch。
Unet网络部分:
import torch.nn as nn
import torch


class Inception(nn.Module):
    def __init__(self, in_ch, out_ch):
        super(Inception, self).__init__()
        hide_ch = out_ch // 2
        self.inception = nn.Sequential(
            nn.Conv2d(in_ch, hide_ch, 1),
            nn.BatchNorm2d(hide_ch),
            nn.ReLU(inplace=True),
            nn.Conv2d(hide_ch, hide_ch, 3, padding=1, groups=hide_ch),
            nn.BatchNorm2d(hide_ch),
            nn.ReLU(inplace=True),
            nn.Conv2d(hide_ch, out_ch, 1)
        )

    def forward(self, x):
        return self.inception(x)


class DoubleConv(nn.Module):
    def __init__(self, in_ch, out_ch):
        super(DoubleConv, self).__init__()
        self.doubleConv = nn.Sequential(
            Inception(in_ch, out_ch),
            nn.BatchNorm2d(out_ch),
            nn.ReLU(inplace=True),
            Inception(out_ch, out_ch),
            nn.BatchNorm2d(out_ch),
            nn.ReLU(inplace=True)
        )

    def forward(self, x):
        return self.doubleConv(x)


class UNet(nn.Module):
    def __init__(self, in_ch, out_ch):
        super(UNet, self).__init__()
        # down
        self.conv1 = DoubleConv(in_ch, 64)
        self.pool1 = nn.Conv2d(64, 64, 2, 2, groups=64)
        self.conv2 = DoubleConv(64, 128)
        self.pool2 = nn.Conv2d(128, 128, 2, 2, groups=128)
        self.bottom = DoubleConv(128, 256)
        # up
        self.up3 = nn.ConvTranspose2d(256, 128, 2, 2)
        self.conv3 = DoubleConv(128 * 2, 128)
        self.up4 = nn.ConvTranspose2d(128, 64, 2, 2)
        self.conv4 = DoubleConv(64 * 2, 64)
        self.out = nn.Conv2d(64, out_ch, 1)

    def forward(self, x):
        # down
        conv1 = self.conv1(x)
        pool1 = self.pool1(conv1)
        conv2 = self.conv2(pool1)
        pool2 = self.pool2(conv2)
        bottom = self.bottom(pool2)
        # up
        up3 = self.up3(bottom)
        merge3 = torch.cat([up3, conv2], dim=1)
        conv3 = self.conv3(merge3)
        up4 = self.up4(conv3)
        merge4 = torch.cat([up4, conv1], dim=1)
        conv4 = self.conv4(merge4)
        out = self.out(conv4)
        return nn.Sigmoid()(out)


if __name__ == '__main__':
    net = UNet(1, 2)
    inputs = torch.zeros((1, 1, 512, 512), dtype=torch.float32)
    output = net(inputs)
    print(output.size())
使用ENet实现:
import torch.nn as nn
import torch
class InitialBlock(nn.Module):

    def __init__(self,
                 in_channels,
                 out_channels,
                 bias=False,
                 relu=True):
        super().__init__()

        if relu:
            activation = nn.ReLU
        else:
            activation = nn.PReLU

        # Main branch - As stated above the number of output channels for this
        # branch is the total minus 3, since the remaining channels come from
        # the extension branch
        self.main_branch = nn.Conv2d(
            in_channels,
            out_channels - 1,
            kernel_size=3,
            stride=2,
            padding=1,
            bias=bias)

        # Extension branch
        self.ext_branch = nn.MaxPool2d(3, stride=2, padding=1)

        # Initialize batch normalization to be used after concatenation
        self.batch_norm = nn.BatchNorm2d(out_channels)

        # PReLU layer to apply after concatenating the branches
        self.out_activation = activation()

    def forward(self, x):
        main = self.main_branch(x)
        ext = self.ext_branch(x)

        # Concatenate branches
        out = torch.cat((main, ext), 1)

        # Apply batch normalization
        out = self.batch_norm(out)

        return self.out_activation(out)


class RegularBottleneck(nn.Module):

    def __init__(self,
                 channels,
                 internal_ratio=4,
                 kernel_size=3,
                 padding=0,
                 dilation=1,
                 asymmetric=False,
                 dropout_prob=0,
                 bias=False,
                 relu=True):
        super().__init__()

        # Check in the internal_scale parameter is within the expected range
        # [1, channels]
        if internal_ratio <= 1 or internal_ratio > channels:
            raise RuntimeError("Value out of range. Expected value in the "
                               "interval [1, {0}], got internal_scale={1}."
                               .format(channels, internal_ratio))

        internal_channels = channels // internal_ratio

        if relu:
            activation = nn.ReLU
        else:
            activation = nn.PReLU

        # Main branch - shortcut connection

        # Extension branch - 1x1 convolution, followed by a regular, dilated or
        # asymmetric convolution, followed by another 1x1 convolution, and,
        # finally, a regularizer (spatial dropout). Number of channels is constant.

        # 1x1 projection convolution
        self.ext_conv1 = nn.Sequential(
            nn.Conv2d(
                channels,
                internal_channels,
                kernel_size=1,
                stride=1,
                bias=bias), nn.BatchNorm2d(internal_channels), activation())

        # If the convolution is asymmetric we split the main convolution in
        # two. Eg. for a 5x5 asymmetric convolution we have two convolution:
        # the first is 5x1 and the second is 1x5.
        if asymmetric:
            self.ext_conv2 = nn.Sequential(
                nn.Conv2d(
                    internal_channels,
                    internal_channels,
                    kernel_size=(kernel_size, 1),
                    stride=1,
                    padding=(padding, 0),
                    dilation=dilation,
                    bias=bias), nn.BatchNorm2d(internal_channels), activation(),
                nn.Conv2d(
                    internal_channels,
                    internal_channels,
                    kernel_size=(1, kernel_size),
                    stride=1,
                    padding=(0, padding),
                    dilation=dilation,
                    bias=bias), nn.BatchNorm2d(internal_channels), activation())
        else:
            self.ext_conv2 = nn.Sequential(
                nn.Conv2d(
                    internal_channels,
                    internal_channels,
                    kernel_size=kernel_size,
                    stride=1,
                    padding=padding,
                    dilation=dilation,
                    bias=bias), nn.BatchNorm2d(internal_channels), activation())

        # 1x1 expansion convolution
        self.ext_conv3 = nn.Sequential(
            nn.Conv2d(
                internal_channels,
                channels,
                kernel_size=1,
                stride=1,
                bias=bias), nn.BatchNorm2d(channels), activation())

        self.ext_regul = nn.Dropout2d(p=dropout_prob)

        # PReLU layer to apply after adding the branches
        self.out_activation = activation()

    def forward(self, x):
        # Main branch shortcut
        main = x

        # Extension branch
        ext = self.ext_conv1(x)
        ext = self.ext_conv2(ext)
        ext = self.ext_conv3(ext)
        ext = self.ext_regul(ext)

        # Add main and extension branches
        out = main + ext

        return self.out_activation(out)


class DownsamplingBottleneck(nn.Module):

    def __init__(self,
                 in_channels,
                 out_channels,
                 internal_ratio=4,
                 return_indices=False,
                 dropout_prob=0,
                 bias=False,
                 relu=True):
        super().__init__()

        # Store parameters that are needed later
        self.return_indices = return_indices

        # Check in the internal_scale parameter is within the expected range
        # [1, channels]
        if internal_ratio <= 1 or internal_ratio > in_channels:
            raise RuntimeError("Value out of range. Expected value in the "
                               "interval [1, {0}], got internal_scale={1}. "
                               .format(in_channels, internal_ratio))

        internal_channels = in_channels // internal_ratio

        if relu:
            activation = nn.ReLU
        else:
            activation = nn.PReLU

        # Main branch - max pooling followed by feature map (channels) padding
        self.main_max1 = nn.MaxPool2d(
            2,
            stride=2,
            return_indices=return_indices)

        # Extension branch - 2x2 convolution, followed by a regular, dilated or
        # asymmetric convolution, followed by another 1x1 convolution. Number
        # of channels is doubled.

        # 2x2 projection convolution with stride 2
        self.ext_conv1 = nn.Sequential(
            nn.Conv2d(
                in_channels,
                internal_channels,
                kernel_size=2,
                stride=2,
                bias=bias), nn.BatchNorm2d(internal_channels), activation())

        # Convolution
        self.ext_conv2 = nn.Sequential(
            nn.Conv2d(
                internal_channels,
                internal_channels,
                kernel_size=3,
                stride=1,
                padding=1,
                bias=bias), nn.BatchNorm2d(internal_channels), activation())

        # 1x1 expansion convolution
        self.ext_conv3 = nn.Sequential(
            nn.Conv2d(
                internal_channels,
                out_channels,
                kernel_size=1,
                stride=1,
                bias=bias), nn.BatchNorm2d(out_channels), activation())

        self.ext_regul = nn.Dropout2d(p=dropout_prob)

        # PReLU layer to apply after concatenating the branches
        self.out_activation = activation()

    def forward(self, x):
        # Main branch shortcut
        if self.return_indices:
            main, max_indices = self.main_max1(x)
        else:
            main = self.main_max1(x)

        # Extension branch
        ext = self.ext_conv1(x)
        ext = self.ext_conv2(ext)
        ext = self.ext_conv3(ext)
        ext = self.ext_regul(ext)

        # Main branch channel padding
        n, ch_ext, h, w = ext.size()
        ch_main = main.size()[1]
        padding = torch.zeros(n, ch_ext - ch_main, h, w)

        # Before concatenating, check if main is on the CPU or GPU and
        # convert padding accordingly
        if main.is_cuda:
            padding = padding.cuda()

        # Concatenate
        if int(ch_ext - ch_main) == 48:
            main = torch.cat((main, main), 1)
            main = torch.cat((main, main), 1)
        else:
            main = torch.cat((main, main), 1)
        # main = torch.cat((main, padding), 1)

        # Add main and extension branches
        out = main + ext

        return self.out_activation(out), max_indices


class UpsamplingBottleneck(nn.Module):
    def __init__(self,
                 in_channels,
                 out_channels,
                 internal_ratio=4,
                 dropout_prob=0,
                 bias=False,
                 relu=True):
        super().__init__()

        # Check in the internal_scale parameter is within the expected range
        # [1, channels]
        if internal_ratio <= 1 or internal_ratio > in_channels:
            raise RuntimeError("Value out of range. Expected value in the "
                               "interval [1, {0}], got internal_scale={1}. "
                               .format(in_channels, internal_ratio))

        internal_channels = in_channels // internal_ratio

        if relu:
            activation = nn.ReLU
        else:
            activation = nn.PReLU

        # Main branch - max pooling followed by feature map (channels) padding
        self.main_conv1 = nn.Sequential(
            nn.Conv2d(in_channels, out_channels, kernel_size=1, bias=bias),
            nn.BatchNorm2d(out_channels))

        # Remember that the stride is the same as the kernel_size, just like
        # the max pooling layers
        self.main_unpool1 = nn.MaxUnpool2d(kernel_size=2)

        # Extension branch - 1x1 convolution, followed by a regular, dilated or
        # asymmetric convolution, followed by another 1x1 convolution. Number
        # of channels is doubled.
        # self.up1 = nn.ConvTranspose2d(out_channels, out_channels, 2, 2)

        # 1x1 projection convolution with stride 1
        self.ext_conv1 = nn.Sequential(
            nn.Conv2d(
                in_channels, internal_channels, kernel_size=1, bias=bias),
            nn.BatchNorm2d(internal_channels), activation())

        # Transposed convolution
        self.ext_tconv1 = nn.ConvTranspose2d(
            internal_channels,
            internal_channels,
            kernel_size=2,
            stride=2,
            bias=bias)
        self.ext_tconv1_bnorm = nn.BatchNorm2d(internal_channels)
        self.ext_tconv1_activation = activation()

        # 1x1 expansion convolution
        self.ext_conv2 = nn.Sequential(
            nn.Conv2d(
                internal_channels, out_channels, kernel_size=1, bias=bias),
            nn.BatchNorm2d(out_channels), activation())

        self.ext_regul = nn.Dropout2d(p=dropout_prob)

        # PReLU layer to apply after concatenating the branches
        self.out_activation = activation()

    def forward(self, x, max_indices, output_size):
        # Main branch shortcut
        main = self.main_conv1(x)
        # main = self.up1(main)
        main = nn.Upsample(size=output_size[2:], mode='bilinear')(main)
        # main = self.main_unpool1(
        #     main, max_indices, output_size=output_size)

        # Extension branch
        ext = self.ext_conv1(x)
        ext = self.ext_tconv1(ext, output_size=output_size)
        ext = self.ext_tconv1_bnorm(ext)
        ext = self.ext_tconv1_activation(ext)
        ext = self.ext_conv2(ext)
        ext = self.ext_regul(ext)

        # Add main and extension branches
        out = main + ext

        return self.out_activation(out)


class ENet(nn.Module):
    def __init__(self, num_classes, encoder_relu=True, decoder_relu=True):
        super().__init__()

        self.initial_block = InitialBlock(1, 16, relu=encoder_relu)

        # Stage 1 - Encoder
        self.downsample1_0 = DownsamplingBottleneck(
            16,
            64,
            return_indices=True,
            dropout_prob=0.01,
            relu=encoder_relu)
        self.regular1_1 = RegularBottleneck(
            64, padding=1, dropout_prob=0.01, relu=encoder_relu)
        self.regular1_2 = RegularBottleneck(
            64, padding=1, dropout_prob=0.01, relu=encoder_relu)
        self.regular1_3 = RegularBottleneck(
            64, padding=1, dropout_prob=0.01, relu=encoder_relu)
        self.regular1_4 = RegularBottleneck(
            64, padding=1, dropout_prob=0.01, relu=encoder_relu)

        # Stage 2 - Encoder
        self.downsample2_0 = DownsamplingBottleneck(
            64,
            128,
            return_indices=True,
            dropout_prob=0.1,
            relu=encoder_relu)
        self.regular2_1 = RegularBottleneck(
            128, padding=1, dropout_prob=0.1, relu=encoder_relu)
        self.dilated2_2 = RegularBottleneck(
            128, dilation=2, padding=2, dropout_prob=0.1, relu=encoder_relu)
        self.asymmetric2_3 = RegularBottleneck(
            128,
            kernel_size=5,
            padding=2,
            asymmetric=True,
            dropout_prob=0.1,
            relu=encoder_relu)
        self.dilated2_4 = RegularBottleneck(
            128, dilation=4, padding=4, dropout_prob=0.1, relu=encoder_relu)
        self.regular2_5 = RegularBottleneck(
            128, padding=1, dropout_prob=0.1, relu=encoder_relu)
        self.dilated2_6 = RegularBottleneck(
            128, dilation=8, padding=8, dropout_prob=0.1, relu=encoder_relu)
        self.asymmetric2_7 = RegularBottleneck(
            128,
            kernel_size=5,
            asymmetric=True,
            padding=2,
            dropout_prob=0.1,
            relu=encoder_relu)
        self.dilated2_8 = RegularBottleneck(
            128, dilation=16, padding=16, dropout_prob=0.1, relu=encoder_relu)

        # Stage 3 - Encoder
        self.regular3_0 = RegularBottleneck(
            128, padding=1, dropout_prob=0.1, relu=encoder_relu)
        self.dilated3_1 = RegularBottleneck(
            128, dilation=2, padding=2, dropout_prob=0.1, relu=encoder_relu)
        self.asymmetric3_2 = RegularBottleneck(
            128,
            kernel_size=5,
            padding=2,
            asymmetric=True,
            dropout_prob=0.1,
            relu=encoder_relu)
        self.dilated3_3 = RegularBottleneck(
            128, dilation=4, padding=4, dropout_prob=0.1, relu=encoder_relu)
        self.regular3_4 = RegularBottleneck(
            128, padding=1, dropout_prob=0.1, relu=encoder_relu)
        self.dilated3_5 = RegularBottleneck(
            128, dilation=8, padding=8, dropout_prob=0.1, relu=encoder_relu)
        self.asymmetric3_6 = RegularBottleneck(
            128,
            kernel_size=5,
            asymmetric=True,
            padding=2,
            dropout_prob=0.1,
            relu=encoder_relu)
        self.dilated3_7 = RegularBottleneck(
            128, dilation=16, padding=16, dropout_prob=0.1, relu=encoder_relu)

        # Stage 4 - Decoder
        self.upsample4_0 = UpsamplingBottleneck(
            128, 64, dropout_prob=0.1, relu=decoder_relu)
        self.regular4_1 = RegularBottleneck(
            128, padding=1, dropout_prob=0.1, relu=decoder_relu)
        self.regular4_2 = RegularBottleneck(
            128, padding=1, dropout_prob=0.1, relu=decoder_relu)

        # Stage 5 - Decoder
        self.upsample5_0 = UpsamplingBottleneck(
            128, 16, dropout_prob=0.1, relu=decoder_relu)
        self.regular5_1 = RegularBottleneck(
            32, padding=1, dropout_prob=0.1, relu=decoder_relu)
        self.regular5_2 = RegularBottleneck(
            32, padding=1, dropout_prob=0.1, relu=decoder_relu)
        self.transposed_conv = nn.ConvTranspose2d(
            32,
            num_classes,
            kernel_size=3,
            stride=2,
            padding=1,
            bias=False)

    def forward(self, x):
        # Initial block
        input_size = x.size()
        x = self.initial_block(x)

        # Stage 1 - Encoder
        stage1_input_size = x.size()
        stage1_input = x
        x, max_indices1_0 = self.downsample1_0(x)
        x = self.regular1_1(x)
        x = self.regular1_2(x)
        x = self.regular1_3(x)
        x = self.regular1_4(x)

        # Stage 2 - Encoder
        stage2_input_size = x.size()
        stage2_input = x
        x, max_indices2_0 = self.downsample2_0(x)
        x = self.regular2_1(x)
        x = self.dilated2_2(x)
        x = self.asymmetric2_3(x)
        x = self.dilated2_4(x)
        x = self.regular2_5(x)
        x = self.dilated2_6(x)
        x = self.asymmetric2_7(x)
        x = self.dilated2_8(x)

        # Stage 3 - Encoder
        x = self.regular3_0(x)
        x = self.dilated3_1(x)
        x = self.asymmetric3_2(x)
        x = self.dilated3_3(x)
        x = self.regular3_4(x)
        x = self.dilated3_5(x)
        x = self.asymmetric3_6(x)
        x = self.dilated3_7(x)

        # Stage 4 - Decoder
        x = self.upsample4_0(x, max_indices2_0, output_size=stage2_input_size)
        x = torch.cat([stage2_input, x], dim=1)
        x = self.regular4_1(x)
        x = self.regular4_2(x)

        # Stage 5 - Decoder
        x = self.upsample5_0(x, max_indices1_0, output_size=stage1_input_size)
        x = torch.cat([stage1_input, x], dim=1)
        x = self.regular5_1(x)
        x = self.regular5_2(x)
        x = self.transposed_conv(x, output_size=input_size)

        return nn.Sigmoid()(x)
if __name__ == '__main__':
    net = ENet(2)
    inputs = torch.zeros((1, 1, 512, 512), dtype=torch.float32)
    output = net(inputs)
    print(output.size())
6.数据集
6.1 数据集准备
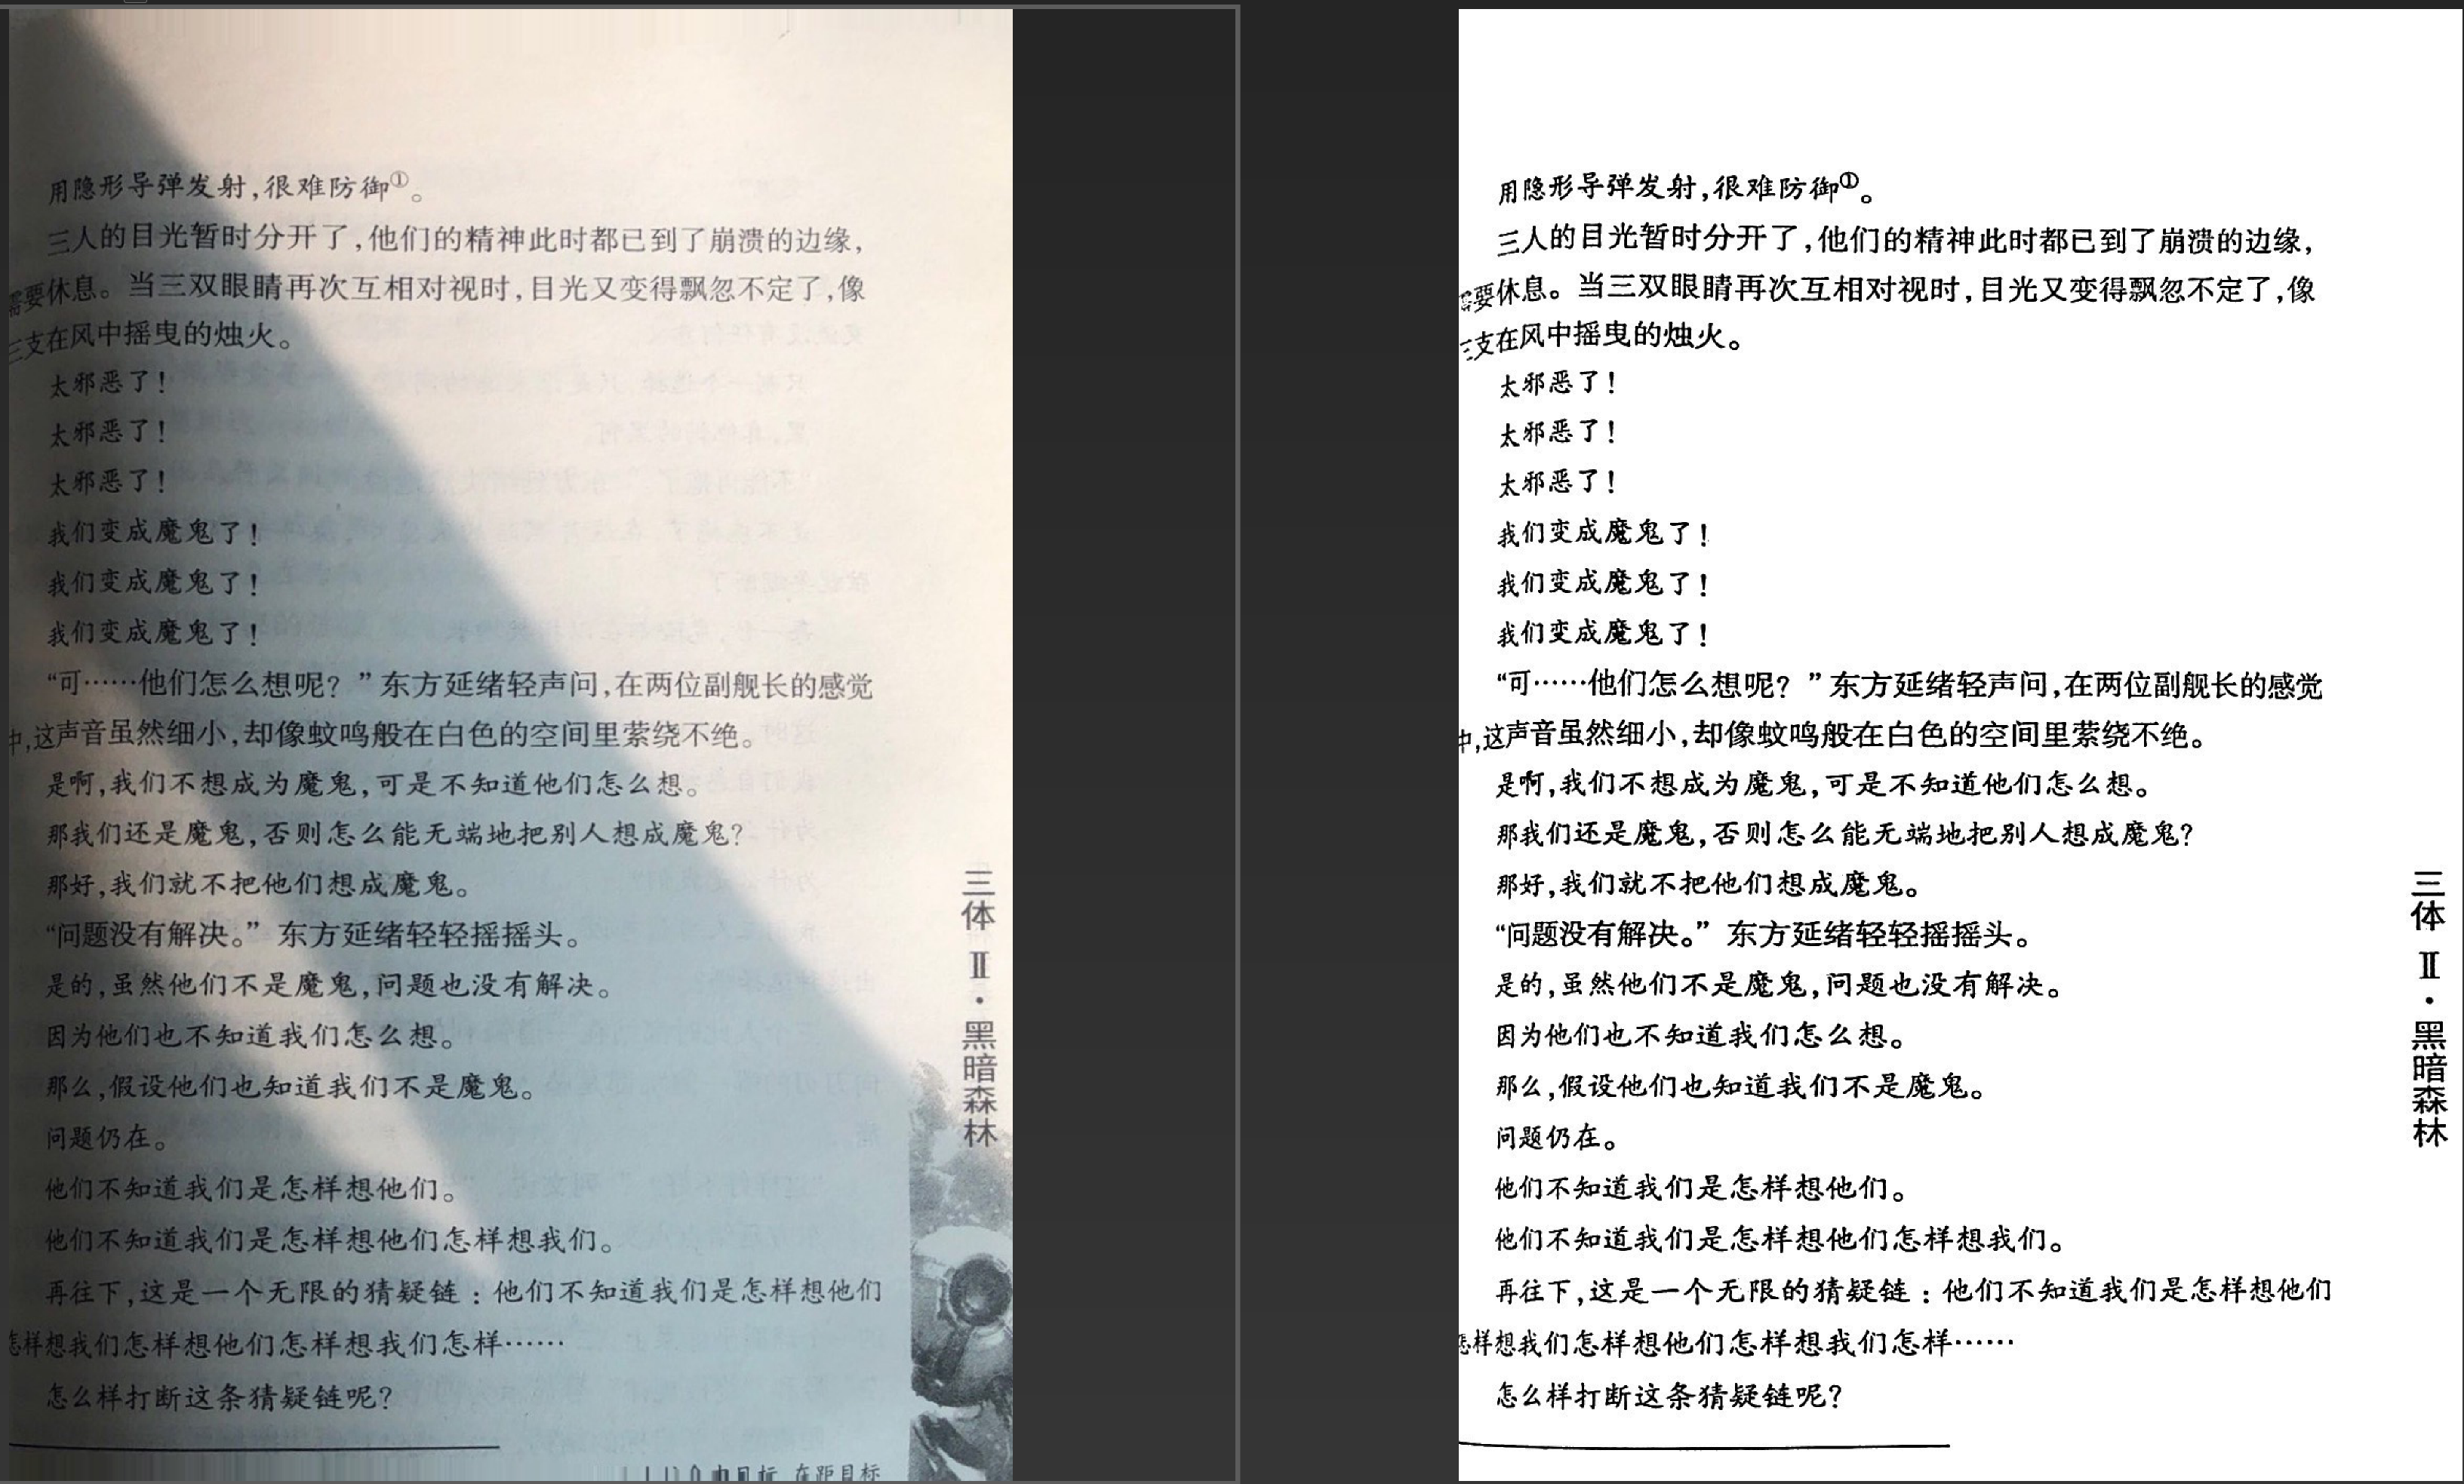
数据集是使用PS或者类似的工具做去掉背景处理出来的标签文件,如下图:

数据集标注好之后,把清除背景的图像放一个目录,原图放一个目录,图像的名称要相同,层级结构如下图:
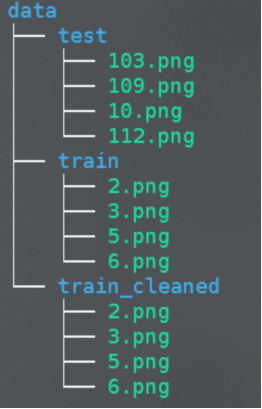
data/test存放测试图像
data/train存放训练原始图像
data/train_cleaned存放去背景后的图像
7.环境安装与训练
7.1 环境安装
conda create --name unet python=3.7
conda activate unet
conda install pytorch torchvision cudatoolkit=10.2 -c pytorch
pip install cython matplotlib tqdm opencv-python scipy pillow
7.2 训练
运行以下命令:
python train.py --data_path data --batch_size 64 --epoch 100 --checkpoint_path checkpoints --lr 0.001
参数说明:
•–data_path:训练数据目录,在该目录下需要有train和train_cleaned两个文件夹
•–batch_size:训练batch size
•–epoch:训练epoch数
•–checkpoint_path:模型保存目录
•–lr:学习率
7.3 测试
python predict.py --image_path data/test --weight checkpoints/last.pth --output_path results
参数说明:
•–weight: 训练得到的模型
•–image_path:图像文件夹路径
•–output_path:输出文件夹路径
7.4 转成onnx模型
为了之后推理方便,这里把模型转成onnx模型,onnx模型可以使用onnxruntime或者opencv dnn进行推理,也可以转成ncnn或者别的移动端可部署的模型进行推理,详细步骤可参考我之前的博客:使用深度学习解决拍照文档复杂背景二值化问题
运行以下命令:
python convert_to_onnx.py --input checkpoints/last.pth --output checkpoints/last.onnx


 2万+
2万+


 到【灌水乐园】发言


