


-
将绑定好的 Sprite 拖入场景中,为其添加 Sprite Skin 脚本。
-
点击 Create Bones 按钮,生成骨骼
在 C# 中,自定义特性(Attribute)的命名有个约定俗成的“语法糖”:
-
如果你定义的类名是
XXXAttribute,那么你可以在使用的时候省略掉Attribute后缀,只写[XXX]
public class TestAttribute : Attribute {}

[Test] // 等价于 [TestAttribute]


例如:
public class MyCustomAttribute : Attribute
{
    public MyCustomAttribute(string msg) { }
}


[MyCustom("Hello")] // OK,自动推断 MyCustomAttribute
public class MyClass {}
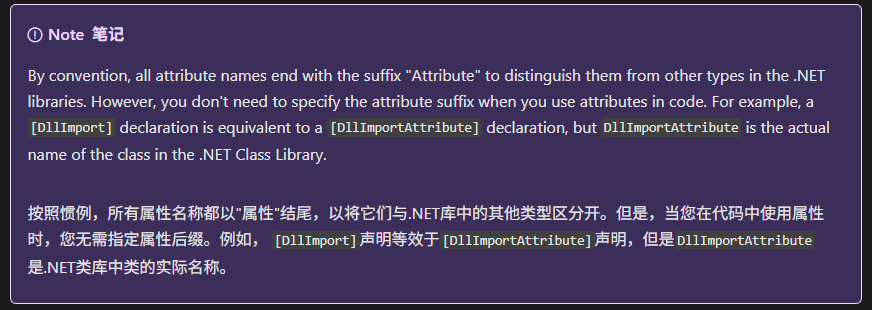
PS:Attribute 类 (System) | Microsoft Learn
实现原理
1、隐式接口实现:正常函数实现即可
例如:public void Init(){}
2、显式式接口实现:函数前添加接口作为前缀,并且函数前不能再使用修饰符修饰
例如:void IInterface.Init(){}
public interface IUpdate
{
    void Update();
}

public class InputManager : SingleTon<InputManager>, IUpdate
{
    void IUpdate.Update()
    {
        // 在这里实现具体的更新逻辑
        // 例如:处理输入事件
    }
}

InputManager inputManager = InputManager.Instance; // 获取单例实例
IUpdate updateInterface = inputManager; // 将实例转换为IUpdate接口类型
updateInterface.Update(); // 调用Update方法
使用显式接口成员执行体通常有两个目的:
1、因为显式接口成员执行体不能通过类的实例进行访问,这就可以从公有接口中把接口的实现部分单独分离开。如果一个类只在内部使用该接口,而类的使用者不会直接使用到该接口,这种显式接口成员执行体就可以起到作用。
2、显式接口成员执行体避免了接口成员之间因为同名而发生混淆。如果一个类希望对名称和返回类型相同的接口成员采用不同的实现方式,这就必须要使用到显式接口成员执行体。如果没有显式接口成员执行体,那么对于名称和返回类型不同的接口成员,类也无法进行实现。
1. Event 类的用途
Event 类在编辑器脚本中非常有用,尤其是在处理自定义编辑器窗口(EditorWindow)或自定义编辑器控件(Editor)时。通过 Event 类,你可以检测和处理各种输入事件,从而实现自定义的交互逻辑。
2. Event 类的主要属性和方法
-
type:事件的类型,如EventType.MouseDown、EventType.MouseUp、EventType.KeyDown等。 -
button:鼠标按钮(左键、中键、右键)。 -
keyCode:按键的键码。 -
delta:鼠标移动的相对位置。 -
.mousePosition:鼠标的位置。 -
Use:标记事件已经被处理。
3. Event.Use 方法
Event.Use 方法用于标记事件已经被处理,这样 Unity 就不会将该事件传递给其他处理程序。这在处理自定义控件时非常重要,可以避免事件被多次处理。
Layer 配置存储在项目的 ProjectSettings/TagManager.asset 文件中
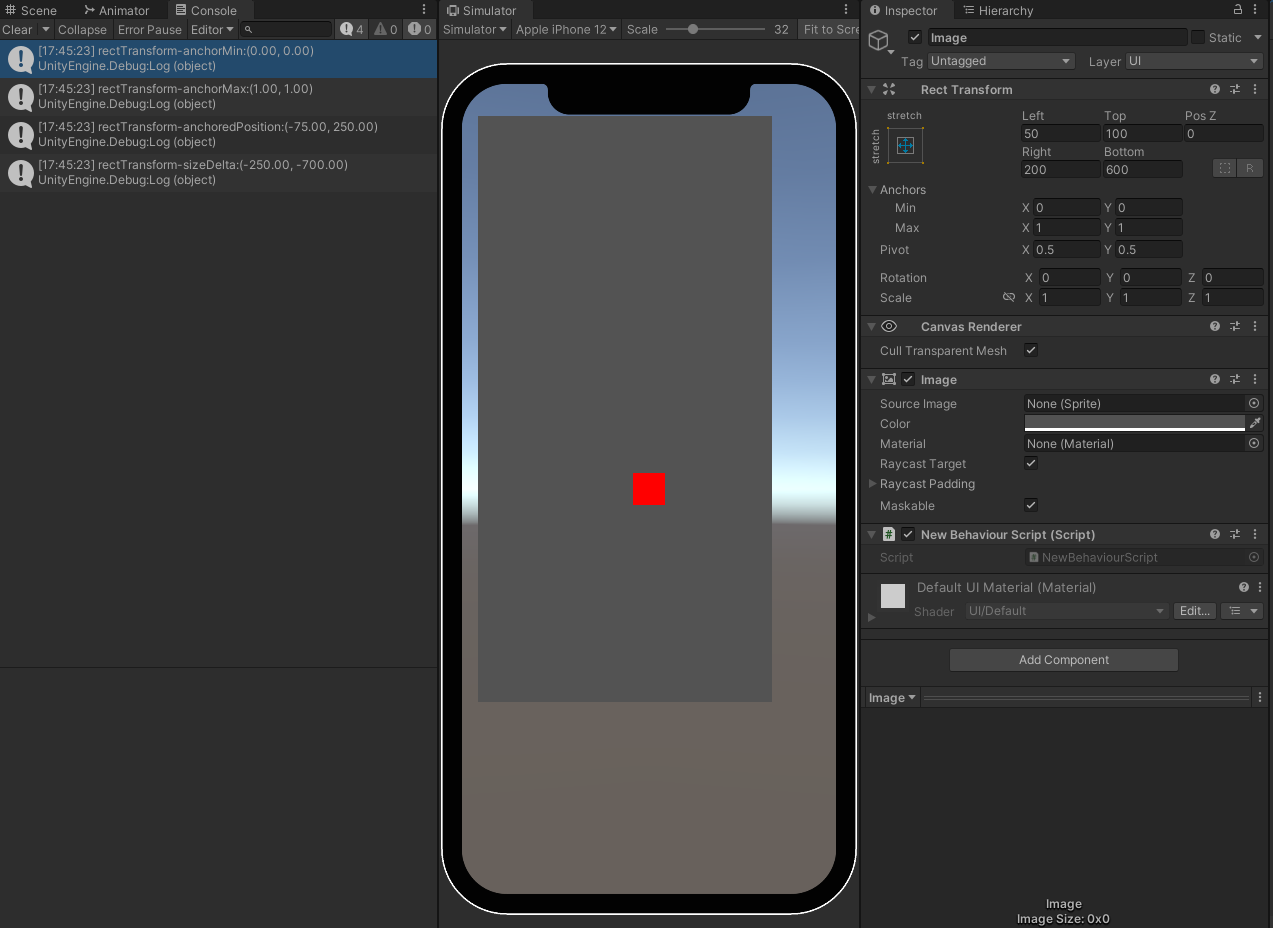
关于RectTransform: 下面是全屏显示
           RectTransform transform = GetComponent<RectTransform>();
           transform.anchorMin = Vector2.zero;
           transform.anchorMax = Vector2.one;
           transform.anchoredPosition = Vector2.zero;
           transform.sizeDelta = Vector2.zero;
anchoredPosition: (Left - Right )/2, (Bottom-Top)/2
sizeDelta: -(Left + Right),-(Top+Bottom)
左下,右上
    RectTransform rectTransform = GetComponent<RectTransform>();
    Debug.Log("rectTransform.offsetMin:" + rectTransform.offsetMin);
    Debug.Log("rectTransform.offsetMax:" + rectTransform.offsetMax);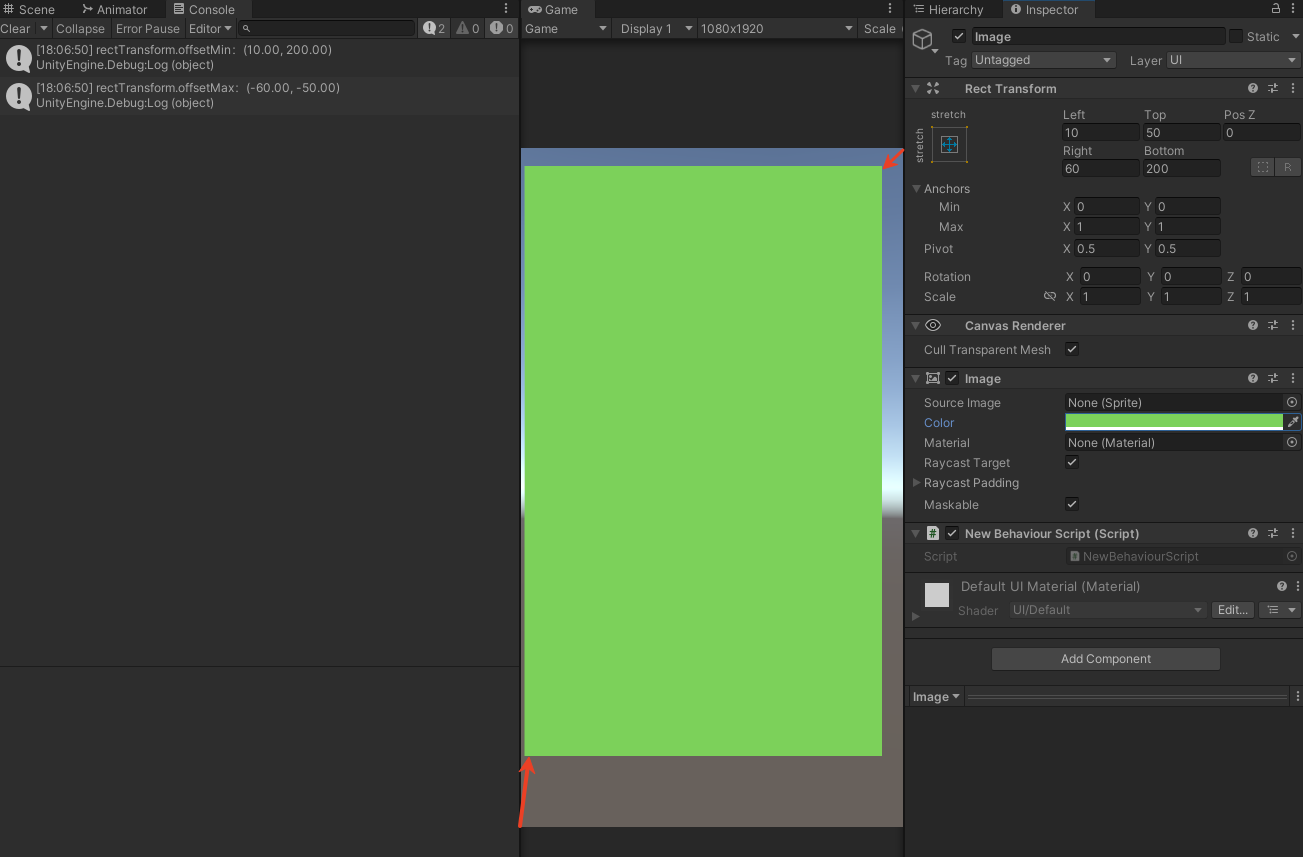
朝向的旋转角度

Vector3 targetPosition = new Vector3(10, 0, 10); // 目标点位置
Vector3 cameraPosition = new Vector3(0, 0, 0); // 相机位置
Quaternion rotation = Quaternion.LookRotation(targetPosition - cameraPosition, Vector3.up);


    {
        Vector3 direction = transform.position - B.transform.position;

        // 归一化方向向量
        direction.Normalize();

        // 计算旋转角度
        Quaternion rotation = Quaternion.LookRotation(direction);

        // 将旋转角度应用到点 A 上
        transform.rotation = rotation;
}
Unity 中的渲染队列是按照从低到高的顺序进行渲染的,队列值越小越先渲染。
-
Background(队列值 1000):用于渲染背景,如天空盒,是最早被渲染的队列。 -
Geometry (队列值 2000):主要用于渲染不透明物体
-
AlphaTest(队列值 2450):用于需要进行 Alpha 测试的物体,渲染顺序在Geometry之后。 -
Transparent(队列值 3000):用于渲染半透明物体,渲染顺序在AlphaTest之后。 -
Overlay(队列值 4000):用于渲染覆盖效果,如镜头光晕,是最后被渲染的队列。 -
Material mat
mat.renderQueue = (int)UnityEngine.Rendering.RenderQueue.Overlay;
-----------------------------------------------------------
点积的计算公式是:
Dot(A,B)=∣A∣×∣B∣×cos(θ)
其中,∣A∣ 和 ∣B∣ 是向量的长度,θ 是两个向量之间的夹角。
-
如果两个向量方向相同(夹角为0°),点积为正值。
-
如果两个向量方向相反(夹角为180°),点积为负值。
-
如果两个向量垂直(夹角为90°),点积为0。
-
System.Math.Sign是一个数学函数,用于返回一个数值的符号。 -
它的返回值为:
-
1,如果输入值为正数。 -
-1,如果输入值为负数。 -
0,如果输入值为0。
-
-----------------------------------------------------------
System.DateTime.UtcNow
返回从格林威治时间1970年1月1日00:00:00至今的总秒数
int unixTimestamp = 1631021641; // 假设这是你的int数值
DateTime dateTime = new DateTime(1970, 1, 1, 0, 0, 0, DateTimeKind.Utc); // 1970年1月1日作为起点
dateTime = dateTime.AddSeconds(unixTimestamp).ToLocalTime(); // 将秒数加到起点时间上,并转换为本地时间

// 如果你想要保留UTC时间,可以不调用ToLocalTime()方法
// dateTime = dateTime.AddSeconds(unixTimestamp); // 直接得到UTC时间

DateTime dateTime = DateTime.Now; // 假设这是你要转换的时间
string timeString = dateTime.ToString("HH:mm:ss"); // 格式化为时分秒

这里的"HH:mm:ss"格式说明符代表:

HH:24小时制的小时(00到23)
mm:分钟(00到59)
ss:秒(00到59)

如果你需要12小时制的时间,可以使用"hh:mm:ss tt"格式说明符,其中tt代表上午(AM)或下午(PM)。
string timeString = dateTime.ToString("hh:mm:ss tt"); // 格式化为12小时制的时分秒
使用相同材质的不同对象的颜色设置:
Renderer renderer = hayBundle.GetComponent<Renderer>();
if (renderer != null)
{
MaterialPropertyBlock props = new MaterialPropertyBlock();
props.SetColor("_Color", new Color(Random.Range(0,1.0f), Random.Range(0, 1.0f), Random.Range(0, 1.0f)));
renderer.SetPropertyBlock(props);
}
float CalculateRotationAngle(Transform begin, Transform end)
{
Vector3 dir = (end.position - begin.position).normalized;
float tanVal = dir.z/dir.x;
float angle = -Mathf.Atan(tanVal) * Mathf.Rad2Deg;
if (dir.x < 0)
angle += 180.0f;
return angle;
}
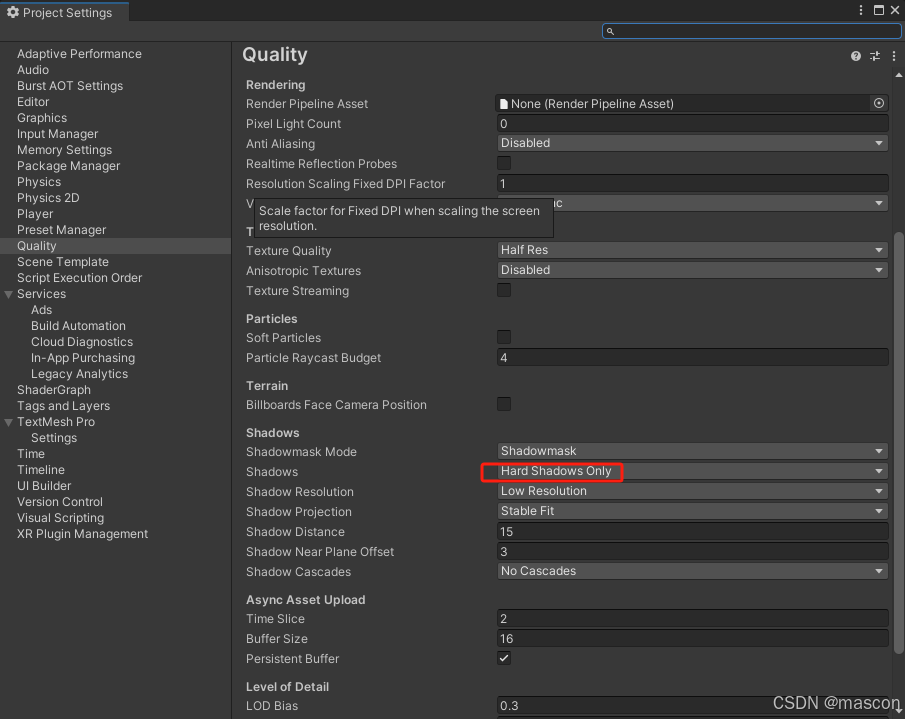
关于阴影: 灯光阴影,模型阴影,Quality的Shadow
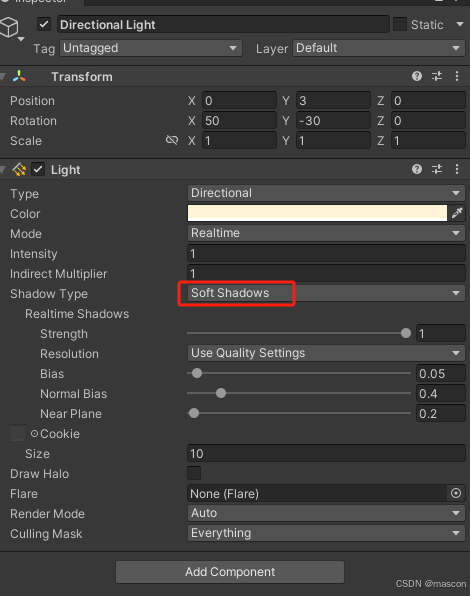
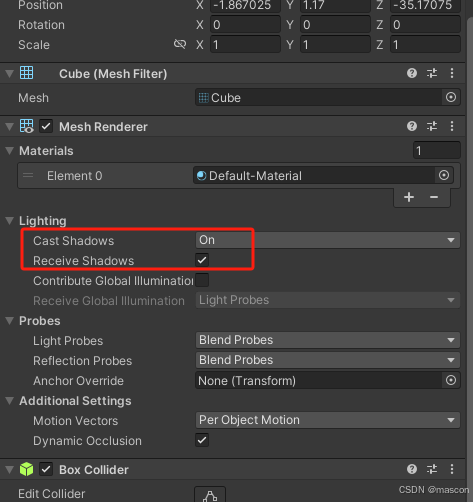
Edit-》ProjectSettings
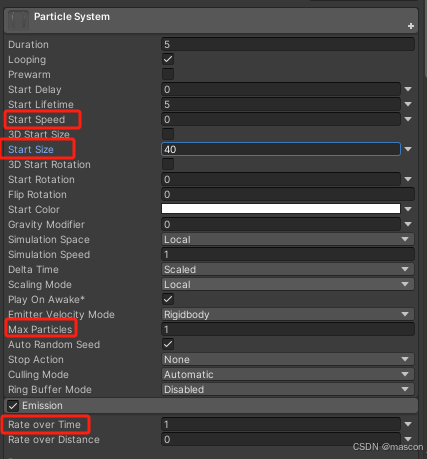
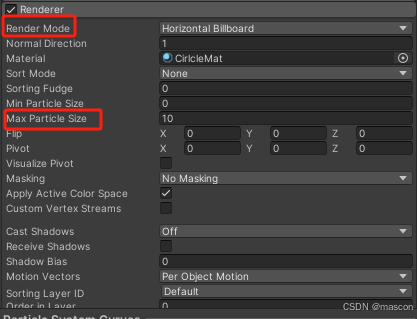
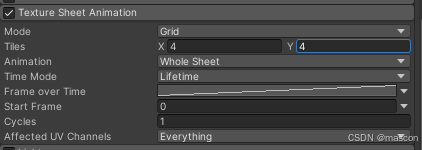
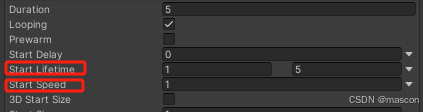
粒子系统:

点击控制:
using UnityEngine.EventSystems;
if (!EventSystem.current.IsPointerOverGameObject())
{
if (Input.GetMouseButtonDown(0))
Material的处理:
Material mat = GetComponent<Renderer>().material;
mat.SetTextureScale("_MainTex", new Vector2(x, y));
mat.SetTextureOffset("_MainTex", new Vector2(offsetX, offsetY));
C:\Users\username\AppData\Roaming\Unity\Editor-5.x
GPU Instance测试
using UnityEngine;
using System.Collections.Generic;

/// <summary>
/// PropertyBlockTest
/// ZhangYu 2019-06-17
/// <para>Blog:https://segmentfault.com/a/1190000019553301</para>
/// </summary>
public class PropertyBlockTest : MonoBehaviour {

    public GameObject prefab;
    public int count = 100;
    private Mesh insMesh;
    private Material insMaterial;
    private List<Matrix4x4> insMatrices;
    private MaterialPropertyBlock insBlock;
    private List<Color> insColors;
    private int colorID;

    private void Start () {
        GPUInstanceByBlock();
        //GPUInstanceByDrawMesh();
    }

    private void Update() {
        if (insMesh != null) DrawMeshes();
    }

    // 方法1:通过Shader + PropertyBlock 实现GPU Instance
    private void GPUInstanceByBlock() {
        MaterialPropertyBlock block = new MaterialPropertyBlock();
        int colorID = Shader.PropertyToID("_Color");
        GameObject[] objs = new GameObject[count];
        for (int i = 0; i < count; i++) {
            Vector3 position = new Vector3(Random.Range(-8, 8f), Random.Range(-4, 4f), 3);
            Color color = new Color(Random.Range(0, 1f), Random.Range(0, 1f), Random.Range(0, 1f));
            block.SetColor(colorID, color);
            GameObject obj = Instantiate(prefab);
            // 用Block代替Material设置值 这样就能合批了
            obj.GetComponent<MeshRenderer>().SetPropertyBlock(block);
            obj.transform.position = position;
            obj.SetActive(true);
        }
    }

    // 方法2:通过DrawMesh + Shader + PropertyBlock实现GPU Instance
    private void GPUInstanceByDrawMesh() {
        insMesh = prefab.GetComponent<MeshFilter>().mesh;
        insMaterial = prefab.GetComponent<Renderer>().material;
        insMatrices = new List<Matrix4x4>();
        insColors = new List<Color>();
        insBlock = new MaterialPropertyBlock();
        colorID = Shader.PropertyToID("_Color");
        for (int i = 0; i < count; i++) {
            Vector3 position = new Vector3(Random.Range(-8, 8f), Random.Range(-4, 4f), 3);
            Quaternion rotation = prefab.transform.rotation;
            Color color = new Color(Random.Range(0, 1f), Random.Range(0, 1f), Random.Range(0, 1f));
            // Position + Rotation + Scale > Matrix4x4
            Matrix4x4 matrix = TransformToMatrix(position, rotation);
            insMatrices.Add(matrix);
            insColors.Add(color);
        }
    }

    private void DrawMeshes() {
        // 测试结果:
        // 同网格 同材质 可以合批 需要Shader支持GPU Instance + 用PropertyBlock设置参数

        // DrawMeshInstanced() 一次绘制多个物体 调用一次 一个DrawCall
        //Graphics.DrawMeshInstanced(insMesh, 0, insMaterial, insMatrices, insBlock);

        // DrawMesh() 一次绘制一个物体 多次调用 可以合成一批
        for (int i = 0; i < count; i++) {
            insBlock.SetColor(colorID, insColors[i]);
            Graphics.DrawMesh(insMesh, insMatrices[i], insMaterial, 1, Camera.main, 0, insBlock);
        }
    }

    private Matrix4x4 TransformToMatrix(Vector3 position) {
        return Matrix4x4.TRS(position, Quaternion.identity, Vector3.one);
    }

    private Matrix4x4 TransformToMatrix(Vector3 position, Quaternion rotation) {
        return Matrix4x4.TRS(position, rotation, Vector3.one);
    }

    private Matrix4x4 TransformToMatrix(Vector3 position, Quaternion rotation, Vector3 scale) {
        return Matrix4x4.TRS(position, rotation, scale);
    }

}
shader
Shader "SimplestInstancedShader"
{
    Properties
    {
        _Color("Color", Color) = (1, 1, 1, 1)
    }

        SubShader
    {
        Tags{ "RenderType" = "Opaque" }
        LOD 100

        Pass
    {
        CGPROGRAM
#pragma vertex vert
#pragma fragment frag
#pragma multi_compile_instancing
#include "UnityCG.cginc"

    struct appdata
    {
        float4 vertex : POSITION;
        UNITY_VERTEX_INPUT_INSTANCE_ID
    };

    struct v2f
    {
        float4 vertex : SV_POSITION;
        UNITY_VERTEX_INPUT_INSTANCE_ID // necessary only if you want to access instanced properties in fragment Shader.
    };

        UNITY_INSTANCING_BUFFER_START(Props)
        UNITY_DEFINE_INSTANCED_PROP(float4, _Color)
        UNITY_INSTANCING_BUFFER_END(Props)

        v2f vert(appdata v)
    {
        v2f o;

        UNITY_SETUP_INSTANCE_ID(v);
        UNITY_TRANSFER_INSTANCE_ID(v, o); // necessary only if you want to access instanced properties in the fragment Shader.

        o.vertex = UnityObjectToClipPos(v.vertex);
        return o;
    }

    fixed4 frag(v2f i) : SV_Target
    {
        UNITY_SETUP_INSTANCE_ID(i); // necessary only if any instanced properties are going to be accessed in the fragment Shader.
        return  UNITY_ACCESS_INSTANCED_PROP(Props, _Color);
    }
        ENDCG
    }
    }
}
Shader "wxf/buils"
{
Properties
{
_MainTex("Texture", 2D) = "white" {}
}
SubShader
{
Tags{ "RenderType" = "Opaque" }
LOD 100
Pass
{
CGPROGRAM
#pragma vertex vert
#pragma fragment frag
#pragma multi_compile_instancing
#include "UnityCG.cginc"
struct appdata
{
float4 vertex : POSITION;
float2 uv : TEXCOORD0; // 添加UV坐标
UNITY_VERTEX_INPUT_INSTANCE_ID
};
struct v2f
{
float4 vertex : SV_POSITION;
float2 uv : TEXCOORD0; // 传递UV坐标到片元着色器
UNITY_VERTEX_INPUT_INSTANCE_ID // necessary only if you want to access instanced properties in fragment Shader.
};
UNITY_INSTANCING_BUFFER_START(Props)
//UNITY_DEFINE_INSTANCED_PROP(float4, _Color) // 移除_Color实例属性定义
UNITY_INSTANCING_BUFFER_END(Props)
sampler2D _MainTex; // 定义纹理采样器
v2f vert(appdata v)
{
v2f o;
UNITY_SETUP_INSTANCE_ID(v);
UNITY_TRANSFER_INSTANCE_ID(v, o); // necessary only if you want to access instanced properties in the fragment Shader.
o.vertex = UnityObjectToClipPos(v.vertex);
o.uv = v.uv; // 传递UV坐标
return o;
}
fixed4 frag(v2f i) : SV_Target
{
UNITY_SETUP_INSTANCE_ID(i); // necessary only if any instanced properties are going to be accessed in the fragment Shader.
//return UNITY_ACCESS_INSTANCED_PROP(Props, _Color); // 移除_Color的使用
return tex2D(_MainTex, i.uv); // 使用纹理采样器获取纹理颜色
}
ENDCG
}
}
}换成纹理的shader
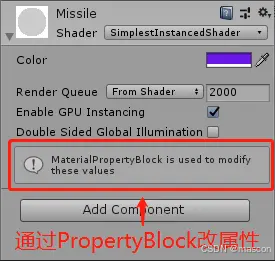
MaterialPropertyBlock的说明:
材质属性块被用于Graphics.DrawMesh和Renderer.SetPropertyBlock两个API,当我们想要绘制许多相同材质但不同属性的对象时可以使用它。例如你想改变每个绘制网格的颜色,但是它却不会改变渲染器的状态。
简单来说利用PropertyBlock设置属性不会产生新的Mesh和Material 速度快性能高
Mathf.PerlinNoise
这个函数会基于一个二维perlin noise图像(本质是算法,并不是真正的生成一张图片),用x和y作为uv坐标(取值范围都是0-1,超出这个范围的情况和uv坐标是一样的,perlin noise图像是可以无限延长放大的)在这个图像中取点,将这个点的灰度值作为函数结果返回。
Perlin Noise的特点是:返回值随着x,y坐标的移动,是连续且平缓的变化的随机值,这点和Random是完全不同的,而且这个特点非常重要,应用范围很广。可以想象,把x或者y的值随着时间去改变,会得到动态变化的一系列数值。
就好像随机地形山脉一样,连绵起伏。
原文链接:https://blog.youkuaiyun.com/sinat_37102348/article/details/82967894
===================================
ShaderLabVS:这是一个免费的Visual Studio插件,专门为Unity3D shader编程设计。它提供了基本的代码提示和高亮显示功能。
- 打开Visual Studio。
- 点击“扩展”->“管理扩展”。
- 在搜索框中输入插件名称,如“ShaderLabVS”或“GLSL language integration”。
- 找到插件后点击“下载”并安装。
- 安装完成后,可能需要重启Visual Studio。
-
HLSL Tools for Visual Studio:虽然这个插件主要是为HLSL设计的,但它也可以为Unity的Shader编程提供支持,包括代码格式化功能。
========================

Shader "Custom/waveShader"
{
    Properties
    {
        _MainTex ("MainTex", 2D) = "white" {}
        _SubTex("SubTex",2D) = "white"{}
        _Color("Color",Color) = (1,1,1,1)
    }
    SubShader
    {
        Pass{

            CGPROGRAM
            #pragma vertex vert
            #pragma fragment frag

            #include "UnityCG.cginc"

            sampler2D _MainTex;
            sampler2D _SubTex;
            float4 _Color;

            struct a2v{
              float2 uv: TEXCOORD0;  //第一套纹理
              float4 position:POSITION; //顶点坐标

            };

            struct v2f{
                float2 sv_uv:TEXCOORD0;  //第一套坐标
                float4 sv_position: SV_POSITION; //裁剪空间坐标
            };

            v2f vert(a2v i){
                v2f o;
                o.sv_position = UnityObjectToClipPos(i.position);
                o.sv_uv = i.uv;
                return o;
            }

            float4 frag(v2f v):SV_TARGET
            {
                float2 offSetXY = float2(0,0);
                //offSetXY.x = _Time.y*0.5f;
                //offSetXY.y = _Time.y*0.2f;

                offSetXY = _Time.y;

                float4 subTex = tex2D(_SubTex,v.sv_uv+offSetXY);
                float4 final = tex2D(_MainTex,v.sv_uv)+subTex;

                return final*_Color;
            }


            ENDCG

        }

    }
    FallBack "Diffuse"
}
Unity3D简单的水面shader实现
学习网址:https://blog.youkuaiyun.com/weixin_46525412/article/details/125399867
Shader "Custom/simpleWater"
{
    Properties
    {
        _Color ("Color", Color) = (0,0,1,1)//深层水体的颜色
        _EdgeColor ("EdgeColor", Color) = (0,1,1,1)//水面的颜色
        _EdgeThreshold ("EdgeThreshold", float) =0.1//深度阈值,用于判定水体不同深度,从而产生不同的水体颜色效果
        _WaveHeight ("WaveHeight", float) = 1//波浪的高度
        _WaveSpeed ("WaveSpeed", float) = 1//波浪传播的速度
        _WaveGap ("WaveGap", float) = 1//波浪的间隔
        _FoamTex ("FoamTex", 2D) = "white"//边缘泡沫的纹理
        _FoamThreshold ("FoamThreshold", float) =0.1//泡沫边缘的阈值
        _FoamColorScale ("FoamColorScale", float) =0.2//边缘的颜色的饱和度,饱和度越高颜色越深
        _FoamSpeed ("FoamSpeed", float) =0.1//泡沫纹理的大小
        _NormalTex ("NormalTex", 2D) = "white"//法线纹理
        _NormalScale ("NormalScale", float) = 1//法线的变化幅度
        _NormalSpeed ("NormalSpeed", float) = 1//法线的变化速度
        _Distortion("Distortion",float) = 1//倒影的偏移大小
    }
    SubShader
    {
    //设置渲染类型是透明的,渲染队列在非透明和透明测试之后,也就是非透明的物体渲染了之后,半透明的水体需要混合之前渲染的颜色,并且忽略别的物体的阴影影响
        Tags { "RenderType"="Transparent" "Queue"="Transparent" "IgnoreProjector"="True" }
        LOD 200

        //抓取屏幕图像存储到_RefractionTex纹理中
        GrabPass{
        "_RefractionTex"
        }
        CGPROGRAM
        //声明表面着色器的函数名和光照函数:Standard,透明度的函数,以及顶线修改函数
        #pragma surface surf Standard alpha:fade keepalpha fullforwardshadows vertex:vertexDataFunc
        #pragma target 3.0

        //表面着色器的输入结构体
        struct Input
        {
            float2 uv_FoamTex;//泡沫纹理
            float4 screenPos;//顶点坐标
        };

        sampler2D _CameraDepthTexture;//深度纹理
        fixed4 _Color;
        fixed4 _EdgeColor;
        float _WaveHeight;
        float _WaveSpeed;
        float _WaveGap;
        float _EdgeThreshold;
        float _FoamThreshold;
        sampler2D _FoamTex;
        float _FoamColorScale;
        sampler2D _NormalTex;
        float _NormalScale;
        float _NormalSpeed;
        float _FoamSpeed;
        float _Distortion;

        sampler2D _RefractionTex;//倒影纹理
        float4 _RefractionTex_TexelSize;//倒影纹理纹素大小

        void vertexDataFunc(inout appdata_full v, out Input o)
        {
        //对o中的参数进行初始化
            UNITY_INITIALIZE_OUTPUT(Input, o);

            //实现水面的波浪的变化
            //计算顶点的实时高度,计算的xz平面,用波的震动函数来计算实时的高度
            fixed height = sin(_Time.y * _WaveSpeed + v.vertex.z * _WaveGap + v.vertex.x) * _WaveHeight;
            //用计算得到的实时高度在法线的方向上进行变化
            v.vertex.xyz += v.normal * height;
        }

        void surf (Input IN, inout SurfaceOutputStandard o)
        {
        //坐标其次变
        IN.screenPos.xyz /= IN.screenPos.w;

        //通过深度差值计算不同深度的水面的颜色
        //获取到深度纹理的深度值,也就是非透明物体渲染进行深度测试所更新存放的最接近摄像头的距离
        float depth1 = LinearEyeDepth(tex2D(_CameraDepthTexture,IN.screenPos.xy).r);
        //获取到该点实际的深度值,也就是水面的深度值,LinearEyeDepth用于转换成线性深度
        float depth2 = LinearEyeDepth(IN.screenPos.z);
        //取差值的绝对值得到深度差,深度差值越大,说明离水面越深,也就是颜色越深
        float distance = abs(depth1-depth2);
        //根据差值与阙值的乘积,来计算不同深度的水体的颜色,阙值越大,越容易靠近1,则颜色会越深
        fixed4 waterColor = lerp(_EdgeColor,_Color,saturate(distance*_EdgeThreshold));

        //边缘泡沫的实现
        //通过对纹理坐标的变化从而获得不同时刻的泡沫的变化,纹理坐标的变化也就是不同时刻采样得到的颜色是变化的,
        //用fixed2(1,1)是为了对xy坐标同时进行变化
        float4 foamColor = tex2D(_FoamTex,(IN.uv_FoamTex+fixed2(1,1)*_Time.y*_FoamSpeed));
        //将深度差值限制在[0,_FoamThreshold]得到formDegree
        fixed formDegree = clamp(distance,0,_FoamThreshold);
        //将formDegree限制在[0,1]
        formDegree = formDegree/_FoamThreshold;
        //如果差值越靠近_FoamThreshold阙值则泡沫的效果越不明显,也就是在深度低的地方泡沫效果越明显,这样可以近似得到一个边缘的泡沫效果
        fixed4 formColor = lerp(foamColor,fixed4(0,0,0,0),formDegree)*_FoamColorScale;

        //水面波光粼粼的效果
        //结合时间计算偏移量,结合波浪的速度使得波光粼粼的变化更加真实自然,speed并非是速度而是偏移量
        float2 speed = _Time.x*float2(_WaveSpeed,_WaveSpeed)*_NormalSpeed;
        //对法线贴图进行两次采样,最后将采样结果相加得到最终的法线,如果单单取一个方向的话,会使得波光的变化只朝着一个方向,这不符合预期效果
        fixed3 bump1 = UnpackNormal(tex2D(_NormalTex,IN.screenPos.xy+speed)).rgb;
        fixed3 bump2 = UnpackNormal(tex2D(_NormalTex,IN.screenPos.xy-speed)).rgb;
        fixed3 bump = normalize(bump1+bump2);
        //法线乘以变化的大小进行变化
        bump.xy *= _NormalScale;
        //归一化
        bump = normalize(bump);
        //法线赋值
        o.Normal = bump;
        //法线(提供偏移方向)乘以_Distortion(偏移大小)得到该点采样倒影纹理的偏移大小,乘以倒影纹理的纹素大小,得到实际偏移
        float2 offset = bump.xy*_Distortion*_RefractionTex_TexelSize.xy;
        //在采样的时候加上实际偏移对倒影的部分进行采样,得到变化的倒影效果,倒影纹理是抓取的屏幕图像的纹理
        fixed3 refrCol = tex2D(_RefractionTex,IN.screenPos.xy+offset).rgb;

        //环境光等于水体的颜色乘以倒影的颜色加上泡沫的颜色
        //水体的颜色用的是各个颜色通道的比例,而倒影的则是255数值的颜色值,所以二者相乘,而泡沫是255颜色值所以是相加
        o.Albedo = waterColor.rgb*refrCol+formColor.rgb;
        //透明度为水体的透明度
        o.Alpha=waterColor.a;
        }
        ENDCG
    }
    FallBack "Diffuse"
}
CODEMONKEY10
METAMASK
https://www.youtube.com/watch?v=GEquMcxkIAk
https://github.com/ChainSafe/web3.unity/releases
    public GameObject graphicsObject; //会在inspector面板显示
public GameObject graphicsClone { get; set; } //不会显示-
字段:
public字段会直接显示在 Inspector 中。 -
属性:
public属性不会显示在 Inspector 中,因为它们是封装的逻辑。 -
如果需要让属性在 Inspector 中显示,可以通过
[SerializeField]修饰字段并使用属性访问器。
IAP(In-App Purchase,应用内购买)和 IAA(In-App Advertising,应用内广告)是两种不同的移动应用盈利模式,尤其在小游戏领域中被广泛采用。
在脚本里增加新的菜单项:
#if UNITY_EDITOR
    [ContextMenu("新的菜单")]
    public void ShowNewMenu()
    {
        Debug.Log("新的菜单 log");
    }
#endif
在Editor里增加菜单项
public class ServerEditorWindow : EditorWindow{

    [MenuItem("xxx/yyy")]
    public static void functions()
    {}
}
加载声音并播放
using System.Collections;
using UnityEngine;
using UnityEngine.Networking;

public class LoadAudio : MonoBehaviour
{
    private string audioURL;
    private string audioClipName = "example.mp3";

    void Start()
    {
        audioURL = Application.dataPath + "/Audio/" + audioClipName;

        Debug.Log("Application.dataPath" + Application.dataPath);
        StartCoroutine(LoadAudioClip(audioURL));
    }

    IEnumerator LoadAudioClip(string url)
    {
        UnityWebRequest request = UnityWebRequestMultimedia.GetAudioClip(url, AudioType.MPEG);
        yield return request.SendWebRequest();

        if (request.result == UnityWebRequest.Result.Success)
        {
            AudioClip clip = DownloadHandlerAudioClip.GetContent(request);
            AudioSource source = gameObject.AddComponent<AudioSource>();
            source.clip = clip;
            source.Play();
        }
        else
        {
            Debug.LogError("Error loading audio clip: " + request.error);
        }
    }
}
缩放
    public AnimationCurve scaleCurve;
    public float animationDuration = 0.5f;
    private void PlayScale()
    {
        transform.localScale = Vector3.zero;
        transform.DOScale(Vector3.one, animationDuration).SetEase(scaleCurve);
    }
截屏
using UnityEngine;
using UnityEngine.UI;

public class Screenshot : MonoBehaviour
{
    private RenderTexture renderTexture;

    public Button shot;
    public Image show;
    void Start()
    {
        renderTexture = transform.Find("Camera").GetComponent<Camera>().targetTexture;
        shot.onClick.AddListener(RenderTextureToSprite);
    }

    private void RenderTextureToSprite()
    {

        Texture2D texture = new Texture2D(renderTexture.width, renderTexture.height, TextureFormat.RGBA32, false);
        RenderTexture tempRT = RenderTexture.GetTemporary(renderTexture.width, renderTexture.height, 0, RenderTextureFormat.ARGB32);
        Graphics.Blit(renderTexture, tempRT);

        RenderTexture previous = RenderTexture.active;
        RenderTexture.active = tempRT;

        texture.ReadPixels(new Rect(0, 0, tempRT.width, tempRT.height), 0, 0);
        texture.Apply();

        SaveTextureToDisk(texture,(int)Time.time);

        show.sprite = Sprite.Create(texture, new Rect(0, 0, texture.width, texture.height), new Vector2(0.5f, 0.5f));

    }

    public void SaveTextureToDisk(Texture2D texture, int id, bool isPNG = true)
    {
        byte[] bytes;

        if (isPNG )
        {
            bytes = texture.EncodeToPNG();
        }
        else
        {
            bytes = texture.EncodeToJPG();
        }
        string path = Application.persistentDataPath + "/" + id + ".png";
        Debug.Log("wxfpath:" + path);

        // 将字节数组写入文件
        System.IO.File.WriteAllBytes(path, bytes);

    }

}
    public static void ShuffleList(List<int> list)
    {
        // 获取随机数生成器
        System.Random rng = new System.Random();

        // 使用 Fisher-Yates 洗牌算法
        int n = list.Count;
        while (n > 1)
        {
            n--;
            int k = rng.Next(n + 1); // 生成一个 [0, n] 范围内的随机数
            int value = list[k];
            list[k] = list[n];
            list[n] = value; // 交换两个元素
        }
    }
Vector3.MoveTowards 是另一种实现平滑移动的方法,它会以固定的速度向目标位置移动,不会超过目标位置
    float speed = 1.0f;
    public GameObject[] movePath;

    public GameObject Player;
    int index = 0;

    void Update()
    {

        transform.position = Vector3.MoveTowards(transform.position, movePath[index].transform.position, speed * Time.deltaTime);
        transform.LookAt(movePath[index].transform);
        if (Vector3.Distance(transform.position, movePath[index].transform.position) < 0.2f)
        {
            index += 1;
            if (index >= movePath.Length)
            {
                index = movePath.Length - 1;
            }
        }
    }
using DG.Tweening;
using UnityEngine;
public class MoveSmooth : MonoBehaviour
{
public Tweener tween;
public Transform[] wpPosTransform;
private Vector3[] wpPos;
public float originSpeed = 6;
void Start()
{
wpPos = new Vector3[wpPosTransform.Length];
for (int i = 0; i < wpPosTransform.Length; i++)
{
wpPos[i] = wpPosTransform[i].transform.position;
}
MoveSmoothly();
}
private void MoveSmoothly()
{
TweenParams parms = new TweenParams();
parms.SetSpeedBased();
parms.SetEase(Ease.Linear);
parms.OnWaypointChange(OnWaypointChange);
parms.OnComplete(ReachedEnd);
tween = transform.DOPath(wpPos, originSpeed, PathType.CatmullRom, PathMode.Full3D)
.SetAs(parms)
.SetOptions(false, AxisConstraint.None, AxisConstraint.None)
.SetLookAt(0);
}
private void OnWaypointChange(int index)
{
Debug.Log("移动到了点:" + index);
}
private void ReachedEnd()
{
Debug.Log("移动完成~~~");
}
}
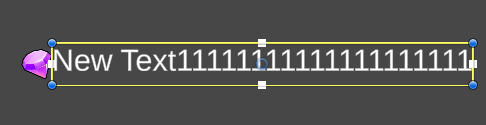
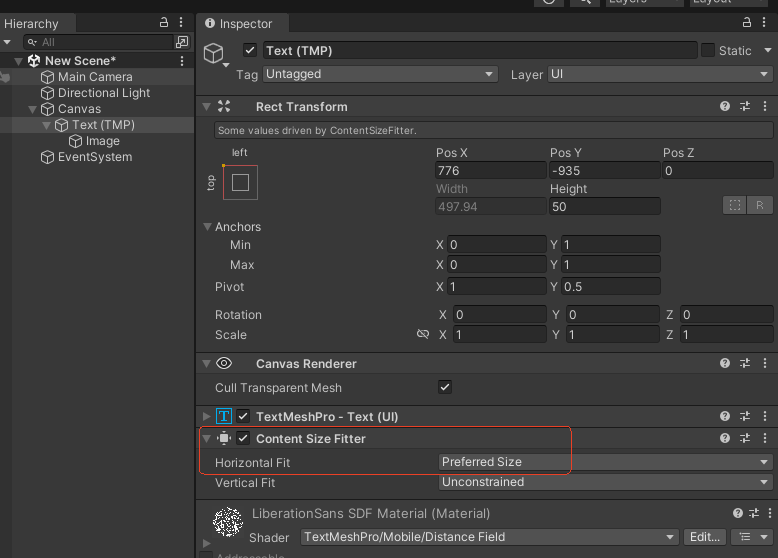
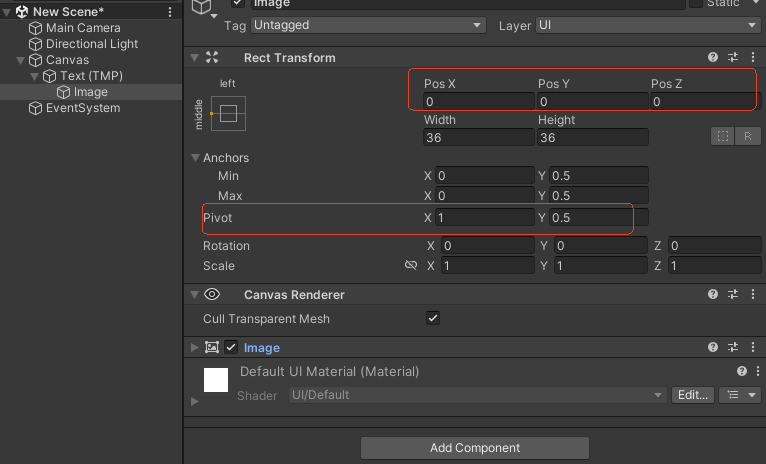
让图标跟随文字的宽度变化而变化
假设 movePath 是一个 List<Vector3>,包含以下元素:
movePath = new List<Vector3>
{
    new Vector3(0, 0, 0),
    new Vector3(1, 1, 1),
    new Vector3(2, 2, 2)
};-
movePath[^1]的值将是new Vector3(2, 2, 2),即列表中的最后一个元素。 -
movePath[^2]的值将是new Vector3(1, 1, 1),即倒数第二个元素。
[^1] 是一种简洁的语法,用于从集合的末尾访问元素,非常适合在处理路径、队列或其他需要访问尾部元素的场景中使用。
List<Vector3> movePath = new List<Vector3>
{
    new Vector3(0, 0, 0),
    new Vector3(1, 1, 1),
    new Vector3(2, 2, 2)
};

// 获取最后一个元素
Vector3 lastPosition = movePath[^1];
Debug.Log(lastPosition); // 输出:(2.0, 2.0, 2.0)


 2443
2443

 被折叠的 条评论
为什么被折叠?
被折叠的 条评论
为什么被折叠?
 到【灌水乐园】发言


