


可能的误区-未识别明明存在的头文件
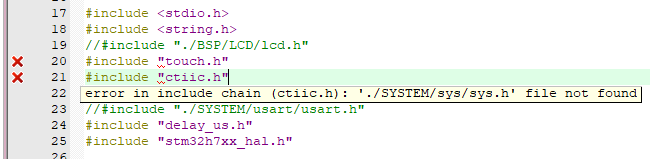
未正确识别的头文件有两种常见的原因导致:
1. 真的没有通过头文件路径找到该文件;
2. 此头文件里包含的其他头文件是坏的;
一种经典的头文件包含方式
/*********************
 *      INCLUDES
 *********************/
#include "../display/lv_display_private.h"
#include "../misc/lv_event_private.h"
#include "../misc/lv_anim_private.h"
#include "../draw/lv_draw_private.h"
#include "../core/lv_obj_private.h"
#include "lv_display.h"
#include "../misc/lv_math.h"
#include "../core/lv_refr_private.h"
#include "../stdlib/lv_string.h"
#include "../themes/lv_theme.h"
#include "../core/lv_global.h"
#include "../others/sysmon/lv_sysmon.h"

这是 LVGL-9.2.0 的库,内部文件大量使用相对路径进行头文件引用。实现原理
编译器的路径解析机制:
当编译器遇到 #include "path/to/header.h" 时,会基于当前源文件所在目录拼接路径。
编译指令的支持:
部分编译器支持通过 -I 参数添加额外搜索路径(如 GCC 的 -I./include),但相对路径的解析优先级通常高于编译器指定的附加路径。
核心优势
1. 项目目录结构清晰化
路径直接反映文件间的物理位置关系(例如 ../../lvgl.h 表明头文件位于项目顶层目录),便于开发者快速定位依赖项,避免“幽灵文件”问题(即无法确定头文件实际来源)。
2.跨环境移植便捷性
场景示例:
若项目从 Windows 迁移到 Linux,绝对路径(如 C:/Project/lvgl.h)会失效,而相对路径仅需保持目录结构即可正常编译。
开发协作友好:提交到 Git 仓库时,相对路径天然适应任意开发者的本地路径,无需修改配置。
3. 模块化开发的支撑
子模块通过相对路径引用父模块(如 ../../lvgl.h),能严格隔离各模块的内部依赖。
对比硬编码路径:
若使用绝对路径或编译器全局路径配置,可能意外包含错误的同名头文件(例如不同目录下的 config.h 冲突)。
4. 编译器兼容性统一
所有主流编译器(GCC、Clang、MSVC)均原生支持相对路径解析,无需平台特定配置。
相对路径通过紧耦合文件物理位置与代码依赖关系,在保证可读性、可移植性、模块化隔离的同时,大幅降低了维护成本。正如您图中的 lvgl.h 和 lcd.h 的引用方式,这种设计是开发中大型嵌入式或跨平台项目的黄金标准。
=======================================================================
自由分配内存布局
ARM >>>>>>>>>>>>>>>>>>>>>>>>>>>>>>>>>>>>>>>>>>>>>>>>>>>>>>>>>
《ARM Compiler version 6.6 armlink User Guide》这本书 ARM 链接器指导书,很有用。参考其目录,提取自己需要的知识,当境界达到一定的程度。
GNU >>>>>>>>>>>>>>>>>>>>>>>>>>>>>>>>>>>>>>>>>>>>>>>>>>>>>>>>>
The GNU Binutils are a collection of binary tools. The main ones are:
- ld - the GNU linker.
- as - the GNU assembler.
- gold - a new, faster, ELF only linker.
But they also include:
- addr2line - Converts addresses into filenames and line numbers.
- ar - A utility for creating, modifying and extracting from archives.
- c++filt - Filter to demangle encoded C++ symbols.
- dlltool - Creates files for building and using DLLs.
- elfedit - Allows alteration of ELF format files.
- gprof - Displays profiling information.
- gprofng - Collects and displays application performance data.
- nlmconv - Converts object code into an NLM.
- nm - Lists symbols from object files.
- objcopy - Copies and translates object files.
- objdump - Displays information from object files.
- ranlib - Generates an index to the contents of an archive.
- readelf - Displays information from any ELF format object file.
- size - Lists the section sizes of an object or archive file.
- strings - Lists printable strings from files.
- strip - Discards symbols.
- windmc - A Windows compatible message compiler.
- windres - A compiler for Windows resource files.
As well as some libraries:
- libbfd - A library for manipulating binary files in a variety of different formats.
- libctf - A library for manipulating the CTF debug format.
- libopcodes - A library for assembling and disassembling a variety of different assembler languages.
- libsframe - A library for manipulating the SFRAME debug format.
Most of these programs use BFD, the Binary File Descriptor library, to do low-level manipulation. Many of them also use the opcodes library to assemble and disassemble machine instructions.
The binutils have been ported to most major Unix variants as well as Wintel systems, and their main reason for existence is to give the GNU system (and GNU/Linux) the facility to compile and link programs.
下面摘取一些重要的话:
关于链接器脚本文件:链接器是通过链接器脚本文件控制的。链接器脚本文件内容是由链接器命令语言组成的文本文件。
=======================================================================
常用的代码调试工具 - objdump 与 readelf
objdump
objdump is a command-line program for displaying various information about object files on Unix-like operating systems. For instance, it can be used as a disassembler to view an executable in assembly form. It is part of the GNU Binutils for fine-grained control over executables and other binary data. objdump uses the BFD library to read the contents of object files. Similar utilities are Borland TDUMP, Microsoft DUMPBIN and readelf.
readelf
readelf is a program for displaying various information about object files on Unix-like systems, similar to objdump. It is part of the GNU binutils.
ARM的调试工具 “ fromelf ” 跟 readelf 的功能类似。
==================================================================
代码可视化调试分析
使用VSCode调试可视化的强大工具:VSCode Debug Visualizer
在这个数字化时代,软件开发人员需要高效且直观的工具来提升他们的工作效率和代码质量。 是一个出色的Visual Studio Code扩展,它将你的调试过程转化为一种可视化体验,帮助开发者更清晰地理解程序运行状态。
项目简介
VSCode Debug Visualizer是一款由Hediet开发的开源插件,其目标是让复杂的调试过程变得简单易懂。通过在VSCode中实时显示变量值的变化和数据结构,这款插件可以帮助开发者快速识别问题、跟踪代码逻辑,并进行精确的调试。
技术分析
该插件的核心功能在于能够动态地将变量、数组、对象等数据以图形化的方式展现出来,为用户提供以下主要技术特性:
实时更新:当代码执行时,变量视图会自动更新,反映最新的数据状态。
丰富的可视化类型:支持列表、树形、图和表格等多种视图,适应不同类型的复杂数据结构。
交互式探索:可以点击并展开数据结构的各个部分,深入到细节。
自定义配置:允许开发者根据自己的需求对特定变量或表达式的显示方式进行定制。
良好的集成性:无缝集成到VSCode的调试面板,无需离开当前工作环境。
应用场景
- 调试复杂的数据结构:对于涉及大量嵌套对象或数组的代码,Debug Visualizer可以提供直观的查看方式,避免手动检查带来的繁琐。
- 教学与学习:初学者可以通过可视化的方式更好地理解代码流程和数据变化,提高学习效率。
- 优化性能:通过观察变量的实时变化,可以更快定位到可能导致性能瓶颈的代码片段。
特点
- 易于安装和使用:只需通过VSCode扩展市场搜索并安装,即可立即开始使用。
- 跨语言支持:目前支持多种编程语言,包括但不限于JavaScript, TypeScript, C++, Python等。
- 源码开放:基于MIT许可证,允许自由修改和分发,鼓励社区贡献和持续改进。
结语
VSCode Debug Visualizer是一个极具潜力的开发辅助工具,它的出现让调试变得更加生动有趣。如果你是一名开发者,无论你是新手还是老手,都值得尝试一下这款工具,它或许能改变你的调试习惯,提升你的编程体验。现在就去VSCode市场将其添加到你的工具箱吧!
==================================================================
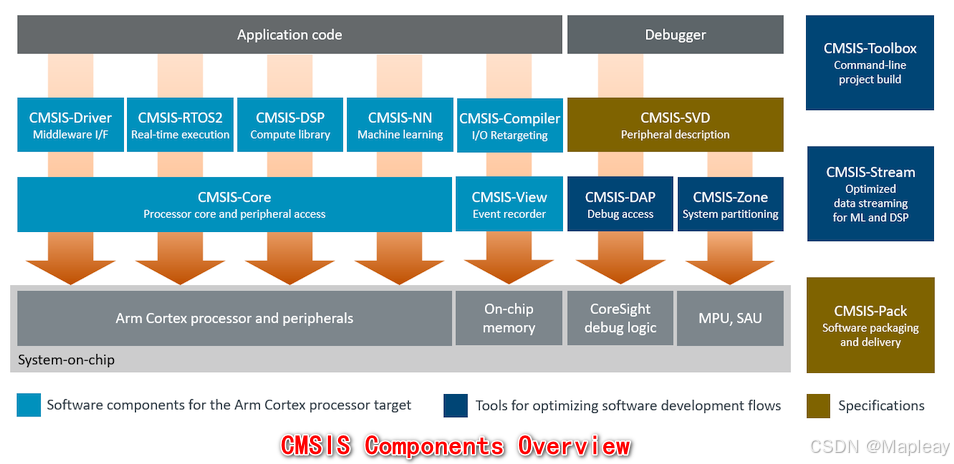
CMSIS
[Old] - The Cortex Microcontroller Software Interface Standard
[New] - Common Microcontroller Software Interface Standard
The CMSIS (Common Microcontroller Software Interface Standard) is a set of APIs, software components, tools, and workflows that help to simplify software re-use, reduce the learning curve for microcontroller developers, speed-up project build and debug, and thus reduce the time to market for new applications.
CMSIS started as a vendor-independent hardware abstraction layer Arm® Cortex®-M based processors and was later extended to support entry-level Arm Cortex-A based processors. To simplify access, CMSIS defines generic tool interfaces and enables consistent device support by providing simple software interfaces to the processor and the peripherals.
CMSIS has been created to help the industry in standardization. It enables consistent software layers and device support across a wide range of development tools and microcontrollers. CMSIS is not a huge software layer that introduces overhead and does not define standard peripherals. The silicon industry can therefore support the wide variations of Arm Cortex processor-based devices with this common standard.
CMSIS-Core
The CMSIS-Core (Cortex-M) component implements the basic run-time system for Arm Cortex-M devices and gives the user access to the processor core and the device peripherals.
In detail it defines:
- Hardware Abstraction Layer (HAL) for Cortex-M processor registers with standardized definitions for the SysTick, NVIC, System Control Block registers, MPU registers, FPU registers, and core access functions.
- System exception names to interface to system exceptions without having compatibility issues.
- Methods to organize header files that makes it easy to learn new Cortex-M microcontroller products and improve software portability. This includes naming conventions for device-specific interrupts.
- Methods for system initialization to be used by each MCU vendor. For example, the standardized
SystemInit()function is essential for configuring the clock system of the device. - Intrinsic functions used to generate CPU instructions that are not supported by standard C functions.
- A variable to determine the system clock frequency which simplifies the setup the SysTick timer.
The following sections provide details about the CMSIS-Core (Cortex-M):
- Using CMSIS-Core explains the project setup and shows a simple program example.
- Using TrustZone® for Armv8-M describes how to use the security extensions available in the Armv8-M architecture.
- CMSIS-Core Files describes the files of the CMSIS-Core (Cortex-M) in detail and explains how to adapt template files provided by Arm to silicon vendor devices.
- MISRA-C Deviations describes the violations to the MISRA standard.
- API Reference describes the features and functions of the Device Header File <Device.h> in detail.
- Data Structures describe the data structures of the Device Header File <Device.h> in detail.
Access to CMSIS-Core (Cortex-M)
CMSIS-Core is actively maintained in the CMSIS 6 GitHub repository and released as part of the CMSIS Software Pack.
The following directories and files relevant to CMSIS-Core (Cortex-M) are present in the ARM::CMSIS Pack:
| Directory | Content |
|---|---|
| 📂 CMSIS | CMSIS Base software components folder |
| ┣ 📂 Documentation/html/Core | A local copy of this CMSIS-Core (M) documentation |
| ┗ 📂 Core | CMSIS-Core files |
| ┣ 📂 Include | CMSIS-Core Processor Files. |
| ┗ 📂 m-profile | Header files specific for Arm M-Profile. See CMSIS-Core Compiler Files and CMSIS-Core Architecture Feature Files. |
| ┗ 📂 Template | Device Template Files |
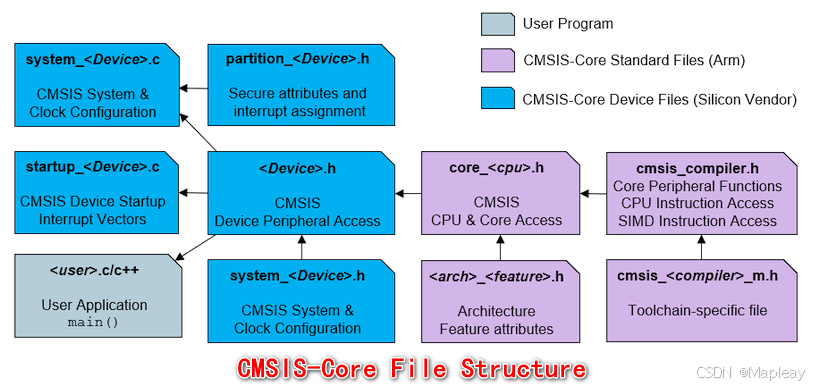
CMSIS-Core Files
CMSIS-Core files can be differentiated in two main groups:
- CMSIS-Core Standard Files are provided by Arm for supported CPU cores as part of the CMSIS-Core software component. These files typically do not require any modifications and are expected to be included via CMSIS-Core device files.
- CMSIS-Core Device Files are specified in CMSIS-Core methodology, and are typically provided by CPU device vendors to correctly cover their specific functionalities. Some of them may expect additional application-specific changes.
The detailed file structure of the CMSIS-Core files is shown in the following picture.
Delivery in CMSIS-Packs explains how CMSIS-Core Files can be distributed in CMSIS-Pack format.
CMSIS-Core Standard Files 可以分为如下几类文件:
CMSIS-Core Device Files 可以分为如下几个文件:
- System Configuration Files system_<Device>.c and system_<Device>.h
- Device Header File <Device.h>
- Startup File startup_<Device>.c
- Scatter-Loading description file <device>_ac6.sct
- TrustZone setup: partition_<Device>.h
- Region/ISR setup: partition_gen.h
比如: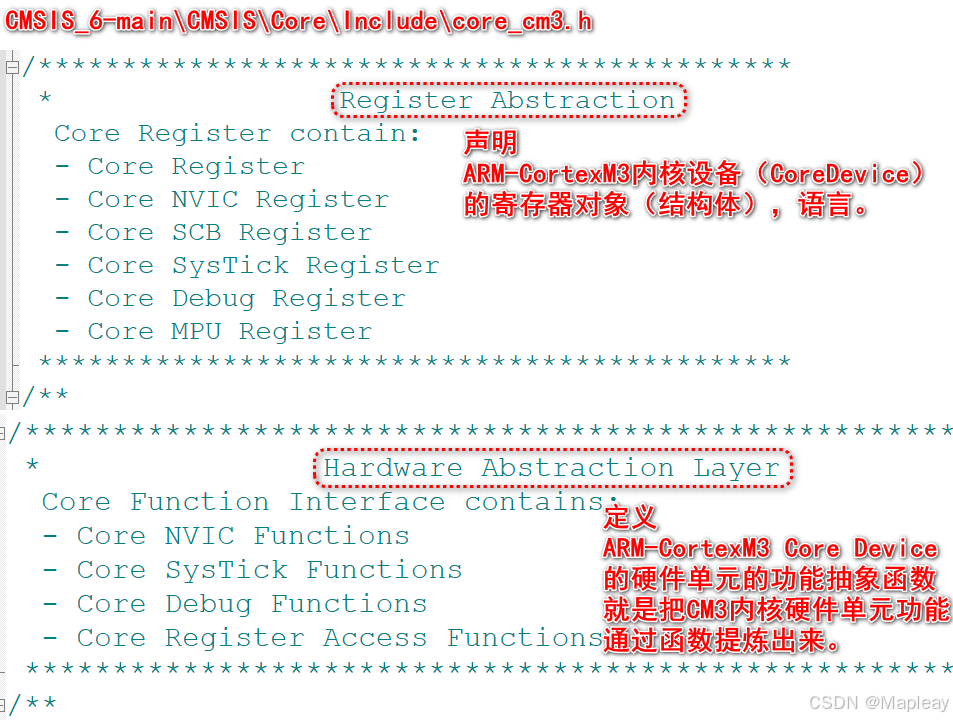
CMSIS_6-main\CMSIS\Core\Include\core_cm3.h 文件就是把ARM-CortexM3内核里的硬件单元,比如NVIC、硬件调试单元、SysTick Register、SCB Register、MPU Register、Core Register做了C语言的结构体声明,然后在做了相关硬件功能特性的实现,也就是C函数的实现。这就类似面向对象的思想:Register Abstraction是CM3的静态数据,Hardware Abstraction Layer是CM3的动态操作。
Using CMSIS-Core
To use the CMSIS-Core (Cortex-M) in an embedded software project at the following CMSIS-Core Device Files need to be added to the application:
- Startup File startup_<Device>.c with reset handler and exception vectors.
- System Configuration Files system_<Device>.c and system_<Device>.h with general device configuration (i.e. for clock and BUS setup).
- Device Header File <Device.h> gives access to processor core and all peripherals.
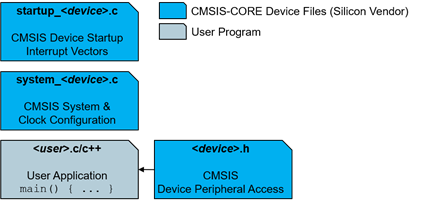
Using CMSIS-Core (Cortex-M) in a project
The Startup File startup_<Device>.c is executed after reset and calls SystemInit() in the reset hander. After the system initialization the control is transferred to the C/C++ run-time library which performs initialization and calls the main function in the user code. In addition the Startup File startup_<Device>.c contains all exception and interrupt vectors and implements a default function for every interrupt. It may also contain stack and heap configurations for the user application.
The System Configuration Files system_<Device>.c and system_<Device>.h performs the setup for the processor clock. The variable SystemCoreClock indicates the CPU clock speed. In addition the file may contain functions for the memory BUS setup and clock re-configuration.
Note
- The files Startup File startup_<Device>.c and System Configuration Files system_<Device>.c and system_<Device>.h may require application specific adaptations and therefore should be copied into the application project folder prior configuration.
The Device Header File <Device.h> provides access to the following device-specific functionalities:
- Peripheral Access provides a standardized register layout for all peripherals. Optionally functions for device-specific peripherals may be available.
- Interrupts and Exceptions (NVIC) can be accessed with standardized symbols and functions for the Nested Interrupt Vector Controller (NVIC) are provided.
- Intrinsic Functions for CPU Instructions allow to access special instructions, for example for activating sleep mode or the NOP instruction.
- Intrinsic Functions for SIMD Instructions provide access to the DSP-oriented instructions.
- Systick Timer (SYSTICK) function to configure and start a periodic timer interrupt.
- Debug Access are functions that allow printf-style I/O via the CoreSight Debug Unit and ITM communication.
=====================================================================
CMSIS-Driver
Overview of CMSIS-Driver
CMSIS-Driver specifies generic driver interfaces for peripherals commonly used in embedded systems with Arm® Cortex® processors.
User applications and middleware components can control such peripherals using the CMSIS-Driver API and so achieve better code reuse and simpler integration in various ecosystems. The API is designed to be generic and independent of a specific RTOS making it reusable across a wide range of supported microcontroller devices.
The following block diagram shows an exemplary set up for various drivers.
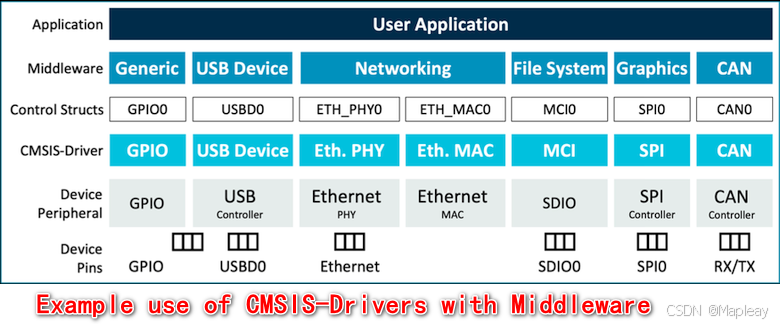
The standard CMSIS-Driver interfaces connect microcontroller peripherals with middleware that implements communication stacks, file system and graphic user interfaces.
Benefits
Using CMSIS-Driver provides great benefits to the embedded developers and software vendors:
- The CMSIS-Driver API covers many common peripherals present in modern embedded systems for sensor interaction, data storage, communication and graphics.
- The unified API follows the similar design principles across all peripherals. This reduces learning efforts and increases developers' productivity. See Theory of Operation for details.
- Driver templates files provide code sceletons that help to get started with implementations for specific peripherals. See CMSIS-Driver Files.
- Support for multiple driver instances with Access Struct.
- Driver-Validation Suite provides a set of tests to verify compatibility to CMSIS-Driver API definitions.
Covered Interfaces
CMSIS-Driver APIs are defined for the following driver interfaces:
- CAN: Interface to CAN bus peripheral.
- Ethernet: Interface to Ethernet MAC and PHY peripheral.
- I2C: Multi-master Serial Single-Ended Bus interface driver.
- MCI: Memory Card Interface for SD/MMC memory.
- NAND: NAND Flash Memory interface driver.
- Flash: Flash Memory interface driver.
- SAI: Serial audio interface driver (I2s, PCM, AC'97, TDM, MSB/LSB Justified).
- SPI: Serial Peripheral Interface Bus driver.
- Storage: Storage device interface driver.
- USART: Universal Synchronous and Asynchronous Receiver/Transmitter interface driver.
- USB: Interface driver for USB Host and USB Device communication.
- GPIO: General-purpose Input/Output driver.
- VIO: API for virtual I/Os (VIO).
- WiFi: Interface driver for wireless communication.
A list of current CMSIS-Driver implementations is available here.
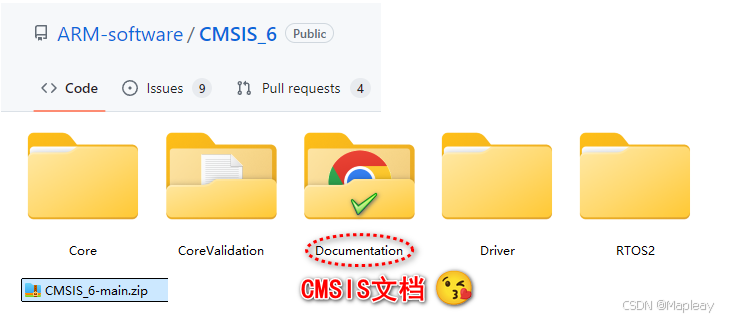
CMSIS资料获取方式
官方git:
https://github.com/ARM-software/CMSIS_6
==================================================================
ARM-MDK for Cortex-M3
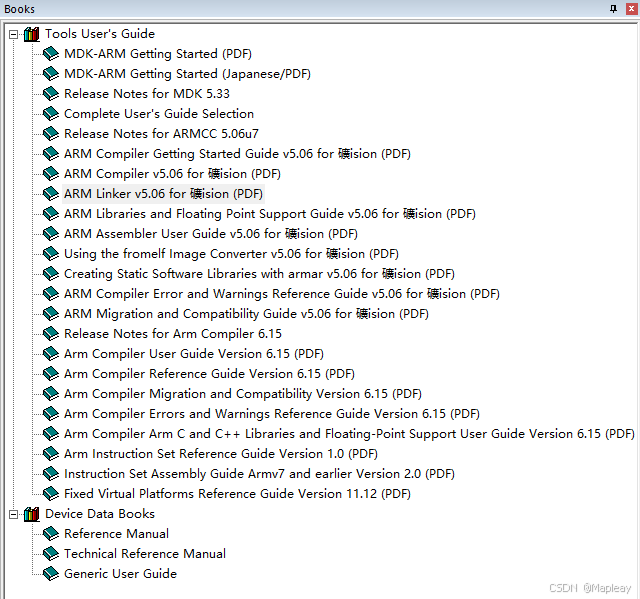
MDK通用信息
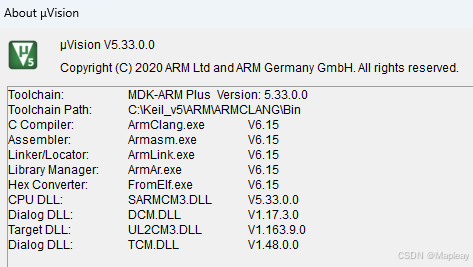
ARM-MDK 自带的资料
ARM-MDK -> [help] -> [Open Books Window]
【todo】
==================================================================
==================================================================
GCC for ARM
GCC 全称为 GNU Compiler Collection。 GCC 是几种主要编程语言的编译器的集成分发。 这些语言目前包括 C,C ++,Objective-C,Objective-C ++,Fortran,Ada,Go 和 BRIG(HSAIL)。
GCC for ARM 则是基于 GCC 开发的,用来编译生成 ARM 内核可执行文件的编译套件,俗称 ARM 交叉编译套件。目前我们用的针对 ARM 芯片的集成开发环境(IDE),除了 IAR 和 ARM 自己的 Keil、DS 等都是使用 GCC for ARM 的编译器!
首先,看看 ARM 交叉编译工具链的命名规则:arch [-vendor] [-os] [-(gnu)eabi] [-gcc]
- arch: 体系架构,如 ARM,MIPS
- vendor: 工具链提供商,没有 vendor 时,用 none 代替;
- os: 目标操作系统,没有 os 支持时,也用 none 代替
- eabi: 嵌入式应用二进制接口(Embedded Application Binary Interface)
如果同时没有 vendor 和 os 支持,则只用一个 none 代替。例如 arm-none-eabi 中的 none 表示既没有 vendor 也没有 os 支持。 前面说过,GCC for ARM 则是基于 GCC 开发的。因此,其和 GCC 一样是一套命令行工具的集合,理论上可以将它集成到其他任何集成开发环境中,从而不直接使用命令行。GCC for ARM 中的各命令行工具与 GCC 中的各命令行工具都是对应的,功能基本一致,仅仅是名字有些改变!
GCC 支持汇编语言
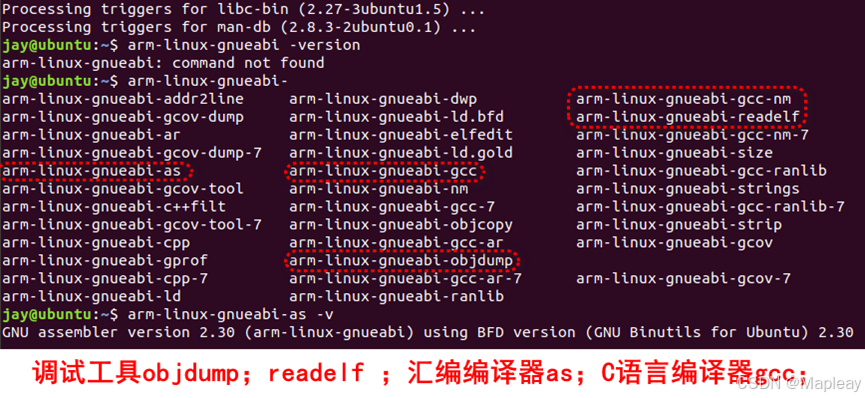
- 在Ubuntu上安装gcc-arm-linux-gnueabi
执行命令jay@ubuntu:~$ sudo apt-get install gcc-arm-linux-gnueabi

安装完成以后里面有很多编程开发套件,包括编译器和调试工具:
19.2.1 开发流程
和 ARM 开发工具的相似, GNU 工具链也包含了编译器、汇编器和连接器,从而使得源代码既可以使用 C,也可以使用汇编写成,如图 19.1 所示。
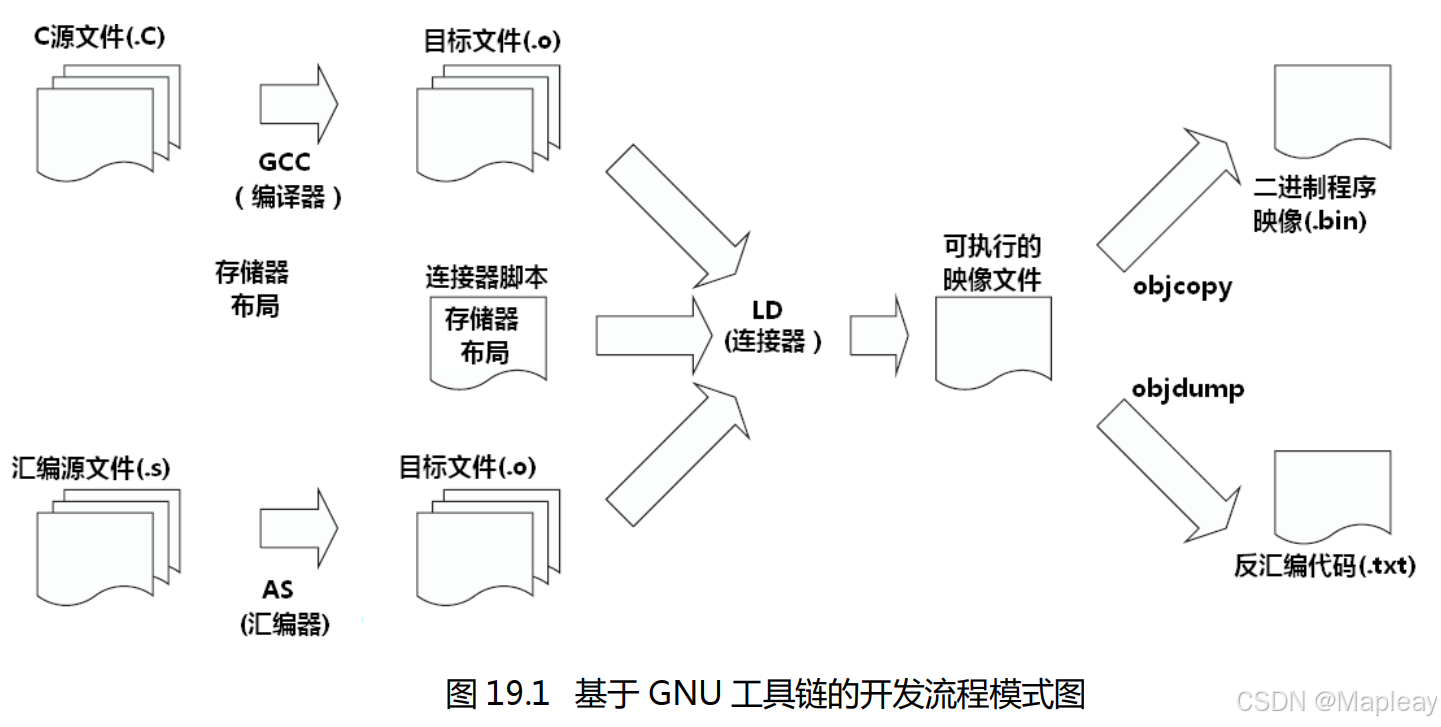
不同的应用程序环境中也有不同版本的工具链(Symbian, Linux, EABI 等)。取决于工具链的目标平台,相应的可执行文件通常有一个前缀。例如,如果使用了 EABI 环境,则 GCC 命令为arm-xxxx-eabi-gcc。本章的目标代码使用 CodeSourcery 的 GNU ARM 工具链,如表 19.1 所示。表 19.1 winARM20080331 GNU 工具链的命令名称
| 功能 | 命令 |
| 汇编器 | arm-none-eabi-as |
| 编译器 | arm-none-eabi-gcc |
| 连接器 | arm-none-eabi-ld |
| 二进制映像产生器 | arm-none-eabi-objcopy |
| 反汇编器 | arm-none-eabi-objdump |
在开发流程图中,连接脚本是可选的。但是当存储器映射比较复杂时,常常是必需的。
假设现在有example6.c文件,可以编译这个C程序了:(主要是看命令如何使用)
$> arm-none-eabi-gcc –mcpu=cortex-m3 -mthumb example6.c -L lib –T lm3s8xx-rom.ld -o example6.out
执行了上条命令后,就创建并且连接了目标文件example6.out。因为只有一个目标文件,二进制文件可以直接由它来生成:
$> arm-none-eabi-objcopy -Obinary example6.out example6.bin
产生反汇编的方式则与上例相同:
$> arm-none-eabi-objdump -S example6.out > example6.list
==================================================================
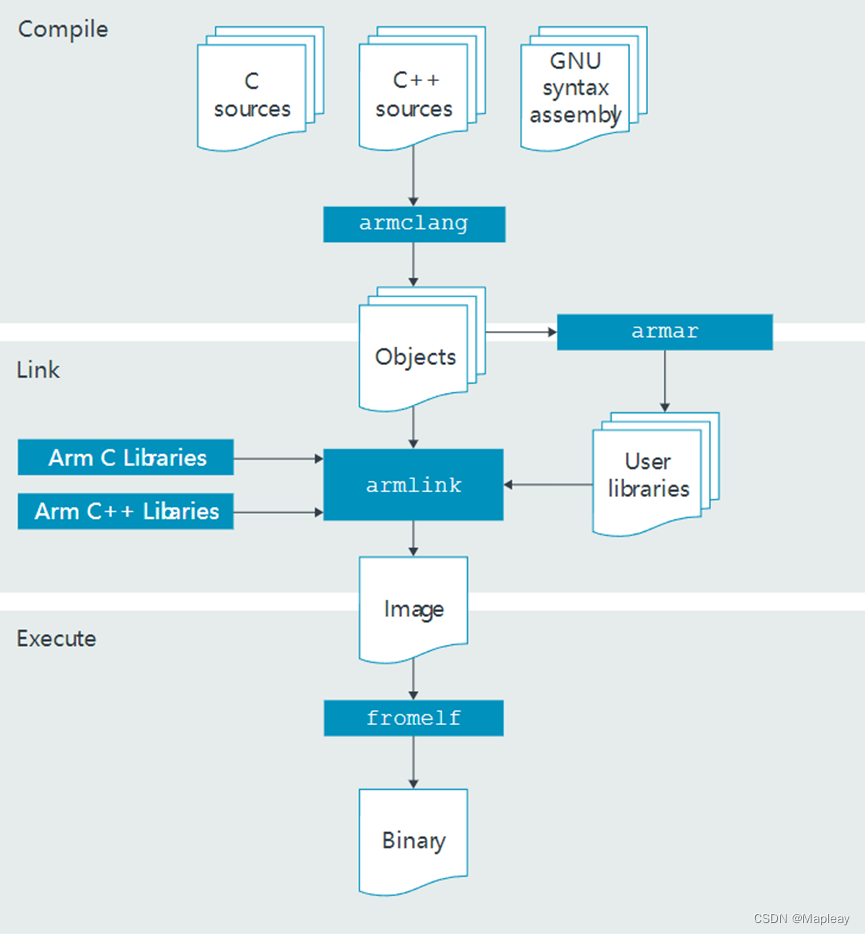
Arm Compiler for Embedded (AC6.0+)
Arm Compiler = AC. 嵌入式ARM编译器包括:
| Toolchain components | |
| armclang C/C++/汇编语言编译器 |
|
| armlink | Linker that combines objects and libraries to produce an executable. |
| Runtime support libraries for embedded systems. These libraries include optimizations for performance and code density. | |
| Libraries based on the LLVM libc++ project. | |
| fromelf | Image conversion utility and disassembler. |
| armar | Archiver that enables sets of ELF object files to be collected together. |
| Other components | |
| Provides examples, guides, and reference information to help you configure and use the toolchain. | |
| Release notes | Summarize new features, enhancements, and defect fixes for each release. The release notes are available as part of the toolchain installation. |
The following diagram shows how the different toolchain components interact with each other in a typical embedded application build process:


 782
782

 被折叠的 条评论
为什么被折叠?
被折叠的 条评论
为什么被折叠?
 到【灌水乐园】发言


