


本文介绍利用shardingsphere-proxy分库分表的配置过程。shardingsphere-proxy是一个中间件,启动后会模拟成一个实际的mysql服务,我们可以通过可视化工具或jdbc操作,实际执行的sql会通过shardingsphere-proxy转换,进而在具体的mysql中执行。
0、规划
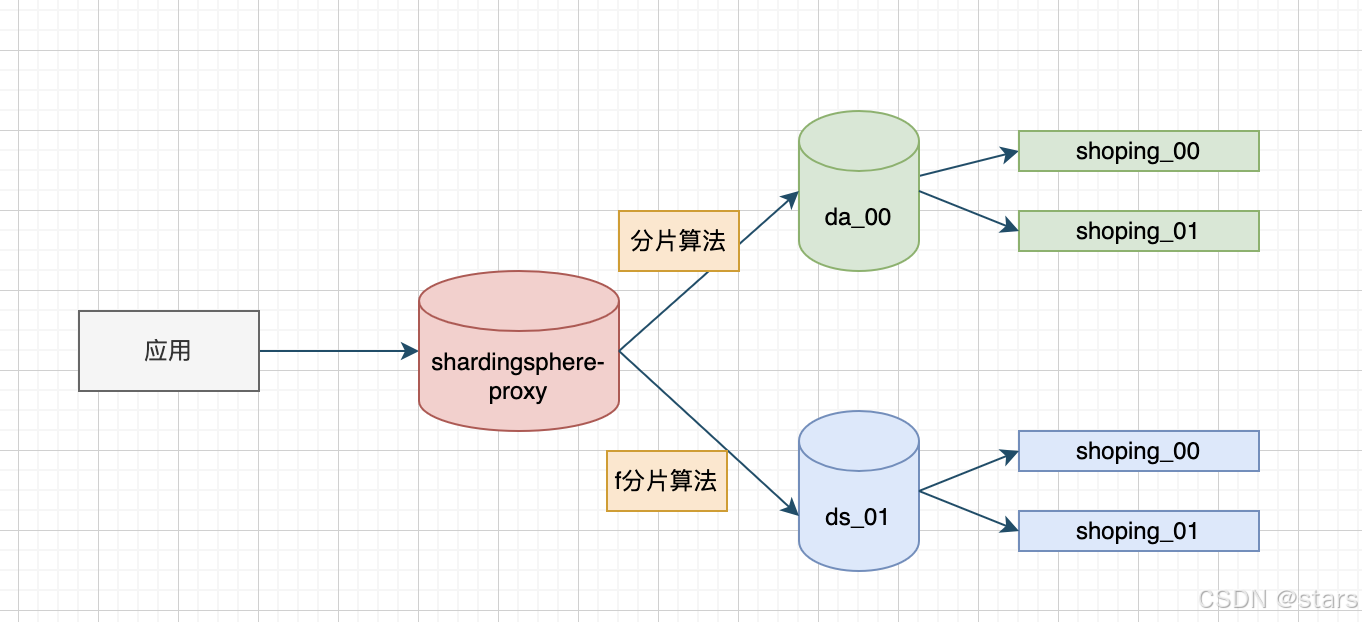
可以看到我分了两个库,每个库中又有分别分了两个shoping表。在配置分库分表前,大家先安装两个mysql,这两个mysql是平等关系,不是主从关系。下面咱们先准备脚本,把两个mysql跑起来。
0.1、sql脚本
下面是ds_00的创建脚本,注意ds_00是逻辑名,不是实际的数据库名称。
create database my_test_db_00;

create table `shoping_00`  (
  `shoping_id` bigint not null comment '商品id',
  `shoping_name` varchar(255) comment '商品名称',
  `shoping_price` int(8) not null comment '价格',
  primary key (`shoping_id`) using btree
)
engine = InnoDB
character set = utf8
collate = utf8_general_ci
row_format = compact;

create table `shoping_01`  (
  `shoping_id` bigint not null comment '商品id',
  `shoping_name` varchar(255) comment '商品名称',
  `shoping_price` int(8) not null comment '价格',
  primary key (`shoping_id`) using btree
)
engine = InnoDB
character set = utf8
collate = utf8_general_ci
row_format = compact;
ds_01的脚本和上面的几乎一样,唯一的区别就是数据库名称不同,是my_test_db_01。数据库准备完成了,下来咱们配置shardingsphere。
注意:主键没有用自增,因为咱们要用雪花算法。
1、shardingsphere-proxy配置
shardingsphere-proxy分片配置文件在conf/config-sharding.yaml文件中。找到mysql部分,放开注释。咱们先配置数据源。
1.1、数据源配置
databaseName: sharding_db

dataSources:
 ds_0:
   url: jdbc:mysql://192.168.99.100:3306/mydb2_1?serverTimezone=UTC&useSSL=false
   username: root
   password: 123456
   connectionTimeoutMilliseconds: 30000
   idleTimeoutMilliseconds: 60000
   maxLifetimeMilliseconds: 1800000
   maxPoolSize: 50
   minPoolSize: 1
 ds_1:
   url: jdbc:mysql://192.168.99.130:3306/mydb2_2?serverTimezone=UTC&useSSL=false
   username: root
   password: 123456
   connectionTimeoutMilliseconds: 30000
   idleTimeoutMilliseconds: 60000
   maxLifetimeMilliseconds: 1800000
   maxPoolSize: 50
   minPoolSize: 1
这一部分配置相对简单,见名知意,我就不多说了。接着配置分片规则。
1.2、分片规则及算法配置
rules:
- !SHARDING
 tables:
   shopping:
    #  实际的库表表达式,这个表达式代表:ds_0.shoping_00,ds_0.shoping_01,ds_1.shoping_00, ds_1.shoping_01
     actualDataNodes: ds_${0..1}.shoping_0${0..1}
     databaseStrategy:                  			#数据库分片策略
       standard:
         shardingColumn: shoping_id     			#分片的数据库列
         shardingAlgorithmName: database_inline     #算法名称
     tableStrategy:
       standard:
         shardingColumn: shoping_id
         shardingAlgorithmName: table_inline

     keyGenerateStrategy:                         #主键生产策略
       column: shoping_id                         #主键对应的列
       keyGeneratorName: snowflake                #主键生成算法,shardingsphere已内置
 shardingAlgorithms:                              #分片算法配置
   database_inline:                               #分片算法名称,和上面数据库配置的算法名称对应
     type: INLINE
     props:
       algorithm-expression: ds_${shoping_id % 2}  #数据库分片的具体算法
   table_inline:
     type: INLINE
     props:
       algorithm-expression: shoping_0${shoping_id % 2}
 keyGenerators:
   snowflake:                                  #主键生产算法名称,和上面配置对应
     type: SNOWFLAKE
这一段配置和上面1.1中的配置都在config-sharding.yml中,这两段配置级别相同(rules和datasources平行),一定要注意。
1.3、配置连接信息
shardingsphere-proxy会模拟成数据库服务,我们可以向普通数据库一样操作,那就需要用户名、密码、端口等信息配置。端口默认是3307,保持默认即可。打开conf/server.yml,修改如下配置:
authority:
 users:
   - user: root
     password: 123456
  #  - user: sharding
  #    password: sharding
 privilege:
   type: ALL_PERMITTED
至此,shardingsphere-proxy分库分表就配置完成了,下面咱们简单测试一下。
3、测试
用工具连接shardingsphere-proxy,找到你配置的数据库,我的如下图:

接下来,打开sql编辑器,下个测试sql:
INSERT into shopping(shoping_name,shoping_price) values('青岛干啤','6');
多跑几次,看看后台日志,效果如下:
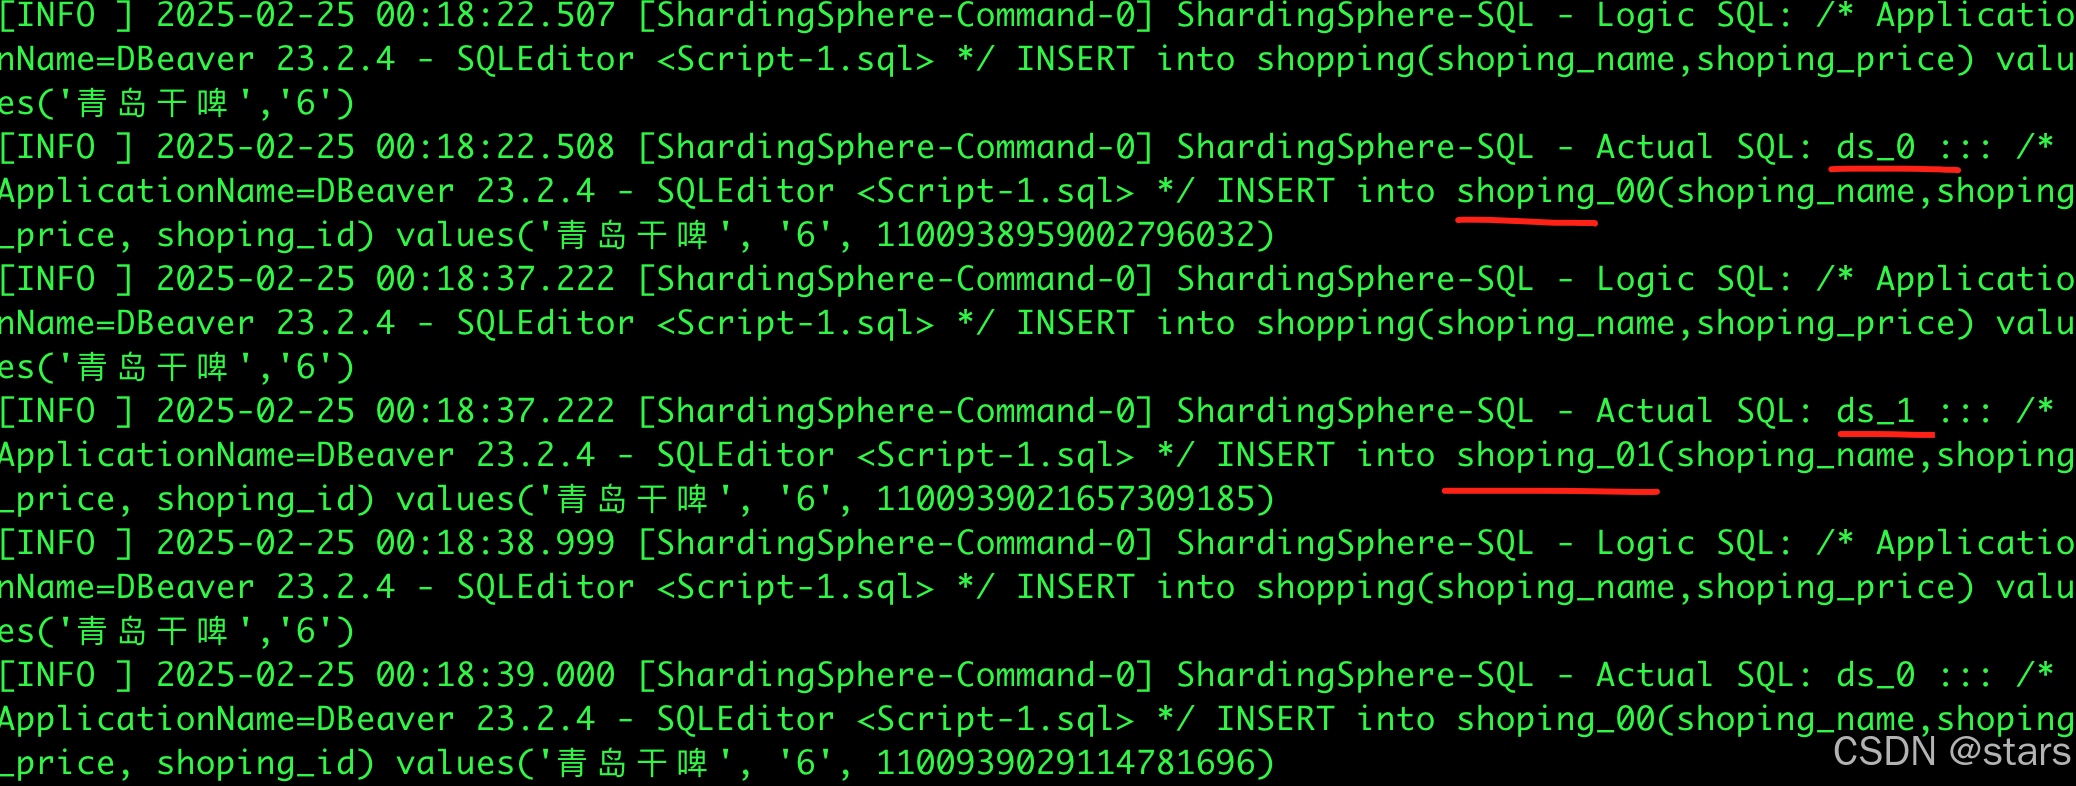
可以看到shardingsphere-proxy已经正确的帮我们路由到预期的数据库和表。好了,就到这里啦。
//~~


 2563
2563

 被折叠的 条评论
为什么被折叠?
被折叠的 条评论
为什么被折叠?
 到【灌水乐园】发言


