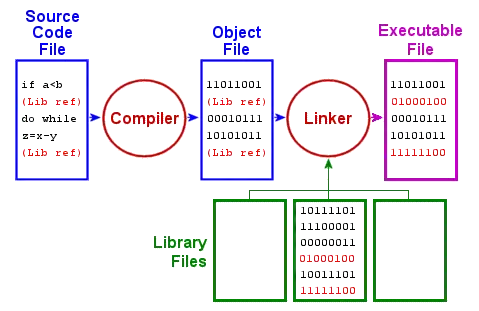
下图是一个可执行文件编译,链接的过程.

本篇将通过一个完整的小工程来阐述ELF编译,链接过程,并分析.o和bin文件中各区,符号表之间的关系.从一个崭新的视角去看中间过程.
准备工作
先得有个小工程,麻雀虽小,但五脏俱全,标准的文件夹和Makefile结构,如下:
目录结构
root@5e3abe332c5a:/home/docker/test4harmony/54# tree
.
├── bin
│   └── weharmony
├── include
│   └── part.h
├── Makefile
├── obj
│   ├── main.o
│   └── part.o
└── src
    ├── main.c
    └── part.c

4 directories, 7 files
看到 .c .h .o 就感觉特别的亲切 : ),项目很简单,但具有代表性,有全局变量/函数,extern,多文件链接,和动态链接库的printf,用cat命令看看三个文件内容。
cat .c .h
root@5e3abe332c5a:/home/docker/test4harmony/54# cat ./src/main.c
#include <stdio.h>
#include "part.h"
extern int g_int;
extern char *g_str;

int main() {
        int loc_int = 53;
        char *loc_str = "harmony os";
        printf("main 开始 - 全局 g_int = %d, 全局 g_str = %s.\n", g_int, g_str);
        func_int(loc_int);
        func_str(loc_str);
        printf("main 结束 - 全局 g_int = %d, 全局 g_str = %s.\n", g_int, g_str);
        return 0;
}
root@5e3abe332c5a:/home/docker/test4harmony/54# cat ./src/part.c
#include <stdio.h>
#include "part.h"

int g_int = 51;
char *g_str = "hello world";

void func_int(int i) {
	int tmp = i;
	g_int = 2 * tmp ;
	printf("func_int g_int = %d,tmp = %d.\n", g_int,tmp);
}
void func_str(char *str) {
        g_str = str;
        printf("func_str g_str = %s.\n", g_str);
}
root@5e3abe332c5a:/home/docker/test4harmony/54# cat ./include/part.h
#ifndef _PART_H_
#define _PART_H_
void func_int(int i);
void func_str(char *str);
#endif
cat Makefile
Makefile采用标准写法,关于makefile系列篇会在编译过程篇中详细说明,此处先看点简单的。
root@5e3abe332c5a:/home/docker/test4harmony/54# cat Makefile
DIR_INC = ./include
DIR_SRC = ./src
DIR_OBJ = ./obj
DIR_BIN = ./bin

SRC = $(wildcard ${DIR_SRC}/*.c)
OBJ = $(patsubst %.c,${DIR_OBJ}/%.o,$(notdir ${SRC}))

TARGET = weharmony

BIN_TARGET = ${DIR_BIN}/${TARGET}

CC = gcc
CFLAGS = -g -Wall -I${DIR_INC}

${BIN_TARGET}:${OBJ}
        $(CC) $(OBJ)  -o $@

${DIR_OBJ}/%.o:${DIR_SRC}/%.c
        $(CC) $(CFLAGS) -c  $< -o $@
.PHONY:clean
clean:
        find ${DIR_OBJ} -name *.o -exec rm -rf {}
编译.链接.运行.看结果
root@5e3abe332c5a:/home/docker/test4harmony/54# make
gcc -g -Wall -I./include -c  src/part.c -o obj/part.o
gcc -g -Wall -I./include -c  src/main.c -o obj/main.o
gcc ./obj/part.o ./obj/main.o  -o bin/weharmony
root@5e3abe332c5a:/home/docker/test4harmony/54# ./bin/weharmony
main 开始 - 全局 g_int = 51, 全局 g_str = hello world.
func_int g_int = 106,tmp = 53.
func_str g_str = harmony os.
main 结束 - 全局 g_int = 106, 全局 g_str = harmony os.
结果很简单,没什么好说的.
开始分析
准备工作完成,开始了真正的分析. 因为命令输出内容太多,本篇做了精简,去除了干扰项.对这些命令还不行清楚的请翻看系列篇其他文章,此处不做介绍,阅读本篇需要一定的基础.
readelf 大S小s ./obj/main.o
root@5e3abe332c5a:/home/docker/test4harmony/54# readelf -S ./obj/main.o
There are 22 section headers, starting at offset 0x1498:

Section Headers:
  [Nr] Name              Type             Address           Offset
       Size              EntSize          Flags  Link  Info  Align
  [ 0]                   NULL             0000000000000000  00000000
       0000000000000000  0000000000000000           0     0     0
  [ 1] .text             PROGBITS         0000000000000000  00000040
       000000000000007b  0000000000000000  AX       0     0     1
  [ 2] .rela.text        RELA             0000000000000000  00000c80
       0000000000000108  0000000000000018   I      19     1     8
  [ 3] .data             PROGBITS         0000000000000000  000000bb
       0000000000000000  0000000000000000  WA       0     0     1
  [ 4] .bss              NOBITS           0000000000000000  000000bb
       0000000000000000  0000000000000000  WA       0     0     1
  [ 5] .rodata           PROGBITS         0000000000000000  000000c0
000000000000007d 0000000000000000 A 0 0  鸿蒙内核静态链接过程分析与开发指南


 最低0.47元/天 解锁文章


 667
667

 被折叠的 条评论
为什么被折叠?


