


 本文深入探讨了使用MATLAB训练神经网络进行图像分类的方法,包括创建网络层(卷积、ReLU、池化、全连接、Softmax)、训练过程、提升网络准确率的策略以及迁移学习的应用。通过MNIST数据集示例,展示训练过程,测试结果显示准确率为0.9423。此外,还介绍了如何利用预训练网络(如AlexNet)进行迁移学习,以提高新任务的训练效率。
这篇文章作为上一篇的补充和拓展,再添加几个例子和相应的介绍。
1. 创建和训练新的神经网络的步骤
- 下载数据集
- 创建和配置网络层
常用网络层:
卷积层将输入图像放进一组卷积滤波器,每个滤波器激活图像中的某些特征。
ReLU 层通过将负值映射到零和保持正数值,实现更快、更高效的训练。
池化层通过执行非线性下采样,减少网络需要学习的参数个数,从而简化输出。
全连接层将网络 2D 空间特征“扁平化”为 1D 矢量,为分类目的而表示图像级特征。
Softmax 层为数据集中的每个类别提供概率。
- 训练

- 测试网络准确率
以识别手写数字为例子
先自行下载数据集MNIST.
clear all;close all;clc
% % 导入数据集
filename = './train-images.idx3-ubyte';
fid = fopen(filename,'r');
MagicNumber=readint32(fid);
numImg=readint32(fid);
numRows=readint32(fid);
numCols=readint32(fid);
rawImgDataTrain = uint8 (fread(fid, numImg * numRows * numCols,'uint8')); % 将数据部分重构为 4D 阵列
rawImgDataTrain = reshape(rawImgDataTrain, [numRows, numCols, numImg]);
imgDataTrain=zeros(numRows,numCols,1,numImg);
for ii=1:numImg
imgDataTrain(:,:,1,ii) = uint8(rawImgDataTrain(:,:,ii));
end
filename = './train-labels.idx1-ubyte';
fid1 = fopen(filename,'r');
MagicNumber=readint32(fid1);
numImg=readint32(fid1);
for i = 1:numImg
temp = fread(fid1,1);
temp1(i,1)=temp;
end
labelsTrain=categorical(temp1,[0,1,2,3,4,5,6,7,8,9],{'0','1','2','3','4','5','6','7','8','9'});
%网络层设置
layers = [ imageInputLayer([28 28 1])
convolution2dLayer(3,16,'Padding',1)
batchNormalizationLayer
reluLayer
maxPooling2dLayer(2,'Stride',2)
convolution2dLayer(3,32,'Padding',1)
batchNormalizationLayer
reluLayer
maxPooling2dLayer(2,'Stride',2)
convolution2dLayer(3,64,'Padding',1)
batchNormalizationLayer
reluLayer
fullyConnectedLayer(10)
softmaxLayer
classificationLayer];
miniBatchSize = 8192;
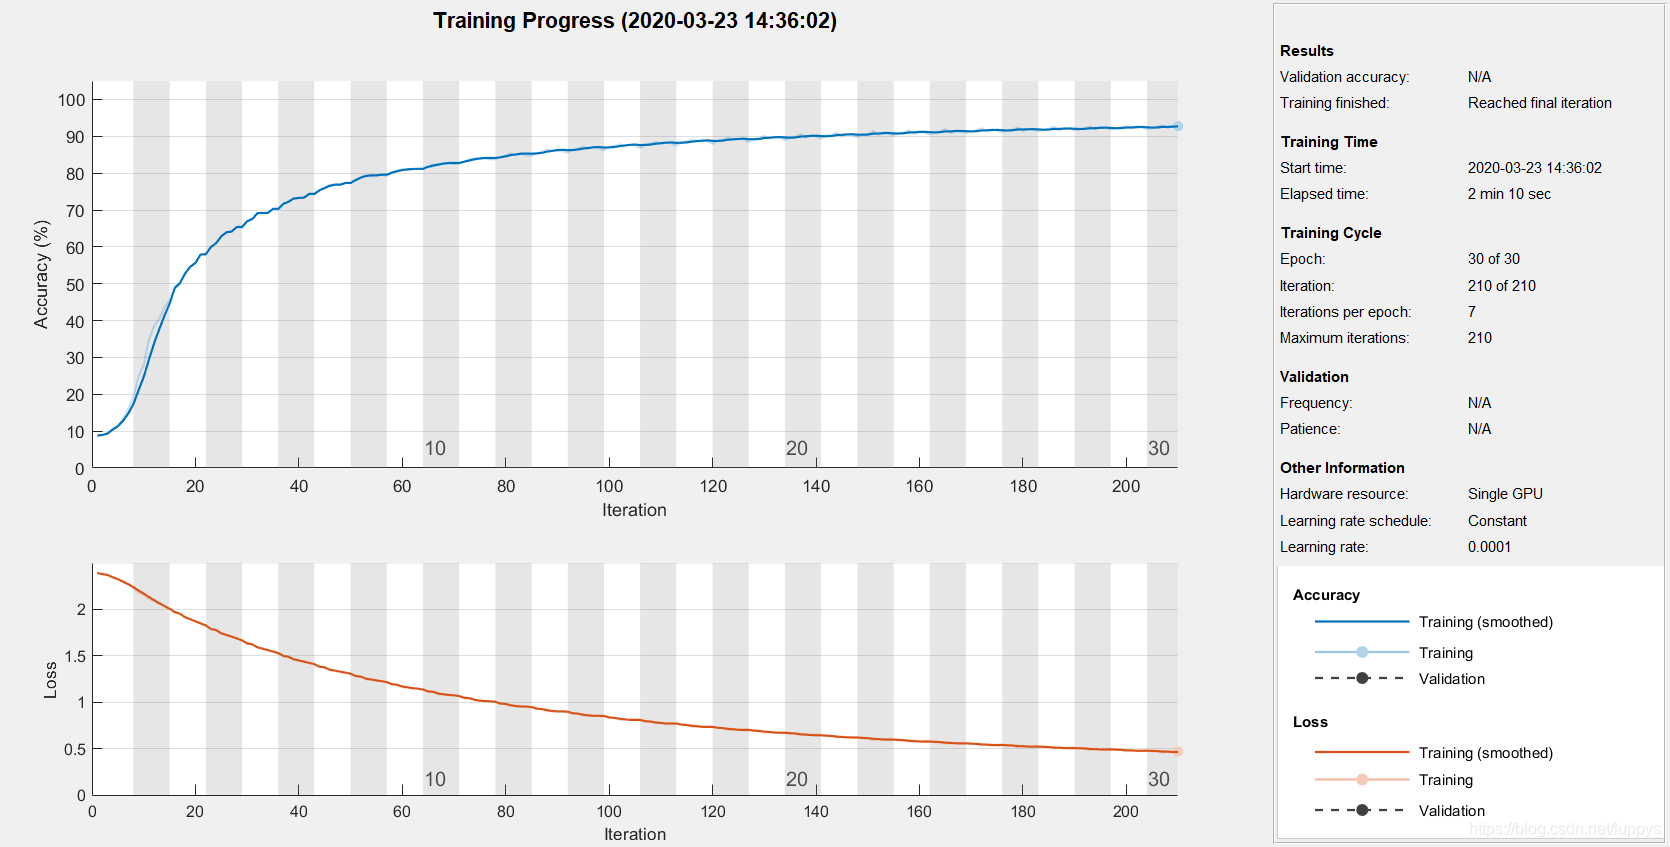
options = trainingOptions( 'sgdm',...
'MiniBatchSize', miniBatchSize,...
'InitialLearnRate', 0.0001 ,...
'Plots', 'training-progress');
%训练
net = trainNetwork(imgDataTrain, labelsTrain, layers, options);
%测试
clear temp temp1;
filename = './t10k-images.idx3-ubyte';
fid = fopen(filename,'r');
MagicNumber=readint32(fid);
numImg=readint32(fid);
numRows=readint32(fid);
numCols=readint32(fid);
rawImgDataTrain = uint8 (fread(fid, numImg * numRows * numCols,'uint8')); % 将数据部分重构为 4D 阵列
rawImgDataTrain = reshape(rawImgDataTrain, [numRows, numCols, numImg]);
imgDataTest=zeros(numRows,numCols,1,numImg);
for ii=1:numImg
imgDataTest(:,:,1,ii) = uint8(rawImgDataTrain(:,:,ii));
end
filename = './t10k-labels.idx1-ubyte';
fid1 = fopen(filename,'r');
MagicNumber=readint32(fid1);
numImg=readint32(fid1);
for i = 1:numImg
temp = fread(fid1,1);
temp1(i,1)=temp;
end
labelsTest=categorical(temp1,[0,1,2,3,4,5,6,7,8,9],{'0','1','2','3','4','5','6','7','8','9'});
predLabelsTest = net.classify(imgDataTest);
accuracy = sum(predLabelsTest == labelsTest) / numel(labelsTest)
调用函数readint32的代码
function [getdata]=readint32(FID)
data = [];
for i = 1:4
    f=fread(FID,1);
    data = strcat(data,num2str(dec2base(f,2,8)));
end
getdata = bin2dec(data);

end
测试结果:准确度为0.9423
2. 如何提高网络准确率
- 增加训练图像的数量
- 提高训练图像的质量
- 改变训练选项•(training option)
如,调整学习速率;使用贝叶斯优化来识别训练参数的最优值。贝叶斯优化将多次运行网络(并且可以并行处理此过程)。 - 改变网络配置(例如,通过添加、删除或重组层)
3. 迁移学习训练神经网络的步骤
我们修改预先训练好的网络并使用迁移学习进行训练以执行新识别任务。微调训练好的网络可以使用更少数量的训练图像迅速迁移学习到新任务。
- 导入预先训练好的网络
预先训练好的网络已完成多数繁重的网络设置(选择和组织层结构)。这意味着我们无需执行任何重新配置操作即可利用网络最初受训练类别的图像检验网络: - 配置网络以执行新任务
- 利用新数据训练网络
- .评估网络
以alexnet为例:
net = alexnet;
layers = net.Layers;

layers

% notice the 1000 in the last fully connected layer. This is for the 1000 categories AlexNet knows.
rootFolder = 'cifar10Train';
categories = {'Deer','Dog','Frog','Cat'};
imds = imageDatastore(fullfile(rootFolder, categories), 'LabelSource', 'foldernames');

imds = splitEachLabel(imds, 500, 'randomize') % we only need 500 images per class
imds.ReadFcn = @readFunctionTrain;

layers = layers(1:end-3);

layers(end+1) = fullyConnectedLayer(64, 'Name', 'special_2');
layers(end+1) = reluLayer;
layers(end+1) = fullyConnectedLayer(4, 'Name', 'fc8_2 ');
layers(end+1) = softmaxLayer;
layers(end+1) = classificationLayer()

layers(end-2).WeightLearnRateFactor = 10;
layers(end-2).WeightL2Factor = 1;
layers(end-2).BiasLearnRateFactor = 20;
layers(end-2).BiasL2Factor = 0;

opts = trainingOptions('sgdm', ...
    'LearnRateSchedule', 'none',...
    'InitialLearnRate', .0001,...
    'MaxEpochs', 20, ...
    'MiniBatchSize', 128);

convnet = trainNetwork(imds, layers, opts);

rootFolder = 'cifar10Test';
testDS = imageDatastore(fullfile(rootFolder, categories), 'LabelSource', 'foldernames');
testDS.ReadFcn = @readFunctionTrain;

[labels,err_test] = classify(convnet, testDS, 'MiniBatchSize', 64);

confMat = confusionmat(testDS.Labels, labels);
confMat = confMat./sum(confMat,2);
mean(diag(confMat))
测试结果:准确度为0.8077


 1万+
1万+


 到【灌水乐园】发言


