


@TOC
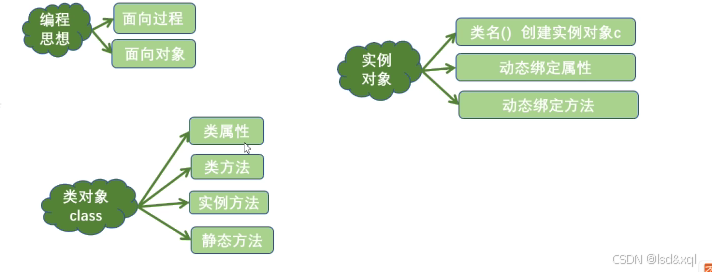
类与对象
类的创建
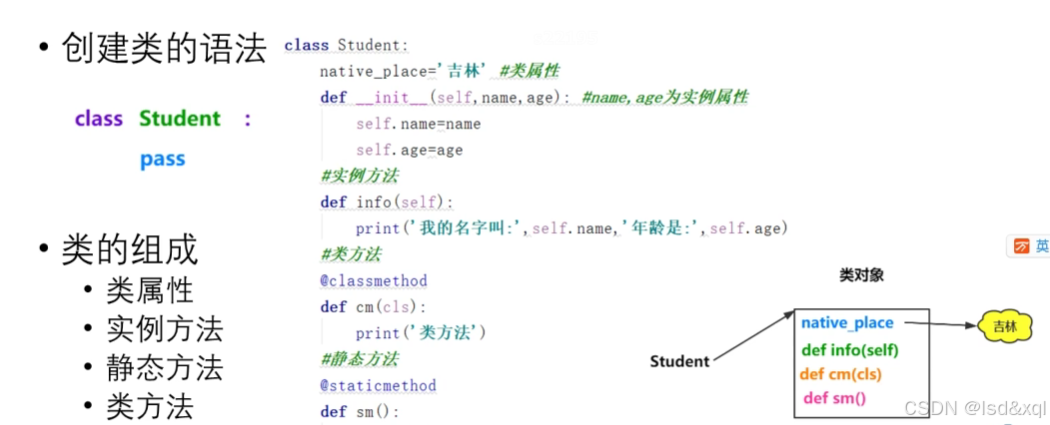
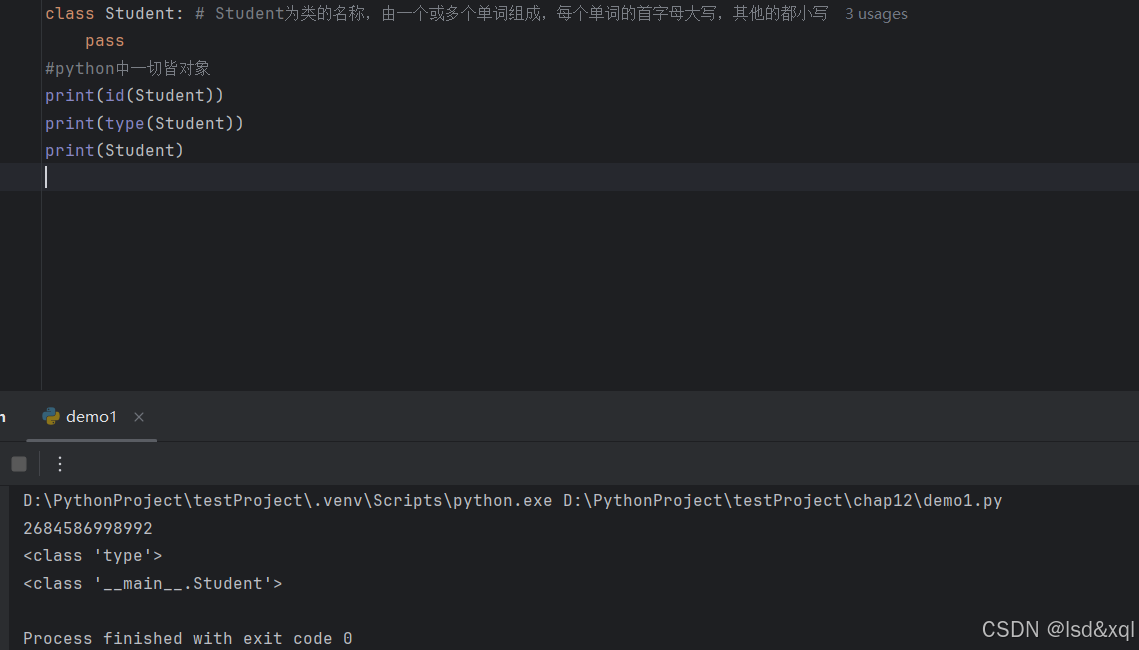
class Student: # Student为类的名称,由一个或多个单词组成,每个单词的首字母大写,其他的都小写
    native_pace='四川' #直接写在类里面的变量,称为类属性
    def __init__(self,name,age):
        self.name=name
        self.age=age

    def eat(self):
        print('学生在吃饭')

    @staticmethod
    def method():
        print('静态方法')

    @classmethod
    def cmethod(cls):
        print('类方法')


# 在类之外定义的称为函数,在类之内定义的称为方法
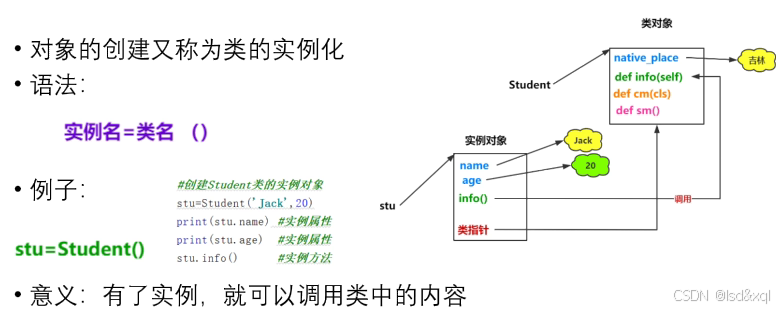
对象的创建
class Student: # Student为类的名称,由一个或多个单词组成,每个单词的首字母大写,其他的都小写
    native_pace='四川' #直接写在类里面的变量,称为类属性
    def __init__(self,name,age):
        self.name=name
        self.age=age

    def eat(self):
        print('学生在吃饭')

    @staticmethod
    def method():
        print('静态方法')

    @classmethod
    def cmethod(cls):
        print('类方法')

#实例对象-》存在类指针指向类对象
stu1=Student('张三',20)
print(id(stu1))
print(type(stu1))
print(stu1)
print()
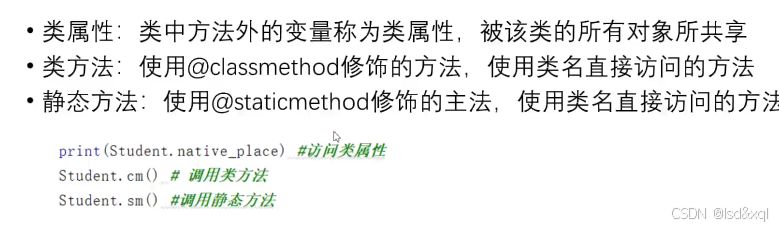
类方法的使用:
class Student: # Student为类的名称,由一个或多个单词组成,每个单词的首字母大写,其他的都小写
    native_pace='四川' #直接写在类里面的变量,称为类属性
    def __init__(self,name,age):
        self.name=name
        self.age=age

    def eat(self):
        print('学生在吃饭')

    @staticmethod
    def method():
        print('静态方法')

    @classmethod
    def cmethod(cls):
        print('类方法')

#实例对象-》存在类指针指向类对象
stu1=Student('张三',20)
stu1.eat()
print(stu1.name)
print(stu1.age)
print(stu1.native_pace)
print()
Student.eat(stu1)
Student.method()
Student.cmethod()
print(Student.native_pace)
动态绑定属性和方法
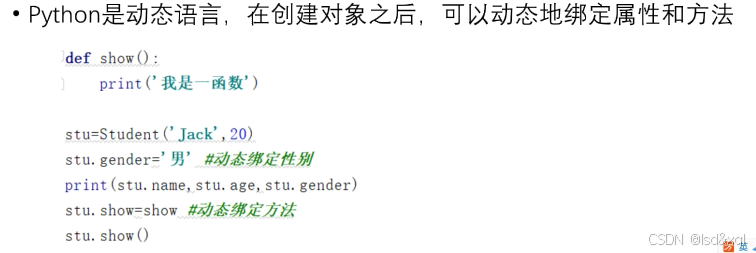
class Student:
    def __init__(self,name,age):
        self.name=name
        self.age=age
    def eat(self):
        print(self.name,'在吃饭')

stu1 = Student('张三',20)
stu2= Student('李四',30)
print(id(stu1),id(stu2))
stu2.gender ='女'
print(stu1.name,stu1.age)
print(stu2.name,stu2.age,stu2.gender)

def show():
    print('函数')
stu1.show =show
stu1.show()
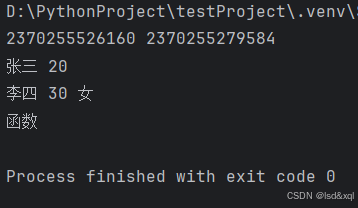
每个stu都开了一个空间
面向对象的三大特性
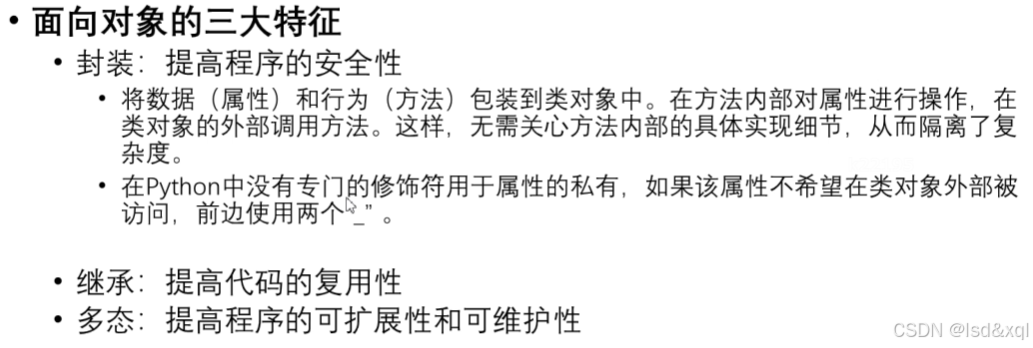
封装的实现
class Car:
    def __init__(self,brand):
        self.brand=brand
    def start(self):
        print('汽车已启动')
car = Car('test')
car.start()
print(car.brand)
class Student:
    def __init__(self,name,age):
        self.name=name
        self.__age=age
    def show(self):
        print(self.name,self.__age)
stu1 = Student('张三',20)
print(stu1.name)
#外部访问不到了
#print(stu1.age)
stu1.show()
print(dir(stu1))
#这样能访问 不建议
print(stu1._Student__age)
继承如何实现
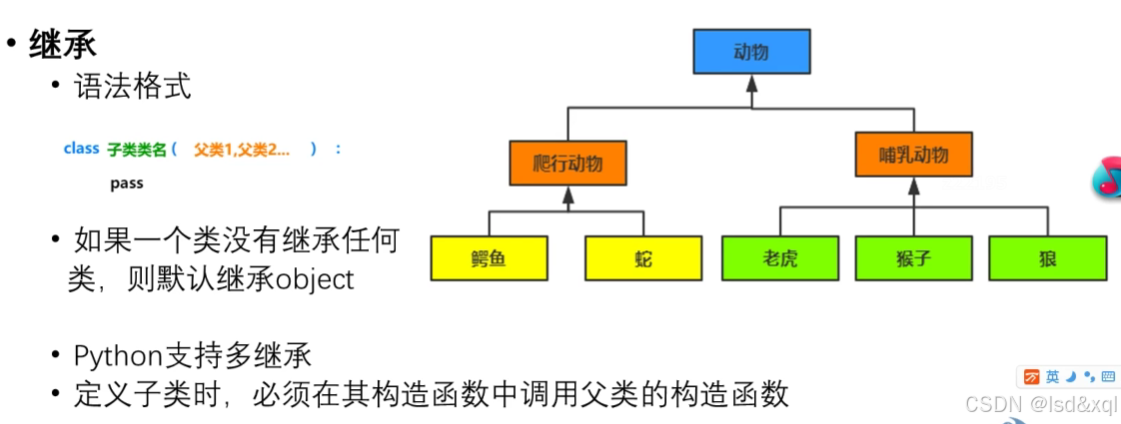
抽取共性特征
class Person:
def __init__(self,name,age):
self.name=name
self.age=age
def info(self):
print(self.name,self.age)
class Student(Person):
def __init__(self,name,age,stu_no):
super().__init__(name,age)
self.stu_no=stu_no
class Teacher(Person):
def __init__(self,name,age,teach_of_year):
super().__init__(name,age)
self.teach_of_year=teach_of_year
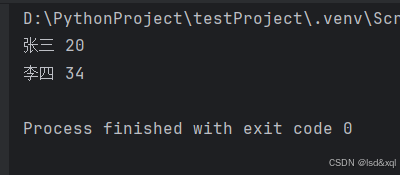
stu=Student('张三',20,'123')
teacher=Teacher('李四',34,10)
stu.info()
teacher.info()
python支持多继承
class A:
    def foo(self):
        print("A.foo")

class B(A):
    def foo(self):
        print("B.foo")
        super().foo()  # 调用父类的 foo()

class C(A):
    def foo(self):
        print("C.foo")
        super().foo()  # 调用父类的 foo()

class D(B, C):
    def foo(self):
        print("D.foo")
        super().foo()  # 调用
Python 支持多继承,但菱形继承问题仍然存在。不过,Python 通过 方法解析顺序(Method Resolution Order, MRO) 和 C3 线性化算法 明确规定了继承链的优先级,避免了二义性。这是 Python 与 Java 在解决多继承问题上的核心区别。
关键点:
方法解析顺序(MRO):Python 会按照 D -> B -> C -> A 的顺序查找方法。
super() 的协作性:super() 不是直接调用父类的方法,而是根据 MRO 顺序依次调用下一个类的方法。
所有父类方法都会被调用:只要每个类的 foo() 中都调用了 super().foo(),所有层级的 foo() 都会被依次执行。
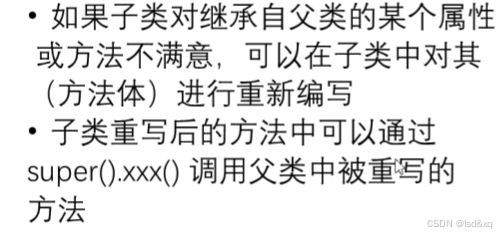
方法的重写
class Person:
    def __init__(self,name,age):
        self.name=name
        self.age=age
    def info(self):
        print(self.name,self.age)

class Student(Person):
    def __init__(self,name,age,stu_no):
        super().__init__(name,age)
        self.stu_no=stu_no
    def info(self):
        super().info()
        print(self.stu_no)

class Teacher(Person):
    def __init__(self,name,age,teach_of_year):
        super().__init__(name,age)
        self.teach_of_year=teach_of_year
    def info(self):
        super().info()
        print(self.teach_of_year)

stu=Student('张三',20,'123')
teacher=Teacher('李四',34,10)
stu.info()
teacher.info()
Object类
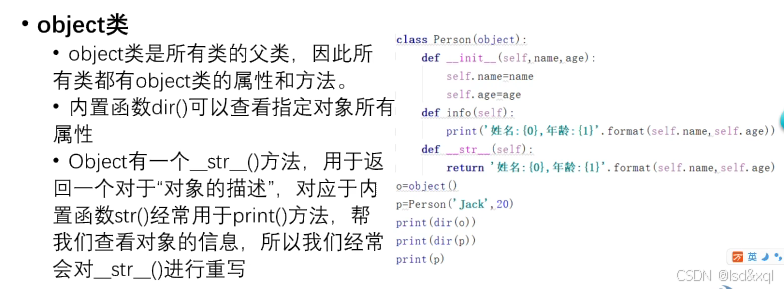
class Student:
    def __init__(self,name,age):
        self.name=name
        self.age=age
    def __str__(self):
        return '我的名字是{0},今年{1}岁'.format(self.name,self.age)

stu=Student('张三',20)
print(dir(stu))
print(stu)
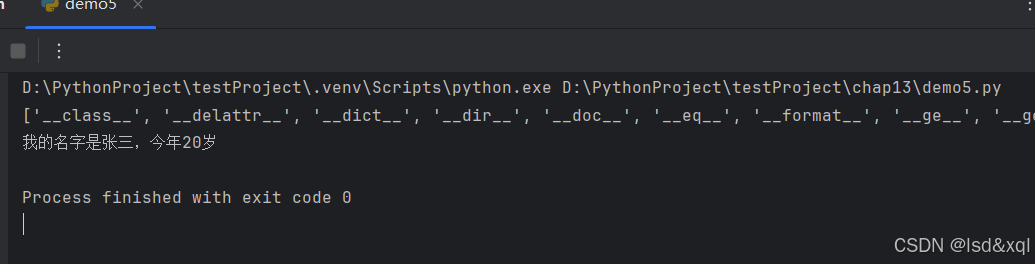
此处会默认调用str方法
多态的实现

class Animal:
    def eat(self):
        print('动物会吃')
class Dog(Animal):
    def eat(self):
        print('狗吃肉')
class Cat(Animal):
    def eat(self):
        print('猫吃鱼')

class Person:
    def eat(self):
        print('人吃五谷杂粮')

def fun(obj):
    obj.eat()

fun(Dog())
fun(Cat())
fun(Animal())
fun(Person())

python是一种动态语言,只关心是否具有这个方法有就行
特殊的属性和特殊方法
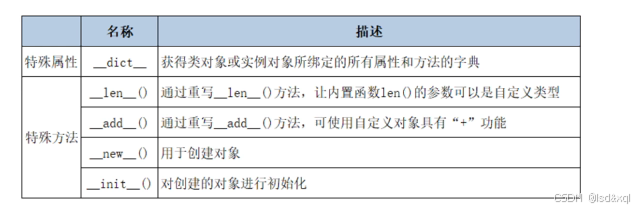
以下是特殊属性:
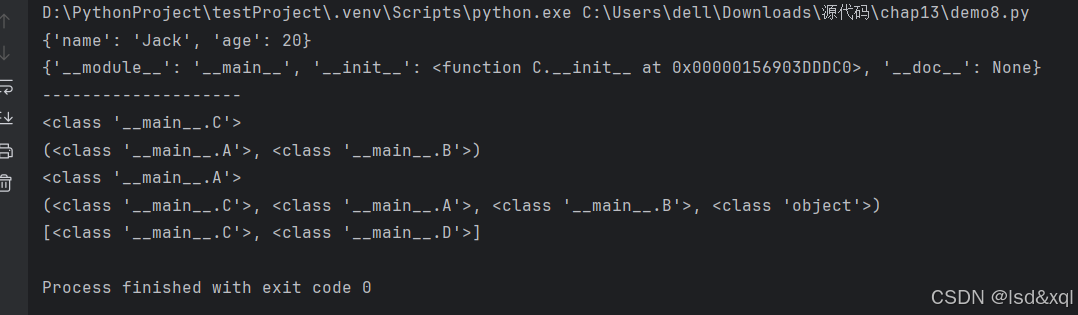
class A:
    pass
class B:
    pass
class C(A,B):
    def __init__(self,name,age):
        self.name=name
        self.age=age
class D(A):
    pass
#创建C类的对象
x=C('Jack',20)  #x是C类型的一个实例对象
print(x.__dict__)  #实例对象的属性字典
print(C.__dict__)
print('--------------------')
print(x.__class__) #<class '__main__.C'> 输出了对象所属的类
print(C.__bases__) #C类的父类类型的元素
print(C.__base__)  #类的基类
print(C.__mro__) #类的层次结构
print(A.__subclasses__()) #子类的列表
以下是特殊方法
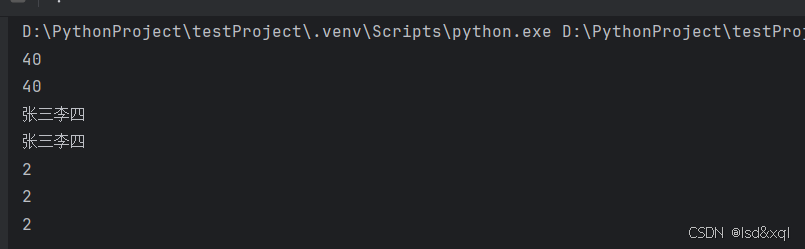
a=20
b=20
c=a+b
d=a.__add__(b)
print(c)
print(d)


class Student:
    def __init__(self,name):
        self.name=name
    def __add__(self, other):
        return self.name+other.name
    def __len__(self):
        return len(self.name)

stu1 =Student('张三')
stu2 =Student('李四')
print(stu1+stu2) #实现了两个对象的加法运算
print(stu1.__add__(stu2))

lst=[11,22]
print(len(lst))
print(lst.__len__())

print(len(stu1))
new 和init创建对象的过程
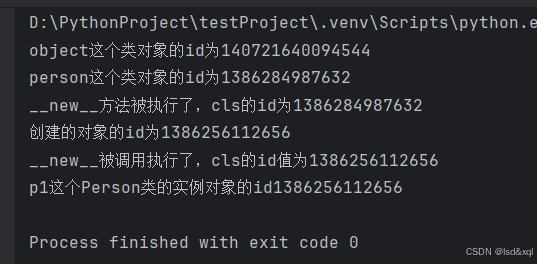
class Person:
    def __init__(self,name,age):
        print('__new__被调用执行了,cls的id值为{0}'.format(id(self)))
        self.name=name
        self.age=age
    def __new__(cls, *args, **kwargs):
        print('__new__方法被执行了,cls的id为{0}'.format(id(cls)))
        obj =super().__new__(cls)
        print('创建的对象的id为{0}'.format(id(obj)))
        return obj


print('object这个类对象的id为{0}'.format(id(object)))
print('person这个类对象的id为{0}'.format(id(Person)))
p1=Person('张三',20)
print('p1这个Person类的实例对象的id{0}'.format(id(p1)))
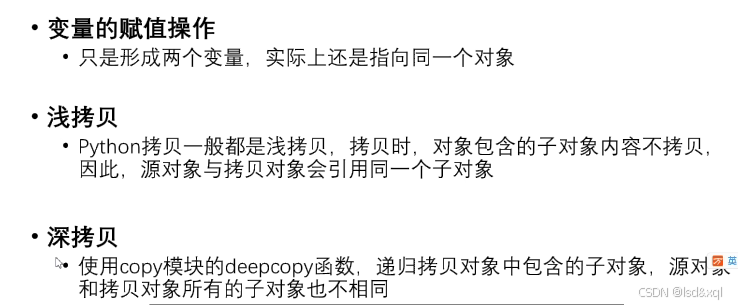
类的浅拷贝与深拷贝
class CPU:
pass
class Disk:
pass
class Computer:
def __init__(self,cpu,disk):
self.cpu = cpu
self.disk = disk
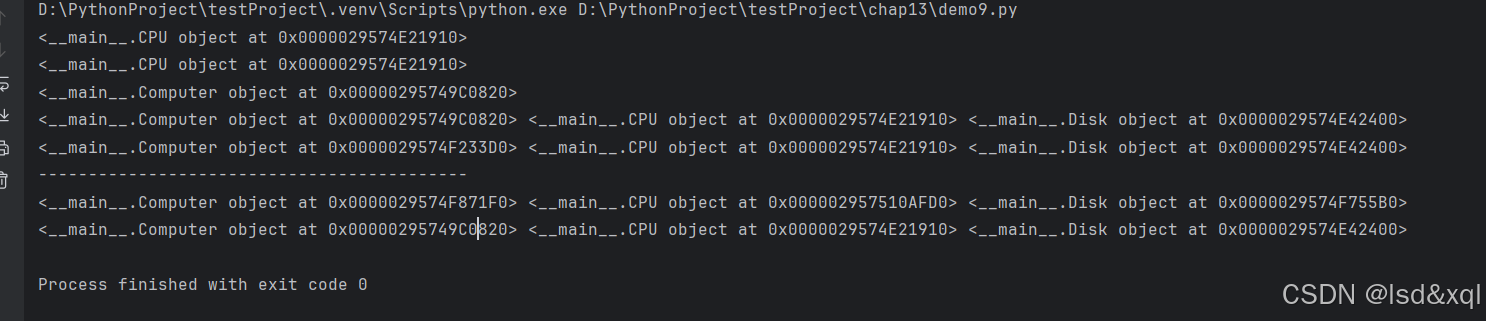
cpu1 = CPU()
cpu2 = cpu1
print(cpu1)
print(cpu2)
#类的浅拷贝
disk=Disk()
computer=Computer(cpu1,disk)
print(computer)
import copy
computer2 = copy.copy(computer)
#可以看到computer对象是不同的,但是cpu和disk是相同的
print(computer,computer.cpu,computer.disk)
print(computer2,computer2.cpu,computer.disk)
print('-------------------------------------------')
# 深拷贝
computer3 = copy.deepcopy(computer)
print(computer3,computer3.cpu,computer3.disk)
print(computer,computer.cpu,computer.disk)


 被折叠的 条评论
为什么被折叠?
被折叠的 条评论
为什么被折叠?
 到【灌水乐园】发言


