


背景:
android系统中自带了一个uinput命令,但是这个命令其实对于使用者并不友好,因为本身命令的使用没有相关的help提示,命令的使用方式基本上整个互联网上都没有相关的文章。
所以本文要带大家学习一下如何使用uinput命令实现input事件的注入。
uinput命令使用的帮助部分
uinput的命令,因为网络找不到资料,我们属于互联网知识开荒一样,如何使用其实主要看如下文件:
frameworks/base/cmds/uinput/README.md
There are two ways to use the `uinput` command:

* **Recommended:** `uinput -` reads commands from standard input until End-of-File (Ctrl+D) is sent.
  This mode can be used interactively from a terminal or used to control uinput from another program
  or app (such as the CTS tests via [`UinputDevice`][UinputDevice]).
* `uinput <filename>` reads commands from a file instead of standard input.

There are also two supported input formats, described in the sections below. The tool will
automatically detect which format is being used.
也就是这里一共两个方式来使用uinput命令
1、“uinput -” 这种方式主要是获取输入是从标准输入流获取数据
2、“uinput “也就是最简单的,uinput命令后面直接加文件的路径名字
其实本质上两个命令方式没有本质区别,都是要一个文件作为输入。
那么请问这个文件到底长什么样子呢?
这里其实是可以也可以通过上面帮助文档看到蛛丝马迹
There are also two supported input formats, described in the sections below. The tool will
automatically detect which format is being used.

[UinputDevice]: https://cs.android.com/android/platform/superproject/main/+/main:cts/libs/input/src/com/android/cts/input/UinputDevice.java

## evemu recording format (recommended)

`uinput` supports the evemu format, as used by the [FreeDesktop project's evemu suite][FreeDesktop].
This is a simple text-based format compatible with recording and replay tools on other platforms.
However, it only supports playback of events from one device from a single recording. Recordings can
be made using the `evemu-record` command on Android or other Linux-based OSes.

[FreeDesktop]: https://gitlab.freedesktop.org/libevdev/evemu

## JSON-like format

The other supported format is JSON-based, though the parser is in [lenient mode] to allow comments,
and integers can be specified in hexadecimal (e.g. `0xABCD`). The input file (or standard input) can
contain multiple commands, which will be executed in sequence. Simply add multiple JSON objects to
the file, one after the other without separators:
依赖文件主要有两种格式:
一种是官方推荐的evemu recording format格式,也是本文重点讲解格式
另一种是JSON-like format,这里因为官方不推荐,所以暂时不进行介绍
那么来看看evemu recording format来自哪里呢?这里也需要看看帮助文档
`uinput` supports the evemu format, as used by the [FreeDesktop project's evemu suite][FreeDesktop].
This is a simple text-based format compatible with recording and replay tools on other platforms.
However, it only supports playback of events from one device from a single recording. Recordings can
be made using the `evemu-record` command on Android or other Linux-based OSes.

[FreeDesktop]: https://gitlab.freedesktop.org/libevdev/evemu
上面文档说明出来了,其实这个文件是可以通过evemu-record命令进行录制的,这里大家肯定有疑问evemu-record是啥,他的代码在哪,如何进行使用?
下面重点看看evemu-record相关
evemu-record相关代码及使用
代码路径:
frameworks/native/cmds/evemu-record
可以看看它的帮助文档
frameworks/native/cmds/evemu-record/README.md
# `evemu-record`

This is a Rust implementation of the `evemu-record` command from the [FreeDesktop project's evemu
suite][FreeDesktop]. It records the descriptor and events produced by a single input device in a
[simple text-based format][format] that can be replayed using the [`uinput` command on
Android][uinput] or the FreeDesktop evemu tools on other Linux-based platforms. It is included by
default with `userdebug` and `eng` builds of Android.

The command-line interface is the same as that of the FreeDesktop version, except for
Android-specific features. For usage instructions, run `evemu-record --help`.
上面可以看出evemu-record主要是用来记录录制设备上的event的相关输入事件,不过这里设备只支持单设备,而且只有在 userdebug and eng才会集成这个命令。
那么如何使用evemu-record生成对应格式文件呢?
录制部分
$ adb shell evemu-record > my-recording.evemu
Available devices:
/dev/input/event0:      gpio_keys
/dev/input/event1:      s2mpg12-power-keys
/dev/input/event2:      NVTCapacitiveTouchScreen
/dev/input/event3:      NVTCapacitivePen
/dev/input/event4:      uinput-folio
/dev/input/event5:      ACME Touchpad
Select the device event number [0-5]: 5
大家注意要手动输入event的序号,比如要录制是/dev/input/event5这个输入设备,那么就输入5.
输入后,在设备上进行相关的操作触发/dev/input/event5会有对应的事件,其实这个和触摸机器人是一样的,就是会全程记录某个输入的事件,只不过格式有所差别这里的格式是evemu recording format。
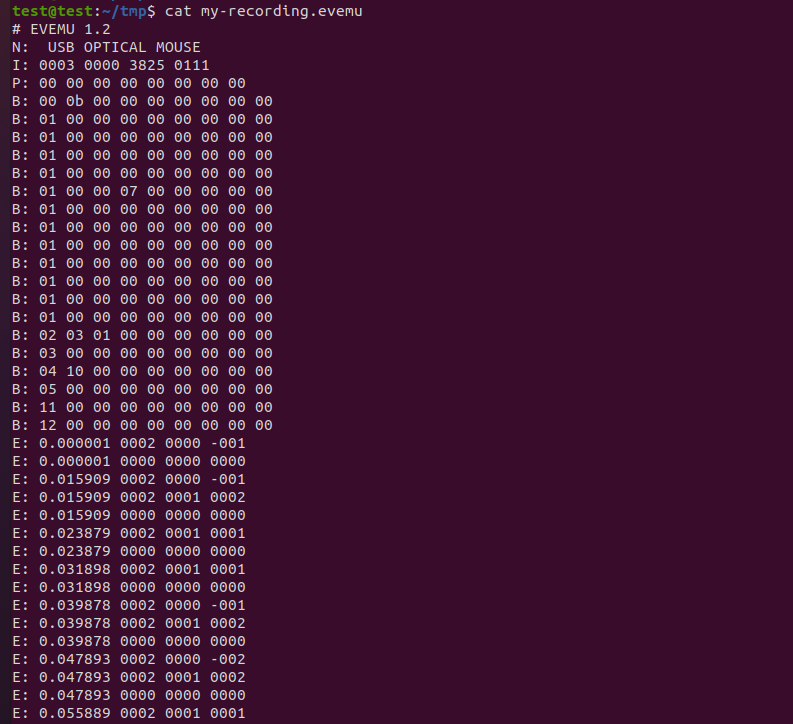
可以看看 my-recording.evemu文件格式如下:
uinput使用evemu文件进行事件注入
看看evemu的帮助
...then use the input device for a while, and press Ctrl+C to finish. You will now have a
`my-recording.evemu` file that you can examine in a text editor. To replay it, use the [`uinput`
command][uinput]:

$ adb shell uinput - < my-recording.evemu
上面步骤录制了my-recording.evemu文件后,现在就可以使用uinput来进行播放
用以下命令就可以
$ adb shell uinput - < my-recording.evemu
最后看看效果:
总结:
要使用uinput命令一共需要2个步骤:
1、录制好相关的 evemu-record文件,这里需要使用
adb shell evemu-record > my-recording.evemu
2、使用录制好的my-recording.evemu
$ adb shell uinput - < my-recording.evemu


 597
597

 被折叠的 条评论
为什么被折叠?
被折叠的 条评论
为什么被折叠?
 到【灌水乐园】发言


