


文章目录
多线程-初阶
1. 认识线程
1.1 概念
1) 线程是什么
-
多个线程组成了一个进程,线程好比是一跟光纤中的一个玻璃丝,进程是整根光纤。
-
一个进程中的线程共享这个进程中的资源(内存、硬盘)
2) 为什么需要线程
单核CPU发展出现瓶颈,想要再提高算力,只能增加CPU个数,并发编程就是利用多核CPU的绝佳方式.
使用进程也可以实现并发编程,只是进程重量大,创建销毁消耗资源多, 所以更好的方式是使用线程进行并发编程.
3) 线程和进程的区别
- 线程包含于进程
- 每个进程至少有一个线程, 即main线程(main thread)
- 进程之间互不干扰, 但是线程之间耦合度高(一个线程出现问题, 其他线程也会崩溃)
- 进程是系统分配资源的最小单位, 线程是系统调度的最小单位
4) Java中线程 和 操作系统线程 的关系
Java中线程是对于操作系统线程的封装和抽象.
1.2 第一个多线程程序
public class Main {
    public static void main(String[] args) {
        Runnable r1 = new Runnable() {
            @Override
            public void run() {
                while (true) {
                    System.out.println("hello thread1.");
                    try {
                        Thread.sleep(2000);
                    } catch (InterruptedException e) {
                        throw new RuntimeException(e);
                    }
                }
            }
        };
        Thread t1 = new Thread(r1);

        Runnable r2 = new Runnable() {
            @Override
            public void run() {
                while (true) {
                    System.out.println("hello thread2.");
                    try {
                        Thread.sleep(2000);
                    } catch (InterruptedException e) {
                        throw new RuntimeException(e);
                    }

                }
            }
        };
        Thread t2 = new Thread(r2);

        t1.start();
        t2.start();
    }
}
运行结果:
hello thread1.
hello thread2.
hello thread1.
hello thread2.
hello thread1.
hello thread2.
hello thread2.
hello thread1.
hello thread1.
hello thread2.
1.3 创建线程
1) 继承Thread
class MyThread extends Thread{
    public void run() {
        System.out.println("继承Thread得到");
    }
}
public class Demo1 {
    public static void main(String[] args) {
        MyThread t1 = new MyThread();
        t1.start();
    }
}
运行结果:
继承Thread得到
2) 实现Runnable接口
class MyRunnable implements Runnable {
    @Override
    public void run() {
        System.out.println("实现Runnable接口得到");
    }
}
public class Demo2 {
    public static void main(String[] args) {
        MyRunnable r1 = new MyRunnable();
        Thread t1 = new Thread(r1);

        t1.start();
    }
}
运行结果:
实现Runnable接口得到
继承Thread和实现Runnable接口的this指代的对象不同, 前者直接指代这个线程, 后者指代接口, 想要指代线程需要使用Thread.currentThread().
4) 使用匿名内部类
public class Demo3 {
    public static void main(String[] args) {
        Thread t1 = new Thread(new Runnable() {
            @Override
            public void run() {
                System.out.println("使用Thread匿名内部类,直接传参new Runnable接口得到");
            }
        });

        Thread t2 = new Thread() {
            public void run() {
                System.out.println("使用Thread匿名内部类,直接重写run方法得到");
            }
        };

        t1.start();
        t2.start();
    }
}
运行结果:
使用Thread匿名内部类,直接传参new Runnable接口得到
使用Thread匿名内部类,直接重写run方法得到
5) 使用lamda表达式
public class Demo4 {
    public static void main(String[] args) {
        Thread t = new Thread(()-> {
            // 不需要重写run,lamda表达式就相当于是run方法
            System.out.println("lamda表达式创建得到");
        });

        t.start();
    }
}
运行结果:
lamda表达式创建得到
1.4 使用多线程编程可以增加程序的运行速度
但是可能导致程序线程不安全, 需要合理加锁.
2. Thread类常见方法
2.1 Thread常见构造方法
| 构造方法名 | 说明 |
|---|---|
| Thread() | 普通构造(仅分配空间) |
| Thread(Runnable) | 根据所给的run()构造对象 |
| Thread(String) | 为将构造出的线程进行命名 |
| Thread(Runnable, String) | 根据run()创建对象并命名 |
命名主要是为了方便调试.
2.2 Thread常见属性
| 方法名 | 作用 |
|---|---|
| start() | 创建线程并运行 |
| getId() | 返回线程的Id (这个Id不同于操作系统未进程分配的Id,也不是PCB中的Id,仅仅是JVM分配的Id) |
| getName() | 返回线程名字 |
| getPriority() | 返回优先级 |
| getState() | 返回线程目前的状态(NEW, RUNNABLE, WAITING, TIMED_WAITING,BLOCKED,TERMINATED) |
| isDaemon() | 判断是否为后台进程(后台进程不决定一个线程的存亡,只有前台进程才决定) |
| isAlive() | 判断是否存活 |
| isInterrupted() | 判断是否被中断 |
2.3 让一个Thread跑起来
使用start()方法即可使其开始运行.
之前写过的run方法, 只是为这个线程规定要怎么做, 只有start方法才能启动线程.
2.3.1 start 和 run 的区别
start会调用系统api进行创建线程
run只是一个普通的方法,告诉线程的执行逻辑,不会创建线程
2.4 中断一个线程
有两种方式:
- 设置一个记号,
线程A和线程B共享这个记号, 两个线程约定一个在其为true时工作, 一个在其为false时工作, 此时如果在A中对于这个记号进行更改, 那就能够使得B停止工作.
public class Demo5 {
    // 设置共同变量
    public static boolean flag = true;
    public static void main(String[] args) throws InterruptedException {
        Thread t1 = new Thread(()->{
            System.out.println("t1");
            // 在第一个线程执行完后暂停3秒
            try {
                Thread.sleep(3000);
            } catch (InterruptedException e) {
                throw new RuntimeException(e);
            }
            // 3秒后,设置共同变量为false
            flag = false;
        });

        Thread t2 = new Thread(()->{
            while (flag == true) {
                System.out.println("t2");
            }
        });

        t1.start();
        // 在第二个线程执行前暂停2秒,让t1线程运行2秒
        Thread.sleep(2000);
        // 意味着t2只能执行1秒
        t2.start();
    }
}
运行结果:
t1
(等待3秒)
t2
t2
...
t2
t2
在3秒后,t1线程将共享变量修改为false, 所以t2被中断.
- 调用interrupt()进行通知
public class Demo6 {
    public static void main(String[] args) throws InterruptedException {
        Thread t1 = new Thread(()->{
            while (!Thread.interrupted()) {
                System.out.println("t1尚未被中断");
                try {
                    Thread.sleep(100);
                } catch (InterruptedException e) {
                    System.out.println("t1收到中断信号");
                    throw new RuntimeException(e);
                }
                break;
            }
        });

        System.out.println(t1.getState());
        t1.start();
        System.out.println(t1.getState());
        // 暂停2秒后进行中断
        Thread.sleep(1);
        t1.interrupt();
    }
}
运行结果:
NEW
RUNNABLE
t1尚未被中断
t1收到中断信号
Exception in thread "Thread-0" java.lang.RuntimeException: java.lang.InterruptedException: sleep interrupted
	at Demo6.lambda$main$0(Demo6.java:10)
	at java.lang.Thread.run(Thread.java:748)
Caused by: java.lang.InterruptedException: sleep interrupted
	at java.lang.Thread.sleep(Native Method)
	at Demo6.lambda$main$0(Demo6.java:7)
	... 1 more
interrupted() 和 currentThread().isInterrupted() 截然不同:
| 方法名 | 说明 |
|---|---|
| interrupted() | 查看当前线程是否被中断, 清除标记为false |
| currentThread().isInterrupted() | 查看当前线程是否中断,仅作判断, 不清除标记 |
演示:
public class Demo7 {
     public static void main(String[] args) {
     Thread t1 = new Thread(()->{
         for (int i = 0; i < 10; i++) {
             //System.out.println(Thread.interrupted());
             System.out.println(Thread.currentThread().isInterrupted());
         }
     });
     t1.start();
     t1.interrupt();
 }
}

运行结果:
true
true
true
true
true
true
true
true
true
true
//(这种方法不清除中断标记, 仅作判断)
public class Demo7 {
     public static void main(String[] args) {
     Thread t1 = new Thread(()->{
         for (int i = 0; i < 10; i++) {
             System.out.println(Thread.interrupted());
         }
     });
     t1.start();
     t1.interrupt();
 }
}

运行结果:
true
false
false
false
false
false
false
false
false
//(这种方法清除中断标记, 恢复为未被中断状态)
2.5 等待一个线程——join()
线程执行有先后顺序的时候**(线程A的执行需要依赖于线程B的执行结果), **那就需要使用join()方法, 这个方法能够保护当前的线程执行完毕后,其他线程才会去执行.
public class Main {
    public static int count = 0;// 1

    public static void main(String[] args) throws InterruptedException {
        Thread t1 = new Thread(()-> {
            System.out.println("t11");
            for (int i = 0; i < 50000; i++) {
                count++;
            }
            System.out.println("t11");
        });

        Thread t2 = new Thread(()-> {
            System.out.println("t21");
            for (int i = 0; i < 50000; i++) {
                count++;
            }
            System.out.println("t21");
        });

        t1.start();
        t1.join();

        t2.start();
        Thread.sleep(100);

        System.out.println(count);
    }
}
在都对count进行++五万次的操作中,可以不加锁,也能使得count得到预期值的方法就是让t2在t1执行结束之后才启动,这样两个线程都能完成自己的任务,得到预期count。
2.5.1 方法中不能够加public、static等修饰词
访问局部变量的过程:对象-> 方法->局部变量。访问局部变量就已经有了访问权限的设定了。由此加修饰符也成了摆设。
对应static来说,因为static只能修饰成员变量和成员方法,在局部变量中用static修饰,又不能直接被类调用。
2.6 获取当前线程的引用
使用 Thread.currentThread();进行获取。
2.7 休眠线程
使用 Thread.sleep(long mills)实现。
在线程内部需要捕获异常,在方法中使用需要抛出异常。
Thread t2 = new Thread(()-> {
    System.out.println("t21");
    for (int i = 0; i < 50000; i++) {
        count++;
    }
    // 捕获异常
    try {
        Thread.sleep(100);
    } catch (InterruptedException e) {
        throw new RuntimeException(e);
    }
}, "t2");
// 抛出异常
public static void main(String[] args) throws InterruptedException {
3. 线程的状态
3.1 线程的所有状态
NEW: 安排了工作, 还未开始行动
RUNNABLE: 可工作的. 又可以分成正在工作中和即将开始工作.
BLOCKED: 这几个都表示排队等着其他事情
WAITING: 这几个都表示排队等着其他事情
TIMED_WAITING: 这几个都表示排队等着其他事情(存在timeout的等待)
TERMINATED: 工作完成了
使用isAlive()方法可以观察线程是否存活。
使用yield()方法会使线程重新排队。
4. 线程不安全
4.1 线程不安全发生的时机
在两个线程进行对于同一个变量进行修改的时候会出现线程不安全的问题。
4.2 线程不安全发生的原因
-
指令非原子性
即使是“++”这个操作,仅有一条语句,也是由3条微指令构成的:
-
从内存中读出count到寄存器
-
在寄存器中完成++
-
++后的值放进寄存器。
在多个线程的这三个操作如果相互穿插进行,那么就可能会读入”脏值“。
-
-
内存可见性
内存可见性,一个线程对共享变量值的修改,能够及时地被其他线程看到.
对于多次重复的读入同一个数据,编译器会对其进行优化,直接在寄存器中使用这份数据的拷贝值,不再从内存中进行读取,对这个变量的修改操作也都是在这个拷贝值身上完成,在这个线程使用完此变量后才会将最终值写进内存。
这种方式对于单线程来说是一种优化,简便了数据的读取操作,但是对于多线程来说,如果在线程A频繁修改变量count的同时,
线程B需要对count进行修改,那么就会读到“脏值”。
4.2.1 解决内存可见性问题
使用volatile关键字,忽略编译器对其的优化。
5. synchronized 关键字——解决线程不安全问题
synchronized 会将其所在的代码块进行加锁。
5.1 synchronized 特性
1) 互斥
如果说一个代码块相当于是一间房,那么一个synchronized就相当于是给这个房间进行上锁,其他人想进去必须要等到里面的人把锁打开,两个人进行争夺房间的使用权的过程也称为“锁竞争”。
锁的作用就是让不同的线程拥有同一个对象的锁的时候,只有执行顺序靠前的线程能够正常运行,后面的线程需要等待前面的线程释放锁以后才能继续正常运行。
2)刷新内存
底层实现:
synchronized的底层是使用操作系统的mutex lock实现的.
synchronized工作过程本质上是通过获取一个安全的空间来进行保证操作原子性的:
-
获得互斥锁
-
从主内存拷贝变量的最新副本到工作的内存
-
执行代码
-
将更改后的共享变量的值刷新到主内存
-
释放互斥锁
3) 可重入性
public static final Object locker = new Object();

synchronized (locker) {
    synchronized (locker) {

    }
}
在对于一个对象上同一把锁两次的时候,理论上来说会产生“死锁”现象。
因为一个第二把锁所在的代码块执行的前提是第一把锁释放,但是第一把锁释放的条件是后序的代码块执行完,形成闭环,造成“死锁”。
死锁的成因
1)互斥使用:同一把锁的不同线程同一时间只有一个能够运行
2)不可抢占:后面的线程只能等前面的将锁释放后才能运行
3)循环等待:在A阻塞等待B释放锁的时候,B在等待A释放锁
4)请求保持:一个线程尝试获取多把锁(线程A在已经被锁1加上的情况下获取一个已经被占用的锁2,那么锁1不会被释放)
1和2都是锁的基本特性,3和4是代码结构,当同时满足以上四点的时候才会发生死锁。
5.2 synchronized 使用示例
1)给普通方法上锁(相当于给this加锁)
synchronized public void method1() {

}
2)给静态方法上锁
synchronized public static void method1() {

}
3)给代码块上锁
3.1给当前对象上锁
//3
public void method2() {
    synchronized (this) {

    }
}
3.2给类对象上锁
//4
public void method3() {
    synchronized (Demo2.class) {

    }
}
其中,3.1 和 1等价,3.2 和 2等价。
5.3 Java 标准库中的线程安全类
不安全的:ArrayList 、LinkedList、 HashMap、 TreeMap、 HashSet、 TreeSet、 StringBuilder
安全的:Vector (不推荐使用)、 HashTable (不推荐使用) 、ConcurrentHashMap、 StringBuffer
6. volatile关键字
6.1 volatile能够保证内存可见性
内存可见性,一个线程对共享变量值的修改,能够及时地被其他线程看到.
import java.util.Scanner;

// volatile的作用
public class Demo3 {
    //public volatile static int isQuit = 0;
    public static int isQuit = 0;
    public static void main(String[] args) throws InterruptedException {
        Thread t1 = new Thread(()-> {
            while (isQuit == 0) {

            }
            System.out.println("t1退出");
        });

        t1.start();
        Thread.sleep(1000);

        Thread t2 = new Thread(()-> {
            System.out.println("请输入");
            Scanner scanner = new Scanner(System.in);
            isQuit = scanner.nextInt();
        });
        t2.start();
        Thread.sleep(1000);

        System.out.println(t1.getState());
    }
}
由于编译器的优化, t2对于isQuit变量进行修改并不影响t1线程中看到的isQuit变量是0, 这就叫做内存不可见.
但是如果加上volatile, 那么编译器会保证内存的可见性, 放弃优化.(所以会将代码的运行效率降低)
volatile的工作过程:
- 将内存中的数据放进寄存器
- 线程对于数据进行修改
- 将数据写回内存
如果是读取:
- 读取最新值进入工作内存
- 从工作内存中读取volatile变量的副本
6.2 volatile不能保证操作的原子性
volatile虽然一次性将数据读取到工作内存, 待其写完后又放回主内存, 但是在写的过程中, 如果其他线程也对同一个变量进行写入, 这将是合法的, 并且存在线程安全问题.
// 线程安全问题
public class Main {
    // 加上volatile并不能够得到预期的count值
    public static volatile int count = 0;// 1

    public static void main(String[] args) throws InterruptedException {
        Thread t1 = new Thread(()-> {
            for (int i = 0; i < 50000; i++) {
                count++;
            }
            try {
                Thread.sleep(1000);
            } catch (InterruptedException e) {
                throw new RuntimeException(e);
            }
        });

        Thread t2 = new Thread(()-> {
            for (int i = 0; i < 50000; i++) {
                count++;
            }
        }, "t2");

        t1.start();
        t2.start();
        Thread.sleep(1000);
        System.out.println(count);

    }
}
结果:
75377
6.3 volatile可以保证禁止指令重排序
比如new 的操作可以在宏观上分为三个步骤:
- 在堆上开辟空间
- 初始化空间
- 返回地址给引用
加上volatile的话就会使得new操作不会出现这三个步骤易位的情况,杜绝了指令重排序。
volatile的这个例子在单例模式的 “双检锁” 式中是即为重要的一环。
6.4 但是synchronized可以保证内存可见性和原子性
7. wait 和 notify
在有些情况下,我们不可避免地需要将B线程放在A线程的后面执行,比如:李四需要在张三做好外应的情况下,才能够进监狱救人。
-
模拟救人场景(不wait的情况):
import static java.lang.Thread.sleep;

public class waitDemo {
 static volatile int deposit = 100;// 存款有100块
 public static void main(String[] args) {
     Object locker = new Object();
     // 张三做准备
     Thread t1 = new Thread(() -> {
         synchronized (locker) {
             try {
                 System.out.println("张三在准备");
                 sleep(1000);
             } catch (InterruptedException e) {
                 e.printStackTrace();
             }
             System.out.println("张三准备好了");
         }
     });


     Thread t2 = new Thread(()-> {
         synchronized (locker) {

             System.out.println("李四在等待");
             System.out.println("李四等待结束");
             System.out.println("李四开始救人");
         }
     });

     t2.start();
     t1.start();
 }
}
运行结果:
李四在等待
李四等待结束
李四开始救人
张三在准备
张三准备好了
可见,李四在张三还没做好准备的情况下就已经开始救人,那必然是死路一条。
-
模拟救人场景(加wait的情况):
import static java.lang.Thread.sleep;

public class waitDemo {
 static volatile int deposit = 100;// 存款有100块
 public static void main(String[] args) {
     Object locker = new Object();
     // 张三做准备
     Thread t1 = new Thread(() -> {
         synchronized (locker) {
             try {
                 System.out.println("张三在准备");
                 sleep(1000);
             } catch (InterruptedException e) {
                 e.printStackTrace();
             }
             locker.notify();
             System.out.println("张三准备好了");
         }
     });


     Thread t2 = new Thread(()-> {
         synchronized (locker) {
             try {
                 System.out.println("李四在等待");
                 locker.wait();
                 System.out.println("李四等待结束");
                 System.out.println("李四开始救人");
             } catch (InterruptedException e) {
                 throw new RuntimeException(e);
             }
         }
     });

     t2.start();
     t1.start();
 }
}
运行结果:
李四在等待
张三在准备
张三准备好了
李四等待结束
李四开始救人
在张三准备一秒之后,李四就不会白白牺牲了。
7.1 wait()方法
wait会做的事情:
-
释放锁
-
使线程等待
-
在唤醒之后重新获取锁
因为wait执行后,这个线程会释放锁,此时这个线程是“裸的”,只是因为处于等待状态,所以没有线程安全问题。
为了避免出现线程安全问题,如果这次被唤醒尚未竞争到锁,那么仍可能处于wait状态(因为安全的执行环境需要获取到锁)
wait唤醒的办法:
- 其他线程notify()恰好被这个线程获取,唤醒
- wait(long timeout)超过timeout这个时间后,自动唤醒
- 被interrupted()中断
7.2 notify()方法
notify会做的事情:
随机挑选一个正在wait的对象进行释放
将唤醒信号传给所有正在wait的对象,由线程调度器进行挑选一个线程进行唤醒。
注:
- wait 和 notify 都需要在synchronized代码块中进行使用,否则会抛异常
但是notify 是Java中的约定俗成,就变成了特殊的规定,本身也可以不加锁。
- wait 和notify 都是使用锁对象去进行“通信”的,只有锁对象相同,notify才可能唤醒。
- notify 执行完毕后,wait 已经被唤醒了,但是如果 notify 所在代码块中仍然有语句,仍然要先执行 notify 所在代码块的语句,(wait 中会有锁竞争,与 notify 的锁进行竞争)因为锁此时并未释放。
7.3 notifyAll()方法
看名知意,这个方法一次能够唤醒所有wait的线程,但是这些线程仍然都处在synchronized锁中,需要同时进行竞争锁,谁获得锁,谁就被唤醒执行=。
7.4 wait和 sleep 的对比(面试题)
相同点:
- 都能够使线程终止运行一段时间
不同点:
- wait 是锁对象进行调用的(是Object的方法),sleep 是Thread调用的(Thread的方法)
- wait 要搭配synchronized进行使用,sleep不需要
8. 多线程案例
8.1 单例模式
-
饿汉模式
创建类的时候同时加载实例,不等待程序是否真正需要实例。
package SingleTon;

public class Demo3 {
    // 饿汉模式
    private static volatile Demo3 singleTon = new Demo3();

    private Demo3() {}

    public static Demo3 getSingleTon() {
        return singleTon;
    }
    public static void main(String[] args) {
        Demo3 d1 = Demo3.getSingleTon();
        Demo3 d2 = Demo3.getSingleTon();

        System.out.println(d1 == d2);
    }
}
-
懒汉模式
2.1 单线程版:
public class Demo1 {
    // 饿汉模式——单线程版
    private static volatile Demo1 singleTon = new Demo1();

    private Demo1() {}
    public Demo1 getSingleTon() {
        return singleTon;
    }

    public static void main(String[] args) {
        Demo1 d1 = Demo1.getSingleTon();
        Demo1 d2 = Demo1.getSingleTon();

        System.out.println(d1 == d2);
    }
}
还有一点小缺陷,改进如下(只在第一次使用的时候创建对象):
package SingleTon;

public class Demo1 {
    // 懒汉模式——单线程版
    private static volatile Demo1 singleTon = null;

    private Demo1() {}
    public static Demo1 getSingleTon() {
        if (singleTon == null) {
            singleTon = new Demo1();
        }
        return singleTon;
    }

    public static void main(String[] args) {
        Demo1 d1 = Demo1.getSingleTon();
        Demo1 d2 = Demo1.getSingleTon();

        System.out.println(d1 == d2);
    }
}
2.2 多线程版:
package SingleTon;

public class Demo2 {
    // 懒汉模式——多线程版
    private static volatile Demo2 singleTon = null;

    public static Demo2 getSingleTon() {
        if (singleTon == null) {
            synchronized (Demo2.class) {// 使用Object对象也可以
                if (singleTon == null) {
                    singleTon = new Demo2();
                }
            }
        }
        return singleTon;
    }

    public static void main(String[] args) {
        Demo2 d1 = Demo2.getSingleTon();
        Demo2 d2 = Demo2.getSingleTon();

        System.out.println(d1 == d2);
    }
}
在这个代码中,最重要理解的是1. 双重if判定且判定条件相同; 2. 加锁的作用; 3. volatile的作用。
内层的if :
为了只有在第一次使用这个类的时候采取创建对象,避免无用功(未改进版)
外层的if :
外层的if 为了提高效率,虽然一层if 已经能够完成安全的单例模式的创建,但是如果没有外层的if, 那么每次有线程想要创建实例的时候,都会去加锁,造成了效率的降低。
加上外层的if 之后会直接在最外层进行拦截想要创建实例的线程,避免了加锁的消耗。
加锁的作用:
因为new 操作分为三步
- 在堆上开辟空间
- 对这片空间进行初始化
- 返回这个空间的地址
所以new 存在线程安全问题。比如线程A和线程 B同时通过内层if 得知这个实例没有被创建出来,所以都去new ,最后会返回不同的实例。
volatile的作用:
避免指令重排序问题。
new 的操作可以在宏观上分为三个步骤:
- 在堆上开辟空间
- 初始化空间
- 返回地址给引用
加上volatile的话就会使得new操作不会出现这三个步骤易位的情况,杜绝了指令重排序。
保持内存可见性,禁止编译器进行某种场景的优化(一个线程在读,一个线程在写,修改对于读线程来说可能没有生效)eg.
线程1第一次读取instance为空,而线程2未释放锁时,加锁失败,与此同时其他线程也读取到instance为空,于是实例化instance后线程2释放锁,此时线程1加锁成功,但读取instance仍然为null。此时的线程2进行了多次读操作,然而由于编译器优化,导致线程2没有读到最新的数据,即实例化的instance。
8.2 阻塞式队列
阻塞式队列的典型作用是==“削峰填谷、降低耦合”==,典型应用场景是“生产者—消费者模型”。
比如,双十一活动中,客户端对于服务器的请求会突然剧增,所以会增加服务器的压力,此时如果有一个阻塞式队列,那么就会使服务器仍能够以之前的速率,“不紧不慢、有条不紊”地进行处理请求,避免服务器挂掉。
阻塞式队列的作用方式:
- 如果队列满了,停止入队,当有元素出队时,再进行入队
- 如果队列为空,停止出队,当有新元素入队是,再进行出队
阻塞式队列的作用:
- 充当缓冲区(给需要处理突然剧增的请求量的服务器充当缓冲区)
- 解耦合(能够使服务器和客户端不再是直接对接,客户端-阻塞式队列-服务器)
8.2.1 阻塞式队列的实现
一对一版:
package BlocingQueue;

public class MyBlocingQueue {
    // 先实现一个环形队列
    private int data;// 元素
    private int size = 5;// 容量
    private int[] arr = new int[size];// 队列
    private int tail = 0;// 队尾
    private int head = 0;// 队头
    private Object locker1 = new Object();
    private Object locker2 = new Object();

    public void put(int data) throws InterruptedException {
        if ((tail + 1)%size == head) {
            // 满了,停止存储
            System.out.println("队列已满");
            // 等待其他线程出队
            synchronized (locker1) {
                System.out.println("wait 开始");
                locker1.wait();
                System.out.println("wait 结束, 开始入队");
            }
        }
        synchronized (locker2) {
            // 未满
            arr[tail] = data;
            System.out.println("入队:" + data);
            tail =(tail + 1) % size;
            locker2.notify();
        }
    }

    public int take() throws InterruptedException {
        if (tail == head) {
            synchronized (locker2) {
                // 为空,等待其他线程进行
                System.out.println("为空,等待其他线程入队");
                locker2.wait();
                System.out.println("已有元素,准备出队");
            }
        }
        // 出队后有空位,唤醒入队操作
        synchronized (locker1) {
            // 进行出队
            int ret = arr[head];
            head = (head+1)%size;
            System.out.println("出队:"+ ret);
            locker1.notify();
            return ret;
        }
    }
}
多对多版:
package BlocingQueue;

/*
* 针对多对多场景 ——notifyAll()
* */
public class MyBlockingQueue2 {
    // 先实现一个环形队列
    private int data;// 元素
    private int size = 5;// 容量
    private int[] arr = new int[size];// 队列
    private int tail = 0;// 队尾
    private int head = 0;// 队头
    private int length;// 当前元素个数
    private Object locker = new Object();

    public synchronized void put(int data) throws InterruptedException {
            // 判满
            while (length == size) {
                System.out.println("队列已满,wait 开始");
                wait();
                System.out.println("wait 结束, 开始入队");
            }
        // 不满,入队
        arr[tail] = data;
        tail = (tail + 1) % size;
        System.out.println("入队:" + data);
        length++;
        notifyAll();
    }

    public synchronized int take() throws InterruptedException {
            // 判空
        while (length == 0) {
            System.out.println("为空,等待其他线程入队");
            wait();
            System.out.println("wait 结束, 开始出队");
        }
        // 不空
        int ret = arr[head];
        head = (head+1) % size;
        System.out.println("出队:"+ ret);
        length--;
        notifyAll();
        return ret;
    }
}
8.3 定时器
8.3.1 标准库定时器
定时器是将预定的任务在delay时间后进行执行,使用方法:
import java.util.Timer;
import java.util.TimerTask;

public class Mytimer2 {
    public static void main(String[] args) {
        Timer timer = new Timer();
        timer.schedule(new TimerTask() {
            @Override
            public void run() {
                System.out.println("1000");
            }
        },1000);
    }
}
8.3.2 定时器实现方法
定时器的构成:
- 能够对于所加任务进行排序,保证每次取出的任务都是距离现在时间最近的任务
- 有一个Task类能够描述将要执行的任务
- 有一个扫描线程能够不断地扫描队首元素,看队首元素是否到达执行时间
代码:
package MyTimer;

import java.util.Comparator;
import java.util.PriorityQueue;
import java.util.Timer;

class MyTimerTask implements Comparable<MyTimerTask>{
    private Runnable runnable;
    private long time;


    public MyTimerTask() {}
    public MyTimerTask(Runnable runnable, long delay) {
        this.runnable = runnable;
        this.time = System.currentTimeMillis() + delay;// 将相对时间转换为绝对时间
    }

    public void run() {
        runnable.run();
    }

    public long getTime() {
        return time;
    }

    @Override
    public int compareTo(MyTimerTask o) {
        return (int) (this.time - o.time);
    }
}
public class MyTimer {
    // 存储任务的优先级队列
    PriorityQueue<MyTimerTask> myTimerTasks = new PriorityQueue<>();
    Thread thread = null;
    Object locker = new Object();

    public void cancel() {
        thread.interrupt();
    }
    public MyTimer() {
        // 扫描线程——查看队首元素是否可以执行
        thread = new Thread(() -> {
            while (!thread.isInterrupted()) {
                try {
                    synchronized (locker) {// 放在while里面,才有可能释放锁,虽然有wait以后也可释放锁,但是还是建议写在while内
                        long curTime = System.currentTimeMillis();

                        while (myTimerTasks.isEmpty()) {
                            locker.wait();
                        }
                        MyTimerTask topTask = myTimerTasks.peek();
                        if (curTime >= topTask.getTime()) {
                            topTask.run();
                            myTimerTasks.poll();
                        } else {
                            // 如果有线程的预执行时间过于长,那就不要让cpu忙等,直接wait到该执行的时间再执行
                            long remain = topTask.getTime() - curTime;
                            locker.wait(remain);
                            System.out.println("等待中");
                        }
                    }
                } catch (InterruptedException e) {
                    //e.printStackTrace();
                    System.out.println("线程被中断");
                    break;
                }

            }
    });
        thread.start();
    }

    // 安排任务
    public void schedule (Runnable runnable,long delay){
        synchronized (locker) {
            myTimerTasks.offer(new MyTimerTask(runnable, delay));
            locker.notify();
        }

    }
}
测试:
package MyTimer;

import java.util.Timer;
import java.util.TimerTask;

public class Test {
    public static void main(String[] args) throws InterruptedException {
//        Timer timer = new Timer();
//        timer.schedule(new TimerTask() {
//            @Override
//            public void run() {
//                System.out.println("*3000");
//            }
//        },3000);
//        timer.schedule(new TimerTask() {
//            @Override
//            public void run() {
//                System.out.println("*2000");
//            }
//        },2000);
//        timer.schedule(new TimerTask() {
//            @Override
//            public void run() {
//                System.out.println("*1000");
//            }
//        },1000);
//
//        Thread.sleep(1000);
//        timer.cancel();


        MyTimer myTimer = new MyTimer();
        myTimer.schedule(() -> System.out.println("1000"), 1000);
        myTimer.schedule(() -> System.out.println("2000"), 2000);
        myTimer.schedule(() -> System.out.println("3000"), 3000);

        Thread.sleep(2500);
        myTimer.cancel();

    }
}
8.4 线程池
8.4.1 线程池是什么
假设张三住在高山上,他只有一个容器用来装水,每次喝水都需要去山下装一壶水,久而久之他觉得麻烦,于是直接在家门口挖了一个水池,然后用各种方式把池子装上够他喝的水,这样他每次喝水就只需要走出家门,缩短了喝水的路程,提高了效率。
所以线程池就是一个装有所需线程的集合,最大好处是能够减少每次创建/销毁线程带来的资源消耗。
线程池的执行流程:
当新加入一个任务时,先判断当前线程数是否大于核心线程数,如果结果为 false,则新建线程并执行任务;
如果结果为 true,则判断任务队列是否已满,如果结果为 false,则把任务添加到任务队列中等待线程执行
如果结果为 true,则判断当前线程数量是否超过最大线程数?如果结果为 false,则新建线程执行此任务
如果结果为 true,执行拒绝策略。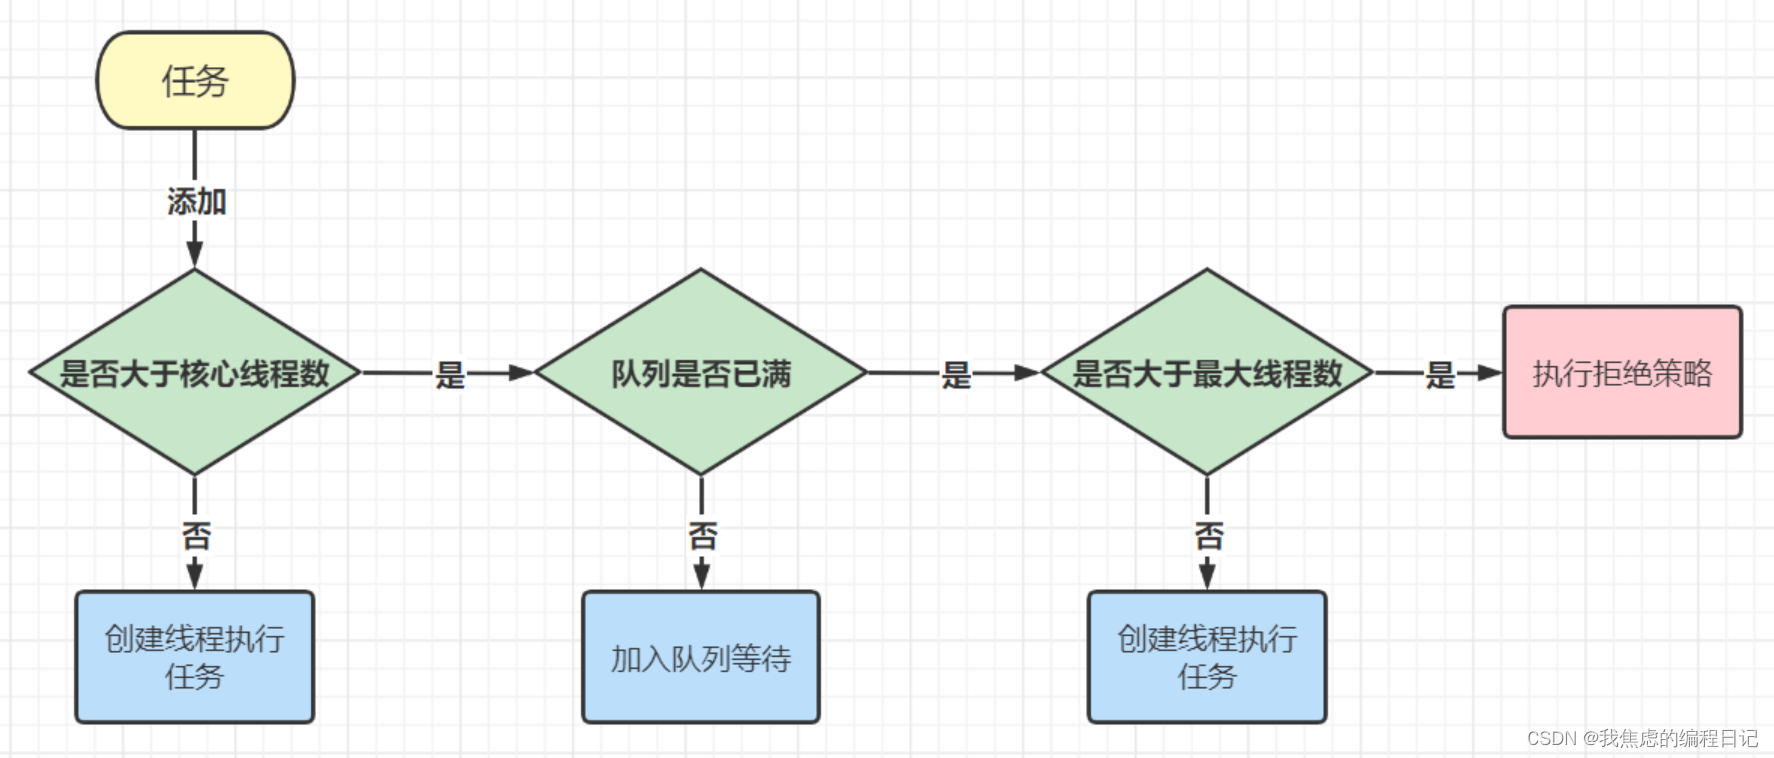
8.4.2 标准库中的线程池
标准库中线程池的接口是ExecutorService,它不能直接new,源码如下:
public interface ExecutorService extends Executor {...}
所以使用了一种工厂模式创建线程池:
// 能够创建出10个固定的线程
ExecutorService executorService = Executors.newFixedThreadPool(10);
插播:工厂模式就是为了解决不能灵活函数重载的问题。
比如现在有需要实现两种构造方法,但是他们的**函数头(参数类型、个数、顺序)都是一样的,这时我们就只能通过更改函数名进行区分,但是更改名字后就不是构造函数了,那么就需要使用“工厂模式”**进行书写。
工厂模式就是通过静态方法对于new进行封装,在这个方法中对于一些属性进行设定,完成对象的初始化。
前半部分:ExecutorService接口继承了Executor接口
后半部分:Executors类是对于ThreadPoolExecutor类的封装
public class Executors {
    public static ExecutorService newFixedThreadPool(int nThreads) {
        return new ThreadPoolExecutor(nThreads, nThreads,
                                      0L, TimeUnit.MILLISECONDS,
                                      new LinkedBlockingQueue<Runnable>());
    }
几种构建方式:

| 参数 | 说明 |
|---|---|
| corePoolSize | 核心线程数 |
| maximumPoolSize | 最大线程数 |
| keepAliveTime | 非核心线程空闲时能够存活的最长时间 |
| unit | 空闲时间的时间单位 |
| workQueue | 保存工作内容的队列 |
| threadFactory | 初始化队列(使用工厂模式) |
| handler | 拒绝策略**(一共有四种)** |
四种拒绝策略:
方法 说明 AbortPolicy 拒绝执行新的和旧的任务 CallerRunsPolicy 来新任务,谁添加的任务谁执行 DiscardOldestPolicy 从以往添加的旧任务中删除一个最老的,空出来的位置留给新任务执行 DiscardPolicy 不管新任务,仍旧继续执行旧任务

8.4.3 封装后的简单线程池
由于ThreadPoolExecutor参数复杂,所以标准库中还实现了一种简单的线程池,称为Executors,这是一个工厂类,其中有四大类工厂方法: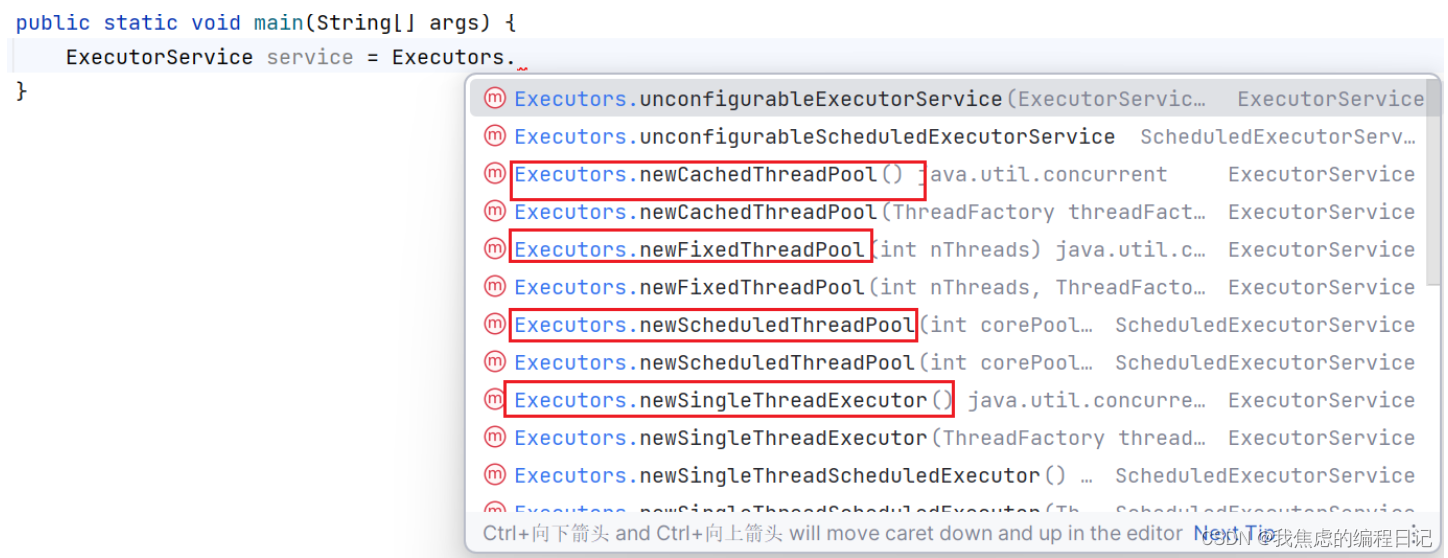
| 工厂方法 | 说明 |
|---|---|
| newCachedThreadPool | 创建线程数目能够动态变化的线程池 |
| newFixedThreadPool | 创建线程数目固定的线程池 |
| newScheduleThreadPool | 创建类似定时器的线程池,能够延迟执行任务 |
| newSingleThreadExecutor | 创建只包含单个线程的线程池 |
简单使用:
import java.util.concurrent.ExecutorService;
import java.util.concurrent.Executors;
import java.util.concurrent.ThreadPoolExecutor;

public class MyThreadPool {
    public static void main(String[] args) {
        ExecutorService service = Executors.newFixedThreadPool(4);

        for (int i = 0; i < 100; i++) {
            int n = i;// 防止变量捕获到一直变化的i
            service.submit(new Runnable() {
                @Override
                public void run() {
                    System.out.println("当前执行的任务是"+n+" " +Thread.currentThread().getName());
                }
            });
        }
    }
}
运行结果:
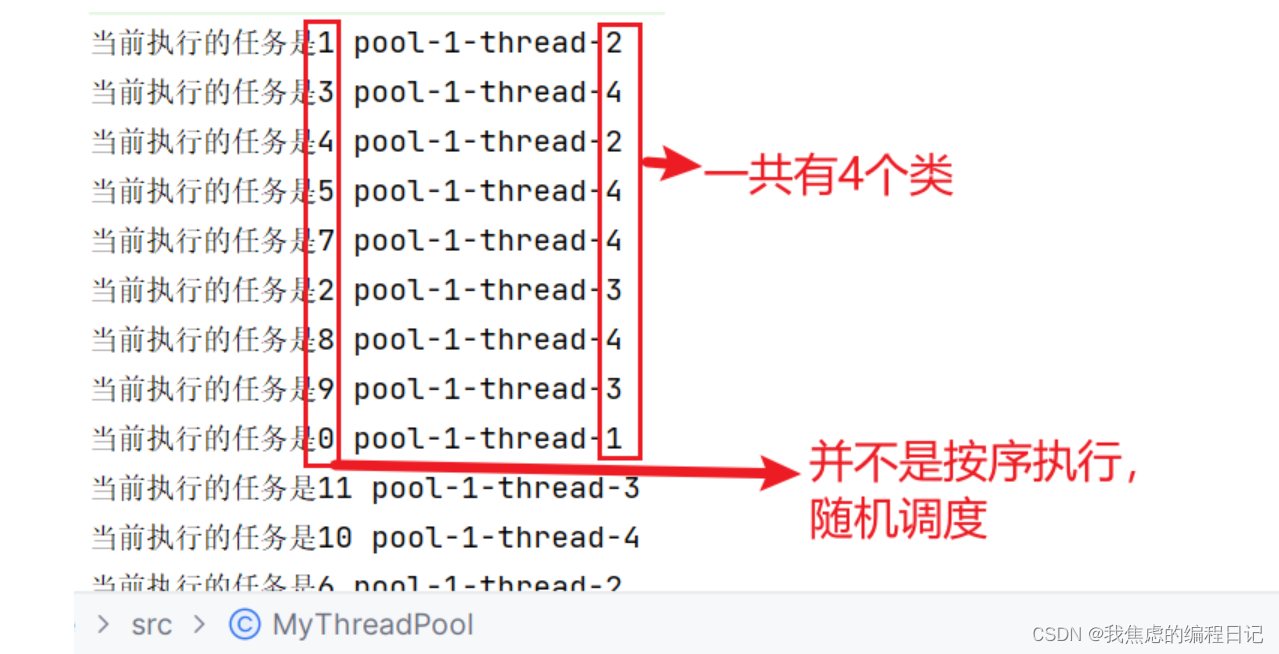
结论:
-
Executors和ThreadPoolExecutor的区别是一个简单一个复杂
-
如果只是简单用用,那么就选择Executors,如果希望高度定制化,就使用ThreadPoolExecutor
-
线程池的线程数目遵循的两个基本原则:
- 如果是高cpu密度任务,那么线程数不应超过cpu核心数
- 如果是高io密度任务,那么线程数越多越好
但是,最终的线程数应是根据实验得到,综合考量,并不是计算得出的。
因为大部分程序的线程应该不是简单的单方面的高cpu或者高io,是比较复杂的。
9.4.4 手动实现线程池
线程池的实现要素:
- 保存任务的队列
- 保存线程的链表
- 创建出n个线程
线程池在创建线程的时候需要使用一个阻塞队列进行实现任务的存取,因为任务可能会满,也可能在线程不停执行的过程中把所有任务都执行完毕了,所以使用阻塞队列的take和put方法可以自行实现阻塞,不需要我们操心线程安全的问题。
同时我们还需要统一将所有线程组织起来,使用链表这种数据结构是最合适的,不然执行玩完一次,这个线程就再也找不到了。
package MyThreadPool;

import java.util.ArrayList;
import java.util.List;
import java.util.concurrent.ArrayBlockingQueue;
import java.util.concurrent.BlockingQueue;
import java.util.concurrent.ExecutorService;
import java.util.concurrent.Executors;

public class MyThreadPoolExecutor {
    // 1. 保存任务的队列
    BlockingQueue<Runnable> queue = new ArrayBlockingQueue<>(1000);

    // 2. 保存线程的链表
    List<Thread> list = new ArrayList<>();

    // 3. 创建 n 个线程
    public MyThreadPoolExecutor(int n) {
        for (int i = 0; i < n; i++) {
            Thread t = new Thread(()->{
                while (true) {
                    // 取出任务并执行
                    try {
                        Runnable tmp = queue.take();
                        tmp.run();
                    } catch (InterruptedException e) {
                        throw new RuntimeException(e);
                    }
                }
            });

            t.start();
            list.add(t);
        }
    }

    public void submit(Runnable runnable) throws InterruptedException {
        queue.put(runnable);// 使用put 可以自动阻塞
    }

    public static void main(String[] args) throws InterruptedException {
        MyThreadPoolExecutor service = new MyThreadPoolExecutor(4);

        for (int i = 0; i < 100; i++) {
            int n = i;// 防止变量捕获到一直变化的i
            service.submit(new Runnable() {
                @Override
                public void run() {
                    System.out.println("当前执行的任务是"+n+" " +Thread.currentThread().getName());
                }
            });
        }
    }
}


 715
715

 被折叠的 条评论
为什么被折叠?
被折叠的 条评论
为什么被折叠?
 到【灌水乐园】发言


