


目录
一、face_recognition
1、介绍
face_recognition 是一个非常流行的 Python 库,专门用于人脸识别任务。它基于 dlib 库和 HOG(Histogram of Oriented Gradients)特征以及深度学习模型,提供了简单易用的接口来进行人脸检测、面部特征点定位和人脸识别。
face_recognition 库由 Adam Geitgey 开发,旨在简化人脸识别任务,使其更加容易上手。
2、主要功能
-
人脸检测:
-
检测图像中的人脸位置。
-
支持使用 HOG 特征或 CNN(卷积神经网络)进行人脸检测。
-
-
面部特征点定位:
-
检测人脸上的关键特征点(如眼睛、鼻子、嘴巴等)。
-
-
人脸识别:
-
提取人脸的特征向量(128维),并用于比较不同人脸之间的相似度。
-
支持从图像或视频中识别特定的人脸。
-
3、和opencv的联系
face_recognition 和 OpenCV 是两个独立的计算机视觉库,但它们在功能上有一些重叠,并且经常一起使用来完成复杂的视觉任务。
尽管 face_recognition 和 OpenCV 各有侧重,但在实际应用中,它们经常被组合起来使用,以发挥各自的优势:
-
图像预处理:通常情况下,会先使用 OpenCV 对图像进行预处理,比如调整大小、灰度化、去噪等。这些预处理步骤有助于提高后续人脸识别的准确率。
-
人脸检测与识别:预处理后的图像可以传递给
face_recognition库来执行人脸检测和识别。face_recognition可以高效地完成这些任务,并返回人脸位置、面部特征点等信息。 -
结果可视化:最后可以再次利用 OpenCV 来对识别结果进行可视化处理,例如在图像上画出人脸框、标注识别到的名字等。
二、检测&切割人脸
import cv2
import face_recognition
img = cv2.imread('../images/p1.png')
"""
检测人脸
face_recognition.face_locations(img, number_of_times_to_upsample=1, model='hog')
参数
img:图像的 NumPy 数组。
number_of_times_to_upsample:图像上采样的次数,用于提高检测精度。
model:使用的模型,可以是 `'hog'`(默认)或 `'cnn'`
返回值
一个列表,每个元素是一个 (top, right, bottom, left) 的元组,表示人脸的位置
"""
# 检测人脸,返回人脸的坐标信息
face_list = face_recognition.face_locations(img)
print(face_list)
# 获取人脸坐标
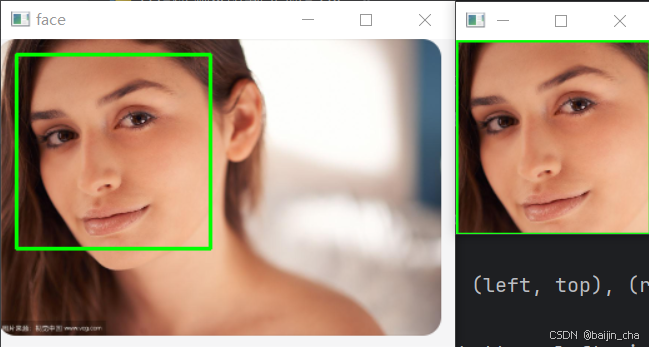
for (top, right, bottom, left) in face_list:
# 画出人脸区域
cv2.rectangle(img, (left, top), (right, bottom), (0, 255, 0), 2)
# 切割人脸图像
end_img = img[top:bottom, left:right]
# 保存图片
cv2.imwrite('../save_image/saved_p1.png', end_img)
# 显示结果
cv2.imshow('face', img)
cv2.imshow('detected_face', end_img)
cv2.waitKey(0)
cv2.destroyAllWindows()
三、提取人脸特征
import cv2
import face_recognition

# 读取人脸图片
img = cv2.imread('../images/p1.png')
"""
提取人脸特征
  face_recognition.face_encodings(img, known_face_locations=None,
  num_jitters=1, model='small')
  参数
    img:图像的 NumPy 数组。
    known_face_locations:人脸位置的列表,如果为 None,则自动检测人脸位置。
    num_jitters:对每个人脸进行多次编码以提高精度。
    model:使用的模型,可以是 'small' 或 'large'(默认)

  返回值
  一个列表,每个元素是一个 128 维的特征向量
"""
# 读取人脸位置
face_locations = face_recognition.face_locations(img)
# 提取人脸特征码
face_encodings = face_recognition.face_encodings(img)[0]
print(face_encodings)
四、计算人脸的欧几里得距离
import cv2
import numpy as np
import face_recognition

"""
欧几里得距离(Euclidean distance)是一种测量两个点之间直线距离的方式
  意义
    1. 距离越小,相似度越高:
   - 特征向量相似:当欧几里得距离越小说明两个特征向量之间的差异越小,即这两个人脸在特征空间中很接近。
   因此,这两个图像可能是同一个人或者相似度很高。
   - 相同身份的概率大:在许多人脸识别系统中,如果计算出的距离小于某个设定的阈值,则系统会认为这两个面
   孔属于同一个人。
2. 距离阈值:
   - 匹配判断:通常,系统会设置一个阈值来判断两个特征向量是否属于同一身份。
   如果计算出的距离小于这个阈值,则认为两张图片中的人脸是相同的;如果距离大于阈值,则认为是不同的身份。
   - 误识别率:设置的阈值会影响系统的误识别率(假阳性和假阴性率)。
   距离阈值的选择需要根据具体应用场景进行调整。
"""
# 读取人脸图片
img01 = cv2.imread('../face_train_images/1.jpg')
img02 = cv2.imread('../face_train_images/4.jpg')

# 读取人脸位置
face_location01 = face_recognition.face_locations(img01)
face_location02 = face_recognition.face_locations(img02)

# 提取人脸特征码
face_encodings01 = face_recognition.face_encodings(img01)[0]
face_encodings02 = face_recognition.face_encodings(img02)[0]

# 计算欧几里得距离
distance = np.linalg.norm(face_encodings01 - face_encodings02)
# print(distance)  # 0.8369087934457882
if distance < 0.45:
    print('是同一个人')
else:
    print('不是同一个人')
五、计算人脸的匹配程度
import cv2
import face_recognition

"""
face_recognition.compare_faces(known_face_encodings, face_encoding_to_check, tolerance=0.6)
  功能
    比较已知人脸特征向量和待检测人脸特征向量,判断是否匹配
  参数
    known_face_encodings:已知人脸特征向量的列表。
    face_encoding_to_check:待检测的人脸特征向量。
    tolerance:匹配的阈值,范围是 0.0 到 1.0,值越小表示匹配要求越高
  返回值
      一个布尔值列表,表示待检测人脸特征向量是否与已知人脸特征向量匹配
"""
# 读取人脸图片
img01 = cv2.imread('../face_train_images/1.jpg')
img02 = cv2.imread('../face_train_images/2.jpg')

# 提取人脸特征码
face_encodings01 = face_recognition.face_encodings(img01)[0]
face_encodings02 = face_recognition.face_encodings(img02)[0]

# 计算是否匹配
re = face_recognition.compare_faces([face_encodings01],
                                    face_encodings02,
                                    tolerance=0.5)
print(re)
六、图片预处理
即在opencv下处理图像后,再使用face_recognition库进行图像识别。
# 2024-11-05 吕国彰

import cv2
import face_recognition
import numpy as np

def face_detected(img):
    # opencv进行图像预处理
    gray_img = cv2.cvtColor(img, cv2.COLOR_BGR2GRAY)
    # 高斯滤波
    gs_img = cv2.GaussianBlur(gray_img, (3, 3), 0)
    #
    end_img = cv2.cvtColor(gs_img, cv2.COLOR_GRAY2BGR)
    # 读取人脸位置
    face_location = face_recognition.face_locations(end_img)
    # 提取人脸特征码
    face_encoding = face_recognition.face_encodings(end_img)[0]
    return face_encoding


# 读取图片
img01 = cv2.imread('../face_train_images/1.jpg')
img02 = cv2.imread('../face_train_images/ldh.jpg')
encoding01 = face_detected(img01)
encoding02 = face_detected(img02)
# 计算两个人脸编码之间的欧几里得距离。
distance = np.linalg.norm(encoding01 - encoding02)
print(distance)
应用项目:人脸检测+相似度识别
# 人脸检测

import cv2

# 读取视频
c = cv2.VideoCapture('../video/1.mp4')

while True:
    ret, frame = c.read()
    if ret:
        # 显示图像
        cv2.imshow('img', frame)
        if cv2.waitKey(20) == 27:
            break
        if cv2.waitKey(20) == 113:
            # 保存人脸
            iss = cv2.imwrite('E:\\images\\saved_face01.png', frame)
            if iss:
                print('收集人脸成功')
            else:
                print('收集人脸失败')

cv2.destroyAllWindows()
# 人脸相似度识别

import os
import cv2
import numpy as np
import face_recognition

# 读取视频
c = cv2.VideoCapture('../video/1.mp4')

while True:
    ret, frame = c.read()
    if ret:
        # 显示图像
        cv2.imshow('img', frame)
        if cv2.waitKey(20) == 27:
            break
        if cv2.waitKey(20) == 113:
            # 检测人脸
            face_list = face_recognition.face_locations(frame)
            print(len(face_list))
            if len(face_list) > 0:
                print("检测到人脸")
                # 遍历目录,查找人脸
                path = os.listdir("E:\\images")
                print(path)
                for i in path:
                    # 获取人脸特征
                    img = cv2.imread(f"E:\\images\\{i}")
                    en1 = face_recognition.face_encodings(img)[0]
                    en2 = face_recognition.face_encodings(frame)[0]
                    iss = np.linalg.norm(en1 - en2)
                    print(iss)
                    if iss < 0.5:
                        print("是同一个人")
                    else:
                        print("不是同一个人")

cv2.destroyAllWindows()


 被折叠的 条评论
为什么被折叠?
被折叠的 条评论
为什么被折叠?
 到【灌水乐园】发言


