


目录
1.1 测试用例(Test Case)和 测试(Test):
2.3.1. 镜像目录结构 (The Mirror Structure)
一、GTest介绍
1.1 测试用例(Test Case)和 测试(Test):
-
TEST(): 宏,用于定义一个独立的测试。
-
测试套件名(Test Suite Name): 逻辑上的一组相关测试的集合(例如,
LinkedListTest,MathUtilsTest)。 -
测试名(Test Name): 单个测试的具体名称(例如,
InsertAtHead,AdditionOverflows)。 -
语法:
TEST(TestSuiteName, TestName) { ... test body ... }
1.2 断言(Assertions):
-
ASSERT_*: 如果断言失败,当前函数会立即返回(
ASSERT_EQ失败后,后面的语句不会执行)。-
ASSERT_TRUE(condition): 验证条件为真。 -
ASSERT_EQ(val1, val2): 验证两个值相等。 -
ASSERT_STREQ(str1, str2): 验证两个 C 字符串相等。 -
ASSERT_NE,ASSERT_LT,ASSERT_GE等。
-
-
EXPECT_*: 如果断言失败,测试会继续运行,并最终报告所有失败。这通常更受欢迎,因为它能一次运行显示所有问题。
-
EXPECT_TRUE(condition) -
EXPECT_EQ(val1, val2) -
EXPECT_STREQ(str1, str2) -
等等。
-
1.3 测试固件(Test Fixtures):
用于多个测试之间共享相同的配置和资源。对于测试需要初始化/清理的 C 结构体非常有用。
-
创建一个继承自
::testing::Test的类。 -
在类中定义你需要共享的变量(例如,一个
struct MyStruct*)。 -
重写
SetUp()方法(类似构造函数)进行初始化。 -
重写
TearDown()方法(类似析构函数)进行清理。 -
使用
TEST_F()宏来编写测试,它可以访问 fixture 中的成员。
1.4 打桩方法:链接时打桩(最常用、最推荐)
-
不将真实的实现文件编译并链接到测试可执行文件中。
-
在你的测试文件(
test_database.cpp)中,重新定义(rewrite) 你需要打桩的函数。 -
可能遇到的问题:函数重定义,解决方法:链接装饰器(推荐):在打桩函数前加前缀__wrap_,在测试文件对应的CMakeLists.txt文件中添加:
target_link_options(target PRIVATE
    # "LINKER:--allow-multiple-definition"
    "LINKER:--wrap=打桩函数名称"
)- 打桩函数模板(可选,用于需要精确返回值,通过队列实现):
template <typename T>
class IgnoreAndReturn_Mock {
public:
    std::queue<T> returnValues;
    int callCount;

    // 重置mock状态
    void reset() {
        while (!returnValues.empty()) returnValues.pop();
        callCount = 0;
    }

    // 设置返回值序列
    void setReturnSequence(const std::vector<T>& values) {
        reset();
        for (const T& val : values) {
            returnValues.push(val);
        }
    }
};
打桩模板类使用方法:
//创建打桩模板类对象
IgnoreAndReturn_Mock<bool> test_Mock;
//桩函数
extern "C" bool __wrap_test() {
    if (test_Mock.returnValues.empty()) {
        ADD_FAILURE() << "error,returnValues is empty";
    }
    test_Mock.callCount++;
    int result = test_Mock.returnValues.front();
    test_Mock.returnValues.pop();
    return result;
}
//使用过程,在测试用例中调用被测函数前,先对桩模板对象进行重置和设置期望返回值序列
test_Mock.reset();
test_Mock.setReturnSequence({False,False,False,False,False,False});
1.5 对比Ceedling测试工具
核心区别:一体化框架 vs. 组合式组件
-
Ceedling:是一个一体化的、高度集成的测试框架和构建系统。它本身不是测试框架,而是一个用Ruby构建的“元工具”(metatool)。它集成了:
-
Unity:一个极简的、纯C的单元测试框架(提供断言、测试运行)。
-
CMock:一个强大的自动打桩(Mock)工具。
-
CException:可选,用于异常处理。
Ceedling为你安排好了一切:目录结构、构建过程(调用底层的GCC等编译器)、运行测试、生成报告。你只需要遵循它的规则。
-
-
Gtest:是Google开发的一个功能强大的C++单元测试框架。它专注于一件事:提供丰富的断言、测试固件、组织测试用例。它不处理C语言的打桩(你需要自己手动或借助其他工具),也不强制规定你的项目结构或构建系统(通常与CMake/Makefile结合使用)。
总体而言,Ceedling更容易上手,更方便打桩,但仅仅支持纯C语言项目,GTest基于CMake工具,灵活性更高,但打桩比较麻烦,支持C/C++。
如果想了解Ceedling的使用方法,可以参考:C语言单元测试工具Ceedling介绍+快速入门-优快云博客
二、文件结构
2.1 核心原则
-
隔离(Isolation): 测试代码和产品代码应该严格分离。
-
镜像(Mirroring): 测试目录的结构应该镜像产品代码目录的结构,这样任何文件的测试位置都一目了然。
-
自动化(Automation): 构建系统(如 CMake)应该能轻松地找到并编译所有测试,无需手动维护文件列表。
-
可维护性(Maintainability): 添加新的产品文件或测试文件都应该遵循明确的惯例,易于集成。
2.2 结构展示
my_project/ # 项目根目录
│
├── CMakeLists.txt # 主 CMake 配置文件,定义项目、全局设置、包含子目录
├── src/ # 产品代码源文件目录
│ ├── CMakeLists.txt # 编译主库或可执行文件
│ ├── module_a/
│ │ ├── feature_a.c
│ │ ├── feature_a.h
│ │ ├── feature_b.h
│ │ └── feature_b.c
│ └── module_b/
│ ├── utility.c
│ └── algorithm.c
│
└── test/ # 测试代码根目录(与 src/ 和 include/ 平行)
├── CMakeLists.txt # 测试项目的总入口,配置 GTest 并添加所有测试
│
├── module_a/ # 镜像 src/module_a/ 的结构
│ ├── CMakeLists.txt # 定义 module_a 的测试可执行文件
│ ├── test_feature_a.cpp # 对应 src/module_a/feature_a.c 的测试
│ └── test_feature_b.cpp # 对应 src/module_a/feature_b.c 的测试
│
└── module_b/ # 镜像 src/module_b/ 的结构
├── CMakeLists.txt
├── test_utility.cpp
└── test_algorithm.cpp
2.3 结构详解与关键点
2.3.1. 镜像目录结构 (The Mirror Structure)
这是最重要的概念。test/ 目录下的子目录 module_a/, module_b/ 与 src/ 下的完全一致
-
直观: 要找到
src/module_a/feature_a.c的测试文在test/module_a/test_feature_a.c。 -
可扩展: 当添加新模块
module_c时,只需在src/和test/下同时创建module_c/目录即可。 -
便于隔离: 可以轻松地为每个模块定义独立的测试可执行文件,方便单独运行特定模块的测试。
2.3.2. 测试文件命名规范
-
统一前缀/后缀: 使用
test_作为前缀或_test作为后缀(如test_feature_a.c或feature_a_test.c)。一致性是关键。 -
内容对应: 通常一个
.c源文件对应一个test_*.c测试文件。如果某个.c文件非常庞大复杂,也可以为其创建多个测试文件(如test_feature_a_basic.c,test_feature_a_advanced.c)。
2.3.3. CMake 构建系统配置
这是将整个结构粘合在一起的关键。
- 根目录的
CMakeLists.txtcmake_minimum_required(VERSION 3.14) project(MyProject) # 设置 C 标准 set(CMAKE_C_STANDARD 11) set(CMAKE_C_STANDARD_REQUIRED ON) # 包含目录:让编译器能找到头文件 include_directories(include) # 添加产品代码目录 add_subdirectory(src) # 启用测试(关键!)。这会让 CMake 处理 enable_testing() 和 add_test() 命令。 enable_testing() # 添加测试目录(只有在构建测试时才这样做,避免污染生产构建) option(BUILD_TESTS "Build the unit tests" ON) # 提供一个选项,默认打开 if(BUILD_TESTS) add_subdirectory(test) endif() test/CMakeLists.txt# 包含 FetchContent 模块,用于自动下载和管理 GTest include(FetchContent) FetchContent_Declare( googletest URL https://github.com/google/googletest/archive/03597a01ee50ed33e9fd718599d30c7d2e4f7d93.zip ) FetchContent_MakeAvailable(googletest) # 让所有在 test/ 目录下的测试都能看到 ../include 路径 include_directories(../include) # 添加所有测试子目录 add_subdirectory(module_a) add_subdirectory(module_b)test/module_a/CMakeLists.txt(示例)# 创建一个针对 module_a 的测试可执行文件 add_executable(module_a_tests test_feature_a.cpp test_feature_b.cpp ) # 链接 GTest 库和你的主产品库 # 假设你的 src/CMakeLists.txt 创建了一个叫 'my_project_lib' 的库 target_link_libraries(module_a_tests PRIVATE gtest_main my_project_lib # 链接主产品库,这样测试才能调用函数 ) # 告诉 CTest(CMake 的测试工具)这个可执行文件是一个测试 add_test(NAME module_a COMMAND module_a_tests)test/module_b/CMakeLists.txt(示例)# 创建一个针对 module_b 的测试可执行文件 add_executable(module_b_tests test_algorithm.cpp test_utility.cpp ) # 链接 GTest 库和你的主产品库 # 假设你的 src/CMakeLists.txt 创建了一个叫 'my_project_lib' 的库 target_link_libraries(module_b_tests PRIVATE gtest_main my_project_lib # 链接主产品库,这样测试才能调用函数 ) # 告诉 CTest(CMake 的测试工具)这个可执行文件是一个测试 add_test(NAME module_b COMMAND module_b_tests)src/CMakeLists.txt(确保创建库)# 将源文件添加到一个库中,而不是直接生成可执行文件 # 这样测试和主程序都可以链接这个库 file(GLOB_RECURSE SRC_FILES "*.c" "module_a/*.c" "module_b/*.c") add_library(my_project_lib STATIC ${SRC_FILES})三、举例说明
-
/CMakeLists.txt
cmake_minimum_required(VERSION 3.14) project(MyProject) # 设置 C 标准 set(CMAKE_C_STANDARD 11) set(CMAKE_C_STANDARD_REQUIRED ON) # 添加产品代码目录 add_subdirectory(src) # 启用测试(关键!)。这会让 CMake 处理 enable_testing() 和 add_test() 命令。 enable_testing() # 测试所有测试文件 add_custom_target(run_all_tests COMMAND ${CMAKE_COMMAND} -E echo "=== Running All Tests ===" COMMAND find ${CMAKE_BINARY_DIR} -name "*_tests" -type f -executable -exec {} \\; WORKING_DIRECTORY ${CMAKE_BINARY_DIR} COMMENT "Running all *_tests executables" VERBATIM ) # 添加测试目录(只有在构建测试时才这样做,避免污染生产构建) option(BUILD_TESTS "Build the unit tests" ON) # 提供一个选项,默认打开 if(BUILD_TESTS) add_subdirectory(test) endif() # 覆盖率检测选项 option(ENABLE_COVERAGE "Enable coverage reporting" OFF) if(ENABLE_COVERAGE) message(STATUS "Coverage reporting enabled") # 启用覆盖率 add_compile_options(-fprofile-arcs -ftest-coverage --coverage) add_link_options(-fprofile-arcs -ftest-coverage --coverage) # 设置GCC/Clang特定选项以获得更详细的覆盖率 if(CMAKE_C_COMPILER_ID MATCHES "GNU|Clang") add_compile_options(-fbranch-probabilities -fcondition-coverage) endif() endif() # 查找 gcovr find_program(GCOVR_PATH gcovr) # 添加详细的覆盖率目标 if(GCOVR_PATH AND ENABLE_COVERAGE AND BUILD_TESTS) # HTML 报告包含所有覆盖率指标 add_custom_target(coverage_html COMMAND ${GCOVR_PATH} --root ${CMAKE_SOURCE_DIR} --exclude ${CMAKE_SOURCE_DIR}/test/ --html-details -o coverage_report.html --print-summary --branches # 启用分支覆盖率 COMMAND echo "HTML coverage report with branch coverage: ${CMAKE_BINARY_DIR}/coverage_report.html" DEPENDS module_a_tests COMMENT "Generating detailed HTML coverage report with branch coverage" ) # XML 报告包含所有指标 add_custom_target(coverage_xml COMMAND ${GCOVR_PATH} --root ${CMAKE_SOURCE_DIR} --exclude ${CMAKE_SOURCE_DIR}/test/ --xml -o coverage.xml --branches COMMAND echo "XML coverage report: ${CMAKE_BINARY_DIR}/coverage.xml" DEPENDS module_a_tests COMMENT "Generating XML coverage report with branch coverage" ) # 控制台输出详细报告 add_custom_target(coverage_console COMMAND ${GCOVR_PATH} --root ${CMAKE_SOURCE_DIR} --exclude ${CMAKE_SOURCE_DIR}/test/ --branches --print-summary DEPENDS module_a_tests COMMENT "Displaying detailed coverage summary in console" ) # 生成所有报告 add_custom_target(coverage_all DEPENDS coverage_html coverage_xml coverage_console COMMENT "Generating all coverage reports with branch coverage" ) # 生成JSON格式的详细报告 add_custom_target(coverage_json COMMAND ${GCOVR_PATH} --root ${CMAKE_SOURCE_DIR} --exclude ${CMAKE_SOURCE_DIR}/test/ --json -o coverage.json --branches COMMAND echo "JSON coverage report: ${CMAKE_BINARY_DIR}/coverage.json" DEPENDS module_a_tests COMMENT "Generating JSON coverage report with branch coverage" ) endif() -
/src/CMakeLists.txt
# 将当前目录(src)添加到包含路径,这样编译器能找到所有子目录中的头文件 include_directories(${CMAKE_CURRENT_SOURCE_DIR}) # 将源文件添加到一个库中,而不是直接生成可执行文件,这样测试和主程序都可以链接这个库 file(GLOB_RECURSE SRC_FILES "*.c" "module_a/*.c" "module_b/*.c") add_library(my_project_lib STATIC ${SRC_FILES}) # 为每个源文件设置覆盖率 if(ENABLE_COVERAGE) foreach(source_file ${SRC_FILES}) set_source_files_properties(${source_file} PROPERTIES COMPILE_FLAGS "-fprofile-arcs -ftest-coverage") endforeach() target_link_libraries(my_project_lib PRIVATE -fprofile-arcs -ftest-coverage) endif() -
/test/CMakeLists.txt
# 包含 FetchContent 模块,用于自动下载和管理 GTest include(FetchContent) FetchContent_Declare( googletest URL https://github.com/google/googletest/archive/refs/tags/v1.14.0.zip ) FetchContent_MakeAvailable(googletest) # 查找系统已安装的 GTest #find_package(GTest REQUIRED) #find_package(Threads REQUIRED) # 让测试能够看到 src 目录中的头文件 include_directories(../src) # 添加所有测试子目录 add_subdirectory(module_a) #add_subdirectory(module_b) -
/test/module_a/CMakeLists.txt
# 创建一个针对 module_a 的测试可执行文件 add_executable(module_a_tests test_feature_a.cpp test_feature_b.cpp ) # 链接 GTest 库和你的主产品库 # 假设你的 src/CMakeLists.txt 创建了一个叫 'my_project_lib' 的库 target_link_libraries(module_a_tests PRIVATE gtest_main my_project_lib # 链接主产品库,这样测试才能调用函数 ) # 告诉 CTest(CMake 的测试工具)这个可执行文件是一个测试 add_test(NAME module_a COMMAND module_a_tests) -
feature_a.c
#include "feature_a.h" #include "feature_b.h" int fun_greater100(int a){ if(update(a) <= 100){ return 0; } return 1; } -
feature_a.h
#ifndef FEATURE_A_H #define FEATURE_A_H #ifdef __cplusplus extern "C" { #endif int fun_greater100(int num); #ifdef __cplusplus } #endif #endif -
feature_b.c
#include "feature_b.h" int update(int a){ return a+50; } -
feature_b.h
#ifndef FEATURE_B_H #define FEATURE_B_H #ifdef __cplusplus extern "C" { #endif int update(int a); #ifdef __cplusplus } #endif #endif -
algorithm.h
#ifndef ALGORITHM_H #define ALGORITHM_H int times_calculator(int input1,int input2); #endif -
algorithm.c
#include "algorithm.h" int times_calculator(int input1,int input2){ return input1*input2; } -
utility.h
#ifndef UTILITY_H #define UTILITY_H #include "algorithm.h" int factorial(int input); #endif -
utility.c
#include "utility.h" int factorial(int input) { int result = 1; while(input >1){ result=times_calculator(result,input); input--; } return result; } -
test_utility.cpp
#include <gtest/gtest.h> #include <vector> #include <queue> // 使用extern "C"包含C头文件 extern "C" { #include "module_b/utility.h" } // 声明我们要mock的C函数 extern "C" { // 这个声明会替换链接时的真实函数 int times_calculator(int input1, int input2); } namespace { // Mock控制类 class TimesCalculatorMock { public: static std::queue<int> returnValues; static std::vector<std::pair<int, int>> callHistory; static int callCount; // 静态方法用于重置mock状态 static void reset() { while (!returnValues.empty()) returnValues.pop(); callHistory.clear(); callCount = 0; } // 设置返回值序列 static void setReturnSequence(const std::vector<int>& values) { reset(); for (int val : values) { returnValues.push(val); } } // 验证调用历史 static void verifyCallHistory(const std::vector<std::pair<int, int>>& expected) { ASSERT_EQ(callHistory.size(), expected.size()); for (size_t i = 0; i < expected.size(); ++i) { EXPECT_EQ(callHistory[i].first, expected[i].first); EXPECT_EQ(callHistory[i].second, expected[i].second); } } }; // 静态成员定义 std::queue<int> TimesCalculatorMock::returnValues; std::vector<std::pair<int, int>> TimesCalculatorMock::callHistory; int TimesCalculatorMock::callCount = 0; } // 替代函数的实现 - 这个函数会在链接时替换原始的times_calculator extern "C" int times_calculator(int input1, int input2) { TimesCalculatorMock::callCount++; TimesCalculatorMock::callHistory.push_back({input1, input2}); if (TimesCalculatorMock::returnValues.empty()) { // 如果没有设置返回值,使用默认行为(可以抛出异常或返回默认值) ADD_FAILURE() << "Unexpected call to times_calculator(" << input1 << ", " << input2 << ")"; return input1 * input2; // 或者返回一个错误值 } int result = TimesCalculatorMock::returnValues.front(); TimesCalculatorMock::returnValues.pop(); return result; } // 测试夹具 class FactorialTest : public ::testing::Test { protected: void SetUp() override { TimesCalculatorMock::reset(); } void TearDown() override { // 可以在这里添加额外的清理代码 } }; // 测试用例1: 基本功能测试 TEST_F(FactorialTest, BasicFactorial) { // 设置times_calculator的返回值序列 // factorial(5)会调用4次times_calculator: // 1. times_calculator(1, 5) = 5 // 2. times_calculator(5, 4) = 20 // 3. times_calculator(20, 3) = 60 // 4. times_calculator(60, 2) = 120 TimesCalculatorMock::setReturnSequence({5, 20, 60, 120}); int result = factorial(5); EXPECT_EQ(result, 120); EXPECT_EQ(TimesCalculatorMock::callCount, 4); // 验证调用参数 std::vector<std::pair<int, int>> expectedCalls = { {1, 5}, {5, 4}, {20, 3}, {60, 2} }; TimesCalculatorMock::verifyCallHistory(expectedCalls); } // 测试用例2: 每次调用返回不同值 TEST_F(FactorialTest, DifferentReturnValuesEachCall) { // 设置完全不同的返回值序列 TimesCalculatorMock::setReturnSequence({10, 50, 150, 500}); int result = factorial(5); // 根据mock的返回值计算期望结果 // 10 + 50 + 150 + 500 的逻辑,但实际上是乘法链 // 1 * 5 = 10 (mock), 10 * 4 = 50 (mock), 50 * 3 = 150 (mock), 150 * 2 = 500 (mock) EXPECT_EQ(result, 500); EXPECT_EQ(TimesCalculatorMock::callCount, 4); } // 测试用例3: 边界情况测试 TEST_F(FactorialTest, EdgeCases) { // 测试factorial(1) - 应该不调用times_calculator int result = factorial(1); EXPECT_EQ(result, 1); EXPECT_EQ(TimesCalculatorMock::callCount, 0); // 重置mock状态 TimesCalculatorMock::reset(); // 测试factorial(2) - 调用1次times_calculator TimesCalculatorMock::setReturnSequence({2}); result = factorial(2); EXPECT_EQ(result, 2); EXPECT_EQ(TimesCalculatorMock::callCount, 1); } // 测试用例4: 异常情况测试 TEST_F(FactorialTest, ErrorConditions) { // 测试当没有设置足够返回值时的行为 // 只设置2个返回值,但需要3次调用 TimesCalculatorMock::setReturnSequence({10, 20}); // 这里会触发失败,因为第三次调用时返回值队列为空 // 你可以修改mock函数的行为来处理这种情况 EXPECT_DEATH(factorial(4), "Unexpected call"); } -
test_feature_a.cpp
#include <gtest/gtest.h>

// 关键:使用 extern "C" 包含 C 头文件
extern "C" {
    #include "module_a/feature_a.h"
    // 注意:我们不包含 feature_b.h,因为我们要手动打桩
}

// 正确的打桩:模拟 update 函数的行为
// 这个桩函数只在测试中使用,取代真正的 feature_b.c 中的实现
extern "C" {
    int update(int a) {
        // 模拟不同的返回路径以测试分支覆盖率
        if (a < 0) {
            return -10;  // 测试负值路径
        } else if (a > 1000) {
            return 2000; // 测试大值路径
        } else {
            return a + 10; // 正常路径
        }
    }
}

class FeatureATest : public ::testing::Test {
protected:
    // 相当于 Ceedling 的 setUp - 在每个测试用例前执行
    void SetUp() override {
        // 初始化代码
        test_data = malloc(100);
        counter = 0;
        printf("SetUp called\n");
    }

    // 相当于 Ceedling 的 tearDown - 在每个测试用例后执行
    void TearDown() override {
        // 清理代码
        free(test_data);
        printf("TearDown called. Counter was: %d\n", counter);
    }

    // 测试用例可以访问的共享数据
    void* test_data;
    int counter;
};

TEST_F(FeatureATest, NormalCase_ReturnsZero) {
    ASSERT_NE(test_data, nullptr);
    EXPECT_EQ(counter, 0);
    counter++;
    int ret = fun_greater100(60);  // update(60) = 70 <= 100
    EXPECT_EQ(ret, 0);
}

TEST_F(FeatureATest, NormalCase_ReturnsOne) {
    ASSERT_NE(test_data, nullptr);
    EXPECT_EQ(counter, 0);
    int ret = fun_greater100(95);  // update(95) = 105 > 100
    EXPECT_EQ(ret, 1);
}

TEST_F(FeatureATest, NegativeInput) {
    ASSERT_NE(test_data, nullptr);
    int ret = fun_greater100(-10); // update(-10) = -10 <= 100
    EXPECT_EQ(ret, 0);
}

TEST_F(FeatureATest, LargeInput) {
    ASSERT_NE(test_data, nullptr);
    int ret = fun_greater100(2000); // update(2000) = 2000 > 100
    EXPECT_EQ(ret, 1);
}

// 测试边界条件
TEST_F(FeatureATest, BoundaryCondition) {
    ASSERT_NE(test_data, nullptr);
    int ret = fun_greater100(90); // update(90) = 100 <= 100
    EXPECT_EQ(ret, 0);

    ret = fun_greater100(91); // update(91) = 101 > 100
    EXPECT_EQ(ret, 1);
}-
运行命令
mkdir build
cd build
cmake .. -DBUILD_TESTS=ON -DENABLE_COVERAGE=ON
make
./test/module_a/module_a_tests
./test/module_b/module_b_tests
make coverage_html
./my_tests > test_results.log 2>&1 //保存测试日志-
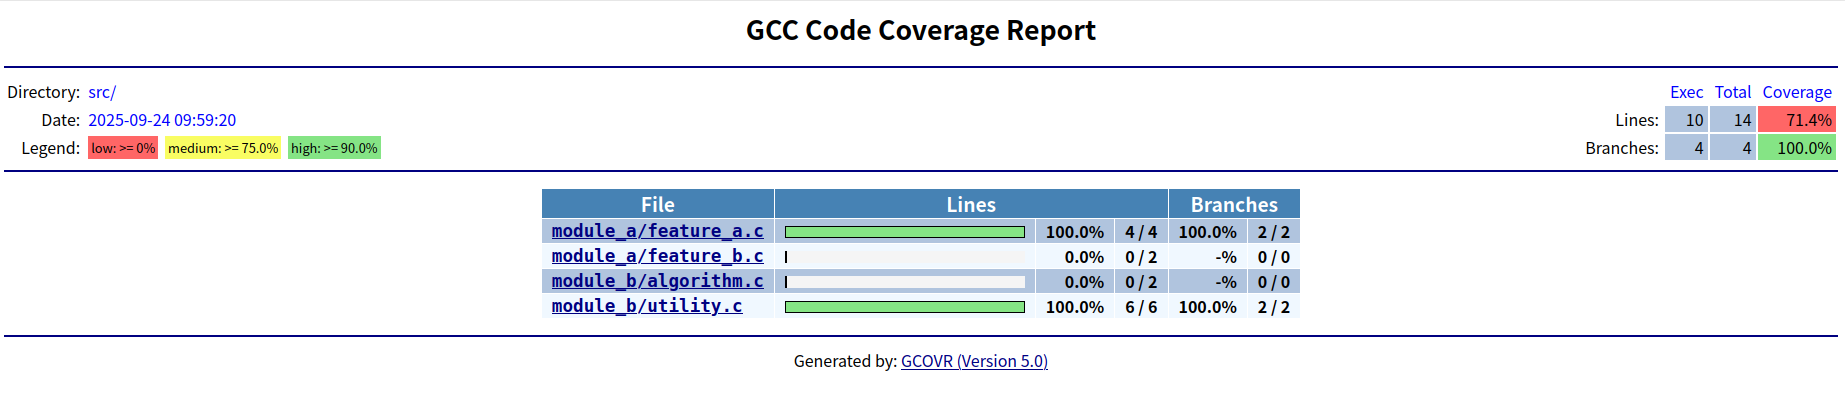
运行结果


-
测试报告:


 3015
3015

 被折叠的 条评论
为什么被折叠?
被折叠的 条评论
为什么被折叠?
 到【灌水乐园】发言


