


Linux系统之ifconfig命令的基本使用
一、ifconfig命令介绍
1. ifconfig简介
ifconfig是Linux中常用的网络配置工具之一,用于配置和显示网络接口的具体状况。
2. ifconfig注意事项
- 用ifconfig命令配置的网卡信息,在网卡重启后机器重启后,配置就不存在。要想将上述的配置信息永远的存的电脑里,那就要修改网卡的配置文件。
- 要使用ifconfig命令,必须具有superuser权限。
- 在一些较新的Linux发行版中,ifconfig命令已经被ip命令所取代,因此在使用ifconfig命令之前,需要先检查系统是否支持该命令。
- ifconfig命令被用于配置和显示Linux内核中网络接口的网络参数。
3. ifconfig命令特点
ifconfig命令是在UNIX和类UNIX系统中常用的命令,它用于配置网络接口参数。以下是ifconfig命令的特点:
-
显示网络接口的状态:ifconfig命令可以显示网络接口(如网卡)的状态信息,包括IP地址、MAC地址、子网掩码、广播地址等。
-
配置网络接口参数:ifconfig命令可以配置网络接口参数,如设置IP地址、子网掩码、广播地址等。
-
显示网络接口统计信息:ifconfig命令可以显示网络接口的统计信息,如收发数据包的数量、错误数量等。
-
支持IPv4和IPv6协议:ifconfig命令支持IPv4和IPv6协议,可以用于配置和管理IPv4和IPv6网络接口。
-
可以启用和禁用网络接口:ifconfig命令可以启用和禁用网络接口,例如禁用无线网卡等。
-
可以用于调试网络问题:ifconfig命令可以用于调试网络问题,例如查看网络接口是否正常工作、是否配置正确等。
二、ifconfig命令的使用方法
1. 查看ifconfig的帮助信息
在centos7.6中,使用ifconfig --help,查看ifconfig帮助信息。
[root@jeven ~]# ifconfig --help
Usage:
  ifconfig [-a] [-v] [-s] <interface> [[<AF>] <address>]
  [add <address>[/<prefixlen>]]
  [del <address>[/<prefixlen>]]
  [[-]broadcast [<address>]]  [[-]pointopoint [<address>]]
  [netmask <address>]  [dstaddr <address>]  [tunnel <address>]
  [outfill <NN>] [keepalive <NN>]
  [hw <HW> <address>]  [mtu <NN>]
  [[-]trailers]  [[-]arp]  [[-]allmulti]
  [multicast]  [[-]promisc]
  [mem_start <NN>]  [io_addr <NN>]  [irq <NN>]  [media <type>]
  [txqueuelen <NN>]
  [[-]dynamic]
  [up|down] ...

  <HW>=Hardware Type.
  List of possible hardware types:
    loop (Local Loopback) slip (Serial Line IP) cslip (VJ Serial Line IP)
    slip6 (6-bit Serial Line IP) cslip6 (VJ 6-bit Serial Line IP) adaptive (Adaptive Serial Line IP)
    ash (Ash) ether (Ethernet) ax25 (AMPR AX.25)
    netrom (AMPR NET/ROM) rose (AMPR ROSE) tunnel (IPIP Tunnel)
    ppp (Point-to-Point Protocol) hdlc ((Cisco)-HDLC) lapb (LAPB)
    arcnet (ARCnet) dlci (Frame Relay DLCI) frad (Frame Relay Access Device)
    sit (IPv6-in-IPv4) fddi (Fiber Distributed Data Interface) hippi (HIPPI)
    irda (IrLAP) ec (Econet) x25 (generic X.25)
    infiniband (InfiniBand) eui64 (Generic EUI-64)
  <AF>=Address family. Default: inet
  List of possible address families:
    unix (UNIX Domain) inet (DARPA Internet) inet6 (IPv6)
    ax25 (AMPR AX.25) netrom (AMPR NET/ROM) rose (AMPR ROSE)
    ipx (Novell IPX) ddp (Appletalk DDP) ec (Econet)
    ash (Ash) x25 (CCITT X.25)
2. ifconfig的使用帮助
以下是ifconfig的使用参数
ifconfig [网络接口] [选项]
add<地址>:设置网络设备IPv6的ip地址;
del<地址>:删除网络设备IPv6的IP地址;
down:关闭指定的网络设备;
<hw<网络设备类型><硬件地址>:设置网络设备的类型与硬件地址;
io_addr<I/O地址>:设置网络设备的I/O地址;
irq<IRQ地址>:设置网络设备的IRQ;
media<网络媒介类型>:设置网络设备的媒介类型;
mem_start<内存地址>:设置网络设备在主内存所占用的起始地址;
metric<数目>:指定在计算数据包的转送次数时,所要加上的数目;
mtu<字节>:设置网络设备的MTU;
netmask<子网掩码>:设置网络设备的子网掩码;
tunnel<地址>:建立IPv4与IPv6之间的隧道通信地址;
up:启动指定的网络设备;
-broadcast<地址>:将要送往指定地址的数据包当成广播数据包来处理;
-pointopoint<地址>:与指定地址的网络设备建立直接连线,此模式具有保密功能;
-promisc:关闭或启动指定网络设备的promiscuous模式;
三、安装ifconfig命令工具
1. 安装net-tools软件包
ifconfig命令的软件包在centos7.6中为net-tools
[root@docker yum.repos.d]# yum -y install net-tools
Loaded plugins: fastestmirror
Loading mirror speeds from cached hostfile
Resolving Dependencies
--> Running transaction check
---> Package net-tools.x86_64 0:2.0-0.25.20131004git.el7 will be installed
--> Finished Dependency Resolution

Dependencies Resolved

=============================================================================================================================
 Package                    Arch                    Version                                      Repository             Size
=============================================================================================================================
Installing:
 net-tools                  x86_64                  2.0-0.25.20131004git.el7                     base                  306 k

Transaction Summary
=============================================================================================================================
Install  1 Package

Total download size: 306 k
Installed size: 917 k
Downloading packages:
net-tools-2.0-0.25.20131004git.el7.x86_64.rpm                                                         | 306 kB  00:00:00
Running transaction check
Running transaction test
Transaction test succeeded
Running transaction
  Installing : net-tools-2.0-0.25.20131004git.el7.x86_64                                                                 1/1
  Verifying  : net-tools-2.0-0.25.20131004git.el7.x86_64                                                                 1/1

Installed:
  net-tools.x86_64 0:2.0-0.25.20131004git.el7

Complete!
2. 查看ifconfig工具的版本
使用ifconfig -V,查看版本情况。
[root@docker ~]# ifconfig -V
net-tools 2.10-alpha
四、ifconfig的基本使用
1. 启停网卡
ifconfig eth0 up为启动网卡eth0,ifconfig eth0 down为关闭网卡eth0。
ifconfig eth0 up   # 启动网卡eth0
ifconfig eth0 down   # 关闭网卡eth0
2. 显示eth0网卡信息
单独显示eth0网卡信息
[root@docker ~]# ifconfig eth0
eth0: flags=4163<UP,BROADCAST,RUNNING,MULTICAST>  mtu 1500
        inet 192.168.3.127  netmask 255.255.255.0  broadcast 192.168.3.255
        inet6 fd58:bc95:d4fb::83b  prefixlen 128  scopeid 0x0<global>
        inet6 fe80::3bde:d1ba:1b78:4dbd  prefixlen 64  scopeid 0x20<link>
        inet6 fd58:bc95:d4fb:0:ff42:9e46:82f5:7a5f  prefixlen 64  scopeid 0x0<global>
        ether ee:99:c7:4b:23:e2  txqueuelen 1000  (Ethernet)
        RX packets 2321266  bytes 571440099 (544.9 MiB)
        RX errors 0  dropped 30683  overruns 0  frame 0
        TX packets 468692  bytes 53519750 (51.0 MiB)
        TX errors 0  dropped 0 overruns 0  carrier 0  collisions 0
3. 设置最大传输单元
设置能通过的最大数据包大小为 1500 bytes
fconfig eth0 mtu 1500
4. 启用和关闭arp协议
对eth0网卡启用和关闭arp协议
ifconfig eth0 arp    #开启网卡eth0 的arp协议
ifconfig eth0 -arp   #关闭网卡eth0 的arp协议
5. 查看所有已激活网卡信息
使用ifconfig命令显示所有已激活网卡信息
[root@docker ~]# ifconfig
docker0: flags=4099<UP,BROADCAST,MULTICAST>  mtu 1500
        inet 172.17.0.1  netmask 255.255.0.0  broadcast 172.17.255.255
        ether 02:42:fe:57:e3:ac  txqueuelen 0  (Ethernet)
        RX packets 0  bytes 0 (0.0 B)
        RX errors 0  dropped 0  overruns 0  frame 0
        TX packets 0  bytes 0 (0.0 B)
        TX errors 0  dropped 0 overruns 0  carrier 0  collisions 0

eth0: flags=4163<UP,BROADCAST,RUNNING,MULTICAST>  mtu 1500
        inet 192.168.3.127  netmask 255.255.255.0  broadcast 192.168.3.255
        inet6 fd58:bc95:d4fb::83b  prefixlen 128  scopeid 0x0<global>
        inet6 fe80::3bde:d1ba:1b78:4dbd  prefixlen 64  scopeid 0x20<link>
        inet6 fd58:bc95:d4fb:0:ff42:9e46:82f5:7a5f  prefixlen 64  scopeid 0x0<global>
        ether ee:99:c7:4b:23:e2  txqueuelen 1000  (Ethernet)
        RX packets 2482  bytes 445608 (435.1 KiB)
        RX errors 0  dropped 39  overruns 0  frame 0
        TX packets 1529  bytes 391681 (382.5 KiB)
        TX errors 0  dropped 0 overruns 0  carrier 0  collisions 0

lo: flags=73<UP,LOOPBACK,RUNNING>  mtu 65536
        inet 127.0.0.1  netmask 255.0.0.0
        inet6 ::1  prefixlen 128  scopeid 0x10<host>
        loop  txqueuelen 1000  (Local Loopback)
        RX packets 14  bytes 2683 (2.6 KiB)
        RX errors 0  dropped 0  overruns 0  frame 0
        TX packets 14  bytes 2683 (2.6 KiB)
        TX errors 0  dropped 0 overruns 0  carrier 0  collisions 0
6. 查看所有网卡网卡信息
查看所有网卡(包括未激活)网卡信息
[root@docker ~]# ifconfig  -a
docker0: flags=4099<UP,BROADCAST,MULTICAST>  mtu 1500
        inet 172.17.0.1  netmask 255.255.0.0  broadcast 172.17.255.255
        ether 02:42:fe:57:e3:ac  txqueuelen 0  (Ethernet)
        RX packets 0  bytes 0 (0.0 B)
        RX errors 0  dropped 0  overruns 0  frame 0
        TX packets 0  bytes 0 (0.0 B)
        TX errors 0  dropped 0 overruns 0  carrier 0  collisions 0

eth0: flags=4163<UP,BROADCAST,RUNNING,MULTICAST>  mtu 1500
        inet 192.168.3.127  netmask 255.255.255.0  broadcast 192.168.3.255
        inet6 fd58:bc95:d4fb::83b  prefixlen 128  scopeid 0x0<global>
        inet6 fe80::3bde:d1ba:1b78:4dbd  prefixlen 64  scopeid 0x20<link>
        inet6 fd58:bc95:d4fb:0:ff42:9e46:82f5:7a5f  prefixlen 64  scopeid 0x0<global>
        ether ee:99:c7:4b:23:e2  txqueuelen 1000  (Ethernet)
        RX packets 2579  bytes 454207 (443.5 KiB)
        RX errors 0  dropped 41  overruns 0  frame 0
        TX packets 1553  bytes 395235 (385.9 KiB)
        TX errors 0  dropped 0 overruns 0  carrier 0  collisions 0

lo: flags=73<UP,LOOPBACK,RUNNING>  mtu 65536
        inet 127.0.0.1  netmask 255.0.0.0
        inet6 ::1  prefixlen 128  scopeid 0x10<host>
        loop  txqueuelen 1000  (Local Loopback)
        RX packets 14  bytes 2683 (2.6 KiB)
        RX errors 0  dropped 0  overruns 0  frame 0
        TX packets 14  bytes 2683 (2.6 KiB)
        TX errors 0  dropped 0 overruns 0  carrier 0  collisions 0
五、配置IP地址
1. 设置网卡的IP地址
对eth0物理网卡配置IP地址。注意ssh连接时,设置后立即生效,单网卡情况下会断开连接。此设置是临时生效,重启服务器后,网卡恢复为原来的IP地址。
ifconfig eth0 192.168.200.200 netmask 255.255.255.0 broadcast 192.168.200.255
2. 新增网卡的IP地址
对网卡eth0新增IP,临时生效。
[root@docker ~]# ifconfig eth0 add 192.168.200.200 netmask 255.255.255.0
[root@docker ~]# ifconfig
docker0: flags=4099<UP,BROADCAST,MULTICAST>  mtu 1500
        inet 172.17.0.1  netmask 255.255.0.0  broadcast 172.17.255.255
        ether 02:42:dc:0d:79:4b  txqueuelen 0  (Ethernet)
        RX packets 0  bytes 0 (0.0 B)
        RX errors 0  dropped 0  overruns 0  frame 0
        TX packets 0  bytes 0 (0.0 B)
        TX errors 0  dropped 0 overruns 0  carrier 0  collisions 0

eth0: flags=4163<UP,BROADCAST,RUNNING,MULTICAST>  mtu 1500
        inet 192.168.3.127  netmask 255.255.255.0  broadcast 192.168.3.255
        inet6 fd58:bc95:d4fb::83b  prefixlen 128  scopeid 0x0<global>
        inet6 fe80::3bde:d1ba:1b78:4dbd  prefixlen 64  scopeid 0x20<link>
        inet6 fd58:bc95:d4fb:0:ff42:9e46:82f5:7a5f  prefixlen 64  scopeid 0x0<global>
        ether ee:99:c7:4b:23:e2  txqueuelen 1000  (Ethernet)
        RX packets 1341  bytes 327185 (319.5 KiB)
        RX errors 0  dropped 21  overruns 0  frame 0
        TX packets 1253  bytes 362959 (354.4 KiB)
        TX errors 0  dropped 0 overruns 0  carrier 0  collisions 0

eth0:0: flags=4163<UP,BROADCAST,RUNNING,MULTICAST>  mtu 1500
        inet 192.168.200.200  netmask 255.255.255.0  broadcast 192.168.3.255
        ether ee:99:c7:4b:23:e2  txqueuelen 1000  (Ethernet)

lo: flags=73<UP,LOOPBACK,RUNNING>  mtu 65536
        inet 127.0.0.1  netmask 255.0.0.0
        inet6 ::1  prefixlen 128  scopeid 0x10<host>
        loop  txqueuelen 1000  (Local Loopback)
        RX packets 28  bytes 4337 (4.2 KiB)
        RX errors 0  dropped 0  overruns 0  frame 0
        TX packets 28  bytes 4337 (4.2 KiB)
        TX errors 0  dropped 0 overruns 0  carrier 0  collisions 0
3. 删除网卡的IP地址
删除网卡的IP地址,临时生效。
[root@docker ~]# ifconfig eth0 del  192.168.200.200 netmask 255.255.255.0
[root@docker ~]# ifconfig
docker0: flags=4099<UP,BROADCAST,MULTICAST>  mtu 1500
        inet 172.17.0.1  netmask 255.255.0.0  broadcast 172.17.255.255
        ether 02:42:dc:0d:79:4b  txqueuelen 0  (Ethernet)
        RX packets 0  bytes 0 (0.0 B)
        RX errors 0  dropped 0  overruns 0  frame 0
        TX packets 0  bytes 0 (0.0 B)
        TX errors 0  dropped 0 overruns 0  carrier 0  collisions 0

eth0: flags=4163<UP,BROADCAST,RUNNING,MULTICAST>  mtu 1500
        inet 192.168.3.127  netmask 255.255.255.0  broadcast 192.168.3.255
        inet6 fd58:bc95:d4fb::83b  prefixlen 128  scopeid 0x0<global>
        inet6 fe80::3bde:d1ba:1b78:4dbd  prefixlen 64  scopeid 0x20<link>
        inet6 fd58:bc95:d4fb:0:ff42:9e46:82f5:7a5f  prefixlen 64  scopeid 0x0<global>
        ether ee:99:c7:4b:23:e2  txqueuelen 1000  (Ethernet)
        RX packets 1547  bytes 344429 (336.3 KiB)
        RX errors 0  dropped 23  overruns 0  frame 0
        TX packets 1359  bytes 374005 (365.2 KiB)
        TX errors 0  dropped 0 overruns 0  carrier 0  collisions 0

lo: flags=73<UP,LOOPBACK,RUNNING>  mtu 65536
        inet 127.0.0.1  netmask 255.0.0.0
        inet6 ::1  prefixlen 128  scopeid 0x10<host>
        loop  txqueuelen 1000  (Local Loopback)
        RX packets 28  bytes 4337 (4.2 KiB)
        RX errors 0  dropped 0  overruns 0  frame 0
        TX packets 28  bytes 4337 (4.2 KiB)
        TX errors 0  dropped 0 overruns 0  carrier 0  collisions 0
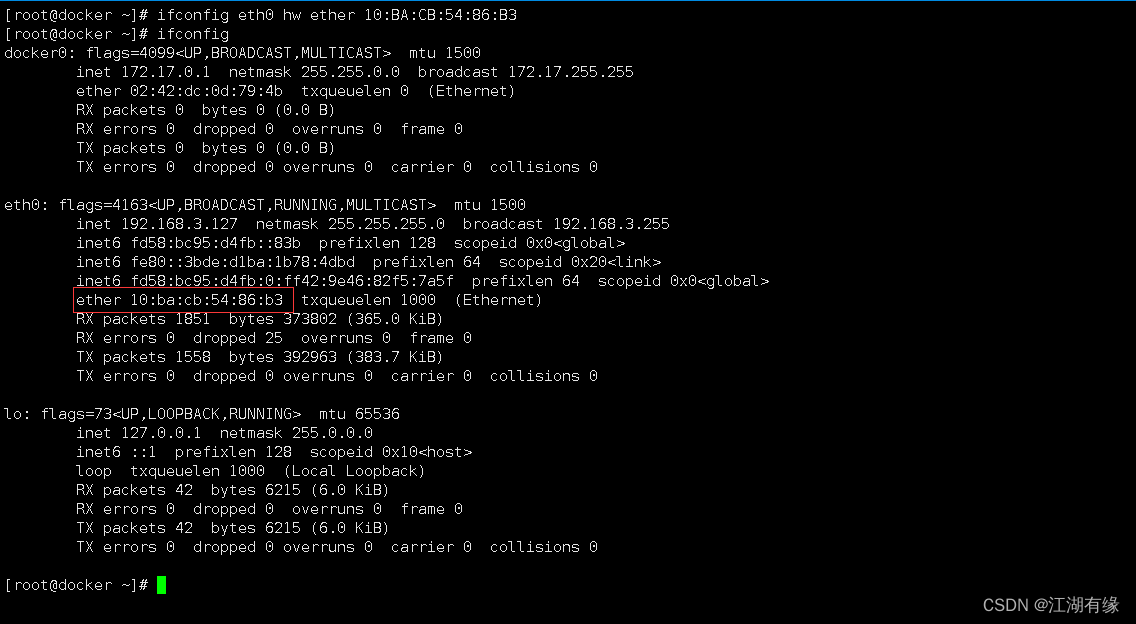
4. 修改MAC地址
用ifconfig修改MAC地址,临时生效。
ifconfig eth0 hw ether 10:BA:CB:54:86:B3


 5901
5901

 被折叠的 条评论
为什么被折叠?
被折叠的 条评论
为什么被折叠?
 到【灌水乐园】发言


