


JDBC
1.JDBC入门
1.1 客户端操作MySQL数据库的方式:
1.1.1 什么是JDBC
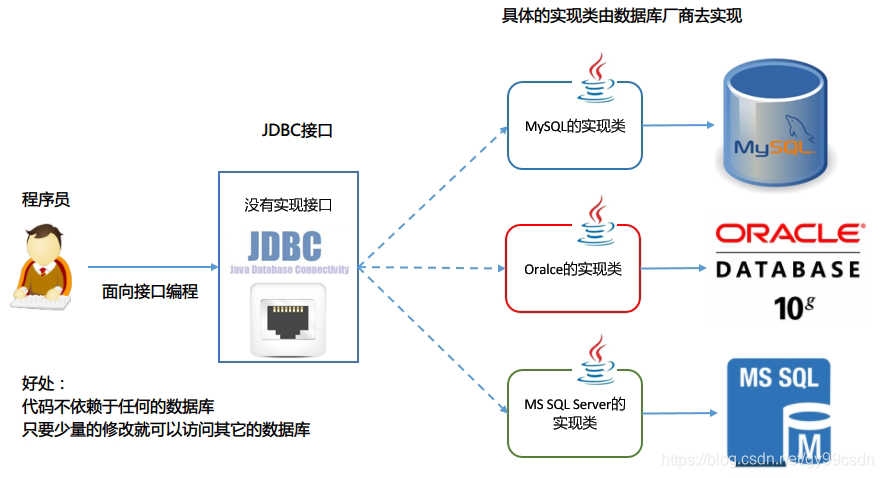
JDBC规范定义接口,具体的实现由各大数据库厂商来实现。
JDBC是Java访问数据库的标准规范,真正怎么操作数据库还需要具体的实现类,也就是数据库驱动。每个数据库厂商根据自家数据库的通信格式编写好自己数据库的驱动。所以我们只需要会调用JDBC接口中的方法即可,数据库驱动由数据库厂商提供。
使用JDBC的好处:
- 程序员如果要开发访问数据库的程序,只需要会调用JDBC接口中的方法即可,不用关注类是如何实现的。
- 使用同一套Java代码,进行少量的修改就可以访问其他JDBC支持的数据库
1.1.2 使用JDBC开发使用到的包:

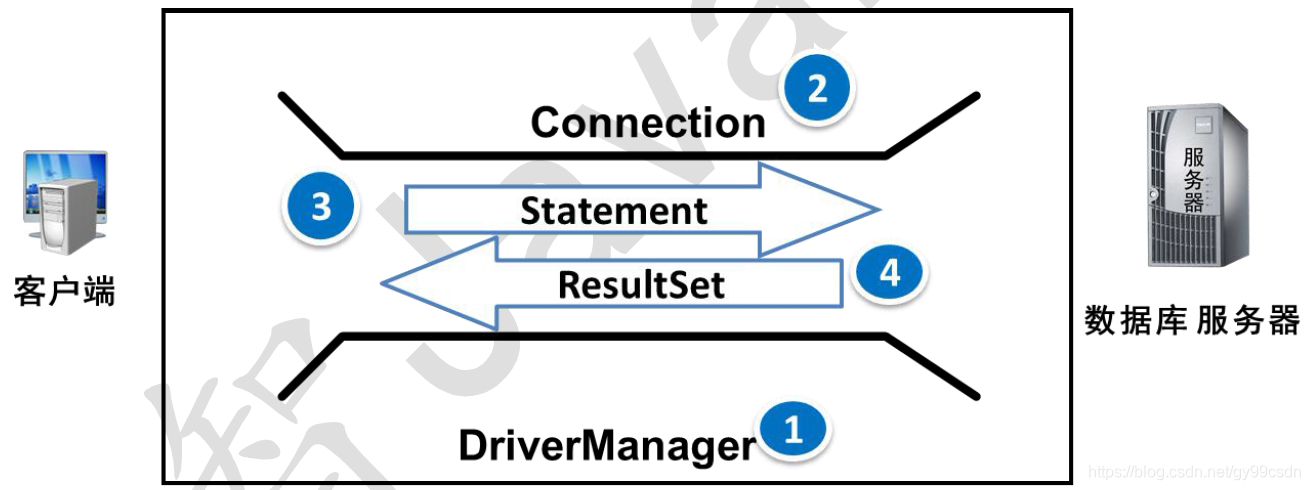
1.2 JDBC的核心API
| 接口或类 | 作用 |
|---|---|
| DriverManager类 | (1)管理和注册数据库驱动 (2)得到数据库连接对象 |
| Connection接口 | 一个连接对象,可用于创建Statement和PreparedStatement对象 |
| Statement接口 | 一个SQL语句对象,用于将SQL语句发送给数据库服务器。 |
| PreparedStatemen接口 | 一个SQL语句对象,是Statement的子接口 |
| ResultSet接口 | 用于封装数据库查询的结果集,返回给客户端Java程序 |
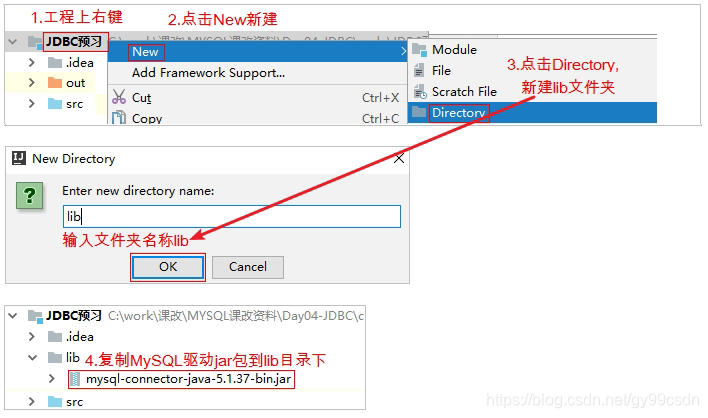
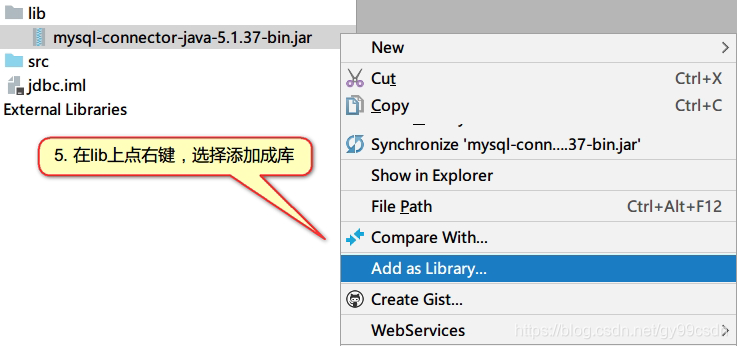
1.3 导入驱动Jar包
1.4 加载和注册驱动
| 加载和注册驱动的方法 | 描述 |
|---|---|
| Class.forName(数据库驱动实现类) | 加载和注册数据库驱动,数据库驱动由mysql厂商 |
“com.mysql.jdbc.Driver”
为什么这样可以注册驱动?
public class Demo1 { public static void main(String[] args) throws ClassNotFoundException {
//抛出类找不到的异常,注册数据库驱动 Class.forName("com.mysql.jdbc.Driver"); } }
com.mysql.jdbc.Driver源代码:
// Driver接口,所有数据库厂商必须实现的接口,表示这是一个驱动类。
public class Driver implements java.sql.Driver { public Driver() throws SQLException { } static { try { DriverManager.registerDriver(new Driver()); //注册数据库驱动 } catch (SQLException var1) { throw new RuntimeException("Can't register driver!"); } } }
注:从JDBC3开始,目前已经普遍使用的版本。可以不用注册驱动而直接使用。Class.forName这句话可以省略。
2.DriverManager类
2.1 DriverManager作用:
1)管理和注册驱动
2)创建数据库的连接
2.2 类中的方法:
| DriverManager类中的静态方法 | 描述 |
|---|---|
| Connection getConnection (String url, String user, String password) | 通过连接字符串,用户名,密码来得到数据库的连接对象 |
“com.mysql.jdbc.Driver”
Connection getConnection (String url, Properties info) | 通过连接字符串,属性对象来得到连接对象
2.3 使用JDBC连接数据库的四个参数:
| JDBC连接数据库的四个参数 | 说明 |
|---|---|
| 用户名 | 登录的用户名 |
| 密码 | 登录的密码 |
| 连接字符串URL | 不同的数据库URL是不同的,mysql的写法jdbc:mysql://localhost:3306/数据库[?参数名=参数值] |
| 驱动类的字符串名 | com.mysql.jdbc.Driver |
2.4 连接数据库的URL地址格式:
协议名:子协议://服务器名或IP地址:端口号/数据库名?参数=参数值
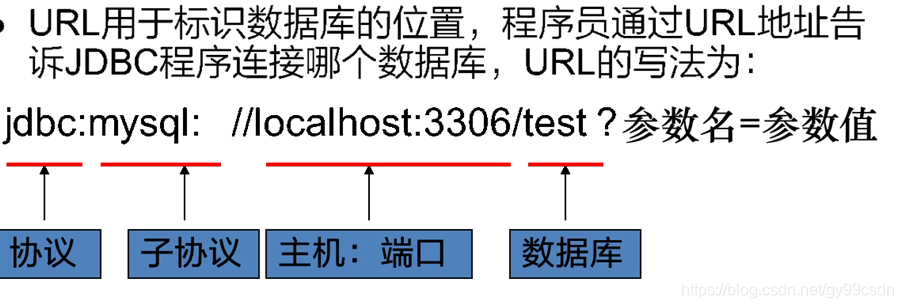
MySQL中可以简写:
前提:必须是本地服务器,端口号是3306
jdbc:mysql:///数据库名
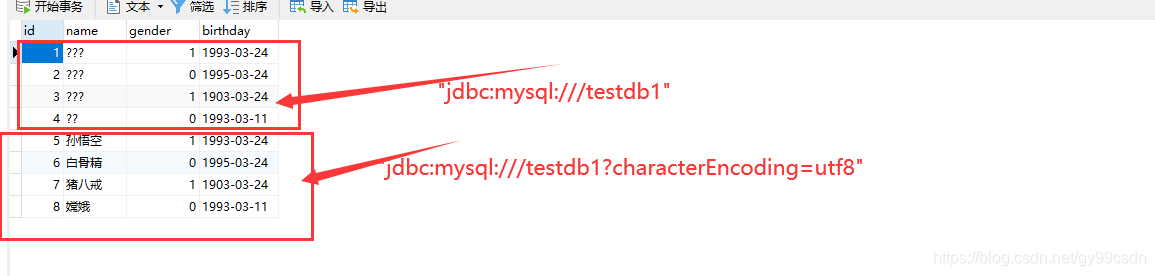
乱码的处理:
如果数据库出现乱码,可以指定参数: ?characterEncoding=utf8,表示让数据库以UTF-8编码来处理数据。
jdbc:mysql://localhost:3306/数据库?characterEncoding=utf8
2.5 案例:得到MySQL的数据库连接对象
1)使用用户名、密码、URL得到连接对象
public class Demo1 {
    public static void main(String[] args) throws SQLException {
        String url="jdbc:mysql://localhost:3306/testdb1";
        //使用用户名、密码、URL得到连接对象
        Connection connection= DriverManager.getConnection(url,"root","123456");
        //com.mysql.jdbc.JDBC4Connection@68de145
        System.out.println(connection);
    }
}

2)使用属性文件和url得到连接对象
public class Demo2 {
    public static void main(String[] args) throws SQLException {
        //url 连接字符串
        String url = "jdbc:mysql://localhost:3306/testdb1";
         //属性对象
        Properties properties = new Properties();
        //把用户名和密码放在properties对象中
        properties.setProperty("user","root");
        properties.setProperty("password","123456");
        Connection connection = DriverManager.getConnection(url, properties);
        System.out.println(connection);
    }

}

3.Connection接口:
3.1 Connection作用:
Connection接口,具体的实现类由数据库的厂商实现,代表一个连接对象。
3.2 Connection方法:
| Connection接口中的方法 | 描述 |
|---|---|
| Statement createStatement() | 创建一条SQL语句对象 |
4.Statement接口
4.1 JDBC访问数据库的步骤
- 注册和加载驱动(可以省略)
- 获取连接
- Connection获取Statement对象
- 使用Statement对象执行SQL语句
- 返回结果集
- 释放资源
4.2 Statement作用:
代表一条语句对象,用于发送SQL语句给服务器,用于执行静态 SQL 语句并返回它所生成结果的对象。
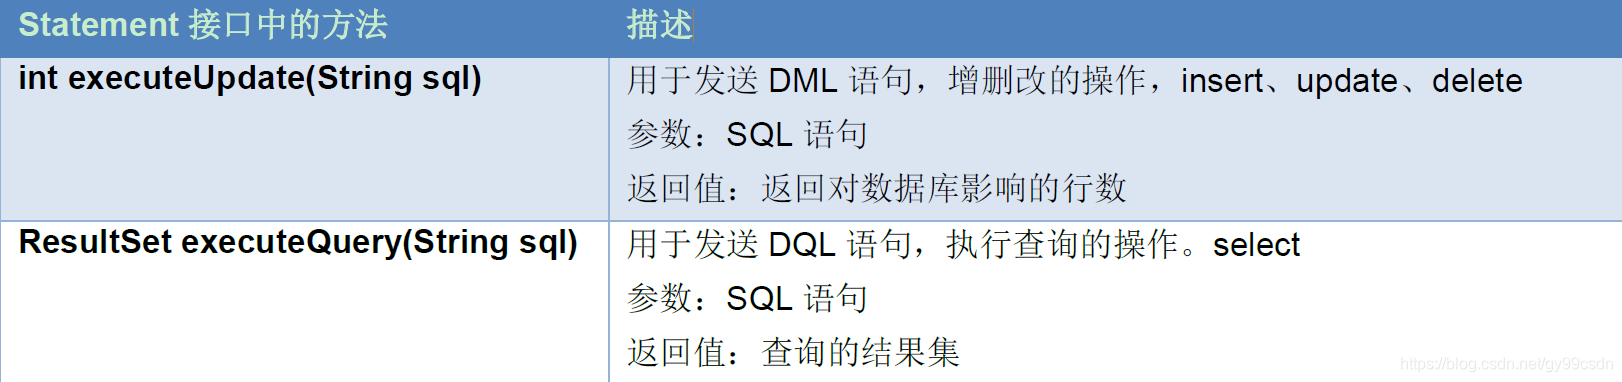
4.3 Statement中的方法:
4.4 释放资源
- 需要释放的对象:ResultSet结果集,Statement语句,Connection连接
- 释放原则:先开的后关,后开的先关。ResultSet --> Statement --> Connection
- 放在哪个代码块中:finally块
4.5 执行DDL操作
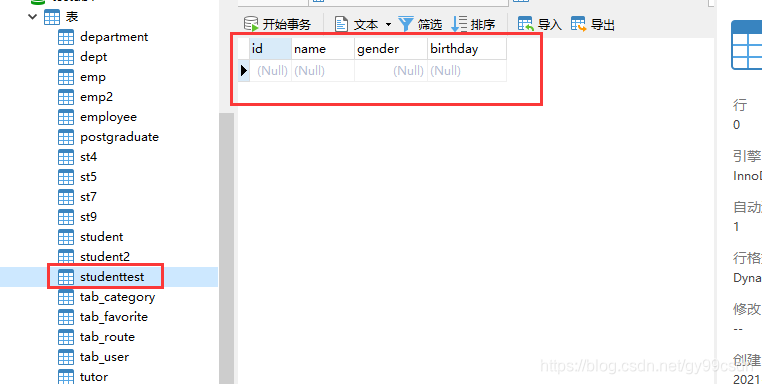
需求:使用JDBC在MySQL的数据库中创建一张学生表
public class Demo3DDL {
    public static void main(String[] args)  {
        //1.创建连接
        Connection connection=null;
        Statement statement=null;
        Connection conn = null;
        try {
            conn = DriverManager.getConnection("jdbc:mysql:///testdb1", "root", "123456");
            //2.通过连接对象得到语句对象
            statement=conn.createStatement();
            //3.通过语句对象发送SQL语句给服务器
            //4.执行SQL
            statement.executeUpdate("create table StudenTtest (id int PRIMARY key auto_increment, " +
                    "name varchar(20) not null, gender boolean, birthday date)");
            //返回影响行数(DDL没有返回值)
            System.out.println("创建表成功");
        } catch (SQLException e) {
            e.printStackTrace();
        }
        //释放资源
        finally {
            //关闭之前要先判断
            if (statement!=null){
                try {
                    statement.close();
                } catch (SQLException e) {
                    e.printStackTrace();
                }
            }
        }

    }
}

4.6 执行DML操作
需求:向学生表中添加4条记录,主键是自动增长
步骤:
1)创建连接对象
2)创建Statement语句对象
3)执行SQL语句:executeUpdate(sql)
4)返回影响的行数
5)释放资源
public class Demo4DML {
    public static void main(String[] args) throws SQLException {
// 1) 创建连接对象
        Connection connection = DriverManager.getConnection("jdbc:mysql:///testdb1", "root", "123456");
// 2) 创建Statement语句对象
        Statement statement = connection.createStatement();
// 3) 执行SQL语句:executeUpdate(sql)
        int count = 0;
// 4) 返回影响的行数
        count += statement.executeUpdate("insert into studenttest values(null, '孙悟空', 1, '1993-03-24')");
        count += statement.executeUpdate("insert into studenttest values(null, '白骨精', 0, '1995-03-24')");
        count += statement.executeUpdate("insert into studenttest values(null, '猪八戒', 1, '1903-03-24')");
        count += statement.executeUpdate("insert into studenttest values(null, '嫦娥', 0, '1993-03-11')");
        System.out.println("插入了" + count + "条记录");
// 5) 释放资源
        statement.close();
        connection.close();
    }
}

4.7 执行DQL操作
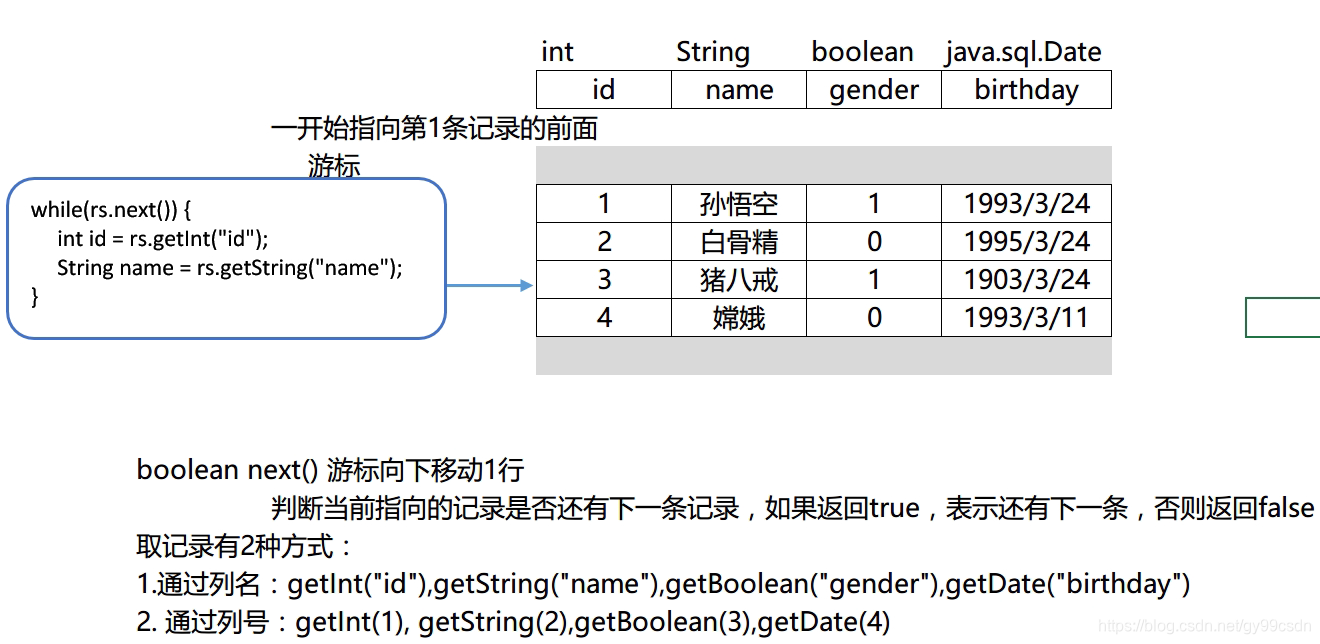
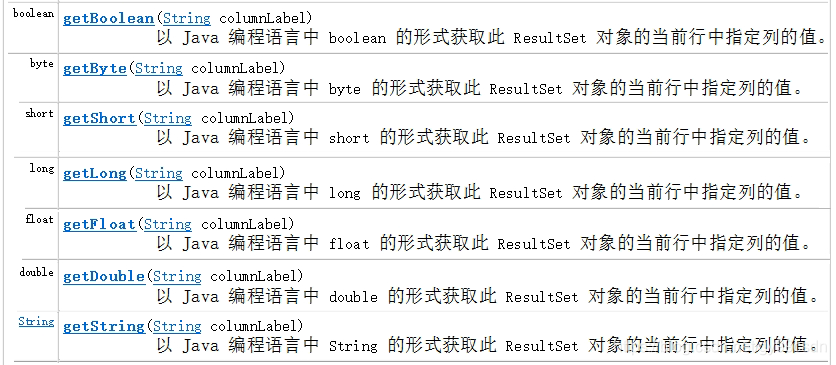
4.7.1 ResultSet接口:
作用:封装数据库查询的结果集,对结果集进行遍历,取出每一条记录。

4.7.2 常用数据类型转换表
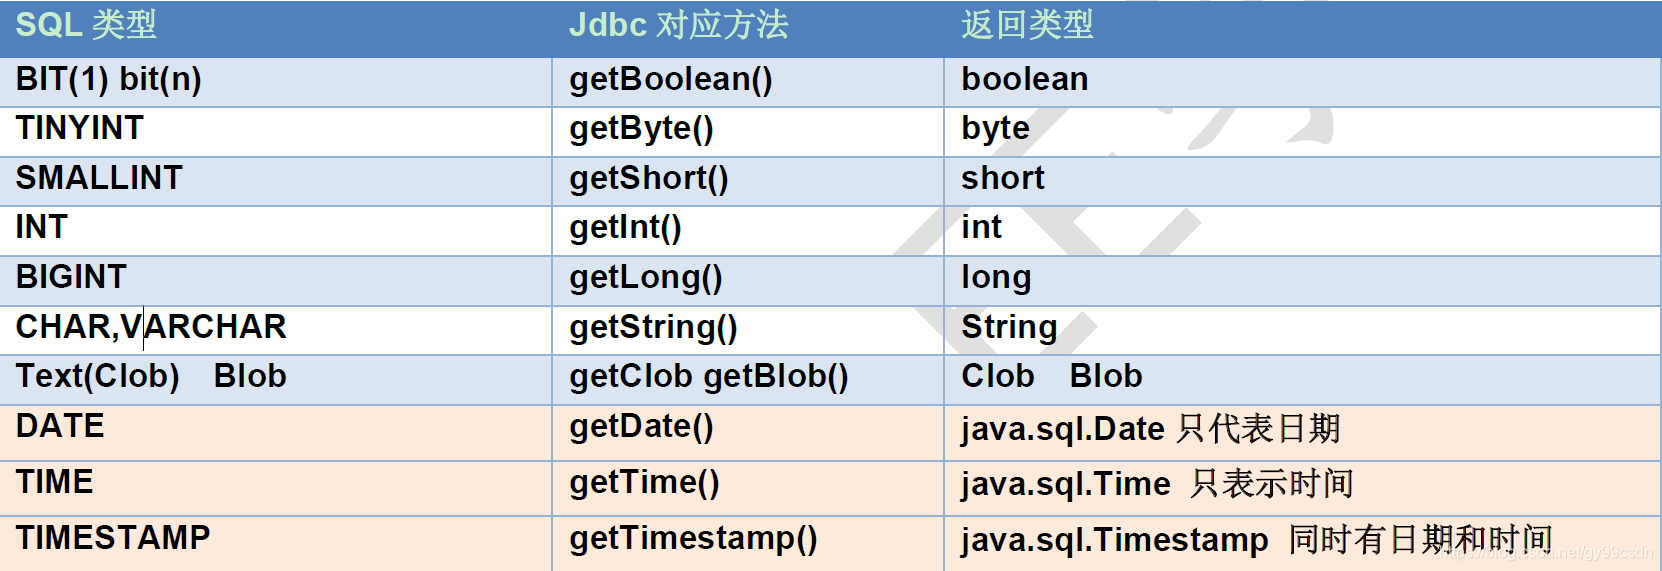
java.sql.Date、Time、Timestamp(时间戳),三个共同父类是:java.util.Date
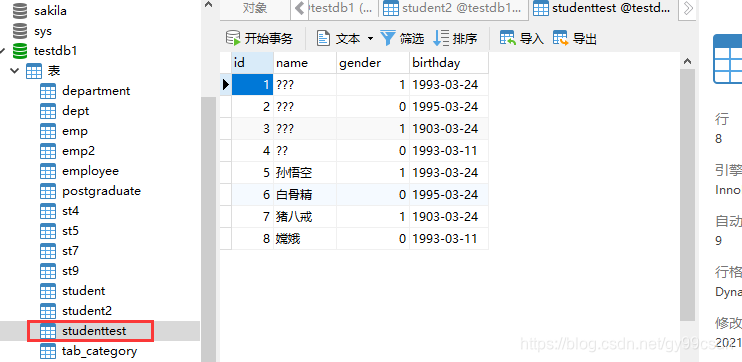
4.7.3 需求:确保数据库中有3条以上的记录,查询所有的学员信息
步骤:
1)得到连接对象
2)得到语句对象
3)执行SQL语句得到结果集ResultSet对象
4)循环遍历取出每一条记录
5)输出的控制台上
6)释放资源
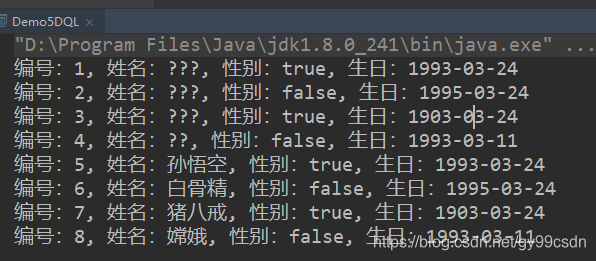
public class Demo5DQL {
    public static void main(String[] args) throws SQLException {
//1) 得到连接对象
        Connection connection = DriverManager.getConnection("jdbc:mysql://localhost:3306/testdb1","root","123456");
//2) 得到语句对象
        Statement statement = connection.createStatement();
//3) 执行SQL语句得到结果集ResultSet对象
        ResultSet rs = statement.executeQuery("select * from studenttest");
//4) 循环遍历取出每一条记录
        while(rs.next()) {
            int id = rs.getInt("id");
            String name = rs.getString("name");
            boolean gender = rs.getBoolean("gender");
            Date birthday = rs.getDate("birthday");
//5) 输出的控制台上
            System.out.println("编号:" + id + ", 姓名:" + name + ", 性别:" + gender + ", 生日:" + birthday);
        }
//6) 释放资源
        rs.close();
        statement.close();
        connection.close();
    }
}
4.7.4 需求:确保数据库中有3条以上的记录,查询所有的学员信息
- 如果光标在第一行之前,使用rs.getXX()获取列值,报错:Before start of result set
- 如果光标在最后一行之后,使用rs.getXX()获取列值,报错:After end of result set
- 使用完毕以后要关闭结果集ResultSet,再关闭Statement,再关闭Connection
5.数据库工具类JdbcUtils
5.1 需求:
上面写的代码中出现了很多重复的代码,可以把这些公共代码抽取出来。
5.2 创建类JdbcUtil包含3个方法:
- 可以把几个字符串定义成常量:用户名,密码,URL,驱动类
- 得到数据库的连接:getConnection()
- 关闭所有打开的资源:
close(Connection conn, Statement stmt),close(Connection conn, Statement stmt, ResultSet rs)
5.3 案例:用户登陆
1)有一张用户表
2)添加几条用户记录
create table user (
id int primary key auto_increment,
name varchar(20),
password varchar(20)
)
insert into user values (null,'jack','123'),(null,'rose','456');
-- 登录, SQL中大小写不敏感
select * from user where name='JACK' and password='123';
-- 登录失败
select * from user where name='JACK' and password='333';

3)使用Statement字符串拼接的方式实现用户的登录, 用户在控制台上输入用户名和密码。
步骤:
1)得到用户从控制台上输入的用户名和密码来查询数据库
2)写一个登录的方法
a)通过工具类得到连接
b)创建语句对象,使用拼接字符串的方式生成SQL语句
c)查询数据库,如果有记录则表示登录成功,否则登录失败
d)释放资源
public class Demo6Login {
//从控制台上输入的用户名和密码
public static void main(String[] args) {
Scanner sc = new Scanner(System.in);
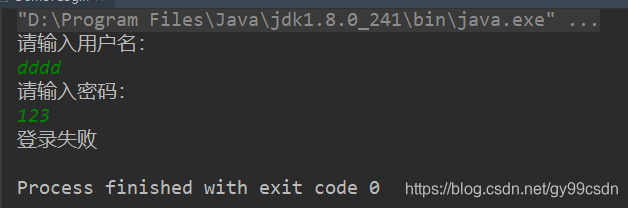
System.out.println("请输入用户名:");
String name = sc.nextLine();
System.out.println("请输入密码:");
String password = sc.nextLine();
login(name, password);
}
/**
* 登录的方法
*/
public static void login(String name,String password){
//通过工具类得到连接
Connection connection=null;
Statement statement=null;
ResultSet rs=null;
try {
connection = JdbcUtils.getConnection();
//创建语句对象,使用拼接字符串的方式生成SQL语句
statement=connection.createStatement();
//查询数据库,如果有记录则表示登录成功,否则登录失败
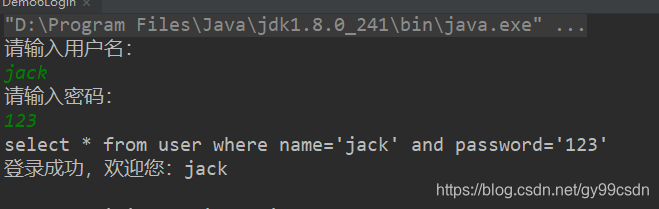
String sql = "select * from user where name='" + name + "' and password='" + password + "'";
System.out.println(sql);
rs=statement.executeQuery(sql);
if (rs.next()) {
System.out.println("登录成功,欢迎您:" + name);
} else {
System.out.println("登录失败");
}
} catch (SQLException e) {
e.printStackTrace();
}finally {
//d) 释放资源
JdbcUtils.close(connection, statement, rs);
}
}
}
5.4 SQL注入问题
当我们输入以下密码,我们发现我们账号和密码都不对竟然登录成功了
请输入用户名:
newboy
请输入密码:
a' or '1'='1
select * from user where name='newboy' and password='a' or '1'='1'
登录成功,欢迎您:newboy
问题分析:
select * from user where name=‘newboy’ and password=‘a’ or ‘1’=‘1’
name=‘newboy’ and password=‘a’ 为假
‘1’=‘1’ 真
相当于
select * from user where true; 查询了所有记录
我们让用户输入的密码和SQL语句进行字符串拼接。用户输入的内容作为了SQL语句语法的一部分,改变了原有SQL真正的意义,以上问题称为SQL注入。要解决SQL注入就不能让用户输入的密码和我们的SQL语句进行简单的字符串拼接。
6.PreparedStatement接口
6.1 继承结构与作用:
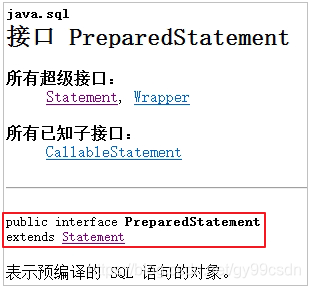
PreparedStatement是Statement接口的子接口,继承于父接口中所有的方法。它是一个预编译的SQL语句
6.2 PreparedSatement的执行原理
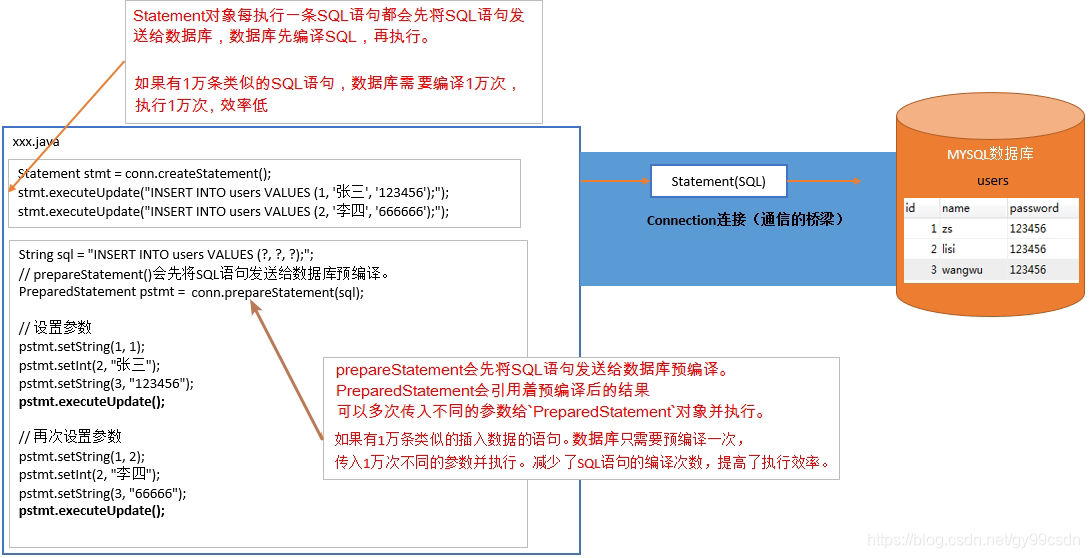
1)因为有预先编译的功能,提高SQL的执行效率。
2)可以有效的防止SQL注入的问题,安全性更高。
6.3 Connection创建PreparedStatement对象
| Connection接口中的方法 | 描述 |
|---|---|
| PreparedStatement prepareStatement(String sql) | 指定预编译的SQL语句,SQL语句中使用占位符?创建一个语句对象 |
6.4 PreparedStatement接口中的方法:
| PreparedStatement接口中的方法 | 描述 |
|---|---|
| int executeUpdate() | 执行DML,增删改的操作,返回影响的行数。 |
| ResultSet executeQuery() | 执行DQL,查询的操作,返回结果集 |
6.5 PreparedSatement的好处
- prepareStatement()会先将SQL语句发送给数据库预编译。PreparedStatement会引用着预编译后的结果。可以多次传入不同的参数给PreparedStatement对象并执行。减少SQL编译次数,提高效率。
- 安全性更高,没有SQL注入的隐患。
- 提高了程序的可读性
6.6 使用PreparedStatement的步骤:
- 编写SQL语句,未知内容使用?占位:“SELECT * FROM user WHERE name=? AND password=?”;
- 获得PreparedStatement对象
- 设置实际参数:setXxx(占位符的位置, 真实的值)
- 执行参数化SQL语句
- 关闭资源
| PreparedStatement中设置参数的方法 | 描述 |
|---|---|
| void setDouble(int parameterIndex, double x) | 将指定参数设置为给定 Java double 值。 |
| void setFloat(int parameterIndex, float x) | 将指定参数设置为给定 Java REAL 值。 |
| void setInt(int parameterIndex, int x) | 将指定参数设置为给定 Java int 值。 |
| void setLong(int parameterIndex, long x) | 将指定参数设置为给定 Java long 值。 |
| void setObject(int parameterIndex, Object x) | 使用给定对象设置指定参数的值。 |
| void setString(int parameterIndex, String x) | 将指定参数设置为给定 Java String 值。 |
使用PreparedStatement改写上面的登录程序,看有没有SQL注入的情况
public class Demo7Login {
//从控制台上输入的用户名和密码
public static void main(String[] args) throws SQLException {
Scanner sc = new Scanner(System.in);
System.out.println("请输入用户名:");
String name = sc.nextLine();
System.out.println("请输入密码:");
String password = sc.nextLine();
login(name, password);
}
/**
* 登录的方法
* @param name
}
* @param password
*/
private static void login(String name, String password) throws SQLException {
Connection connection = JdbcUtils.getConnection();
//写成登录SQL语句,没有单引号
String sql = "select * from user where name=? and password=?";
//得到语句对象
PreparedStatement ps = connection.prepareStatement(sql);
//设置参数
ps.setString(1, name);
ps.setString(2,password);
ResultSet resultSet = ps.executeQuery();
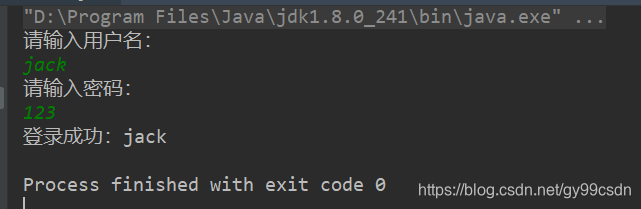
if (resultSet.next()) {
System.out.println("登录成功:" + name);
}
else {
System.out.println("登录失败");
}
//释放资源,子接口直接给父接口
JdbcUtils.close(connection,ps,resultSet);
}
}
6.7 表与类的关系
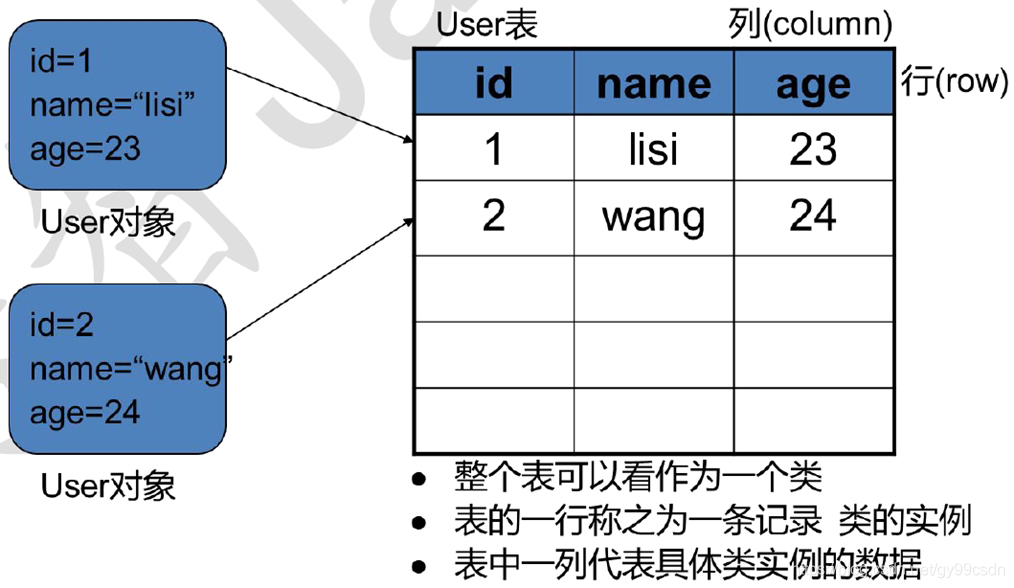
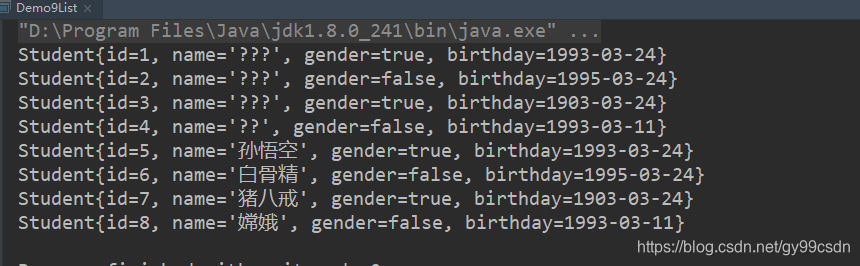
6.7.1 案例:使用PreparedStatement查询一条数据,封装成一个学生Student对象。循环输出每条数据。
public class Demo9List {
    public static void main(String[] args) throws SQLException {
//创建一个集合
        List<Student> students = new ArrayList<>();
        Connection connection = JdbcUtils.getConnection();
        PreparedStatement ps = connection.prepareStatement("select * from studenttest");
//没有参数替换
        ResultSet resultSet = ps.executeQuery();
        while(resultSet.next()) {
//每次循环是一个学生对象
            Student student = new Student();
//封装成一个学生对象
            student.setId(resultSet.getInt("id"));
            student.setName(resultSet.getString("name"));
            student.setGender(resultSet.getBoolean("gender"));
            student.setBirthday(resultSet.getDate("birthday"));
//把数据放到集合中
            students.add(student);
        }
//关闭连接
        JdbcUtils.close(connection,ps,resultSet);
//使用数据
        for (Student stu: students) {
            System.out.println(stu);
        }
    }
}
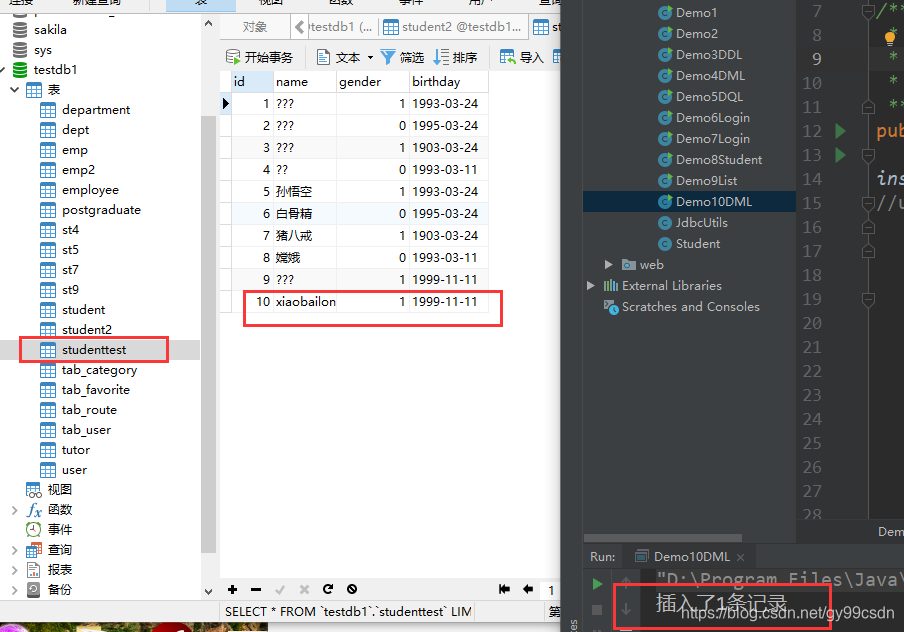
6.8 PreparedStatement执行DML操作
public class Demo10DML {
    public static void main(String[] args) throws SQLException {
//insert();
//update();
        delete();
    }
    //插入记录
    private static void insert() throws SQLException {
        Connection connection = JdbcUtils.getConnection();
        PreparedStatement ps = connection.prepareStatement("insert into studenttest values(null,?,?,?)");
        ps.setString(1,"小白龙");
        ps.setBoolean(2, true);
        ps.setDate(3,java.sql.Date.valueOf("1999-11-11"));
        int row = ps.executeUpdate();
        System.out.println("插入了" + row + "条记录");
        JdbcUtils.close(connection,ps);
    }
    //更新记录: 换名字和生日
    private static void update() throws SQLException {
        Connection connection = JdbcUtils.getConnection();
        PreparedStatement ps = connection.prepareStatement("update studenttest set name=?, birthday=? where id=?");
        ps.setString(1,"黑熊怪");
        ps.setDate(2,java.sql.Date.valueOf("1999-03-23"));
        ps.setInt(3,5);
        int row = ps.executeUpdate();
        System.out.println("更新" + row + "条记录");
        JdbcUtils.close(connection,ps);
    }
    //删除记录: 删除第5条记录
    private static void delete() throws SQLException {
        Connection connection = JdbcUtils.getConnection();
        PreparedStatement ps = connection.prepareStatement("delete from studenttest where id=?");
        ps.setInt(1,5);
        int row = ps.executeUpdate();
        System.out.println("删除了" + row + "条记录");
        JdbcUtils.close(connection,ps);
    }
}


 9993
9993

 被折叠的 条评论
为什么被折叠?
被折叠的 条评论
为什么被折叠?
 到【灌水乐园】发言


