


点击上方“芋道源码”,选择“设为星标”
管她前浪,还是后浪?
能浪的浪,才是好浪!
每天 8:55 更新文章,每天掉亿点点头发...
源码精品专栏
摘要: 原创出处 http://www.iocoder.cn/Apollo/config-service-config-query-api/ 「芋道源码」欢迎转载,保留摘要,谢谢!
1. 概述
2. ConfigController
2.1 构造方法
2.2 queryConfig
2.3 tryToGetClientIp
2.4 mergeReleaseConfigurations
3. ConfigService
3.1 AbstractConfigService
3.3 DefaultConfigService
3.4 ConfigServiceWithCache
4. ApolloConfig
666. 彩蛋
1. 概述
老艿艿:本系列假定胖友已经阅读过 《Apollo 官方 wiki 文档》 。
本文接 《Apollo 源码解析 —— Config Service 通知配置变化》 一文,分享 Config Service 配置读取的接口的实现。在上文,我们看到通知变化接口,仅返回通知相关的信息,而不包括配置相关的信息。所以 Config Service 需要提供配置读取的接口。
???? 为什么不在通知变化的同时,返回最新的配置信息呢?老艿艿请教了作者,下一篇文章进行分享。
OK,让我们开始看看具体的代码实现。
2. ConfigController
com.ctrip.framework.apollo.configservice.controller.ConfigController ,配置 Controller ,仅提供 configs/{appId}/{clusterName}/{namespace:.+} 接口,提供配置读取的功能。
2.1 构造方法
private static final Splitter X_FORWARDED_FOR_SPLITTER = Splitter.on(",").omitEmptyStrings().trimResults();

private static final Type configurationTypeReference = new TypeToken<Map<String, String>>() {}.getType();

@Autowired
private ConfigService configService;
@Autowired
private AppNamespaceServiceWithCache appNamespaceService;
@Autowired
private NamespaceUtil namespaceUtil;
@Autowired
private InstanceConfigAuditUtil instanceConfigAuditUtil;
@Autowired
private Gson gson
2.2 queryConfig
  1: @RequestMapping(value = "/{appId}/{clusterName}/{namespace:.+}", method = RequestMethod.GET)
  2: public ApolloConfig queryConfig(@PathVariable String appId, @PathVariable String clusterName,
  3:                                 @PathVariable String namespace,
  4:                                 @RequestParam(value = "dataCenter", required = false) String dataCenter,
  5:                                 @RequestParam(value = "releaseKey", defaultValue = "-1") String clientSideReleaseKey,
  6:                                 @RequestParam(value = "ip", required = false) String clientIp,
  7:                                 @RequestParam(value = "messages", required = false) String messagesAsString,
  8:                                 HttpServletRequest request, HttpServletResponse response) throws IOException {
  9:     String originalNamespace = namespace;
 10:     // 若 Namespace 名以 .properties 结尾,移除该结尾,并设置到 ApolloConfigNotification 中。例如 application.properties => application 。
 11:     // strip out .properties suffix
 12:     namespace = namespaceUtil.filterNamespaceName(namespace);
 13:     // 获得归一化的 Namespace 名字。因为,客户端 Namespace 会填写错大小写。
 14:     //fix the character case issue, such as FX.apollo <-> fx.apollo
 15:     namespace = namespaceUtil.normalizeNamespace(appId, namespace);
 16:
 17:     // 若 clientIp 未提交,从 Request 中获取。
 18:     if (Strings.isNullOrEmpty(clientIp)) {
 19:         clientIp = tryToGetClientIp(request);
 20:     }
 21:
 22:     // 解析 messagesAsString 参数,创建 ApolloNotificationMessages 对象。
 23:     ApolloNotificationMessages clientMessages = transformMessages(messagesAsString);
 24:
 25:     // 创建 Release 数组
 26:     List<Release> releases = Lists.newLinkedList();
 27:     // 获得 Namespace 对应的 Release 对象
 28:     String appClusterNameLoaded = clusterName;
 29:     if (!ConfigConsts.NO_APPID_PLACEHOLDER.equalsIgnoreCase(appId)) {
 30:         // 获得 Release 对象
 31:         Release currentAppRelease = configService.loadConfig(appId, clientIp, appId, clusterName, namespace, dataCenter, clientMessages);
 32:         if (currentAppRelease != null) {
 33:             // 添加到 Release 数组中。
 34:             releases.add(currentAppRelease);
 35:             // 获得 Release 对应的 Cluster 名字
 36:             // we have cluster search process, so the cluster name might be overridden
 37:             appClusterNameLoaded = currentAppRelease.getClusterName();
 38:         }
 39:     }
 40:     // 若 Namespace 为关联类型,则获取关联的 Namespace 的 Release 对象
 41:     // if namespace does not belong to this appId, should check if there is a public configuration
 42:     if (!namespaceBelongsToAppId(appId, namespace)) {
 43:         // 获得 Release 对象
 44:         Release publicRelease = this.findPublicConfig(appId, clientIp, clusterName, namespace, dataCenter, clientMessages);
 45:         // 添加到 Release 数组中
 46:         if (!Objects.isNull(publicRelease)) {
 47:             releases.add(publicRelease);
 48:         }
 49:     }
 50:     // 若获得不到 Release ,返回状态码为 404 的响应
 51:     if (releases.isEmpty()) {
 52:         response.sendError(HttpServletResponse.SC_NOT_FOUND, String.format("Could not load configurations with appId: %s, clusterName: %s, namespace: %s",
 53:                 appId, clusterName, originalNamespace));
 54:         Tracer.logEvent("Apollo.Config.NotFound", assembleKey(appId, clusterName, originalNamespace, dataCenter));
 55:         return null;
 56:     }
 57:
 58:     // 记录 InstanceConfig
 59:     auditReleases(appId, clusterName, dataCenter, clientIp, releases);
 60:
 61:     // 计算 Config Service 的合并 ReleaseKey
 62:     String mergedReleaseKey = releases.stream().map(Release::getReleaseKey).collect(Collectors.joining(ConfigConsts.CLUSTER_NAMESPACE_SEPARATOR));
 63:     // 对比 Client 的合并 Release Key 。若相等,说明没有改变,返回状态码为 302 的响应
 64:     if (mergedReleaseKey.equals(clientSideReleaseKey)) {
 65:         // Client side configuration is the same with server side, return 304
 66:         response.setStatus(HttpServletResponse.SC_NOT_MODIFIED);
 67:         Tracer.logEvent("Apollo.Config.NotModified", assembleKey(appId, appClusterNameLoaded, originalNamespace, dataCenter));
 68:         return null;
 69:     }
 70:
 71:     // 创建 ApolloConfig 对象
 72:     ApolloConfig apolloConfig = new ApolloConfig(appId, appClusterNameLoaded, originalNamespace, mergedReleaseKey);
 73:     // 合并 Release 的配置,并将结果设置到 ApolloConfig 中
 74:     apolloConfig.setConfigurations(mergeReleaseConfigurations(releases));
 75:
 76:     // 【TODO 6001】Tracer 日志
 77:     Tracer.logEvent("Apollo.Config.Found", assembleKey(appId, appClusterNameLoaded, originalNamespace, dataCenter));
 78:     return apolloConfig;
 79: }
GET
/configs/{appId}/{clusterName}/{namespace:.+}接口,指定 Namespace 的配置读取。在 《Apollo 官方文档 —— 其它语言客户端接入指南 —— 1.3 通过不带缓存的Http接口从Apollo读取配置》 中,有该接口的接口定义说明。clientSideReleaseKey请求参数,客户端侧的 Release Key ,用于和获得的 Release 的releaseKey对比,判断是否有配置更新。clientIp请求参数,客户端 IP ,用于灰度发布的功能。???? 本文会跳过和灰度发布相关的内容,后续文章单独分享。messagesAsString请求参数,客户端当前请求的 Namespace 的通知消息明细,在【第 23 行】中,调用#transformMessages(messagesAsString)方法,解析messagesAsString参数,创建 ApolloNotificationMessages 对象。在 《Apollo 源码解析 —— Config Service 通知配置变化》 中,我们已经看到通知变更接口返回的就包括 ApolloNotificationMessages 对象。#transformMessages(messagesAsString)方法,代码如下:ApolloNotificationMessages transformMessages(String messagesAsString) { ApolloNotificationMessages notificationMessages = null; if (!Strings.isNullOrEmpty(messagesAsString)) { try { notificationMessages = gson.fromJson(messagesAsString, ApolloNotificationMessages.class); } catch (Throwable ex) { Tracer.logError(ex); } } return notificationMessages; }第 12 行:调用
NamespaceUtil#filterNamespaceName(namespaceName)方法,若 Namespace 名以".properties"结尾,移除该结尾。第 15 行:调用
NamespaceUtil#normalizeNamespace(appId, originalNamespace)方法,获得归一化的 Namespace 名字。因为,客户端 Namespace 会填写错大小写。第 17 至 20 行:若客户端未提交
clientIp,调用#tryToGetClientIp(HttpServletRequest)方法,获取 IP 。详细解析,见 「2.3 tryToGetClientIp」 方法。========== 分割线 ==========
第 26 行:创建 Release 数组。
第 27 至 39 行:获得 Namespace 对应的最新的 Release 对象。
第 31 行:调用
ConfigService#loadConfig(appId, clientIp, appId, clusterName, namespace, dataCenter, clientMessages)方法,获得 Release 对象。详细解析,见 「3. ConfigService」 方法。第 34 行:添加到 Release 书中。
第 37 行:获得 Release 对应的 Cluster 名字。因为,在
ConfigService#loadConfig(appId, clientIp, appId, clusterName, namespace, dataCenter, clientMessages)方法中,会根据clusterName和dataCenter分别查询 Release 直到找到一个,所以需要根据结果的 Release 获取真正的 Cluster 名。
第 40 至 49 行:若 Namespace 为关联类型,则获取关联的 Namespace 的最新的 Release 对象。
在其内部,也是调用
ConfigService#loadConfig(appId, clientIp, appId, clusterName, namespace, dataCenter, clientMessages)方法,获得 Namespace 最新的 Release 对象。x
第 42 行:调用
#namespaceBelongsToAppId(appId, namespace)方法,判断 Namespace 非当前 App 下的,这是关联类型的前提。代码如下:private boolean namespaceBelongsToAppId(String appId, String namespaceName) { // Namespace 非 'application' ,因为每个 App 都有 // Every app has an 'application' namespace if (Objects.equals(ConfigConsts.NAMESPACE_APPLICATION, namespaceName)) { return true; } // App 编号非空 // if no appId is present, then no other namespace belongs to it if (ConfigConsts.NO_APPID_PLACEHOLDER.equalsIgnoreCase(appId)) { return false; } // 非当前 App 下的 Namespace AppNamespace appNamespace = appNamespaceService.findByAppIdAndNamespace(appId, namespaceName); return appNamespace != null; }第 44 行:调用
#findPublicConfig(...)方法,获得公用类型的 Namespace 的 Release 对象。代码如下:private Release findPublicConfig(String clientAppId, String clientIp, String clusterName, String namespace, String dataCenter, ApolloNotificationMessages clientMessages) { // 获得公用类型的 AppNamespace 对象 AppNamespace appNamespace = appNamespaceService.findPublicNamespaceByName(namespace); // 判断非当前 App 下的,那么就是关联类型。 // check whether the namespace's appId equals to current one if (Objects.isNull(appNamespace) || Objects.equals(clientAppId, appNamespace.getAppId())) { return null; } String publicConfigAppId = appNamespace.getAppId(); // 获得 Namespace 最新的 Release 对象 return configService.loadConfig(clientAppId, clientIp, publicConfigAppId, clusterName, namespace, dataCenter, clientMessages); }第 45 至 48 行:添加到 Release 数组中。
第 50 至 56 行:若获得不到 Release ,返回状态码为 404 的响应。
========== 分割线 ==========
第 59 行:调用
#auditReleases(...)方法,记录 InstanceConfig 。详细解析,见 《Apollo 源码解析 —— Config Service 记录 Instance》 。========== 分割线 ==========
第 62 行:计算 Config Service 的合并 ReleaseKey 。当有多个 Release 时,使用
"+"作为字符串的分隔。第 64 至 69 行:对比 Client 的合并 Release Key 。若相等,说明配置没有改变,返回状态码为 302 的响应。
========== 分割线 ==========
第 72 行:创建 ApolloConfig 对象。详细解析,见 「3. ApolloConfig」 方法。
第 74 行:调用
#mergeReleaseConfigurations(List<Release)方法,合并多个 Release 的配置集合,并将结果设置到 ApolloConfig 中。详细解析,见 「2.4 mergeReleaseConfigurations」 方法。第 77 行:【TODO 6001】Tracer 日志
第 78 行:返回 ApolloConfig 对象。
2.3 tryToGetClientIp
#tryToGetClientIp(HttpServletRequest) 方法,从请求中获取 IP 。代码如下:
private String tryToGetClientIp(HttpServletRequest request) {
    String forwardedFor = request.getHeader("X-FORWARDED-FOR");
    if (!Strings.isNullOrEmpty(forwardedFor)) {
        return X_FORWARDED_FOR_SPLITTER.splitToList(forwardedFor).get(0);
    }
    return request.getRemoteAddr();
}
关于
"X-FORWARDED-FOR"Header ,详细解析见 《HTTP 请求头中的 X-Forwarded-For》 。
2.4 mergeReleaseConfigurations
#mergeReleaseConfigurations(List<Release) 方法,合并多个 Release 的配置集合。代码如下:
Map<String, String> mergeReleaseConfigurations(List<Release> releases) {
    Map<String, String> result = Maps.newHashMap();
    // 反转 Release 数组,循环添加到 Map 中。
    for (Release release : Lists.reverse(releases)) {
        result.putAll(gson.fromJson(release.getConfigurations(), configurationTypeReference));
    }
    return result;
}
为什么要反转数组?因为关联类型的 Release 后添加到 Release 数组中。但是,App 下 的 Release 的优先级更高,所以进行反转。
3. ConfigService
com.ctrip.framework.apollo.configservice.service.config.ConfigService ,实现 ReleaseMessageListener 接口,配置 Service 接口。代码如下:
public interface ConfigService extends ReleaseMessageListener {

    /**
     * Load config
     *
     * 读取指定 Namespace 的最新的 Release 对象
     *
     * @param clientAppId       the client's app id
     * @param clientIp          the client ip
     * @param configAppId       the requested config's app id
     * @param configClusterName the requested config's cluster name
     *                          Cluster 的名字
     * @param configNamespace   the requested config's namespace name
     * @param dataCenter        the client data center
     *                          数据中心的 Cluster 的名字
     * @param clientMessages    the messages received in client side
     * @return the Release
     */
    Release loadConfig(String clientAppId, String clientIp, String configAppId, String
            configClusterName, String configNamespace, String dataCenter, ApolloNotificationMessages clientMessages);

}
子类如下图所示: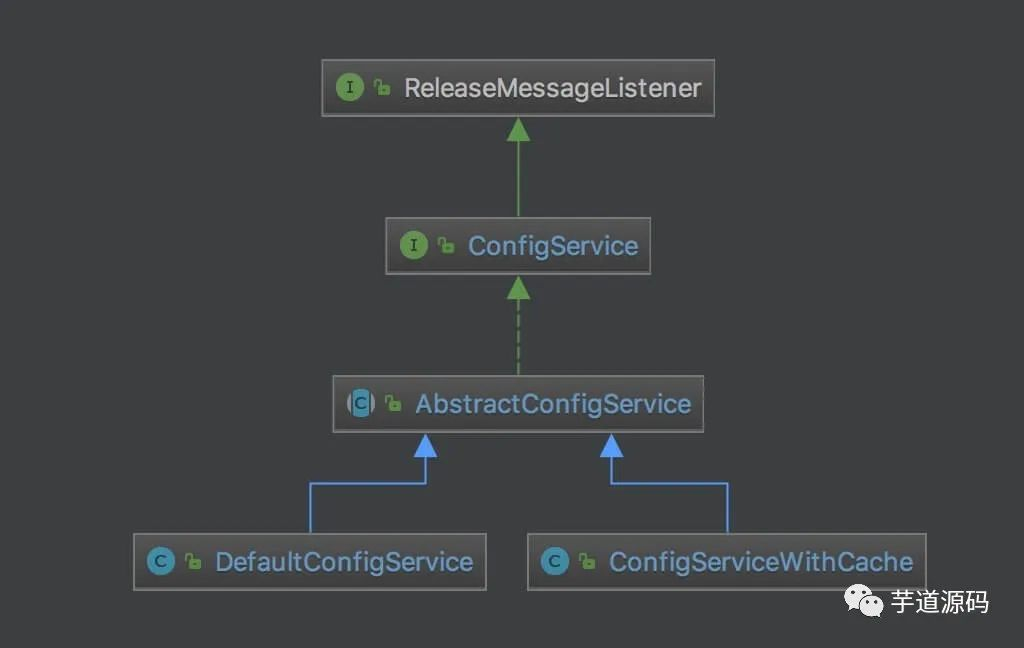
最终有两个子类,差异点在于是否使用缓存,通过 ServerConfig "config-service.cache.enabled" 配置,默认关闭。开启后能提高性能,但是会增大内存消耗!
在 ConfigServiceAutoConfiguration 中,初始化使用的 ConfigService 实现类,代码如下:
@Autowired
private BizConfig bizConfig;

@Bean
public ConfigService configService() {
    // 开启缓存,使用 ConfigServiceWithCache
    if (bizConfig.isConfigServiceCacheEnabled()) {
        return new ConfigServiceWithCache();
    }
    // 不开启缓存,使用 DefaultConfigService
    return new DefaultConfigService();
}
3.1 AbstractConfigService
com.ctrip.framework.apollo.configservice.service.config.AbstractConfigService ,实现 ConfigService 接口,配置 Service 抽象类,实现公用的获取配置的逻辑,并暴露抽象方法,让子类实现。抽象方法如下:
/**
 * 获得指定编号,并且有效的 Release 对象
 *
 * Find active release by id
 *
 * @param id Release 编号
 */
protected abstract Release findActiveOne(long id, ApolloNotificationMessages clientMessages);

/**
 * 获得最新的,并且有效的 Release 对象
 *
 * Find active release by app id, cluster name and namespace name
 */
protected abstract Release findLatestActiveRelease(String configAppId, String configClusterName,
                                                   String configNamespaceName, ApolloNotificationMessages clientMessages);
3.1.1 loadConfig
#loadConfig(...) 实现方法,代码如下:
  1: @Override
  2: public Release loadConfig(String clientAppId, String clientIp, String configAppId, String configClusterName,
  3:                           String configNamespace, String dataCenter, ApolloNotificationMessages clientMessages) {
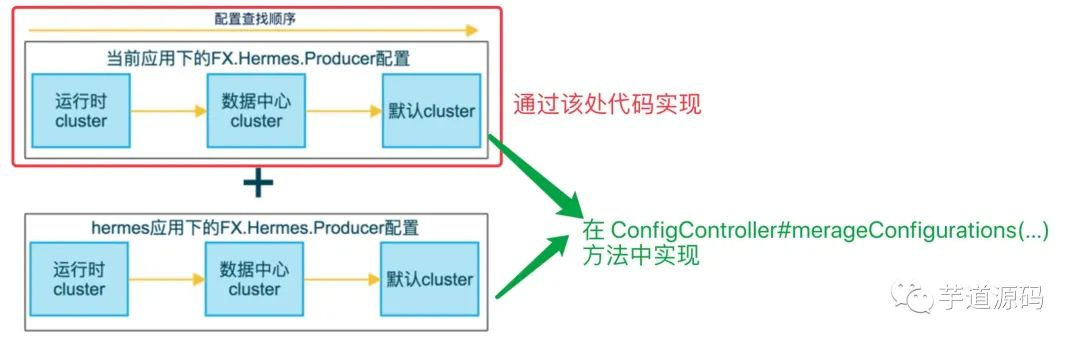
  4:     // 优先,获得指定 Cluster 的 Release 。若存在,直接返回。
  5:     // load from specified cluster fist
  6:     if (!Objects.equals(ConfigConsts.CLUSTER_NAME_DEFAULT, configClusterName)) {
  7:         Release clusterRelease = findRelease(clientAppId, clientIp, configAppId, configClusterName, configNamespace,
  8:                 clientMessages);
  9:         if (!Objects.isNull(clusterRelease)) {
 10:             return clusterRelease;
 11:         }
 12:     }
 13:
 14:     // 其次,获得所属 IDC 的 Cluster 的 Release 。若存在,直接返回
 15:     // try to load via data center
 16:     if (!Strings.isNullOrEmpty(dataCenter) && !Objects.equals(dataCenter, configClusterName)) {
 17:         Release dataCenterRelease = findRelease(clientAppId, clientIp, configAppId, dataCenter, configNamespace, clientMessages);
 18:         if (!Objects.isNull(dataCenterRelease)) {
 19:             return dataCenterRelease;
 20:         }
 21:     }
 22:
 23:     // 最后,获得默认 Cluster 的 Release 。
 24:     // fallback to default release
 25:     return findRelease(clientAppId, clientIp, configAppId, ConfigConsts.CLUSTER_NAME_DEFAULT, configNamespace, clientMessages);
 26: }
第 4 至 12 行:优先,获得指定 Cluster 的 Release 。若存在,直接返回。
第 14 至 21 行:其次,获得所属 IDC 的 Cluster 的 Release 。若存在,直接返回。
第 25 行:最后,获得默认的 Cluster 的 Release 。
每一次获取,都调用了
#findRelease(...)方法,获取对应的 Release 对象。详细解析,见 「3.2 findRelease」 方法。关于多 Cluster 的读取顺序,可参见 《Apollo 配置中心介绍 —— 4.4.1 应用自身配置的获取规则》 。这块的代码,就是实现该顺序,如下图:
3.1.2 findRelease
  1: /**
  2:  * Find release
  3:  *
  4:  * 获得 Release 对象
  5:  *
  6:  * @param clientAppId       the client's app id
  7:  * @param clientIp          the client ip
  8:  * @param configAppId       the requested config's app id
  9:  * @param configClusterName the requested config's cluster name
 10:  * @param configNamespace   the requested config's namespace name
 11:  * @param clientMessages    the messages received in client side
 12:  * @return the release
 13:  */
 14: private Release findRelease(String clientAppId, String clientIp, String configAppId, String configClusterName,
 15:                             String configNamespace, ApolloNotificationMessages clientMessages) {
 16:     // 读取灰度发布编号
 17:     Long grayReleaseId = grayReleaseRulesHolder.findReleaseIdFromGrayReleaseRule(clientAppId, clientIp, configAppId, configClusterName, configNamespace);
 18:     //  读取灰度 Release 对象
 19:     Release release = null;
 20:     if (grayReleaseId != null) {
 21:         release = findActiveOne(grayReleaseId, clientMessages);
 22:     }
 23:     // 非灰度,获得最新的,并且有效的 Release 对象
 24:     if (release == null) {
 25:         release = findLatestActiveRelease(configAppId, configClusterName, configNamespace, clientMessages);
 26:     }
 27:     return release;
 28: }
第 17 行:调用
GrayReleaseRulesHolder#findReleaseIdFromGrayReleaseRule(...)方法,读取灰度发布编号,即GrayReleaseRule.releaseId属性。详细解析,在 《Apollo 源码解析 —— Portal 灰度发布》 中。第 18 至 22 行:调用
#findActiveOne(grayReleaseId, clientMessages)方法,读取灰度 Release 对象。第 23 至 26 行:若非灰度,调用
#findLatestActiveRelease(configAppId, configClusterName, configNamespace, clientMessages)方法,获得最新的,并且有效的 Release 对象。
3.3 DefaultConfigService
com.ctrip.framework.apollo.configservice.service.config.DefaultConfigService ,实现 AbstractConfigService 抽象类,配置 Service 默认实现类,直接查询数据库,而不使用缓存。代码如下:
public class DefaultConfigService extends AbstractConfigService {

    @Autowired
    private ReleaseService releaseService;

    @Override
    protected Release findActiveOne(long id, ApolloNotificationMessages clientMessages) {
        return releaseService.findActiveOne(id);
    }

    @Override
    protected Release findLatestActiveRelease(String configAppId, String configClusterName, String configNamespace,
                                              ApolloNotificationMessages clientMessages) {
        return releaseService.findLatestActiveRelease(configAppId, configClusterName, configNamespace);
    }

    @Override
    public void handleMessage(ReleaseMessage message, String channel) {
        // since there is no cache, so do nothing
    }

}
ReleaseService ,在 《Apollo 源码解析 —— Portal 发布配置》 中,有详细解析。
3.4 ConfigServiceWithCache
com.ctrip.framework.apollo.configservice.service.config.ConfigServiceWithCache ,实现 AbstractConfigService 抽象类,基于 Guava Cache 的配置 Service 实现类。
3.4.1 构造方法
private static final Logger logger = LoggerFactory.getLogger(ConfigServiceWithCache.class);

/**
 * 默认缓存过滤时间,单位:分钟
 */
private static final long DEFAULT_EXPIRED_AFTER_ACCESS_IN_MINUTES = 60; //1 hour

// TRACER 日志内存的枚举
private static final String TRACER_EVENT_CACHE_INVALIDATE = "ConfigCache.Invalidate";
private static final String TRACER_EVENT_CACHE_LOAD = "ConfigCache.LoadFromDB";
private static final String TRACER_EVENT_CACHE_LOAD_ID = "ConfigCache.LoadFromDBById";
private static final String TRACER_EVENT_CACHE_GET = "ConfigCache.Get";
private static final String TRACER_EVENT_CACHE_GET_ID = "ConfigCache.GetById";

private static final Splitter STRING_SPLITTER = Splitter.on(ConfigConsts.CLUSTER_NAMESPACE_SEPARATOR).omitEmptyStrings();

@Autowired
private ReleaseService releaseService;
@Autowired
private ReleaseMessageService releaseMessageService;
/**
 * ConfigCacheEntry 缓存
 *
 * KEY:Watch Key {@link ReleaseMessage#message}
 */
private LoadingCache<String, ConfigCacheEntry> configCache;
/**
 * Release 缓存
 *
 * KEY :Release 编号
 */
private LoadingCache<Long, Optional<Release>> configIdCache;
/**
 * 无 ConfigCacheEntry 占位对象
 */
private ConfigCacheEntry nullConfigCacheEntry;

public ConfigServiceWithCache() {
    nullConfigCacheEntry = new ConfigCacheEntry(ConfigConsts.NOTIFICATION_ID_PLACEHOLDER, null);
}
3.4.2 ConfigCacheEntry
ConfigCacheEntry ,ConfigServiceWithCache 的内部私有静态类,配置缓存 Entry 。代码如下:
private static class ConfigCacheEntry {

    /**
     * 通知编号
     */
    private final long notificationId;
    /**
     * Release 对象
     */
    private final Release release;

    public ConfigCacheEntry(long notificationId, Release release) {
        this.notificationId = notificationId;
        this.release = release;
    }

    public long getNotificationId() {
        return notificationId;
    }

    public Release getRelease() {
        return release;
    }

}
3.4.3 初始化
#initialize() 方法,通过 Spring 调用,初始化缓存对象。代码如下:
  1: @PostConstruct
  2: void initialize() {
  3:     // 初始化 configCache
  4:     configCache = CacheBuilder.newBuilder()
  5:             .expireAfterAccess(DEFAULT_EXPIRED_AFTER_ACCESS_IN_MINUTES, TimeUnit.MINUTES) // 访问过期
  6:             .build(new CacheLoader<String, ConfigCacheEntry>() {
  7:                 @Override
  8:                 public ConfigCacheEntry load(String key) {
  9:                     // 格式不正确,返回 nullConfigCacheEntry
 10:                     List<String> namespaceInfo = STRING_SPLITTER.splitToList(key);
 11:                     if (namespaceInfo.size() != 3) {
 12:                         Tracer.logError(new IllegalArgumentException(String.format("Invalid cache load key %s", key)));
 13:                         return nullConfigCacheEntry;
 14:                     }
 15:                     // 【TODO 6001】Tracer 日志
 16:                     Transaction transaction = Tracer.newTransaction(TRACER_EVENT_CACHE_LOAD, key);
 17:                     try {
 18:                         // 获得最新的 ReleaseMessage 对象
 19:                         ReleaseMessage latestReleaseMessage = releaseMessageService.findLatestReleaseMessageForMessages(Lists.newArrayList(key));
 20:                         // 获得最新的,并且有效的 Release 对象
 21:                         Release latestRelease = releaseService.findLatestActiveRelease(namespaceInfo.get(0), namespaceInfo.get(1), namespaceInfo.get(2));
 22:                         // 【TODO 6001】Tracer 日志
 23:                         transaction.setStatus(Transaction.SUCCESS);
 24:                         // 获得通知编号
 25:                         long notificationId = latestReleaseMessage == null ? ConfigConsts.NOTIFICATION_ID_PLACEHOLDER : latestReleaseMessage.getId();
 26:                         // 若 latestReleaseMessage 和 latestRelease 都为空,返回 nullConfigCacheEntry
 27:                         if (notificationId == ConfigConsts.NOTIFICATION_ID_PLACEHOLDER && latestRelease == null) {
 28:                             return nullConfigCacheEntry;
 29:                         }
 30:                         // 创建 ConfigCacheEntry 对象
 31:                         return new ConfigCacheEntry(notificationId, latestRelease);
 32:                     } catch (Throwable ex) {
 33:                         // 【TODO 6001】Tracer 日志
 34:                         transaction.setStatus(ex);
 35:                         throw ex;
 36:                     } finally {
 37:                         // 【TODO 6001】Tracer 日志
 38:                         transaction.complete();
 39:                     }
 40:                 }
 41:             });
 42:     // 初始化 configIdCache
 43:     configIdCache = CacheBuilder.newBuilder()
 44:             .expireAfterAccess(DEFAULT_EXPIRED_AFTER_ACCESS_IN_MINUTES, TimeUnit.MINUTES) // 访问过期
 45:             .build(new CacheLoader<Long, Optional<Release>>() {
 46:                 @Override
 47:                 public Optional<Release> load(Long key) {
 48:                     // 【TODO 6001】Tracer 日志
 49:                     Transaction transaction = Tracer.newTransaction(TRACER_EVENT_CACHE_LOAD_ID, String.valueOf(key));
 50:                     try {
 51:                         // 获得 Release 对象
 52:                         Release release = releaseService.findActiveOne(key);
 53:                         // 【TODO 6001】Tracer 日志
 54:                         transaction.setStatus(Transaction.SUCCESS);
 55:                         // 使用 Optional 包装 Release 对象返回
 56:                         return Optional.ofNullable(release);
 57:                     } catch (Throwable ex) {
 58:                         // 【TODO 6001】Tracer 日志
 59:                         transaction.setStatus(ex);
 60:                         throw ex;
 61:                     } finally {
 62:                         // 【TODO 6001】Tracer 日志
 63:                         transaction.complete();
 64:                     }
 65:                 }
 66:             });
 67: }
第 4 至 41 行:初始化
configCache。第 9 至 14 行:
key格式不正确,返回nullConfigCacheEntry。第 19 行:调用
releaseMessageService.findLatestReleaseMessageForMessages(List<String>)方法,获得最新的 ReleaseMessage 对象。这一步是 DefaultConfigService 没有的操作,用于读取缓存的时候,判断缓存是否过期,下文详细解析。第 21 行:调用
ReleaseService.findLatestActiveRelease(appId, clusterName, namespaceName)方法,获得最新的,且有效的 Release 对象。第 25 行:获得通知编号。
第 26 至 29 行:若
latestReleaseMessage和latestRelease都为空,返回nullConfigCacheEntry。第 31 行:创建 ConfigCacheEntry 对象,并返回。
第 42 至 66 行:初始化
configIdCache。第 52 行:调用
ReleaseService#findActiveOne(key)方法,获得 Release 对象。第 56 行:调用
Optional.ofNullable(Object)方法,使用 Optional 包装 Release 对象,并返回。
3.4.4 handleMessage
  1: @Override
  2: public void handleMessage(ReleaseMessage message, String channel) {
  3:     logger.info("message received - channel: {}, message: {}", channel, message);
  4:     // 仅处理 APOLLO_RELEASE_TOPIC
  5:     if (!Topics.APOLLO_RELEASE_TOPIC.equals(channel) || Strings.isNullOrEmpty(message.getMessage())) {
  6:         return;
  7:     }
  8:     try {
  9:         // 清空对应的缓存
 10:         invalidate(message.getMessage());
 11:         // 预热缓存,读取 ConfigCacheEntry 对象,重新从 DB 中加载。
 12:         // warm up the cache
 13:         configCache.getUnchecked(message.getMessage());
 14:     } catch (Throwable ex) {
 15:         //ignore
 16:     }
 17: }
第 4 至 7 行:仅处理 APOLLO_RELEASE_TOPIC 。
第 10 行:调用
#invalidate(message)方法,清空对应的缓存。代码如下:private void invalidate(String key) { // 清空对应的缓存 configCache.invalidate(key); // 【TODO 6001】Tracer 日志 Tracer.logEvent(TRACER_EVENT_CACHE_INVALIDATE, key); }第 13 行:调用
LoadingCache#getUnchecked(key)方法,预热缓存,读取 ConfigCacheEntry 对象,重新从 DB 中加载。
3.4.5 findLatestActiveRelease
  1: @Override
  2: protected Release findLatestActiveRelease(String appId, String clusterName, String namespaceName, ApolloNotificationMessages clientMessages) {
  3:     // 根据 appId + clusterName + namespaceName ,获得 ReleaseMessage 的 `message` 。
  4:     String key = ReleaseMessageKeyGenerator.generate(appId, clusterName, namespaceName);
  5:     // 【TODO 6001】Tracer 日志
  6:     Tracer.logEvent(TRACER_EVENT_CACHE_GET, key);
  7:     // 从缓存 configCache 中,读取 ConfigCacheEntry 对象
  8:     ConfigCacheEntry cacheEntry = configCache.getUnchecked(key);
  9:     // 若客户端的通知编号更大,说明缓存已经过期。
 10:     // cache is out-dated
 11:     if (clientMessages != null && clientMessages.has(key) && clientMessages.get(key) > cacheEntry.getNotificationId()) {
 12:         // 清空对应的缓存
 13:         // invalidate the cache and try to load from db again
 14:         invalidate(key);
 15:         // 读取 ConfigCacheEntry 对象,重新从 DB 中加载。
 16:         cacheEntry = configCache.getUnchecked(key);
 17:     }
 18:     // 返回 Release 对象
 19:     return cacheEntry.getRelease();
 20: }
第 4 行:调用
ReleaseMessageKeyGenerator#generate(appId, clusterName, namespaceName)方法,根据appId+clusterName+namespaceName,获得 ReleaseMessage 的message。第 8 行:调用
LoadingCache#getUnchecked(key)方法,从缓存configCache中,读取 ConfigCacheEntry 对象。第 9 至 17 行:若客户端的通知编号更大,说明缓存已经过期。因为
#handleMessage(ReleaseMessage message, String channel)方法,是通过定时扫描 ReleaseMessage 的机制实现,那么延迟是不可避免会存在的。所以通过此处比较的方式,实现缓存的过期的检查。第 14 行:调用
#invalidate(message)方法,清空对应的缓存。第 16 行:调用
LoadingCache#getUnchecked(key)方法,读取 ConfigCacheEntry 对象,重新从 DB 中加载。
第 19 行:返回 Release 对象。
3.4.6 findActiveOne
@Override
protected Release findActiveOne(long id, ApolloNotificationMessages clientMessages) {
    // 【TODO 6001】Tracer 日志
    Tracer.logEvent(TRACER_EVENT_CACHE_GET_ID, String.valueOf(id));
    // 从缓存 configIdCache 中,读取 Release 对象
    return configIdCache.getUnchecked(id).orElse(null);
}
4. ApolloConfig
com.ctrip.framework.apollo.core.dto.ApolloConfig ,Apollo 配置 DTO 。代码如下:
public class ApolloConfig {

    /**
     * App 编号
     */
    private String appId;
    /**
     * Cluster 名字
     */
    private String cluster;
    /**
     * Namespace 名字
     */
    private String namespaceName;
    /**
     * 配置 Map
     */
    private Map<String, String> configurations;
    /**
     * Release Key
     *
     * 如果 {@link #configurations} 是多个 Release ,那 Release Key 是多个 `Release.releaseKey` 拼接,使用 '+' 拼接。
     */
    private String releaseKey;

}
该类在
apollo-core项目中,被apollo-configservice和apollo-client共同引用。因此,Apollo 的客户端,也使用 ApolloConfig 。
666. 彩蛋
???? 对流程上的细节,越来越清晰。
充实的周六。
欢迎加入我的知识星球,一起探讨架构,交流源码。加入方式,长按下方二维码噢:

已在知识星球更新源码解析如下:


最近更新《芋道 SpringBoot 2.X 入门》系列,已经 20 余篇,覆盖了 MyBatis、Redis、MongoDB、ES、分库分表、读写分离、SpringMVC、Webflux、权限、WebSocket、Dubbo、RabbitMQ、RocketMQ、Kafka、性能测试等等内容。
提供近 3W 行代码的 SpringBoot 示例,以及超 4W 行代码的电商微服务项目。
获取方式:点“在看”,关注公众号并回复 666 领取,更多内容陆续奉上。

 469


 扫一扫


 被折叠的 条评论
为什么被折叠?
 到【灌水乐园】发言


