


在游戏场景的技能光效、网页活动的动态背景、数据可视化的粒子流中,我们总能看到炫酷的粒子特效,类似这种👇👇👇

体验地址:
https://opensource.icegl.cn/#/plugins/visualArts/imgParticle
这些效果看似复杂,实则可通过 Three.js 的专用粒子库 Three.Quarks 高效实现。
本系列课程我们将带着大家从基础到进阶拆解 Three.Quarks 的实战应用,并通过三个案例详解粒子特效的实现逻辑与操作步骤,帮助大家掌握酷炫粒子效果的开发方法。
-
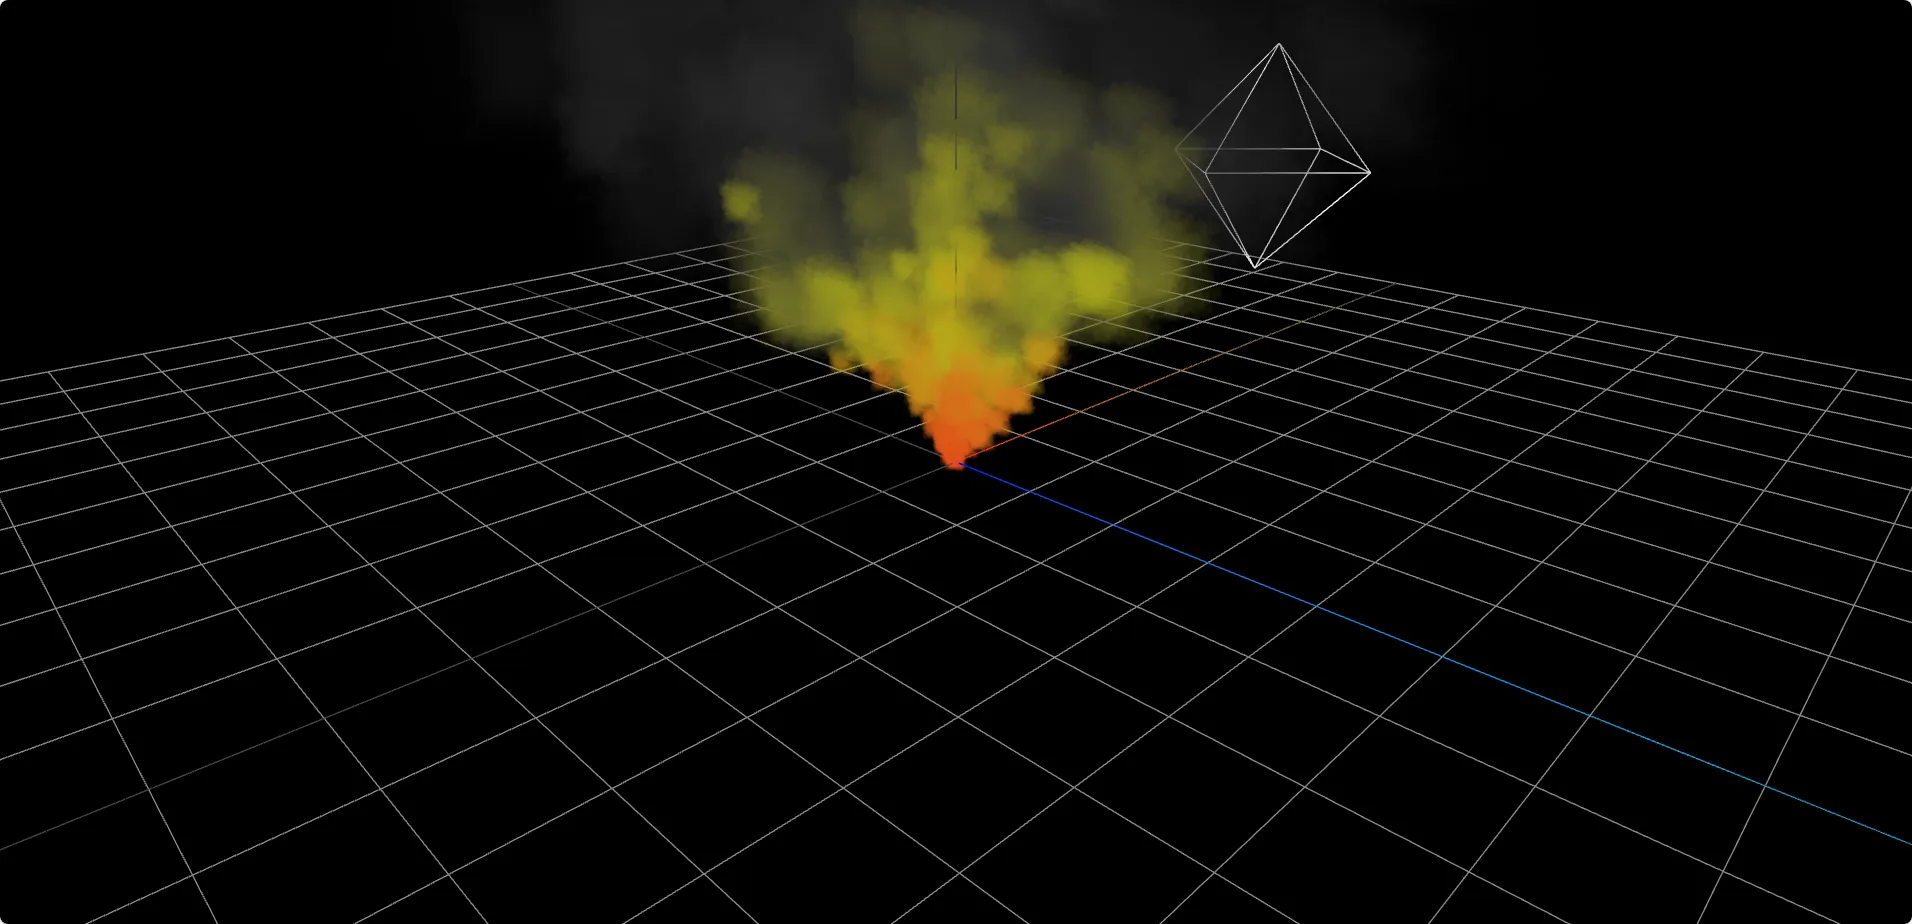
火焰喷射效果&喷泉效果
-
粒子重组效果
-
引用官方的粒子json文件
今天我们实现一下 火焰喷射效果&喷泉效果
基本api使用
以下是使用three.quark粒子系统的基本流程
1.创建粒子渲染器以及粒子容器
// 创建粒子系统批量渲染器
const batchRenderer = new BatchedParticleRenderer();
const group = new THREE.Group();
2.创建粒子系统
const particles = new ParticleSystem({
	...粒子系统参数
});
什么是粒子系统? 打一个比方,在消防员灭火的时候,喷枪中会喷射出很多的水,每一个水滴如果是一个粒子的话,那么粒子系统就是消防员手中的喷枪,可以决定粒子的喷射方式,喷射速度,喷射时间等等
3.将粒子系统添加到粒子渲染器中
group.add(particles.emitter);
batchRenderer.addSystem(particles);
scene.add(group);
4.在动画函数中更新渲染器
const clock = new THREE.Clock();
renderer.setAnimation(() => {
  const delta = clock.getDelta();
  renderer.render(scene, camera);
  // 渲染循环中更新粒子
  if (batchRenderer) {
    batchRenderer.update(delta);
  }
});
具体的流程并不复杂,粒子系统中复杂的是ParticleSystem中的参数
先来看看上图中火焰效果的参数
以下参数的解释分别为:
1.duration 整个粒子动画的周期
2.looping 粒子动画是否循环播放
3.startLife 粒子的生命周期时长,这里设置为IntervalValue数据,这个是three.quark自带的数据类型,可以描述一个随机范围,粒子的生命周期时长将处于5---9秒
4.startSpeed 粒子的速度,这里也可以设置为一个范围数据,如果想要设置为固定数据,可以填ConstantValue
5.startSize 粒子的大小,取值逻辑同上
6.emissionOverTime 粒子的排放数量,数量越多粒子越多
7.shape 粒子发射器的类型,在quark中有很多排放类型, 比如圆形排放,锥形排放,这里火焰是呈锥形排放的
8.material 每个粒子的材质,可以写入一个基本材质
const particles = new ParticleSystem({
  duration: 20,
  looping: true,
  startLife: new IntervalValue(5, 9),
  startSpeed: new IntervalValue(0.8,1.2),
  startSize: new IntervalValue(0.5, 1),
  emissionOverTime: new ConstantValue(100),
  shape: new ConeEmitter({
    radius: 0,
    arc: Math.PI * 2,
    angle:Math.PI/4
  }),
  material: new THREE.MeshBasicMaterial({
    map: texture,
    transparent: true,
    side: THREE.DoubleSide,
    depthWrite: false,
  }),
});
实现火焰效果
实现效果
源码实现
省略threejs的基本环境配置
// -----------------------------------------实现粒子效果---------------------------------------
const group = new THREE.Group();

// 创建粒子系统批量渲染器
const batchRenderer = new BatchedParticleRenderer();
group.add(batchRenderer);

const loader = new THREE.TextureLoader();
const texture = loader.load("/src/assets/texture/smoke.png");

// 初始化粒子系统,并绑定材质
// 动画时长20s,循环执行,每个粒子的生命周期在0-10s随机,速度在0-500s随机,大小在0-100随机
// emissionOverTime是发射多少个粒子
// shape是粒子发射器的类型
const particles = new ParticleSystem({
  duration: 20,
  looping: true,
  startLife: new IntervalValue(5, 9),
  startSpeed: new IntervalValue(0.8,1.2),
  startSize: new IntervalValue(0.5, 1),
  emissionOverTime: new ConstantValue(100),
  shape: new ConeEmitter({
    radius: 0,
    arc: Math.PI * 2,
    angle:Math.PI/4
  }),
  material: new THREE.MeshBasicMaterial({
    map: texture,
    transparent: true,
    side: THREE.DoubleSide,
    depthWrite: false,
  }),
});
console.log(particles);

// 旋转粒子发射器,使其向上发射
particles.emitter.rotateX(-Math.PI / 2);
group.add(particles.emitter);
batchRenderer.addSystem(particles);

particles.addBehavior(
  new SizeOverLife(new PiecewiseBezier([[new Bezier(1, 0.2, 0.4, 0), 0]]))
);

const gradient = new Gradient(
  [
    [new THREE.Vector3(0.9, 0.3, 0.1), 0], // Black at position 0
    [new THREE.Vector3(0.7, 0.7, 0.1), 0.3], // Black at position 0
    [new THREE.Vector3(0.2, 0.2, 0.2), 0.5],
    [new THREE.Vector3(0,0,0), 1], // White at position 1
  ],
  [
    [1, 0], // Alpha 1 at position 0
    [0.1, 1], // Alpha 1 at position 1
  ]
);

particles.addBehavior(
  new ColorOverLife(
    gradient
  )
);

scene.add(group);
const clock = new THREE.Clock();
renderer.setAnimation(() => {
  const delta = clock.getDelta();
  renderer.render(scene, camera);
  // 渲染循环中更新粒子
  if (batchRenderer) {
    batchRenderer.update(delta);
  }
});
实现原理
在基本的api使用基础上,添加了粒子系统的行为模式设置
核心api
particles.addBehavior粒子的行为模式设置可以决定粒子在生命周期中的状态,这个状态可以是颜色,大小,速度等属性
比如火焰的颜色从刚开始的时候应该是明黄色,但是如果到了末尾,颜色应该变为灰色或者黑色。
又比如喷泉的效果需要在粒子上升之后又随着重力下降,这种状态变化也是行为模式Behavior
quark的行为模式放在了文档behavior章节中,我们学习基本的即可
这里需要让粒子在生命周期中颜色不断发生变化,可以设置颜色行为模式
这里一定要使用quarks的数据格式,比如Gradient,就是quarks专用的渐变颜色格式
这里我设置了四个颜色阶段,粒子会从比较橙黄色慢慢变化到灰色,透明度也会慢慢变淡
const gradient = new Gradient(
  [
    [new THREE.Vector3(0.9, 0.3, 0.1), 0], // Black at position 0
    [new THREE.Vector3(0.7, 0.7, 0.1), 0.3], // Black at position 0
    [new THREE.Vector3(0.2, 0.2, 0.2), 0.5],
    [new THREE.Vector3(0,0,0), 1], // White at position 1
  ],
  [
    [1, 0], // Alpha 1 at position 0
    [0.1, 1], // Alpha 1 at position 1
  ]
);

particles.addBehavior(
  new ColorOverLife(
    gradient
  )
);
同时,我还设置了粒子大小的行为模式,因为火焰的扩散是从小到大的,这里设置一个贝塞尔曲线的数值,PiecewiseBezier中要求的参数是一个curve,也就是我们之前讲过的曲线,这里的数值会从0.3慢慢变化到3,数组中第二个参数固定填0即可
particles.addBehavior(
new SizeOverLife(new PiecewiseBezier([[new Bezier(0.3, 0.6, 2.4, 3), 0]]))
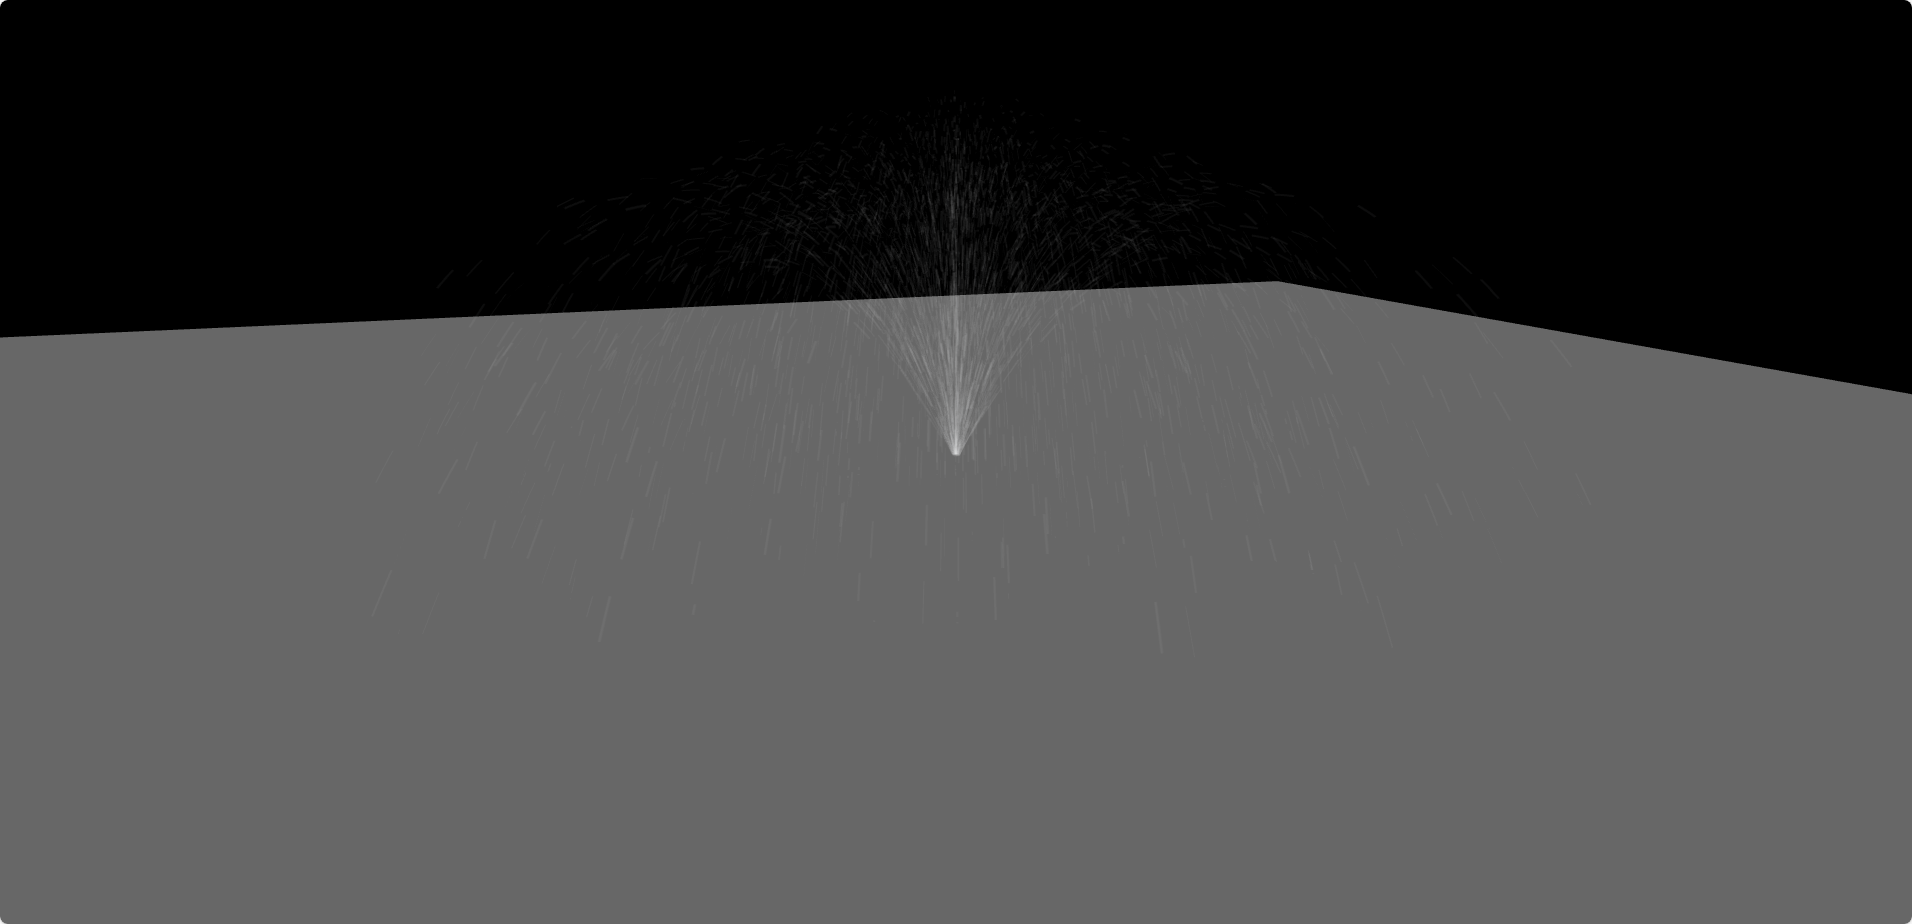
);实现喷泉效果
实现效果
源码
省略threejs的基本场景搭建
// -----------------------------------------实现粒子效果---------------------------------------
const group = new THREE.Group();

// 创建粒子系统批量渲染器
const batchRenderer = new BatchedParticleRenderer();
group.add(batchRenderer);

const loader = new THREE.TextureLoader();
const texture = loader.load("/src/assets/texture/fountain.png");

const particles = new ParticleSystem({
  duration: 20,
  looping: true,
  startLife: new IntervalValue(20, 60),
  startSpeed: new IntervalValue(1200, 1400),
  startSize: new IntervalValue(0, 10),
  emissionOverTime: new ConstantValue(2000),
  renderMode: RenderMode.Trail,
  rendererEmitterSettings: {
    startLength: new ConstantValue(5),
  },
  shape: new ConeEmitter({
    radius: 0,
    arc: Math.PI * 2,
  }),
  material: new THREE.MeshBasicMaterial({
    map: texture,
    transparent: true,
    side: THREE.DoubleSide,
  }),
});
particles.emitter.rotateX(-Math.PI / 2);
group.add(particles.emitter);
batchRenderer.addSystem(particles);

particles.addBehavior(
  new SizeOverLife(new PiecewiseBezier([[new Bezier(1, 0.2, 0.4, 0), 0]]))
);

const gradient = new Gradient(
  [
    [new THREE.Vector3(1, 1, 1), 0], // Black at position 0
    [new THREE.Vector3(0, 0, 0), 1], // White at position 1
  ],
  [
    [1, 0], // Alpha 1 at position 0
    [0, 1], // Alpha 1 at position 1
  ]
);

particles.addBehavior(new ColorOverLife(gradient));

// 使用重力
particles.addBehavior(
  new ApplyForce(new THREE.Vector3(0, 0, -1), new ConstantValue(1000))
);

// 添加速度变化
particles.addBehavior(
    new SpeedOverLife(new PiecewiseBezier(
        [
            [
                new Bezier(1.5 ,0.8, 0.4, 0),
                0
            ]
        ]
    ))
);

scene.add(group);
const clock = new THREE.Clock();
renderer.setAnimation(() => {
  const delta = clock.getDelta();
  renderer.render(scene, camera);
  // 渲染循环中更新粒子
  if (batchRenderer) {
    batchRenderer.update(delta);
  }
});
实现原理
有了上一节的基础,再来实现喷泉就很简单了
我们将材质的图片替换为喷泉粒子的图片,并且设置好基本参数,这里新增的设置包括
1.renderMode:RenderMode.Trail 这个配置可以让喷泉效果具有拖尾的感觉
2.rendererEmitterSettings :配合renderMode使用,设置拖尾的长度
const loader = new THREE.TextureLoader();
const texture = loader.load("/src/assets/texture/fountain.png");

const particles = new ParticleSystem({
  duration: 20,
  looping: true,
  startLife: new IntervalValue(20, 60),
  startSpeed: new IntervalValue(1200, 1400),
  startSize: new IntervalValue(0, 10),
  emissionOverTime: new ConstantValue(2000),
  renderMode: RenderMode.Trail,
  rendererEmitterSettings: {
    startLength: new ConstantValue(5),
  },
  shape: new ConeEmitter({
    radius: 0,
    arc: Math.PI * 2,
  }),
  material: new THREE.MeshBasicMaterial({
    map: texture,
    transparent: true,
    side: THREE.DoubleSide,
  }),
});
然后我添加了粒子大小的行为模式,并让喷泉粒子在喷射之后不断变小
particles.addBehavior(
  new SizeOverLife(new PiecewiseBezier([[new Bezier(1, 0.2, 0.4, 0), 0]]))
);
添加颜色的简单变化,让喷泉粒子不断变淡
const gradient = new Gradient(
  [
    [new THREE.Vector3(1, 1, 1), 0], // Black at position 0
    [new THREE.Vector3(0, 0, 0), 1], // White at position 1
  ],
  [
    [1, 0], // Alpha 1 at position 0
    [0, 1], // Alpha 1 at position 1
  ]
);

particles.addBehavior(new ColorOverLife(gradient));
添加重力行为模式,这里让重力朝-z方向,因为我们的粒子系统是做了旋转的,所以-z才是重力方向
调整重力的强度为1000
particles.addBehavior(
  new ApplyForce(new THREE.Vector3(0, 0, -1), new ConstantValue(1000))
);
添加粒子的速度变化
// 添加速度变化
particles.addBehavior(
    new SpeedOverLife(new PiecewiseBezier(
        [
            [
                new Bezier(1.5 ,0.8, 0.4, 0),
                0
            ]
        ]
    ))
);来源:https://mp.weixin.qq.com/s/PX-iDJ6IKyBXpBzt7SHHRw
webgis开发学习资料+下方↓↓小助手


 1548
1548

 被折叠的 条评论
为什么被折叠?
被折叠的 条评论
为什么被折叠?
 到【灌水乐园】发言


