 深度学习图像分割实战


 本文详细介绍了一种在Win10环境下使用Anaconda3、TensorFlow1.15及PyCharm进行深度学习图像分割的全流程,包括数据标注、预处理、模型训练、评估及部署。通过具体步骤和代码示例,读者将学会如何使用LabelMe标注数据,制作Pascal VOC风格的数据集,生成TFRecord格式,训练模型并导出PB文件,最后进行单张图片的预测。
版权所有,翻版必究。https://blog.youkuaiyun.com/fightingxyz/article/details/105512849
环境:win10,Anaconda3,tensorflow1.15.0,tensorflow-gpu1.14.0,pycharm。
再看这篇博客的时候建议先看上一篇博客,然后再看就简单了!https://blog.youkuaiyun.com/fightingxyz/article/details/105488802
第一步:准备数据。使用labelme来进行标注。安装方法pip install labelme
然后对你的数据进行标注,并保存。可以参考文章https://blog.youkuaiyun.com/heiheiya/article/details/88342597。该作者说的很详细。
补充:将数据的输入变成一样的大小,后面的测试需要。
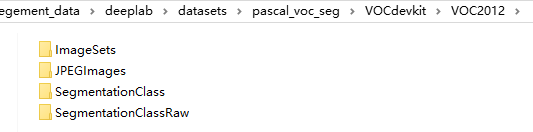
第二步:制作类似pasval_cov_2012的数据。
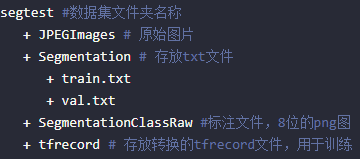
我的数据最终形式:
那么该怎么做呢?
首先将你第一步准备好的数据进行处理。
import argparse
import json
import os
import os.path as osp
import warnings
import copy
import shutil
import numpy as np
import PIL.Image
from skimage import io
import yaml

from labelme import utils

NAME_LABEL_MAP = {
    '_background_': 0,
    '第二类': 1,
}

def main():
    json_file = 'D:\\segement_data\\train_image\\'
    # json_file = 'D:\\segement_data\\json\\'
    out_dir = 'D:\\segement_data\\output'
    if not os.path.exists(out_dir):
        os.mkdir(out_dir)
    print(out_dir)
    list = os.listdir(json_file)
    for i in range(0, len(list)):
        path = os.path.join(json_file, list[i])
        if (list[i].split(".")[-1]) != "json":
            continue
        filename = list[i][:-5]  # .json
        print(filename)
        # label_name_to_value = {'_background_': 0}
        if os.path.isfile(path):

            data = json.load(open(path))
            img = utils.image.img_b64_to_arr(data['imageData'])
            lbl, lbl_names = utils.shape.labelme_shapes_to_label(img.shape, data['shapes'])  # labelme_shapes_to_label
            # lbl, lbl_names = utils.shape.shapes_to_label(img.shape, data['shapes'])  # labelme_shapes_to_label
            # lbl = utils.shapes_to_label(img.shape, data['shapes'], label_name_to_value)

            # modify labels according to NAME_LABEL_MAP
            lbl_tmp =
 最低0.47元/天 解锁文章


 219
219


 到【灌水乐园】发言


