


 本文介绍了FBX场景图的组织方式,包括场景创建、全局设置、动画评估等内容。此外,还深入探讨了FBX节点及其属性,如节点层次结构、转换数据、分组节点等。同时,文章还讲解了如何合并场景以及进行轴和单位转换。
FBX节点和场景图
FBX节点和场景图
本节介绍了FBX场景图及其场景元素的组织。
节点数
场景元素(例如网格,灯光,照相机,骨骼或线条)的位置可以通过一系列平移,旋转和缩放操作来描述。 此几何变换数据由FbxNode封装。
节点属性
考虑场景中的摄像机。 除了其平移,旋转和缩放值外,它还可以定义其帧宽度,帧高度,景深,运动模糊等。此附加数据由FbxCamera封装,后者是FbxNodeAttribute的子类。 FbxMesh和FbxLight也是FbxNodeAttribute的子类,并且可以绑定到FbxNode以指定它们在场景中的位置。
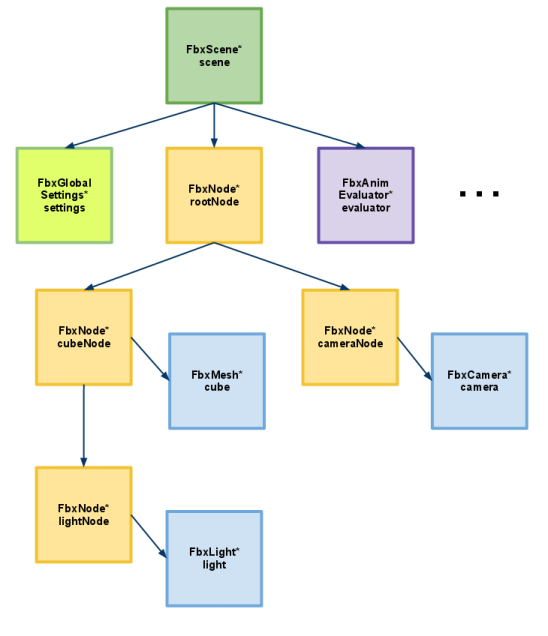
一.FBX场景
1.场景图组织摘要
FBX SDK场景图由FbxScene类抽象。 场景按节点层次结构(FbxNode)进行组织。 通过FbxScene :: GetRootNode()访问场景的根节点。 通过将FbxNode与FbxNodeAttribute的子类组合来定义场景元素(例如,网格,灯光或摄像头)。 有关更多信息,请参见FBX节点和FBX节点属性。
注意:在导出操作中,场景的根节点不会导出到文件中。 仅根节点的子级被导出到文件。 因此,不建议将任何内容保存到根节点上,而应将其关联到文件中。
2.创建一个场景
如使用FBX SDK Manager管理内存中所示,通过调用FbxScene :: Create()函数来创建FbxScene。 一个新的FbxScene包含一个根FbxNode和一个具有默认配置的FbxGlobalSettings对象。
// Create the SDK manager.
FbxManager* lSdkManager = FbxManager::Create();

// Create the scene.
FbxScene* lScene = FbxScene::Create(lSdkManager, "Scene Name");
场景元素是通过引用它们所属的FbxScene来创建的。 这样,将使用场景创建的所有元素导出场景。 在以下示例中,将使用对FbxScene的引用创建一个节点,并将其附加到场景的根节点。
// Get the root node of the scene.
FbxNode* lRootNode = lScene->GetRootNode();

// Create a child node.
FbxNode* lChild = FbxNode::Create(lScene, "child");

// Add the child to the root node.
lRootNode->AddChild(lChild);
3.全局场景设置
场景的轴系统,系统单位,环境照明和时间设置在其FbxGlobalSettings对象中定义。通过FbxScene :: GetGlobalSettings()访问此对象。
4.动画评估
场景的FbxAnimEvaluator在特定时间评估场景中每个节点的动画几何变换。它还评估场景的任何其他可设置动画的属性,例如,特定材质的颜色变化。可通过FbxScene :: GetEvaluator()访问场景的FbxAnimEvaluator。有关更多信息,请参见动画。
5.材质和材质管理
可以使用成员函数(例如FbxScene :: GetMaterial()和FbxScene :: GetTexture())访问和修改场景中创建的材质(FbxSurfaceMaterial)和纹理(FbxTexture)。有关在网格上使用材质和纹理的更多信息,请参见网格,材质和纹理。
6.角色和角色姿势管理
可以使用FbxScene :: GetCharacter()和FbxScene :: GetCharacterPose()访问场景中的角色(FbxCharacter)和角色姿势(FbxCharacterPose)。有关如何在场景中定义角色的更多信息,请查阅FbxCharacter和FbxCharacterPose的类文档。
7.本节中的主题
合并两个场景
本主题介绍如何合并两个导入的场景。它还提供了有关操纵场景及其中节点的基本见解,并将使读者开始了解连接和连接管理的概念。
场景轴和单位转换
(1)合并两个场景
本主题介绍如何合并两个导入的场景。 它还提供了有关操纵场景及其中节点的基本见解,并将使读者开始了解连接和连接管理的概念。
合并两个场景所采取的步骤如下:
加载场景。
修改已加载场景中的节点。
将已加载场景的内容移动到参考场景中。
加载不同的场景。
使用参考场景的内容更新新加载的场景。
销毁参考场景。
(a)加载和修改场景
我们创建的第一个对象是FbxManager。 创建后续FBX SDK对象需要执行此步骤。 然后,将一个新创建的FbxScene对象(称为“当前场景”)传递到我们的自定义LoadScene()函数,以便可以使用“ file1.fbx”的导入内容(应与该文件位于同一文件夹中)填充该对象。 可执行程序)。 填充场景的内容后,我们只需将根节点的第一个子节点(索引为0)的名称更改为“测试名称”。
// Create an SDK manager.
    FbxManager* lSdkManager = FbxManager::Create();

    // Create a new scene so it can be populated by the imported file.
    FbxScene* lCurrentScene = FbxScene::Create(lSdkManager,"My Scene");

    // Load the scene.
    LoadScene(lSdkManager, lCurrentScene, "file1.fbx");

    // Modify the scene. In this example, only one node name is changed.
    lCurrentScene->GetRootNode()->GetChild(0)->SetName("Test Name");
(b)将已加载场景的内容移动到参考场景中
创建了另一个FbxScene对象,我们将其称为“参考场景”。 请注意,创建FbxScene对象时,还将同时创建其根节点及其全局设置。 因此,此步骤的目标是从当前场景的根节点中删除子级,以便它们可以成为参考场景的根节点的子级。
// Create a reference scene to store the contents of the currently loaded scene.
    FbxScene *lMyRefScene = FbxScene::Create(lSdkManager, "My Reference Scene");

    // Move the node tree of the currently loaded scene into the reference scene.
    int lNumChildren = lCurrentScene->GetRootNode()->GetChildCount();
    for(int i = 0; i < lNumChildren; i++) {

        // Obtain a child node from the currently loaded scene.
        FbxNode* lChildNode = lCurrentScene->GetRootNode()->GetChild(i);

        // Attach the child node to the reference scene's root node.
        lMyRefScene->GetRootNode()->AddChild(lChildNode);
    }

    // Remove the children from the root node.
    lCurrentScene->GetRootNode()->DisconnectAllSrcObject();
当前场景中包含的其他FbxObject可能需要移动到参考场景。 这样的对象可能包括以下实例:FbxCharacter,FbxCharacterPose和FbxDocumentInfo等。 请注意,这些对象不是当前场景的根节点的子级,因此需要进行不同的移动。 为此,我们需要在FBX SDK的上下文中具有一些有关“连接”的基本知识。
连接是以下两个之间的定向“源到目的地”关系:两个FbxObject,一个FbxObject和一个FbxProperty或两个FbxProperty。 有关连接的更多信息,请参见连接。 在本教程的范围内,我们希望从当前场景断开所有相关的源对象,并将它们连接到参考场景。 我们使用FbxObject :: GetSrcObjectCount(),FbxObject :: DisconnectAllSrcObject()和FbxObject :: ConnectDstObject()进行此操作。
// Move other objects to the reference scene.
    int lNumSceneObjects = lCurrentScene->GetSrcObjectCount();
    for(int i = 0; i < lNumSceneObjects; i++) {
        FbxObject* lObj = lCurrentScene->GetSrcObject(i);
        if(lObj == lCurrentScene->GetRootNode() || *lObj == lCurrentScene->GetGlobalSettings()){
            // Don't move the root node or the scene's global settings; these
            // objects are created for every scene.
            continue;
        }
        // Attach the object to the reference scene.
        lObj->ConnectDstObject(lMyRefScene);
    }

    // Disconnect all scene objects.
    lCurrentScene->DisconnectAllSrcObject();
注意:您可以使用连接概念来获取场景中特定类型的所有对象。 在以下代码段中,我们通过调用lScene-> GetSrcObjectCount(FbxMesh :: ClassId)遍历连接到场景的网格。
for(int i = 0; i < lScene->GetSrcObjectCount(FbxMesh::ClassId); i++) {
    FbxMesh* lMesh = (FbxMesh*)lScene->GetSrcObject(FbxMesh::ClassId, i);
    //...
}
©加载和更新其他场景
此时,我们已将当前场景的元素移到参考场景中,并且当前场景已变为空。 现在,我们以当前场景为准,并使用“ file2.fbx”的内容重新填充该场景。 最后,我们将当前场景中的根的第一个孩子的名称更改为参考场景中根的第一个孩子的名称。 最后,当前场景中根的第一个子节点的名称应为“测试名称”。
// Import the second file into lCurrentScene.
    LoadScene(lSdkManager, lCurrentScene, "file2.fbx");

    // Get the names after the second file is loaded.
    FbxString lNameBeforeUpdate = lCurrentScene->GetRootNode()->GetChild(0)->GetName();
    FbxString lReferenceName = lMyRefScene->GetRootNode()->GetChild(0)->GetName();

    // Update the root's child 0 name.
    lCurrentScene->GetRootNode()->GetChild(0)->SetName(lReferenceName);
    FbxString lNameAfterUpdate = lCurrentScene->GetRootNode()->GetChild(0)->GetName();

    // Destroy the reference scene.
    lMyRefScene->Destroy();
    lMyRefScene = NULL;

    // Verification step
    printf("Verification (0 for success): %d\n", lNameAfterUpdate.Compare("Test Name"));
(d)场景合并教程程序
以下是上面讨论的场景合并教程程序。
#include <fbxsdk.h>

/**
 * Load a scene given an FbxManager, a FbxScene, and a valid filename.
 */
int LoadScene(FbxManager* pSdkManager, FbxScene* pScene, char* filename) {
    // Create the io settings object.
    FbxIOSettings *ios = FbxIOSettings::Create(pSdkManager, IOSROOT);
    pSdkManager->SetIOSettings(ios);

    // Create an importer using our sdk manager.
    FbxImporter* lImporter = FbxImporter::Create(pSdkManager,"");

    // Use the first argument as the filename for the importer.
    if(!lImporter->Initialize(filename, -1, pSdkManager->GetIOSettings())) {
        printf("Call to FbxImporter::Initialize() failed.\n");
        printf("Error returned: %s\n\n", lImporter->GetStatus().GetErrorString());
        lImporter->Destroy();
        return -1;
    }

    // Import the contents of the file into the scene.
    lImporter->Import(pScene);

    // The file has been imported; we can get rid of the importer.
    lImporter->Destroy();
    return 0;
}

/**
 * Entry point for the merging two scenes sample program.
 */
int main(int argc, char** argv) {
    // Create an SDK manager.
    FbxManager* lSdkManager = FbxManager::Create();

    // Create a new scene so it can be populated by the imported file.
    FbxScene* lCurrentScene = FbxScene::Create(lSdkManager,"My Scene");

    // Load the scene.
    LoadScene(lSdkManager, lCurrentScene, "file1.fbx");

    // Modify the scene. In this example, only one node name is changed.
    lCurrentScene->GetRootNode()->GetChild(0)->SetName("Test Name");

    // Create a reference scene to store the contents of the currently loaded scene.
    FbxScene *lMyRefScene = FbxScene::Create(lSdkManager, "My Reference Scene");

    // Move the node tree of the currently loaded scene into the reference scene.
    int lNumChildren = lCurrentScene->GetRootNode()->GetChildCount();
    for(int i = 0; i < lNumChildren; i++) {

        // Obtain a child node from the currently loaded scene.
        FbxNode* lChildNode = lCurrentScene->GetRootNode()->GetChild(i);

        // Attach the child node to the reference scene's root node.
        lMyRefScene->GetRootNode()->AddChild(lChildNode);
    }

    // Remove the children from the root node.
    lCurrentScene->GetRootNode()->DisconnectAllSrcObject();

    // Move other objects to the reference scene.
    int lNumSceneObjects = lCurrentScene->GetSrcObjectCount();
    for(int i = 0; i < lNumSceneObjects; i++) {
        FbxObject* lObj = lCurrentScene->GetSrcObject(i);
        if(lObj == lCurrentScene->GetRootNode() || *lObj == lCurrentScene->GetGlobalSettings()){
            // Don't move the root node or the scene's global settings; these
            // objects are created for every scene.
            continue;
        }
        // Attach the object to the reference scene.
        lObj->ConnectDstObject(lMyRefScene);
    }

    // Disconnect all scene objects.
    lCurrentScene->DisconnectAllSrcObject();

    // Import the second file into lCurrentScene.
    LoadScene(lSdkManager, lCurrentScene, "file1.fbx");

    // Get the names after the second file is loaded.
    FbxString lNameBeforeUpdate = lCurrentScene->GetRootNode()->GetChild(0)->GetName();
    FbxString lReferenceName = lMyRefScene->GetRootNode()->GetChild(0)->GetName();

    // Update the root's child 0 name.
    lCurrentScene->GetRootNode()->GetChild(0)->SetName(lReferenceName);
    FbxString lNameAfterUpdate = lCurrentScene->GetRootNode()->GetChild(0)->GetName();

    // Destroy the reference scene.
    lMyRefScene->Destroy();
    lMyRefScene = NULL;

    // Verification step
    printf("Verification (0 for success): %d\n", lNameAfterUpdate.Compare("Test Name"));

    // Destroy the sdk manager.
    lSdkManager->Destroy();
    exit(0);
}
(2)场景轴和单位转换
FBX SDK中的对象始终在右手Y轴系统中创建。场景的轴系可能需要转换以适合您的应用程序的需求。有关更多信息,请查阅FbxAxisSystem类文档。
关于FBX SDK系统单元的要点:
如果阅读应用程序需要确定在其中创建数据的系统单位,则将原始系统单位用作参考。
编写应用程序必须显式设置系统单位。
隐式坐标系以厘米为单位。这表示一个坐标为(0,0,0),(1,0,0),(1,1,0),(0,1,0)且所有缩放/单位因子等于1的平面定义了一个“ 1x1厘米”平面。
可以使用以下功能分别更改场景的轴和单位制:
FbxAxisSystem :: ConvertScene(),它作用于节点变换(预旋转)和动画。
FbxSystemUnit :: ConvertScene(),它作用于节点变换(缩放)和动画。
请注意,对ConvertScene()的调用不会更改网格的顶点值,而只会影响节点变换和动画。如果场景已经在所需的轴系统或所需的单位系统中,则对ConvertScene()的调用将对该场景无效。例如:
如果场景已经在MayaZUp轴系统中,则代码FbxAxisSystem :: MayaZUp.ConvertScene(scene);不会改变任何东西。
如果场景已经以厘米为单位,则代码FbxSystemUnit :: cm.ConvertScene(scene);不会改变任何东西。
注意:如果场景在单位转换后缩放比例不正确,则可能是由不同的节点继承类型(ETransformInheritType)引起的,尤其是继承类型为eINHERIT_Rrs的节点。为避免此问题,请确保通过使用以下代码片段中的转换选项来避免在这些节点上进行单位转换。此代码段还说明了如何将场景的单位从厘米(cm)转换为米(m):
if(lScene->GetGlobalSettings().GetSystemUnit() == FbxSystemUnit::cm)
{
  const FbxSystemUnit::ConversionOptions lConversionOptions = {
    false, /* mConvertRrsNodes */
    true, /* mConvertLimits */
    true, /* mConvertClusters */
    true, /* mConvertLightIntensity */
    true, /* mConvertPhotometricLProperties */
    true  /* mConvertCameraClipPlanes */
  };

  // Convert the scene to meters using the defined options.
  FbxSystemUnit::m.ConvertScene(lScene, lConversionOptions);
}
二.FBX节点
1.什么是节点?
节点主要用于指定场景中场景元素的位置,旋转和缩放。 节点由FbxNode类抽象。 FbxScene包含节点的父子层次结构。 通过FbxScene :: GetRootNode()访问该树的根节点。 如FBX场景中所述,可以创建其他节点并将其添加到此根节点。
// Get the root node of the scene.
FbxNode* lRootNode = lScene->GetRootNode();

// Create a child node.
FbxNode* lNode = FbxNode::Create(lScene, "child");

// Add the child to the root node.
lRootNode->AddChild(lNode);
注意:某些文件格式不允许使用重复的节点名称。 在这种情况下,重复名称将重命名为:nodename_ncl1,nodename_ncl2,nodename_ncl3等。请注意,以前的FBX文件格式(1.0版到6.1版)不允许重复的节点名。
2.节点层次结构
使用诸如FbxNode :: GetChild()和FbxNode :: GetParent()之类的方法遍历节点层次结构。 FbxNode :: GetChildCount()返回该节点的子节点数。
节点按层次结构进行组织,以相对于其父级坐标系描述节点的位置,旋转和比例。 例如,在下图中,如果cubeNode沿rootNode的x轴平移了4个单位,则lightNode也将受到此平移的影响。 但是,cameraNode不受此转换的影响,因为cameraNode不是cubeNode的子级。
旋转和缩放变换应用于父级及其子级的顺序由节点的继承类型(ETransformInheritType)指定。 可以使用FbxNode :: SetTransformationInheritType()设置此转换继承。 有关更多详细信息,请查阅FbxNode类文档。
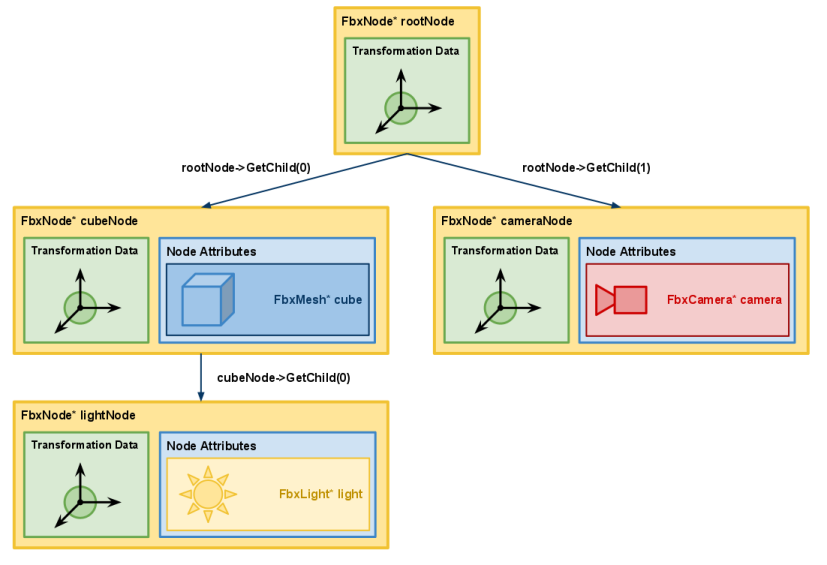
如导出场景和FBX场景中所述,导出场景时不会保存场景的根节点。仅根节点的递归后代子级与场景一起导出。在上图中,假设rootNode是场景的根节点。导出场景时,将不会保存rootNode。但是,cubeNode,lightNode和cameraNode以及它们的节点属性将被保存到文件中。
3.节点属性
通常由FbxNodeAttribute的子类(例如FbxMesh,FbxLight或FbxCamera)抽象化场景中存在的网格,灯光,摄像机或任何其他对象。 FbxNodeAttribute绑定到FbxNode以描述其在场景中的位置。使用FbxNode :: SetNodeAttribute()执行此绑定。
在上图中,FbxNode * lightNode的节点属性是FbxLight。因此,场景中FbxLight *光的位置将取决于应用于从FbxNode *根节点到FbxNode * lightNode的每个节点的累积转换。
一个节点可以绑定多个节点属性。当处理不同级别的细节(LOD)的网格时,此概念很有用。同样,一个节点属性可以绑定到多个节点。此技术称为“实例化”,可减少内存消耗。有关更多信息,请参见实例化。
注意:FbxSurfaceMaterial也可以绑定到节点,并应用于其属性以定义(例如)网格的表面属性。请注意,FbxSurfaceMaterial不是FbxNodeAttribute的子类。
4.转换数据
节点的转换数据包括其相对于其父节点的平移,旋转和缩放向量。此数据表示为一组FbxTypedProperty对象,可通过FbxNode :: LclTranslation,FbxNode :: LclRotation,FbxNode :: LclScaling访问。请注意,“ Lcl”前缀代表“本地”。
FbxDouble3 translation = lNode->LclTranslation.Get();
FbxDouble3 rotation = lNode->LclRotation.Get();
FbxDouble3 scaling = lNode->LclScaling.Get();
节点的转换数据可以受FbxLimits对象限制,该对象可以通过FbxNode :: GetTranslationLimits(),FbxNode :: GetRotationLimits()和FbxNode :: GetScalingLimits()访问。 节点也可以使用FbxConstraint对象进行约束。 有关更多详细信息,请查阅FbxLimits和FbxConstraint的类文档。
节点相对于场景的全局坐标系的平移,旋转和缩放属性可以表示为变换矩阵。 该转换矩阵是通过FbxNode :: EvaluateGlobalTransform()获得的。
5.分组节点
FbxNode的实例可以存在而没有绑定的FbxNodeAttribute。 在这种情况下,可以使用这样的FbxNode将其子节点分组或放置在场景中。
6.本节中的主题
转换数据
计算转换矩阵
(1)转换数据
平移,旋转和缩放向量
可使用FbxNode :: LclTranslation,FbxNode :: LclRotation和FbxNode :: LclScaling属性访问节点的默认平移,旋转和缩放(默认TRS属性):
// Get the node’s default TRS properties
FbxDouble3 lTranslation = lNode->LclTranslation.Get();
FbxDouble3 lRotation    = lNode->LclRotation.Get();
FbxDouble3 lScaling     = lNode->LclScaling.Get();
FbxTypedPropertyAll三个成员函数返回FbxDouble3类型的向量。 每个向量的值是X,Y和Z坐标的三元组。 这些向量之一的值是相对于父节点的相应默认TRS属性向量的偏移量。 因此,节点的默认TRS属性在父节点本地。
节点在给定时间点的实际TRS属性取决于:
节点的默认TRS属性。
适用于该节点的限制(请参阅FbxNode :: GetLimits())。
适用于该节点的约束(请参阅FbxConstraint及其子类)。
当前动画堆栈的动画曲线。 有关更多信息,请参见动画。
全球和本地转换矩阵
可以通过调用FbxNode :: EvaluateGlobalTransform()和FbxNode :: EvaluateLocalTransform()分别获得节点的全局和局部转换矩阵:
// Get the node's default global transformation matrix.
FbxAMatrix& lGlobalTransform = lNode->EvaluateGlobalTransform();

// Get the node's default local transformation matrix.
FbxAMatrix& lLocalTransform = lNode->EvaluateLocalTransform();
这些成员函数等效于使用FbxScene的动画评估器FbxAnimEvaluator :: GetNodeGlobalTransform()和FbxAnimEvaluator :: GetNodeLocalTransform()函数:
// Get the scene's animation evaluator.
FbxAnimEvaluator* lEvaluator = lScene->getEvaluator();

// Get the node's default global transformation matrix.
FbxAMatrix& lGlobalTransform = lEvaluator->GetNodeGlobalTransform(lNode);

// Get the node's default local transformation matrix.
FbxAMatrix& lLocalTransform = lEvaluator->GetNodeLocalTransform(lNode);
通过传递FbxTime对象,可以在特定的时间点获得动画节点的变换矩阵。
FbxTime lTime;

// Set the time at two seconds.
lTime.SetSecondDouble((float) 2);

// Get the node's global transformation matrix at 2 seconds.
FbxAMatrix& lGlobalTransform = lNode->EvaluateGlobalTransform(lTime);
注意:无法在FBX SDK中显式设置节点的全局转换矩阵。
几何变换属性
FbxNode几何变换属性(FbxNode :: GeometricTranslation,FbxNode :: GeometricRotation和FbxNode :: GeometricScaling)描述了FbxNodeAttribute如何从FbxNode的本地参考框架偏移。 在计算FbxNode的局部变换之后,这些几何变换将应用于FbxNodeAttribute,并且不会在节点层次结构中继承。
注意:几何变换属性与3ds Max表示轴心信息的方式有关。 它可与3ds Max的对象偏移转换相媲美。
将组件拷贝到标准TRS变换中
FbxNode :: ConvertPivotAnimationRecursive()函数使您可以设置变换组件:旋转前和旋转后,旋转和缩放枢轴和偏移-在标准变换内部-平移,旋转,缩放。 这是一个代码片段。
// Do this setup for each node (FbxNode).
// We set up what we want to bake via ConvertPivotAnimationRecursive.
// When the destination is set to 0, baking will occur.
// When the destination value is set to the source’s value, the source values will be retained and not baked.
{
    FbxVector4 lZero(0,0,0);

    // Activate pivot converting
    pNode->SetPivotState(FbxNode::eSourcePivot, FbxNode::ePivotActive);
    pNode->SetPivotState(FbxNode::eDestinationPivot, FbxNode::ePivotActive);

    // We want to set all these to 0 and bake them into the transforms.
    pNode->SetPostRotation(FbxNode::eDestinationPivot, lZero);
    pNode->SetPreRotation(FbxNode::eDestinationPivot, lZero);
    pNode->SetRotationOffset(FbxNode::eDestinationPivot, lZero);
    pNode->SetScalingOffset(FbxNode::eDestinationPivot, lZero);
    pNode->SetRotationPivot(FbxNode::eDestinationPivot, lZero);
    pNode->SetScalingPivot(FbxNode::eDestinationPivot, lZero);

    // This is to import in a system that supports rotation order.
    // If rotation order is not supported, do this instead:
    // pNode->SetRotationOrder(FbxNode::eDestinationPivot, FbxNode::eEulerXYZ);
    ERotationOrder lRotationOrder;
    pNode->GetRotationOrder(FbxNode::eSourcePivot, lRotationOrder);
    pNode->SetRotationOrder(FbxNode::eDestinationPivot, lRotationOrder);

    // Similarly, this is the case where geometric transforms are supported by the system.
    // If geometric transforms are not supported, set them to zero instead of
    // the source’s geometric transforms.
    // Geometric transform = local transform, not inherited by children.
    pNode->SetGeometricTranslation(FbxNode::eDestinationPivot, pNode->GetGeometricTranslation(FbxNode::eSourcePivot));
    pNode->SetGeometricRotation(FbxNode::eDestinationPivot, pNode->GetGeometricRotation(FbxNode::eSourcePivot));
    pNode->SetGeometricScaling(FbxNode::eDestinationPivot, pNode->GetGeometricScaling(FbxNode::eSourcePivot));

    // Idem for quaternions.
    pNode->SetUseQuaternionForInterpolation(FbxNode::eDestinationPivot, pNode->GetUseQuaternionForInterpolation(FbxNode::eSourcePivot));
}

// When the setup is done, call ConvertPivotAnimationRecursive to the scene’s root node.
// Sampling rate e.g. 30.0.
mScene->GetRootNode()->ConvertPivotAnimationRecursive(FbxNode::eDestinationPivot, lSamplingRate );
注意:为避免在每次更改参数之一时重新计算枢轴矩阵并更新动画曲线,仅当显式调用ResetPivotSetAndConvertAnimation()或ConvertPivotAnimationRecursive()时,FBX SDK才会应用新设置。
(2)计算转换矩阵
FBX SDK和Maya使用相同的公式来计算转换矩阵。 但是,3ds Max使用不同的公式。
注意:3ds Max的FBX导入器和导出器会自动将转换矩阵与3ds Max相互转换。
FBX和Maya
以下公式表示FBX SDK和Maya如何计算节点的转换矩阵:

对任何给定的向量进行变换,以使V’= WorldTransform * V

该公式的作用是,首先缩放任何给定的矢量,然后旋转并最终平移该矢量。
R矩阵考虑了旋转顺序。 由于矩阵的数学特性,R是Rx,Ry和Rz的可能组合之一(每个都是矩阵)的结果。 例如,对于默认旋转顺序XYZ,R = Rz * Ry * Rx。
3ds Max
以下公式表示3ds Max如何计算节点的变换矩阵。 公式中的所有术语与FBX和Maya中的相同,但代表几何变换的三个术语除外:
WorldTransform = ParentWorldTransform * T * R * S * OT * OR * OS
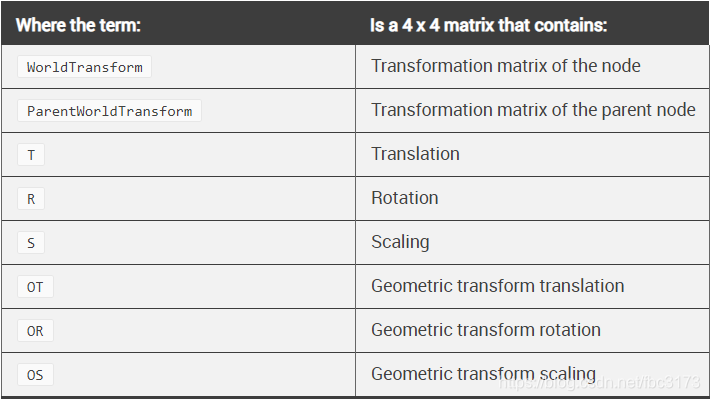
几何平移,几何旋转和几何缩放与3ds Max中的对象偏移概念有关。 在节点转换之后,将这些几何转换应用于节点属性。
几何变换不会被继承:ParentWorldTransform不包含WorldTransform父节点的OT,OR和OS。
几何变换在FBX SDK中作为FbxNode对象的三个属性实现:FbxNode :: GeometricTranslation,FbxNode :: GeometricRotation和FbxNode :: GeometricScaling。
三.FBX节点属性
1.创建节点属性
FbxNodeAttribute与FbxNode配对用来定义具有特定位置,旋转和比例的场景元素。 如果未为该节点设置节点属性,则调用FbxNode :: GetNodeAttribute()将返回NULL。
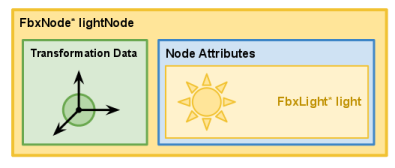
以下代码示例(从ExportScene04 / main.cxx进行了修改以适合上图)说明了如何在场景中创建简单的聚光灯。 在此,FbxLight * light是FbxNode * lightNode的节点属性。 有关灯光的更多信息,请参阅灯光。
// Create a spotlight.
FbxNode* CreateLight(FbxScene* pScene, char* pName)
{
    FbxLight* light = FbxLight::Create(pScene,pName);

    light->LightType.Set(FbxLight::eSpot);
    light->CastLight.Set(true);

    FbxNode* lightNode = FbxNode::Create(pScene,pName);

    lightNode->SetNodeAttribute(light);

    return lightNode;
}
2.节点属性
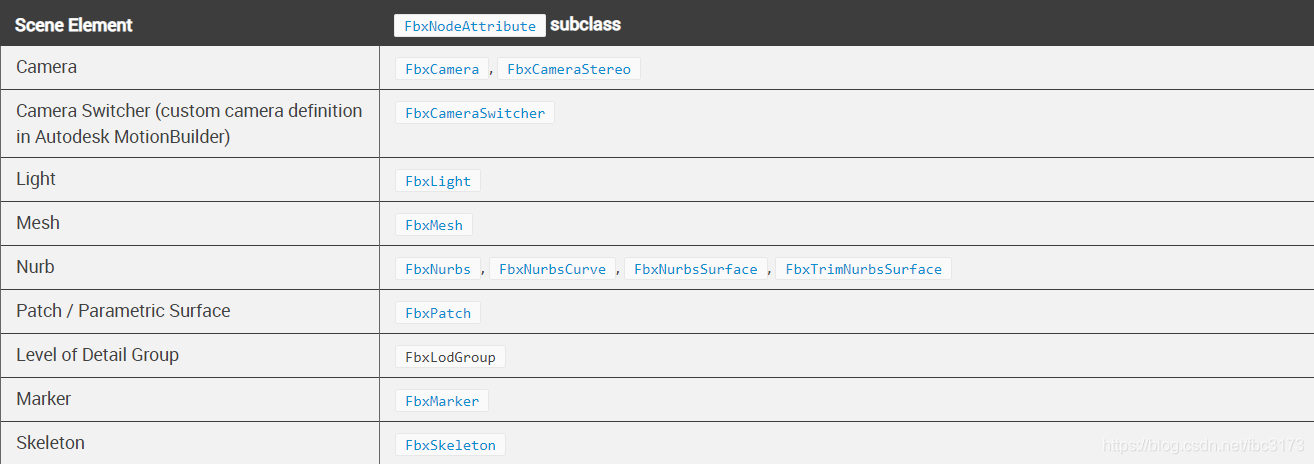
下表列出了一组基本场景元素及其相关的FbxNodeAttribute子类。 可以使用FbxNode :: SetNodeAttribute()将这些节点属性与FbxNode配对。 有关完整的类层次结构,请参阅《 C ++参考指南》。
注意:某些应用程序要求其场景图中的节点类型为空。 FbxNull节点属性用于定义这种节点类型。 观察到FbxNull的实例与NULL值不同。
3.节点属性类型
FbxNodeAttribute的类型(FbxNodeAttribute :: EAttributeType)可以通过调用FbxNodeAttribute :: GetAttributeType()获得。 EAttributeType对于将节点属性对象向下转换到其适当的子类很有用。
以下代码示例(从ImportScene / main.cxx和ImportScene / DisplayLight.cxx改编)说明了如何使用开关显示FbxNode中包含的FbxLight。
//
// Adapted from ImportScene/DisplayLight.cxx ...
// Display the various properties of the FbxLight contained within the FbxNode.
//
void DisplayLight(FbxNode* pNode)
{
    FbxLight* lLight = (FbxLight*) pNode->GetNodeAttribute();

    DisplayString("Light Name: ", (char *) pNode->GetName());
    // ...

    char* lLightTypes[] = { "Point", "Directional", "Spot" };

    DisplayString("    Type: ", lLightTypes[lLight->LightType.Get()]);
    DisplayBool("    Cast Light: ", lLight->CastLight.Get());

    if (!(lLight->FileName.Get().IsEmpty()))
    {
        DisplayString("    Gobo");

        DisplayString("        File Name: \"", lLight->FileName.Get().Buffer(), "\"");
        DisplayBool("        Ground Projection: ", lLight->DrawGroundProjection.Get());
        DisplayBool("        Volumetric Projection: ", lLight->DrawVolumetricLight.Get());
        DisplayBool("        Front Volumetric Projection: ", lLight->DrawFrontFacingVolumetricLight.Get());
    }

    // ...
}

//
// Adapted from ImportScene/main.cxx ...
// Display the contents of a node. Here, we are only interested in
// looking  at the eLight attribute type, which coincides with the
// FbxLight node attribute.
//
void DisplayContent(FbxNode* pNode)
{
    FbxNodeAttribute::EAttributeType lAttributeType;
    int i;

    if(pNode->GetNodeAttribute() == NULL)
    {
        printf("NULL Node Attribute\n\n");
    }
    else
    {
        lAttributeType = (pNode->GetNodeAttribute()->GetAttributeType());

        switch (lAttributeType)
        {
            // ...

        case FbxNodeAttribute::eLight:
            DisplayLight(pNode);
            break;

            // ...
        }
    }

    // ...

    for(i = 0; i < pNode->GetChildCount(); i++)
    {
        DisplayContent(pNode->GetChild(i));
    }
}
4.本节中的主题
灯光
照相机
几何
(1)灯光
创建灯光
FBX SDK中的灯光由FbxLight类抽象。 FbxLight的创建与场景中的其他任何对象一样。
默认情况下,FbxLight沿节点的负Y轴指向。
// Create a node for our light in the scene.
FbxNode* lLightNode = FbxNode::Create(pScene, "lightNode");

// Create a light.
FbxLight* lLight = FbxLight::Create(pScene, "light");

// Set the node attribute of the light node.
lLightNode->SetNodeAttribute(lLight);

// Add the light node to the root node in the scene.
FbxNode* lRootNode = pScene->GetRootNode();
lRootNode->AddChild(lLightNode);
注意:场景的环境照明是在其全局设置中定义的,可以通过FbxScene :: GetGlobalSettings()进行访问。 有关更多信息,请查阅FbxGlobalSettings类文档。
灯光类型
可以通过设置其FbxLight :: LightType属性来定义灯光的行为。
// Set the type of the light to a spotlight.
lLight->LightType.Set(FbxLight::eSpot);
下表总结了每种灯光类型的行为。

对准灯光
可以强制使用聚光灯或定向灯始终指向场景中的特定目标。 为此,光源的节点必须使用FbxNode :: SetTarget()设置其目标。 FbxMarker节点属性在目标节点中使用。
// Create a node to contain the marker. This will be our target node.
FbxNode* lTargetNode = FbxNode::Create(pScene, "targetNode");

// Create a marker node attribute.
FbxMarker* lMarker = FbxMarker::Create(pScene, "lightMarker");

// Set the marker as the target node's attribute.
lTargetNode->SetNodeAttribute(lMarker);

// Set our light node's target.
lLightNode->SetTarget(lTargetNode);
默认情况下,FbxNode使用其正X轴作为瞄准约束。 回想一下,默认情况下,新创建的光源指向节点的负Y轴。 为了使光点沿着节点的正X轴,必须使用FbxNode :: SetPostTargetRotation()将90度的旋转偏移应用于光的节点。 有关更多信息,请查阅FbxNode类文档中的“节点目标管理”部分。
颜色和强度
灯光的颜色在其FbxLight :: Color属性中定义。 光源的默认RGB值为(1.0,1.0,1.0),表示为FbxDouble3。
// Set the light's color to (0, 1, 0.5).
lLight->Color.Set(FbxDouble3(0.0, 1.0, 0.5));
灯光的强度在其FbxLight :: Intensity属性中定义。 强度的默认值为100.0,表示为FbxDouble1。
// Set the light's intensity to 50.0
lLight->Intensity.Set(50.0)
光衰
灯光的衰减类型在其FbxLight :: DecayType属性中定义。
// Set the decay type of the light to quadratic decay.
lLight->DecayType.Set(FbxLight::eQuadratic);
下表总结了可用的衰减类型。

注意:可以使用其他基于距离的衰减属性,例如FbxLight :: EnableNearAttenuation和FbxLight :: EnableFarAttenuation。 有关更多信息,请查阅FbxLight类文档。
暗影
使用FbxLight :: CastShadows布尔属性启用阴影。 灯光阴影的颜色在FbxLight :: ShadowColor属性中定义。 灯光阴影的默认RGB值为(0.0,0.0,0.0),表示为FbxDouble3。 阴影纹理也可以使用FbxLight :: SetShadowTexture()来应用。
(2)照相机
创建相机
FBX SDK中的相机由FbxCamera类抽象。 FbxCameraStereo类抽象了用于3D成像的立体异构体。 在本主题中,我们将仅介绍创建和操作FbxCamera的基本方法。
默认情况下,FbxCamera指向节点的正X轴方向。
// Create a node for our camera in the scene.
FbxNode* lCameraNode = FbxNode::Create(pScene, "cameraNode");

// Create a light.
FbxCamera* lCamera = FbxCamera::Create(pScene, "camera");

// Set the node attribute of the camera node.
lCameraNode->SetNodeAttribute(lCamera);

// Add the camera node to the root node in the scene.
FbxNode* lRootNode = pScene->GetRootNode();
lRootNode->AddChild(lCameraNode);
创建相机后,可以将其设置为场景的默认相机。 即使场景中只有一个相机,也必须明确设置场景的默认相机。
// Set the scene's default camera.
pScene->GetGlobalSettings().SetDefaultCamera((char *) lCamera->GetName());
对准相机
可以强制摄像机始终指向场景中的特定目标。 为此,必须使用FbxNode :: SetTarget()设置摄像机的节点目标。 FbxMarker节点属性在目标节点中使用。
// Create a node to contain the marker. This will be our target node.
FbxNode* lTargetNode = FbxNode::Create(pScene, "targetNode");

// Create a marker node attribute.
FbxMarker* lMarker = FbxMarker::Create(pScene, "cameraMarker");

// Set the marker as the target node's attribute.
lTargetNode->SetNodeAttribute(lMarker);

// Set our camera node's target.
lCameraNode->SetTarget(lTargetNode);
注意:有关更多信息,请查阅FbxNode类文档中的“节点目标管理”部分。
默认情况下,FbxCamera :: FocusSource属性设置为FbxCamera :: eFocusSrcCameraInterest以保持对相机目标的聚焦。 聚焦源也可以设置为距相机特定距离。
// Set the camera's focus source to a specific distance.
lCamera->FocusSource.Set(FbxCamera::eFocusSpecificDistance);

// Set the distance to 100.0 units from the camera.
// The default value for this distance is 200.0 units.
lCamera->FocusDistance.Set(100.0);
相机属性
有关在场景中配置相机的更多信息,请查阅FbxCamera类文档。
(3)几何
几何
FbxGeometry是支持控制点变形的几何对象的基类。 FbxGeometry的实例可以作为FbxNode :: SetNodeAttribute()的节点属性绑定到FbxNode对象。 从FbxGeometry继承的类包括FbxMesh,FbxNurb,FbxPatch和FbxLine。 有关从FbxGeometry继承的类的完整列表,请查阅《 C ++参考》中的类层次结构。
有关更多信息,请参见“网格,材质和纹理”部分。


 1231
1231

 被折叠的 条评论
为什么被折叠?
被折叠的 条评论
为什么被折叠?
 到【灌水乐园】发言


