 Maven进阶:模块划分、依赖管理与多环境配置详解


 本文详细介绍了Maven高级用法,包括分模块开发(DAO与Domain分离)、依赖传递与管理(可选依赖与排除)、继承与聚合的区别、属性配置(如版本和属性设置),以及多环境部署和私服(Nexus)的搭建与配置。
39-Maven进阶-heima-笔记
一、分模块开发
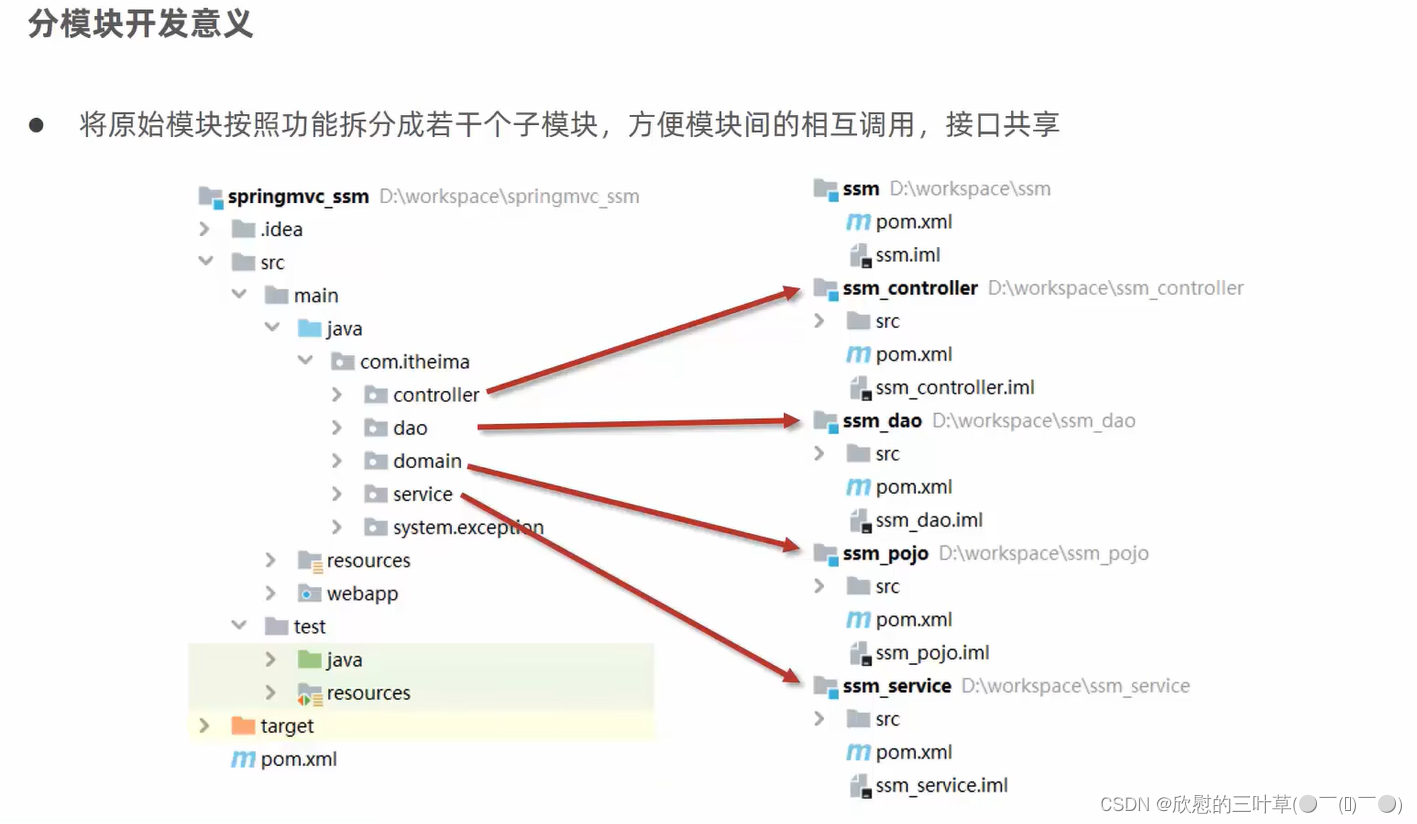
①:分模块发开与设计
②:需求
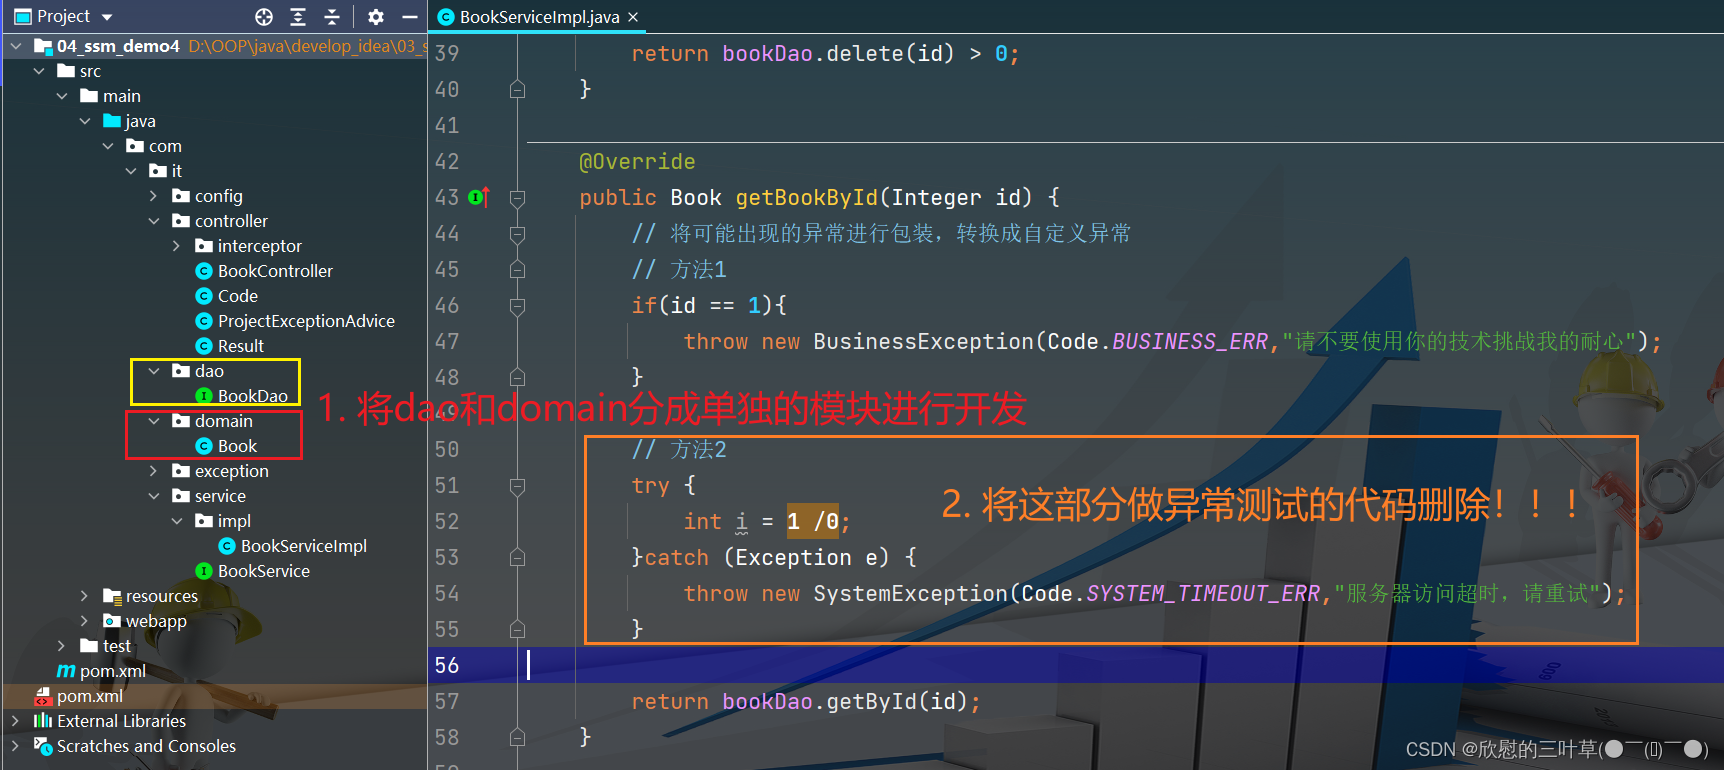
1. 分成单独的模块进行开发 |
|---|
 |
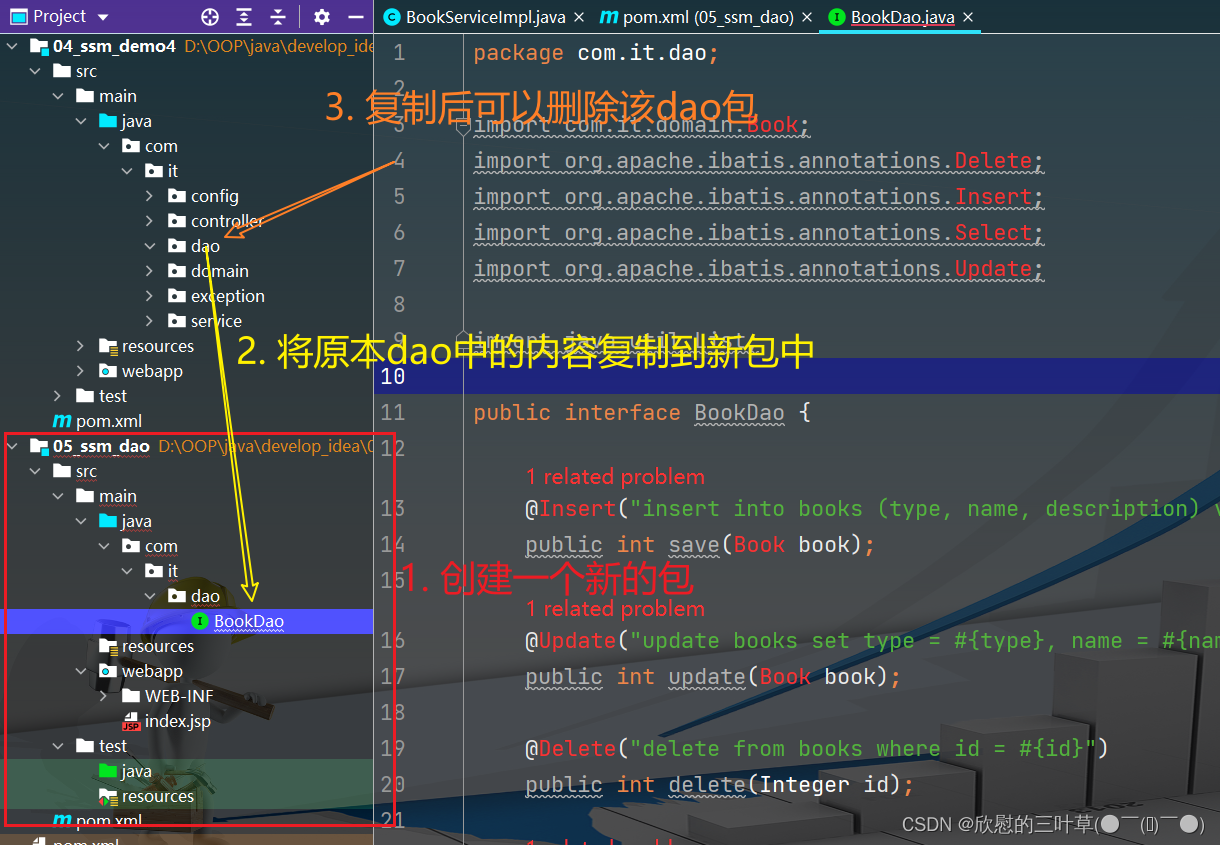
③:将dao包分为单独的模块
1. 创建一个新的包并将dao包中内容复制到新的包中 |
|---|
 |
1. 在原始项目包中引用新项目包坐标 |
|---|
 |
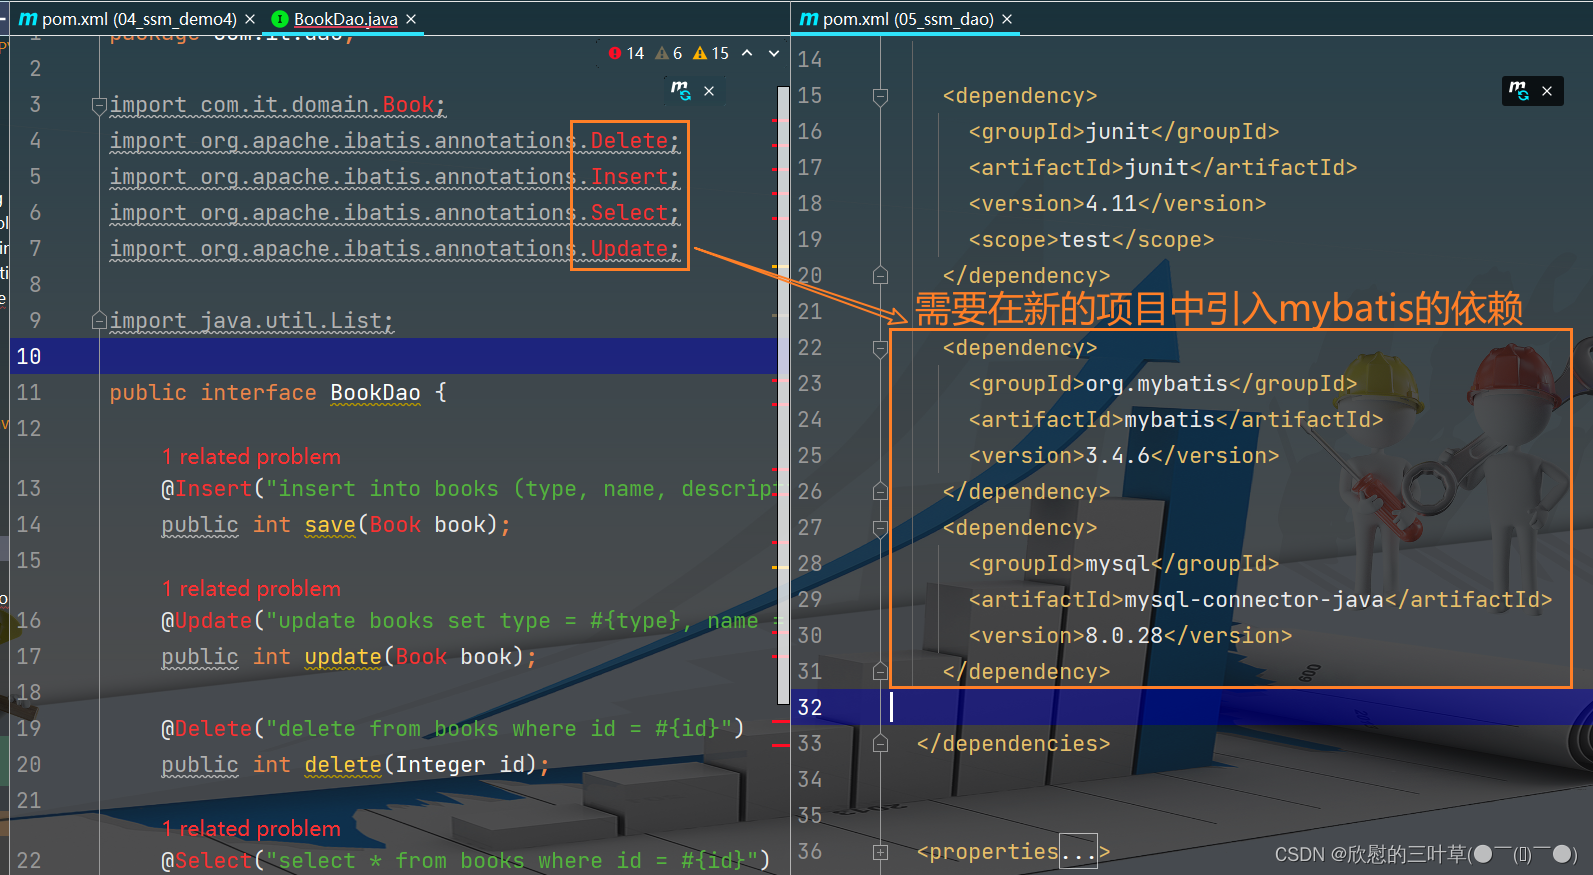
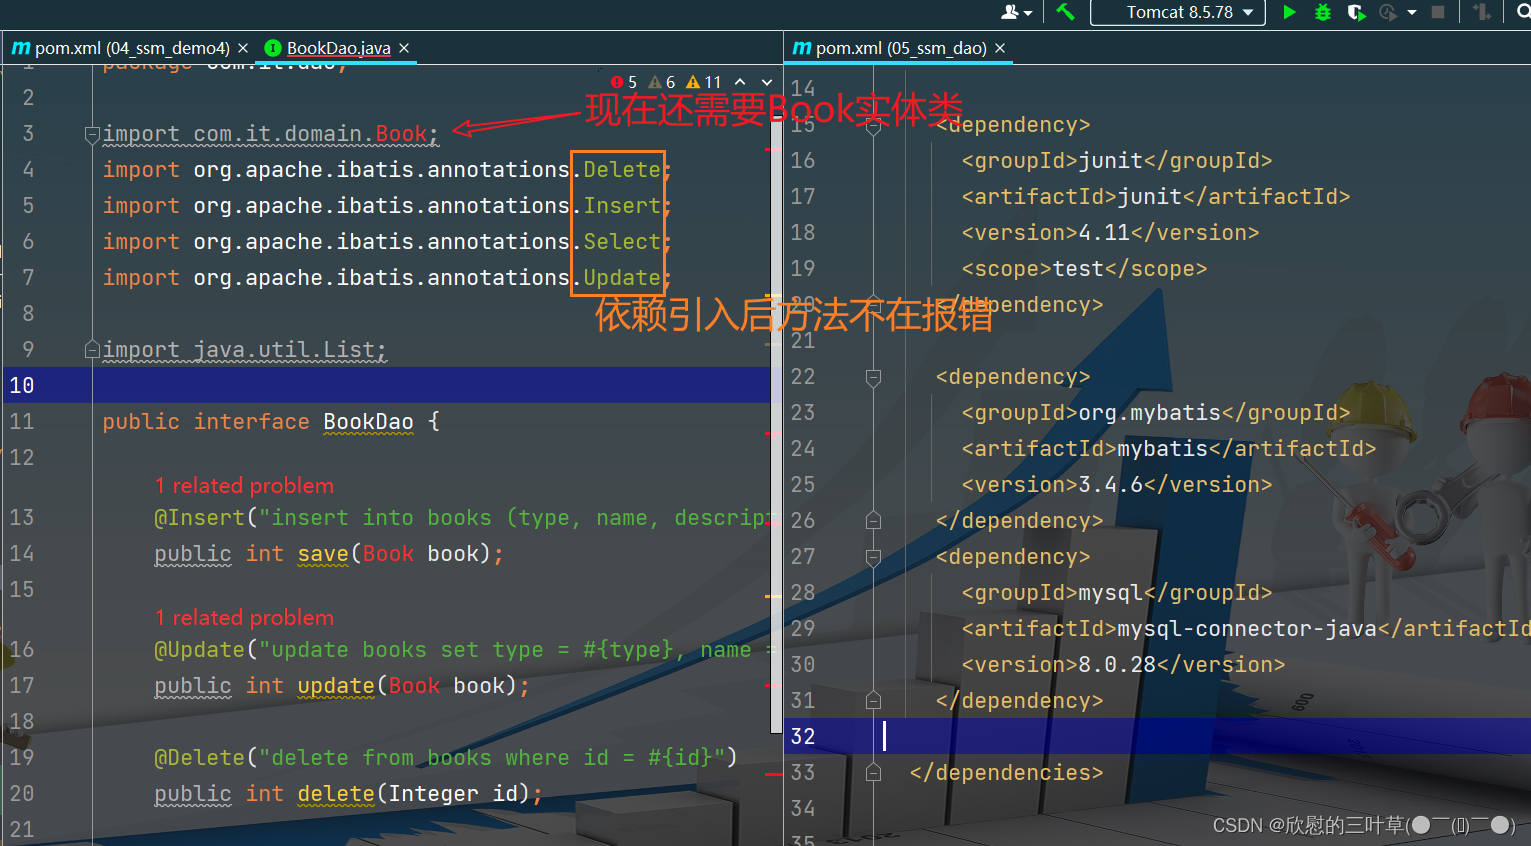
2. 引入后发现新项目中方法都在报错!!!(引入依赖) |
|---|
  |
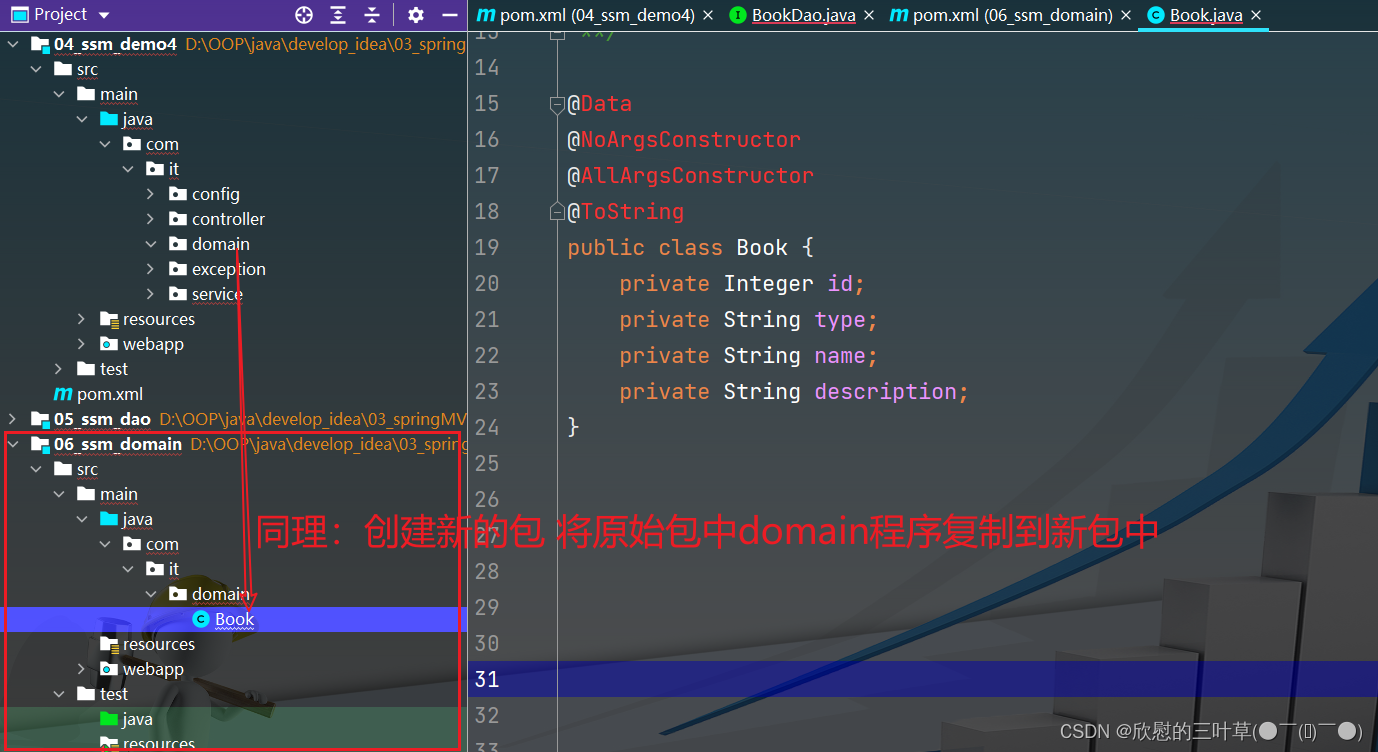
④:将domain实体类分为单独模块开发
1. 创建新的项目包将原始domain中的程序复制到新项目包中(删除原始项目包中的domain文件夹) |
|---|
 |
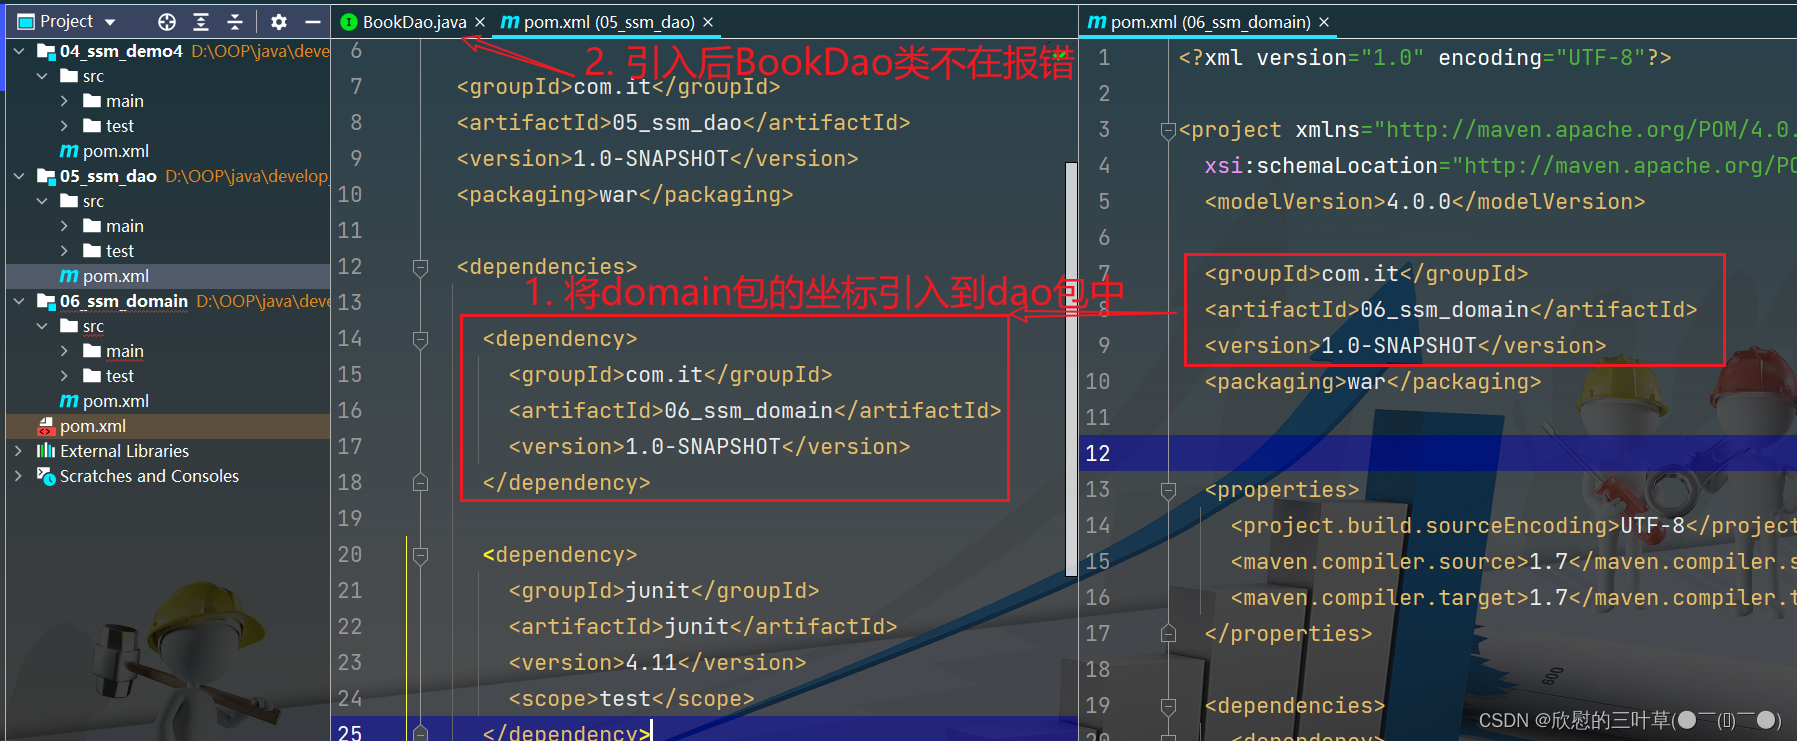
2. 在dao项目包中引入daomin包坐标 |
|---|
 |
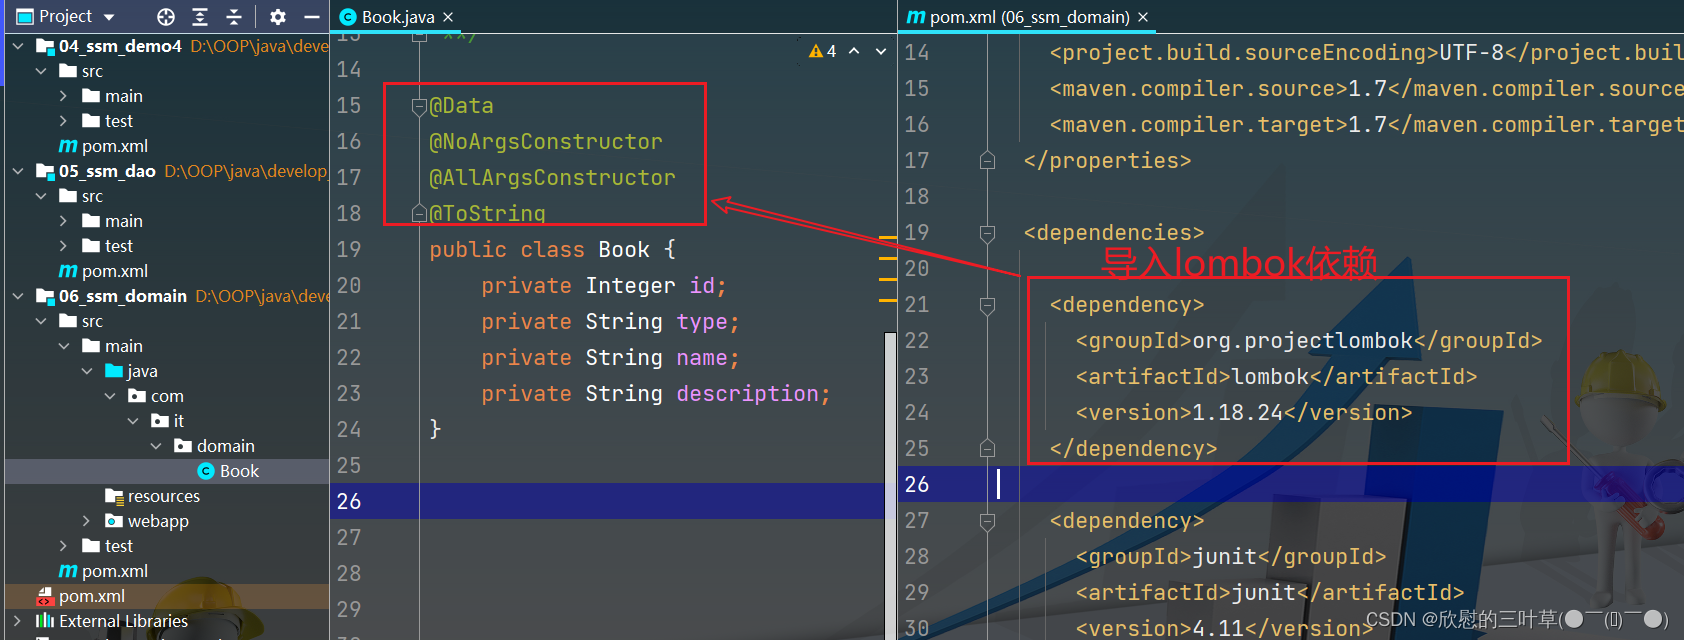
3. 在domain包中导入lombok依赖 |
|---|
 |
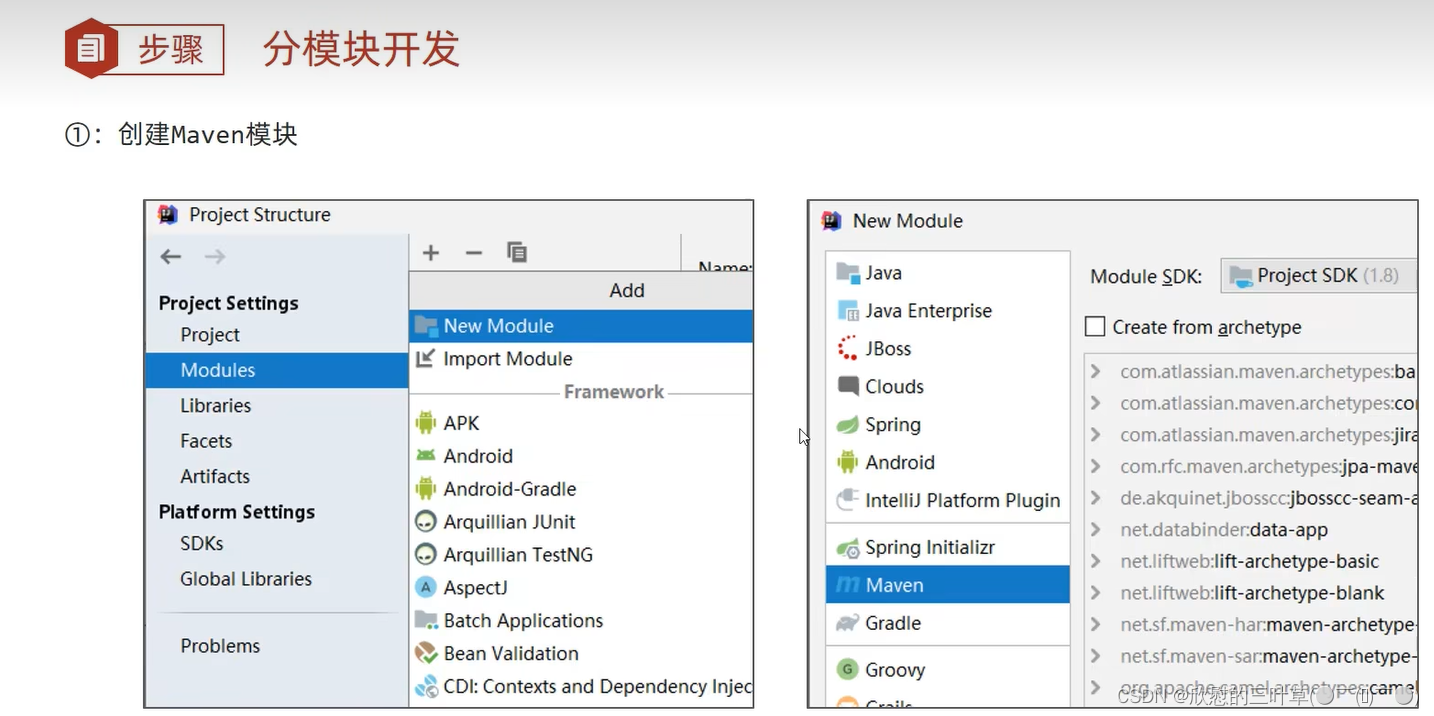
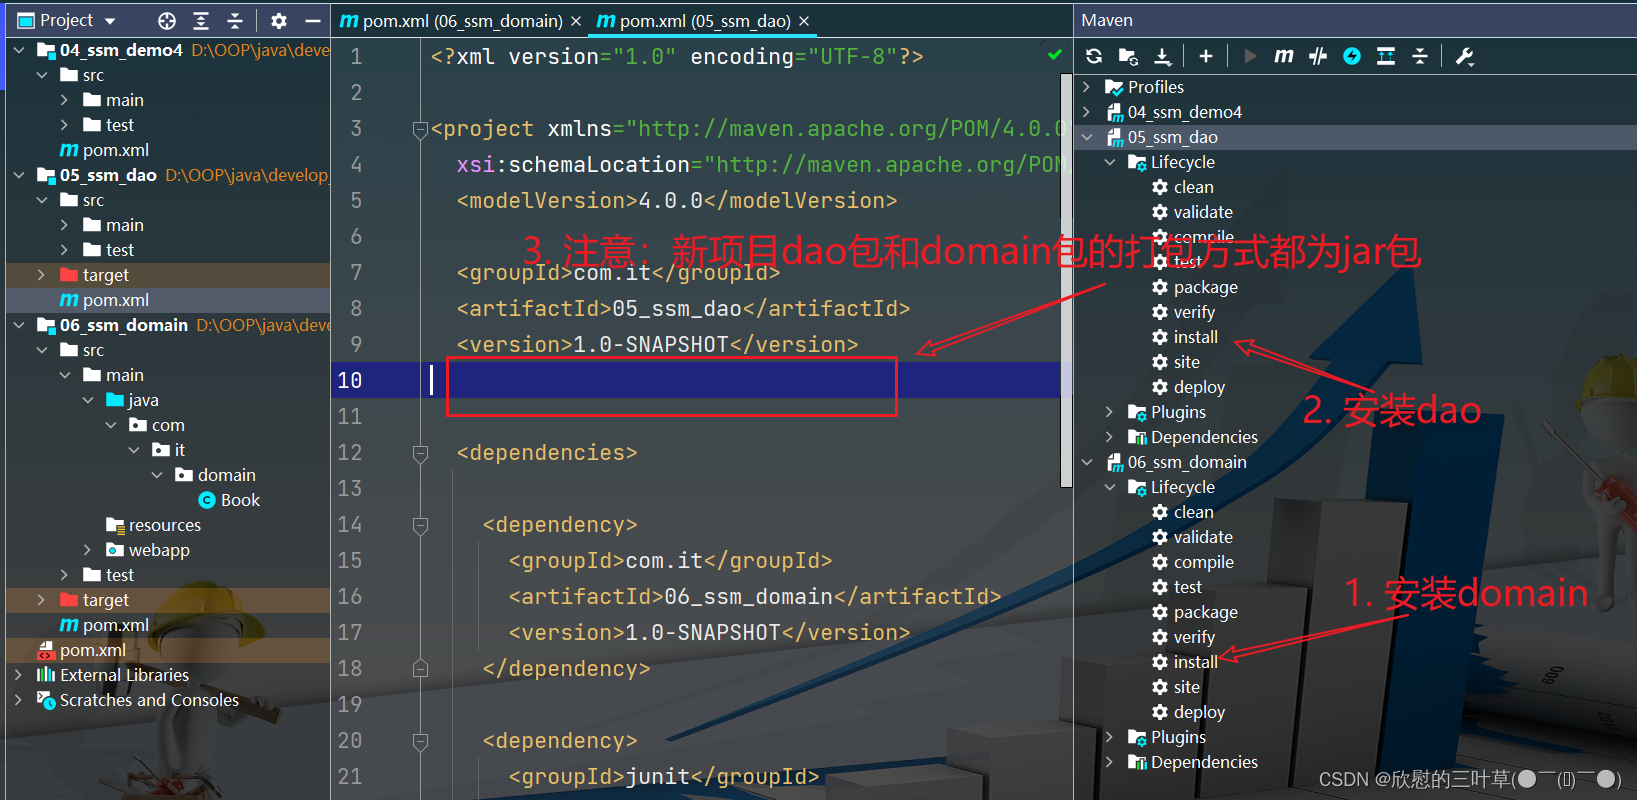
⑤:将分开的项目包install到仓库
1. 将项目包install到仓库(否则会找不到而报错) |
|---|
 |
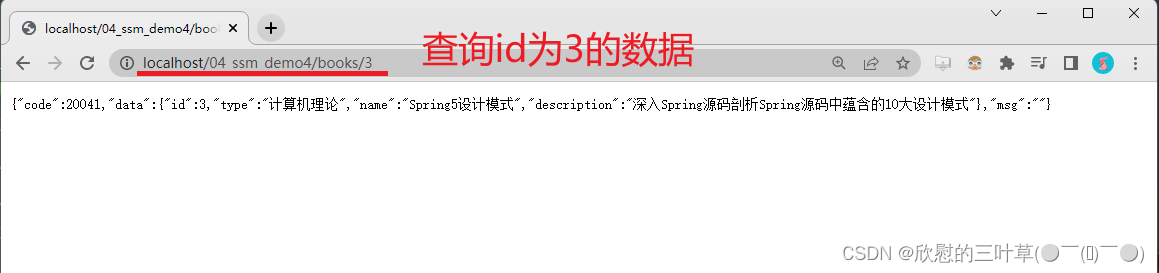
2. 测试 |
|---|
 |
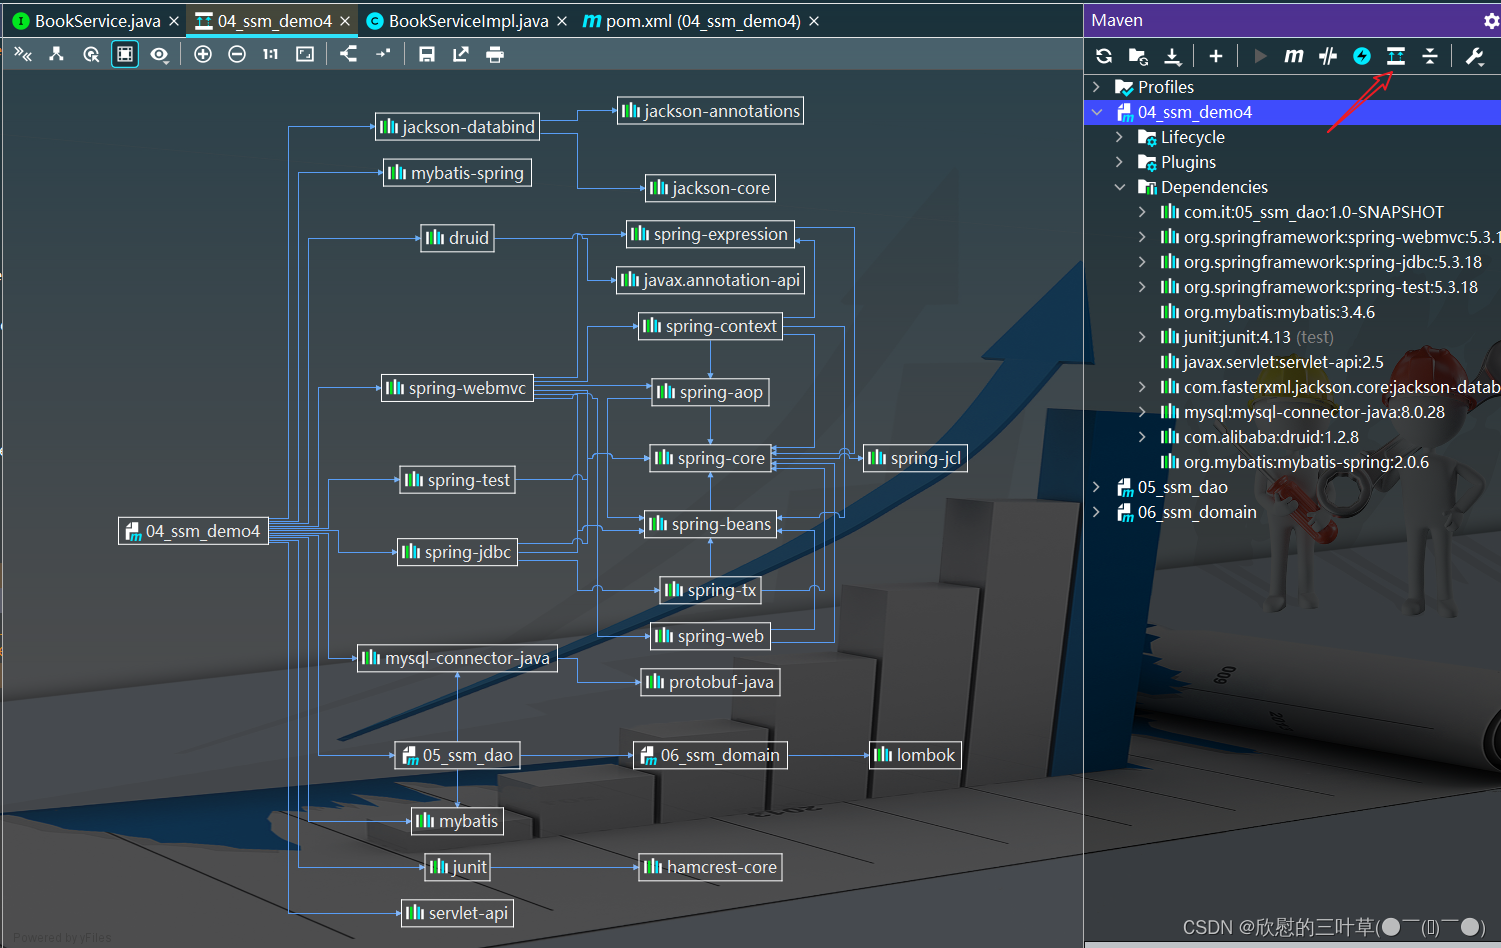
二、依赖管理
①:依赖传递
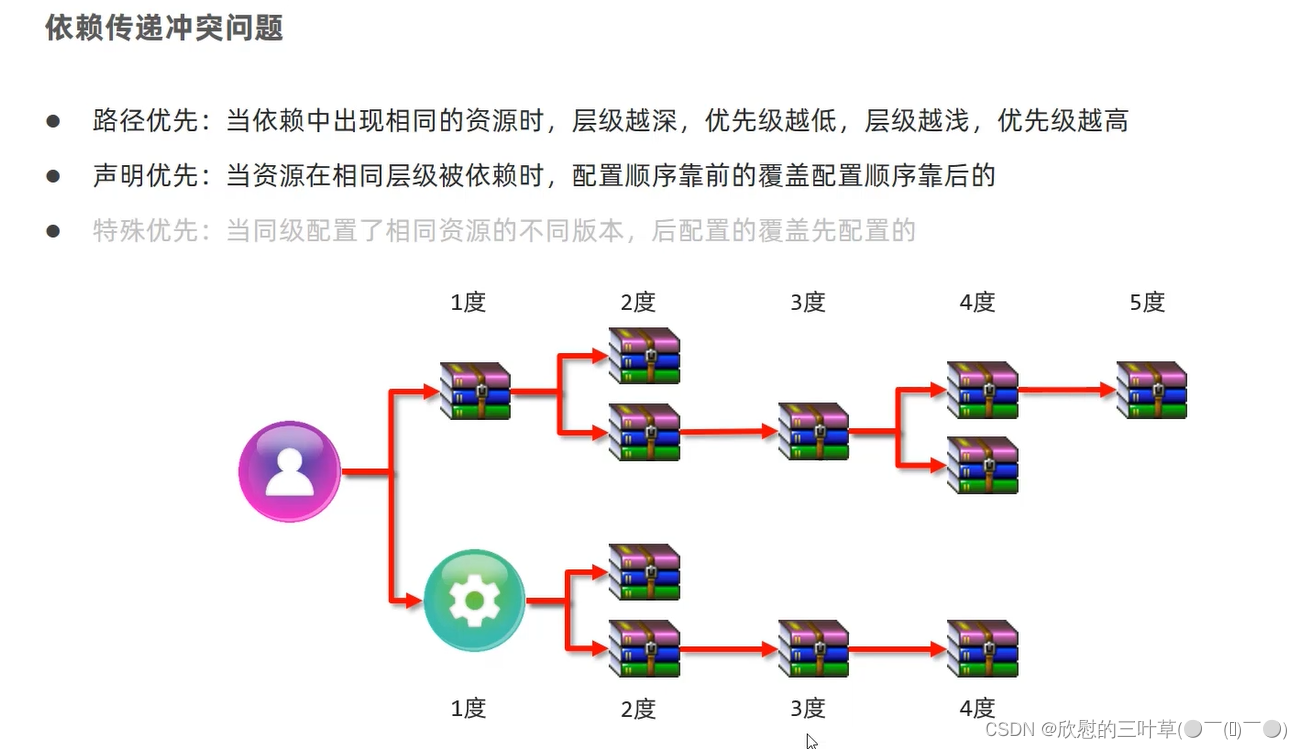 |
 |
②:可选依赖与排除依赖
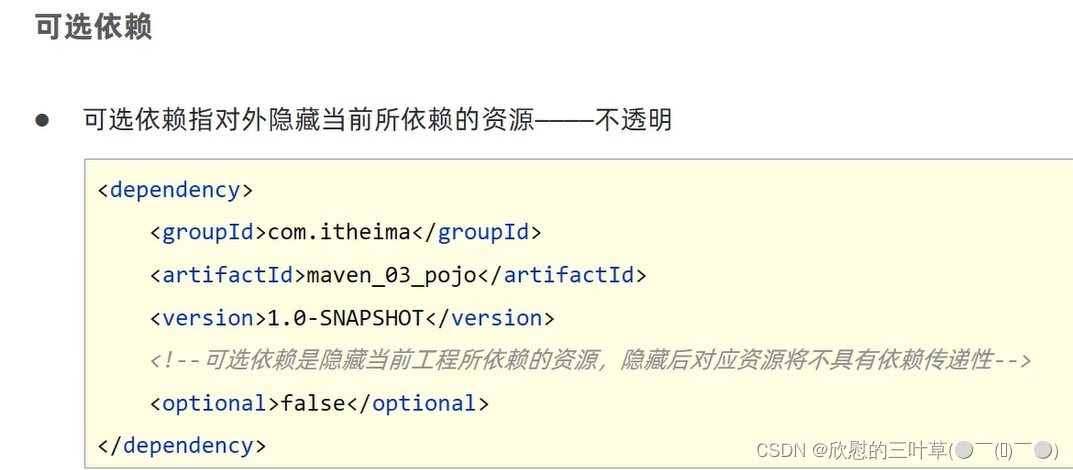 |
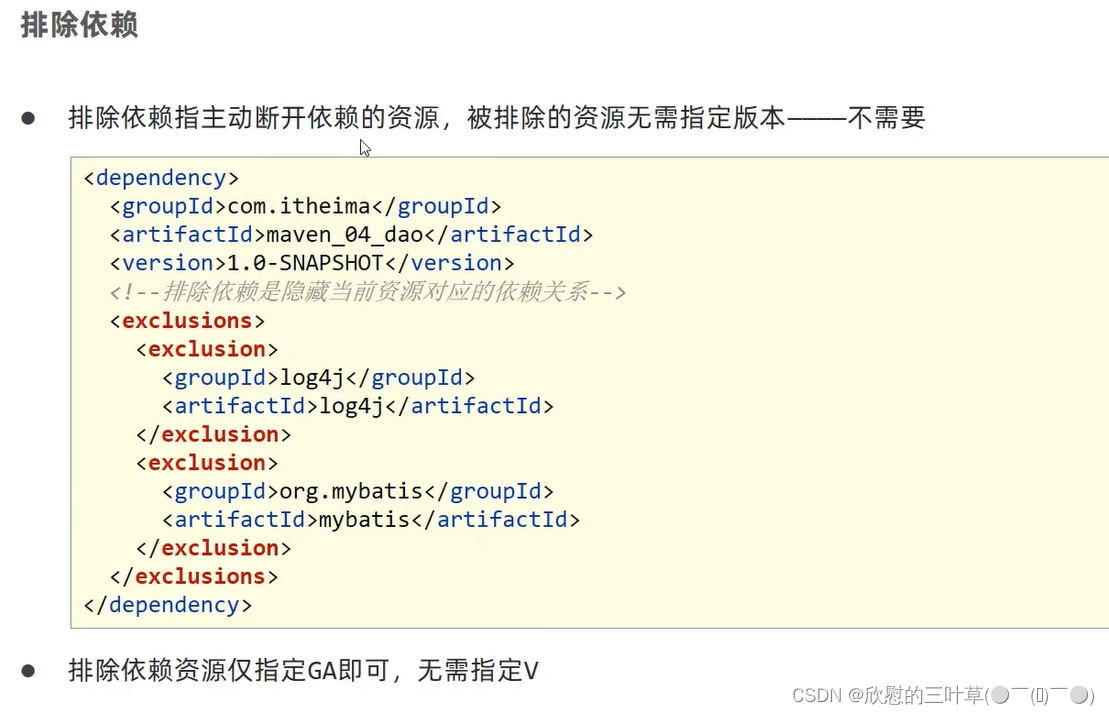 |
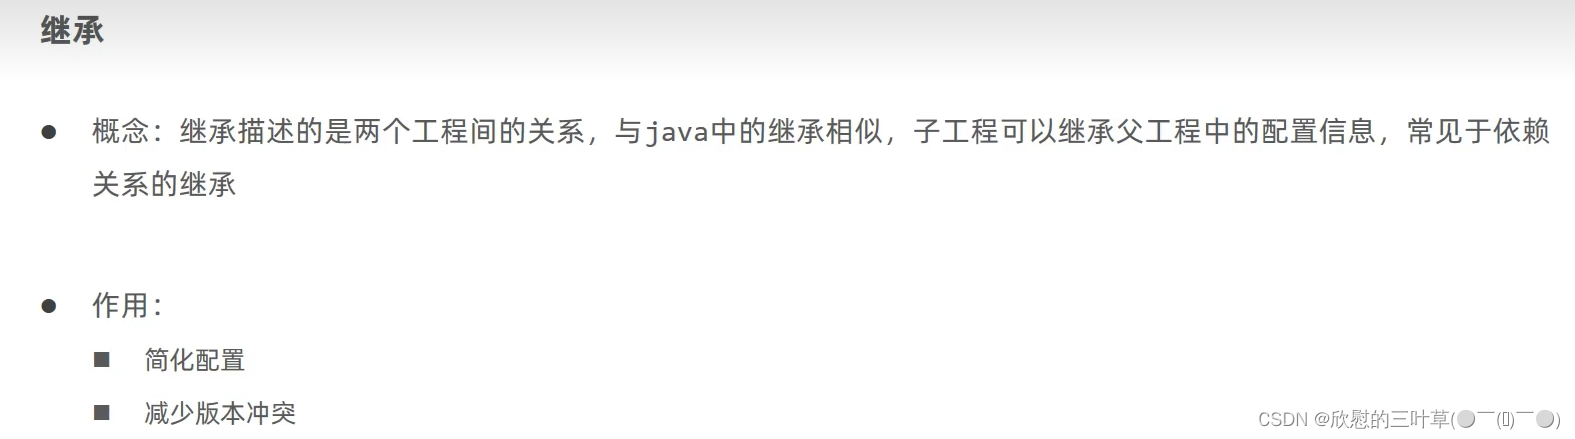
三、 继承与聚合
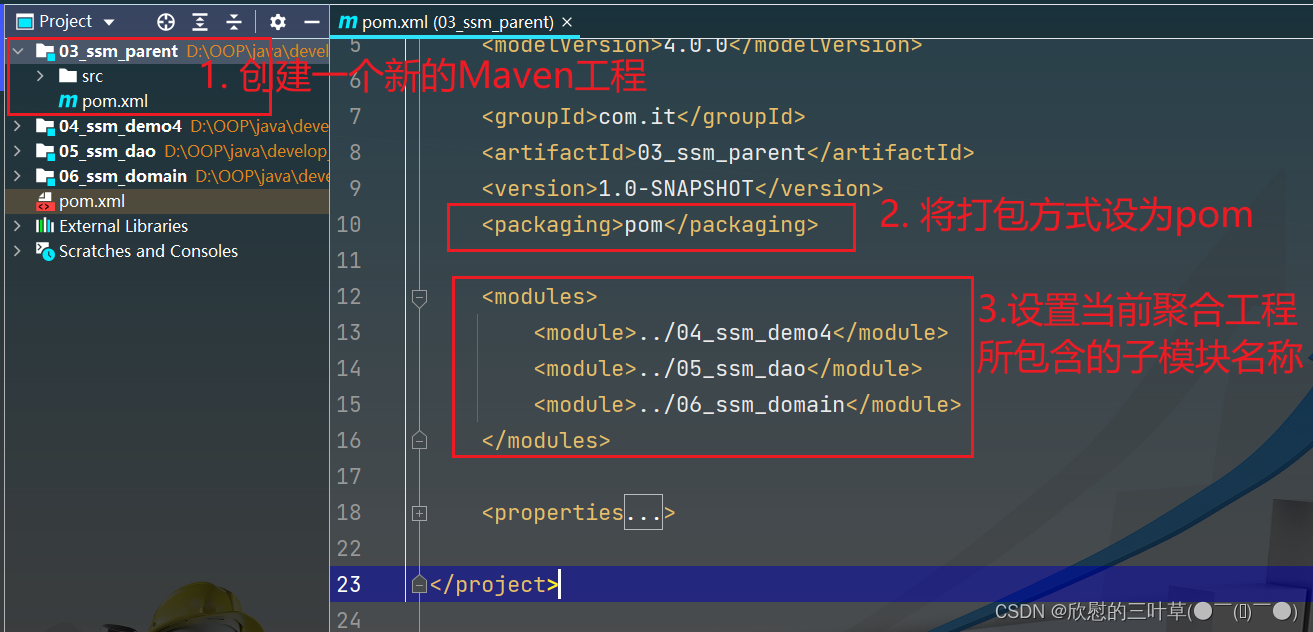
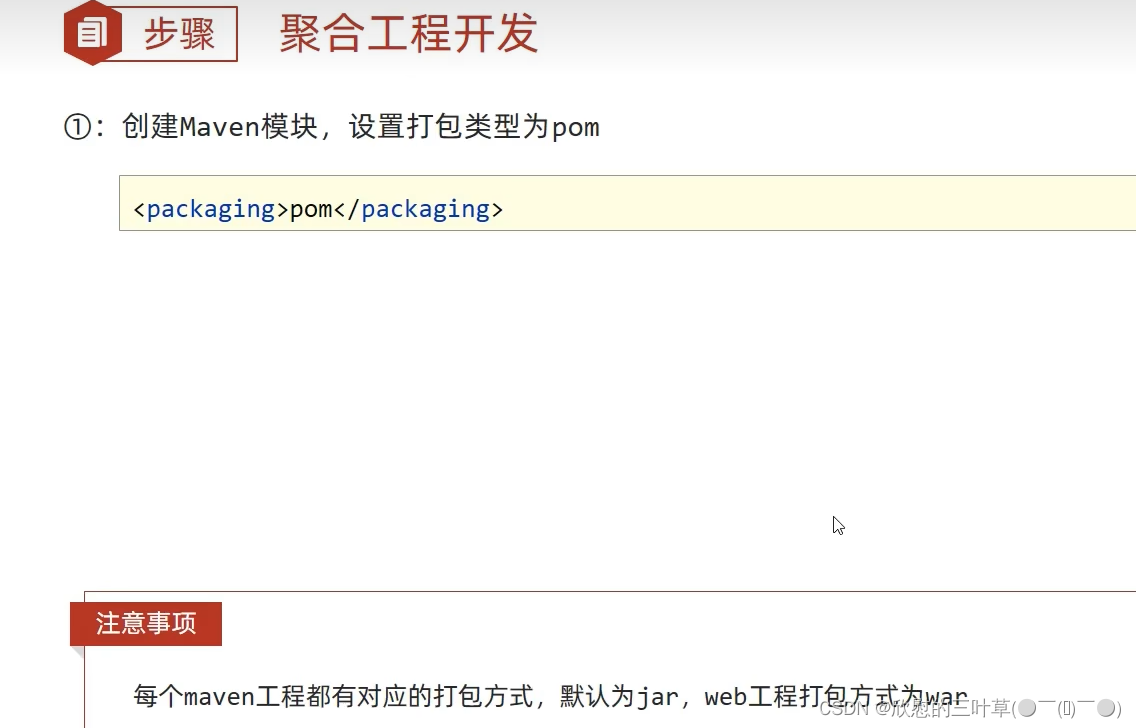
①:聚合
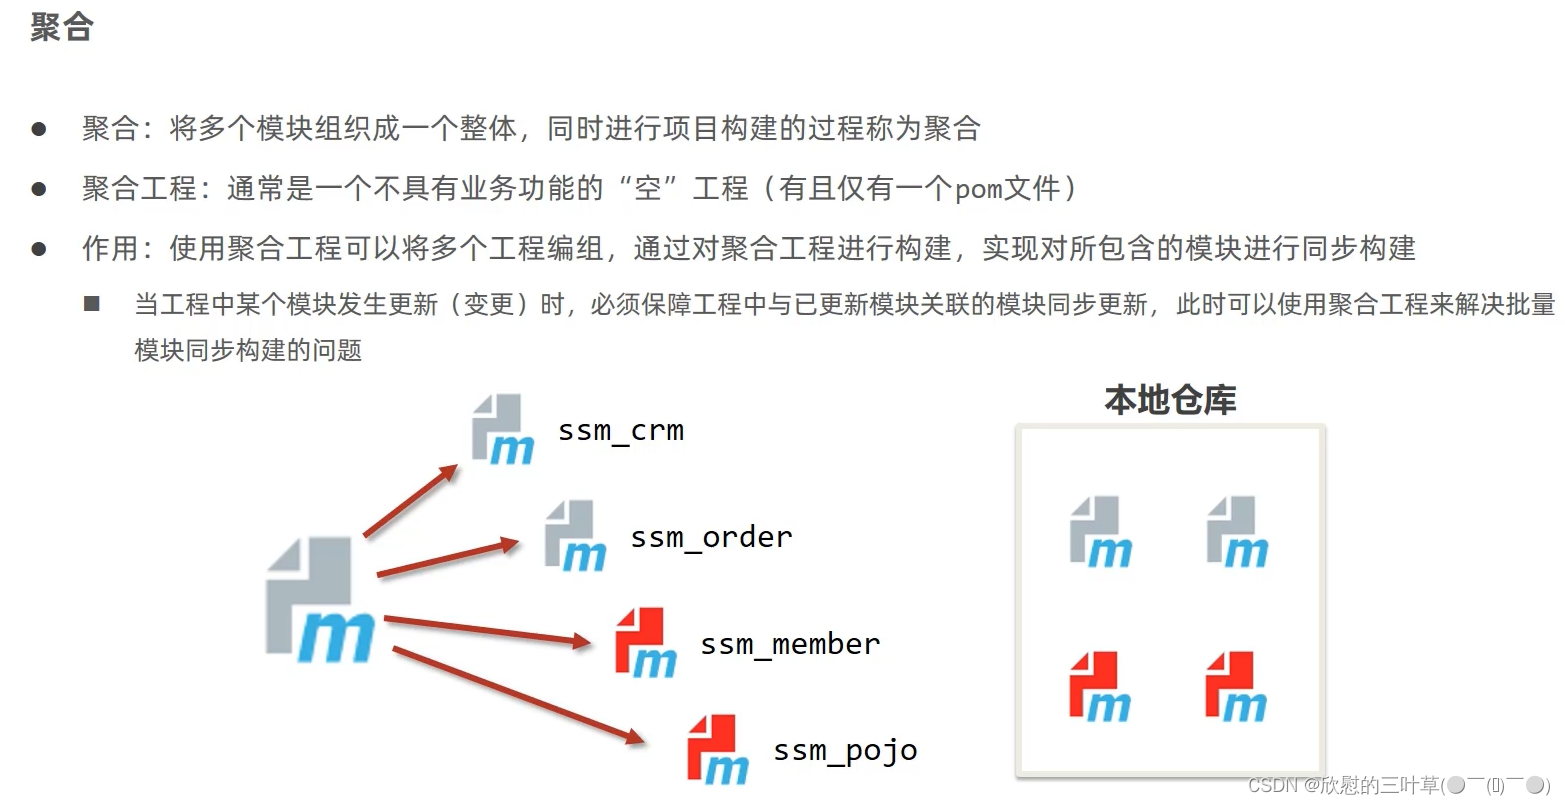 |
1. 创建一个Maven工程 |
|---|
 |
 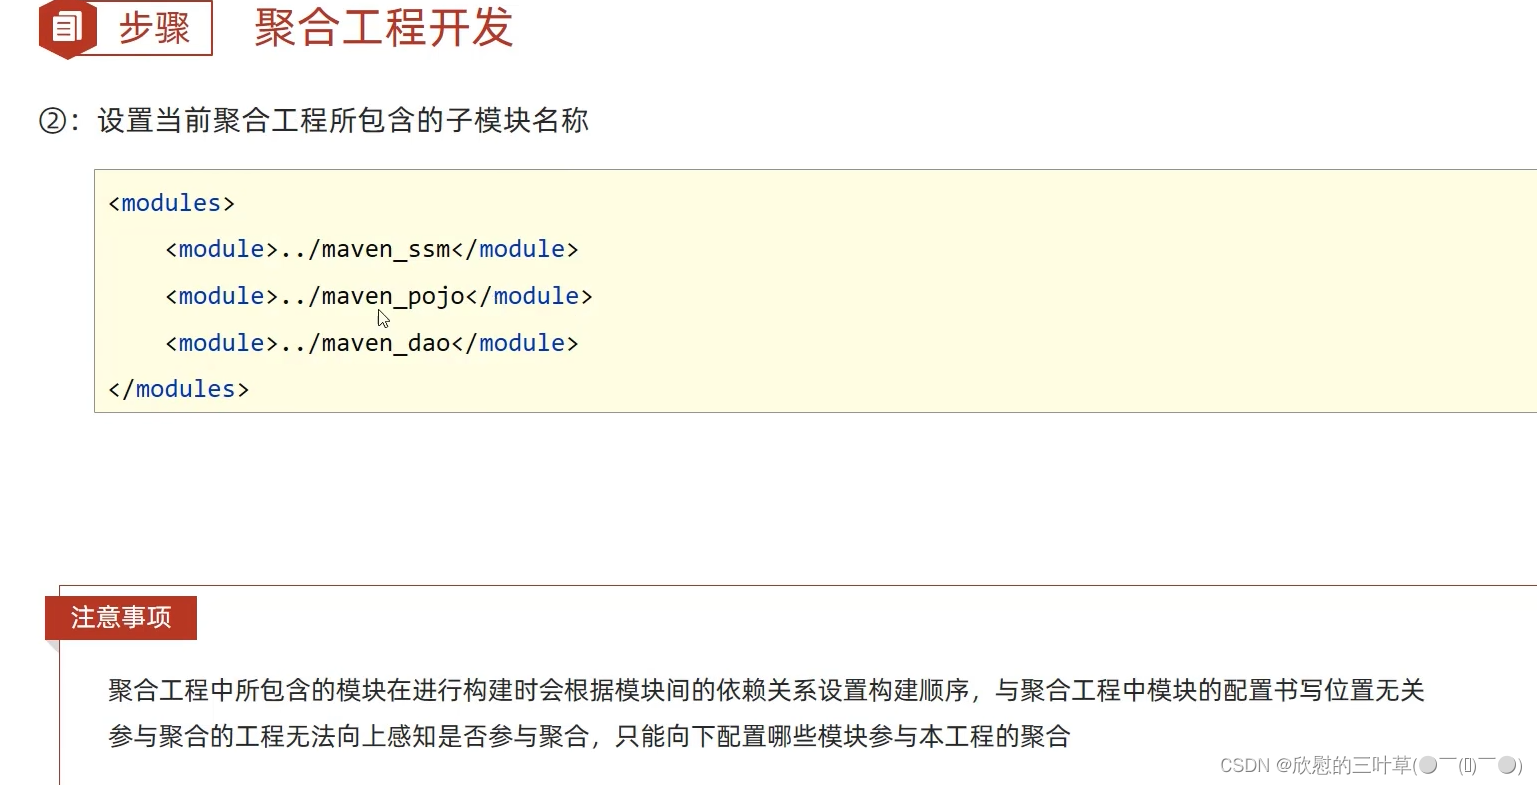 |
②:继承
1. 创建Maven模块,设置打包类型为pom |
|---|
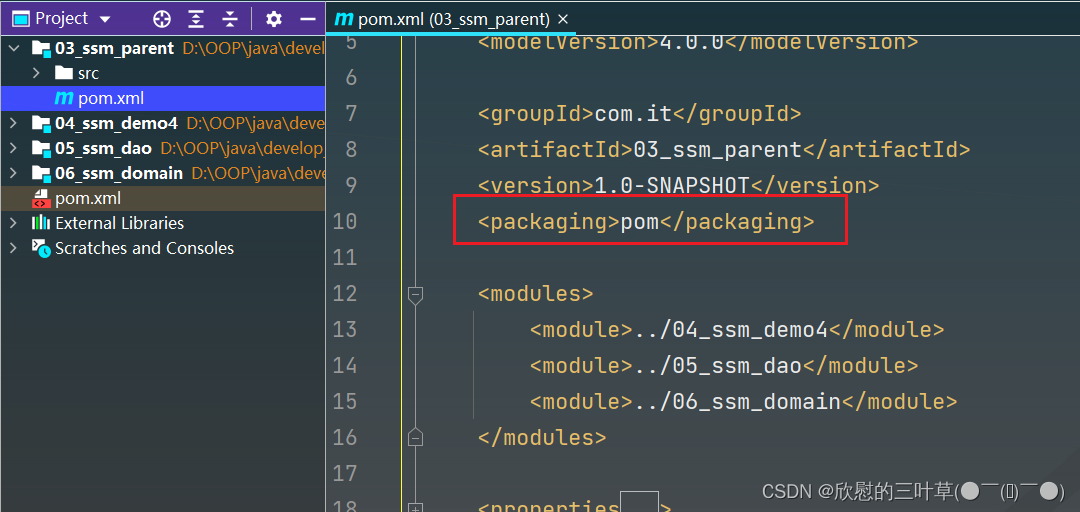 |
2. 在父工程中配置子工程需要用的依赖 |
|---|
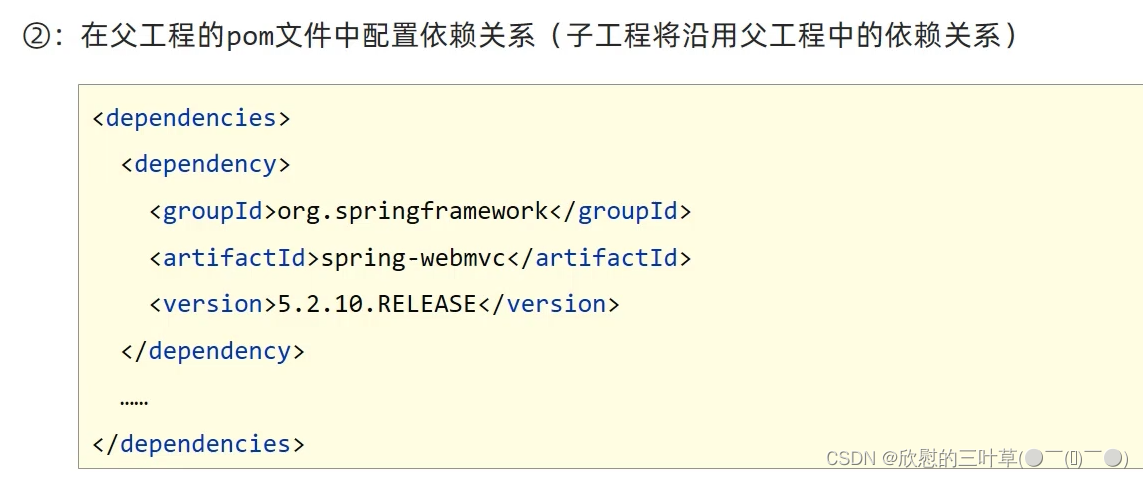 |
<dependencies>
    <dependency>
        <groupId>org.springframework</groupId>
        <artifactId>spring-webmvc</artifactId>
        <version>5.3.18</version>
    </dependency>
    <dependency>
        <groupId>org.springframework</groupId>
        <artifactId>spring-jdbc</artifactId>
        <version>5.3.18</version>
    </dependency>
    <dependency>
        <groupId>org.springframework</groupId>
        <artifactId>spring-test</artifactId>
        <version>5.3.18</version>
    </dependency>
    <dependency>
        <groupId>org.mybatis</groupId>
        <artifactId>mybatis</artifactId>
        <version>3.4.6</version>
    </dependency>
    <dependency>
        <groupId>junit</groupId>
        <artifactId>junit</artifactId>
        <version>4.13</version>
        <scope>test</scope>
    </dependency>
    <dependency>
        <groupId>javax.servlet</groupId>
        <artifactId>servlet-api</artifactId>
        <version>2.5</version>
    </dependency>
    <dependency>
        <groupId>com.fasterxml.jackson.core</groupId>
        <artifactId>jackson-databind</artifactId>
        <version>2.13.3</version>
    </dependency>

    <dependency>
        <groupId>mysql</groupId>
        <artifactId>mysql-connector-java</artifactId>
        <version>8.0.28</version>
    </dependency>
    <dependency>
        <groupId>com.alibaba</groupId>
        <artifactId>druid</artifactId>
        <version>1.2.8</version>
    </dependency>
    <dependency>
        <groupId>org.mybatis</groupId>
        <artifactId>mybatis-spring</artifactId>
        <version>2.0.6</version>
    </dependency>
</dependencies>
3. 配置子工程中可选的依赖关系 |
|---|
 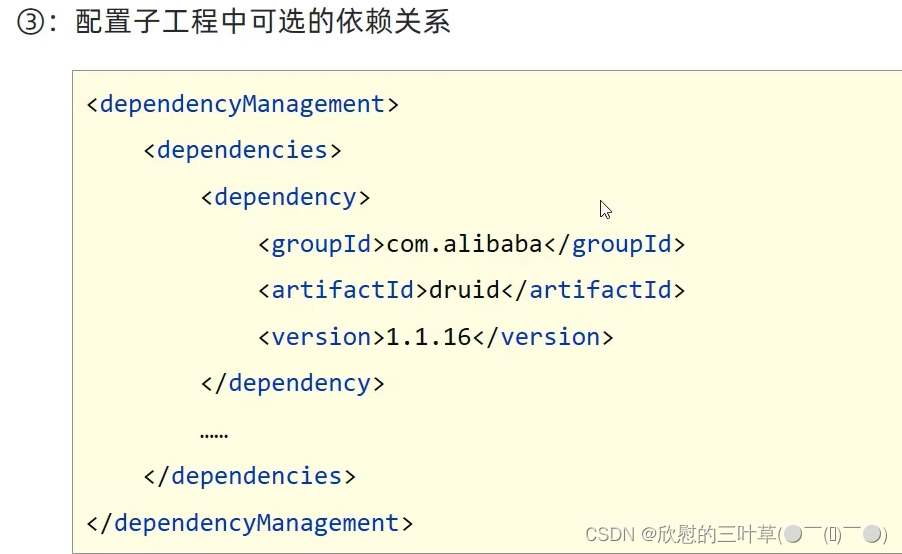 |
4. 在子工程中配置当前工程所继承的工程 |
|---|
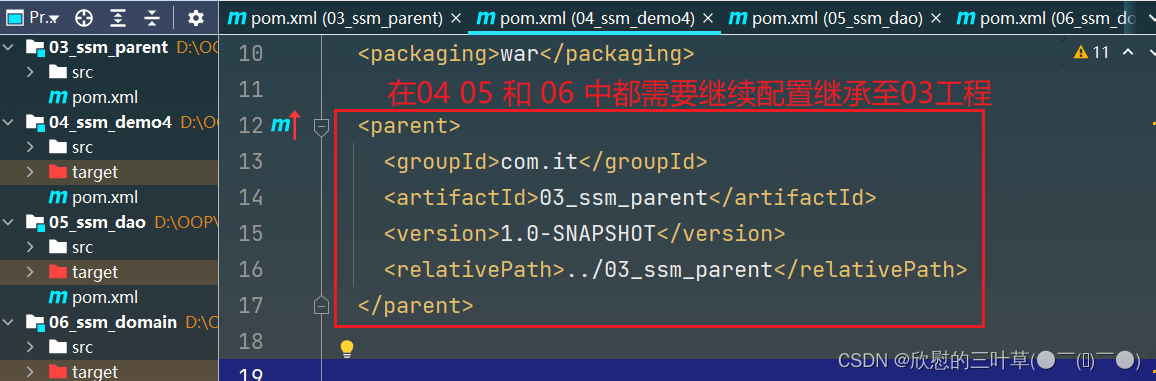 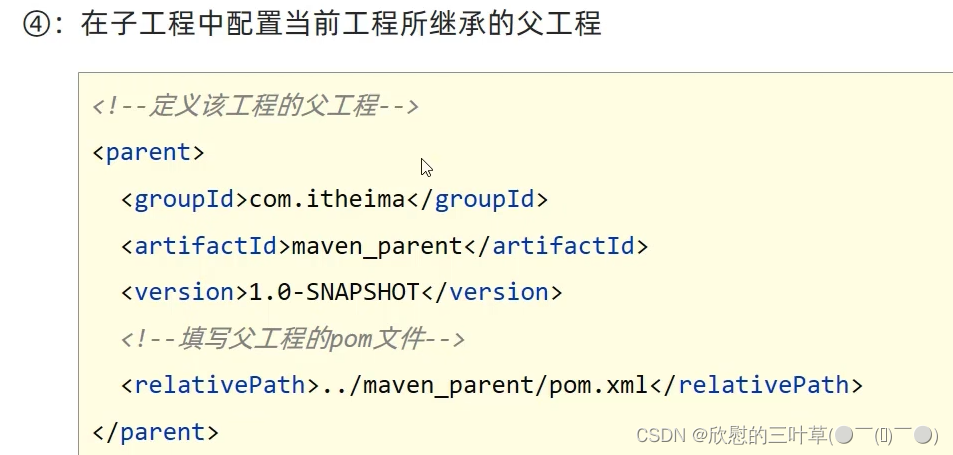 |
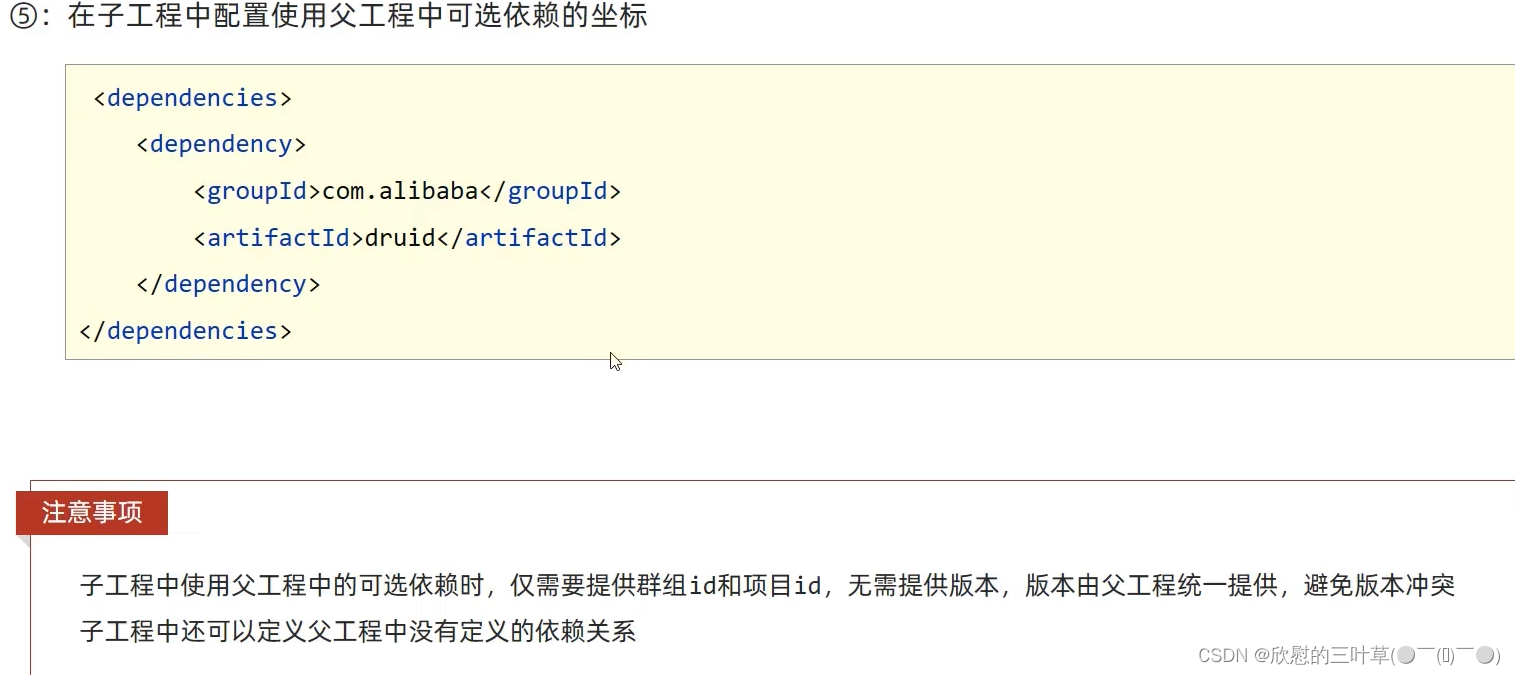
5. 在子工程中配置使用父工程中可选依赖坐标 |
|---|
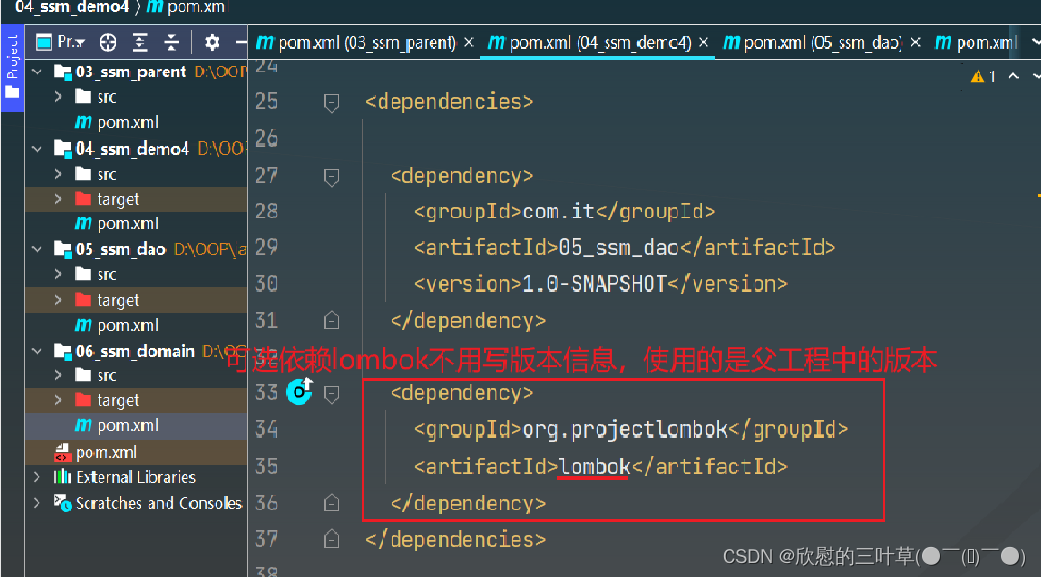 |
③:继承和聚合的区别
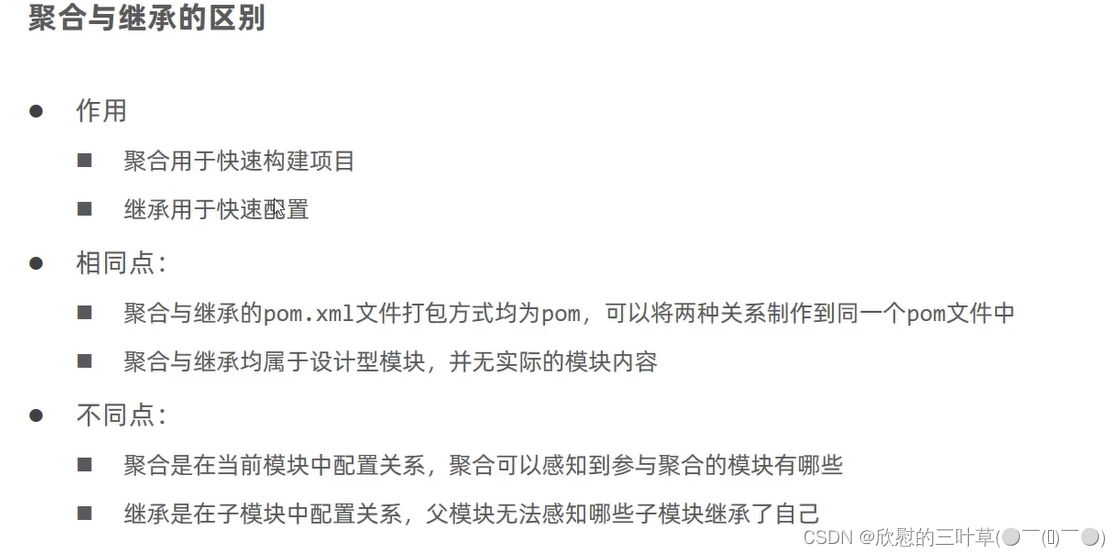 |
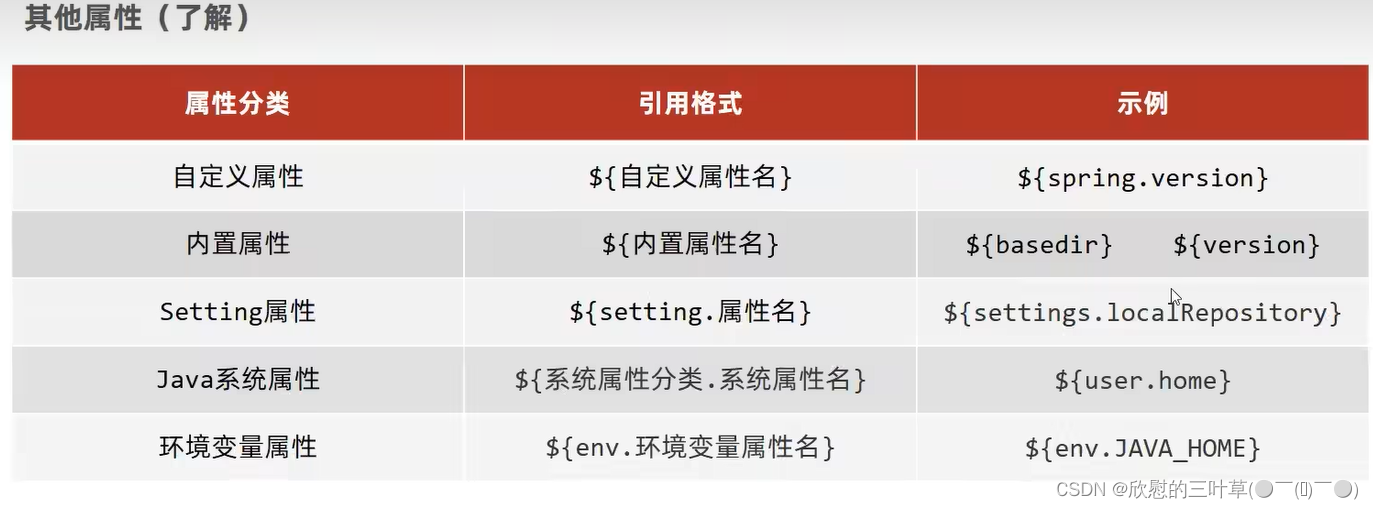
四、属性
①:属性
1. 定义属性及使用 |
|---|
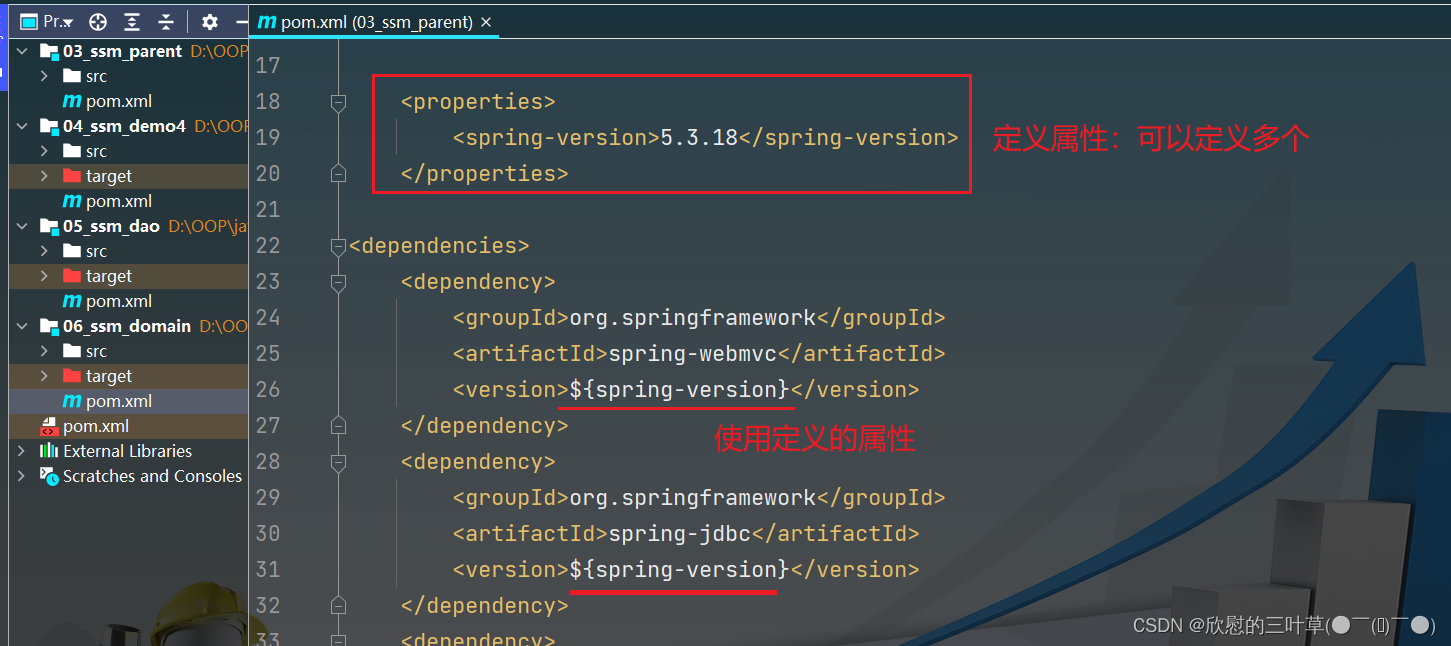 |
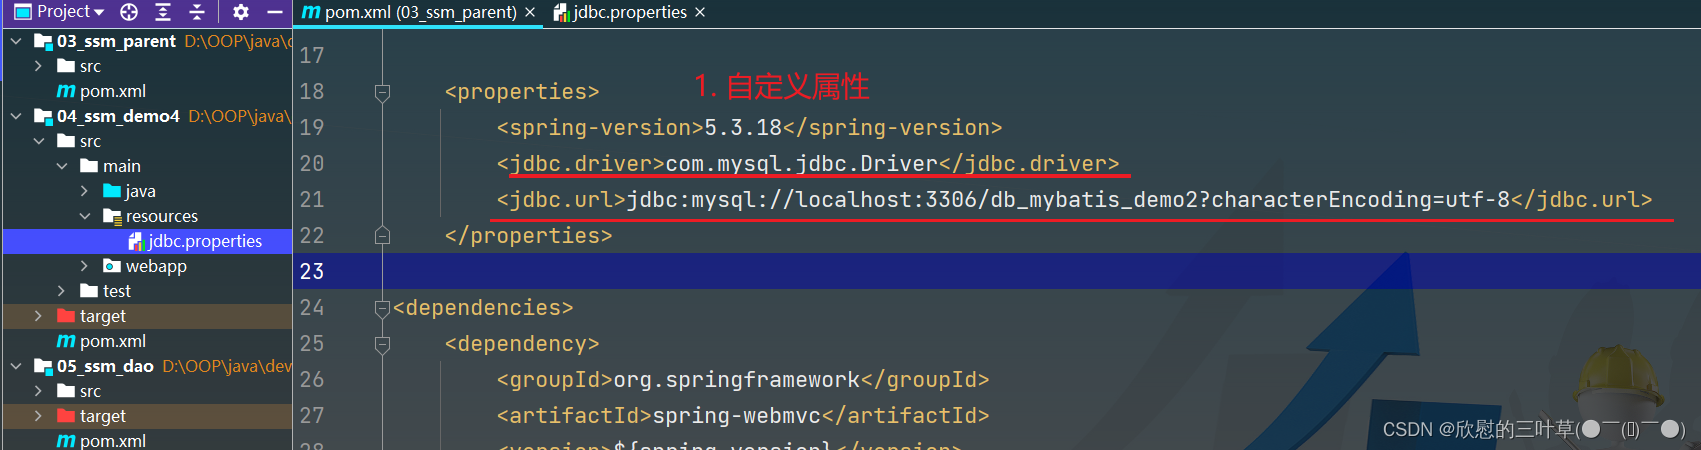
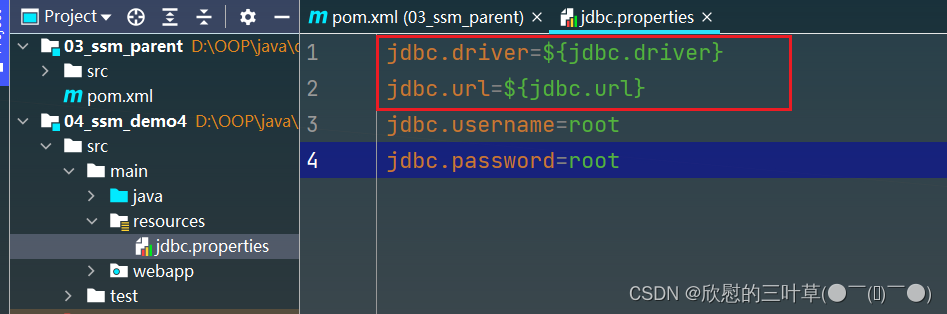
②:配置文件加载属性
1. 定义属性 |
|---|
 |
2. 引入属性 |
|---|
 |
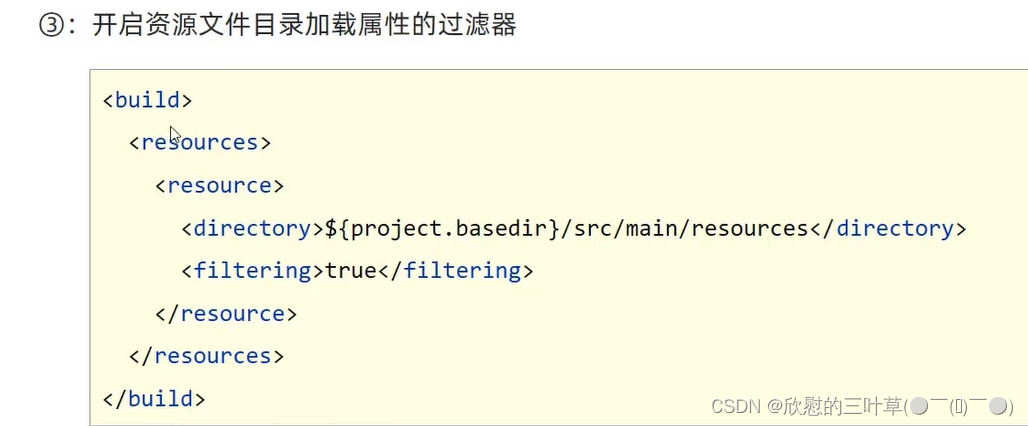
3.开启资源文件目录加载属性的过滤器 |
|---|
    <build>
        <resources>
            <resource>
                <directory>${project.basedir}/src/main/resources</directory>
                <filtering>true</filtering>
            </resource>
        </resources>
    </build>
 |
4. 配置maven打war包时,忽略web.xml检查 |
|---|
        <plugins>
            <plugin>
                <groupId>org.apache.maven.plugins</groupId>
                <artifactId>maven-war-plugin</artifactId>
                <version>3.2.2</version>
                <configuration>
                    <failOnMissingWebXml>false</failOnMissingWebXml>
                </configuration>
            </plugin>
        </plugins>
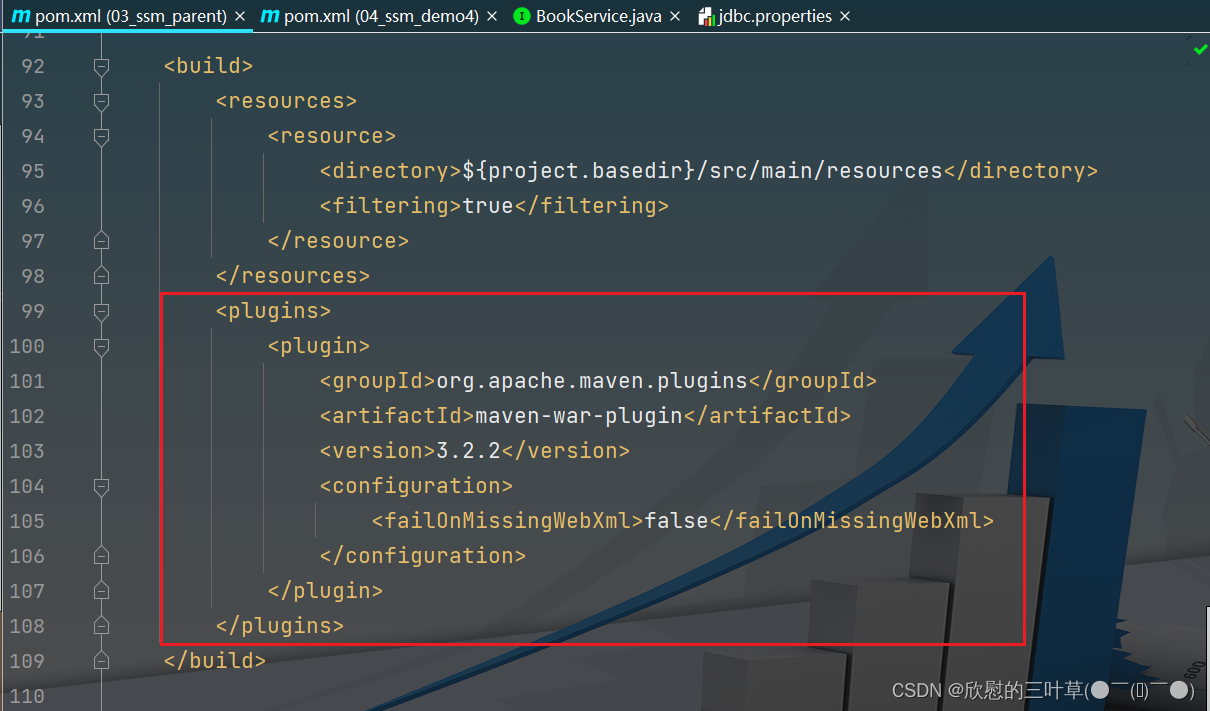 |
5.测试 |
|---|
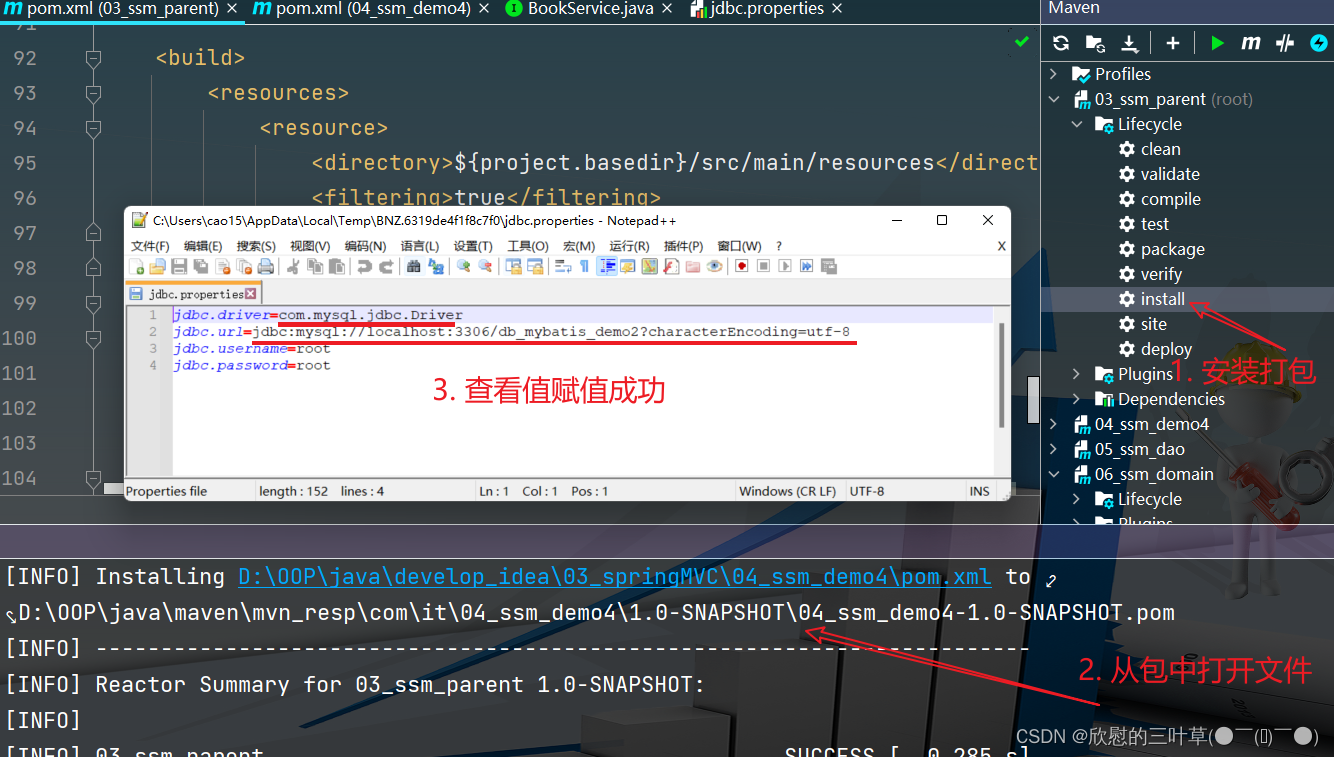 |
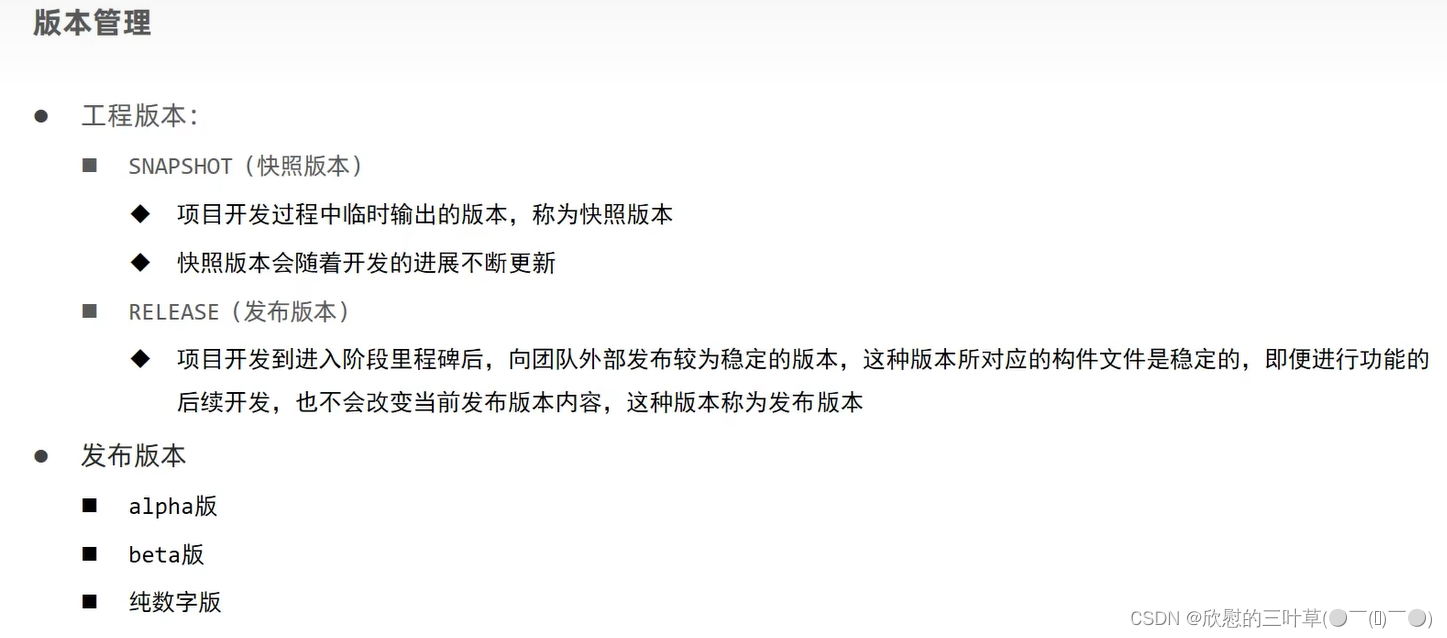
③:版本管理
 |
五、多环境配置与应用
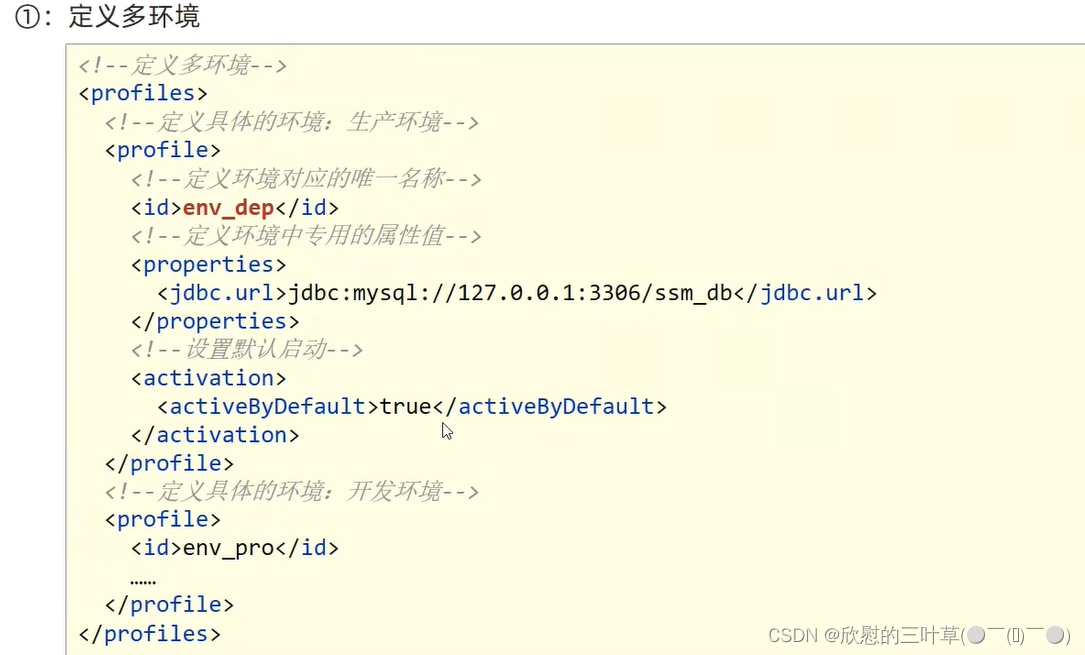
①:多环境开发
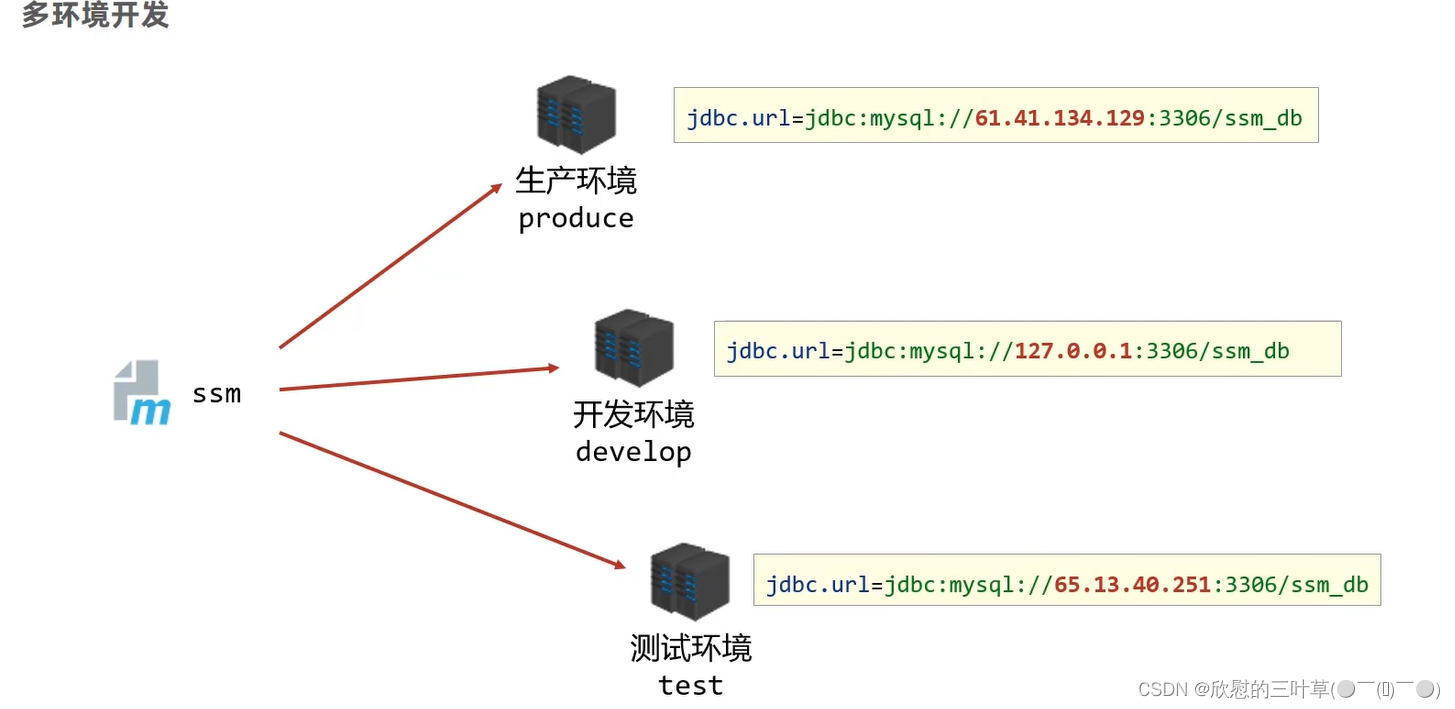
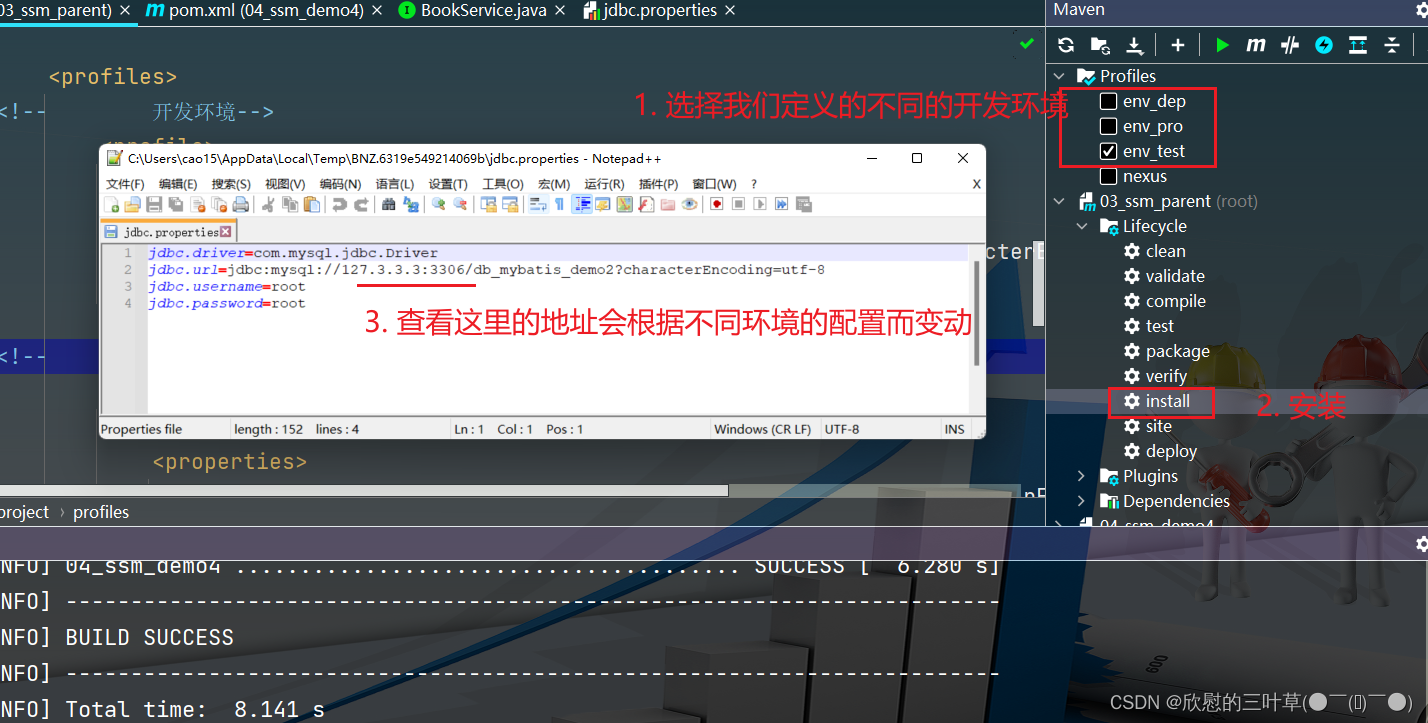
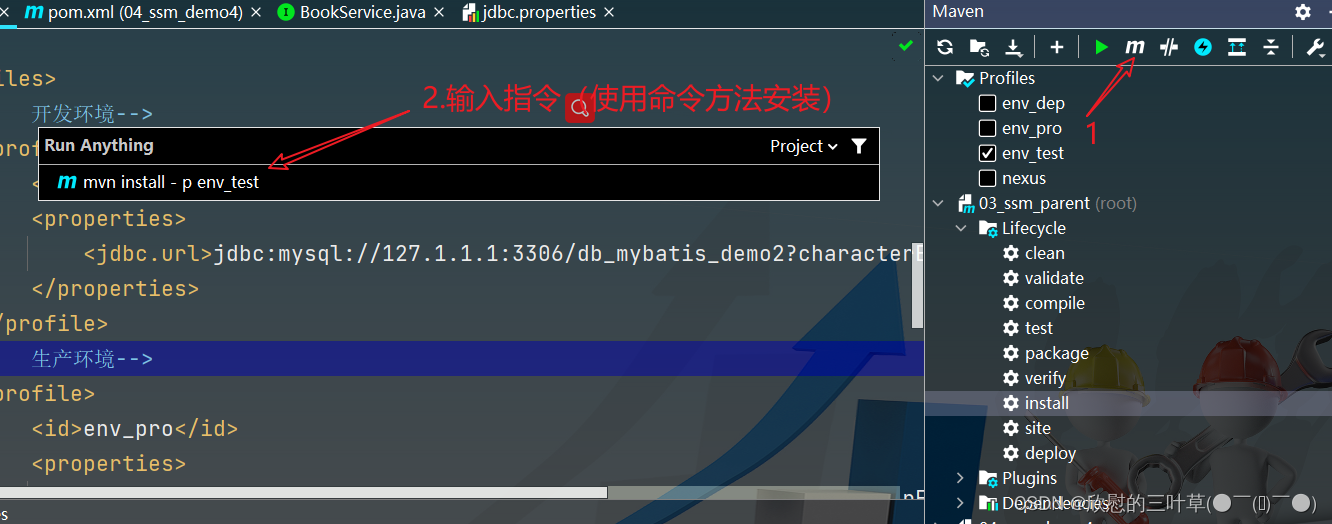
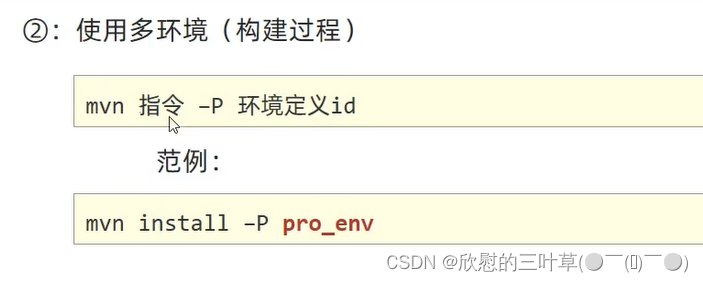
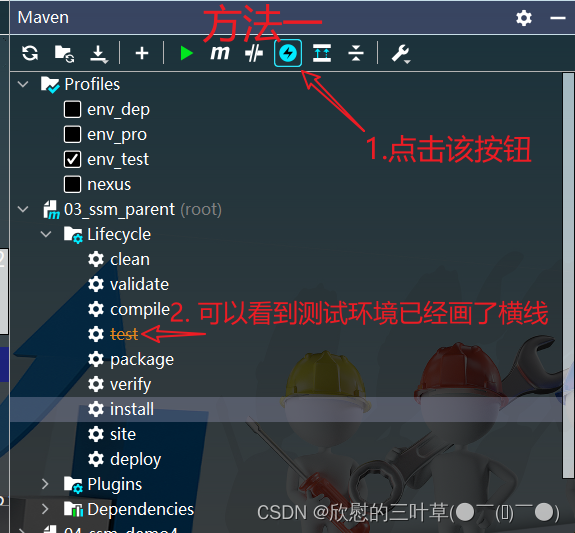
1. 定义的多环境 |
|---|
 |
 |
2. 测试 |
|---|
   |
②:跳过测试
1. 方法一(缺点:全部测试都会跳过) |
|---|
 |
2. 方法二(插件配置) |
|---|
            <plugin>
                <groupId>org.apache.maven.plugins</groupId>
                <artifactId>maven-surefire-plugin</artifactId>
                <version>2.22.1</version>
                <configuration>
<!--                    是否跳过测试 false -->
                    <skipTests>false</skipTests>
<!--                    排除掉不参与测试的内容-->
                    <excludes>
                        <exclude>**/BookServiceTest.java</exclude>
                    </excludes>
                </configuration>
            </plugin>
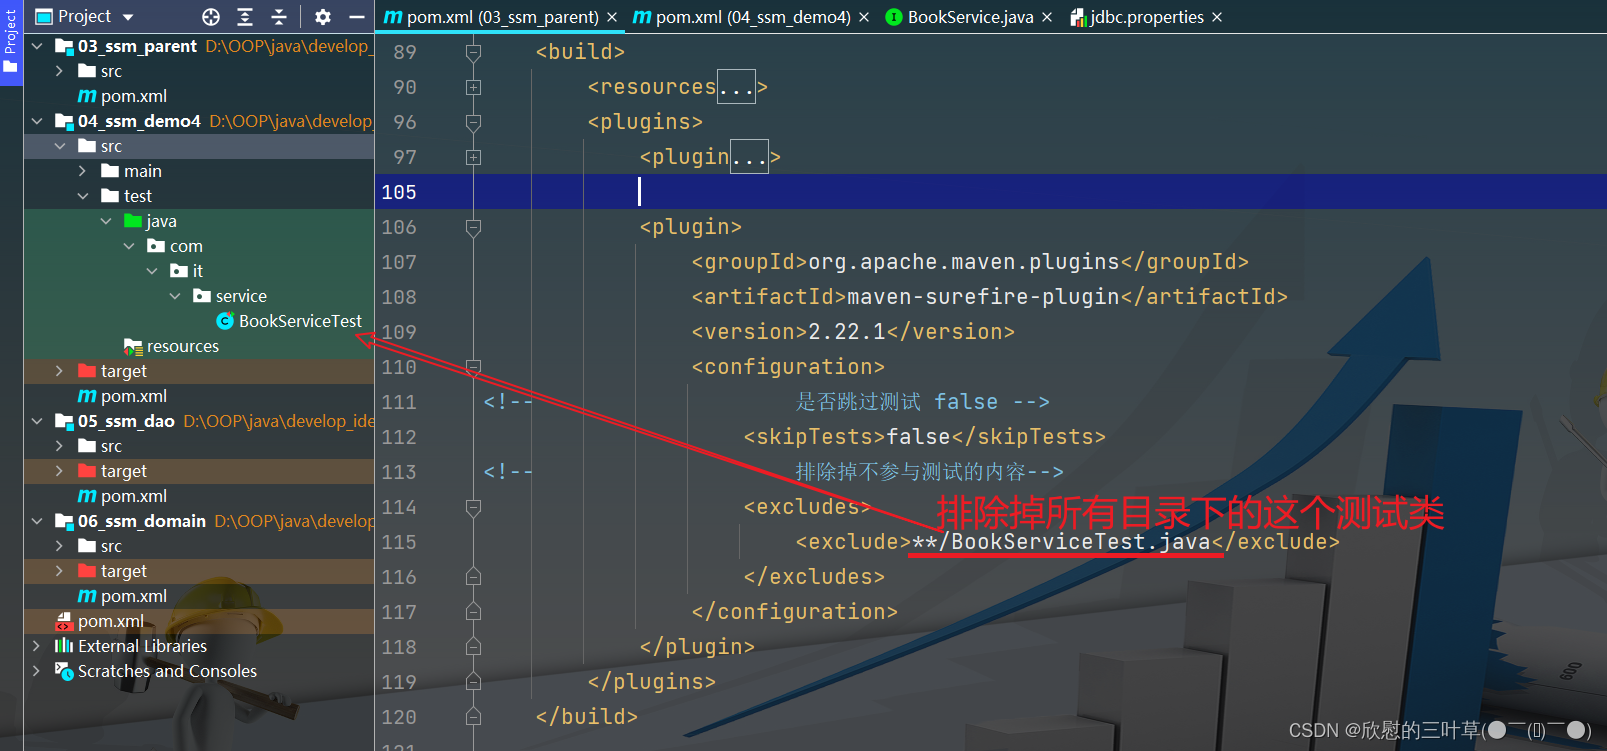 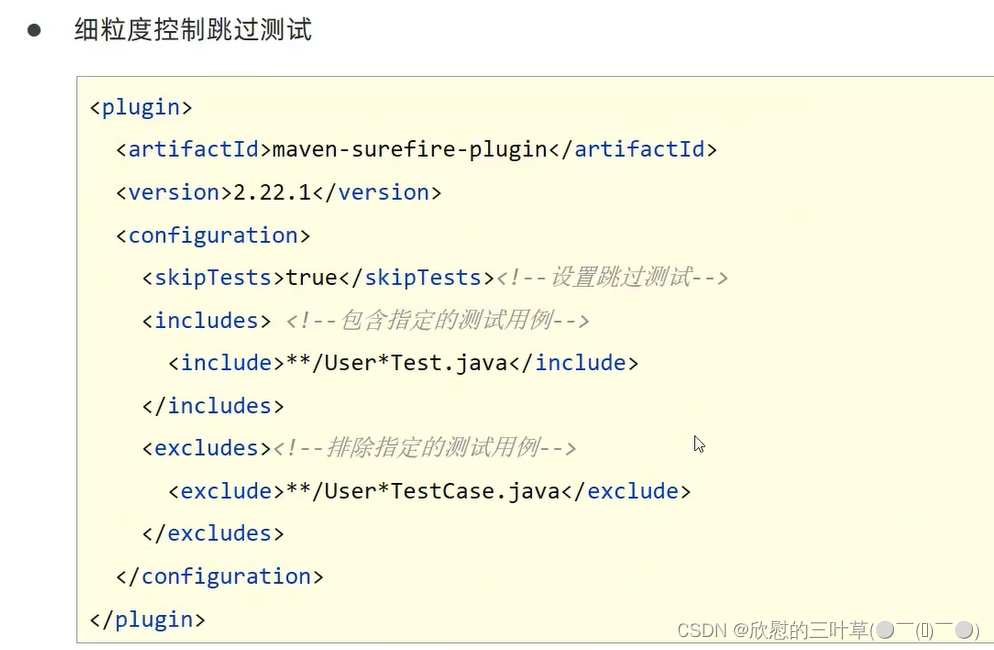 |
3. 方法三(使用命令跳过测试) |
|---|
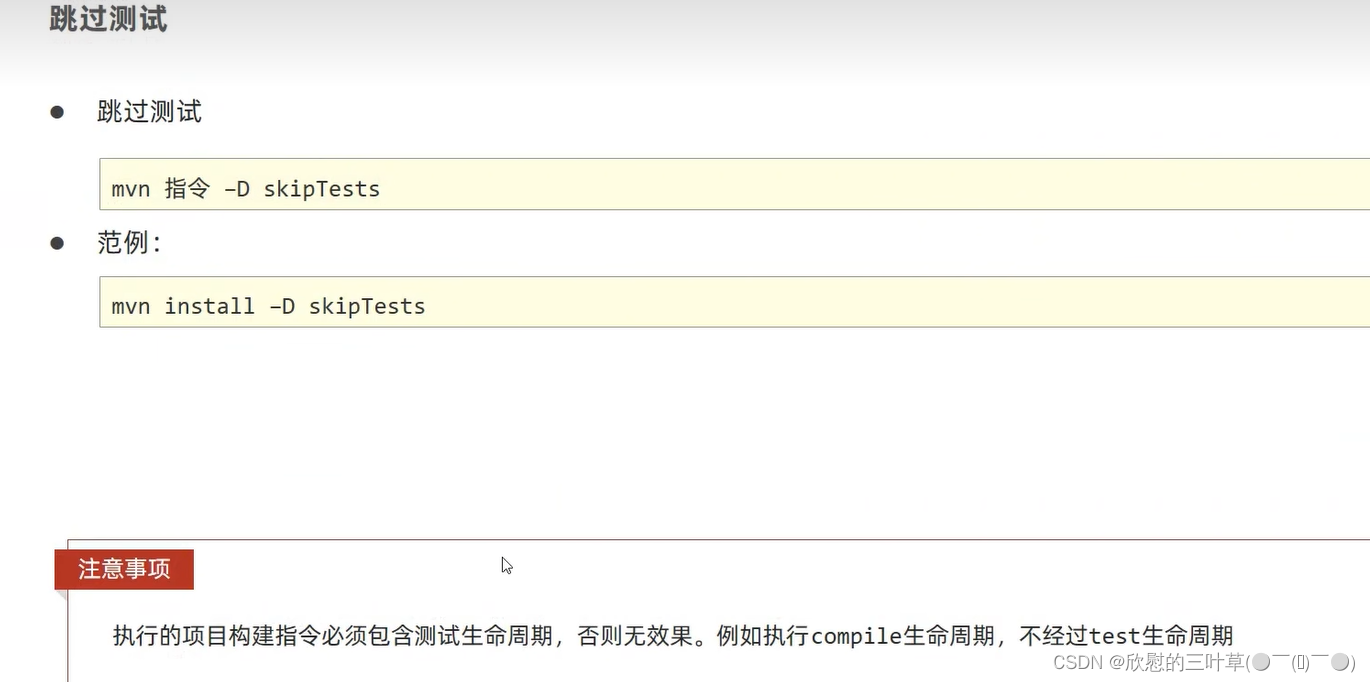 |
六、私服
①:私服介绍

②:私服安装(Nexus)
-
Nexus
- Sonatype公司的一款maven私服产品
- 下载地址 :https://help.sonatype.com/repomanager3/product-information/download
-
网盘下载
1. 下载 |
|---|
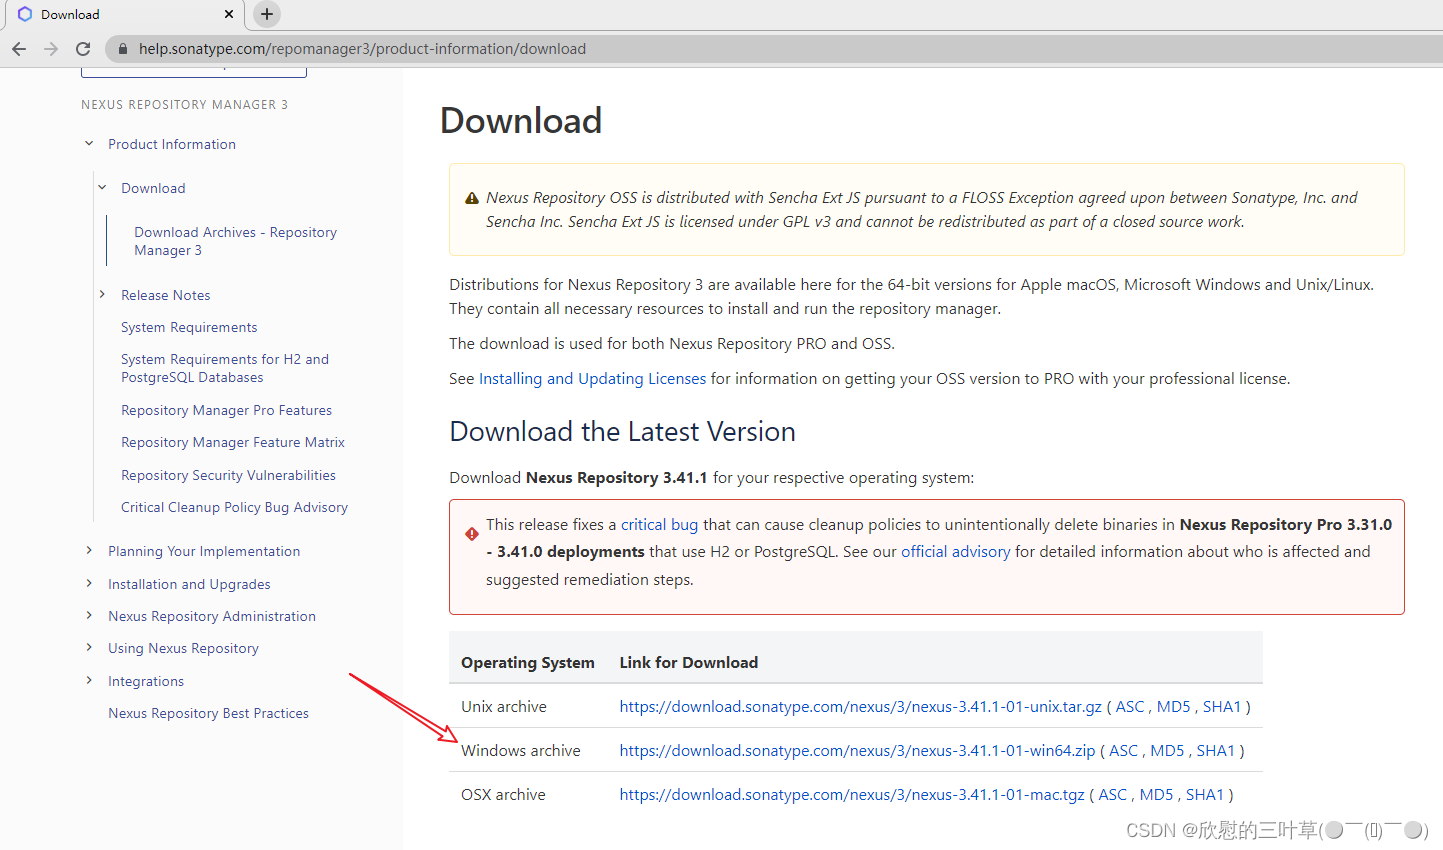 |
2. 绿色版的(直接解压即可) |
|---|
 |
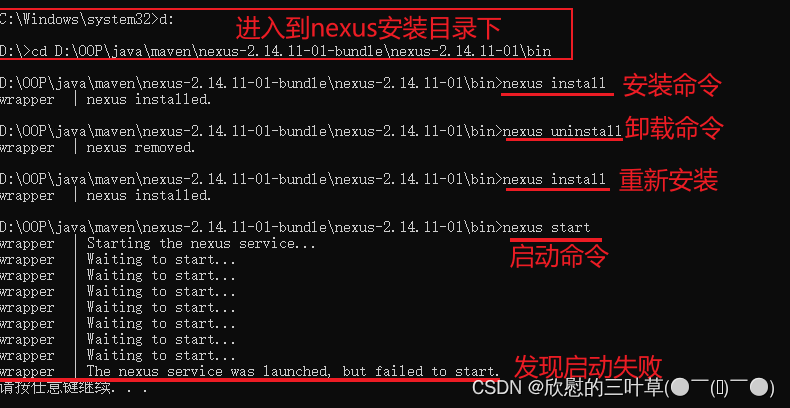
3. 直接启动服务器(缺点:关闭cmd窗口后私服服务自动关闭) |
|---|
- ①.
使用管理员运行cmd - ②.进入
nexus-2.14.11-01\bin目录中执行以下命令
3.1 启动指令:nexus.exe /run nexus |
|---|
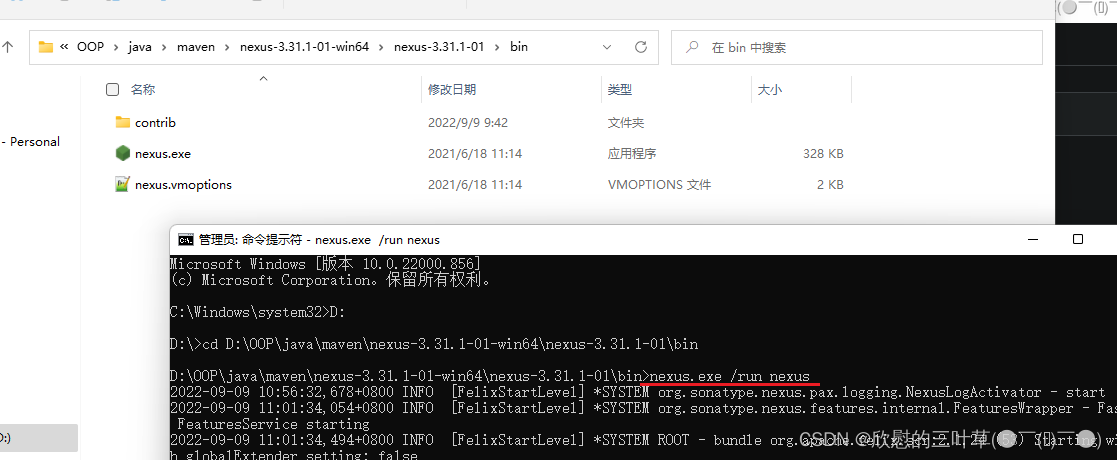 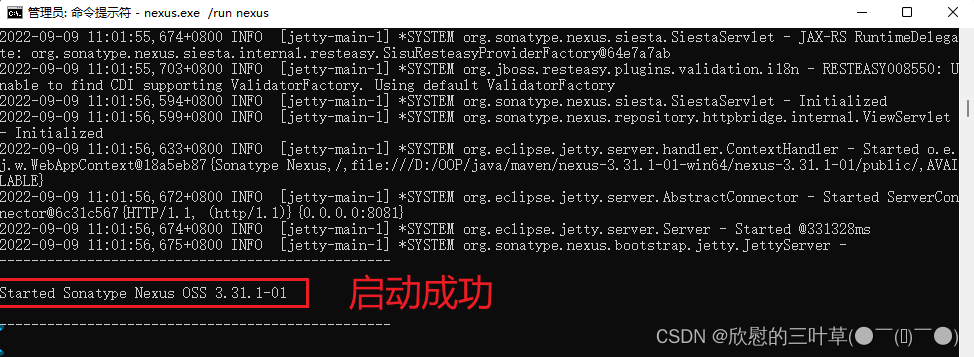 |
3.2 如果因为其他版本而启动失败(先卸载其他版本) |
|---|
 |
3.3 将服务安装到本地(推荐使用:cmd命令窗口关闭后私服不会自动停止) |
|---|
nexus.exe /install <optional-service-name> //安装服务
(optional-service-name是服务别名,默认是nexus)
nexus.exe /uninstall //卸载服务

nexus.exe /start <optional-service-name> //启动服务
nexus.exe /stop <optional-service-name>  //停止服务
扩展:
可以安装多个服务名不同的服务,分别启动
nexus.exe /install nexus01 //安装服务
nexus.exe /start nexus01 //启动服务
nexus.exe /install nexus02 //安装服务
nexus.exe /start nexus02 //启动服务
安装指令 |
|---|
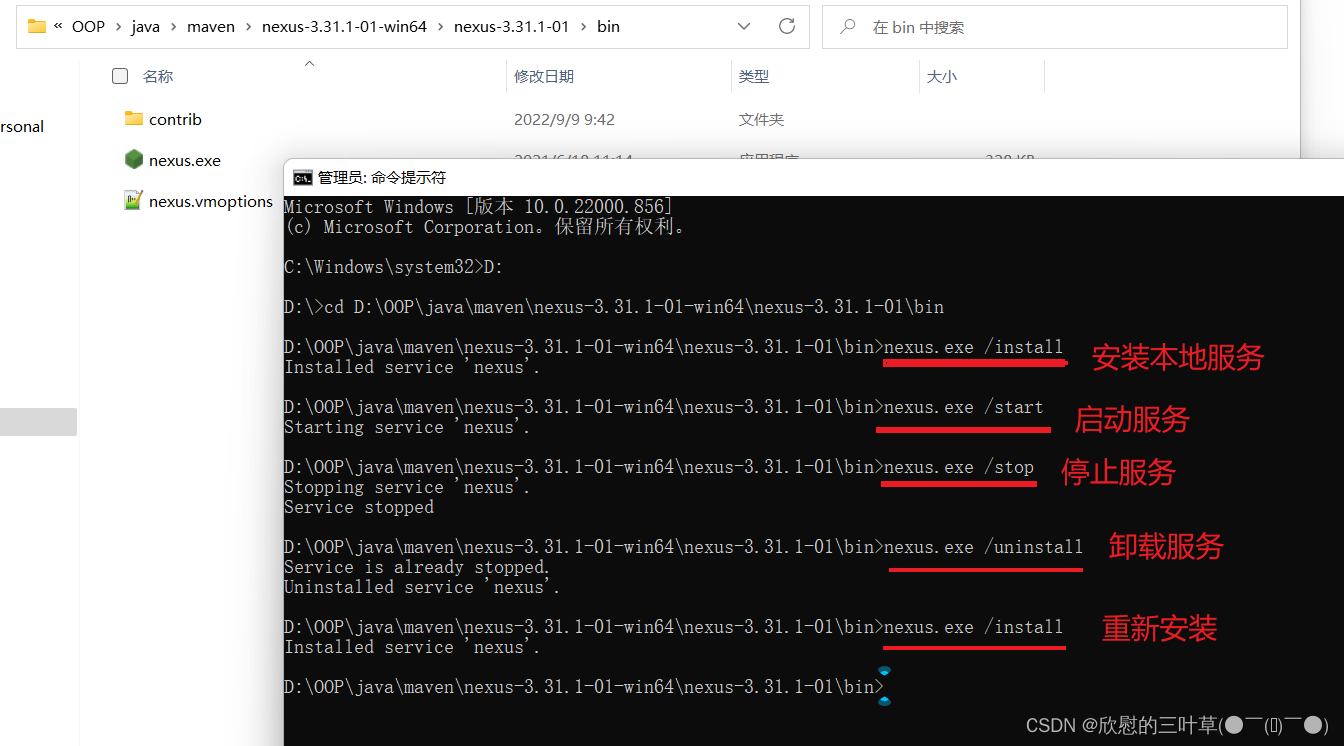 |
4. 访问私服:[http://localhost:8081/](http://localhost:8081/) |
|---|
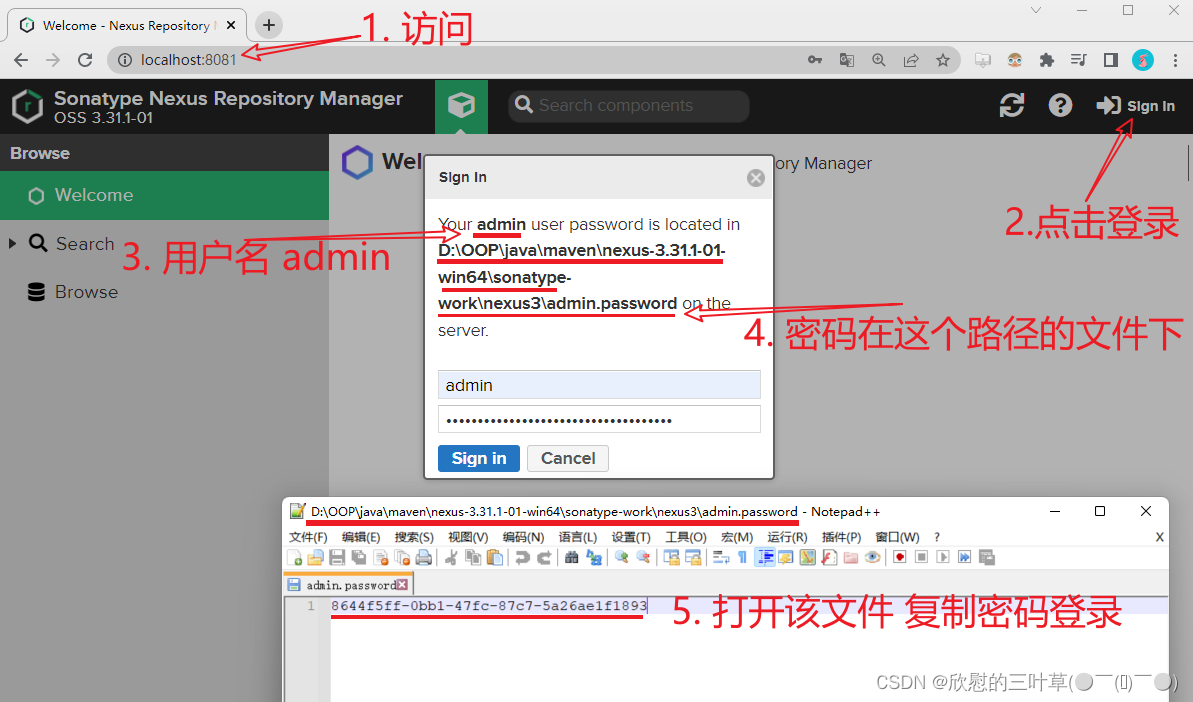 |
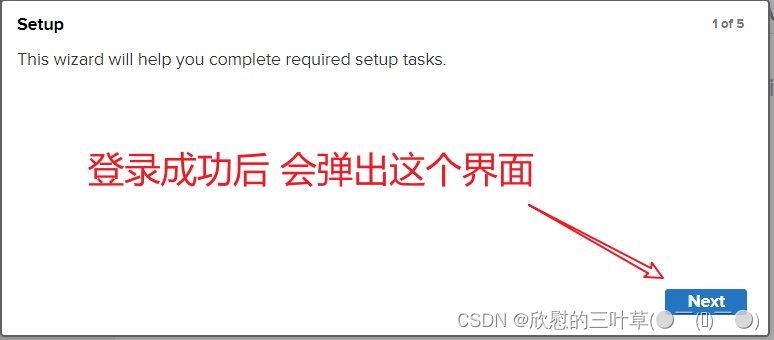
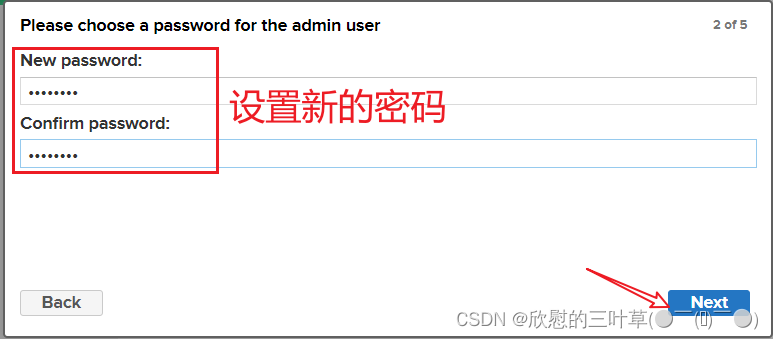
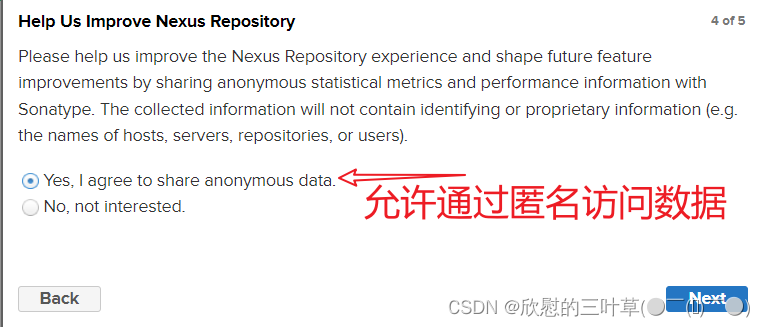
5. 根据向导完成 密码修改 及 匿名访问 |
|---|
    |
③:修改基本配置信息
可根据需求进行更改(此处我并没有做修改) |
|---|
 |
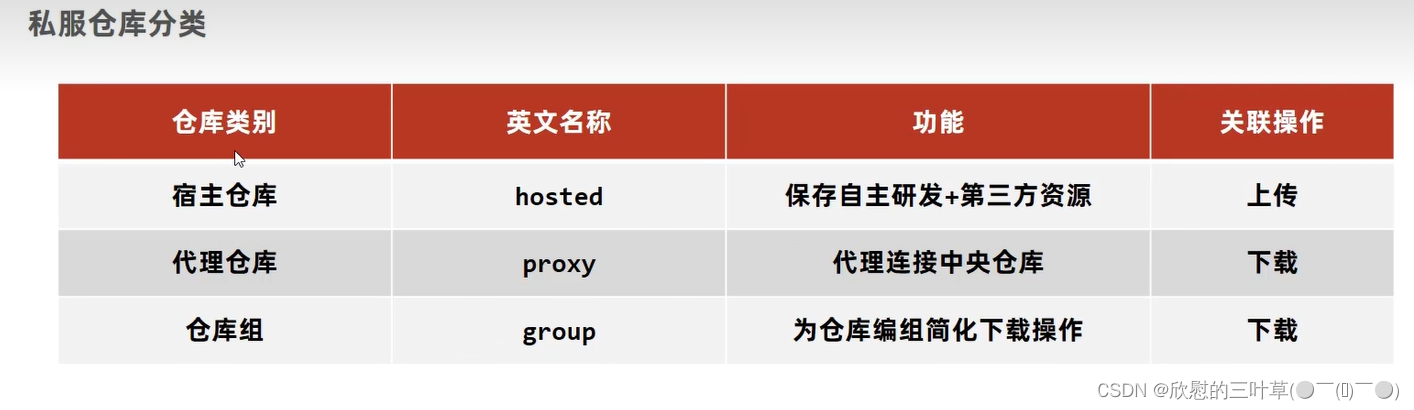
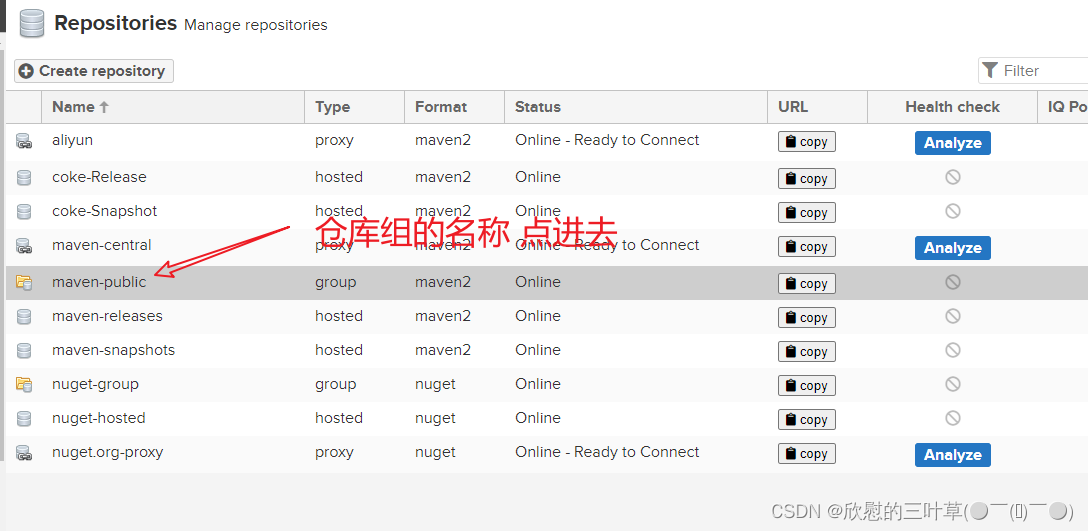
④:私服仓库分类
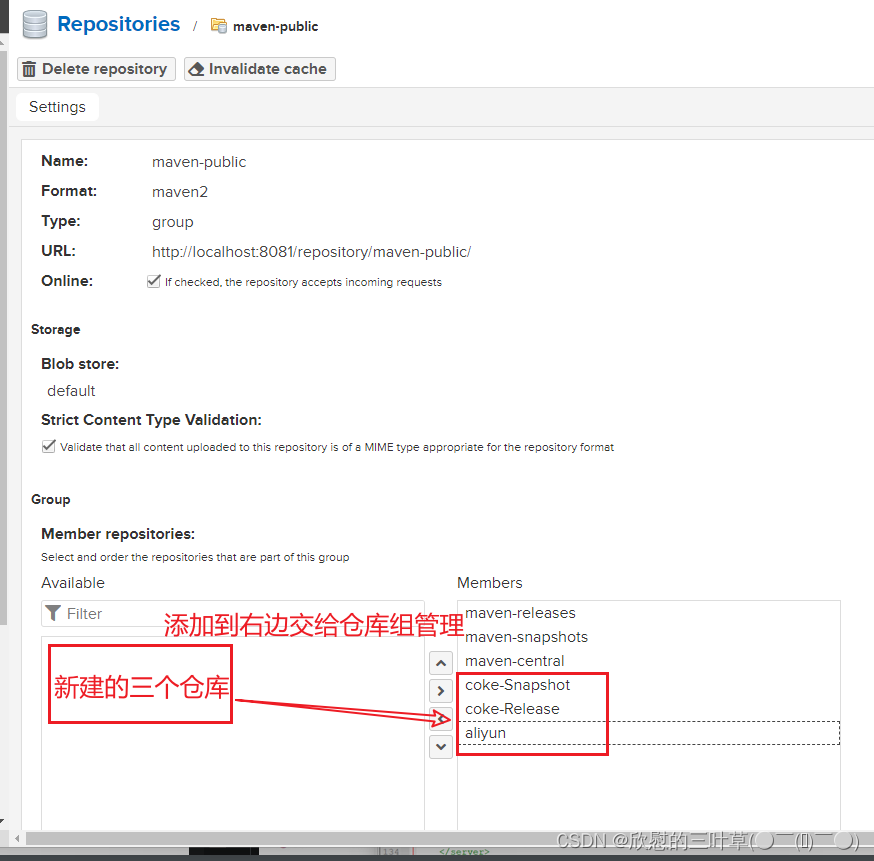
⑤:本地仓库访问服务配置
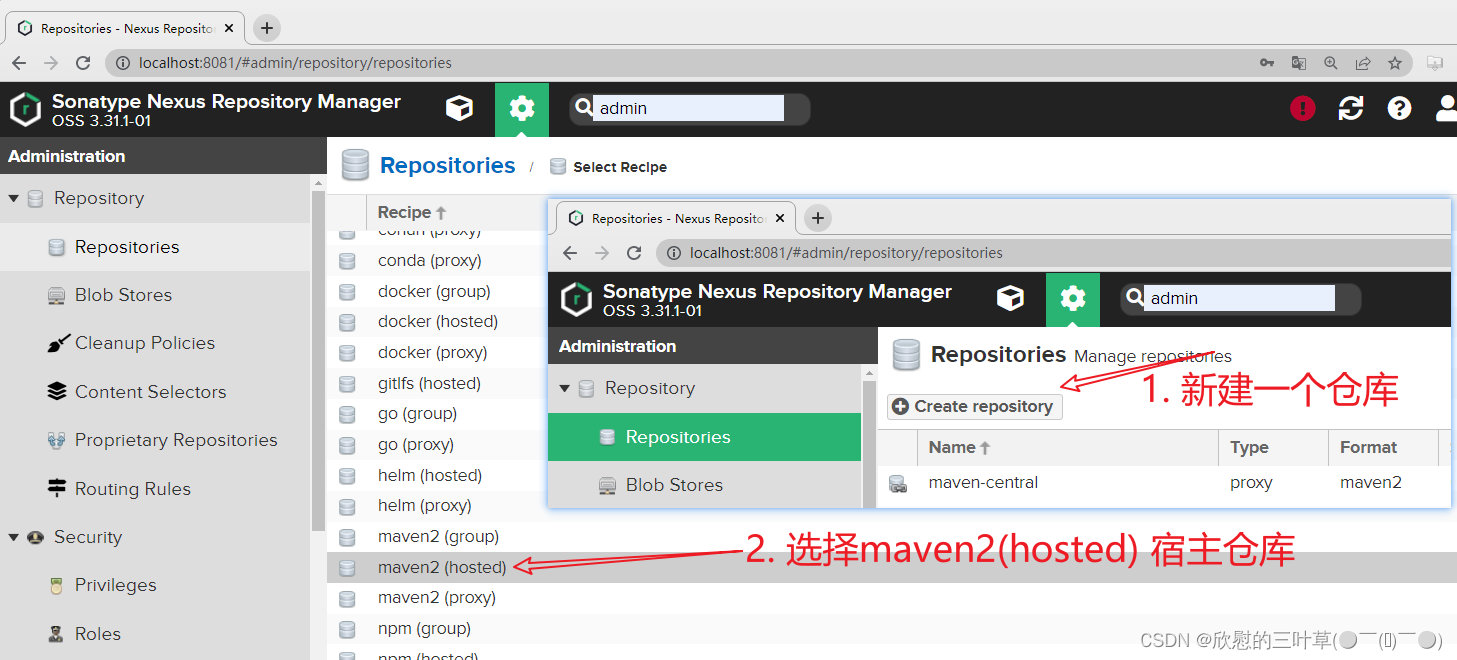
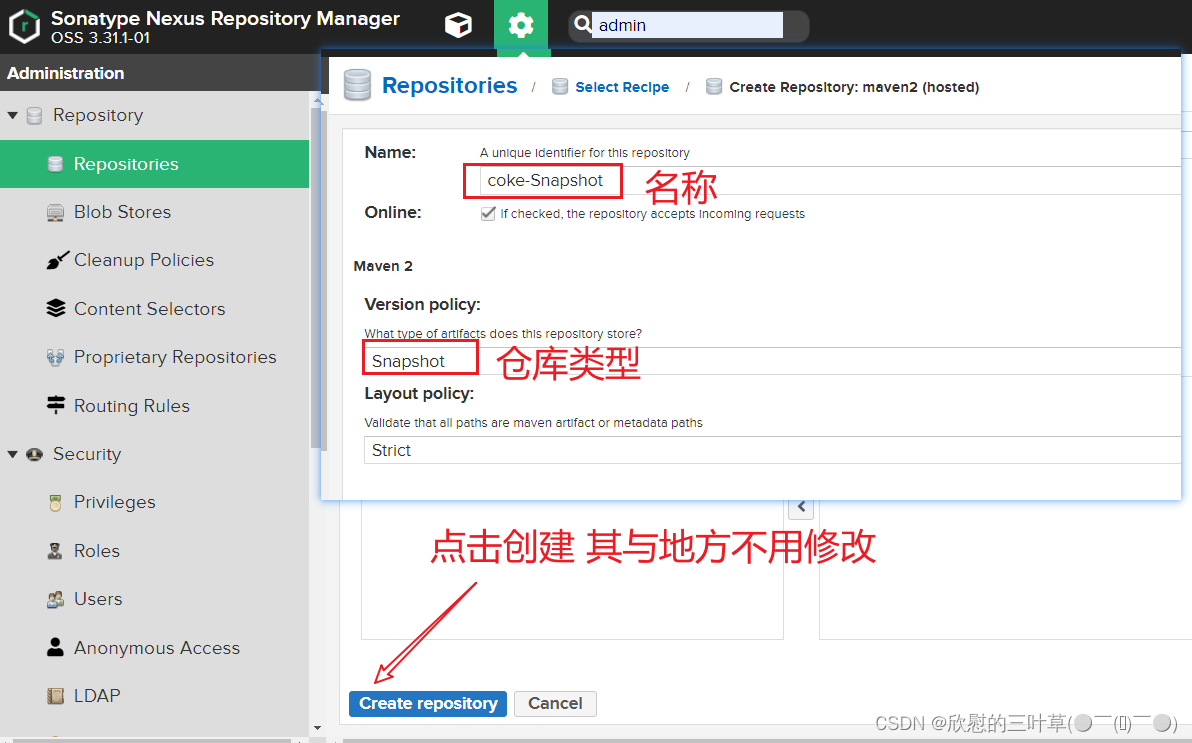
01. 新建仓库
1. 新建一个 Snapshot 类型的 存快照的仓库 |
|---|
  |
|
2. 新建一个 Release 类型的 存发行版的仓库 |
|---|
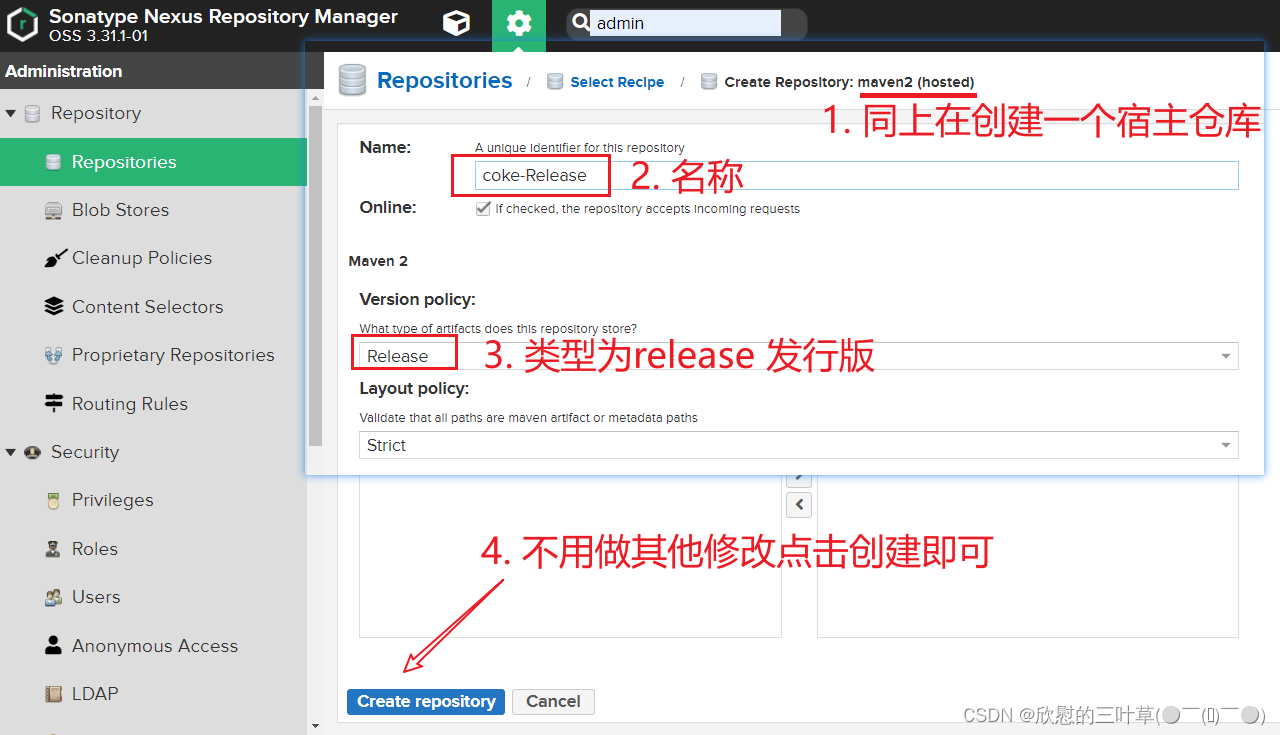 |
02. 配置是否允许重新发布
新建的两个仓库都是同样的操作 |
|---|
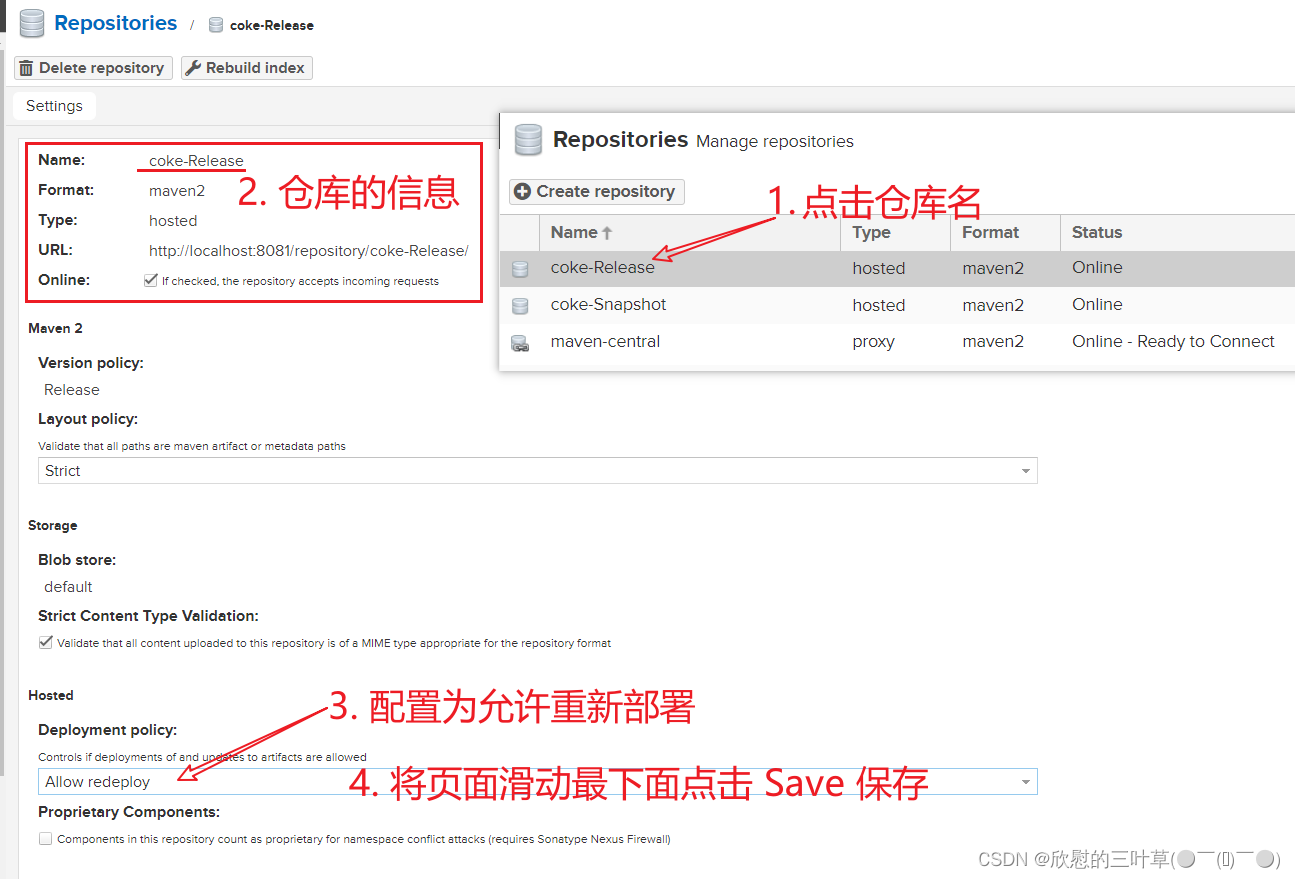 |
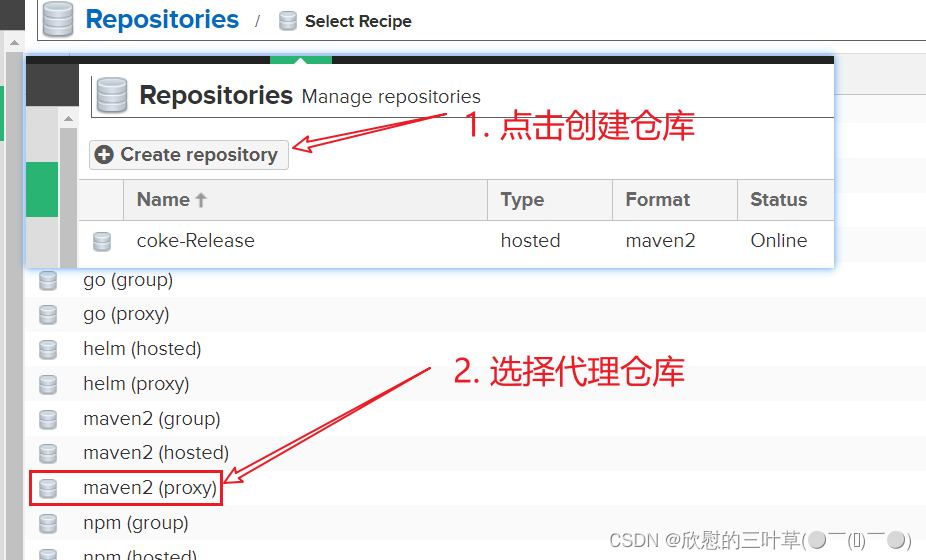
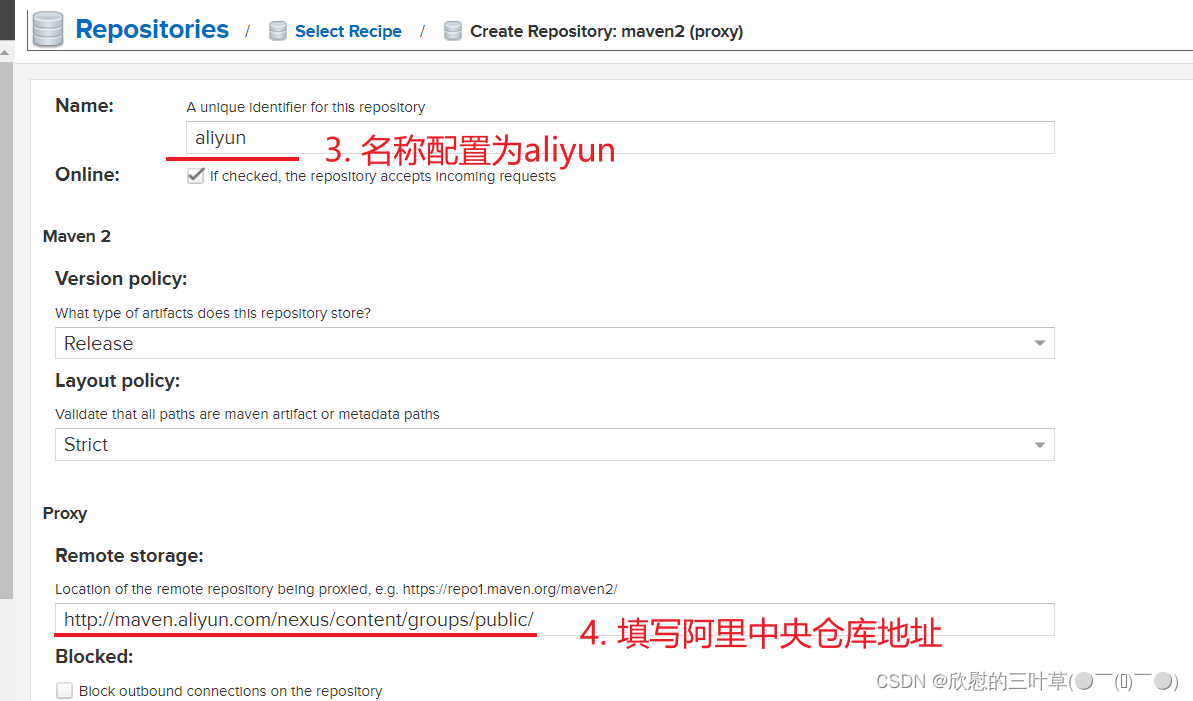
03.添加阿里中央仓库
添加阿里中央仓库 |
|---|
   |
04. 配置本地仓库访问私服的权限
配置本地仓库 (Maven) 访问私服的权限 |
|---|
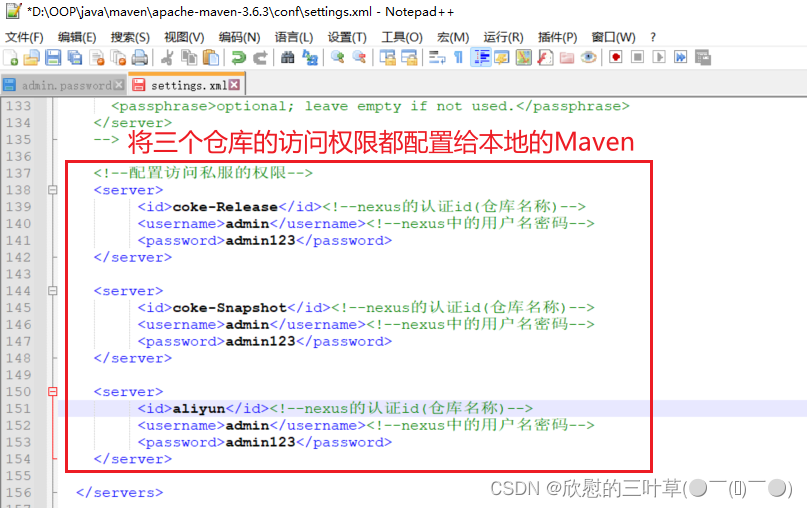 |
	<!--配置访问私服的权限-->
	<server>
		 <id>coke-Release</id><!--nexus的认证id(仓库名称)-->
		 <username>admin</username><!--nexus中的用户名密码-->
		 <password>admin123</password>
	</server>

	<server>
		 <id>coke-Snapshot</id><!--nexus的认证id(仓库名称)-->
		 <username>admin</username><!--nexus中的用户名密码-->
		 <password>admin123</password>
	</server>

	<server>
		 <id>aliyun</id><!--nexus的认证id(仓库名称)-->
		 <username>admin</username><!--nexus中的用户名密码-->
		 <password>admin123</password>
	</server>
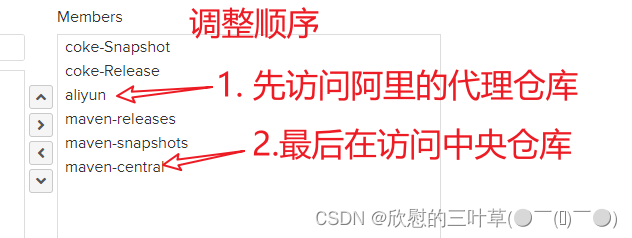
05. 配置映射(私服的地址URL)
	 <!--配置私服的访问路径-->
	 <mirror>
		<id>maven-public</id> <!--id(仓库组名称)-->
		<mirrorOf>*</mirrorOf> <!--*(所有的操作都会与私服打交道)-->
		<url>http://localhost:8081/repository/maven-public/</url>
	</mirror>
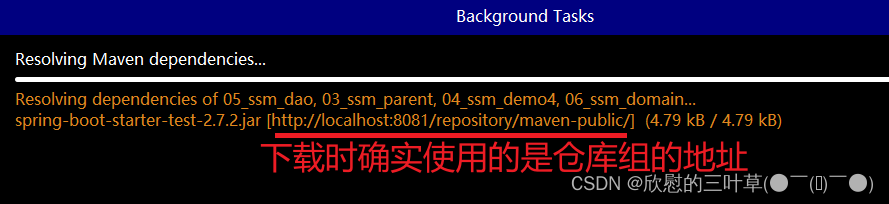
配置私服的访问地址URL为仓库组的 |
|---|
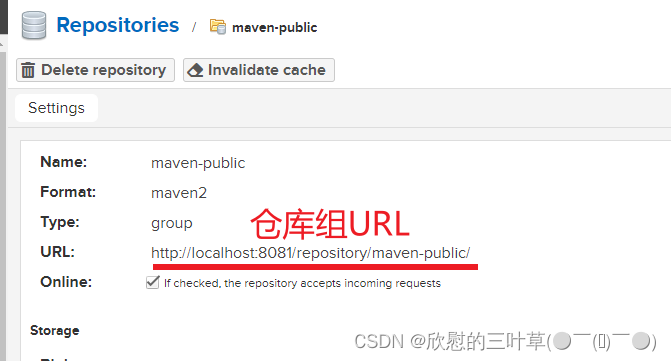 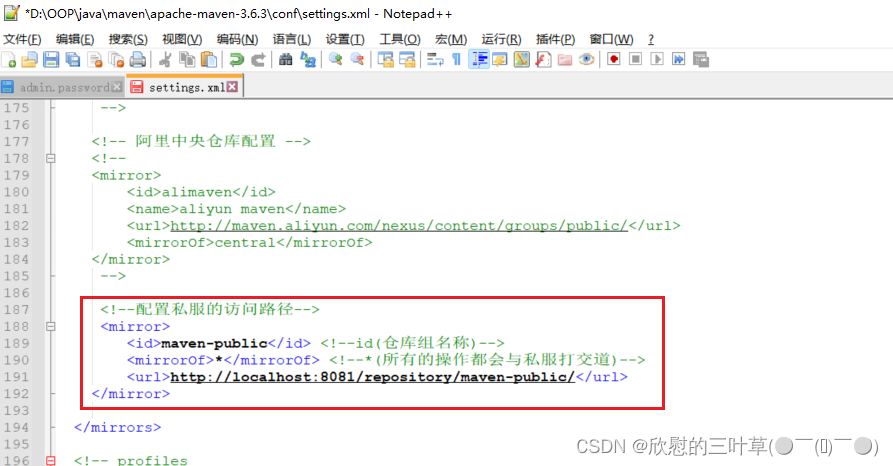 |
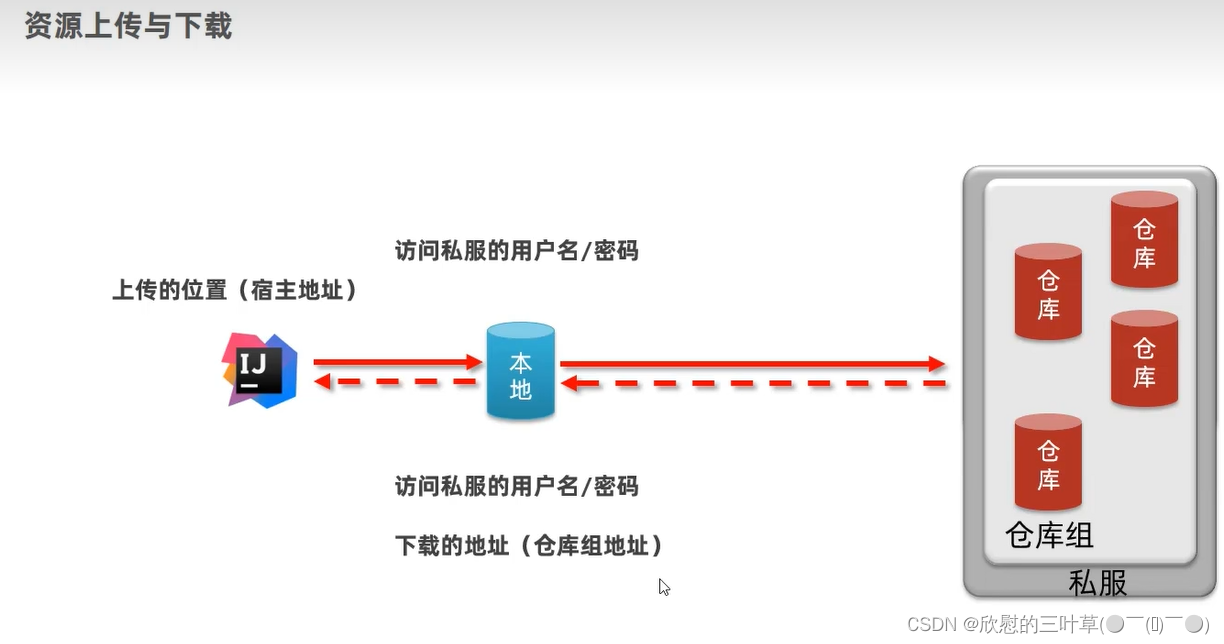
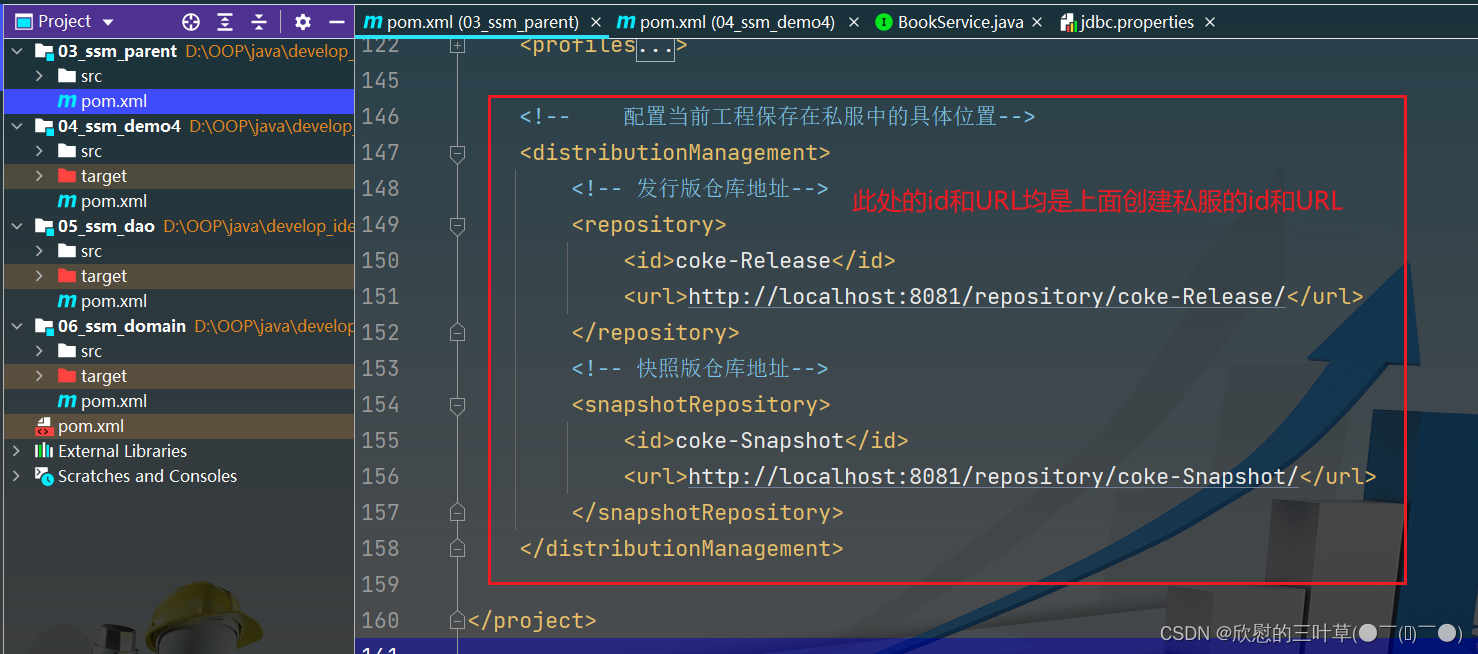
⑥:私服资源上传与下载
    <!--    配置当前工程保存在私服中的具体位置-->
    <distributionManagement>
        <!-- 发行版仓库地址-->
        <repository>
            <id>coke-Release</id>
            <url>http://localhost:8081/repository/coke-Release/</url>
        </repository>
        <!-- 快照版仓库地址-->
        <snapshotRepository>
            <id>coke-Snapshot</id>
            <url>http://localhost:8081/repository/coke-Snapshot/</url>
        </snapshotRepository>
    </distributionManagement>
配置当前工程保存在私服中的具体位置 |
|---|
 |
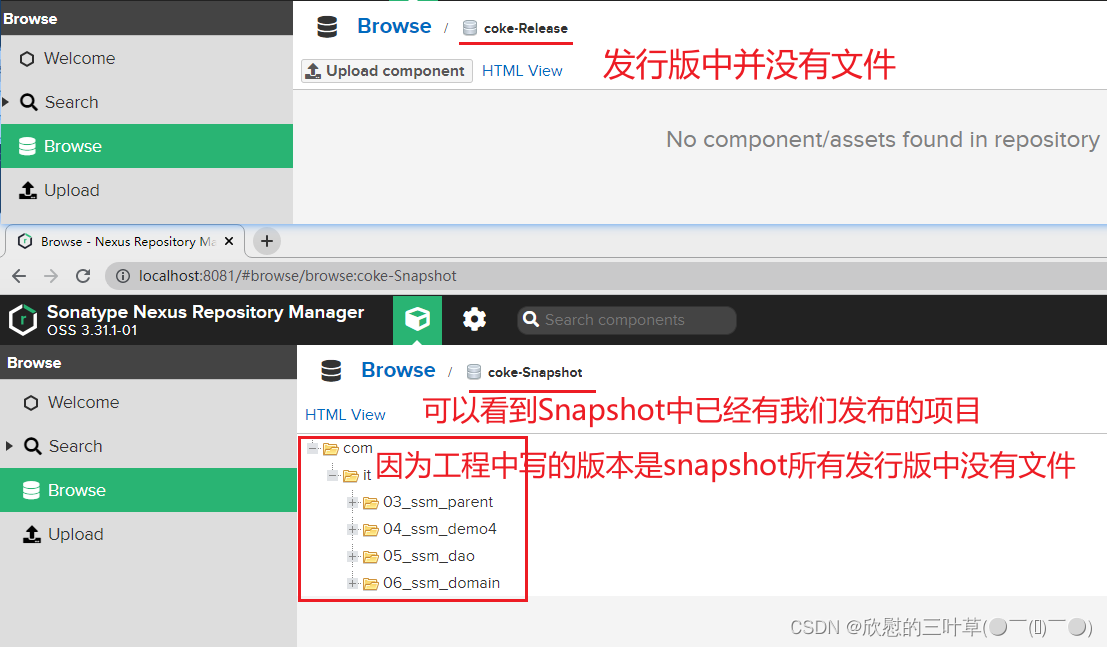
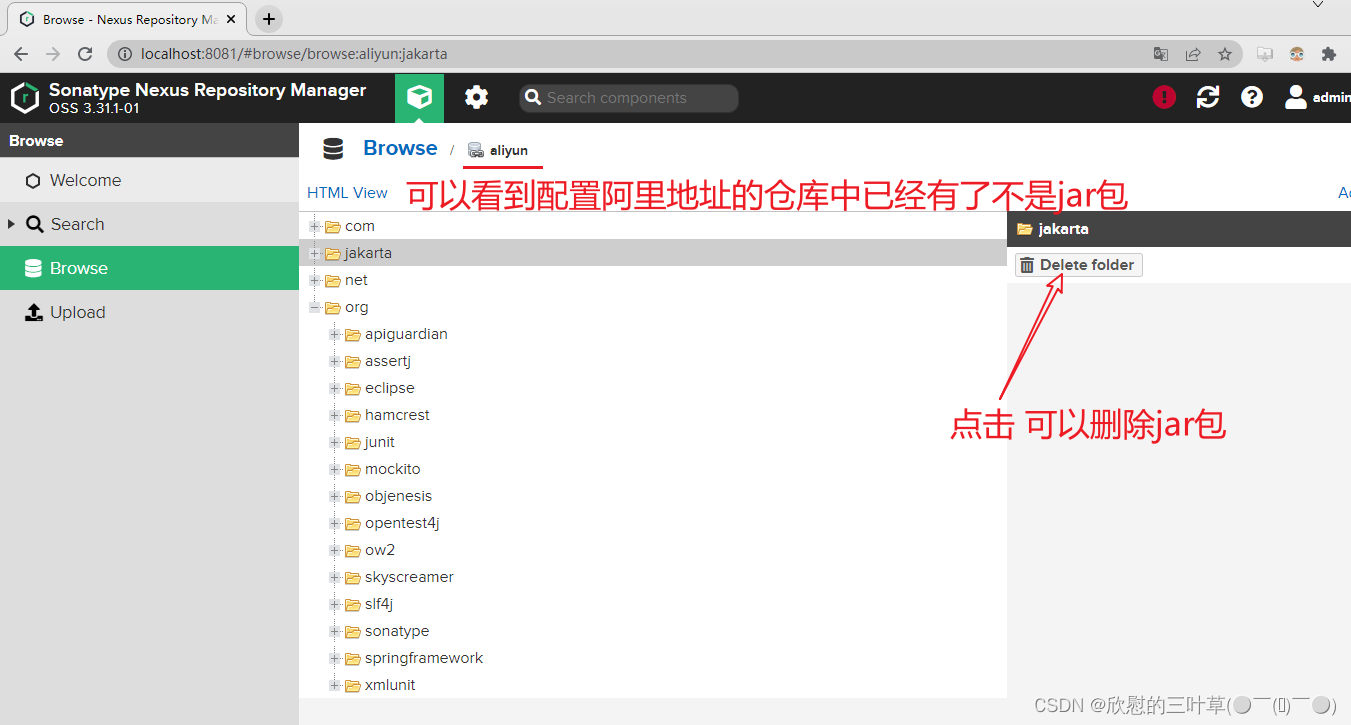
2. 查看私服中的文件 |
|---|
 |
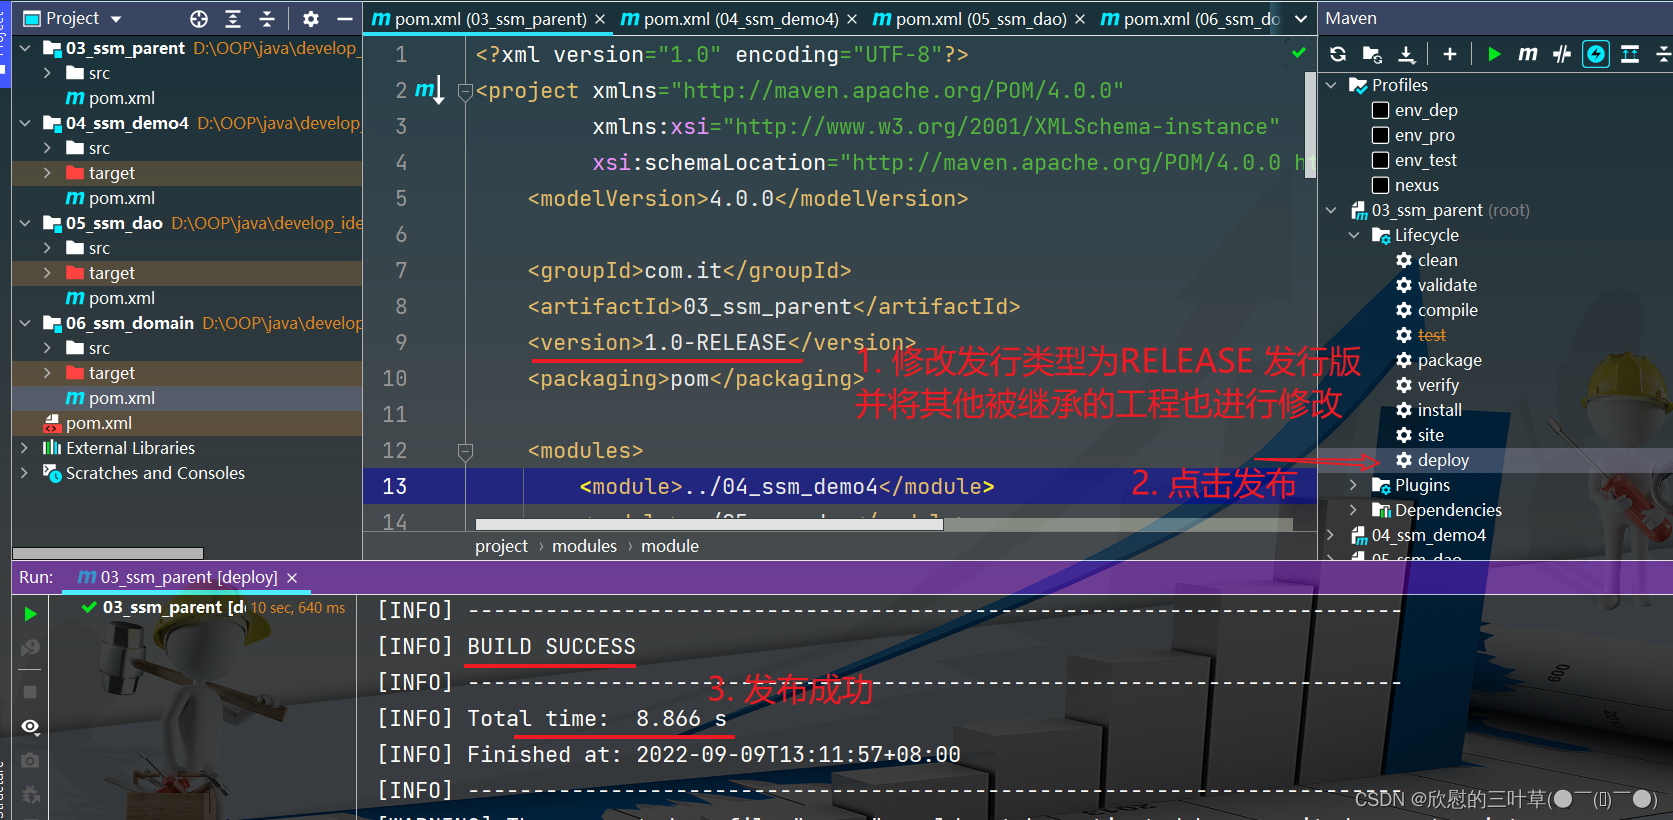
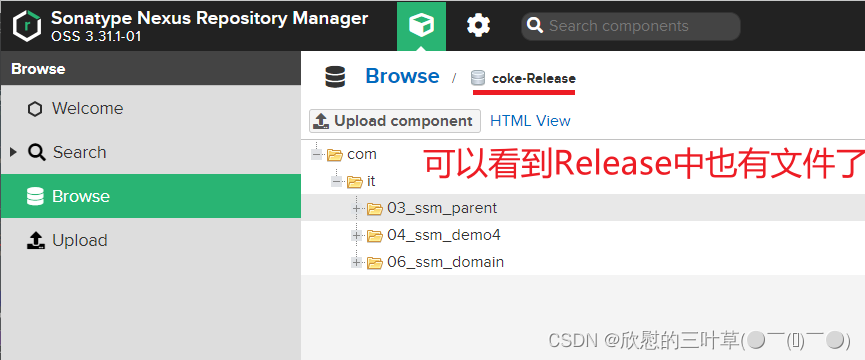
3. 上传发布 |
|---|
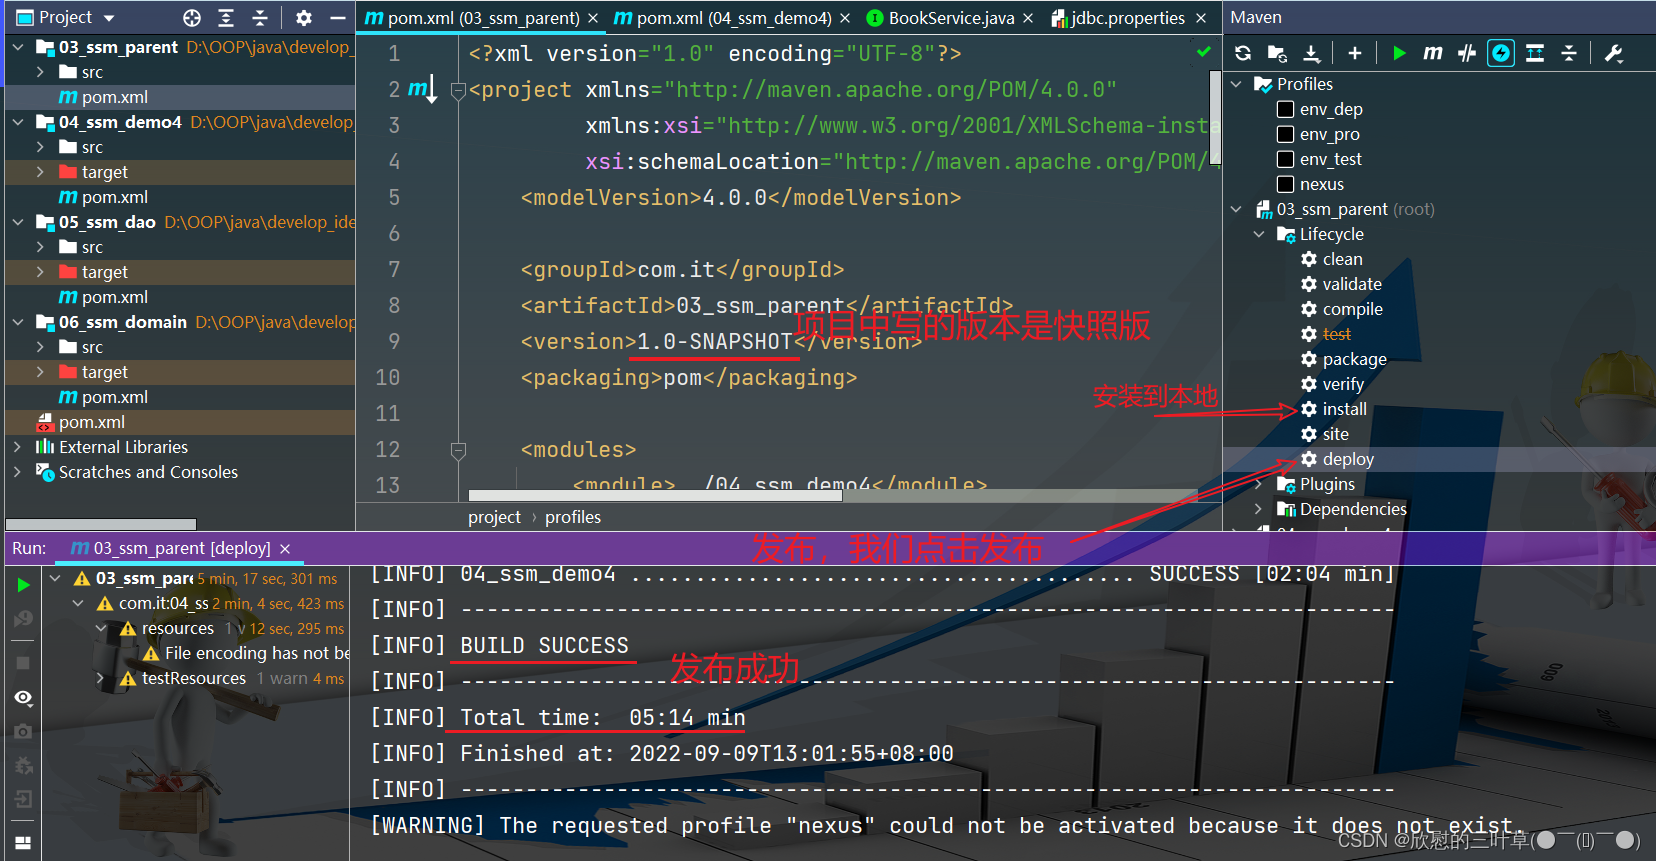   |
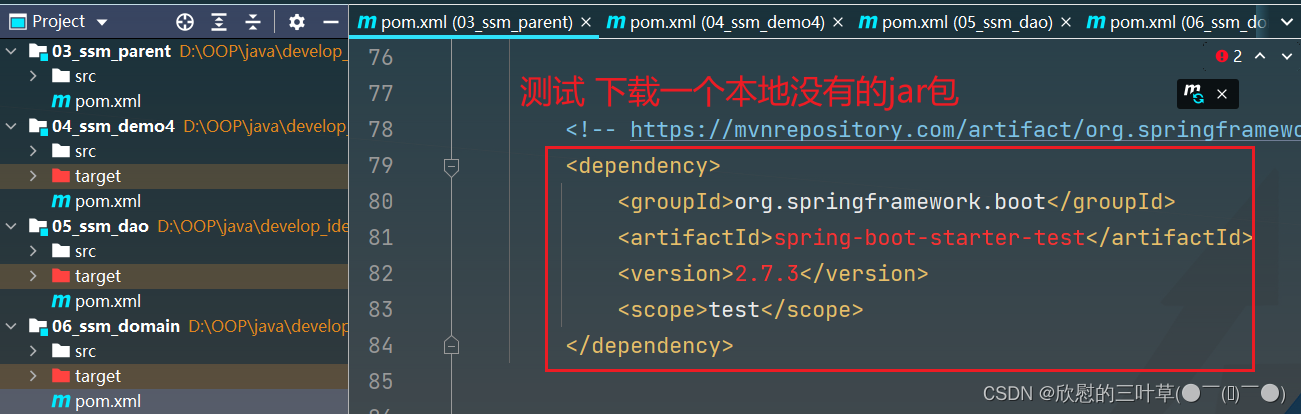
4. 下载测试 |
|---|
   |


 1270
1270

 被折叠的 条评论
为什么被折叠?
被折叠的 条评论
为什么被折叠?
 到【灌水乐园】发言


