


目录:导读
前言
1、接口鉴权的多种方式
1)后端接口鉴权常用方法
cookie:
携带身份信息请求认证
之后的每次请求都携带cookie信息,cookie记录在请求头中
token:
携带身份信息请求认证
之后的每次请求都携带token认证信息
可能记录在请求头,可能记录在url参数中
auth:
每次请求携带用户的username和password,并对其信息加密
oauth2(选修):
携带身份信息请求认证
服务端向指定回调地址回传code
通过code获取token
之后的请求信息都携带token。
2)cookie 鉴权
cookie 的获取(根据接口文档获取)
发送携带 cookie 的请求
直接通过 cookies 参数
通过 Session() 对象
class TestWithSession:
    proxy = {"http": "http://127.0.0.1:8888", "https": "https://127.0.0.1:8888"}
    req = requests.Session()

    def setup_class(self):
        url = "http://train-manage.atstudy.com/login"
        data = {"username": "199****9999", "password": "a1***56"}
        resp = self.req.request("post", url, data=data, proxies=self.proxy)
        print(self.req.headers)

    def test_get_userinfo(self):
        url = "http://train-manage.atstudy.com/api/manage/User/Info"
        resp = self.req.request("get", url, proxies=self.proxy)
        print(resp.text)

    def test_manage_tag(self):
        url = "http://train-manage.atstudy.com/api/manage/Tag?type=1"
        resp = self.req.request("get", url, proxies=self.proxy)
        print(resp.text)
3)token 鉴权
token 的获取(根据接口文档获取)
发送携带 token 的请求(根据接口文档获取)
class TestWithToken:
    proxy = {"http": "http://127.0.0.1:8888", "https": "http://127.0.0.1:8888"}
    headers = {}

    def setup_class(self):
        token = self.login().json()["data"]["token"]
        print(token)
        self.headers["x-litemall-admin-token"] = token

    @classmethod
    def login(cls):
        url = "https://litemall.hogwarts.ceshiren.com/admin/auth/login"
        data = {"username": "hogwarts", "password": "test12345", "code": ""}
        resp = requests.request("post", url, json=data, proxies=cls.proxy, verify=False)
        return resp

    def test_get_dashboard(self):
        url = "https://litemall.hogwarts.ceshiren.com/admin/dashboard"
        resp = requests.request("get", url, headers=self.headers, proxies=self.proxy, verify=False)
        print(resp.text)
        # print(1)

    def test_category_list(self):
        url = "https://litemall.hogwarts.ceshiren.com/admin/category/list"
        resp = requests.request("get", url, headers=self.headers, proxies=self.proxy, verify=False)
        print(resp.text)
2、加密与解密
1)原理
在得到响应后对响应做解密处理:
如果知道使用的是哪个通用加密算法的话,可以自行解决。
如果不了解对应的加密算法的话,可以让研发提供加解密的lib。
如果既不是通用加密算法、研发也无法提供加解密的lib的话,可以让加密方提供远程解析服务,这样算法仍然是保密的。
2)实战练习
调用python自带的base64,直接对返回的响应做解密,即可得到解密后的响应。
封装对于不同算法的处理方法。
class TestEncode:
    def test_decode(self):
        url = "http://127.0.0.1:9999/demo.txt"
        res = requests.request("get",url)
        print(res.content)
        de_res = base64.b64decode(res.content)
        print(json.loads(de_res))
3、数据库操作与断言
1)接口测试响应验证
如何在测试过程中验证接口没有 Bug?
通过接口响应值;
通过查询数据库信息辅助验证;
2)接口测试数据清理
自动化测试中会产生大量的脏数据,该如何清理?
通过调用delete接口删除
自动化测试使用干净的测试环境,每次自动化测试完成后,还原数据。
3)数据库操作注意事项
直接对数据库操作是非常危险的行为
权限管理严格的公司对数据库权限给的很低
表结构复杂,随便删除数据会影响功能异常,甚至会出现系统异常。
4)接口自动化测试常用的数据库操作
连接与配置
查询数据与断言
数据库封装(Python):
封装数据库配置
封装 sql 查询操作
调用方法执行 sql 语句
class Mysql:
    @classmethod
    def connect(cls):
        mysql_info = {
            "host": "litemall.hogwarts.ceshiren.com",
            "port": 13306,
            "user": "test",
            "password": "test123456",
            "database": "litemall",
            "charset": "utf8mb4"
        }
        conn = pymysql.Connect(**mysql_info)
        return conn

    @classmethod
    def execute(cls, sql):
        cnn = cls.connect()
        sor = cnn.cursor()
        sor.execute(sql)
        res = sor.fetchall()
        sor.close()
        cnn.close()
        return res
数据库断言:
def test_cart_add(self, good_sn='CC102101'):
        """测试添加购物车功能"""
        with allure.step("获取商品的id"):
            ids = self.good.id(good_sn)
        with allure.step("获取商品的good_id和product_id"):
            good_id = ids[0]
            product_id = ids[1]
        sql = f"""
        SELECT number FROM litemall_cart where goods_sn='{good_sn}' and goods_id='{good_id}'
        """
        good_num1 = Mysql.execute(sql)[0][0]
        print(good_num1)
        with allure.step("添加商品到购物车"):
            print(self.cart.add(good_id, product_id))
        good_num2 = Mysql.execute(sql)[0][0]
        print(good_num2)
        assert good_num2 - good_num1 == 1
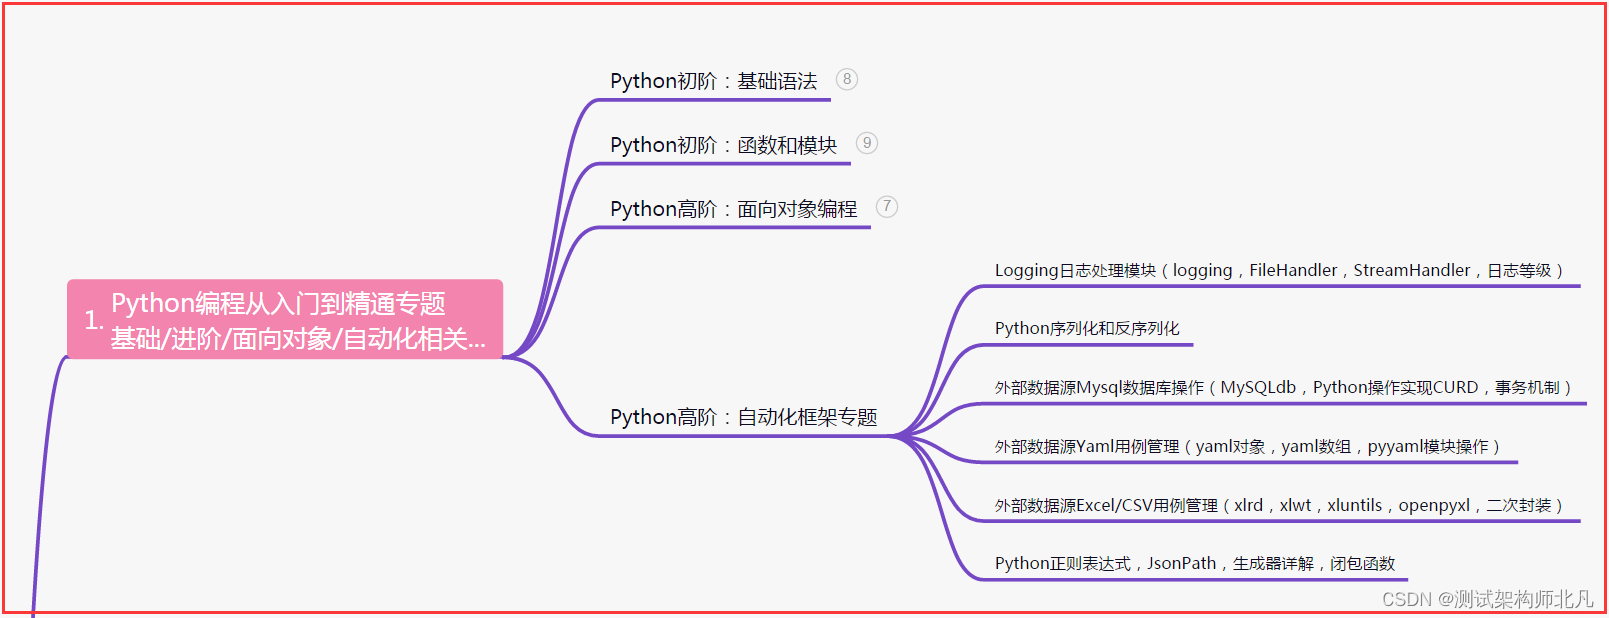
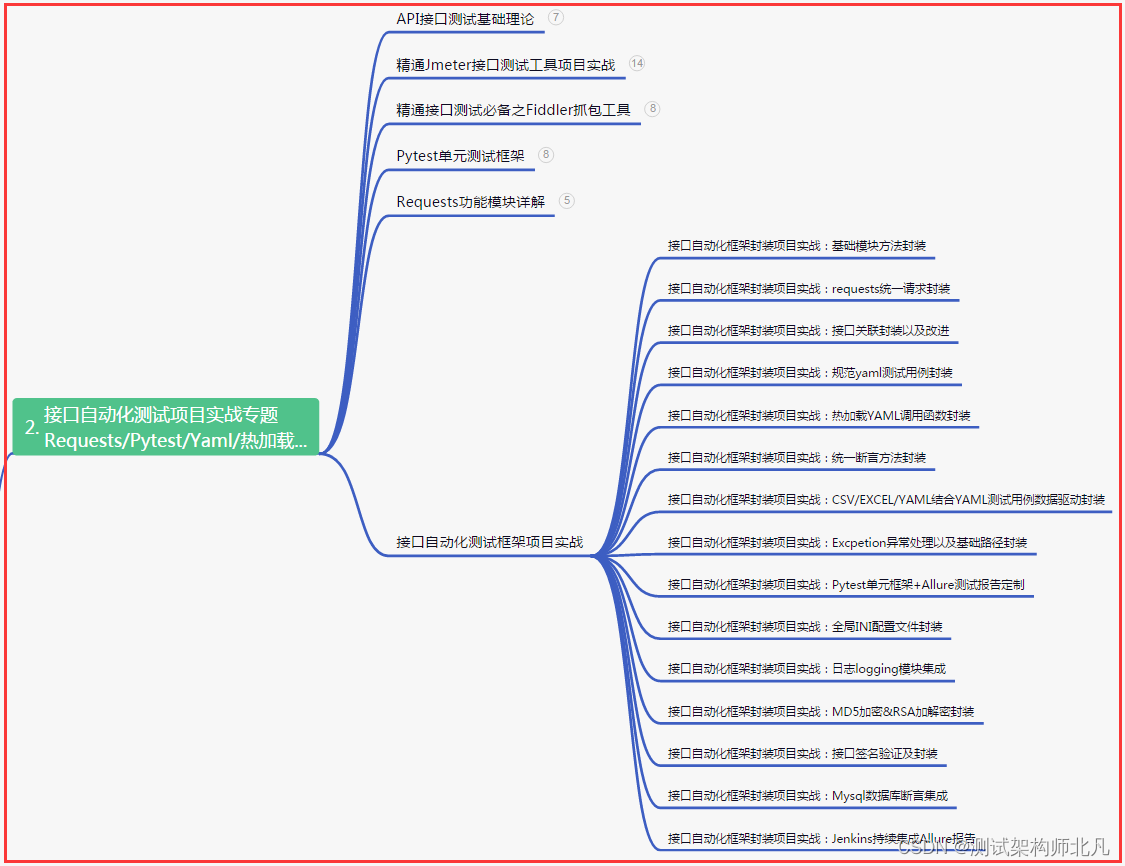
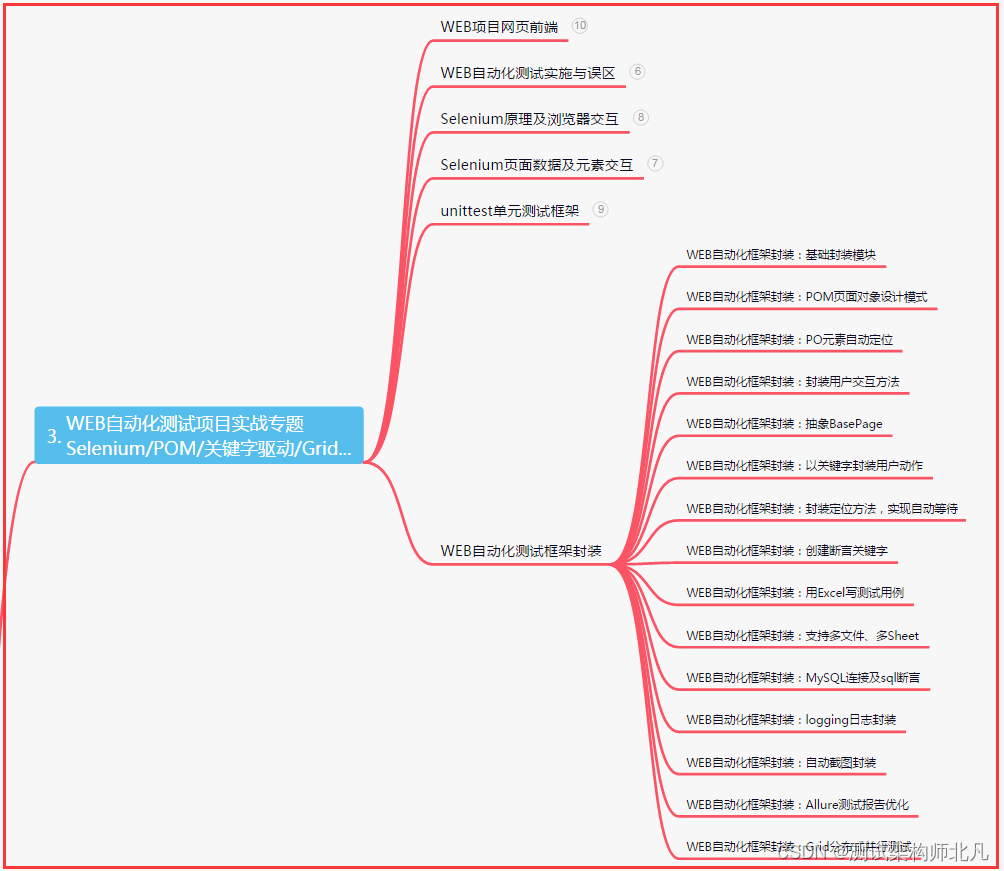
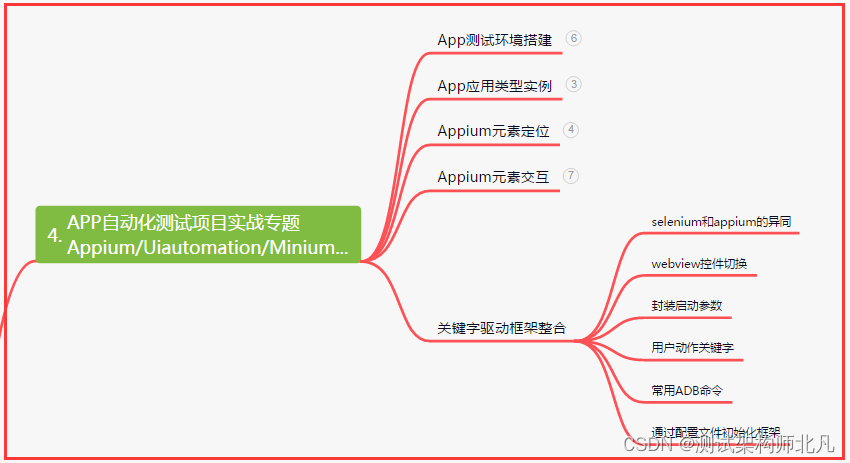
| 下面是我整理的2023年最全的软件测试工程师学习知识架构体系图 |
一、Python编程入门到精通
二、接口自动化项目实战
三、Web自动化项目实战
四、App自动化项目实战
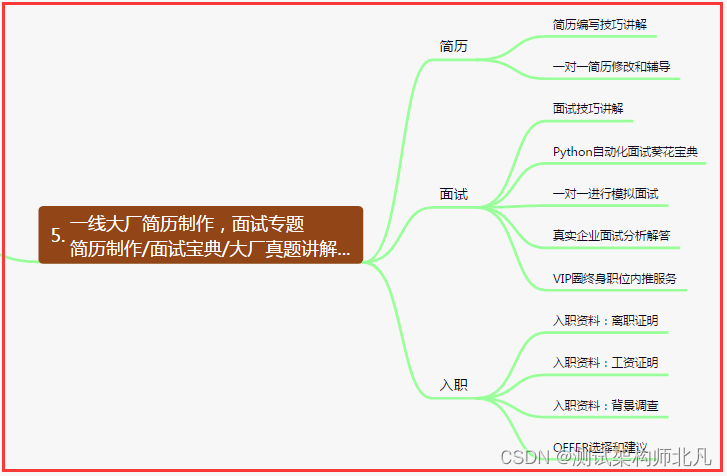
五、一线大厂简历
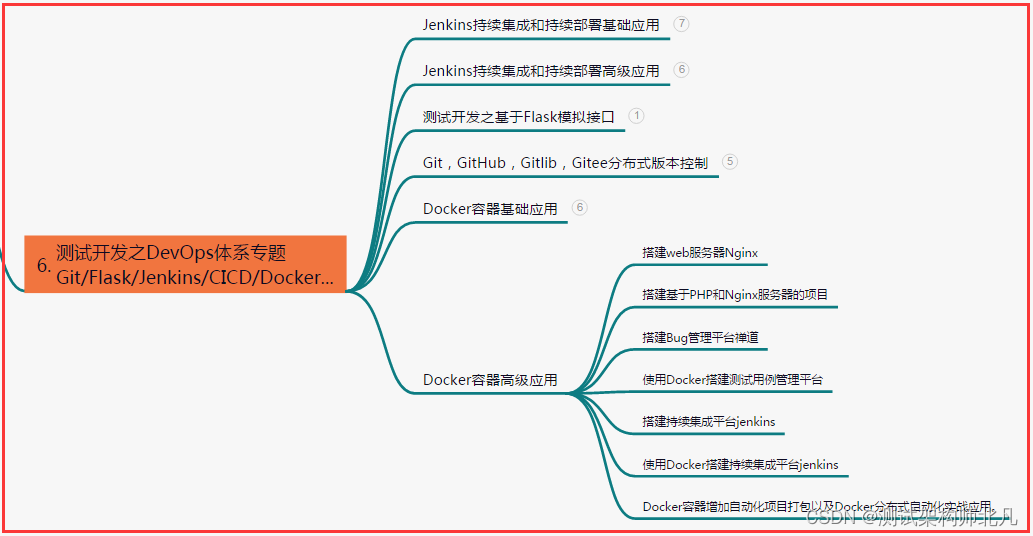
六、测试开发DevOps体系
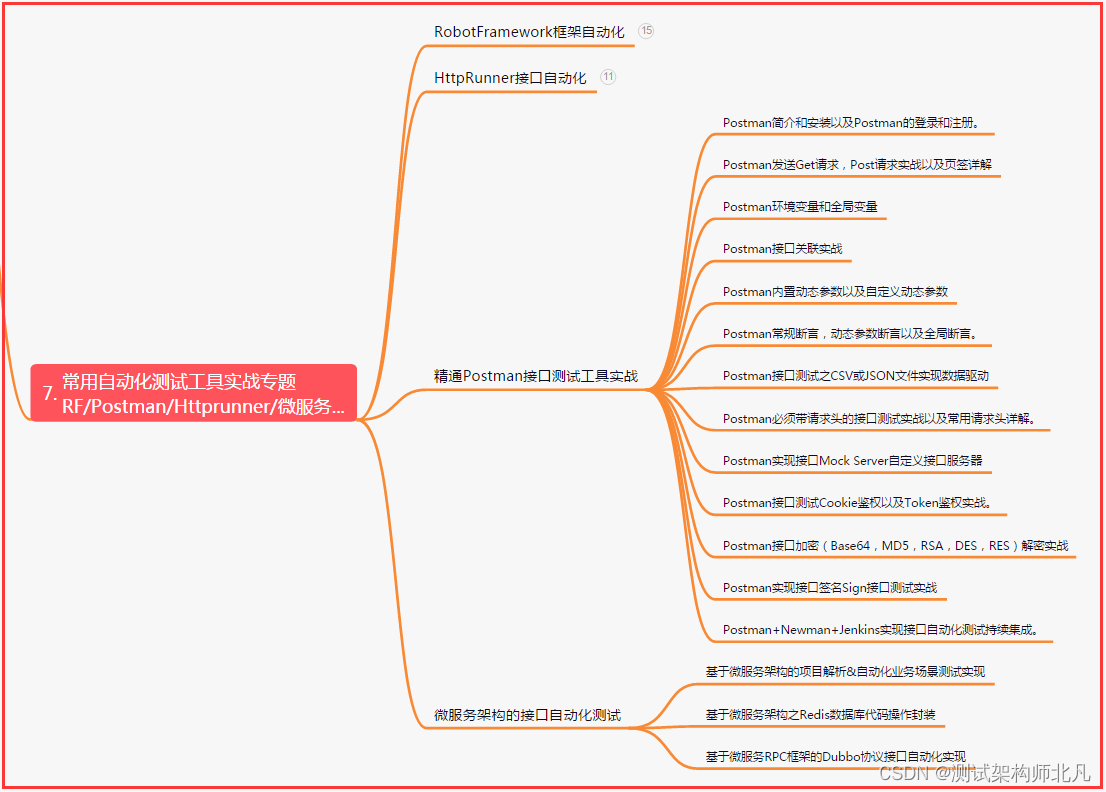
七、常用自动化测试工具
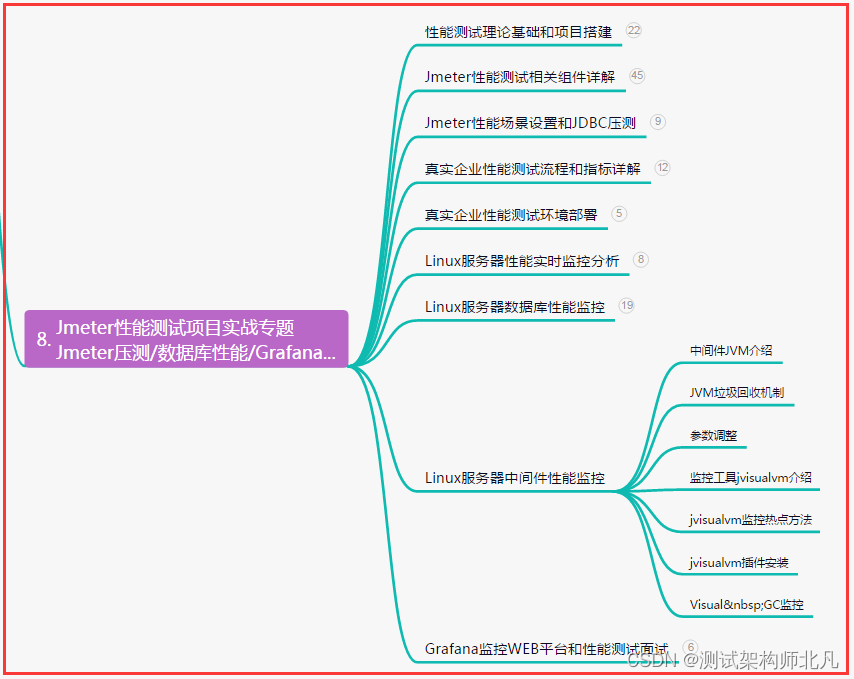
八、JMeter性能测试
九、总结(尾部小惊喜)
即使面临困难和挑战,我们也不能放弃追求梦想。每一次的奋斗,都是向目标迈进的步伐。只有坚持不懈,才能实现自我超越,创造属于自己的辉煌。
在追逐梦想的道路上,每一次的挫折都是对我们的考验。只要我们勇往直前,不畏艰难,就一定能够实现梦想,创造出属于自己的精彩人生。
无论前方有多少困难和挑战,只要我们坚持不懈,勇往直前,就一定能够实现梦想。每一次的奋斗,都是向成功迈进的步伐。


 2万+
2万+

 被折叠的 条评论
为什么被折叠?
被折叠的 条评论
为什么被折叠?
 到【灌水乐园】发言


