


📑 摘要
本文旨在为中国的 AI 应用开发者提供一份全面的实战指南。文章将详细介绍 AI 应用开发的核心流程,包括环境搭建、模型选择、数据处理、模型训练、部署与优化等关键环节。通过实践示例和代码展示,帮助开发者快速掌握 AI 应用开发的关键技术和最佳实践。文章还提供了丰富的图表和架构图,帮助读者更好地理解和应用这些技术。
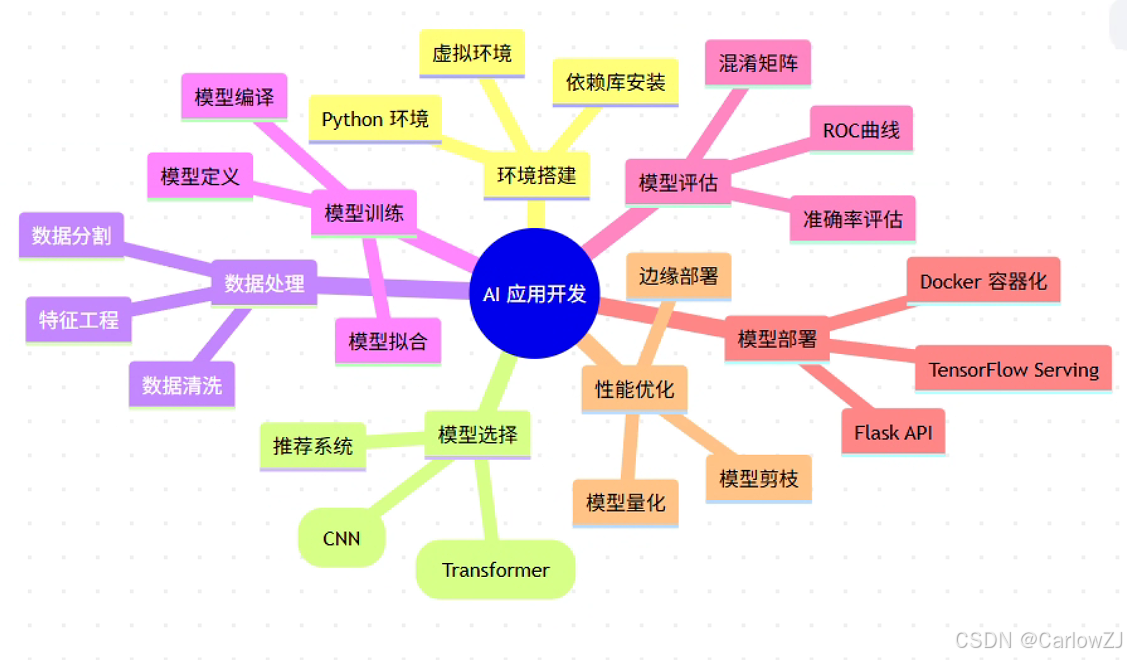
思维导图:AI 应用开发生命周期
mindmap
  root((AI 应用开发))
    环境搭建
      Python 环境
      虚拟环境
      依赖库安装
    模型选择
      图像识别(CNN)
      自然语言处理(Transformer)
      推荐系统
    数据处理
      数据清洗
      特征工程
      数据分割
    模型训练
      模型定义
      模型编译
      模型拟合
    模型评估
      准确率评估
      混淆矩阵
      ROC曲线
    模型部署
      TensorFlow Serving
      Flask API
      Docker 容器化
    性能优化
      模型量化
      模型剪枝
      边缘部署
第一章:环境搭建 - 打好基础
1.1 安装 Python 和依赖库
Python 是 AI 开发中最常用的编程语言之一。首先,确保您已经安装了 Python 3.8 或更高版本。然后,安装必要的依赖库,如 NumPy、Pandas 和 TensorFlow。
pip install numpy pandas tensorflow scikit-learn matplotlib seaborn
1.2 搭建开发环境
推荐使用虚拟环境来管理项目依赖,避免不同项目之间的依赖冲突。创建一个新的虚拟环境并激活它:
# 创建虚拟环境
python -m venv ai-dev-env

# 激活虚拟环境 (Linux/Mac)
source ai-dev-env/bin/activate

# 激活虚拟环境 (Windows)
ai-dev-env\Scripts\activate
💡 最佳实践:为每个 AI 项目创建独立的虚拟环境,确保依赖隔离和项目可重现性。
第二章:模型选择与数据处理 - 关键决策
2.1 选择合适的 AI 模型
根据您的应用场景选择合适的模型至关重要。不同的任务类型需要不同的模型架构:
- 图像识别任务:使用卷积神经网络(CNN)
- 自然语言处理任务:使用 Transformer 模型
- 时间序列预测:使用 LSTM 或 GRU
- 推荐系统:使用协同过滤或深度学习模型
2.2 数据预处理
数据预处理是 AI 开发中的关键步骤,直接影响模型的性能。以下是一个完整的数据预处理示例:
#!/usr/bin/env python3
# -*- coding: utf-8 -*-
"""
data_preprocessing.py
数据预处理完整示例
"""

import pandas as pd
import numpy as np
from sklearn.model_selection import train_test_split
from sklearn.preprocessing import StandardScaler, LabelEncoder
from sklearn.impute import SimpleImputer

def load_and_preprocess_data(file_path):
    """
    加载并预处理数据

    Args:
        file_path (str): 数据文件路径

    Returns:
        tuple: (X_train, X_test, y_train, y_test) 处理后的训练和测试数据
    """
    try:
        # 加载数据
        print("正在加载数据...")
        data = pd.read_csv(file_path)
        print(f"数据加载完成,共 {len(data)} 行")

        # 查看数据基本信息
        print("数据基本信息:")
        print(data.info())

        # 处理缺失值
        print("处理缺失值...")
        # 数值型特征用均值填充
        numeric_features = data.select_dtypes(include=[np.number]).columns
        numeric_imputer = SimpleImputer(strategy='mean')
        data[numeric_features] = numeric_imputer.fit_transform(data[numeric_features])

        # 分类特征用众数填充
        categorical_features = data.select_dtypes(include=['object']).columns
        categorical_imputer = SimpleImputer(strategy='most_frequent')
        data[categorical_features] = categorical_imputer.fit_transform(data[categorical_features])

        # 编码分类变量
        print("编码分类变量...")
        label_encoders = {}
        for feature in categorical_features:
            if feature != 'target':  # 假设目标变量名为 'target'
                le = LabelEncoder()
                data[feature] = le.fit_transform(data[feature])
                label_encoders[feature] = le

        # 分离特征和目标变量
        X = data.drop('target', axis=1)  # 假设目标变量名为 'target'
        y = data['target']

        # 分割数据集
        print("分割数据集...")
        X_train, X_test, y_train, y_test = train_test_split(
            X, y, test_size=0.2, random_state=42, stratify=y
        )

        # 特征标准化
        print("特征标准化...")
        scaler = StandardScaler()
        X_train_scaled = scaler.fit_transform(X_train)
        X_test_scaled = scaler.transform(X_test)

        print("数据预处理完成!")
        return X_train_scaled, X_test_scaled, y_train, y_test

    except Exception as e:
        print(f"数据预处理过程中出现错误: {e}")
        raise

# 使用示例
if __name__ == "__main__":
    # 注意:需要先准备一个 data.csv 文件
    # X_train, X_test, y_train, y_test = load_and_preprocess_data('data.csv')
    print("数据预处理模块准备就绪")
⚠️ 注意事项:在实际使用中,请确保数据文件存在且格式正确。
第三章:模型训练与评估 - 核心环节
3.1 模型训练
使用 TensorFlow 训练一个简单的神经网络模型:
#!/usr/bin/env python3
# -*- coding: utf-8 -*-
"""
model_training.py
模型训练完整示例
"""

import tensorflow as tf
from tensorflow.keras.models import Sequential
from tensorflow.keras.layers import Dense, Dropout
from tensorflow.keras.callbacks import EarlyStopping, ReduceLROnPlateau
import numpy as np
import matplotlib.pyplot as plt

def create_model(input_dim, hidden_layers=[128, 64], dropout_rate=0.3):
    """
    创建神经网络模型

    Args:
        input_dim (int): 输入特征维度
        hidden_layers (list): 隐藏层神经元数量列表
        dropout_rate (float): Dropout 比率

    Returns:
        model: 编译后的 Keras 模型
    """
    model = Sequential()

    # 输入层
    model.add(Dense(hidden_layers[0],
                   activation='relu',
                   input_shape=(input_dim,),
                   name='input_layer'))
    model.add(Dropout(dropout_rate, name='dropout_1'))

    # 隐藏层
    for i, units in enumerate(hidden_layers[1:], 2):
        model.add(Dense(units,
                       activation='relu',
                       name=f'hidden_layer_{i}'))
        model.add(Dropout(dropout_rate, name=f'dropout_{i}'))

    # 输出层 (二分类)
    model.add(Dense(1, activation='sigmoid', name='output_layer'))

    # 编译模型
    model.compile(
        optimizer='adam',
        loss='binary_crossentropy',
        metrics=['accuracy']
    )

    return model

def train_model(X_train, y_train, X_val=None, y_val=None,
                epochs=100, batch_size=32, verbose=1):
    """
    训练模型

    Args:
        X_train: 训练特征
        y_train: 训练标签
        X_val: 验证特征 (可选)
        y_val: 验证标签 (可选)
        epochs (int): 训练轮数
        batch_size (int): 批次大小
        verbose (int): 日志显示级别

    Returns:
        tuple: (trained_model, history)
    """
    try:
        # 确定输入维度
        input_dim = X_train.shape[1]

        # 创建模型
        model = create_model(input_dim)

        # 显示模型结构
        if verbose > 0:
            print("模型结构:")
            model.summary()

        # 定义回调函数
        callbacks = [
            EarlyStopping(
                monitor='val_loss' if X_val is not None else 'loss',
                patience=10,
                restore_best_weights=True,
                verbose=verbose
            ),
            ReduceLROnPlateau(
                monitor='val_loss' if X_val is not None else 'loss',
                factor=0.5,
                patience=5,
                min_lr=1e-7,
                verbose=verbose
            )
        ]

        # 准备验证数据
        validation_data = (X_val, y_val) if X_val is not None and y_val is not None else None

        # 训练模型
        print("开始训练模型...")
        history = model.fit(
            X_train, y_train,
            epochs=epochs,
            batch_size=batch_size,
            validation_data=validation_data,
            validation_split=0.2 if validation_data is None else 0.0,
            callbacks=callbacks,
            verbose=verbose
        )

        print("模型训练完成!")
        return model, history

    except Exception as e:
        print(f"模型训练过程中出现错误: {e}")
        raise

def plot_training_history(history):
    """
    绘制训练历史曲线

    Args:
        history: Keras 训练历史对象
    """
    fig, (ax1, ax2) = plt.subplots(1, 2, figsize=(12, 4))

    # 绘制损失曲线
    ax1.plot(history.history['loss'], label='训练损失')
    if 'val_loss' in history.history:
        ax1.plot(history.history['val_loss'], label='验证损失')
    ax1.set_title('模型损失')
    ax1.set_xlabel('Epoch')
    ax1.set_ylabel('Loss')
    ax1.legend()

    # 绘制准确率曲线
    ax2.plot(history.history['accuracy'], label='训练准确率')
    if 'val_accuracy' in history.history:
        ax2.plot(history.history['val_accuracy'], label='验证准确率')
    ax2.set_title('模型准确率')
    ax2.set_xlabel('Epoch')
    ax2.set_ylabel('Accuracy')
    ax2.legend()

    plt.tight_layout()
    plt.show()

# 使用示例
if __name__ == "__main__":
    # 模拟数据 (实际使用时请替换为真实数据)
    np.random.seed(42)
    X_train = np.random.randn(1000, 20)
    y_train = np.random.randint(0, 2, 1000)

    # 训练模型
    # model, history = train_model(X_train, y_train)

    # 绘制训练历史 (需要在训练完成后执行)
    # plot_training_history(history)

    print("模型训练模块准备就绪")
3.2 模型评估
评估模型性能是确保模型质量的重要步骤:
#!/usr/bin/env python3
# -*- coding: utf-8 -*-
"""
model_evaluation.py
模型评估完整示例
"""

import numpy as np
from sklearn.metrics import (accuracy_score, precision_score, recall_score,
                           f1_score, confusion_matrix, classification_report,
                           roc_auc_score, roc_curve)
import matplotlib.pyplot as plt
import seaborn as sns

def evaluate_model(model, X_test, y_test, class_names=None):
    """
    全面评估模型性能

    Args:
        model: 训练好的模型
        X_test: 测试特征
        y_test: 测试标签
        class_names (list): 类别名称列表

    Returns:
        dict: 评估结果字典
    """
    try:
        # 预测
        y_pred_proba = model.predict(X_test)
        y_pred = (y_pred_proba > 0.5).astype(int).flatten()

        # 计算各种评估指标
        accuracy = accuracy_score(y_test, y_pred)
        precision = precision_score(y_test, y_pred, average='weighted')
        recall = recall_score(y_test, y_pred, average='weighted')
        f1 = f1_score(y_test, y_pred, average='weighted')

        # 对于二分类问题,计算 AUC
        auc = None
        if len(np.unique(y_test)) == 2:
            auc = roc_auc_score(y_test, y_pred_proba)

        # 创建评估结果字典
        results = {
            'accuracy': accuracy,
            'precision': precision,
            'recall': recall,
            'f1_score': f1,
            'auc': auc,
            'y_pred': y_pred,
            'y_pred_proba': y_pred_proba
        }

        # 打印评估结果
        print("=" * 50)
        print("模型评估结果")
        print("=" * 50)
        print(f"准确率 (Accuracy):  {accuracy:.4f}")
        print(f"精确率 (Precision): {precision:.4f}")
        print(f"召回率 (Recall):    {recall:.4f}")
        print(f"F1 分数:            {f1:.4f}")
        if auc is not None:
            print(f"AUC 分数:           {auc:.4f}")

        # 详细分类报告
        print("\n详细分类报告:")
        print(classification_report(y_test, y_pred, target_names=class_names))

        return results

    except Exception as e:
        print(f"模型评估过程中出现错误: {e}")
        raise

def plot_confusion_matrix(y_true, y_pred, class_names=None, title="混淆矩阵"):
    """
    绘制混淆矩阵

    Args:
        y_true: 真实标签
        y_pred: 预测标签
        class_names (list): 类别名称
        title (str): 图表标题
    """
    # 计算混淆矩阵
    cm = confusion_matrix(y_true, y_pred)

    # 绘制混淆矩阵
    plt.figure(figsize=(8, 6))
    sns.heatmap(cm, annot=True, fmt='d', cmap='Blues',
                xticklabels=class_names or range(cm.shape[1]),
                yticklabels=class_names or range(cm.shape[0]))
    plt.title(title)
    plt.xlabel('预测标签')
    plt.ylabel('真实标签')
    plt.show()

def plot_roc_curve(y_true, y_pred_proba, title="ROC 曲线"):
    """
    绘制 ROC 曲线

    Args:
        y_true: 真实标签
        y_pred_proba: 预测概率
        title (str): 图表标题
    """
    # 确保是二分类问题
    if len(np.unique(y_true)) != 2:
        print("ROC 曲线仅适用于二分类问题")
        return

    # 计算 ROC 曲线
    fpr, tpr, _ = roc_curve(y_true, y_pred_proba)
    auc = roc_auc_score(y_true, y_pred_proba)

    # 绘制 ROC 曲线
    plt.figure(figsize=(8, 6))
    plt.plot(fpr, tpr, color='darkorange', lw=2,
             label=f'ROC 曲线 (AUC = {auc:.2f})')
    plt.plot([0, 1], [0, 1], color='navy', lw=2, linestyle='--',
             label='随机分类器')
    plt.xlim([0.0, 1.0])
    plt.ylim([0.0, 1.05])
    plt.xlabel('假正率 (False Positive Rate)')
    plt.ylabel('真正率 (True Positive Rate)')
    plt.title(title)
    plt.legend(loc="lower right")
    plt.grid(True)
    plt.show()

# 使用示例
if __name__ == "__main__":
    # 模拟数据 (实际使用时请替换为真实数据和模型)
    np.random.seed(42)
    y_test = np.random.randint(0, 2, 100)
    y_pred = np.random.randint(0, 2, 100)
    y_pred_proba = np.random.rand(100, 1)

    # 评估模型 (需要真实模型和数据)
    # results = evaluate_model(model, X_test, y_test)

    # 绘制混淆矩阵
    # plot_confusion_matrix(y_test, y_pred, class_names=['类别0', '类别1'])

    # 绘制 ROC 曲线 (仅适用于二分类)
    # plot_roc_curve(y_test, y_pred_proba)

    print("模型评估模块准备就绪")
第四章:模型部署与优化 - 落地应用
4.1 模型部署
将训练好的模型部署到生产环境中。可以使用 TensorFlow Serving 或其他工具来部署模型。
tensorflow_model_server --rest_api_port=8501 --model_name=my_model --model_base_path=/path/to/model
使用 Flask 构建 API 服务:
#!/usr/bin/env python3
# -*- coding: utf-8 -*-
"""
model_api.py
使用 Flask 构建模型 API 服务
"""

from flask import Flask, request, jsonify
import tensorflow as tf
import numpy as np
import logging

# 配置日志
logging.basicConfig(level=logging.INFO)
logger = logging.getLogger(__name__)

# 初始化 Flask 应用
app = Flask(__name__)

# 全局变量存储模型
model = None

def load_model(model_path):
    """
    加载训练好的模型

    Args:
        model_path (str): 模型文件路径

    Returns:
        model: 加载的模型
    """
    try:
        model = tf.keras.models.load_model(model_path)
        logger.info(f"模型加载成功: {model_path}")
        return model
    except Exception as e:
        logger.error(f"模型加载失败: {e}")
        raise

@app.route('/health', methods=['GET'])
def health_check():
    """
    健康检查接口
    """
    return jsonify({"status": "healthy", "message": "API 服务运行正常"}), 200

@app.route('/predict', methods=['POST'])
def predict():
    """
    模型预测接口

    请求格式:
    {
        "features": [1.2, 3.4, 5.6, ...]  # 特征数组
    }

    返回格式:
    {
        "prediction": 0.85,  # 预测概率
        "class": 1           # 预测类别
    }
    """
    try:
        # 获取请求数据
        data = request.get_json()

        if not data or 'features' not in data:
            return jsonify({"error": "缺少 features 字段"}), 400

        features = data['features']

        # 验证输入数据
        if not isinstance(features, list):
            return jsonify({"error": "features 必须是数组"}), 400

        # 转换为 numpy 数组并 reshape
        features_array = np.array(features).reshape(1, -1)

        # 模型预测
        if model is None:
            return jsonify({"error": "模型未加载"}), 500

        prediction_proba = model.predict(features_array)[0][0]
        prediction_class = int(prediction_proba > 0.5)

        # 记录预测日志
        logger.info(f"预测完成 - 概率: {prediction_proba:.4f}, 类别: {prediction_class}")

        # 返回结果
        return jsonify({
            "prediction": float(prediction_proba),
            "class": prediction_class
        }), 200

    except Exception as e:
        logger.error(f"预测过程中出现错误: {e}")
        return jsonify({"error": "预测失败", "message": str(e)}), 500

@app.route('/batch_predict', methods=['POST'])
def batch_predict():
    """
    批量预测接口

    请求格式:
    {
        "features_list": [
            [1.2, 3.4, 5.6, ...],
            [2.1, 4.3, 6.5, ...],
            ...
        ]
    }

    返回格式:
    {
        "predictions": [
            {"prediction": 0.85, "class": 1},
            {"prediction": 0.23, "class": 0},
            ...
        ]
    }
    """
    try:
        # 获取请求数据
        data = request.get_json()

        if not data or 'features_list' not in data:
            return jsonify({"error": "缺少 features_list 字段"}), 400

        features_list = data['features_list']

        # 验证输入数据
        if not isinstance(features_list, list) or len(features_list) == 0:
            return jsonify({"error": "features_list 必须是非空数组"}), 400

        # 转换为 numpy 数组
        features_array = np.array(features_list)

        # 模型预测
        if model is None:
            return jsonify({"error": "模型未加载"}), 500

        predictions_proba = model.predict(features_array).flatten()
        predictions_class = (predictions_proba > 0.5).astype(int)

        # 构造返回结果
        results = []
        for proba, cls in zip(predictions_proba, predictions_class):
            results.append({
                "prediction": float(proba),
                "class": int(cls)
            })

        # 记录预测日志
        logger.info(f"批量预测完成 - 样本数: {len(results)}")

        # 返回结果
        return jsonify({"predictions": results}), 200

    except Exception as e:
        logger.error(f"批量预测过程中出现错误: {e}")
        return jsonify({"error": "批量预测失败", "message": str(e)}), 500

def main():
    """
    主函数 - 启动 API 服务
    """
    global model

    # 模型路径 (请根据实际情况修改)
    MODEL_PATH = "path/to/your/model.h5"

    try:
        # 加载模型
        model = load_model(MODEL_PATH)

        # 启动服务
        logger.info("启动模型 API 服务...")
        app.run(host='0.0.0.0', port=5000, debug=False)

    except Exception as e:
        logger.error(f"启动服务失败: {e}")
        raise

# 使用示例
if __name__ == "__main__":
    # 注意:运行前请确保模型文件存在
    # main()
    print("模型 API 服务模块准备就绪")
4.2 性能优化
优化模型性能,例如使用量化和剪枝技术。
#!/usr/bin/env python3
# -*- coding: utf-8 -*-
"""
model_optimization.py
模型优化完整示例
"""

import tensorflow as tf
import tensorflow_model_optimization as tfmot
import numpy as np

def quantize_model(model, representative_dataset=None):
    """
    模型量化 - 减少模型大小并提高推理速度

    Args:
        model: 原始模型
        representative_dataset: 代表性数据集 (用于动态范围量化)

    Returns:
        quantized_model: 量化后的模型
    """
    try:
        # 方法1: 训练后量化 (Post-training quantization)
        converter = tf.lite.TFLiteConverter.from_keras_model(model)

        # 启用优化
        converter.optimizations = [tf.lite.Optimize.DEFAULT]

        # 如果提供了代表性数据集,使用动态范围量化
        if representative_dataset is not None:
            def representative_data_gen():
                for input_value in representative_dataset.take(100):
                    # 模型有多个输入时需要调整
                    yield [input_value]

            converter.representative_dataset = representative_data_gen
            # 确保模型是全整数量化
            converter.target_spec.supported_ops = [tf.lite.OpsSet.TFLITE_BUILTINS_INT8]
            converter.inference_input_type = tf.int8
            converter.inference_output_type = tf.int8

        # 转换模型
        tflite_model = converter.convert()

        print("模型量化完成!")
        print(f"原始模型大小: {len(model.weights)//2} 参数")
        print(f"TFLite 模型大小: {len(tflite_model)} 字节")

        return tflite_model

    except Exception as e:
        print(f"模型量化过程中出现错误: {e}")
        raise

def prune_model(model, X_train, y_train, X_val, y_val,
                pruning_rate=0.5, epochs=10):
    """
    模型剪枝 - 移除不重要的权重参数

    Args:
        model: 原始模型
        X_train, y_train: 训练数据
        X_val, y_val: 验证数据
        pruning_rate (float): 剪枝比例
        epochs (int): 微调轮数

    Returns:
        pruned_model: 剪枝后的模型
    """
    try:
        # 定义剪枝参数
        pruning_params = {
            'pruning_schedule': tfmot.sparsity.keras.PolynomialDecay(
                initial_sparsity=0.0,
                final_sparsity=pruning_rate,
                begin_step=0,
                end_step=len(X_train) // 32 * epochs  # 假设 batch_size=32
            )
        }

        # 应用剪枝到模型
        pruned_model = tfmot.sparsity.keras.prune_low_magnitude(
            model, **pruning_params)

        # 编译剪枝模型
        pruned_model.compile(
            optimizer='adam',
            loss='binary_crossentropy',
            metrics=['accuracy']
        )

        # 微调剪枝模型
        print(f"开始剪枝模型微调 ({epochs} 轮)...")
        pruned_model.fit(
            X_train, y_train,
            batch_size=32,
            epochs=epochs,
            validation_data=(X_val, y_val),
            callbacks=[tfmot.sparsity.keras.UpdatePruningStep()]
        )

        # 移除剪枝包装器
        final_model = tfmot.sparsity.keras.strip_pruning(pruned_model)

        print("模型剪枝完成!")
        return final_model

    except Exception as e:
        print(f"模型剪枝过程中出现错误: {e}")
        raise

def save_optimized_model(optimized_model, file_path):
    """
    保存优化后的模型

    Args:
        optimized_model: 优化后的模型 (TFLite 模型为 bytes)
        file_path (str): 保存路径
    """
    try:
        # 根据模型类型选择保存方式
        if isinstance(optimized_model, bytes):
            # TFLite 模型
            with open(file_path, 'wb') as f:
                f.write(optimized_model)
        else:
            # Keras 模型
            optimized_model.save(file_path)

        print(f"优化模型已保存到: {file_path}")

    except Exception as e:
        print(f"保存优化模型时出现错误: {e}")
        raise

# 使用示例
if __name__ == "__main__":
    # 模拟模型和数据 (实际使用时请替换为真实模型和数据)
    model = tf.keras.Sequential([
        tf.keras.layers.Dense(64, activation='relu', input_shape=(20,)),
        tf.keras.layers.Dense(32, activation='relu'),
        tf.keras.layers.Dense(1, activation='sigmoid')
    ])

    model.compile(optimizer='adam', loss='binary_crossentropy', metrics=['accuracy'])

    # 创建模拟数据
    np.random.seed(42)
    X_train = np.random.randn(1000, 20)
    y_train = np.random.randint(0, 2, 1000)
    X_val = np.random.randn(200, 20)
    y_val = np.random.randint(0, 2, 200)

    # 模型量化
    # 注意:需要代表性数据集进行动态范围量化
    # representative_dataset = tf.data.Dataset.from_tensor_slices(X_train).batch(1)
    # quantized_model = quantize_model(model, representative_dataset)
    # save_optimized_model(quantized_model, 'model_quantized.tflite')

    # 模型剪枝
    # pruned_model = prune_model(model, X_train, y_train, X_val, y_val)
    # save_optimized_model(pruned_model, 'model_pruned.h5')

    print("模型优化模块准备就绪")
第五章:实践案例 - 应用场景
5.1 图像识别应用
构建一个图像识别应用,使用 TensorFlow 和 Keras。
#!/usr/bin/env python3
# -*- coding: utf-8 -*-
"""
image_classification.py
图像分类完整示例
"""

import tensorflow as tf
from tensorflow.keras.applications import MobileNetV2
from tensorflow.keras.preprocessing import image
from tensorflow.keras.applications.mobilenet_v2 import preprocess_input, decode_predictions
import numpy as np
import matplotlib.pyplot as plt
from PIL import Image
import requests
from io import BytesIO
import os

class ImageClassifier:
    """
    图像分类器类
    """

    def __init__(self, model_name='MobileNetV2'):
        """
        初始化图像分类器

        Args:
            model_name (str): 模型名称
        """
        self.model_name = model_name
        self.model = None
        self.load_model()

    def load_model(self):
        """
        加载预训练模型
        """
        try:
            print(f"正在加载 {self.model_name} 模型...")
            if self.model_name == 'MobileNetV2':
                self.model = MobileNetV2(weights='imagenet')
            else:
                raise ValueError(f"不支持的模型: {self.model_name}")

            print(f"{self.model_name} 模型加载完成!")

        except Exception as e:
            print(f"模型加载失败: {e}")
            raise

    def preprocess_image(self, img_path, target_size=(224, 224)):
        """
        预处理图像

        Args:
            img_path (str): 图像路径或URL
            target_size (tuple): 目标尺寸

        Returns:
            numpy.ndarray: 预处理后的图像数组
        """
        try:
            # 从URL或本地文件加载图像
            if img_path.startswith('http'):
                response = requests.get(img_path)
                img = Image.open(BytesIO(response.content))
            else:
                img = image.load_img(img_path)

            # 调整图像大小
            img = img.resize(target_size)

            # 转换为数组
            img_array = image.img_to_array(img)

            # 添加批次维度
            img_array = np.expand_dims(img_array, axis=0)

            # 预处理
            img_array = preprocess_input(img_array)

            return img_array

        except Exception as e:
            print(f"图像预处理失败: {e}")
            raise

    def predict(self, img_path, top_k=3):
        """
        图像分类预测

        Args:
            img_path (str): 图像路径或URL
            top_k (int): 返回前k个预测结果

        Returns:
            list: 预测结果列表
        """
        try:
            # 预处理图像
            img_array = self.preprocess_image(img_path)

            # 预测
            predictions = self.model.predict(img_array)

            # 解码预测结果
            decoded_predictions = decode_predictions(predictions, top=top_k)[0]

            # 格式化结果
            results = []
            for i, (imagenet_id, label, score) in enumerate(decoded_predictions):
                results.append({
                    'rank': i + 1,
                    'label': label,
                    'confidence': float(score)
                })

            return results

        except Exception as e:
            print(f"预测过程中出现错误: {e}")
            raise

    def predict_and_visualize(self, img_path, top_k=3):
        """
        预测并可视化结果

        Args:
            img_path (str): 图像路径或URL
            top_k (int): 返回前k个预测结果
        """
        try:
            # 加载原始图像用于显示
            if img_path.startswith('http'):
                response = requests.get(img_path)
                original_img = Image.open(BytesIO(response.content))
            else:
                original_img = Image.open(img_path)

            # 预测
            results = self.predict(img_path, top_k)

            # 显示图像和预测结果
            fig, (ax1, ax2) = plt.subplots(1, 2, figsize=(12, 5))

            # 显示图像
            ax1.imshow(original_img)
            ax1.set_title('输入图像')
            ax1.axis('off')

            # 显示预测结果
            labels = [result['label'] for result in results]
            scores = [result['confidence'] for result in results]

            y_pos = np.arange(len(labels))
            ax2.barh(y_pos, scores, color='skyblue')
            ax2.set_yticks(y_pos)
            ax2.set_yticklabels(labels)
            ax2.set_xlabel('置信度')
            ax2.set_title('预测结果')
            ax2.set_xlim(0, 1)

            # 添加数值标签
            for i, score in enumerate(scores):
                ax2.text(score + 0.01, i, f'{score:.3f}',
                        va='center', ha='left')

            plt.tight_layout()
            plt.show()

            # 打印结果
            print("\n预测结果:")
            print("-" * 40)
            for result in results:
                print(f"{result['rank']}. {result['label']:<30} {result['confidence']:.4f}")

        except Exception as e:
            print(f"预测和可视化过程中出现错误: {e}")
            raise

# 使用示例
if __name__ == "__main__":
    # 初始化分类器
    classifier = ImageClassifier()

    # 示例1: 使用本地图像
    # 注意:需要准备一个图像文件
    # classifier.predict_and_visualize('path/to/your/image.jpg')

    # 示例2: 使用网络图像
    # sample_url = "https://upload.wikimedia.org/wikipedia/commons/thumb/4/4d/Cat_November_2010-1a.jpg/1200px-Cat_November_2010-1a.jpg"
    # classifier.predict_and_visualize(sample_url)

    print("图像分类模块准备就绪")
5.2 自然语言处理应用
构建一个文本分类应用,使用 Hugging Face 的 Transformers。
#!/usr/bin/env python3
# -*- coding: utf-8 -*-
"""
nlp_classification.py
自然语言处理分类完整示例
"""

from transformers import pipeline, AutoTokenizer, AutoModelForSequenceClassification
import torch
import logging

# 配置日志
logging.basicConfig(level=logging.INFO)
logger = logging.getLogger(__name__)

class TextClassifier:
    """
    文本分类器类
    """

    def __init__(self, model_name='cardiffnlp/twitter-roberta-base-sentiment-latest'):
        """
        初始化文本分类器

        Args:
            model_name (str): 预训练模型名称
        """
        self.model_name = model_name
        self.classifier = None
        self.tokenizer = None
        self.model = None
        self.load_model()

    def load_model(self):
        """
        加载预训练模型
        """
        try:
            print(f"正在加载 {self.model_name} 模型...")

            # 方法1: 使用 pipeline (推荐用于简单任务)
            self.classifier = pipeline(
                "sentiment-analysis",
                model=self.model_name,
                tokenizer=self.model_name
            )

            # 方法2: 分别加载 tokenizer 和 model (用于自定义任务)
            self.tokenizer = AutoTokenizer.from_pretrained(self.model_name)
            self.model = AutoModelForSequenceClassification.from_pretrained(self.model_name)

            print(f"{self.model_name} 模型加载完成!")

        except Exception as e:
            print(f"模型加载失败: {e}")
            raise

    def predict(self, text, return_all_scores=False):
        """
        文本分类预测

        Args:
            text (str): 输入文本
            return_all_scores (bool): 是否返回所有类别分数

        Returns:
            list: 预测结果列表
        """
        try:
            if not text or not isinstance(text, str):
                raise ValueError("输入文本不能为空且必须是字符串")

            # 使用 pipeline 进行预测
            results = self.classifier(text, return_all_scores=return_all_scores)

            # 格式化结果
            formatted_results = []
            if isinstance(results, list) and len(results) > 0:
                # 处理返回所有分数的情况
                if isinstance(results[0], list):
                    for result in results[0]:
                        formatted_results.append({
                            'label': result['label'],
                            'confidence': float(result['score'])
                        })
                else:
                    # 处理返回最高分数的情况
                    for result in results:
                        formatted_results.append({
                            'label': result['label'],
                            'confidence': float(result['score'])
                        })

            return formatted_results

        except Exception as e:
            print(f"预测过程中出现错误: {e}")
            raise

    def predict_batch(self, texts, batch_size=8):
        """
        批量文本分类预测

        Args:
            texts (list): 文本列表
            batch_size (int): 批次大小

        Returns:
            list: 批量预测结果
        """
        try:
            if not texts or not isinstance(texts, list):
                raise ValueError("输入文本列表不能为空且必须是列表")

            all_results = []

            # 分批处理
            for i in range(0, len(texts), batch_size):
                batch_texts = texts[i:i+batch_size]

                # 批量预测
                batch_results = self.classifier(batch_texts)

                # 格式化结果
                for result in batch_results:
                    if isinstance(result, list):
                        # 多标签情况
                        formatted_result = []
                        for r in result:
                            formatted_result.append({
                                'label': r['label'],
                                'confidence': float(r['score'])
                            })
                        all_results.append(formatted_result)
                    else:
                        # 单标签情况
                        all_results.append([{
                            'label': result['label'],
                            'confidence': float(result['score'])
                        }])

            return all_results

        except Exception as e:
            print(f"批量预测过程中出现错误: {e}")
            raise

    def predict_with_details(self, text):
        """
        详细预测 - 包含 token 级别的信息

        Args:
            text (str): 输入文本

        Returns:
            dict: 详细预测结果
        """
        try:
            # Tokenize 文本
            inputs = self.tokenizer(text, return_tensors="pt", truncation=True, padding=True)

            # 模型预测
            with torch.no_grad():
                outputs = self.model(**inputs)
                predictions = torch.nn.functional.softmax(outputs.logits, dim=-1)

            # 获取标签映射
            id2label = self.model.config.id2label

            # 格式化结果
            results = []
            for i, score in enumerate(predictions[0]):
                label = id2label[i] if i in id2label else f"LABEL_{i}"
                results.append({
                    'label': label,
                    'confidence': float(score)
                })

            # 按置信度排序
            results.sort(key=lambda x: x['confidence'], reverse=True)

            return {
                'text': text,
                'predictions': results,
                'tokens': self.tokenizer.convert_ids_to_tokens(inputs['input_ids'][0])
            }

        except Exception as e:
            print(f"详细预测过程中出现错误: {e}")
            raise

def main():
    """
    主函数 - 演示文本分类功能
    """
    try:
        # 初始化分类器
        classifier = TextClassifier()

        # 示例1: 单个文本分类
        print("示例1: 单个文本情感分析")
        print("-" * 50)
        text1 = "I love this product! It's amazing!"
        results1 = classifier.predict(text1, return_all_scores=True)

        print(f"输入文本: {text1}")
        print("预测结果:")
        for result in results1:
            print(f"  {result['label']:<15} {result['confidence']:.4f}")

        print("\n" + "="*60 + "\n")

        # 示例2: 批量文本分类
        print("示例2: 批量文本情感分析")
        print("-" * 50)
        texts = [
            "This movie is terrible!",
            "I'm so happy today!",
            "The weather is okay.",
            "This is the worst experience ever!"
        ]

        batch_results = classifier.predict_batch(texts)

        for i, (text, results) in enumerate(zip(texts, batch_results)):
            print(f"文本 {i+1}: {text}")
            for result in results:
                print(f"  {result['label']:<15} {result['confidence']:.4f}")
            print()

        print("\n" + "="*60 + "\n")

        # 示例3: 详细预测
        print("示例3: 详细预测分析")
        print("-" * 50)
        text3 = "The new AI model performs exceptionally well on various benchmarks."
        detailed_result = classifier.predict_with_details(text3)

        print(f"输入文本: {detailed_result['text']}")
        print(f"Tokens: {detailed_result['tokens']}")
        print("预测结果:")
        for result in detailed_result['predictions']:
            print(f"  {result['label']:<20} {result['confidence']:.4f}")

    except Exception as e:
        print(f"演示过程中出现错误: {e}")

# 使用示例
if __name__ == "__main__":
    # 注意:首次运行会自动下载模型,需要网络连接
    # main()
    print("自然语言处理分类模块准备就绪")
第六章:注意事项与最佳实践 - 避坑指南
6.1 注意事项
- 数据质量:确保数据质量高,避免数据偏差。垃圾进,垃圾出(GIGO)是机器学习的基本原则。
- 模型选择:根据任务选择合适的模型。不要盲目追求复杂模型,简单有效的模型往往更好。
- 性能优化:在部署前优化模型性能。考虑模型大小、推理速度和准确率的平衡。
6.2 最佳实践
- 代码规范:遵循 PEP8 规范。良好的代码风格提高可读性和可维护性。
- 错误处理:在代码中添加错误处理逻辑。健壮的错误处理提升系统稳定性。
- 持续学习:关注最新的 AI 技术和工具。AI 领域发展迅速,持续学习至关重要。
第七章:常见问题解答 - FAQ
7.1 如何选择合适的 AI 模型?
根据您的应用场景和数据类型选择合适的模型。例如,CNN 适用于图像处理,Transformer 适用于自然语言处理。
7.2 如何优化模型性能?
使用量化、剪枝和模型压缩技术来优化模型性能。
7.3 如何处理数据不平衡问题?
可以使用过采样、欠采样、SMOTE 或调整类别权重等方法处理数据不平衡问题。
7.4 如何防止模型过拟合?
可以通过以下方法防止模型过拟合:
- 增加训练数据
- 使用正则化技术(L1/L2)
- 使用 Dropout
- 早停法(Early Stopping)
- 数据增强
第八章:扩展阅读 - 深入学习
8.1 推荐书籍
- 《深度学习》(Ian Goodfellow 等著)- 深度学习领域的经典教材
- 《Python 数据科学手册》(Jake VanderPlas 著)- Python 数据科学实践指南
- 《机器学习实战》(Peter Harrington 著)- 机器学习算法实现和应用
8.2 推荐网站
- TensorFlow 官方文档 - TensorFlow 官方学习资源
- Hugging Face Transformers - 预训练模型和工具库
- Kaggle - 数据科学竞赛和学习平台
- Papers With Code - 论文与代码实现
AI 应用开发生命周期架构图
AI 应用开发流程图
项目实施甘特图
数据分布饼图
模型服务时序图
🏁 总结
本文详细介绍了 AI 应用开发的核心流程,包括环境搭建、模型选择、数据处理、模型训练、部署与优化等关键环节。通过实践示例和代码展示,帮助开发者快速掌握 AI 应用开发的关键技术和最佳实践。
关键要点总结:
- 环境搭建:使用虚拟环境隔离项目依赖,确保开发环境的稳定性和可重现性
- 数据处理:重视数据质量,合理的数据预处理是模型成功的关键
- 模型训练:选择合适的模型架构,使用回调函数优化训练过程
- 模型评估:全面评估模型性能,使用多种指标衡量模型质量
- 模型部署:构建稳定的 API 服务,确保模型在生产环境中的可靠运行
- 性能优化:使用量化和剪枝技术优化模型,提高推理效率
实践是检验真理的唯一标准,立即动手 构建属于你的 AI 应用吧!
📚 参考资料
- TensorFlow 官方文档 - https://www.tensorflow.org/
- Hugging Face Transformers 文档 - https://huggingface.co/transformers
- Python 数据科学手册 - Jake VanderPlas 著
- 《深度学习》- Ian Goodfellow 等著
- Kaggle Learn 平台 - https://www.kaggle.com/learn


 1462
1462

 被折叠的 条评论
为什么被折叠?
被折叠的 条评论
为什么被折叠?
 到【灌水乐园】发言


