


1.Mybatis多表查询
1.1 一对一查询
1.1.1 一对一查询的模型
MapperScannerConfigurer
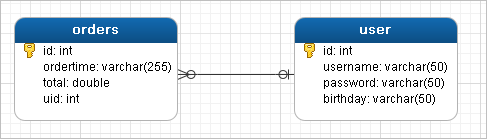
用户表和订单表的关系为,一个用户有多个订单,一个订单只从属于一个用户
一对一查询的需求:查询一个订单,与此同时查询出该订单所属的用户
1.1.2一对一查询的语句
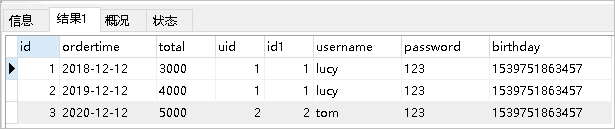
对应的sql语句:select * from orders o,user u where o.uid=u.id;
查询的结果如下:
1.1.3 创建Order和User实体
public class Order {

    private int id;
    private Date ordertime;
    private double total;

    //代表当前订单从属于哪一个客户
    private User user;
}

public class User {

    private int id;
    private String username;
    private String password;
    private Date birthday;

}
1.1.4 创建OrderMapper接口
public interface OrderMapper {
    List<Order> findAll();
}
1.1.5 配置OrderMapper.xml
<mapper namespace="com.itheima.mapper.OrderMapper">
    <resultMap id="orderMap" type="com.itheima.domain.Order">
        <result column="uid" property="user.id"></result>
        <result column="username" property="user.username"></result>
        <result column="password" property="user.password"></result>
        <result column="birthday" property="user.birthday"></result>
    </resultMap>
    <select id="findAll" resultMap="orderMap">
        select * from orders o,user u where o.uid=u.id
    </select>
</mapper>
其中还可以配置如下:
<resultMap id="orderMap" type="com.itheima.domain.Order">
    <result property="id" column="id"></result>
    <result property="ordertime" column="ordertime"></result>
    <result property="total" column="total"></result>
    <association property="user" javaType="com.itheima.domain.User">
        <result column="uid" property="id"></result>
        <result column="username" property="username"></result>
        <result column="password" property="password"></result>
        <result column="birthday" property="birthday"></result>
    </association>
</resultMap>
1.1.6 测试结果
OrderMapper mapper = sqlSession.getMapper(OrderMapper.class);
List<Order> all = mapper.findAll();
for(Order order : all){
    System.out.println(order);
}

1.2 一对多查询
1.2.1 一对多查询的模型
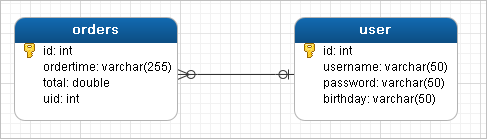
用户表和订单表的关系为,一个用户有多个订单,一个订单只从属于一个用户
一对多查询的需求:查询一个用户,与此同时查询出该用户具有的订单
1.2.2 一对多查询的语句
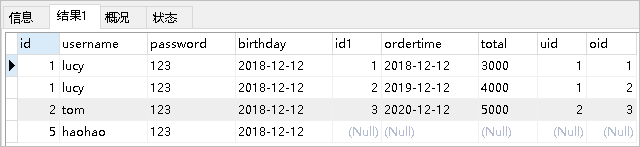
对应的sql语句:select *,o.id oid from user u left join orders o on u.id=o.uid;
查询的结果如下:
1.2.3 修改User实体
public class Order {

    private int id;
    private Date ordertime;
    private double total;

    //代表当前订单从属于哪一个客户
    private User user;
}

public class User {

    private int id;
    private String username;
    private String password;
    private Date birthday;
    //代表当前用户具备哪些订单
    private List<Order> orderList;
}
1.2.4 创建UserMapper接口
public interface UserMapper {
    List<User> findAll();
}
1.2.5 配置UserMapper.xml
<?xml version="1.0" encoding="UTF-8" ?>
<!DOCTYPE mapper
        PUBLIC "-//mybatis.org//DTD Mapper 3.0//EN"
        "http://mybatis.org/dtd/mybatis-3-mapper.dtd">
<mapper namespace="com.zy.mapper.UserMapper">
        <!--    sql片段的抽取-->

    <select id="findAll" resultType="com.zy.entity.User">
        select * from user
    </select>
    <delete id="delete" parameterType="int">
        delete from user where id=#{id}
    </delete>
    <update id="update" parameterType="com.zy.entity.User">
        update  user set value username=#{username},password=#{password}
    </update>
    <insert id="insert" parameterType="com.zy.entity.User">
        insert into  user(username,password) value {#{username},#{password}}
    </insert>
    <select id="findByCollection" parameterType="user" resultType="user">
        selcet * from user
        <where>
        <if test="id!=0">
          and  id=#{id}
        </if>
        <if test="username!=null">
            and username =#{username}
        </if>
        <if test="password!=null">
            and password =#{password}
        </if>
        </where>
    </select>
    <select id="findByIds" resultType="user" parameterType="list">
        select * from user
        <where>
            <foreach collection="list" open="id in(" close=")" item="id" separator=",">
                #{id}
            </foreach>
        </where>
    </select>
    <insert id="insertOne" parameterType="user" >
        insert  into user (id,username,password,birthday) value {#{id},#{username},#{password},#{birthday}}
    </insert>
    <resultMap id="userMap" type="user">
        <id column="id" property="uid"/>
        <result column="username" property="username"/>
        <result column="password" property="password"/>
        <result column="birthday" property="birthday"/>
        <collection property="orders " column="uid" ofType="order" select="selectById" >
            <id column="oid" property="oid"/>
            <result column="ordertime" property="ordertime"/>
            <result column="total" property="total"/>
        </collection>
    </resultMap>
    <select id="findAll1" resultMap="userMap">
        select * from user u ,orders o where u.id = o.uid
    </select>
    <select id="selectById" parameterType="int" resultType="order">
        select * from orders where uid =#{uid}
    </select>


</mapper>
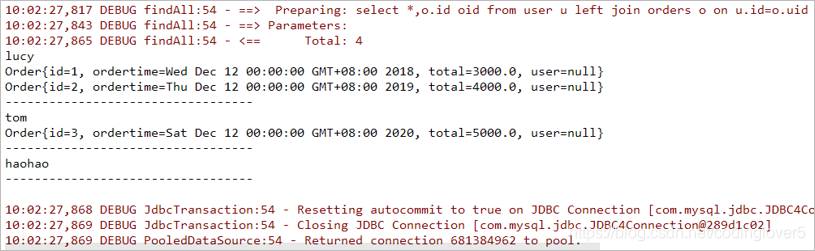
1.2.6 测试结果
UserMapper mapper = sqlSession.getMapper(UserMapper.class);
List<User> all = mapper.findAll();
for(User user : all){
    System.out.println(user.getUsername());
    List<Order> orderList = user.getOrderList();
    for(Order order : orderList){
        System.out.println(order);
    }
    System.out.println("----------------------------------");
}
1.3 多对多查询
1.3.1 多对多查询的模型
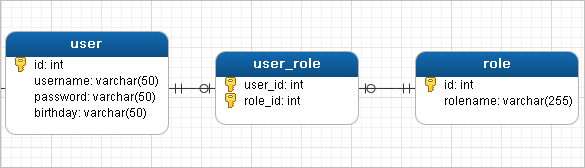
用户表和角色表的关系为,一个用户有多个角色,一个角色被多个用户使用
多对多查询的需求:查询用户同时查询出该用户的所有角色
1.3.2 多对多查询的语句
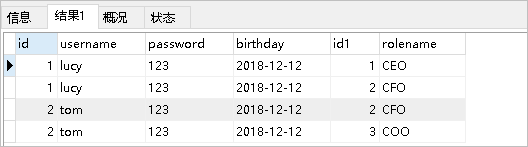
对应的sql语句:select u.,r.,r.id rid from user u left join user_role ur on u.id=ur.user_id
inner join role r on ur.role_id=r.id;
查询的结果如下:
1.3.3 创建Role实体,修改User实体
public class User {
    private int id;
    private String username;
    private String password;
    private Date birthday;
    //代表当前用户具备哪些订单
    private List<Order> orderList;
    //代表当前用户具备哪些角色
    private List<Role> roleList;
}

public class Role {

    private int id;
    private String rolename;

}
1.3.4 添加UserMapper接口方法
List<User> findAllUserAndRole();
1.3.5 配置UserMapper.xml
   <resultMap id="roleMap" type="user">
        <id column="uid" property="uid"/>
        <result column="username" property="username"/>
        <result column="password" property="password"/>
        <result column="birthday" property="birthday"/>
        <collection property="roles" ofType="role">
            <id column="rid" property="rid"/>
            <result column="roleName" property="roleName"/>
            <result column="roleDes" property="roleDes"/>
        </collection>
    </resultMap>
    <select id="findAllRole" resultMap="roleMap">
        select  * from `user` u,role_user ur ,role r where u.uid=ur.uid and ur.rid = r.rid
    </select>
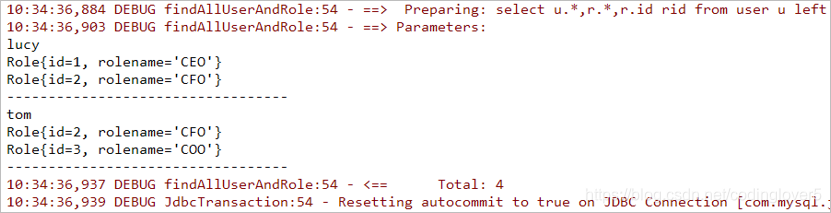
1.3.6 测试结果
UserMapper mapper = sqlSession.getMapper(UserMapper.class);
List<User> all = mapper.findAllUserAndRole();
for(User user : all){
    System.out.println(user.getUsername());
    List<Role> roleList = user.getRoleList();
    for(Role role : roleList){
        System.out.println(role);
    }
    System.out.println("----------------------------------");
}
1.4 知识小结
MyBatis多表配置方式:
一对一配置:使用<resultMap >做配置
一对多配置:使用<resultMap>+<collection>做配置
多对多配置:使用<resultMap>+<collection>做配置
2.Mybatis的注解开发
2.1 MyBatis的常用注解
这几年来注解开发越来越流行,Mybatis也可以使用注解开发方式,这样我们就可以减少编写Mapper
映射文件了。我们先围绕一些基本的CRUD来学习,再学习复杂映射多表操作。
@Insert:实现新增
@Update:实现更新
@Delete:实现删除
@Select:实现查询
@Result:实现结果集封装
@Results:可以与@Result 一起使用,封装多个结果集
@One:实现一对一结果集封装
@Many:实现一对多结果集封装
2.2 MyBatis的增删改查
我们完成简单的user表的增删改查的操作
private UserMapper userMapper;

@Before
public void before() throws IOException {
    InputStream resourceAsStream = Resources.getResourceAsStream("SqlMapConfig.xml");
    SqlSessionFactory sqlSessionFactory = new
                 SqlSessionFactoryBuilder().build(resourceAsStream);
    SqlSession sqlSession = sqlSessionFactory.openSession(true);
    userMapper = sqlSession.getMapper(UserMapper.class);
}

@Test
public void testAdd() {
    User user = new User();
    user.setUsername("测试数据");
    user.setPassword("123");
    user.setBirthday(new Date());
    userMapper.add(user);
}
@Test
public void testUpdate() throws IOException {
    User user = new User();
    user.setId(16);
    user.setUsername("测试数据修改");
    user.setPassword("abc");
    user.setBirthday(new Date());
    userMapper.update(user);
}

@Test
public void testDelete() throws IOException {
    userMapper.delete(16);
}
@Test
public void testFindById() throws IOException {
    User user = userMapper.findById(1);
    System.out.println(user);
}
@Test
public void testFindAll() throws IOException {
    List<User> all = userMapper.findAll();
    for(User user : all){
        System.out.println(user);
    }
}
修改MyBatis的核心配置文件,我们使用了注解替代的映射文件,所以我们只需要加载使用了注解的Mapper接口即可
<mappers>
    <!--扫描使用注解的类-->
    <mapper class="com.zy.mapper.UserMapper"></mapper>
</mappers>
或者指定扫描包含映射关系的接口所在的包也可以
<mappers>
    <!--扫描使用注解的类所在的包-->
    <package name="com.zy.mapper"></package>
</mappers>
简单的注解映射开发
public interface UserMapper {
    @Insert(" insert into user values (#{uid},#{username},#{password},#{birthday})")
    void saveUser(User user);

    @Select("select * from user where uid=#{uid}")
    User findUserById(int id);

    @Delete("delete from user  where uid=#{uid}")
    int deleteById(int id);

    @Select("select * from user")
    List<User> findAll();

    @Update("update user set username=#{username},password=#{password},birthday=#{birthday} where uid=#{uid}")
    int update(User user);
}
2.3 MyBatis的注解实现复杂映射开发
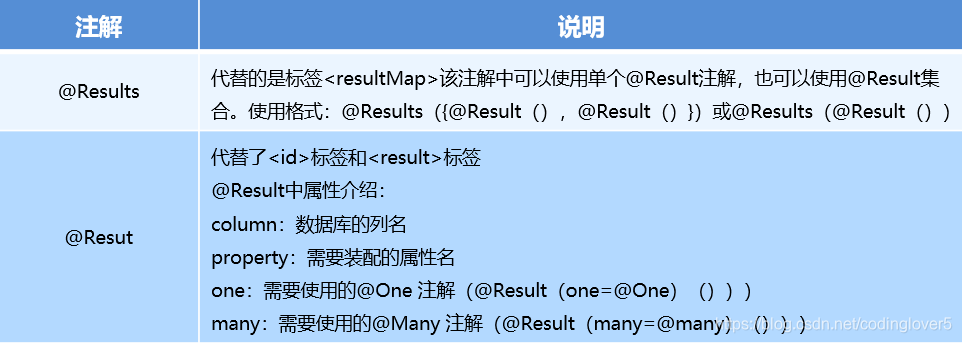
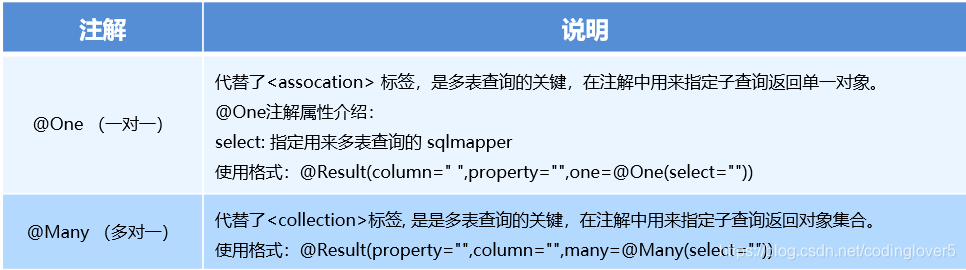
实现复杂关系映射之前我们可以在映射文件中通过配置来实现,使用注解开发后,我们可以使用@Results注解,@Result注解,@One注解,@Many注解组合完成复杂关系的配置
2.4 一对一查询
2.4.1 一对一查询的模型
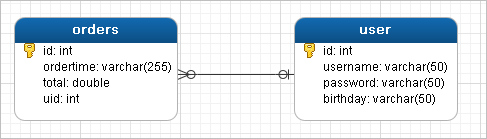
用户表和订单表的关系为,一个用户有多个订单,一个订单只从属于一个用户
一对一查询的需求:查询一个订单,与此同时查询出该订单所属的用户
2.4.2 一对一查询的语句
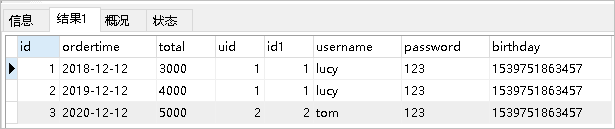
对应的sql语句:
select * from orders;

select * from user where id=查询出订单的uid;
查询的结果如下:
2.4.3 创建Order和User实体
public class Order {

    private Integer id;
    private Date ordertime;
    private Integer total;

    //代表当前订单从属于哪一个客户
    private User user;
}

public class User {

    private int id;
    private String username;
    private String password;
    private Date birthday;

}
2.4.4 创建OrderMapper接口
public interface OrderMapper {
    List<Order> findAll();
}
OrderMapper
<?xml version="1.0" encoding="UTF-8" ?>
<!DOCTYPE mapper
        PUBLIC "-//mybatis.org//DTD Mapper 3.0//EN"
        "http://mybatis.org/dtd/mybatis-3-mapper.dtd">
<mapper namespace="com.zy.mapper.OrderMapper">
<!--    手动指定字段与实体属性的映射关系-->
    <resultMap id="selectOrder" type="order">
        <id column="oid" property="oid"/>
        <result property="user.username" column="username"/>
        <result property="user.password" column="password"/>
        <result property="user.birthday" column="birthday"/>
        <result property="user.uid" column="uid"/>
    </resultMap>

    <select id="selectUserAndOrder" resultMap="selectOrder">
        select * from user u ,orders o where u.id =o.oid
    </select>
</mapper>
测试
public static void main(String[] args) throws IOException {
        InputStream stream = Resources.getResourceAsStream("MybatisConfig.xml");

        SqlSessionFactory sessionFactory = new SqlSessionFactoryBuilder().build(stream);
        SqlSession session = sessionFactory.openSession();

        OrderMapper orderMapper = session.getMapper(OrderMapper.class);
        List<Order> orders = orderMapper.selectUserAndOrder();
        for (Order order : orders) {
            System.out.println(order);
        }
        session.close();
    }
查询出来的字段就会被封装到user对象中打印出来

2.4.5 使用注解配置Mapper
public interface OrderMapper {

    @Select("select * from orders o , `user` u where o.uid=u.uid")
    @Results({
            @Result(column = "oid", property = "oid"),
            @Result(column = "ordertime", property = "ordertime"),
            @Result(column = "total", property = "total"),
            @Result(column = "uid", property = "user.uid"),
            @Result(column = "username", property = "user.username"),
            @Result(column = "password", property = "user.password"),
            @Result(column = "birthday", property = "user.birthday")
    }
    )
    //一对一查询的第二中写法类似于
    public List<Order> findAll1();

    @Select("select * from orders ")
    @Results({
            @Result(column = "oid", property = "oid"),
            @Result(column = "ordertime", property = "ordertime"),
            @Result(column = "total", property = "total"),
            @Result(
                    property = "user",//要封装的属性名称
                    column = "uid",
                    javaType = User.class,//要封装的实体类型
                    one = @One(select = "com.zy.mapper.UserMapper.findUserById")
            )
    }
    )
    public List<Order> findAll();

    @Select("select * from orders where uid=#{uid}")
    public List<Order> findUsers(int uid);


}
public interface UserMapper {

    @Select("select * from user where id=#{id}")
    User findById(int id);

}
2.4.6 测试结果
@Test
public void testSelectOrderAndUser() {
    List<Order> all = orderMapper.findAll();
    for(Order order : all){
        System.out.println(order);
    }
}

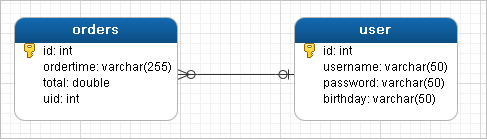
2.5 一对多查询
2.5.1 一对多查询的模型
用户表和订单表的关系为,一个用户有多个订单,一个订单只从属于一个用户
一对多查询的需求:查询一个用户,与此同时查询出该用户具有的订单
2.5.2 一对多查询的语句
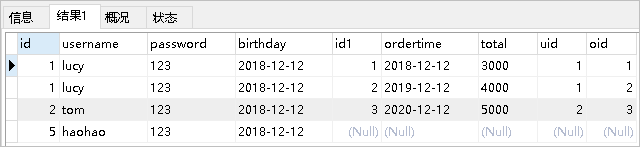
对应的sql语句:
select * from user;

select * from orders where uid=查询出用户的id;
查询的结果如下:
2.5.3 修改User实体
public class Order {

    private int id;
    private Date ordertime;
    private double total;

    //代表当前订单从属于哪一个客户
    private User user;
}

public class User {

    private int id;
    private String username;
    private String password;
    private Date birthday;
    //代表当前用户具备哪些订单
    private List<Order> orderList;
}
2.5.4 创建UserMapper接口
List<User> findAllUserAndOrder();
2.5.5 使用注解配置Mapper
public interface UserMapper {
    @Insert(" insert into user values (#{uid},#{username},#{password},#{birthday})")
    void saveUser(User user);

    @Select("select * from user where uid=#{uid}")
    User findUserById(int id);

    @Delete("delete from user  where uid=#{uid}")
    int deleteById(int id);

    @Select("select * from user")
    List<User> findAll();

    @Update("update user set username=#{username},password=#{password},birthday=#{birthday} where uid=#{uid}")
    int update(User user);

    @Select("select * from user ")
    @Results({
            @Result(id = true,column = "uid",property = "uid"),//这个id表示这个是主键
            @Result(column = "username",property = "username"),
            @Result(column = "password",property = "password"),
            @Result(column = "birthday",property = "birthday"),
            @Result(
                    column = "uid",
                    property = "orders",
                    javaType = List.class,
                    many = @Many(select = "com.zy.mapper.OrderMapper.findUsers")

            )
    })
    public List<User> findUserAndOrder();

    @Select("select * from `user` ")
    @Results({
            @Result(id = true,column = "uid",property = "uid"),
            @Result(column = "username",property = "username"),
            @Result(column = "password",property = "password"),
            @Result(column = "birthday",property = "birthday"),
            @Result(
                    property = "roles",
                    column = "uid",
                    javaType = List.class,
                    many = @Many(select = "com.zy.mapper.RoleMapper.findUsers")

            )
    })
    public List<User> findUserAndRole();
}
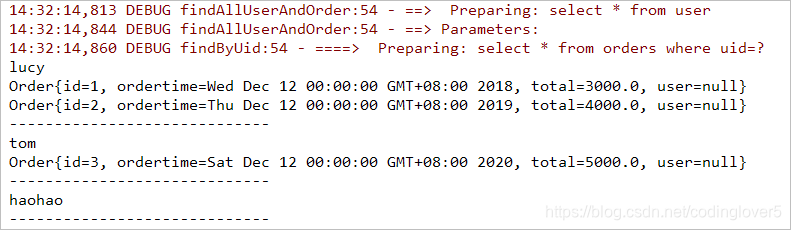
2.5.6 测试结果
List<User> all = userMapper.findAllUserAndOrder();
for(User user : all){
    System.out.println(user.getUsername());
    List<Order> orderList = user.getOrderList();
    for(Order order : orderList){
        System.out.println(order);
    }
    System.out.println("-----------------------------");
}
2.6 多对多查询
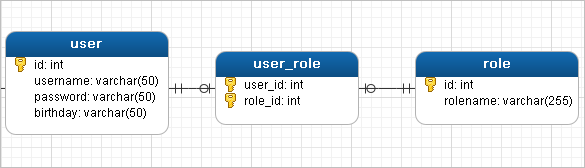
2.6.1 多对多查询的模型
用户表和角色表的关系为,一个用户有多个角色,一个角色被多个用户使用
多对多查询的需求:查询用户同时查询出该用户的所有角色
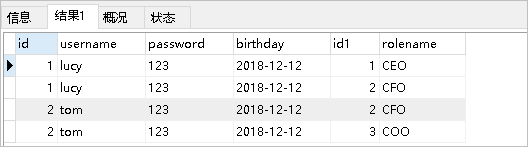
2.6.2 多对多查询的语句
对应的sql语句:
select * from user;

select * from role r,user_role ur where r.id=ur.role_id and ur.user_id=用户的id
查询的结果如下:
2.6.3 创建Role实体,修改User实体
public class User {
    private int id;
    private String username;
    private String password;
    private Date birthday;
    //代表当前用户具备哪些订单
    private List<Order> orderList;
    //代表当前用户具备哪些角色
    private List<Role> roleList;
}

public class Role {

    private int id;
    private String rolename;

}
2.6.4 添加UserMapper接口方法
List<User> findAllUserAndRole();
2.6.5 使用注解配置Mapper
public interface UserMapper {
   @Select("select * from `user` ")
    @Results({
            @Result(id = true,column = "uid",property = "uid"),
            @Result(column = "username",property = "username"),
            @Result(column = "password",property = "password"),
            @Result(column = "birthday",property = "birthday"),
            @Result(
                    property = "roles",
                    column = "uid",
                    javaType = List.class,
                    many = @Many(select = "com.zy.mapper.RoleMapper.findUsers")

            )
    })
    public List<User> findUserAndRole();


public interface RoleMapper {
@Select("select * from role where rid=#{uid}")
    public List<Role> findUsers(int uid);
}
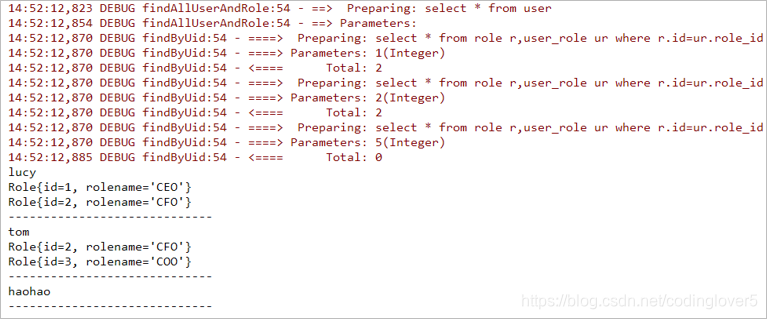
2.6.6 测试结果
UserMapper mapper = sqlSession.getMapper(UserMapper.class);
List<User> all = mapper.findAllUserAndRole();
for(User user : all){
    System.out.println(user.getUsername());
    List<Role> roleList = user.getRoleList();
    for(Role role : roleList){
        System.out.println(role);
    }
    System.out.println("----------------------------------");
}
3.mybatis的缓存
MyBatis 缓存详解
缓存是一般的ORM 框架都会提供的功能,目的就是提升查询的效率和减少数据库的压力。跟Hibernate 一样,MyBatis 也有一级缓存和二级缓存,并且预留了集成第三方缓存的接口。
缓存体系结构:
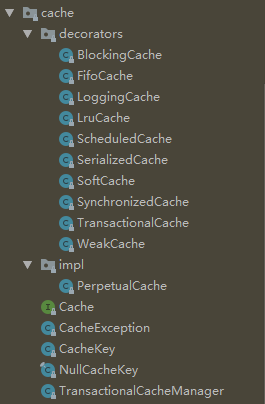
MyBatis 跟缓存相关的类都在cache 包里面,其中有一个Cache 接口,只有一个默认的实现类 PerpetualCache,它是用HashMap 实现的。我们可以通过 以下类找到这个缓存
DefaultSqlSession
-> BaseExecutor
-> PerpetualCache localCache
->private Map<Object, Object> cache = new HashMap();
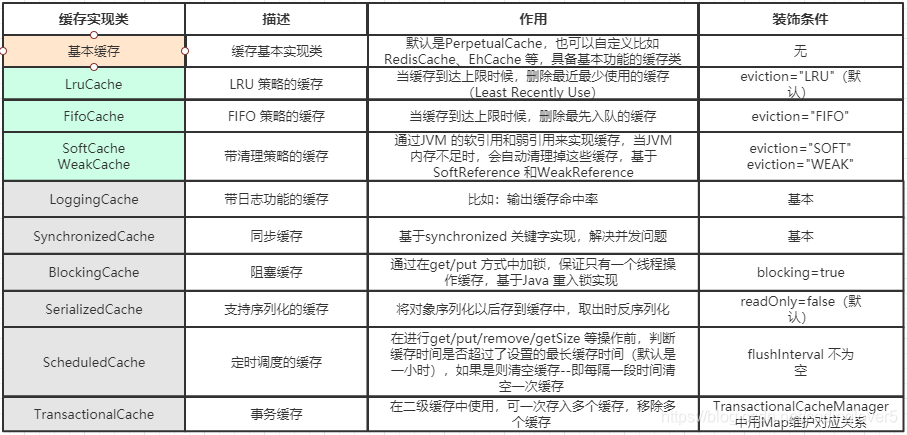
除此之外,还有很多的装饰器,通过这些装饰器可以额外实现很多的功能:回收策略、日志记录、定时刷新等等。但是无论怎么装饰,经过多少层装饰,最后使用的还是基本的实现类(默认PerpetualCache)。可以通过 CachingExecutor 类 Debug 去查看。
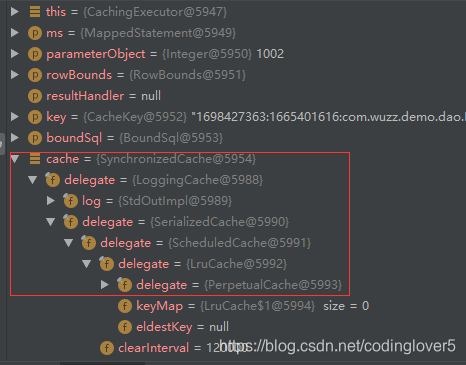
所有的缓存实现类总体上可分为三类:基本缓存、淘汰算法缓存、装饰器缓存。
一级缓存
同一个 SqlSession 对象, 在参数和 SQL 完全一样的情况先, 只执行一次 SQL 语句(如果缓存没有过期)
一级缓存也叫本地缓存,MyBatis 的一级缓存是在会话(SqlSession)层面进行缓存的。MyBatis 的一级缓存是默认开启的,不需要任何的配置。首先我们必须去弄清楚一个问题,在MyBatis 执行的流程里面,涉及到这么多的对象,那么缓存PerpetualCache 应该放在哪个对象里面去维护?如果要在同一个会话里面共享一级缓存,这个对象肯定是在SqlSession 里面创建的,作为SqlSession 的一个属性。
DefaultSqlSession 里面只有两个属性,Configuration 是全局的,所以缓存只可能放在Executor 里面维护—SimpleExecutor/ReuseExecutor/BatchExecutor 的父类BaseExecutor 的构造函数中持有PerpetualCache。在同一个会话里面,多次执行相同的SQL 语句,会直接从内存取到缓存的结果,不会再发送SQL 到数据库。但是不同的会话里面,即使执行的SQL 一模一样(通过一个Mapper 的同一个方法的相同参数调用),也不能使用到一级缓存。
每当我们使用MyBatis开启一次和数据库的会话,MyBatis会创建出一个SqlSession对象表示一次数据库会话。
在对数据库的一次会话中,我们有可能会反复地执行完全相同的查询语句,如果不采取一些措施的话,每一次查询都会查询一次数据库,而我们在极短的时间内做了完全相同的查询,那么它们的结果极有可能完全相同,由于查询一次数据库的代价很大,这有可能造成很大的资源浪费。
为了解决这一问题,减少资源的浪费,MyBatis会在表示会话的SqlSession对象中建立一个简单的缓存,将每次查询到的结果结果缓存起来,当下次查询的时候,如果判断先前有个完全一样的查询,会直接从缓存中直接将结果取出,返回给用户,不需要再进行一次数据库查询了。
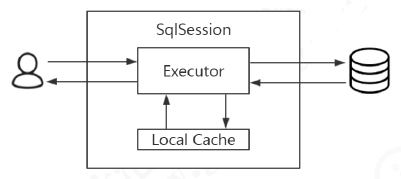
如下图所示,MyBatis会在一次会话的表示----一个SqlSession对象中创建一个本地缓存(local cache),对于每一次查询,都会尝试根据查询的条件去本地缓存中查找是否在缓存中,如果在缓存中,就直接从缓存中取出,然后返回给用户;否则,从数据库读取数据,将查询结果存入缓存并返回给用户。
刷新缓存
刷新缓存是清空这个 SqlSession 的所有缓存, 不单单是某个键。
@Test
public void sameSqlSessionNoCache() {
    SqlSession sqlSession = null;
    try {
        sqlSession = sqlSessionFactory.openSession();

        StudentMapper studentMapper = sqlSession.getMapper(StudentMapper.class);
        // 执行第一次查询
        Student student = studentMapper.selectByPrimaryKey(1);
        System.out.println("=============开始同一个 Sqlsession 的第二次查询============");
        // 同一个 sqlSession 进行第二次查询
        Student stu = studentMapper.selectByPrimaryKey(1);
        Assert.assertEquals(student, stu);
    } catch (Exception e) {
        e.printStackTrace();
    } finally {
        if (sqlSession != null) {
            sqlSession.close();
        }
    }
}
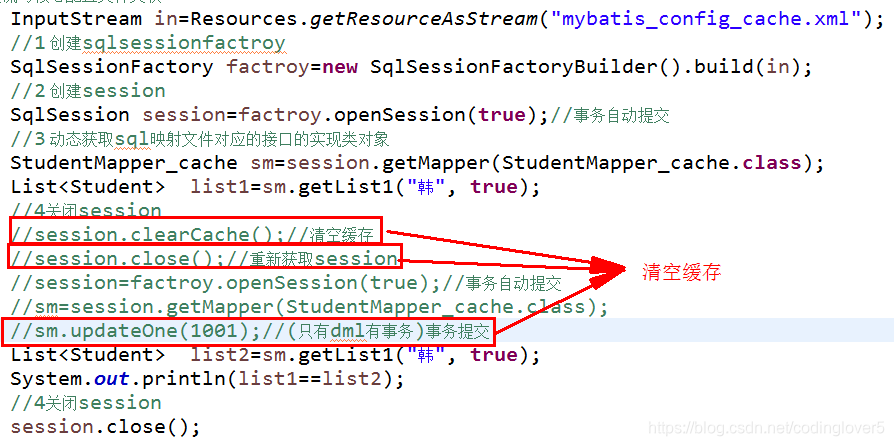
如果是以上, 没什么不同, 结果还是第二个不发 SQL 语句。
在此, 做一些修改, 在 StudentMapper.xml 中, 添加
flushCache=“true”
一级缓存的不足
使用一级缓存的时候,因为缓存不能跨会话共享,不同的会话之间对于相同的数据可能有不一样的缓存。在有多个会话或者分布式环境下,会存在脏数据的问题。如果要解决这个问题,就要用到二级缓存。MyBatis 一级缓存(MyBaits 称其为 Local Cache)无法关闭,但是有两种级别可选:
session 级别的缓存,在同一个 sqlSession 内,对同样的查询将不再查询数据库,直接从缓存中。
statement 级别的缓存,避坑: 为了避免这个问题,可以将一级缓存的级别设为 statement 级别的,这样每次查询结束都会清掉一级缓存。
一级缓存的生命周期
总结
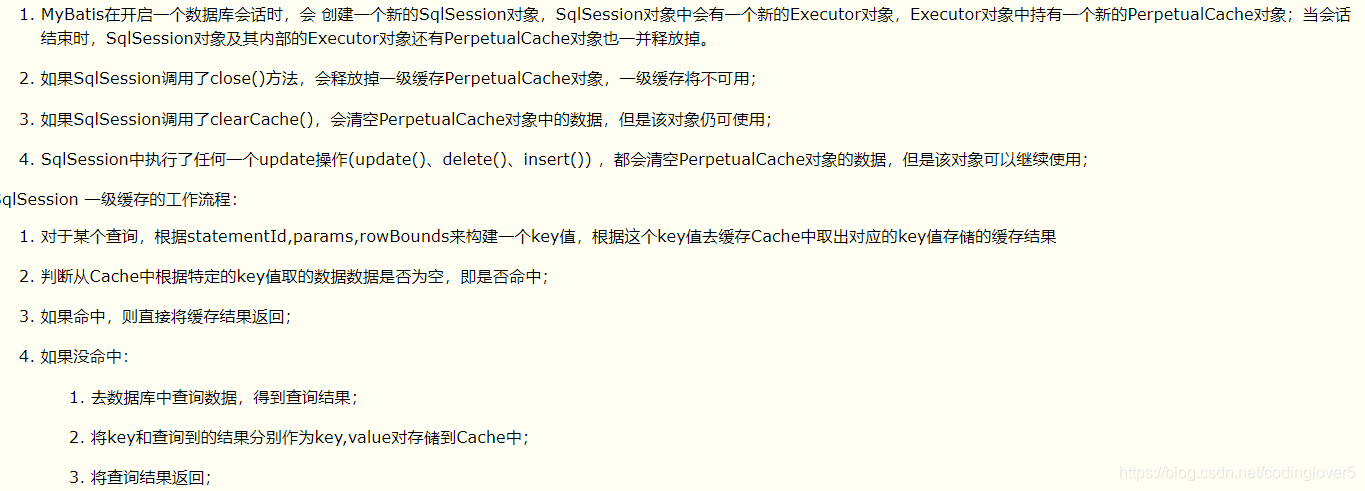
在同一个 SqlSession 中, Mybatis 会把执行的方法和参数通过算法生成缓存的键值, 将键值和结果存放在一个 Map 中, 如果后续的键值一样, 则直接从 Map 中获取数据;
不同的 SqlSession 之间的缓存是相互隔离的;
用一个 SqlSession, 可以通过配置使得在查询前清空缓存;
任何的 UPDATE, INSERT, DELETE 语句都会清空缓存。
二级缓存
二级缓存:
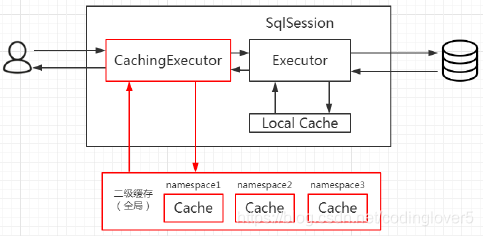
二级缓存是用来解决一级缓存不能跨会话共享的问题的,范围是namespace 级别的,可以被多个SqlSession 共享(只要是同一个接口里面的相同方法,都可以共享),生命周期和应用同步。如果你的MyBatis使用了二级缓存,并且你的Mapper和select语句也配置使用了二级缓存,那么在执行select查询的时候,MyBatis会先从二级缓存中取输入,其次才是一级缓存,即MyBatis查询数据的顺序是:二级缓存 —> 一级缓存 —> 数据库。
测试步骤
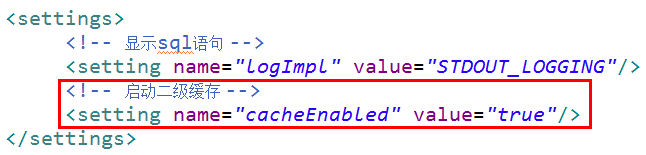
第一步:在核心配置文件中settings中设置缓存开启
 第二步
在需要设置缓存的select标签的属性中设置useache=true
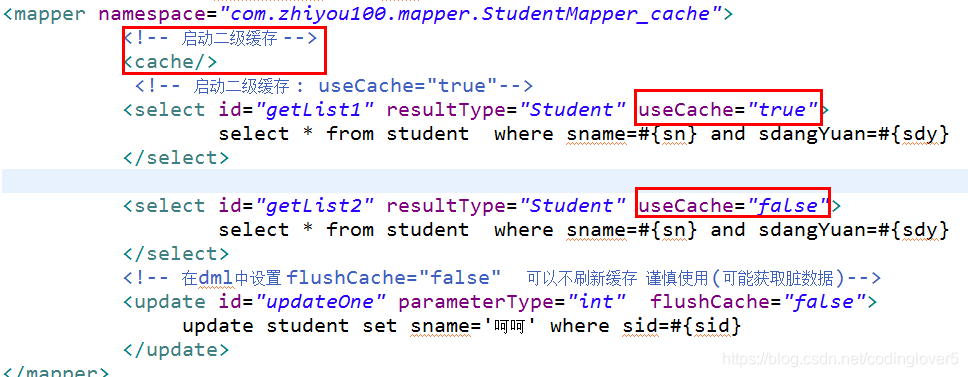 测试: 查看控制台中sql语句执行的次数
注意: 由于在更新时会刷新缓存, 因此需要注意使用场合:查询频率很高, 更新频率很低时使用, 即经常使用 select, 相对较少使用delete, insert, update。
缓存是以 namespace 为单位的,不同 namespace 下的操作互不影响。但刷新缓存是刷新整个 namespace 的缓存, 也就是你 update 了一个, 则整个缓存都刷新了。
最好在 「只有单表操作」 的表的 namespace 使用缓存, 而且对该表的操作都在这个 namespace 中。 否则可能会出现数据不一致的情况。
使用场景:


 2万+


 扫一扫


 被折叠的 条评论
为什么被折叠?
 到【灌水乐园】发言


