


 本文详细介绍了一种在单台服务器上模拟多台服务器环境,搭建MongoDB集群的方法。包括规划、配置、启动服务、配置分片和副本集等步骤,并提供了集群控制脚本,便于后期维护和操作。

。
一、规划:
只有一台测试服务器,因此拷贝3个mongo目录模拟3台不同服务器
1、逻辑规划
先做副本集再做分片
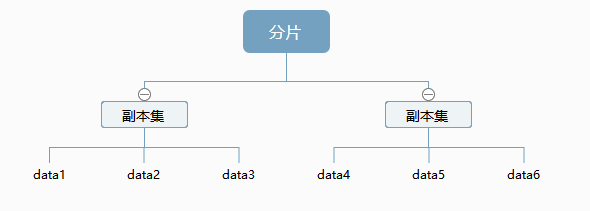
原因:(类似raid 10)
先做副本集:如果一个节点损坏,副本集1还有还可以损坏一块,副本集二还可以损坏两块(如下图):
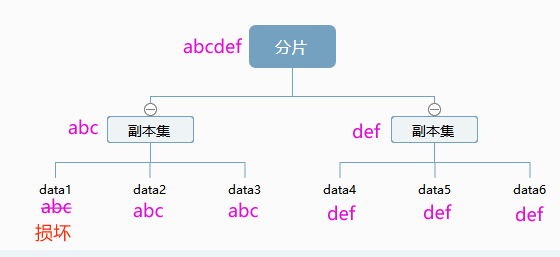
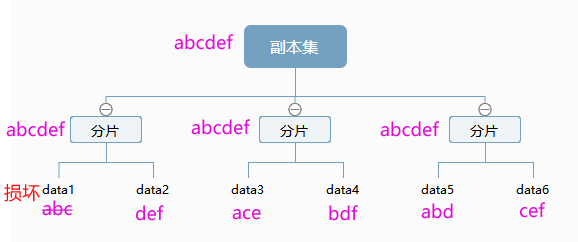
如果先做分片,某副本的一个节点损坏损坏,那么其两个副本的4个节点只能再损坏一个(如下图)
2、 服务器规划
server1
/usr/local/mongodb1
数据节点1 28017
数据节点2 28018
表决节点1 28031
表决节点2 28032
配置节点1 20000
路由节点 28885
server2
/usr/local/mongodb2
数据节点1 29017
数据节点2 29018
表决节点1 29031
表决节点2 29032
配置节点1 21000
路由节点 29885
server3
/usr/local/mongodb3
数据节点1 27017
数据节点2 27018
表决节点1 27031
表决节点2 27032
配置节点1 22000
路由节点 27885
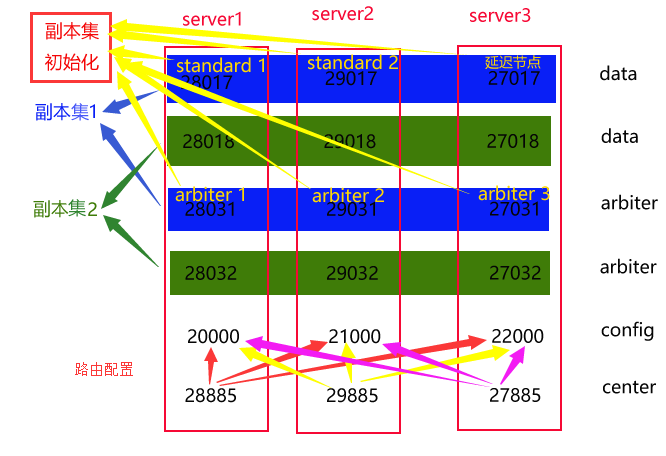
2、架构规划
1)创建两个副本集:
副本集1:standard ×2,延迟节点1,仲裁节点 3
副本集2:standard ×2,延迟节点1,仲裁节点 3
2)创建一个分片
standard 1:副本集1的两个 standard
standard 2:副本集1的两个 standard
route和config:将各服务器的route和config链接起来组成
二、配置文件:
配置文件做成一个脚本直接执行即可。
# vim /tmp/mongo_conf.sh #####【server1】
####数据节点 (2个)#####
mkdir -p /usr/local/mongodb/shard11
cat > /usr/local/mongodb/shard11/shard11.conf <<EOF
shardsvr=true
replSet=shard1
port=28017
dbpath=/usr/local/mongodb/shard11
oplogSize=2048
logpath=/usr/local/mongodb/shard11/shard11.log
logappend=true
fork=true
rest=true
httpinterface=true
nojournal = true
EOF
mkdir -p /usr/local/mongodb/shard12
cat > /usr/local/mongodb/shard12/shard12.conf <<EOF
shardsvr=true
replSet=shard2
port=28018
dbpath=/usr/local/mongodb/shard12
oplogSize=2048
logpath=/usr/local/mongodb/shard12.log
logappend=true
fork=true
rest=true
httpinterface=true
nojournal = true
EOF
#表决节点 (2个)
mkdir -p /usr/local/mongodb/arbiter1
cat > /usr/local/mongodb/arbiter1/arbiter1.conf <<EOF
shardsvr=true
replSet=shard1
port=28031
dbpath=/usr/local/mongodb/arbiter1
oplogSize=100
logpath=/usr/local/mongodb/arbiter1.log
logappend=true
fork=true
rest=true
httpinterface=true
nojournal = true
EOF
mkdir -p /usr/local/mongodb/arbiter2
cat > /usr/local/mongodb/arbiter2/arbiter2.conf <<EOF
shardsvr=true
replSet=shard2
port=28032
dbpath=/usr/local/mongodb/arbiter2
oplogSize=100
logpath=/usr/local/mongodb/arbiter2.log
logappend=true
fork=true
rest=true
httpinterface=true
nojournal = true
EOF
#配置节点 (1个)
mkdir -p /usr/local/mongodb/config/
cat > /usr/local/mongodb/config/config1.conf <<EOF
configsvr=true
dbpath=/usr/local/mongodb/config/
port=20000
logpath=/usr/local/mongodb/config/config1.log
logappend=true
fork=true
httpinterface=true
#nojournal=true
EOF
#路由节点(1个)
mkdir -p /usr/local/mongodb/mongos
cat > /usr/local/mongodb/mongos/mongos1.conf <<EOF
configdb=ZSC-test:20000,ZSC-test:21000,ZSC-test:22000
port=28885
chunkSize=100
logpath=/usr/local/mongodb/mongos/mongos1.log
logappend=true
fork=true
EOF
##【server 2】
#数据节点
mkdir -p /usr/local/mongodb2/shard21
cat > /usr/local/mongodb2/shard21/shard21.conf <<EOF
shardsvr=true
replSet=shard1
port=29017
dbpath=/usr/local/mongodb2/shard21
oplogSize=2048
logpath=/usr/local/mongodb2/shard21/shard21.log
logappend=true
fork=true
rest=true
httpinterface=true
nojournal = true
EOF
mkdir -p /usr/local/mongodb2/shard22
cat > /usr/local/mongodb2/shard22/shard22.conf <<EOF
shardsvr=true
replSet=shard2
port=29018
dbpath=/usr/local/mongodb2/shard22
oplogSize=2048
logpath=/usr/local/mongodb2/shard22/shard22.log
logappend=true
fork=true
rest=true
httpinterface=true
nojournal = true
EOF
#表决节点
mkdir -p /usr/local/mongodb2/arbiter1
cat > /usr/local/mongodb2/arbiter1/arbiter1.conf<<EOF
shardsvr=true
replSet=shard1
port=29031
dbpath=/usr/local/mongodb2/arbiter1
oplogSize=100
logpath=/usr/local/mongodb2/arbiter1/arbiter1.log
logappend=true
fork=true
rest=true
httpinterface=true
nojournal = true
EOF
mkdir -p /usr/local/mongodb2/arbiter2
cat > /usr/local/mongodb2/arbiter2/arbiter2.conf <<EOF
shardsvr=true
replSet=shard2
port=29032
dbpath=/usr/local/mongodb2/arbiter2
oplogSize=100
logpath=/usr/local/mongodb2/arbiter2/arbiter2.log
logappend=true
fork=true
rest=true
httpinterface=true
nojournal = true
EOF
#配置节点
mkdir -p /usr/local/mongodb2/config/
cat > /usr/local/mongodb2/config/config2.conf <<EOF
configsvr=true
dbpath=/usr/local/mongodb2/config/
port=21000
logpath=/usr/local/mongodb2/config/config2.log
logappend=true
fork=true
#nojournal = true
EOF
#路由节点
mkdir -p /usr/local/mongodb2/mongos
cat >/usr/local/mongodb2/mongos/mongos2.conf <<EOF
configdb=ZSC-test:20000,ZSC-test:21000,ZSC-test:22000
port=29885
chunkSize=100
logpath=/usr/local/mongodb2/mongos/mongos2.log
logappend=true
fork=true
EOF
###【server3】
#数据节点
mkdir -p /usr/local/mongodb3/shard31
cat > /usr/local/mongodb3/shard31/shard31.conf <<EOF
shardsvr=true
replSet=shard1
port=27017
dbpath=/usr/local/mongodb3/shard31
oplogSize=2048
logpath=/usr/local/mongodb3/shard31/shard31.log
logappend=true
fork=true
rest=true
httpinterface=true
nojournal = true
EOF
mkdir -p /usr/local/mongodb3/shard32
cat > /usr/local/mongodb3/shard32/shard32.conf <<EOF
shardsvr=true
replSet=shard2
port=27018
dbpath=/usr/local/mongodb3/shard32
oplogSize=2048
logpath=/usr/local/mongodb3/shard32/shard32.log
logappend=true
fork=true
rest=true
httpinterface=true
nojournal = true
EOF
#表决节点
mkdir -p /usr/local/mongodb3/arbiter1
cat > /usr/local/mongodb3/arbiter1/arbiter1.conf<<EOF
shardsvr=true
replSet=shard1
port=27031
dbpath=/usr/local/mongodb3/arbiter1
oplogSize=100
logpath=/usr/local/mongodb3/arbiter1/arbiter1.log
logappend=true
fork=true
rest=true
httpinterface=true
nojournal = true
EOF
mkdir -p /usr/local/mongodb3/arbiter2
cat > /usr/local/mongodb3/arbiter2/arbiter2.conf <<EOF
shardsvr=true
replSet=shard2
port=27032
dbpath=/usr/local/mongodb3/arbiter2
oplogSize=100
logpath=/usr/local/mongodb3/arbiter2/arbiter2.log
logappend=true
fork=true
rest=true
httpinterface=true
nojournal = true
EOF
#配置节点
mkdir -p /usr/local/mongodb3/config/
cat > /usr/local/mongodb3/config/config2.conf <<EOF
configsvr=true
dbpath=/usr/local/mongodb3/config/
port=22000
logpath=/usr/local/mongodb3/config/config2.log
logappend=true
fork=true
#nojournal = true
EOF
#路由节点
mkdir -p /usr/local/mongodb3/mongos
cat >/usr/local/mongodb3/mongos/mongos3.conf <<EOF
configdb=ZSC-test:20000,ZSC-test:21000,ZSC-test:22000
port=29885
chunkSize=100
logpath=/usr/local/mongodb3/mongos/mongos3.log
logappend=true
fork=true
EOF三、启动服务
1、mongod服务
【server 1】
启动shard1、shard2、arbiter1、arbiter2服务
# /usr/local/mongodb/bin/mongod --config /usr/local/mongodb/shard11/shard11.conf
# /usr/local/mongodb/bin/mongod --config /usr/local/mongodb/shard12/shard12.conf
# /usr/local/mongodb/bin/mongod --config /usr/local/mongodb/arbiter1/arbiter1.conf
# /usr/local/mongodb/bin/mongod --config /usr/local/mongodb/arbiter2/arbiter2.conf
# /usr/local/mongodb/bin/mongod --config /usr/local/mongodb/config/config1.conf
【server 2】
启动shard1、shard2、arbiter1、arbiter2服务
/usr/local/mongodb2/bin/mongod --config /usr/local/mongodb2/shard21/shard21.conf
/usr/local/mongodb2/bin/mongod --config /usr/local/mongodb2/shard22/shard22.conf
/usr/local/mongodb2/bin/mongod --config /usr/local/mongodb2/arbiter1/arbiter1.conf
/usr/local/mongodb2/bin/mongod --config /usr/local/mongodb2/arbiter2/arbiter2.conf
/usr/local/mongodb2/bin/mongod --config /usr/local/mongodb2/config/config2.conf
【server 3】
启动shard1、shard2、arbiter1、arbiter2服务
# /usr/local/mongodb3/bin/mongod --config /usr/local/mongodb3/shard31/shard31.conf
# /usr/local/mongodb3/bin/mongod --config /usr/local/mongodb3/shard32/shard32.conf
# /usr/local/mongodb3/bin/mongod --config /usr/local/mongodb3/arbiter1/arbiter1.conf
# /usr/local/mongodb3/bin/mongod --config /usr/local/mongodb3/arbiter2/arbiter2.conf
# /usr/local/mongodb3/bin/mongod --config /usr/local/mongodb3/config/config2.conf
2、mongos服务
【server1】
# /usr/local/mongodb/bin/mongos --config /usr/local/mongodb/mongos/mongos1.conf【 server2】
# /usr/local/mongodb2/bin/mongos --config /usr/local/mongodb2/mongos/mongos2.conf【 server3】
# /usr/local/mongodb3/bin/mongos --config /usr/local/mongodb3/mongos/mongos3.conf【此时服务器状态】
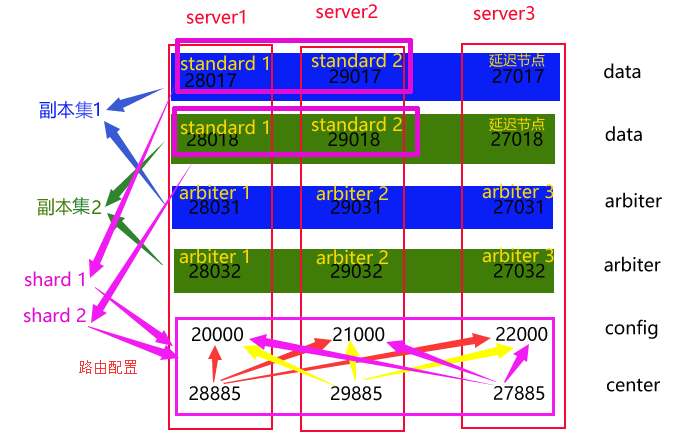
说明:
通过配置,设置了两个不同的副本集,每个副本集中有三个standard,三个arbiter。
副本集均未初始化,各节点尚未分工。
在配置中每个路由器都指向3个config节点,因此三个路由已经连在一起。

四、配置分片和副本集
1、设置副本集
#cd /usr/local/mongodb1)设置第一个分片副本集
# ./mongo ZSC-test:28017/admin● 定义副本集配置
> config = {_id: "shard1", members:[

{_id: 0, host:"ZSC-test:28017"},

{_id: 1, host:"ZSC-test:29017"},

{_id: 2, host:"ZSC-test:27017",slaveDelay : 7200, priority:0},

{_id: 3, host:"ZSC-test:28031", arbiterOnly : true},

{_id: 4, host:"ZSC-test:29031", arbiterOnly : true},

{_id: 5, host:"ZSC-test:27031", arbiterOnly : true}

]

};
副本集shard1结构:
| 节点 | 作用 |
| mongodb1:28071 | standard |
| mongodb2:29071 | standard |
| mongodb3:27071 | 延迟节点 |
| Mongodb1:28031 | arbiterOnly |
| Mongodb1:29031 | arbiterOnly |
| Mongodb1:27031 | arbiterOnly |
● 初始化副本集配置
> rs.initiate(config);
2)设置第二个分片副本集
> ./mongo ZSC-test:28018/admin● 定义副本集配置
config = {_id: "shard2", members:[

{_id: 0, host:"ZSC-test:28018"},

{_id: 1, host:"ZSC-test:29018"},

{_id: 2, host:"ZSC-test:27018",slaveDelay : 7200, priority:0},

{_id: 3, host:"ZSC-test:28032", arbiterOnly : true},

{_id: 4, host:"ZSC-test:29032", arbiterOnly : true},

{_id: 5, host:"ZSC-test:27032", arbiterOnly : true}

]

};
副本集shard2结构
| 节点 | 作用 |
| mongodb1:28071 | standard |
| mongodb2:29071 | standard |
| mongodb3:27071 | 延迟节点 |
| Mongodb1:28031 | arbiterOnly |
| Mongodb1:29031 | arbiterOnly |
| Mongodb1:27031 | arbiterOnly |
● 初始化副本集配置
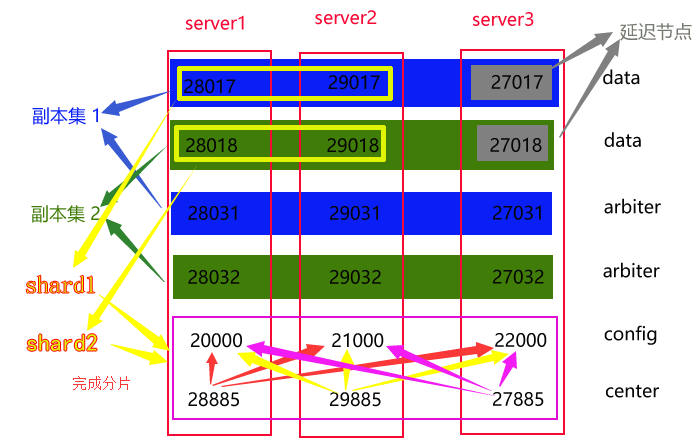
> rs.initiate(config);【此时服务器状态】
副本集初始化后各节点功能明确:
2个standard节点、1一个延迟节点、3个arbiter节点
2、添加分片
可在任一机器登录路由节点
#./mongo ZSC-test:28885/admin1)串联路由服务器与分配副本集1
> db.runCommand({"addshard" :"shard1/ZSC-test:28017,ZSC-test:29017"})2)串联路由服务器与分配副本集2
> db.runCommand({"addshard" :"shard2/ZSC-test:28018,ZSC-test:29018"})说明:因为ZSC-test:27017和ZSC-test:27018是延迟节点,所以不在副本集当中
3)查看配置
> db.runCommand( { listshards : 1 } );
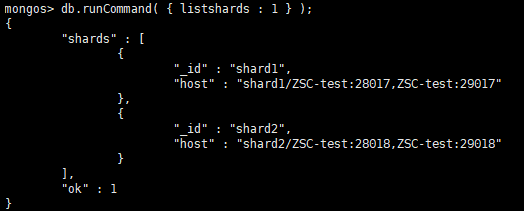
【此时服务器状态】
将“副本集1”中的连两个standard节点取出,作为分片的shard1
将“副本集2”中的连两个standard节点取出,作为分片的shard2
通过路由加入分片
五、制作“集群控制脚本”
制作集群控制脚本,便于后期维护和操作。
1、菜单脚本
#!/bin/bash
while :
do
#########主菜单内容#####
echo -e "\e[35;1m
###################################################
    1.初始化mongo集群配置文件
    2.停止mongo集群
    3.启动mongo集群
    4.退出
###################################################
\e[0m"
echo -en "\e[35;1m请输入java服务操作代码号(1-7):\e[0m"
read java_operate
case ${java_operate} in
1)
/usr/local/mongo/bin/mongos_config.sh;;
2)
/usr/local/mongo/bin/mongos_stop.sh;;
3)
while :
do
#########启动菜单####
echo -e "\e[35;1m
###################################################
    1.启动server2的mongod
    2.启动server1的mongod
    3.启动server3的mongod
    4.启动server2的mongos
    5.启动server1的mongos
    6.启动server1的mongos
    7.返回上一层
    8.退出
###################################################
\e[0m"
echo -en "\e[35;1m请输入java服务操作代码号(1-7):\e[0m"
read java_operate
case ${java_operate} in
1)
/usr/local/mongo/bin/mongod_start.sh mongod_2;;
2)
/usr/local/mongo/bin/mongod_start.sh mongod_1;;
3)
/usr/local/mongo/bin/mongod_start.sh mongod_3;;
4)
/usr/local/mongo/bin/mongod_start.sh mongos_2;;
5)
/usr/local/mongo/bin/mongod_start.sh mongos_1;;
6)
/usr/local/mongo/bin/mongod_start.sh mongos_3;;
7)
  clear
  break
  ;;
8)
  exit
  ;;
  *)
  clear
  ;;
esac;
done;;
4)
  exit
  ;;
  *)
  clear
  ;;
esac
done
2、初始化集群脚本(刚才部署的时候用过这个脚本,直接拷过来用。)
# vim mongod_config.sh#!/bin/bash
#####【server1】
####数据节点 (2个)#####
mkdir -p /usr/local/mongodb/shard11
cat > /usr/local/mongodb/shard11/shard11.conf <<EOF
shardsvr=true
replSet=shard1
port=28017
dbpath=/usr/local/mongodb/shard11
oplogSize=2048
logpath=/usr/local/mongodb/shard11/shard11.log
logappend=true
fork=true
rest=true
httpinterface=true
nojournal = true
keyFile=/usr/local/mongodb/mongo_key.file
auth = true
EOF
mkdir -p /usr/local/mongodb/shard12
cat > /usr/local/mongodb/shard12/shard12.conf <<EOF
shardsvr=true
replSet=shard2
port=28018
dbpath=/usr/local/mongodb/shard12
oplogSize=2048
logpath=/usr/local/mongodb/shard12.log
logappend=true
fork=true
rest=true
httpinterface=true
nojournal = true
keyFile=/usr/local/mongodb/mongo_key.file
auth = true
EOF
#表决节点 (2个)
mkdir -p /usr/local/mongodb/arbiter1
cat > /usr/local/mongodb/arbiter1/arbiter1.conf <<EOF
shardsvr=true
replSet=shard1
port=28031
dbpath=/usr/local/mongodb/arbiter1
oplogSize=100
logpath=/usr/local/mongodb/arbiter1.log
logappend=true
fork=true
rest=true
httpinterface=true
nojournal = true
keyFile=/usr/local/mongodb/mongo_key.file
auth = true
EOF
mkdir -p /usr/local/mongodb/arbiter2
cat > /usr/local/mongodb/arbiter2/arbiter2.conf <<EOF
shardsvr=true
replSet=shard2
port=28032
dbpath=/usr/local/mongodb/arbiter2
oplogSize=100
logpath=/usr/local/mongodb/arbiter2.log
logappend=true
fork=true
rest=true
httpinterface=true
nojournal = true
keyFile=/usr/local/mongodb/mongo_key.file
auth = true
EOF
#配置节点 (1个)
mkdir -p /usr/local/mongodb/config/
cat > /usr/local/mongodb/config/config1.conf <<EOF
configsvr=true
dbpath=/usr/local/mongodb/config/
port=20000
logpath=/usr/local/mongodb/config/config1.log
logappend=true
fork=true
httpinterface=true
#nojournal=true
keyFile=/usr/local/mongodb/mongo_key.file
auth = true
EOF
#路由节点(1个)
mkdir -p /usr/local/mongodb/mongos
cat > /usr/local/mongodb/mongos/mongos1.conf <<EOF
configdb=ZSC-test:20000,ZSC-test:21000,ZSC-test:22000
port=28885
chunkSize=100
logpath=/usr/local/mongodb/mongos/mongos1.log
logappend=true
fork=true
keyFile=/usr/local/mongodb/mongo_key.file
EOF
##【server 2】
#数据节点
mkdir -p /usr/local/mongodb2/shard21
cat > /usr/local/mongodb2/shard21/shard21.conf <<EOF
shardsvr=true
replSet=shard1
port=29017
dbpath=/usr/local/mongodb2/shard21
oplogSize=2048
logpath=/usr/local/mongodb2/shard21/shard21.log
logappend=true
fork=true
rest=true
httpinterface=true
nojournal = true
keyFile=/usr/local/mongodb/mongo_key.file
auth = true
EOF
mkdir -p /usr/local/mongodb2/shard22
cat > /usr/local/mongodb2/shard22/shard22.conf <<EOF
shardsvr=true
replSet=shard2
port=29018
dbpath=/usr/local/mongodb2/shard22
oplogSize=2048
logpath=/usr/local/mongodb2/shard22/shard22.log
logappend=true
fork=true
rest=true
httpinterface=true
nojournal = true
keyFile=/usr/local/mongodb/mongo_key.file
auth = true
EOF
#表决节点
mkdir -p /usr/local/mongodb2/arbiter1
cat > /usr/local/mongodb2/arbiter1/arbiter1.conf<<EOF
shardsvr=true
replSet=shard1
port=29031
dbpath=/usr/local/mongodb2/arbiter1
oplogSize=100
logpath=/usr/local/mongodb2/arbiter1/arbiter1.log
logappend=true
fork=true
rest=true
httpinterface=true
nojournal = true
keyFile=/usr/local/mongodb/mongo_key.file
auth = true
EOF
mkdir -p /usr/local/mongodb2/arbiter2
cat > /usr/local/mongodb2/arbiter2/arbiter2.conf <<EOF
shardsvr=true
replSet=shard2
port=29032
dbpath=/usr/local/mongodb2/arbiter2
oplogSize=100
logpath=/usr/local/mongodb2/arbiter2/arbiter2.log
logappend=true
fork=true
rest=true
httpinterface=true
nojournal = true
keyFile=/usr/local/mongodb/mongo_key.file
auth = true
EOF
#配置节点
mkdir -p /usr/local/mongodb2/config/
cat > /usr/local/mongodb2/config/config2.conf <<EOF
configsvr=true
dbpath=/usr/local/mongodb2/config/
port=21000
logpath=/usr/local/mongodb2/config/config2.log
logappend=true
fork=true
#nojournal = true
keyFile=/usr/local/mongodb/mongo_key.file
auth = true
EOF
#路由节点
mkdir -p /usr/local/mongodb2/mongos
cat >/usr/local/mongodb2/mongos/mongos2.conf <<EOF
configdb=ZSC-test:20000,ZSC-test:21000,ZSC-test:22000
port=29885
chunkSize=100
logpath=/usr/local/mongodb2/mongos/mongos2.log
logappend=true
fork=true
keyFile=/usr/local/mongodb/mongo_key.file
EOF
###【server3】
#数据节点
mkdir -p /usr/local/mongodb3/shard31
cat > /usr/local/mongodb3/shard31/shard31.conf <<EOF
shardsvr=true
replSet=shard1
port=27017
dbpath=/usr/local/mongodb3/shard31
oplogSize=2048
logpath=/usr/local/mongodb3/shard31/shard31.log
logappend=true
fork=true
rest=true
httpinterface=true
nojournal = true
keyFile=/usr/local/mongodb/mongo_key.file
auth = true
EOF
mkdir -p /usr/local/mongodb3/shard32
cat > /usr/local/mongodb3/shard32/shard32.conf <<EOF
shardsvr=true
replSet=shard2
port=27018
dbpath=/usr/local/mongodb3/shard32
oplogSize=2048
logpath=/usr/local/mongodb3/shard32/shard32.log
logappend=true
fork=true
rest=true
httpinterface=true
nojournal = true
keyFile=/usr/local/mongodb/mongo_key.file
auth = true
EOF
#表决节点
mkdir -p /usr/local/mongodb3/arbiter1
cat > /usr/local/mongodb3/arbiter1/arbiter1.conf<<EOF
shardsvr=true
replSet=shard1
port=27031
dbpath=/usr/local/mongodb3/arbiter1
oplogSize=100
logpath=/usr/local/mongodb3/arbiter1/arbiter1.log
logappend=true
fork=true
rest=true
httpinterface=true
nojournal = true
keyFile=/usr/local/mongodb/mongo_key.file
auth = true
EOF
mkdir -p /usr/local/mongodb3/arbiter2
cat > /usr/local/mongodb3/arbiter2/arbiter2.conf <<EOF
shardsvr=true
replSet=shard2
port=27032
dbpath=/usr/local/mongodb3/arbiter2
oplogSize=100
logpath=/usr/local/mongodb3/arbiter2/arbiter2.log
logappend=true
fork=true
rest=true
httpinterface=true
nojournal = true
keyFile=/usr/local/mongodb/mongo_key.file
auth = true
EOF
#配置节点
mkdir -p /usr/local/mongodb3/config/
cat > /usr/local/mongodb3/config/config2.conf <<EOF
configsvr=true
dbpath=/usr/local/mongodb3/config/
port=22000
logpath=/usr/local/mongodb3/config/config2.log
logappend=true
fork=true
#nojournal = true
keyFile=/usr/local/mongodb/mongo_key.file
auth = true
EOF
#路由节点
mkdir -p /usr/local/mongodb3/mongos
cat >/usr/local/mongodb3/mongos/mongos3.conf <<EOF
configdb=ZSC-test:20000,ZSC-test:21000,ZSC-test:22000
port=29885
chunkSize=100
logpath=/usr/local/mongodb3/mongos/mongos3.log
logappend=true
fork=true
keyFile=/usr/local/mongodb/mongo_key.file
EOF
5、副本集启动脚本:
# vim mongod_start.sh#!/bin/bash
#!/bin/bash
case $1 in
'mongod_1')
/usr/local/mongodb/bin/mongod --config /usr/local/mongodb/shard11/shard11.conf
/usr/local/mongodb/bin/mongod --config /usr/local/mongodb/shard12/shard12.conf
/usr/local/mongodb/bin/mongod --config /usr/local/mongodb/arbiter1/arbiter1.conf
/usr/local/mongodb/bin/mongod --config /usr/local/mongodb/arbiter2/arbiter2.conf
/usr/local/mongodb/bin/mongod --config /usr/local/mongodb/config/config1.conf
;;
'mongod_2')
/usr/local/mongodb2/bin/mongod --config /usr/local/mongodb2/shard21/shard21.conf
/usr/local/mongodb2/bin/mongod --config /usr/local/mongodb2/shard22/shard22.conf
/usr/local/mongodb2/bin/mongod --config /usr/local/mongodb2/arbiter1/arbiter1.conf
/usr/local/mongodb2/bin/mongod --config /usr/local/mongodb2/arbiter2/arbiter2.conf
/usr/local/mongodb2/bin/mongod --config /usr/local/mongodb2/config/config2.conf
;;
'mongod_3')
/usr/local/mongodb3/bin/mongod --config /usr/local/mongodb3/shard31/shard31.conf
/usr/local/mongodb3/bin/mongod --config /usr/local/mongodb3/shard32/shard32.conf
/usr/local/mongodb3/bin/mongod --config /usr/local/mongodb3/arbiter1/arbiter1.conf
/usr/local/mongodb3/bin/mongod --config /usr/local/mongodb3/arbiter2/arbiter2.conf
/usr/local/mongodb3/bin/mongod --config /usr/local/mongodb3/config/config2.conf
;;
'mongos_1')
/usr/local/mongodb/bin/mongos --config /usr/local/mongodb/mongos/mongos1.conf;;
'mongos_2')
/usr/local/mongodb2/bin/mongos --config /usr/local/mongodb2/mongos/mongos2.conf;;
'mongos_3')
/usr/local/mongodb3/bin/mongos --config /usr/local/mongodb3/mongos/mongos3.conf;;
esac3、关闭集群
副本集关闭脚本
# vim mongod_stop.sh#!/bin/bash
killall mongod
killall mongos
/bin/find /usr/local/ -name mongod.lock |xargs rm -rf
mongo_num=`ps -ef |grep mongo |grep -v grep |grep -v log`
if [ ${mongo_num} -eq 0 ]
then
echo "mongod and mongos are stop "
else
echo "mongo is not stop "
ps -ef |grep mongo |grep -v grep |grep -v log
fi


 877
877

 被折叠的 条评论
为什么被折叠?
被折叠的 条评论
为什么被折叠?
 到【灌水乐园】发言


