


dns实现视图:上海和西安的用户使用相同域名访问不同的web服务器
第一步:注释一些代码->[之前手动配置的正向和反向解析的代码]
[root@server ~]# vim /etc/named.conf
/*
zone "." IN {
type hint;
file "named.ca";
};
zone "openlab.com" IN {
type master;
allow-transfer {192.168.118.130};
file "openlab.com.zone";
};
zone "118.168.192.in-addr.arpa" IN {
type master;
allow-transfer {192.168.118.130};
file "192.168.118.arpa";
};
*/
# include "/etc/named.rfc1912.zones";
第二步:写视图
[root@server ~]# vim /etc/named.conf
acl client_sh { 192.168.118.129; };
acl client_xa { 192.168.118.1; };
view "shanghai" {
match-clients {client_sh;};
zone "." IN {
type hint;
file "named.ca";
};
zone "openlab.com" IN {
type master;
file "openlab.shanghai";
};
zone "118.168.192.in-addr.arpa" IN {
type master;
file "118.168.192.shanghai";
};
};
view "xian" {
match-clients {client_xa;};
zone "." IN {
type hint;
file "named.ca";
};
zone "openlab.com" IN {
type master;
file "openlab.xian";
};
zone "118.168.192.in-addr.arpa" IN {
type master;
file "118.168.192.xian";
};
};
第三步:准备文件,进行修改
[root@server named]# cp openlab.com.zone openlab.xian
[root@server named]# cp openlab.com.zone openlab.shanghai
[root@server named]# cp 192.168.118.arpa 118.168.192.xian
[root@server named]# cp 192.168.118.arpa 118.168.192.shanghai
拷贝文件后进入改www.openlab.com.这一行的ip【正反都改】
第四步:检测重启
[root@server named]# named-checkconf /etc/named.conf
[root@server named]# systemctl restart named
第五步:进行验证
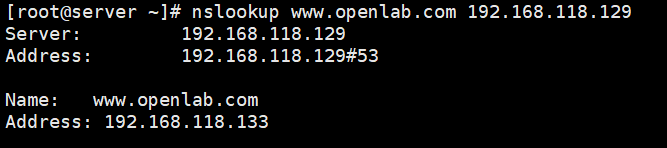
在ip地址为192.168.118.1的主机上测试得到
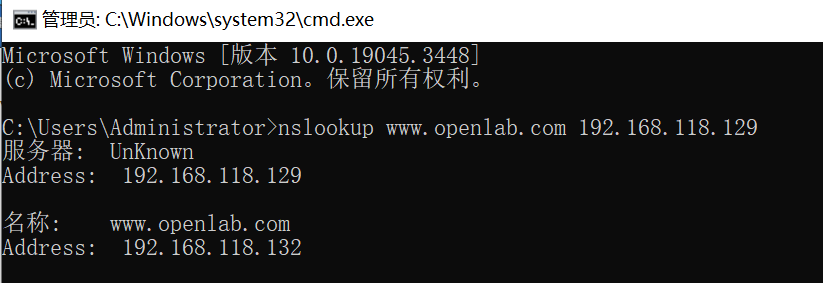
在ip地址为192.168.118.129的主机上测试得到


 被折叠的 条评论
为什么被折叠?
被折叠的 条评论
为什么被折叠?
 到【灌水乐园】发言


