


 本文深入解析BiSeNetV1和BiSeNetV2,这两种用于实时语义分割的网络结构。BiSeNet通过空间通道和语义通道解耦空间信息和语义信息,实现高精度和快速推理。文章详细介绍了网络的各个组成部分,如Spatial Path、Context Path、ARM和FFM模块,以及在BiSeNetV2中引入的细节分支和语义分支,展示了如何平衡速度与精度。
1、主要参考
(1)github的地址
https://github.com/CoinCheung/BiSeNet
(2)华科还真是不错的学校
2、 测试模型
(1)下载github代码
(2)下载权重

(3)测试一下
(1)bisenetV1
python tools/demo.py --config configs/bisenetv1_city.py --weight-path D:/pytorch_learning2022/5chen_segement_test2022/BiSeNet/weight/model_final_v1_city_new.pth --img-path D:/pytorch_learning2022/5chen_segement_test2022/BiSeNet/example.png (2)bisenetV2
python tools/demo.py --config configs/bisenetv2_city.py --weight-path D:/pytorch_learning2022/5chen_segement_test2022/BiSeNet/weight/model_final_v2_city.pth --img-path D:/pytorch_learning2022/5chen_segement_test2022/BiSeNet/chen_test1.png3、BiSeNetV1 的原理
3.1 论文题目
(1)论文下载地址
https://arxiv.org/abs/1808.00897
(2)题目
BiSeNet: Bilateral Segmentation Network for Real-time Semantic Segmentation
(3)中文翻译(哈哈,能看出点东西)
BiSeNet:用于实时语义分割的双边分割网络
3.2 论文的思想
陈简单整理,20221023
(一)语义分割面对两个主要问题:需要足够的空间信息(浅层网络),需要较好的语义信息(深层网络,或者说大的感受野)。
 (二)传统的方法如何如何,本文采用了两个分支网络:(1)其中一个分支网络使用较浅的卷积获得了大的空间信息(Spatial Path)下采样1/8,(2)其中另一个卷积网络使用快速下采样(各类轻量网络都可以)获得了较好的感受野(Context Path),下采样1/32;(3)最后两个网络融合起来。
 (三)该方法实现了空间信息和语义信息(感受野)的解耦!
思想如下:

3.3 语义分割面临的问题和传统解决方法
ps:语义分割的速度当然很重要,抛开速度讲精度是耍......
论文中总结了三种语义分割的加速方法
(一)通过裁剪输入图像尺寸的方法降低运算量来加速。该方法简单有效,但是很丢失空间信息,特别是边缘。


(二)通过对神经网络剪枝来加速推理。尤其是在网络的早期阶段剪枝,该方法会丢失空间信息。

(三)丢弃最后的网络模块来获得极致精巧的网络,比如ENet。然而放弃了最后阶段的操作中的下采样,模型的接受范围不足以覆盖大物体,导致辨别能力差。

上述三个方法都是为了速度对精度进行了妥协。
3.4 传统U形网络的问题
为了弥补上述空间细节的缺失,研究人员广泛利用U形结构。(ps:比如说我们熟悉的Unet和Unet2)。通过融合骨干网络的分层特征,U形结构逐渐提高了空间分辨率,并填补了一些缺失的细节,然后该技术也有两个弱点:
(1)由于额外的引入了高分辨率特征,计算速度会下降。
(2)在剪枝过程中丢失的大部分空间信息无法通过浅层网络来轻松恢复。如下图所示。

下面这句翻译真不靠谱啊。

3.5 我们(本文)的语义分割bisenet的方法
(一)网络结构如下图所示:

(二)本论文的三个卖点:
(1)提出了一种创新的方法,使用2个通道(空间通道Spatial Path,语义通道Context Path)来解耦空间信息和大的感受野。

(2)设计了两个特殊的模块,特征融合模块FFM和注意力增强模块ARM,在增加适度开销(运算量)的情况下改进了精度。

(3)在三个数据集上获得了很好的结果。

(三)网络整体结构如下:

3.6 空间通道Spatial path的实现
(1)当前研究中为了保持输入图像分辨率的方法一些研究采用了空洞卷积(dilated convolution),另外一些研究为了获得足够的感受野使用了金字塔池模块(pyramid pooling module),ASPP(atrous spatial pyramid pooling)或者大的卷积核(large kernel)。(PS应该对应deeplab的v1、v2和v3版本)。
这些研究也表明空间信息和感受野对实现高精度检测的重要性,但是要同时满足他们太难了,特别是要求实现实时语义分割的情况下。
该论文提出的空间通道包括三个卷积层,每个卷积层的stride=2,然后跟着BN和Relu,因而该通道实现了原图的1/8采样,因而获得了丰富的空间信息(PS:1/8下采样应该还算是大的)
(2)论文中对应的图如下所示:

(3)陈根据模型自己画了一遍,20221024,PS:发现是4层卷积
PS:第一层卷积和deeplabv3的是一样的

(4)陈根据源码导出,20221024

(5)作者对应的代码实现部分,ps:包含了我测试的导出代码
import torch
import torch.nn as nn
import torch.nn.functional as F
import torchvision

# from resnet import Resnet18

from torch.nn import BatchNorm2d

#清晰打印网络结构
from    torchinfo import summary

#保存为onnx
import torch
import torch.onnx
from torch.autograd import Variable

#导出有尺寸
import onnx
# from onnx import shape_inference

class ConvBNReLU(nn.Module):

    def __init__(self, in_chan, out_chan, ks=3, stride=1, padding=1, *args, **kwargs):
        super(ConvBNReLU, self).__init__()
        self.conv = nn.Conv2d(in_chan,
                out_chan,
                kernel_size = ks,
                stride = stride,
                padding = padding,
                bias = False)
        self.bn = BatchNorm2d(out_chan)
        self.relu = nn.ReLU(inplace=True)
        self.init_weight()

    def forward(self, x):
        x = self.conv(x)
        x = self.bn(x)
        x = self.relu(x)
        return x

    def init_weight(self):
        for ly in self.children():
            if isinstance(ly, nn.Conv2d):
                nn.init.kaiming_normal_(ly.weight, a=1)
                if not ly.bias is None: nn.init.constant_(ly.bias, 0)


class SpatialPath(nn.Module):
    def __init__(self, *args, **kwargs):
        super(SpatialPath, self).__init__()
        self.conv1 = ConvBNReLU(3, 64, ks=7, stride=2, padding=3)
        self.conv2 = ConvBNReLU(64, 64, ks=3, stride=2, padding=1)
        self.conv3 = ConvBNReLU(64, 64, ks=3, stride=2, padding=1)
        self.conv_out = ConvBNReLU(64, 128, ks=1, stride=1, padding=0)
        self.init_weight()

    def forward(self, x):
        feat = self.conv1(x)
        feat = self.conv2(feat)
        feat = self.conv3(feat)
        feat = self.conv_out(feat)
        return feat

    def init_weight(self):
        for ly in self.children():
            if isinstance(ly, nn.Conv2d):
                nn.init.kaiming_normal_(ly.weight, a=1)
                if not ly.bias is None: nn.init.constant_(ly.bias, 0)

    def get_params(self):
        wd_params, nowd_params = [], []
        for name, module in self.named_modules():
            if isinstance(module, nn.Linear) or isinstance(module, nn.Conv2d):
                wd_params.append(module.weight)
                if not module.bias is None:
                    nowd_params.append(module.bias)
            elif isinstance(module, nn.modules.batchnorm._BatchNorm):
                nowd_params += list(module.parameters())
        return wd_params, nowd_params

def save_onnx(model,x,model_file_name):
    torch_out = torch.onnx.export(model, x,
                              model_file_name,
                               export_params=True,
                               verbose=True)

def save_scale_onnx(model_file_name):
    model = model_file_name
    onnx.save(onnx.shape_inference.infer_shapes(onnx.load(model)), model)

if __name__ == "__main__":

    sp_net = SpatialPath()
    x = torch.randn(16, 3, 640, 480)
    sp_out = sp_net(x)
    print(sp_out.shape)
    sp_net.get_params()

    model_file_name = "D:/pytorch_learning2022/5chen_segement_test2022/BiSeNet/chentest_print_mode/chen_sp.onnx"
    #打印网络结构
    summary(sp_net, input_size=(16, 3, 640, 480))
    #保存为onnx
    save_onnx(sp_net,x,model_file_name)
    #保存为onnx 有尺寸
    save_scale_onnx(model_file_name)
3.7 语义通道Context path的内容
语义通道旨在提供足够的感受野,本采用的语义通道使用了轻量化网络(lightweight model)和全局平均池化技术(global average pooling)。
(1)轻量化网络比如说xception都能提供快速的下采样从而获得大的感受野,ps:实际上代码你用了resnet18。
(2)然后本文在轻量级模型的尾部添加了一个全局平均池,它可以为语义通道提供最大的感受野信息。

(3)最后通过ARM模块和FFM模块融合输出
3.8 所使用的Resnet18网络
Resnet18的网络详见
(26)到处都可能用到的基础网络resnet18和resnet50_chencaw的博客-优快云博客
(1)本文所使用的Resnet模块如下,要修改

(2)resnet18的图如下所示,PS:手绘

(3)resnet18的图导出如下

(4)对应测试代码
#!/usr/bin/python
# -*- encoding: utf-8 -*-

import torch
import torch.nn as nn
import torch.nn.functional as F
import torch.utils.model_zoo as modelzoo

resnet18_url = 'https://download.pytorch.org/models/resnet18-5c106cde.pth'

from torch.nn import BatchNorm2d
#清晰打印网络结构
from    torchinfo import summary

#保存为onnx
import torch
import torch.onnx
from torch.autograd import Variable

#导出有尺寸
import onnx
# from onnx import shape_inference


def conv3x3(in_planes, out_planes, stride=1):
    """3x3 convolution with padding"""
    return nn.Conv2d(in_planes, out_planes, kernel_size=3, stride=stride,
                     padding=1, bias=False)


class BasicBlock(nn.Module):
    def __init__(self, in_chan, out_chan, stride=1):
        super(BasicBlock, self).__init__()
        self.conv1 = conv3x3(in_chan, out_chan, stride)
        self.bn1 = BatchNorm2d(out_chan)
        self.conv2 = conv3x3(out_chan, out_chan)
        self.bn2 = BatchNorm2d(out_chan)
        self.relu = nn.ReLU(inplace=True)
        self.downsample = None
        if in_chan != out_chan or stride != 1:
            self.downsample = nn.Sequential(
                nn.Conv2d(in_chan, out_chan,
                          kernel_size=1, stride=stride, bias=False),
                BatchNorm2d(out_chan),
                )

    def forward(self, x):
        residual = self.conv1(x)
        residual = self.bn1(residual)
        residual = self.relu(residual)
        residual = self.conv2(residual)
        residual = self.bn2(residual)

        shortcut = x
        if self.downsample is not None:
            shortcut = self.downsample(x)

        out = shortcut + residual
        out = self.relu(out)
        return out


def create_layer_basic(in_chan, out_chan, bnum, stride=1):
    layers = [BasicBlock(in_chan, out_chan, stride=stride)]
    for i in range(bnum-1):
        layers.append(BasicBlock(out_chan, out_chan, stride=1))
    return nn.Sequential(*layers)


class Resnet18(nn.Module):
    def __init__(self):
        super(Resnet18, self).__init__()
        self.conv1 = nn.Conv2d(3, 64, kernel_size=7, stride=2, padding=3,
                               bias=False)
        self.bn1 = BatchNorm2d(64)
        self.relu = nn.ReLU(inplace=True)
        self.maxpool = nn.MaxPool2d(kernel_size=3, stride=2, padding=1)
        self.layer1 = create_layer_basic(64, 64, bnum=2, stride=1)
        self.layer2 = create_layer_basic(64, 128, bnum=2, stride=2)
        self.layer3 = create_layer_basic(128, 256, bnum=2, stride=2)
        self.layer4 = create_layer_basic(256, 512, bnum=2, stride=2)
        self.init_weight()

    def forward(self, x):
        x = self.conv1(x)
        x = self.bn1(x)
        x = self.relu(x)
        x = self.maxpool(x)

        x = self.layer1(x)
        feat8 = self.layer2(x) # 1/8
        feat16 = self.layer3(feat8) # 1/16
        feat32 = self.layer4(feat16) # 1/32
        return feat8, feat16, feat32

    def init_weight(self):
        state_dict = modelzoo.load_url(resnet18_url)
        self_state_dict = self.state_dict()
        for k, v in state_dict.items():
            if 'fc' in k: continue
            self_state_dict.update({k: v})
        self.load_state_dict(self_state_dict)

    def get_params(self):
        wd_params, nowd_params = [], []
        for name, module in self.named_modules():
            if isinstance(module, (nn.Linear, nn.Conv2d)):
                wd_params.append(module.weight)
                if not module.bias is None:
                    nowd_params.append(module.bias)
            elif isinstance(module, nn.modules.batchnorm._BatchNorm):
                nowd_params += list(module.parameters())
        return wd_params, nowd_params


def save_onnx(model,x,model_file_name):
    torch_out = torch.onnx.export(model, x,
                              model_file_name,
                               export_params=True,
                               verbose=True)

def save_scale_onnx(model_file_name):
    model = model_file_name
    onnx.save(onnx.shape_inference.infer_shapes(onnx.load(model)), model)


if __name__ == "__main__":
    resnet18_net = Resnet18()
    x = torch.randn(16, 3, 640, 480)
    resnet_out = resnet18_net(x)
    # print(resnet_out.shape)
    resnet18_net.get_params()

    model_file_name = "D:/pytorch_learning2022/5chen_segement_test2022/BiSeNet/chentest_print_mode/chen_resnet.onnx"
    #打印网络结构
    summary(resnet18_net, input_size=(16, 3, 640, 480))
    #保存为onnx
    save_onnx(resnet18_net,x,model_file_name)
    #保存为onnx 有尺寸
    save_scale_onnx(model_file_name)
3.9 所使用的ARM
(1)ARM模块的结构如下图所示
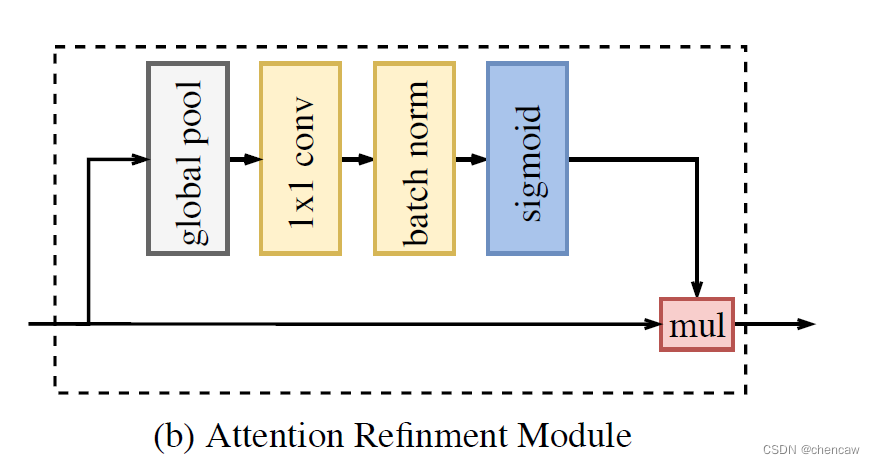
(2)手绘图分别对应ARM对应16Dowm和32Dowm
1)
2)注意:实际网络对应的输入通道排布为[B,C,W,H],我手绘的图都是使用了[W,H,C]
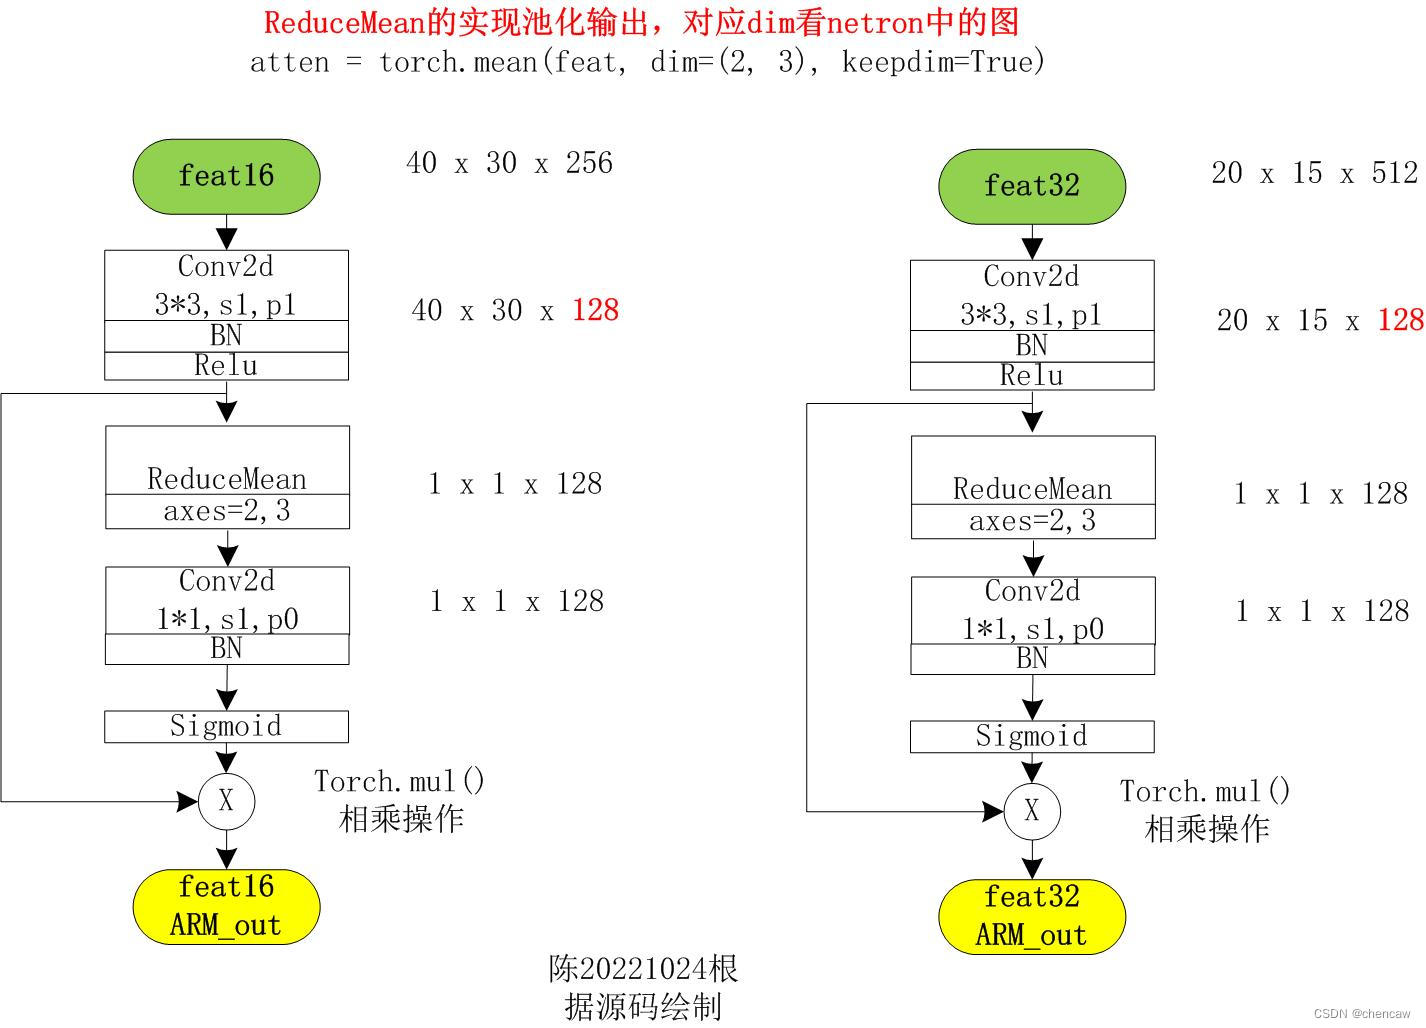
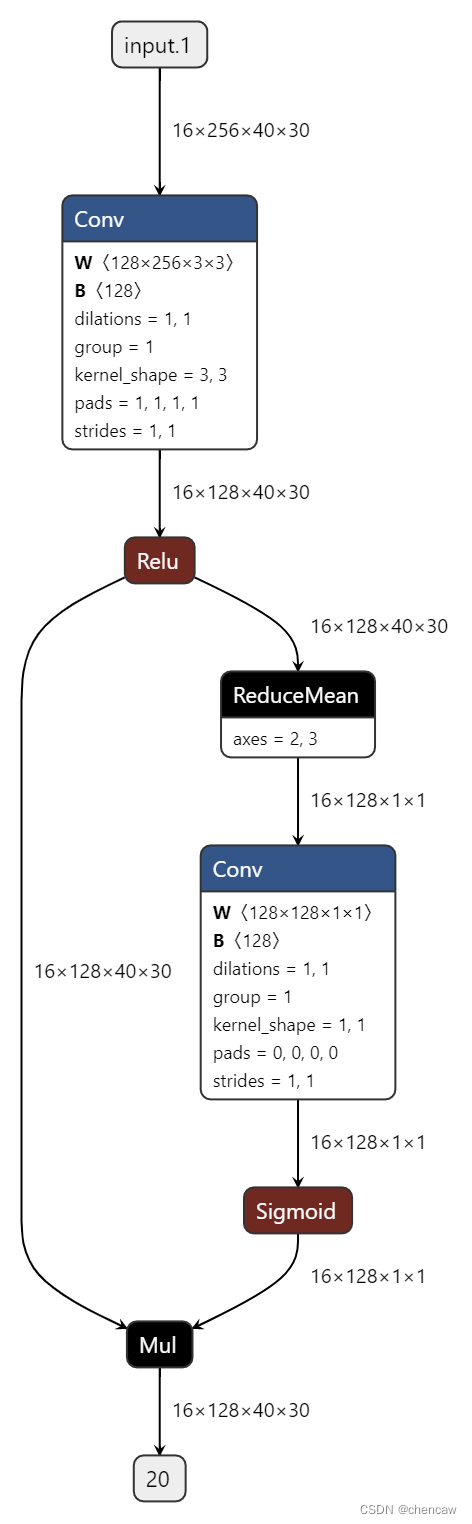
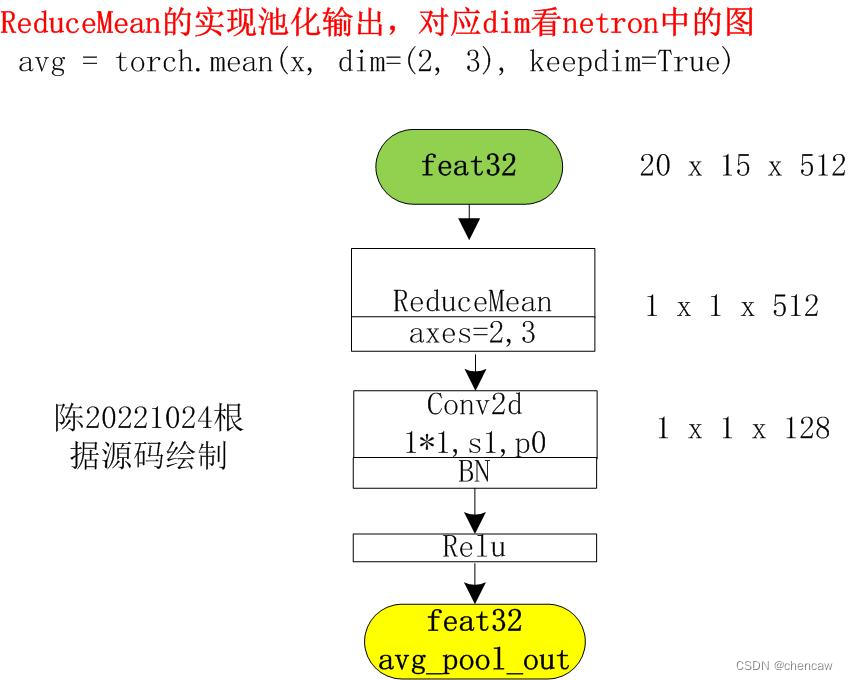
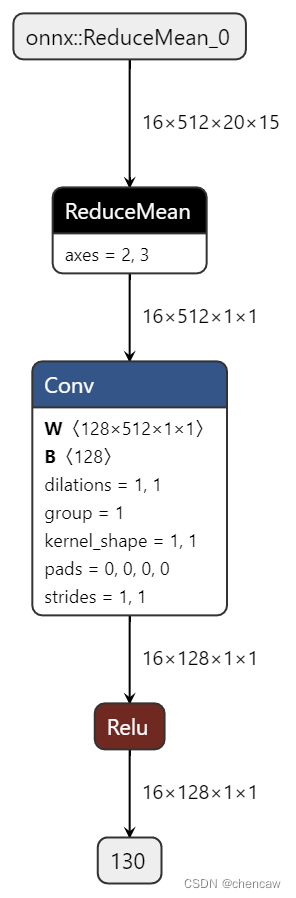
注意ReduceMean的实现池化输出,对应dim看netron中的图
atten = torch.mean(feat, dim=(2, 3), keepdim=True)
(4)netron对应的图,注意上述中dim对应的位置
(5)对应测试代码
#!/usr/bin/python
# -*- encoding: utf-8 -*-

import torch
import torch.nn as nn
import torch.nn.functional as F
import torch.utils.model_zoo as modelzoo

resnet18_url = 'https://download.pytorch.org/models/resnet18-5c106cde.pth'

from torch.nn import BatchNorm2d
#清晰打印网络结构
from    torchinfo import summary

#保存为onnx
import torch
import torch.onnx
from torch.autograd import Variable

#导出有尺寸
import onnx
# from onnx import shape_inference

class ConvBNReLU(nn.Module):

    def __init__(self, in_chan, out_chan, ks=3, stride=1, padding=1, *args, **kwargs):
        super(ConvBNReLU, self).__init__()
        self.conv = nn.Conv2d(in_chan,
                out_chan,
                kernel_size = ks,
                stride = stride,
                padding = padding,
                bias = False)
        self.bn = BatchNorm2d(out_chan)
        self.relu = nn.ReLU(inplace=True)
        self.init_weight()

    def forward(self, x):
        x = self.conv(x)
        x = self.bn(x)
        x = self.relu(x)
        return x

    def init_weight(self):
        for ly in self.children():
            if isinstance(ly, nn.Conv2d):
                nn.init.kaiming_normal_(ly.weight, a=1)
                if not ly.bias is None: nn.init.constant_(ly.bias, 0)


class AttentionRefinementModule(nn.Module):
    def __init__(self, in_chan, out_chan, *args, **kwargs):
        super(AttentionRefinementModule, self).__init__()
        self.conv = ConvBNReLU(in_chan, out_chan, ks=3, stride=1, padding=1)
        self.conv_atten = nn.Conv2d(out_chan, out_chan, kernel_size= 1, bias=False)
        self.bn_atten = BatchNorm2d(out_chan)
        #  self.sigmoid_atten = nn.Sigmoid()
        self.init_weight()

    def forward(self, x):
        feat = self.conv(x)
        atten = torch.mean(feat, dim=(2, 3), keepdim=True)
        atten = self.conv_atten(atten)
        atten = self.bn_atten(atten)
        #  atten = self.sigmoid_atten(atten)
        atten = atten.sigmoid()
        out = torch.mul(feat, atten)
        return out

    def init_weight(self):
        for ly in self.children():
            if isinstance(ly, nn.Conv2d):
                nn.init.kaiming_normal_(ly.weight, a=1)
                if not ly.bias is None: nn.init.constant_(ly.bias, 0)


def save_onnx(model,x,model_file_name):
    torch_out = torch.onnx.export(model, x,
                              model_file_name,
                               export_params=True,
                               verbose=True)

def save_scale_onnx(model_file_name):
    model = model_file_name
    onnx.save(onnx.shape_inference.infer_shapes(onnx.load(model)), model)


if __name__ == "__main__":
    arm_net = AttentionRefinementModule(256, 128) #对应feat16
    # arm_net = AttentionRefinementModule(512, 128) #对应feat32
    x = torch.randn(16, 256, 40, 30)#对应feat16 测速
    # x = torch.randn(16, 512, 20, 15)#对应feat32 测速
    resnet_out = arm_net(x)
    # print(resnet_out.shape)

    model_file_name = "D:/pytorch_learning2022/5chen_segement_test2022/BiSeNet/chentest_print_mode/chen_arm.onnx"
    # #打印网络结构
    # summary(arm_net, input_size=(16, 3, 640, 480))
    #保存为onnx
    save_onnx(arm_net,x,model_file_name)
    #保存为onnx 有尺寸
    save_scale_onnx(model_file_name)
3.10 语义通道中Resnet18最后输出的全局池化小模块的实现
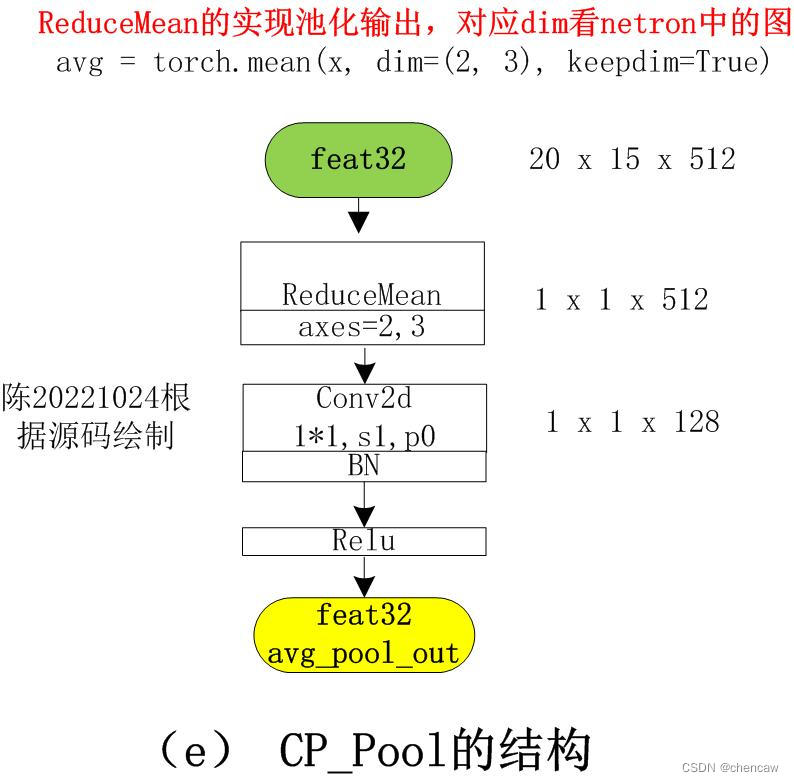
(1)这个池化模块是怎么实现的?
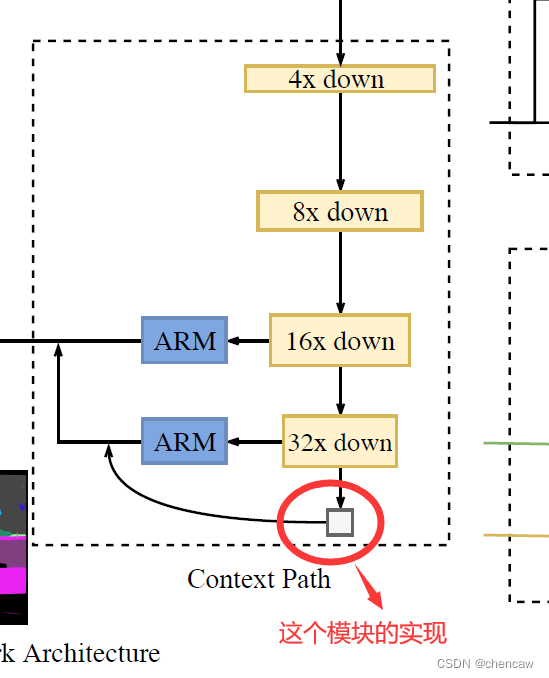
(2)这个池化模块是怎么实现的?手绘图
(3)netron对应的图
(4)测试代码
#!/usr/bin/python
# -*- encoding: utf-8 -*-
import torch
import torch.nn as nn
import torch.nn.functional as F
import torch.utils.model_zoo as modelzoo
resnet18_url = 'https://download.pytorch.org/models/resnet18-5c106cde.pth'
from resnet import Resnet18
from torch.nn import BatchNorm2d
#清晰打印网络结构
from torchinfo import summary
#保存为onnx
import torch
import torch.onnx
from torch.autograd import Variable
#导出有尺寸
import onnx
# from onnx import shape_inference
class ConvBNReLU(nn.Module):
def __init__(self, in_chan, out_chan, ks=3, stride=1, padding=1, *args, **kwargs):
super(ConvBNReLU, self).__init__()
self.conv = nn.Conv2d(in_chan,
out_chan,
kernel_size = ks,
stride = stride,
padding = padding,
bias = False)
self.bn = BatchNorm2d(out_chan)
self.relu = nn.ReLU(inplace=True)
self.init_weight()
def forward(self, x):
x = self.conv(x)
x = self.bn(x)
x = self.relu(x)
return x
def init_weight(self):
for ly in self.children():
if isinstance(ly, nn.Conv2d):
nn.init.kaiming_normal_(ly.weight, a=1)
if not ly.bias is None: nn.init.constant_(ly.bias, 0)
class Chen_avg_pool(nn.Module):
def __init__(self, *args, **kwargs):
super(Chen_avg_pool, self).__init__()
self.resnet = Resnet18()
self.conv_avg = ConvBNReLU(512, 128, ks=1, stride=1, padding=0)
self.init_weight()
def forward(self, x):
avg = torch.mean(x, dim=(2, 3), keepdim=True)
print("avg.shape")
print(avg.shape)
avg = self.conv_avg(avg)
print("avg.shape222")
print(avg.shape)
return avg
def init_weight(self):
for ly in self.children():
if isinstance(ly, nn.Conv2d):
nn.init.kaiming_normal_(ly.weight, a=1)
if not ly.bias is None: nn.init.constant_(ly.bias, 0)
def get_params(self):
wd_params, nowd_params = [], []
for name, module in self.named_modules():
if isinstance(module, (nn.Linear, nn.Conv2d)):
wd_params.append(module.weight)
if not module.bias is None:
nowd_params.append(module.bias)
elif isinstance(module, nn.modules.batchnorm._BatchNorm):
nowd_params += list(module.parameters())
return wd_params, nowd_params
def save_onnx(model,x,model_file_name):
torch_out = torch.onnx.export(model, x,
model_file_name,
export_params=True,
verbose=True)
def save_scale_onnx(model_file_name):
model = model_file_name
onnx.save(onnx.shape_inference.infer_shapes(onnx.load(model)), model)
if __name__ == "__main__":
avg_pool_net = Chen_avg_pool()
x = torch.randn(16, 512, 20, 15)
resnet_out = avg_pool_net(x)
# print(resnet_out.shape)
# avg_pool_net.get_params()
model_file_name = "D:/pytorch_learning2022/5chen_segement_test2022/BiSeNet/chentest_print_mode/chen_avg_pool.onnx"
#打印网络结构
summary(avg_pool_net, input_size=(16, 512, 20, 15))
# #保存为onnx
save_onnx(avg_pool_net,x,model_file_name)
#保存为onnx 有尺寸
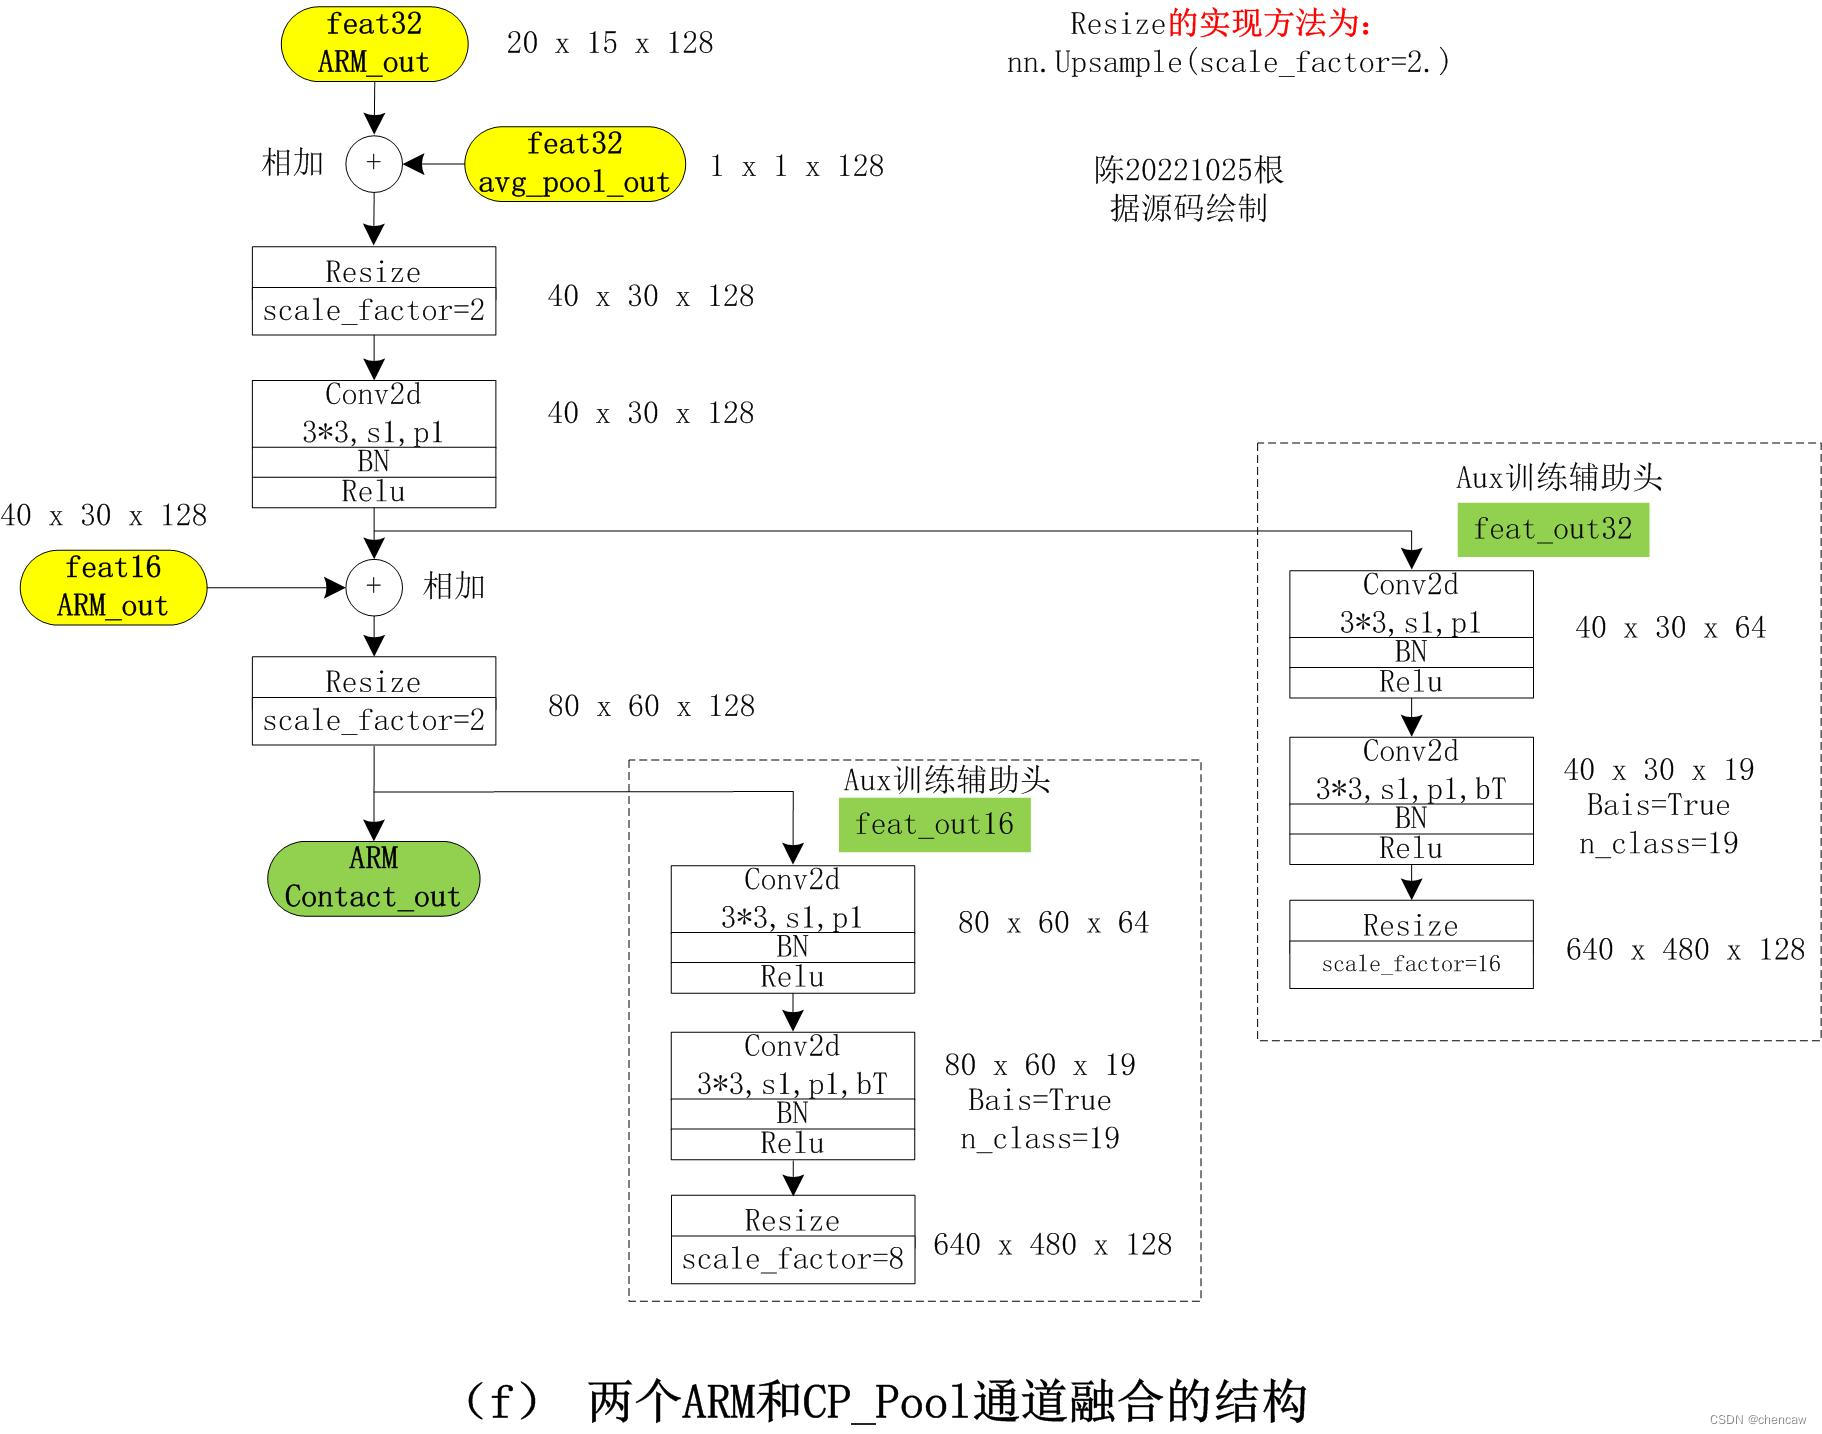
save_scale_onnx(model_file_name)3.11 语义通道连接的两个ARM模块和avg_pool输出的合并
(1)这三个模块是如何合并的?
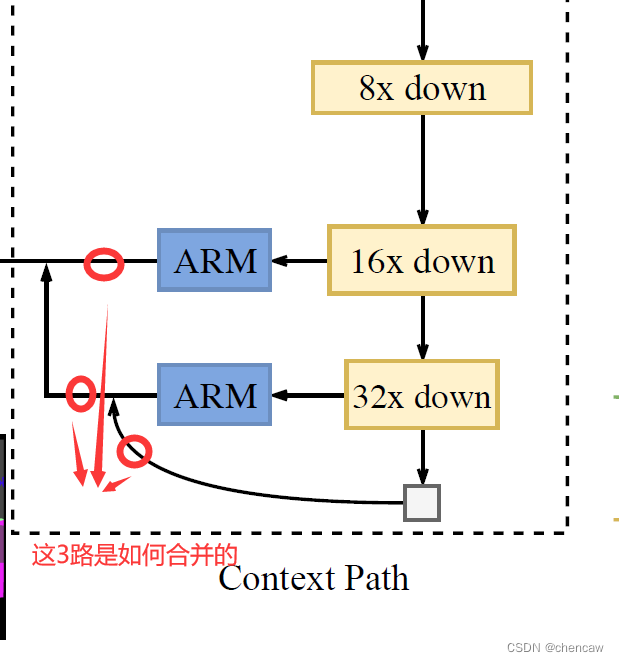
(2)手绘模块实现,其中的两个辅助输出头在训练的时候用到,推理测试的时候不用
(3)测试代码
#!/usr/bin/python
# -*- encoding: utf-8 -*-
import torch
import torch.nn as nn
import torch.nn.functional as F
import torch.utils.model_zoo as modelzoo
resnet18_url = 'https://download.pytorch.org/models/resnet18-5c106cde.pth'
# from resnet import Resnet18
from torch.nn import BatchNorm2d
#清晰打印网络结构
from torchinfo import summary
#保存为onnx
import torch
import torch.onnx
from torch.autograd import Variable
#导出有尺寸
import onnx
# from onnx import shape_inference
class ConvBNReLU(nn.Module):
def __init__(self, in_chan, out_chan, ks=3, stride=1, padding=1, *args, **kwargs):
super(ConvBNReLU, self).__init__()
self.conv = nn.Conv2d(in_chan,
out_chan,
kernel_size = ks,
stride = stride,
padding = padding,
bias = False)
self.bn = BatchNorm2d(out_chan)
self.relu = nn.ReLU(inplace=True)
self.init_weight()
def forward(self, x):
x = self.conv(x)
x = self.bn(x)
x = self.relu(x)
return x
def init_weight(self):
for ly in self.children():
if isinstance(ly, nn.Conv2d):
nn.init.kaiming_normal_(ly.weight, a=1)
if not ly.bias is None: nn.init.constant_(ly.bias, 0)
class BiSeNetOutput(nn.Module):
def __init__(self, in_chan, mid_chan, n_classes, up_factor=32, *args, **kwargs):
super(BiSeNetOutput, self).__init__()
self.up_factor = up_factor
out_chan = n_classes
self.conv = ConvBNReLU(in_chan, mid_chan, ks=3, stride=1, padding=1)
self.conv_out = nn.Conv2d(mid_chan, out_chan, kernel_size=1, bias=True)
self.up = nn.Upsample(scale_factor=up_factor,
mode='bilinear', align_corners=False)
self.init_weight()
def forward(self, x):
x = self.conv(x)
x = self.conv_out(x)
x = self.up(x)
return x
def init_weight(self):
for ly in self.children():
if isinstance(ly, nn.Conv2d):
nn.init.kaiming_normal_(ly.weight, a=1)
if not ly.bias is None: nn.init.constant_(ly.bias, 0)
def get_params(self):
wd_params, nowd_params = [], []
for name, module in self.named_modules():
if isinstance(module, (nn.Linear, nn.Conv2d)):
wd_params.append(module.weight)
if not module.bias is None:
nowd_params.append(module.bias)
elif isinstance(module, nn.modules.batchnorm._BatchNorm):
nowd_params += list(module.parameters())
return wd_params, nowd_params
class Chen_concate(nn.Module):
def __init__(self, *args, **kwargs):
super(Chen_concate, self).__init__()
self.conv_head32 = ConvBNReLU(128, 128, ks=3, stride=1, padding=1)
self.conv_head16 = ConvBNReLU(128, 128, ks=3, stride=1, padding=1)
self.up32 = nn.Upsample(scale_factor=2.)
self.up16 = nn.Upsample(scale_factor=2.)
self.conv_out16 = BiSeNetOutput(128, 64, 19, up_factor=8) #n_classes = 19,测试用
self.conv_out32 = BiSeNetOutput(128, 64, 19, up_factor=16) #n_classes = 19,测试用
self.init_weight()
def forward(self, arm16, arm32, avg_pool_arm32):
feat32_sum = arm32 + avg_pool_arm32
feat32_up = self.up32(feat32_sum)
feat32_up = self.conv_head32(feat32_up)
print("feat32_up.shape")
print(feat32_up.shape)
feat16_sum = arm16 + feat32_up
feat16_up = self.up16(feat16_sum)
feat16_up = self.conv_head16(feat16_up)
print("feat16_up.shape")
print(feat16_up.shape)
# aux_mode = 'train' #测试用,训练时
# if aux_mode == 'train':
feat_out16 = self.conv_out16(feat16_up)
feat_out32 = self.conv_out32(feat32_up)
return feat16_up, feat32_up ,feat_out16, feat_out32 # x8, x16 其中 feat16_up和feat32_up还可以用于辅助训练头
def init_weight(self):
for ly in self.children():
if isinstance(ly, nn.Conv2d):
nn.init.kaiming_normal_(ly.weight, a=1)
if not ly.bias is None: nn.init.constant_(ly.bias, 0)
def get_params(self):
wd_params, nowd_params = [], []
for name, module in self.named_modules():
if isinstance(module, (nn.Linear, nn.Conv2d)):
wd_params.append(module.weight)
if not module.bias is None:
nowd_params.append(module.bias)
elif isinstance(module, nn.modules.batchnorm._BatchNorm):
nowd_params += list(module.parameters())
return wd_params, nowd_params
# def save_onnx(model,x,model_file_name):
# torch_out = torch.onnx.export(model, x,
# model_file_name,
# export_params=True,
# verbose=True)
def save_onnx(model,x1, x2, x3, model_file_name):
torch_out = torch.onnx.export(model, (x1, x2, x3),
model_file_name,
export_params=True,
verbose=True)
def save_scale_onnx(model_file_name):
model = model_file_name
onnx.save(onnx.shape_inference.infer_shapes(onnx.load(model)), model)
if __name__ == "__main__":
arm_concate_net = Chen_concate()
x_feate16 = torch.randn(16, 128, 40, 30)
x_feate32 = torch.randn(16, 128, 20, 15)
x_feate32_pool = torch.randn(16, 128, 1, 1)
feat16_up, feat32_up ,conv_out16, conv_out32 = arm_concate_net(x_feate16, x_feate32, x_feate32_pool)
# print(resnet_out.shape)
# avg_pool_net.get_params()
model_file_name = "D:/pytorch_learning2022/5chen_segement_test2022/BiSeNet/chentest_print_mode/chen_concate.onnx"
# #打印网络结构
# summary(arm_concate_net, input_size=(16, 512, 20, 15))
#保存为onnx
save_onnx(arm_concate_net,x_feate16,x_feate32,x_feate32_pool,model_file_name)
# #保存为onnx 有尺寸
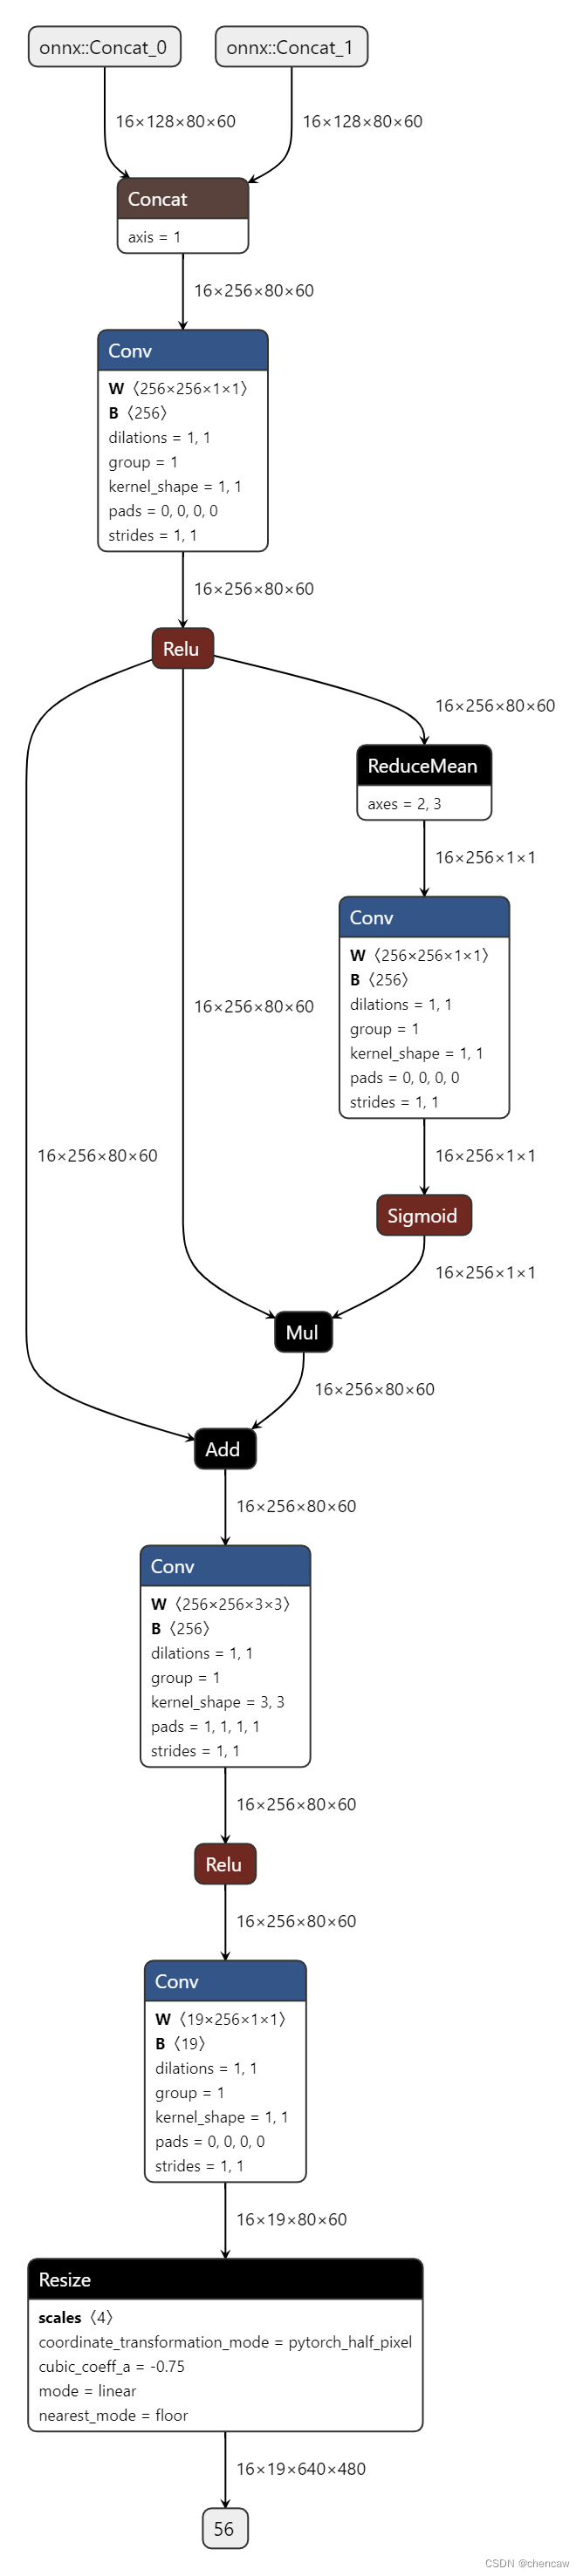
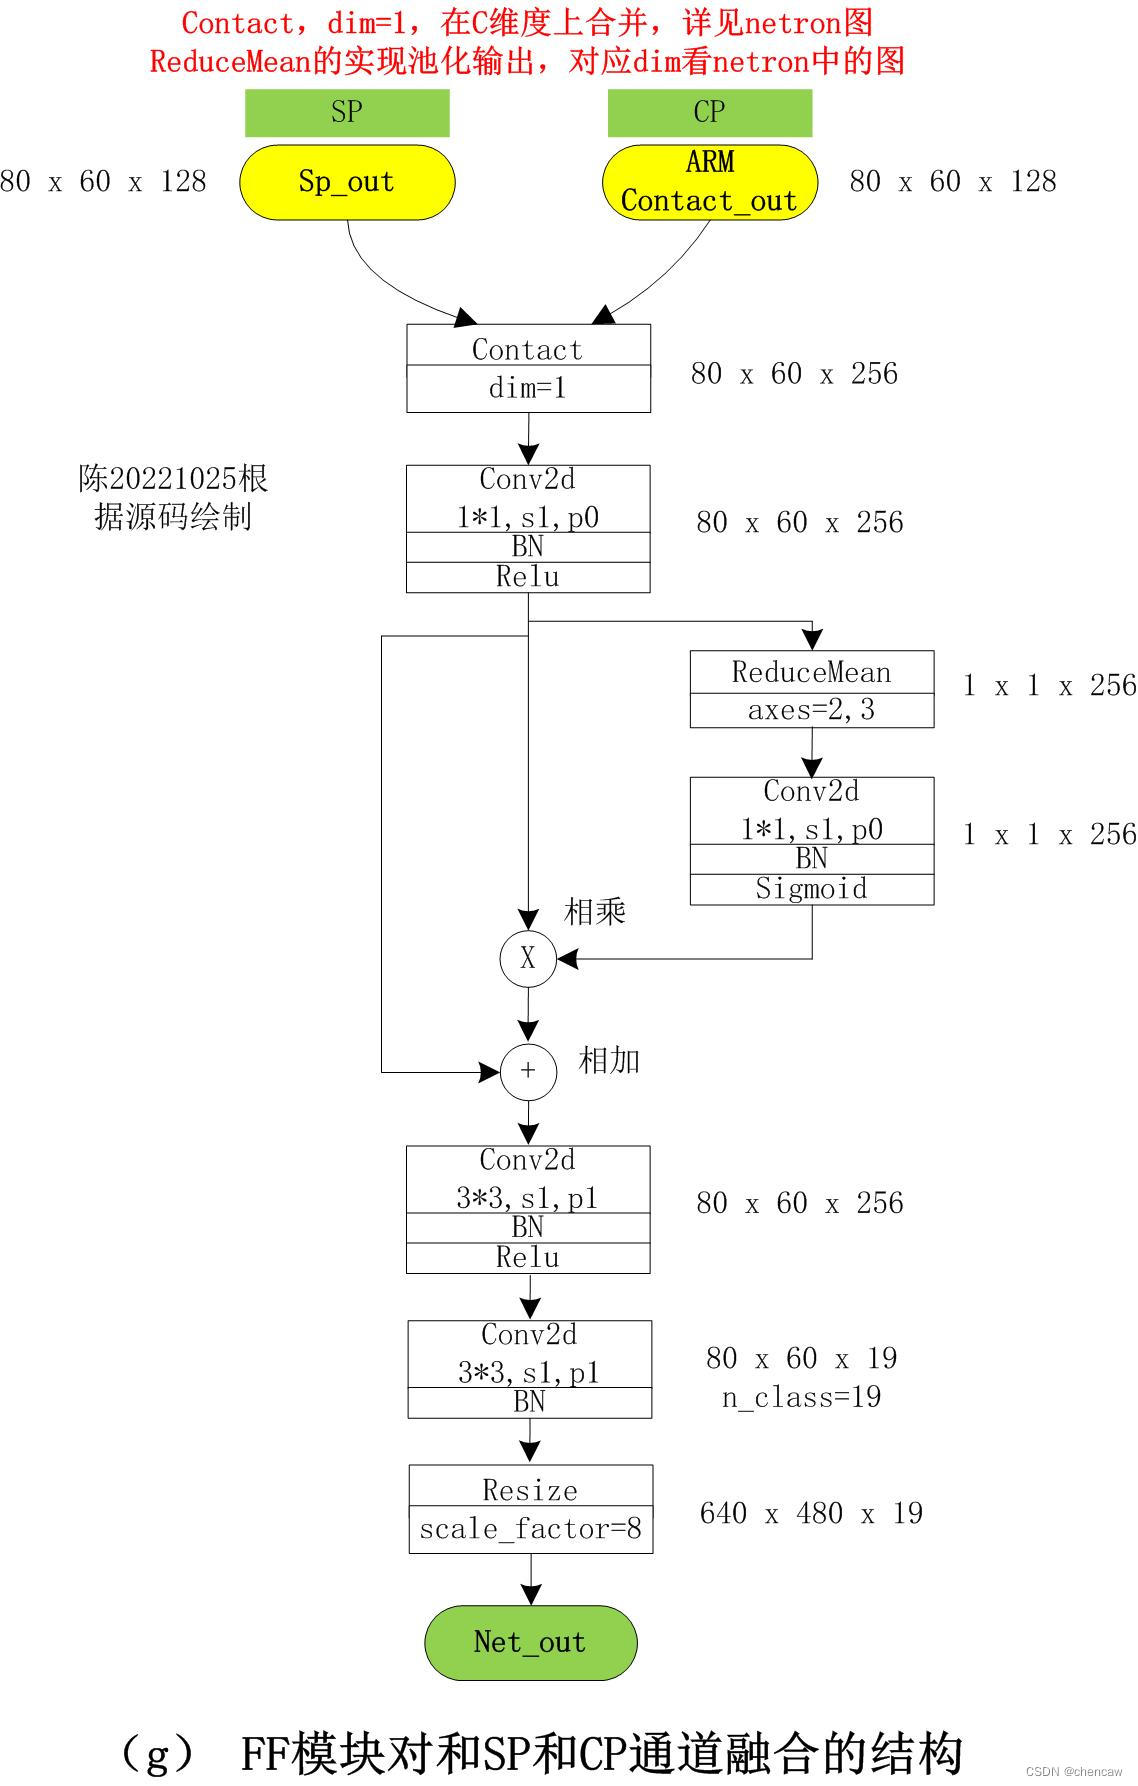
save_scale_onnx(model_file_name)3.12 FFM融合模块的输出
(1)融合模块的结构如下图所示
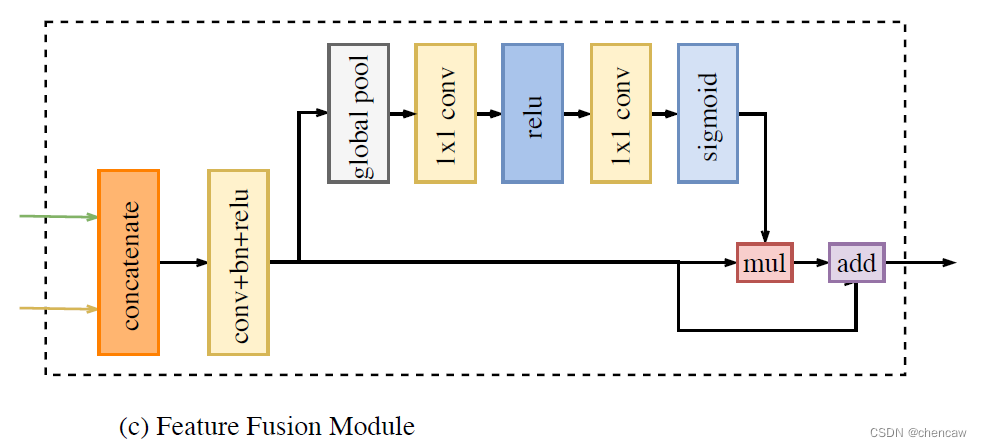
(2)手绘模块如下
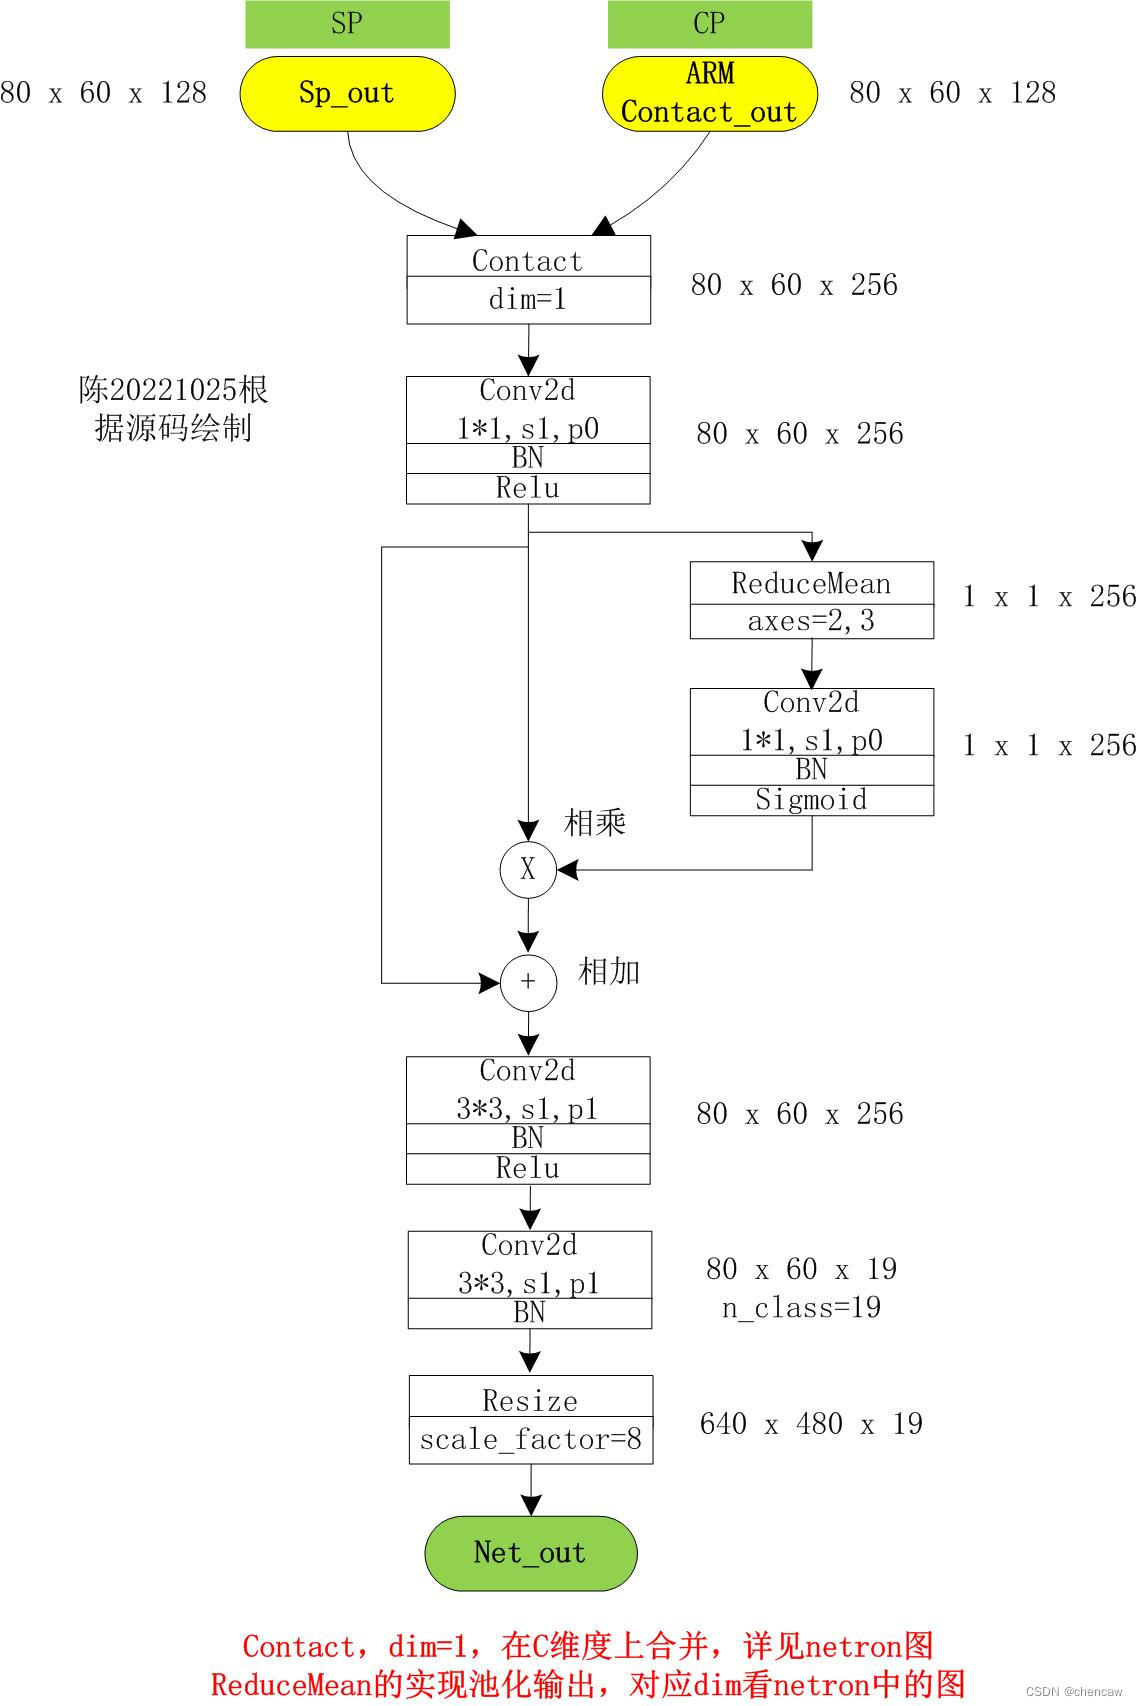
(3)netron导出
(4)测试代码
#!/usr/bin/python
# -*- encoding: utf-8 -*-

import torch
import torch.nn as nn
import torch.nn.functional as F
import torch.utils.model_zoo as modelzoo

from torch.nn import BatchNorm2d
#清晰打印网络结构
from    torchinfo import summary

#保存为onnx
import torch
import torch.onnx
from torch.autograd import Variable

#导出有尺寸
import onnx
# from onnx import shape_inference

class ConvBNReLU(nn.Module):

    def __init__(self, in_chan, out_chan, ks=3, stride=1, padding=1, *args, **kwargs):
        super(ConvBNReLU, self).__init__()
        self.conv = nn.Conv2d(in_chan,
                out_chan,
                kernel_size = ks,
                stride = stride,
                padding = padding,
                bias = False)
        self.bn = BatchNorm2d(out_chan)
        self.relu = nn.ReLU(inplace=True)
        self.init_weight()

    def forward(self, x):
        x = self.conv(x)
        x = self.bn(x)
        x = self.relu(x)
        return x

    def init_weight(self):
        for ly in self.children():
            if isinstance(ly, nn.Conv2d):
                nn.init.kaiming_normal_(ly.weight, a=1)
                if not ly.bias is None: nn.init.constant_(ly.bias, 0)


class FeatureFusionModule(nn.Module):
    def __init__(self, in_chan, out_chan, *args, **kwargs):
        super(FeatureFusionModule, self).__init__()
        self.convblk = ConvBNReLU(in_chan, out_chan, ks=1, stride=1, padding=0)
        ## use conv-bn instead of 2 layer mlp, so that tensorrt 7.2.3.4 can work for fp16
        self.conv = nn.Conv2d(out_chan,
                out_chan,
                kernel_size = 1,
                stride = 1,
                padding = 0,
                bias = False)
        self.bn = nn.BatchNorm2d(out_chan)
        #  self.conv1 = nn.Conv2d(out_chan,
        #          out_chan//4,
        #          kernel_size = 1,
        #          stride = 1,
        #          padding = 0,
        #          bias = False)
        #  self.conv2 = nn.Conv2d(out_chan//4,
        #          out_chan,
        #          kernel_size = 1,
        #          stride = 1,
        #          padding = 0,
        #          bias = False)
        #  self.relu = nn.ReLU(inplace=True)
        self.init_weight()

    def forward(self, fsp, fcp):
        print("fsp.shape",fsp.shape)
        print("fcp.shape",fcp.shape)
        fcat = torch.cat([fsp, fcp], dim=1)
        print("fcat.shape",fcat.shape)


        feat = self.convblk(fcat)
        atten = torch.mean(feat, dim=(2, 3), keepdim=True)
        atten = self.conv(atten)
        atten = self.bn(atten)
        #  atten = self.conv1(atten)
        #  atten = self.relu(atten)
        #  atten = self.conv2(atten)
        atten = atten.sigmoid()
        feat_atten = torch.mul(feat, atten)
        feat_out = feat_atten + feat
        return feat_out

    def init_weight(self):
        for ly in self.children():
            if isinstance(ly, nn.Conv2d):
                nn.init.kaiming_normal_(ly.weight, a=1)
                if not ly.bias is None: nn.init.constant_(ly.bias, 0)

    def get_params(self):
        wd_params, nowd_params = [], []
        for name, module in self.named_modules():
            if isinstance(module, (nn.Linear, nn.Conv2d)):
                wd_params.append(module.weight)
                if not module.bias is None:
                    nowd_params.append(module.bias)
            elif isinstance(module, nn.modules.batchnorm._BatchNorm):
                nowd_params += list(module.parameters())
        return wd_params, nowd_params


class BiSeNetOutput(nn.Module):

    def __init__(self, in_chan, mid_chan, n_classes, up_factor=32, *args, **kwargs):
        super(BiSeNetOutput, self).__init__()
        self.up_factor = up_factor
        out_chan = n_classes
        self.conv = ConvBNReLU(in_chan, mid_chan, ks=3, stride=1, padding=1)
        self.conv_out = nn.Conv2d(mid_chan, out_chan, kernel_size=1, bias=True)
        self.up = nn.Upsample(scale_factor=up_factor,
                mode='bilinear', align_corners=False)
        self.init_weight()

    def forward(self, x):
        x = self.conv(x)
        x = self.conv_out(x)
        x = self.up(x)
        return x

    def init_weight(self):
        for ly in self.children():
            if isinstance(ly, nn.Conv2d):
                nn.init.kaiming_normal_(ly.weight, a=1)
                if not ly.bias is None: nn.init.constant_(ly.bias, 0)

    def get_params(self):
        wd_params, nowd_params = [], []
        for name, module in self.named_modules():
            if isinstance(module, (nn.Linear, nn.Conv2d)):
                wd_params.append(module.weight)
                if not module.bias is None:
                    nowd_params.append(module.bias)
            elif isinstance(module, nn.modules.batchnorm._BatchNorm):
                nowd_params += list(module.parameters())
        return wd_params, nowd_params


class Chen_BiSeNetV1_FFM_TEST(nn.Module):

    def __init__(self, n_classes,aux_mode='train', *args, **kwargs):
        super(Chen_BiSeNetV1_FFM_TEST, self).__init__()
        # self.cp = cp
        # self.sp = sp
        self.ffm = FeatureFusionModule(256, 256)
        self.conv_out = BiSeNetOutput(256, 256, n_classes, up_factor=8)
        self.aux_mode = aux_mode
        if self.aux_mode == 'train':
            self.conv_out16 = BiSeNetOutput(128, 64, n_classes, up_factor=8)
            self.conv_out32 = BiSeNetOutput(128, 64, n_classes, up_factor=16)
        self.init_weight()

    def forward(self, cp, sp):
        # H, W = x.size()[2:]
        # feat_cp8, feat_cp16 = self.cp(x)
        # print("feat_cp8.shape")
        # print(feat_cp8.shape)
        # print("feat_cp16.shape")
        # print(feat_cp16.shape)

        # feat_sp = self.sp(x)
        feat_fuse = self.ffm(sp, cp)

        feat_out = self.conv_out(feat_fuse)
        #辅助输出头已在上面说过,测试的输出先不管
        # if self.aux_mode == 'train':
        #     feat_out16 = self.conv_out16(feat_cp8)
        #     feat_out32 = self.conv_out32(feat_cp16)
        #     return feat_out, feat_out16, feat_out32
        # elif self.aux_mode == 'eval':
        #     return feat_out,
        # elif self.aux_mode == 'pred':
        #     feat_out = feat_out.argmax(dim=1)
        #     return feat_out
        # else:
        #     raise NotImplementedError
        return feat_out

    def init_weight(self):
        for ly in self.children():
            if isinstance(ly, nn.Conv2d):
                nn.init.kaiming_normal_(ly.weight, a=1)
                if not ly.bias is None: nn.init.constant_(ly.bias, 0)

    def get_params(self):
        wd_params, nowd_params, lr_mul_wd_params, lr_mul_nowd_params = [], [], [], []
        for name, child in self.named_children():
            child_wd_params, child_nowd_params = child.get_params()
            if isinstance(child, (FeatureFusionModule, BiSeNetOutput)):
                lr_mul_wd_params += child_wd_params
                lr_mul_nowd_params += child_nowd_params
            else:
                wd_params += child_wd_params
                nowd_params += child_nowd_params
        return wd_params, nowd_params, lr_mul_wd_params, lr_mul_nowd_params


def save_onnx(model,x1, x2, model_file_name):
    torch_out = torch.onnx.export(model, (x1, x2),
                              model_file_name,
                               export_params=True,
                               verbose=True)

def save_scale_onnx(model_file_name):
    model = model_file_name
    onnx.save(onnx.shape_inference.infer_shapes(onnx.load(model)), model)


if __name__ == "__main__":
    cp_input = torch.randn(16, 128, 80, 60)  #[B,C,W,H]
    sp_input = torch.randn(16, 128, 80, 60)  #[B,C,W,H]

    ffm_net = Chen_BiSeNetV1_FFM_TEST(19)


    feat_out = ffm_net(cp_input, sp_input)
    # print(resnet_out.shape)
    # avg_pool_net.get_params()

    model_file_name = "D:/pytorch_learning2022/5chen_segement_test2022/BiSeNet/chentest_print_mode/chen_ffm.onnx"
    # #打印网络结构
    # summary(arm_concate_net, input_size=(16, 512, 20, 15))
    #保存为onnx
    save_onnx(ffm_net,cp_input,sp_input,model_file_name)
    # #保存为onnx 有尺寸
    save_scale_onnx(model_file_name)
4 BiseNet V1的网络结构完整展示
基于github的代码,手绘。可能有误。
注意:
(1)实际网络对应的输入通道排布为[B,C,W,H],我手绘的图都是使用了[W,H,C]。
(2)其中的两个辅助输出头在训练的时候用到,推理测试的时候不用。
(3)测试的时候,最终输出需要加上
        elif self.aux_mode == 'pred':
            feat_out = feat_out.argmax(dim=1)
4.1 整体结构
4.2 SP通道
(1)下采样了8倍,Sp_out的输出大小为80*60*128
4.3 CP通道中的骨干网络Resnet结构
(1)输出头feat16的大小为40*30*256
(2)输出头feat32的大小为20*15*512
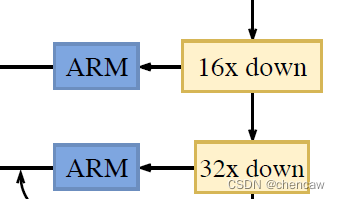
4.4 ARM结构对Resnet骨干网络输出feat16和feat32的操作
(1)feat16相乘后的输出是40*30*128
(2)feat32相乘后的输出是20*15*128
4.5 平均池化模块CP_POOL对feat32的输出
(1)输入是20*15*512;输出是1*1*128
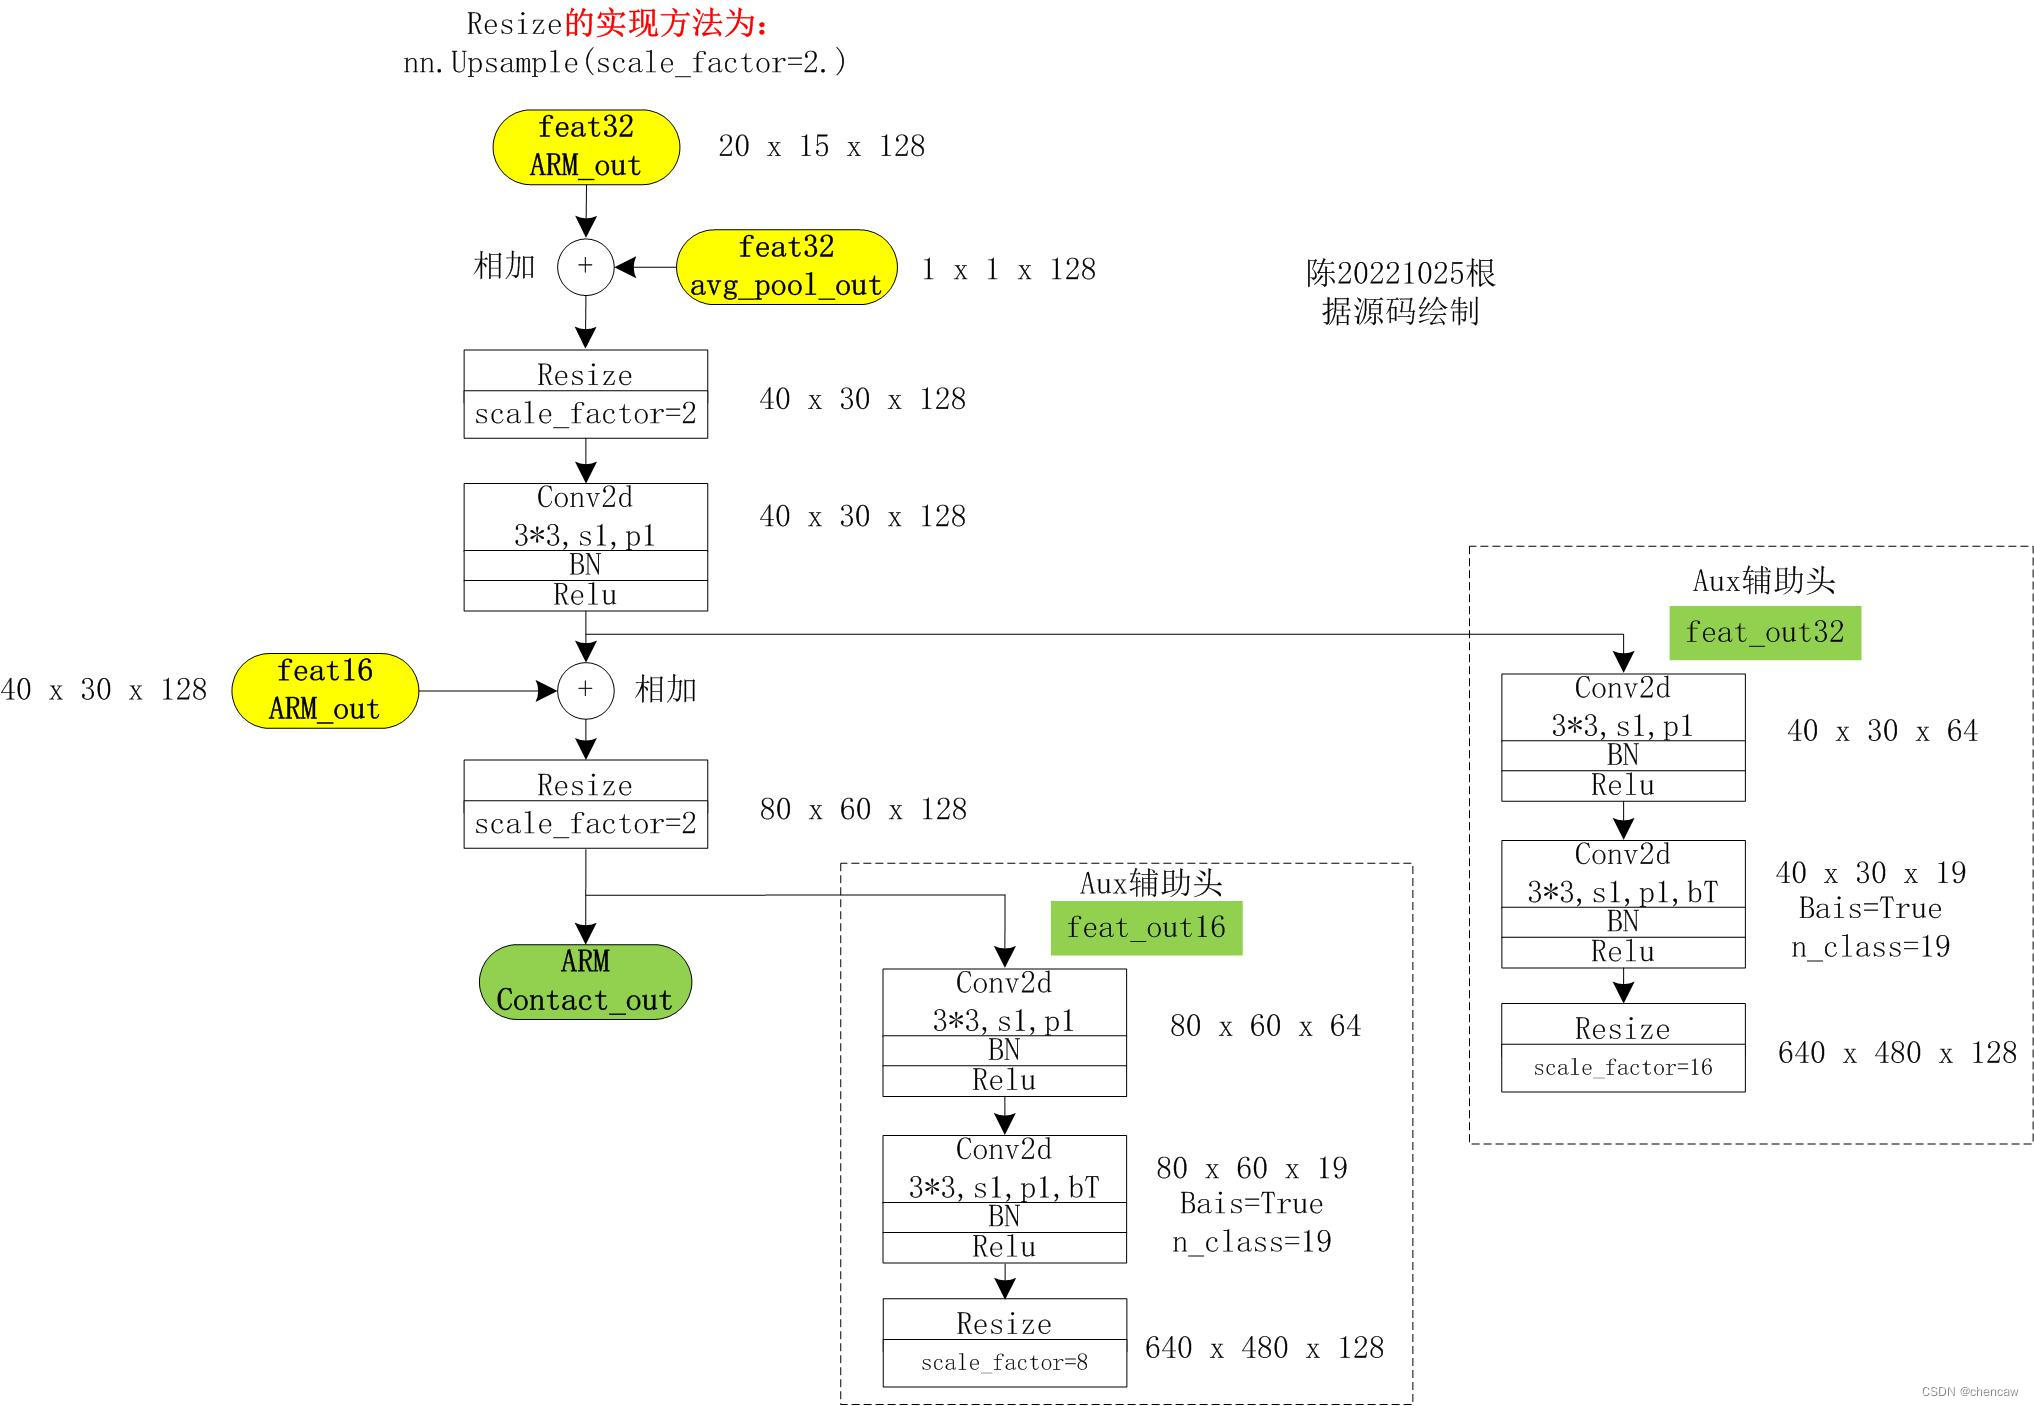
4.6 ARM_Contact模块的融合输出
(1)其中的Aux训练辅助头feat_out32和feat_out16只在训练的时候用到;
(2)融合后的输出ARM Contact_out的大小为80*60*128
(3)该输出作为CP通道的处理结果,直接给下面的FFM模块使用
4.7 FFM模块对SP和CP通道处理结果的融合输出
(1)其中一个输入为SP通道的输出,大小为80*60*128
(2)其中另一个输入为CP通道的处理结果,大小为80*60*128
(3)最终的输出和分类个数有关,大小为640*480*19;其中测试分类个数为19
5 BiseNet V2网络的原理
5.1 主要参考
语义分割 | 轻量级实时分割经典BiSeNet及其进化BiSeNet V2_AI算法修炼营的博客-优快云博客_轻量级分割算法
5.2 论文地址
(1)下载的地址
https://arxiv.org/abs/2004.02147
(2)论文题目(翻译一下看看挺有意思)
BiSeNet V2: Bilateral Network with Guided Aggregation for Real-time Semantic Segmentation
BiSeNet V2:用于实时语义分割的引导聚合双边网络
5.3 论文主要贡献
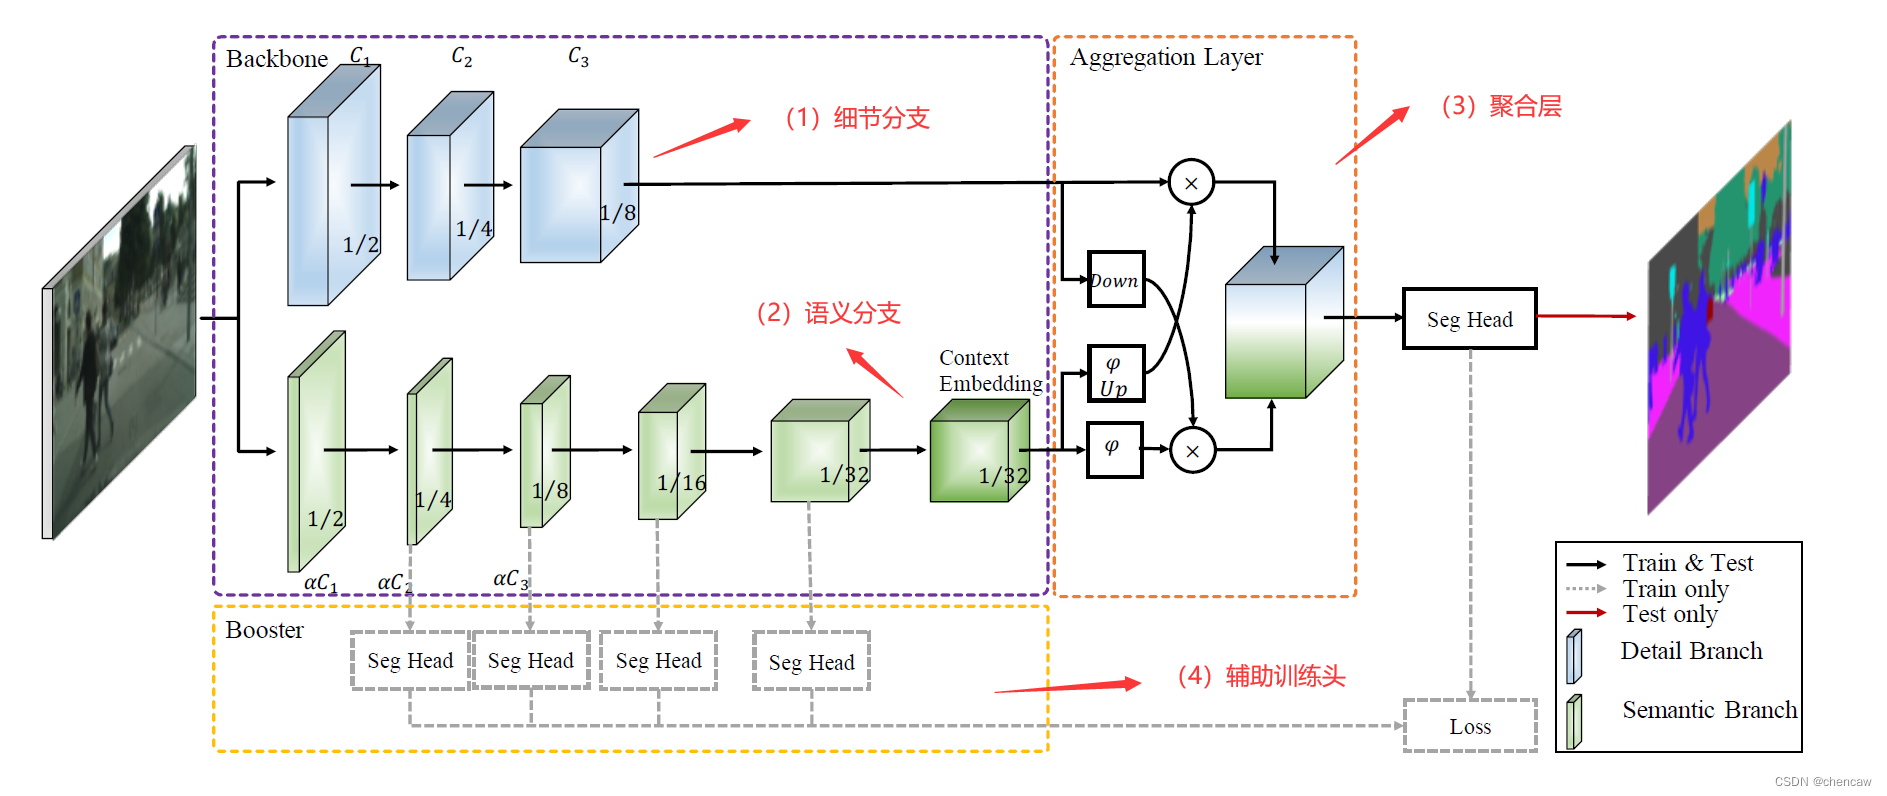
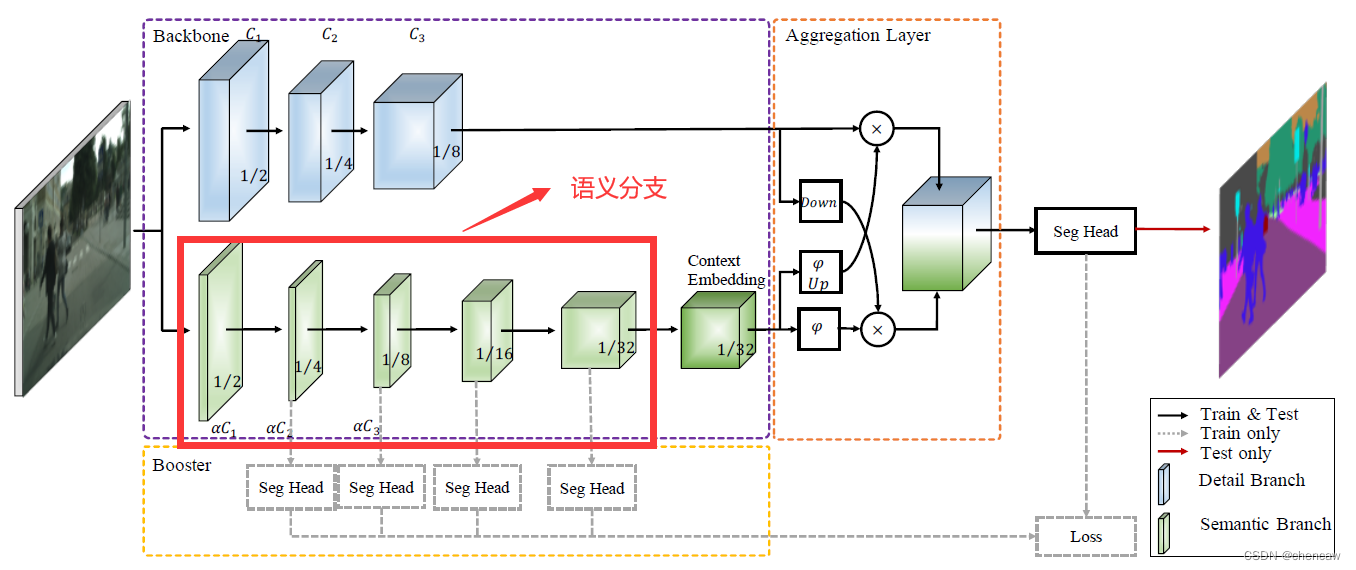
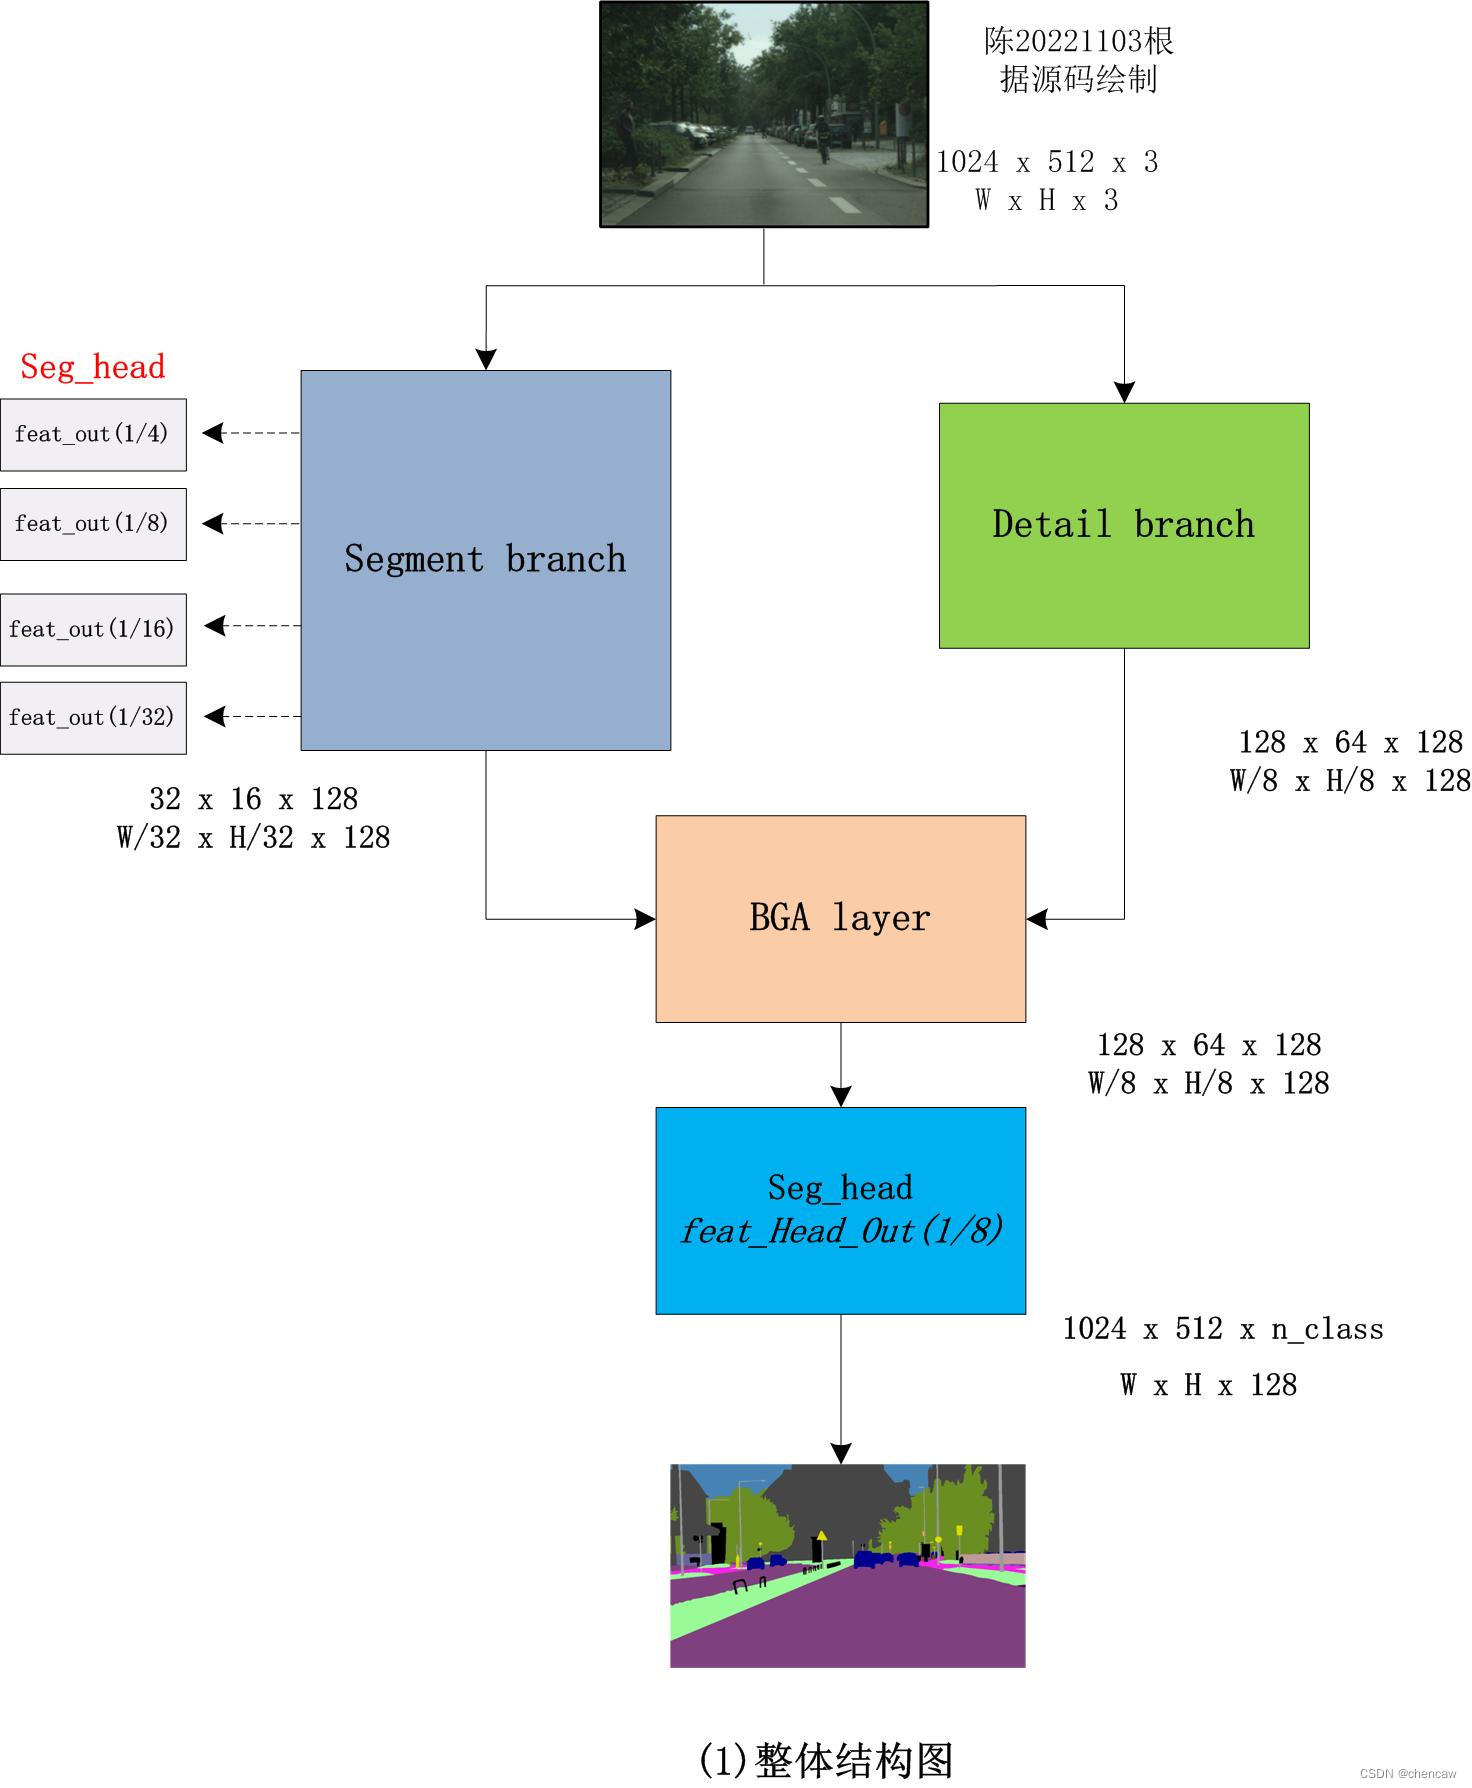
(1)BiSeNet V2将这些空间细节和分类语义分开处理,以实现高精度和高效率的实时语义分割。为此,提出了一个有效的架构,在速度和精度之间进行权衡,称为双边分割网络(BiSeNet V2)。该体系结构包括:(1)一个细节分支(Detail Branch),具有宽通道和浅层,用于捕获低层细节并生成高分辨率的特征表示;(2)一个语义分支(Semantic Branch),通道窄,层次深,获取高层次语义语境。语义分支是轻量级的,因为它减少了通道容量和快速下采样策略。此外,设计了一个引导聚合层来增强相互连接和融合这两种类型的特征表示。此外,还设计了一种增强型训练策略,在不增加任何推理代价的情况下提高分割性能。
(2)主要贡献:
PS:碎碎念翻译,哈哈
(1)提出了一种用于实时语义分割的有效和高效的两通道网络结构:双边分割网络。该网络将空间信息和语义分类分开来处理。
(2)在语义分支我们设计了一种新的轻量级、基于深度可分离卷积网络,以增强感受野并捕获丰富的上下文信息。(PS:mobilenet的套路)
(3)引入了增强训练策略(PS:引入了多个训练辅助头,google net套路),在不增加推理成本的情况下进一步提高分割性能。
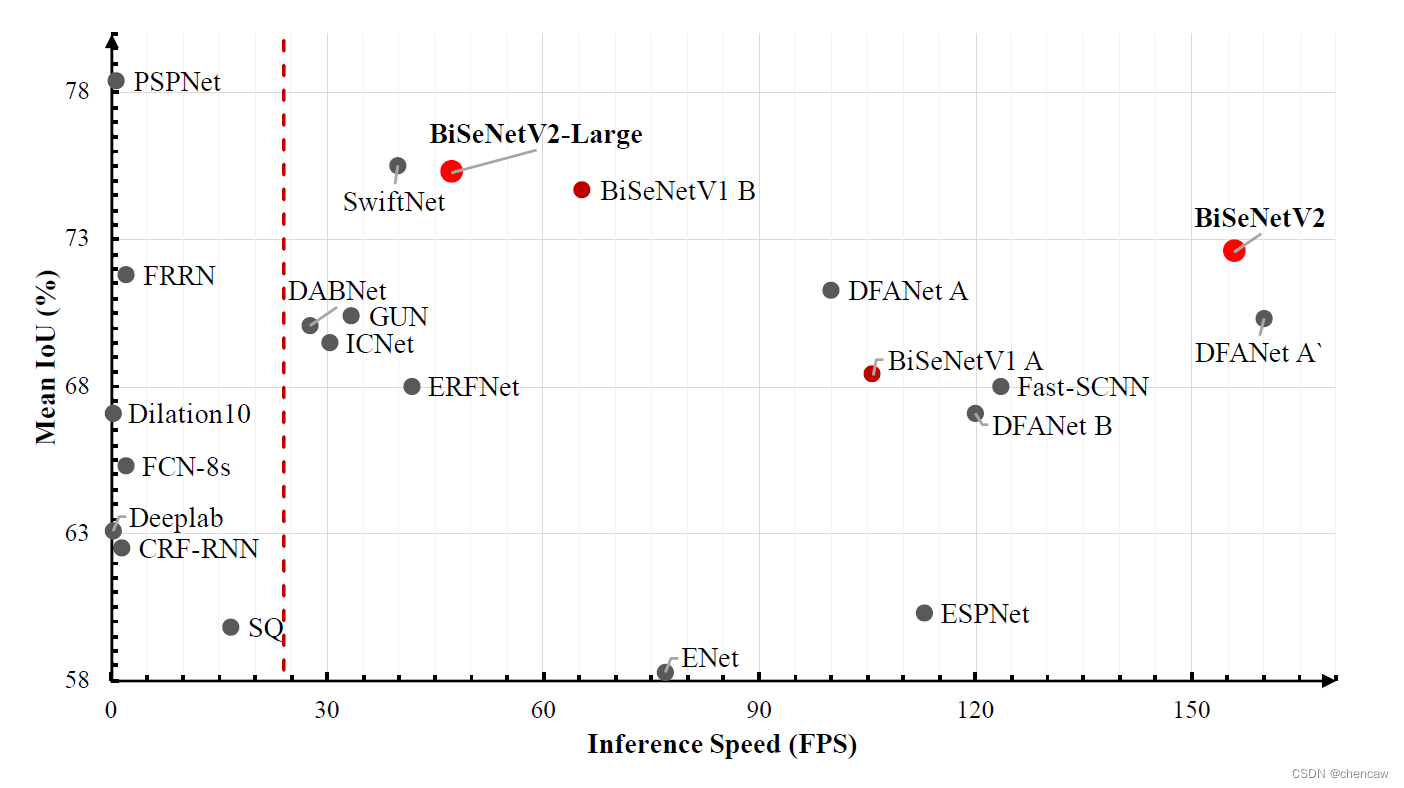
(4)在Cityscapes、CamVid和COCO-Stuff三个数据集上取得了很好的效果,单卡GTX1080TI,推理速度156 FPS
(3)SOTA
(4)和bisenetV1相比的改进
- (1)我们简化了原始结构,为实时语义分割提供了一个高效的架构。我们删除了原始版本中耗时的跨层连接,以获得更清晰、更简单的架构。
(2)我们用更紧凑的网络结构和精心设计的组件重新设计了整体架构。具体来说,我们深化细节分支(we deepen the Detail Path)以获得更多细节。在语义分支(Semantic Path)上,设计了基于深度可分离卷积的轻量化模块。同时,我们提出了一种有效的聚合层,以增强两条路径之间的相互连接。
我们进行了全面的消融实验,以阐述所提出方法的有效性和效率。
比起V1来,提高了速度156fps,单卡GTX1080TI
5.4 当前别人用的backbone及问题
当前其他人获得好的语义分割的两种类型骨干网络:
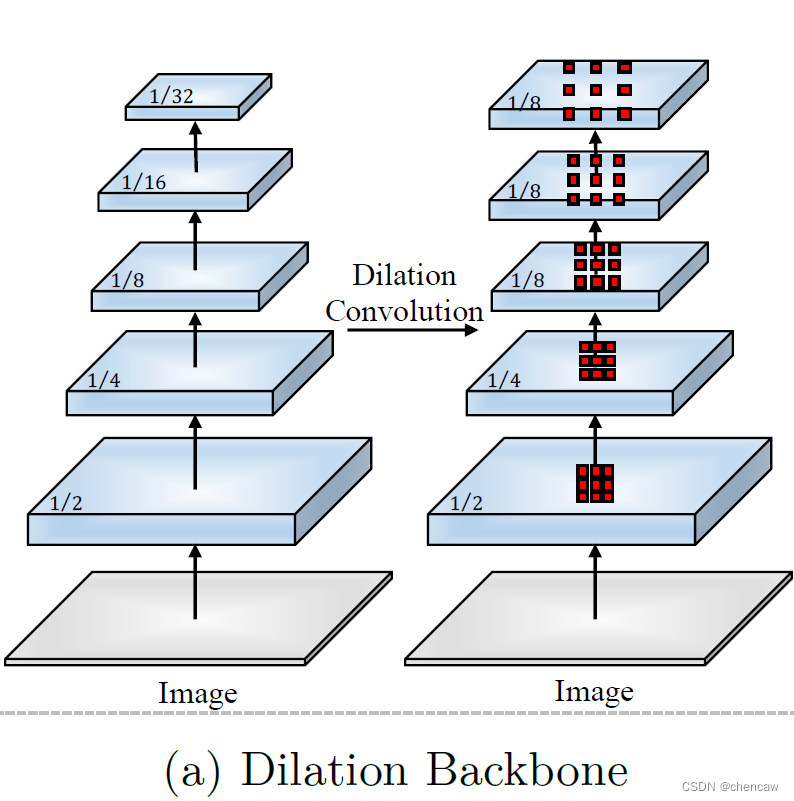
(1)空洞卷积的骨干网络(Dilation Backbone):通过去除下采样操作,并使用相应的滤波器核上采样以保持高分辨率特征表示。

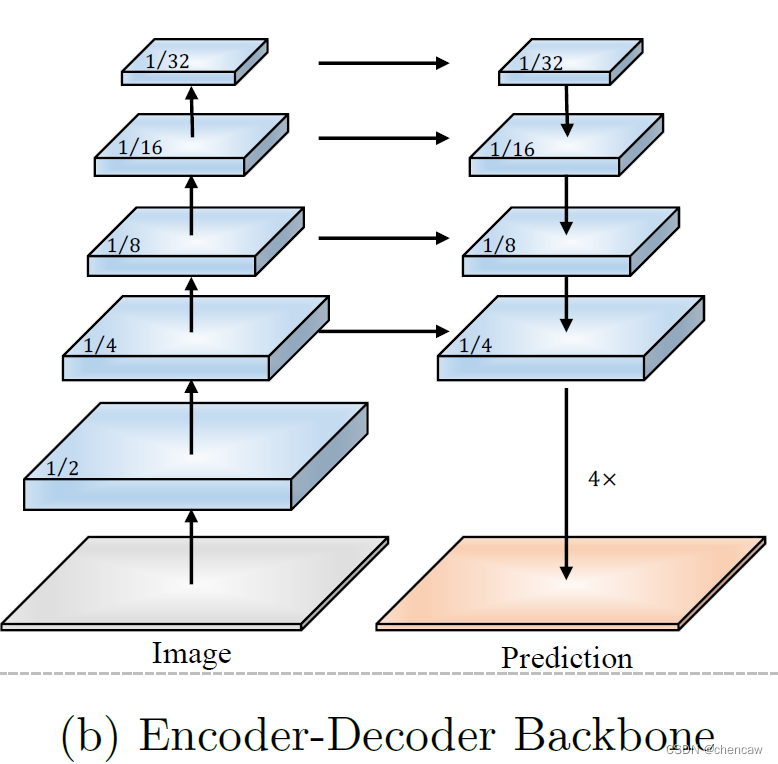
(2)编码解码骨干网络(Encoder-Decoder Backbone):使用自上而下和跳过连接来恢复解码器部分中的高分辨率特征表示。
(3)上述网络的问题:
- 然而,这两种架构都是为一般的语义分割任务设计的,而不太关心推理速度和计算成本。在空洞卷积的骨干网络(Dilation Backbone,空洞卷积是耗时的,并且去除下采样操作会带来很大的计算复杂性和内存占用。
- 编码解码骨干网络(Encoder-Decoder Backbone)中的许多连接对存储器访问成本不太友好(Ma等人,2018)。然而,实时语义分割应用要求高效的推理速度。
5.5 网络的结构
网络的结构如下图所示:
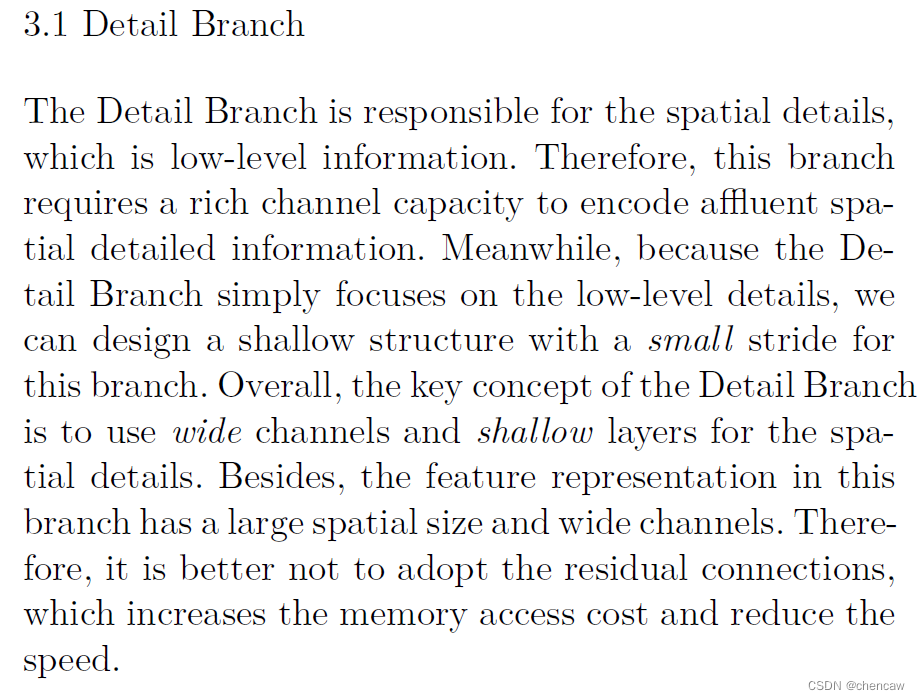
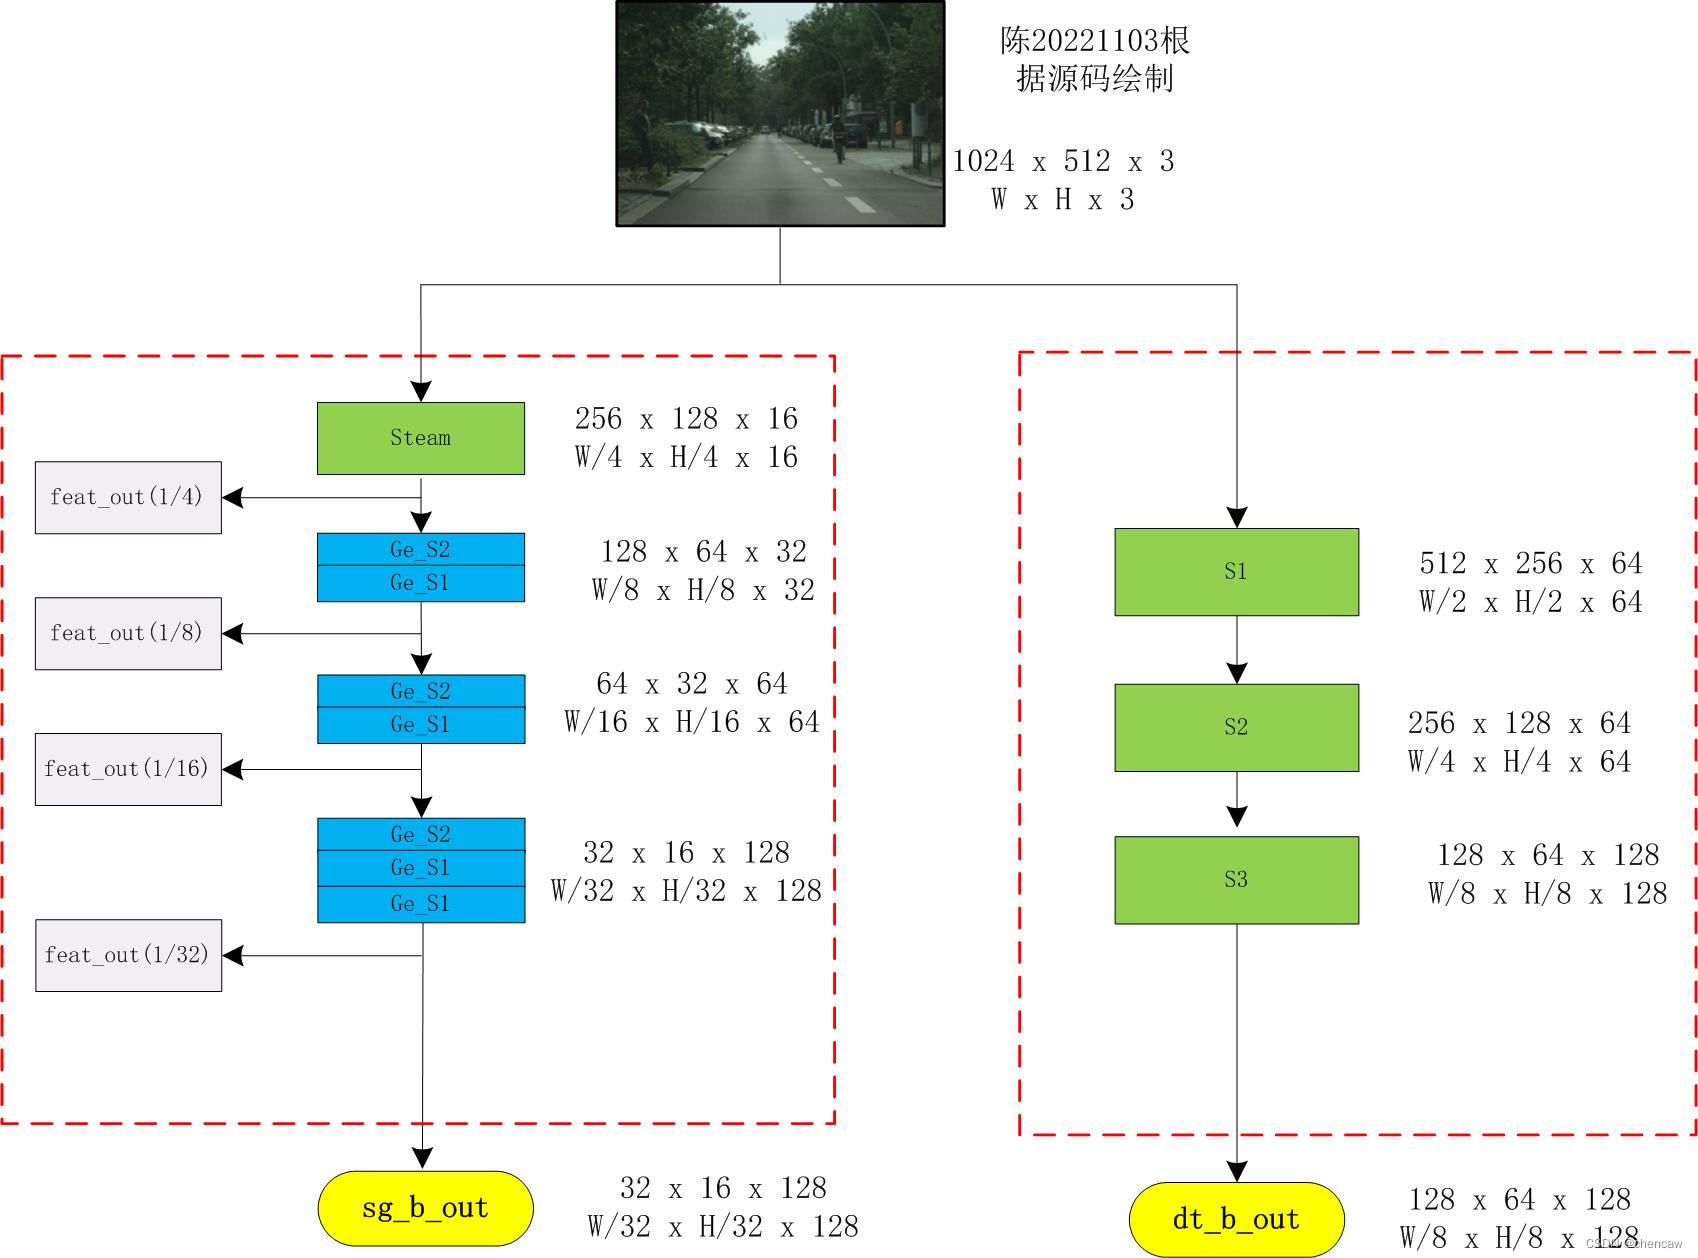
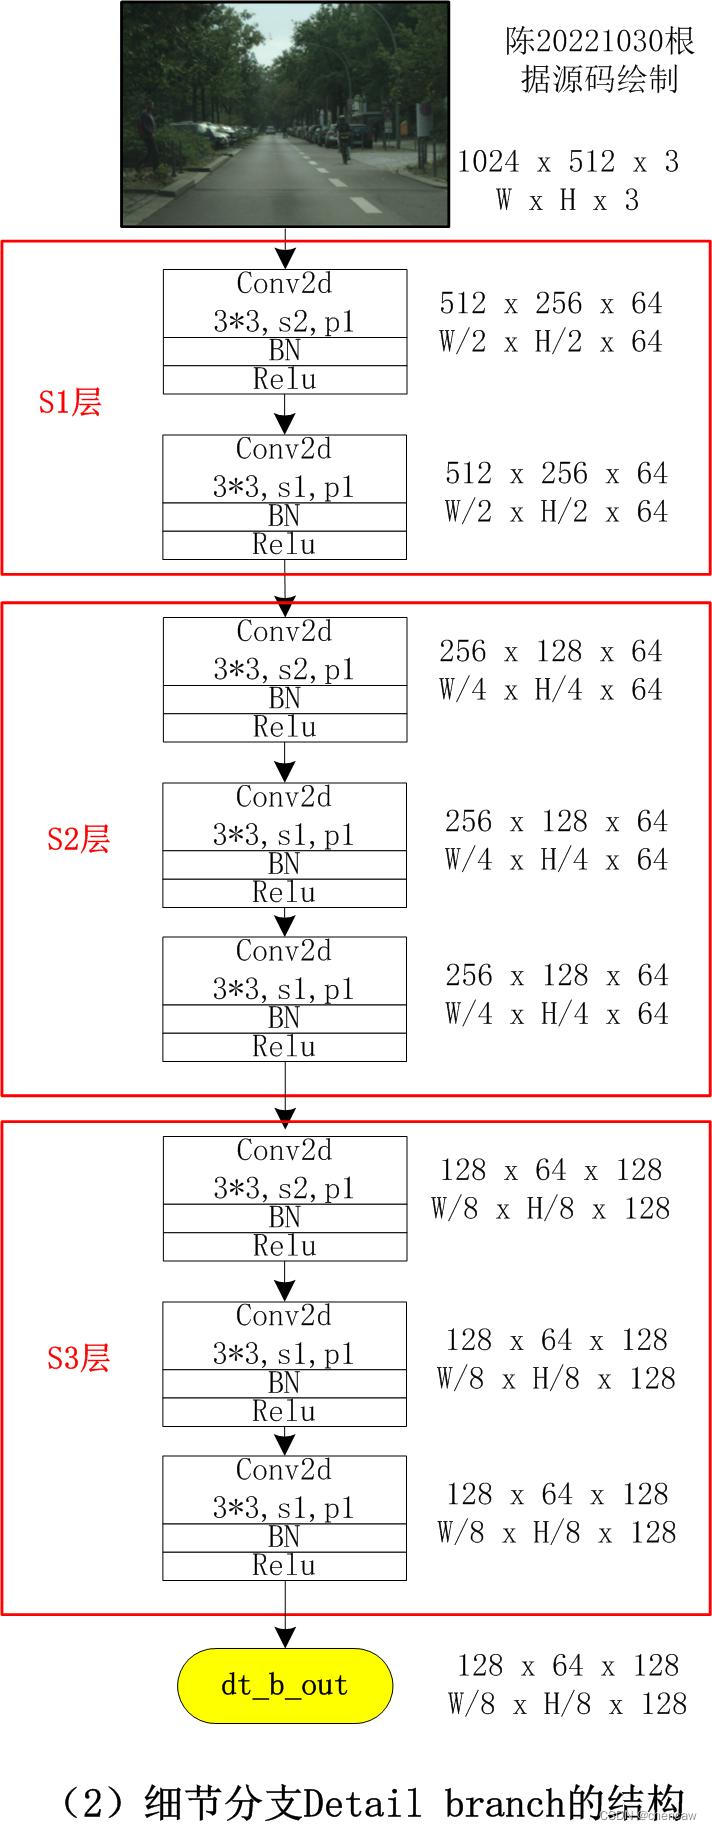
5.6细节分支Detail Branch
(1)原文描述
细节分支负责空间细节,这是低层次的信息。因此,该分支需要丰富的channel容量来编码丰富的空间细节信息。同时,由于细节分支只关注底层细节,因此我们可以为该分支设计一个步幅较小的浅层结构。总体而言,细节分支的关键概念是使用宽通道和浅层来处理空间细节。此外,该分支中的特征表示具有大的空间尺寸和宽的通道。因此,最好不要采用残差(resdiual)连接,这会增加内存访问成本并降低速度。
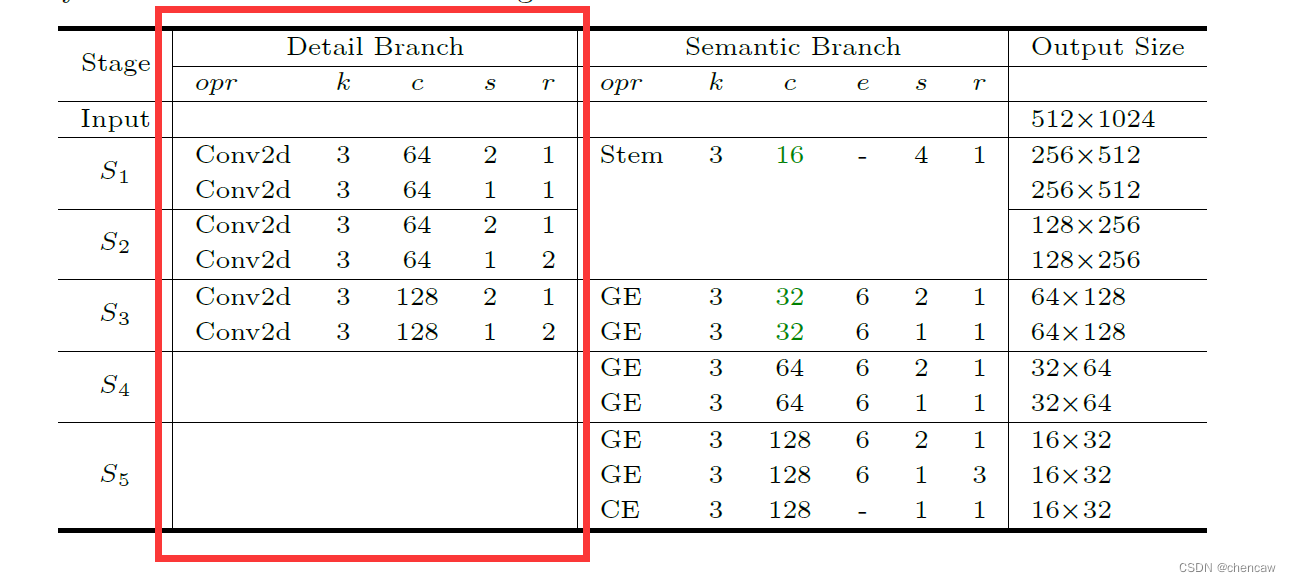
(2)原文中的网络结构描述
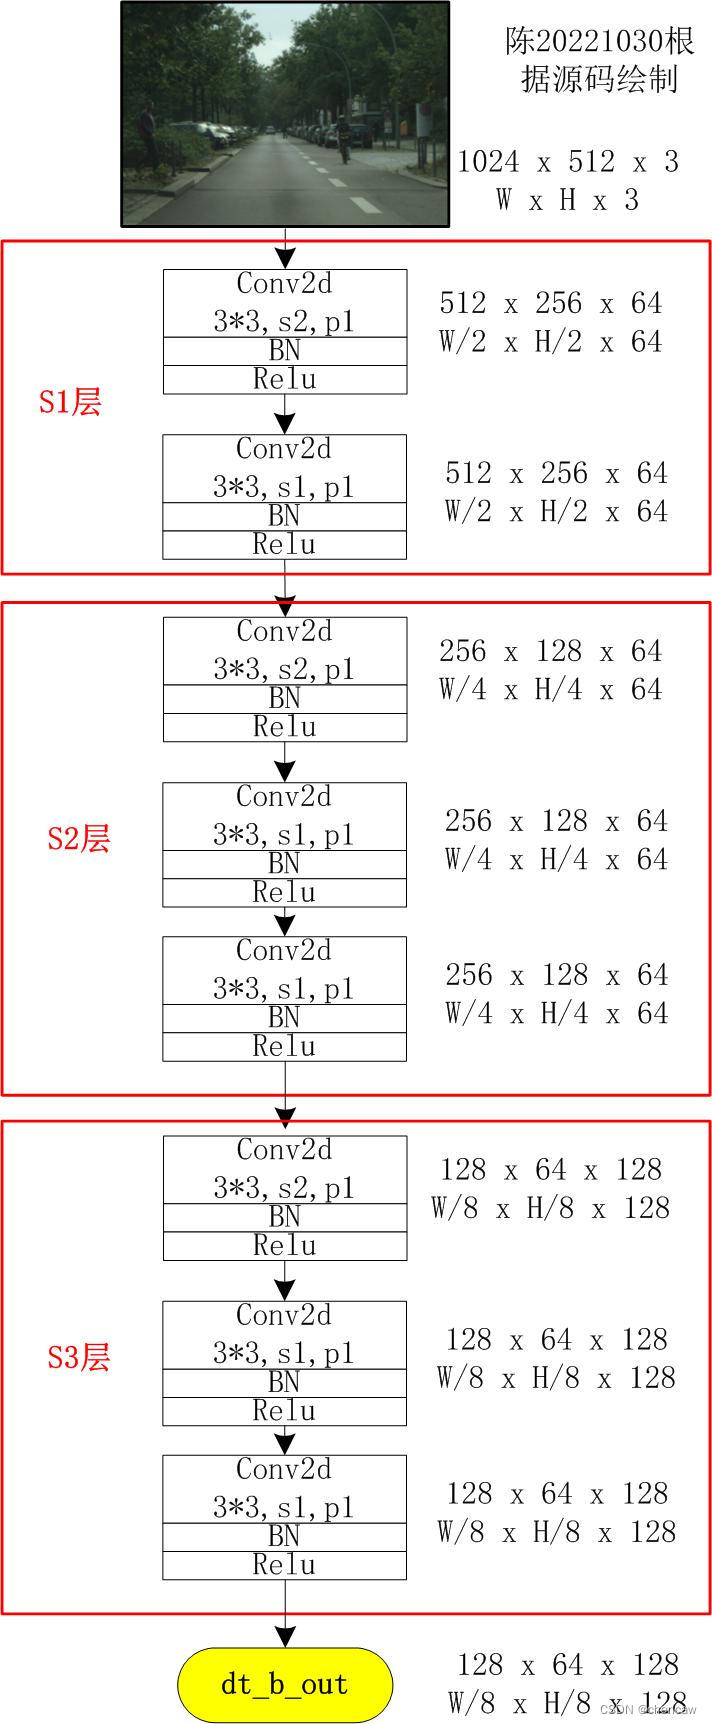
(3)测试代码chentest_v2_detialbranch.py
import torch
import torch.nn as nn
import torch.nn.functional as F
import torchvision

# from resnet import Resnet18

from torch.nn import BatchNorm2d

#清晰打印网络结构
from torchinfo import summary

#保存为onnx
import torch
import torch.onnx
from torch.autograd import Variable

#导出有尺寸
import onnx
# from onnx import shape_inference

class ConvBNReLU(nn.Module):

    def __init__(self, in_chan, out_chan, ks=3, stride=1, padding=1,
                 dilation=1, groups=1, bias=False):
        super(ConvBNReLU, self).__init__()
        self.conv = nn.Conv2d(
                in_chan, out_chan, kernel_size=ks, stride=stride,
                padding=padding, dilation=dilation,
                groups=groups, bias=bias)
        self.bn = nn.BatchNorm2d(out_chan)
        self.relu = nn.ReLU(inplace=True)

    def forward(self, x):
        feat = self.conv(x)
        feat = self.bn(feat)
        feat = self.relu(feat)
        return feat


class DetailBranch(nn.Module):

    def __init__(self):
        super(DetailBranch, self).__init__()
        self.S1 = nn.Sequential(
            ConvBNReLU(3, 64, 3, stride=2),
            ConvBNReLU(64, 64, 3, stride=1),
        )
        self.S2 = nn.Sequential(
            ConvBNReLU(64, 64, 3, stride=2),
            ConvBNReLU(64, 64, 3, stride=1),
            ConvBNReLU(64, 64, 3, stride=1),
        )
        self.S3 = nn.Sequential(
            ConvBNReLU(64, 128, 3, stride=2),
            ConvBNReLU(128, 128, 3, stride=1),
            ConvBNReLU(128, 128, 3, stride=1),
        )

    def forward(self, x):
        feat = self.S1(x)
        feat = self.S2(feat)
        feat = self.S3(feat)
        return feat

def save_onnx(model,x,model_file_name):
    torch_out = torch.onnx.export(model, x,
                              model_file_name,
                               export_params=True,
                               verbose=True)

def save_scale_onnx(model_file_name):
    model = model_file_name
    onnx.save(onnx.shape_inference.infer_shapes(onnx.load(model)), model)

if __name__ == "__main__":

    dt_net = DetailBranch()
    x = torch.randn(16, 3, 1024, 512)
    dt_out = dt_net(x)
    print(dt_out.shape)


    model_file_name = "D:/pytorch_learning2022/5chen_segement_test2022/BiSeNet/chentest_v2_print_mode/chen_dt.onnx"
    # #打印网络结构
    summary(dt_net, input_size=(16, 3, 1024, 512))
    # #保存为onnx
    save_onnx(dt_net,x,model_file_name)
    # #保存为onnx 有尺寸
    save_scale_onnx(model_file_name)
(4)手绘图实际网络对应的输入通道排布为[B,C,W,H],我手绘的图都是使用了[W,H,C]。
注意:作者实际开源的代码中S2和S3使用了3层卷积
(4)onnx查看的结构

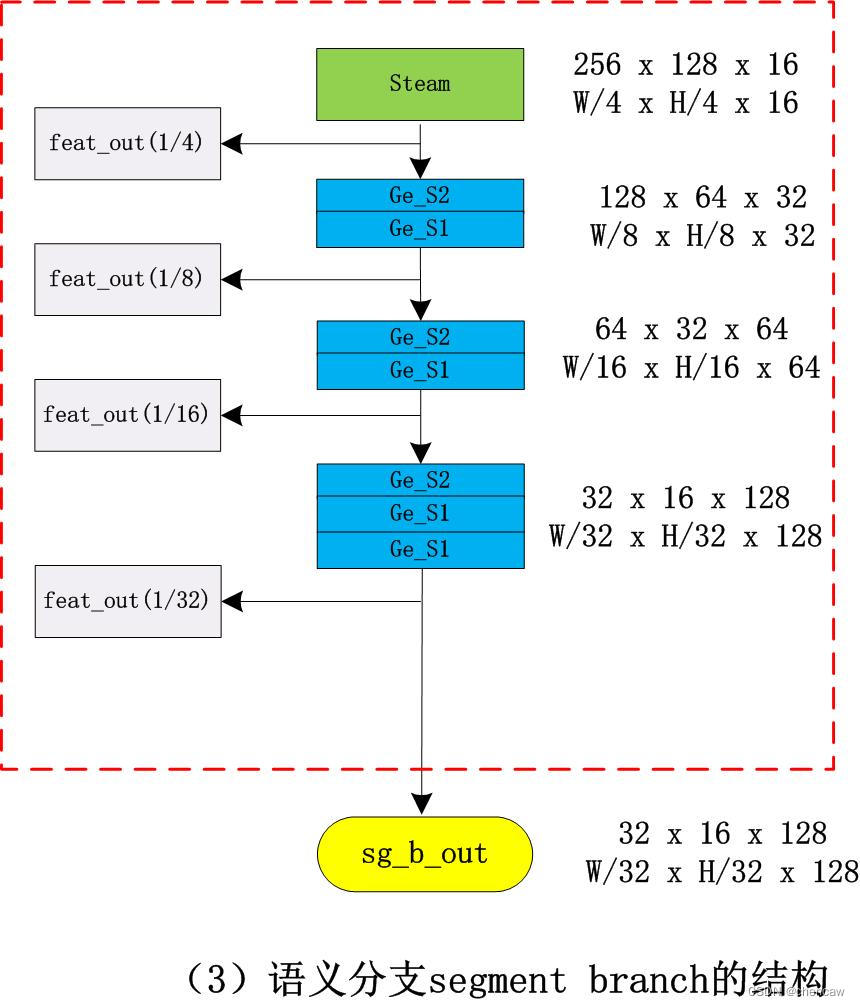
5.7语义分支Semantic Branch
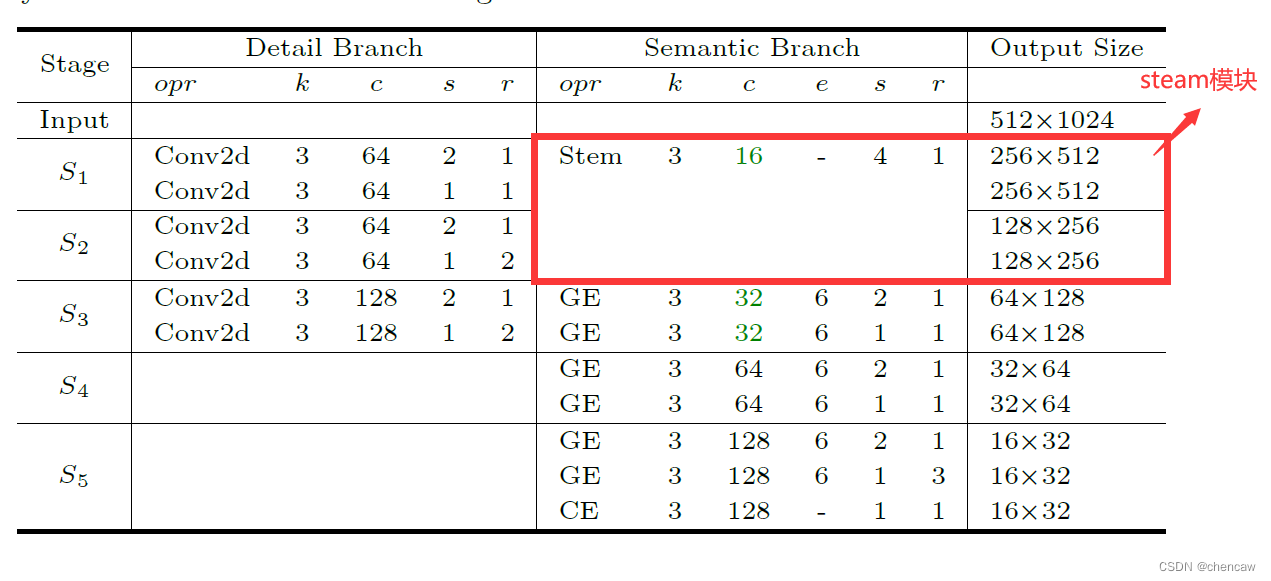
与细节分支并行,语义分支旨在捕获高级语义。该分支的信道容量较低,而空间细节可以由细节分支提供。相反,在我们的实验中,语义分支占比λ(λ<1)细节分支的通道,这使得这个分支是轻量级的。实际上,语义分支可以是任何轻量级的卷积模型。同时,语义分支采用快速下采样策略提高了特征表示的层次,快速扩大了接受域。高级语义需要大量的接受域。因此,语义分支使用全局平均池嵌入全局上下文响应。
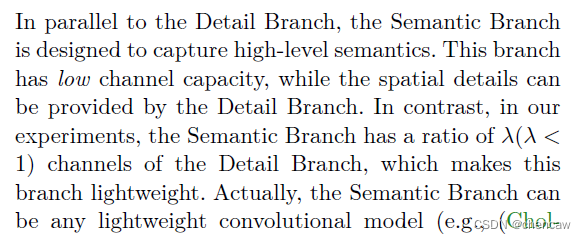
PS :λ的含义,by陈。细节分支下采样后为1/8大小;语义分支下采样后为1/32大小,所以λ=1/4

考虑到接受域大,计算效率高,设计语义分支,其灵感来自轻量级图像分类模型的理念,如Xception、MobileNet、ShuffleNet 。语义分支的一些关键特性如下:
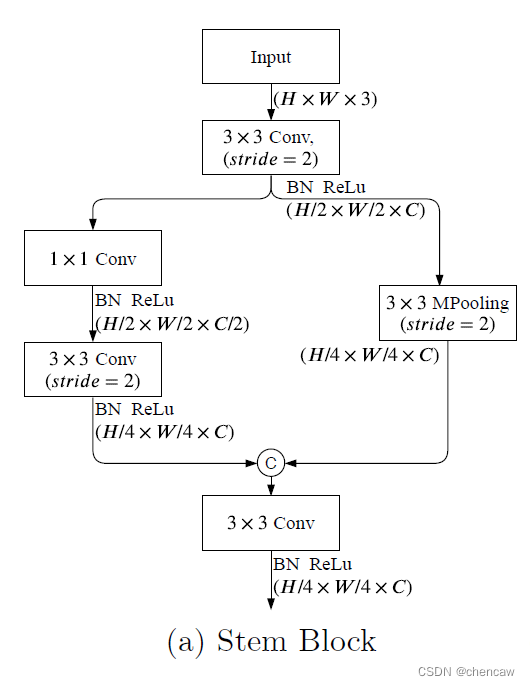
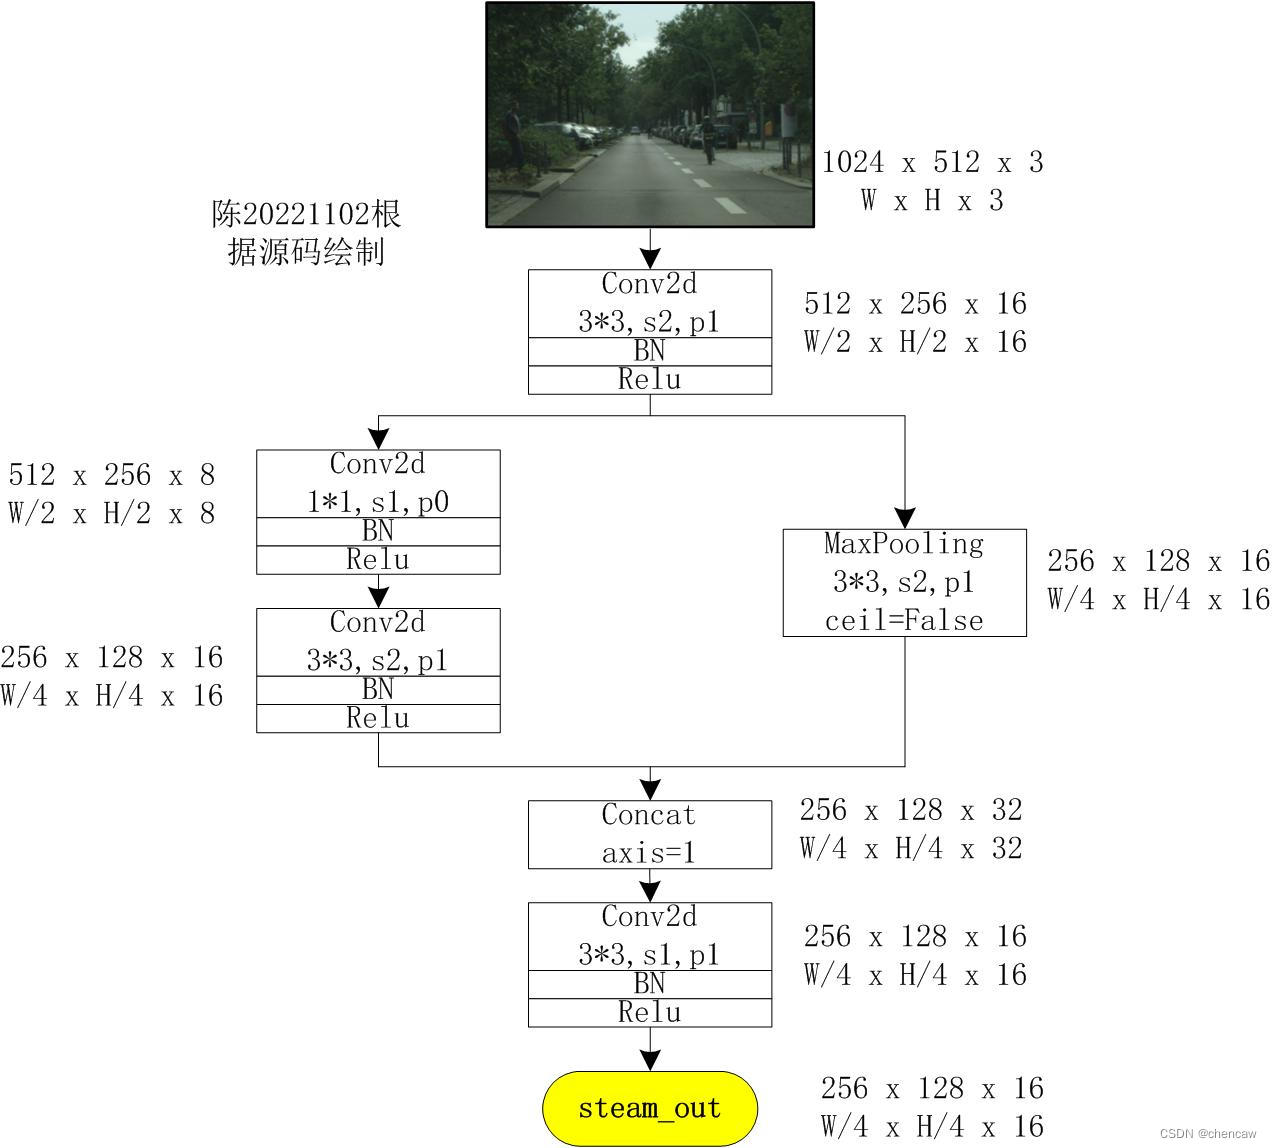
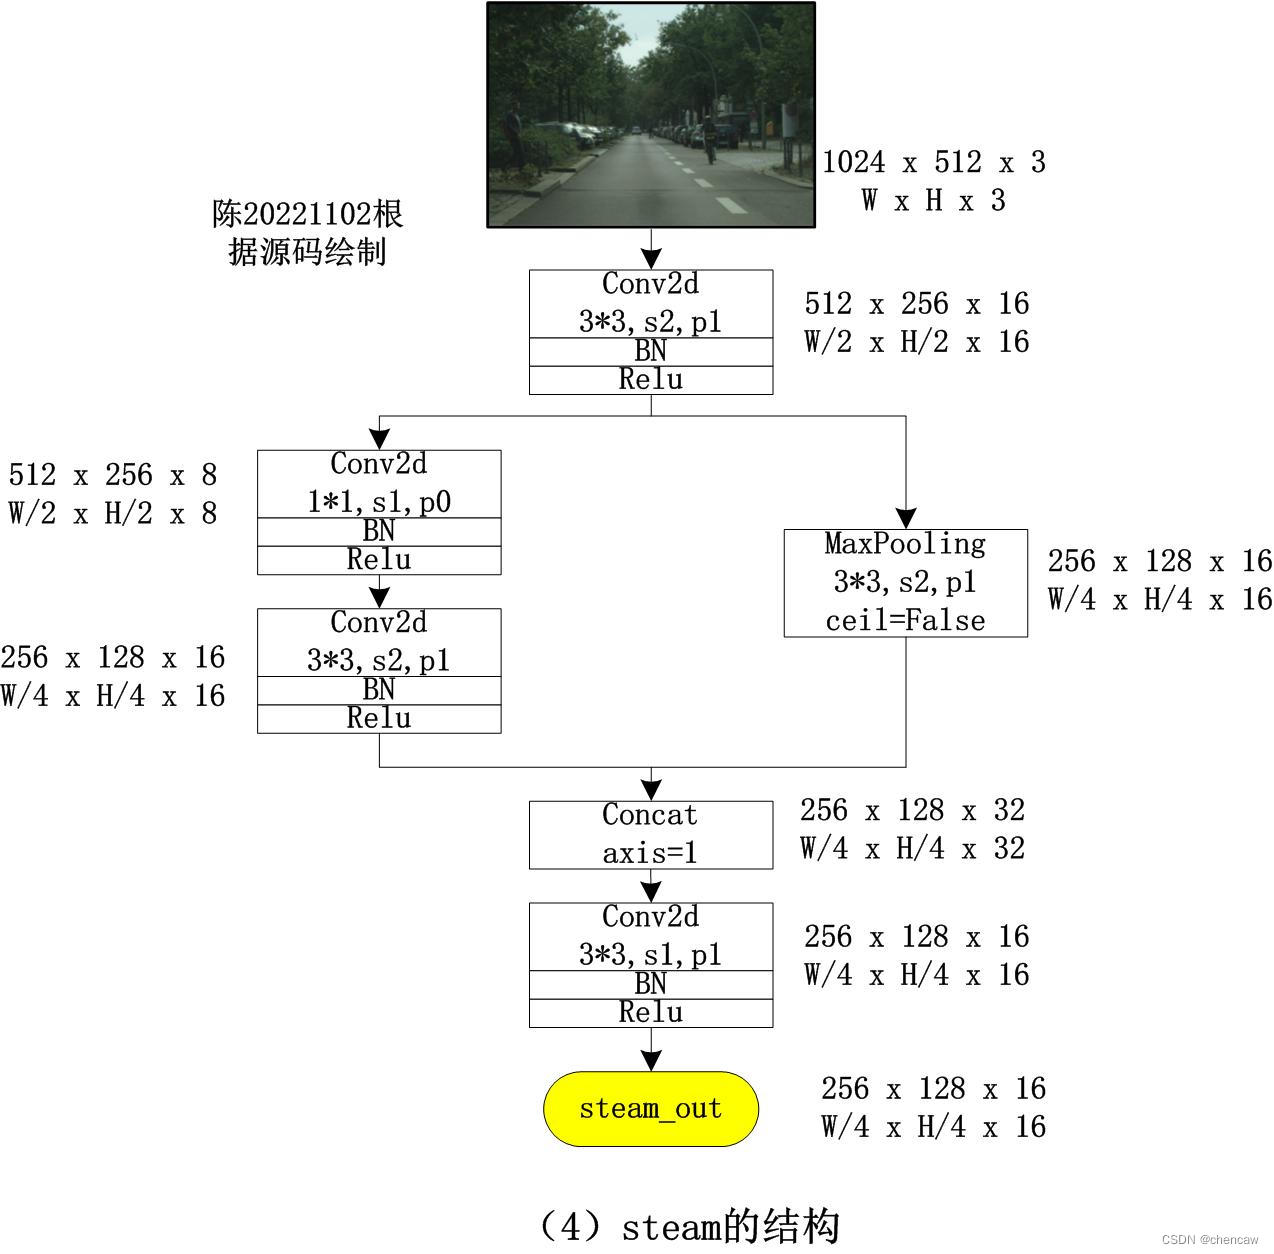
5.7.1 Stem Block
(1)Stem Block:采用Stem Block作为语义分支的第一阶段,如图(a)所示。它使用两种不同的下采样方式来缩小特征表示。然后将两个分支的输出特性串联起来作为输出。该结构具有高效的计算成本和有效的特征表达能力。
(2)测试代码
import torch
import torch.nn as nn
import torch.nn.functional as F
import torchvision

# from resnet import Resnet18

from torch.nn import BatchNorm2d

#清晰打印网络结构
from torchinfo import summary

#保存为onnx
import torch
import torch.onnx
from torch.autograd import Variable

#导出有尺寸
import onnx
# from onnx import shape_inference

class ConvBNReLU(nn.Module):

    def __init__(self, in_chan, out_chan, ks=3, stride=1, padding=1,
                 dilation=1, groups=1, bias=False):
        super(ConvBNReLU, self).__init__()
        self.conv = nn.Conv2d(
                in_chan, out_chan, kernel_size=ks, stride=stride,
                padding=padding, dilation=dilation,
                groups=groups, bias=bias)
        self.bn = nn.BatchNorm2d(out_chan)
        self.relu = nn.ReLU(inplace=True)

    def forward(self, x):
        feat = self.conv(x)
        feat = self.bn(feat)
        feat = self.relu(feat)
        return feat

class StemBlock(nn.Module):

    def __init__(self):
        super(StemBlock, self).__init__()
        self.conv = ConvBNReLU(3, 16, 3, stride=2)
        self.left = nn.Sequential(
            ConvBNReLU(16, 8, 1, stride=1, padding=0),
            ConvBNReLU(8, 16, 3, stride=2),
        )
        self.right = nn.MaxPool2d(
            kernel_size=3, stride=2, padding=1, ceil_mode=False)
        self.fuse = ConvBNReLU(32, 16, 3, stride=1)

    def forward(self, x):
        feat = self.conv(x)
        feat_left = self.left(feat)
        feat_right = self.right(feat)
        feat = torch.cat([feat_left, feat_right], dim=1)
        feat = self.fuse(feat)
        return feat


class ChenStemBlock(nn.Module):

    def __init__(self):
        super(ChenStemBlock, self).__init__()
        self.S1S2 = StemBlock()

    def forward(self, x):
        feat2 = self.S1S2(x)
        return feat2

def save_onnx(model,x,model_file_name):
    torch_out = torch.onnx.export(model, x,
                              model_file_name,
                               export_params=True,
                               verbose=True)

def save_scale_onnx(model_file_name):
    model = model_file_name
    onnx.save(onnx.shape_inference.infer_shapes(onnx.load(model)), model)

if __name__ == "__main__":

    steamblock_net = ChenStemBlock()
    x = torch.randn(16, 3, 1024, 512)
    dt_out = steamblock_net(x)
    print(dt_out.shape)


    model_file_name = "D:/pytorch_learning2022/5chen_segement_test2022/BiSeNet/chentest_v2_print_mode/chen_steamblock.onnx"
    # #打印网络结构
    summary(steamblock_net, input_size=(16, 3, 1024, 512))
    # #保存为onnx
    save_onnx(steamblock_net,x,model_file_name)
    # #保存为onnx 有尺寸
    save_scale_onnx(model_file_name)
(3)steam模块在网络中的位置和输入输出大小如下
(4)手绘图实际网络对应的输入通道排布为[B,C,W,H],我手绘的图都是使用了[W,H,C]。
注意:concat的维度axis=1,合并在C维度上
(5)netron查看的图

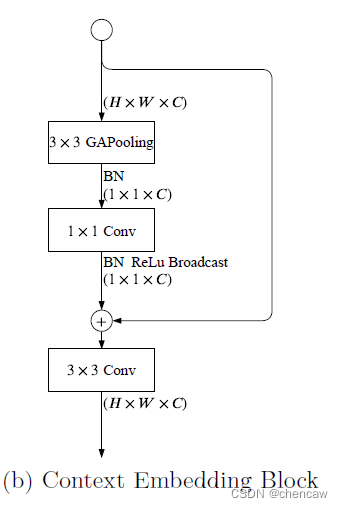
5.7.2 CE模块
Context Embedding Block:语义分支需要大的接受域来捕获高级语义。所以设计了Context Embedding Block。该块使用全局平均池和残差连接有效地嵌入全局上下文信息,如图(b)所示。该部分的实现对应着下面的GE模块
5.7.3 GE模块
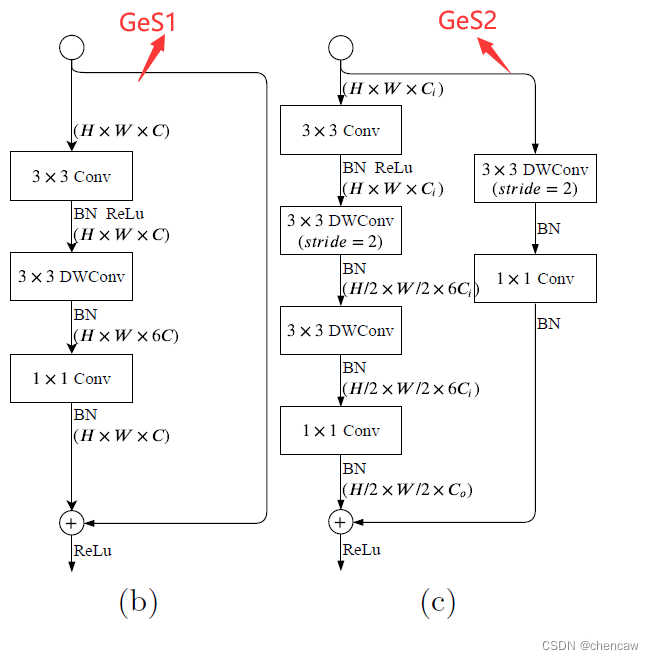
(0)原理图
下面的三个图注意啦,图a是mobile netv2的结构,拿来对比的
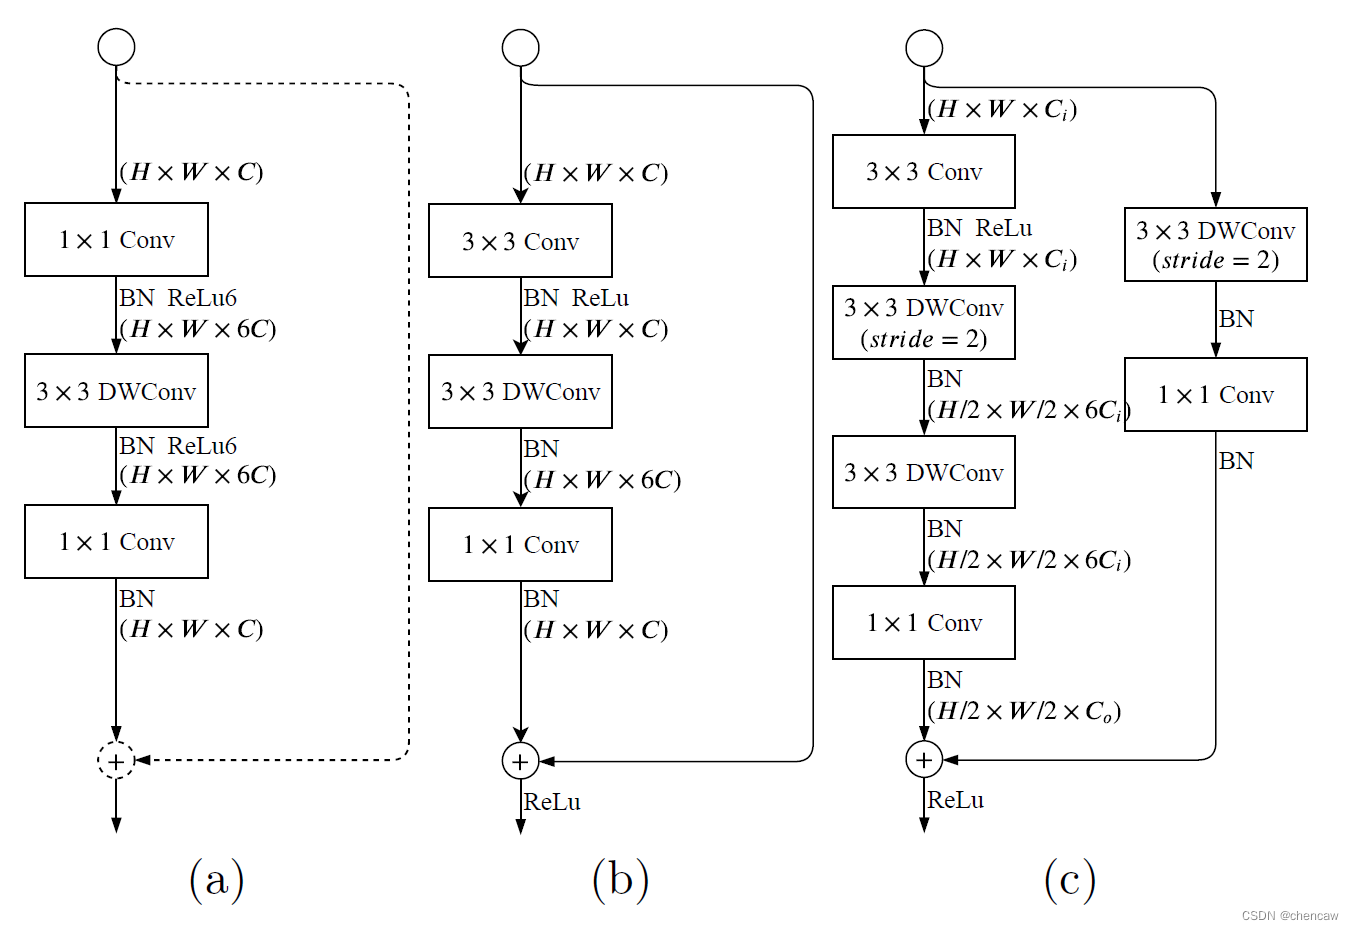
(1) 上图图(a)是MobileNetv2中提出带有线性瓶颈的倒置残差结构。stride=2的使用,用于Residual 的虚线和求和的圆不存在。
 (2)上图中的(b)和(c)是本文提出的结构,主要包括:
1)一个3×3的卷积,有效地聚合特征响应并扩展到高维空间;
2)在膨胀层的每个单独输出通道上独立进行3×3深度卷积;
3)以1×1的卷积作为投影层,将深度卷积的输出投影到低信道容量空间中。当stide = 2时,我们采用两个3×3的深度卷积,进一步扩大了感受野,一个3×3的可分离卷积用于shortcut。在这一层,用两个3×3深度卷积代替可分离变量卷积中的5×5深度卷积,这两个3×3深度卷积的计算量少,感受野相同。
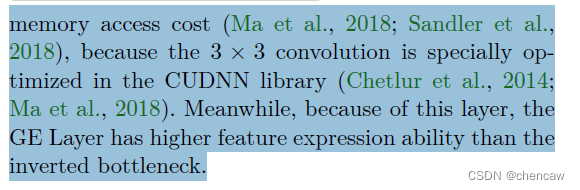
与MobileNetv2的反向瓶颈层相比,GE层多了一个3×3的卷积,却有利于计算成本和内存访问成本,因为在CUDNN库中对3×3卷积进行了特别优化同时,由于这一层,GE层比反向瓶颈层具有更高的特征表达能力。

PS:感觉作者的意思是比MobileNetv2的模块少了一个1*1,多了一个3*3的结构,但是因为在CUDNN库中对3×3卷积进行了特别优化同时,却有利于计算成本和内存访问成本。
(3)两个不同类型GE模块的测试代码实现
import torch
import torch.nn as nn
import torch.nn.functional as F
import torchvision

# from resnet import Resnet18

from torch.nn import BatchNorm2d

#清晰打印网络结构
from torchinfo import summary

#保存为onnx
import torch
import torch.onnx
from torch.autograd import Variable

#导出有尺寸
import onnx
# from onnx import shape_inference

class ConvBNReLU(nn.Module):

    def __init__(self, in_chan, out_chan, ks=3, stride=1, padding=1,
                 dilation=1, groups=1, bias=False):
        super(ConvBNReLU, self).__init__()
        self.conv = nn.Conv2d(
                in_chan, out_chan, kernel_size=ks, stride=stride,
                padding=padding, dilation=dilation,
                groups=groups, bias=bias)
        self.bn = nn.BatchNorm2d(out_chan)
        self.relu = nn.ReLU(inplace=True)

    def forward(self, x):
        feat = self.conv(x)
        feat = self.bn(feat)
        feat = self.relu(feat)
        return feat

class GELayerS1(nn.Module):

    def __init__(self, in_chan, out_chan, exp_ratio=6):
        super(GELayerS1, self).__init__()
        mid_chan = in_chan * exp_ratio
        self.conv1 = ConvBNReLU(in_chan, in_chan, 3, stride=1)
        self.dwconv = nn.Sequential(
            nn.Conv2d(
                in_chan, mid_chan, kernel_size=3, stride=1,
                padding=1, groups=in_chan, bias=False),
            nn.BatchNorm2d(mid_chan),
            nn.ReLU(inplace=True), # not shown in paper
        )
        self.conv2 = nn.Sequential(
            nn.Conv2d(
                mid_chan, out_chan, kernel_size=1, stride=1,
                padding=0, bias=False),
            nn.BatchNorm2d(out_chan),
        )
        self.conv2[1].last_bn = True
        self.relu = nn.ReLU(inplace=True)

    def forward(self, x):
        feat = self.conv1(x)
        feat = self.dwconv(feat)
        feat = self.conv2(feat)
        feat = feat + x
        feat = self.relu(feat)
        return feat


class GELayerS2(nn.Module):

    def __init__(self, in_chan, out_chan, exp_ratio=6):
        super(GELayerS2, self).__init__()
        mid_chan = in_chan * exp_ratio
        self.conv1 = ConvBNReLU(in_chan, in_chan, 3, stride=1)
        self.dwconv1 = nn.Sequential(
            nn.Conv2d(
                in_chan, mid_chan, kernel_size=3, stride=2,
                padding=1, groups=in_chan, bias=False),
            nn.BatchNorm2d(mid_chan),
        )
        self.dwconv2 = nn.Sequential(
            nn.Conv2d(
                mid_chan, mid_chan, kernel_size=3, stride=1,
                padding=1, groups=mid_chan, bias=False),
            nn.BatchNorm2d(mid_chan),
            nn.ReLU(inplace=True), # not shown in paper
        )
        self.conv2 = nn.Sequential(
            nn.Conv2d(
                mid_chan, out_chan, kernel_size=1, stride=1,
                padding=0, bias=False),
            nn.BatchNorm2d(out_chan),
        )
        self.conv2[1].last_bn = True
        self.shortcut = nn.Sequential(
                nn.Conv2d(
                    in_chan, in_chan, kernel_size=3, stride=2,
                    padding=1, groups=in_chan, bias=False),
                nn.BatchNorm2d(in_chan),
                nn.Conv2d(
                    in_chan, out_chan, kernel_size=1, stride=1,
                    padding=0, bias=False),
                nn.BatchNorm2d(out_chan),
        )
        self.relu = nn.ReLU(inplace=True)

    def forward(self, x):
        feat = self.conv1(x)
        feat = self.dwconv1(feat)
        feat = self.dwconv2(feat)
        feat = self.conv2(feat)
        shortcut = self.shortcut(x)
        feat = feat + shortcut
        feat = self.relu(feat)
        return feat


class ChenGeLayerBlock(nn.Module):

    def __init__(self):
        super(ChenGeLayerBlock, self).__init__()
        self.S3 = nn.Sequential(
            GELayerS2(16, 32),
            GELayerS1(32, 32),
        )

    def forward(self, x):
        # feat2 = self.S1S2(x)  #输出为[16,16,256,128]
        # feat3 = self.S3(feat2)
        feat3 = self.S3(x)
        return feat3

def save_onnx(model,x,model_file_name):
    torch_out = torch.onnx.export(model, x,
                              model_file_name,
                               export_params=True,
                               verbose=True)

def save_scale_onnx(model_file_name):
    model = model_file_name
    onnx.save(onnx.shape_inference.infer_shapes(onnx.load(model)), model)

if __name__ == "__main__":
    steamblock_net = ChenGeLayerBlock()
    # x = torch.randn(16, 3, 1024, 512)
    x = torch.randn(16, 16, 256, 128)
    dt_out = steamblock_net(x)
    print(dt_out.shape)


    model_file_name = "D:/pytorch_learning2022/5chen_segement_test2022/BiSeNet/chentest_v2_print_mode/chen_geselayer.onnx"
    # #打印网络结构
    # summary(steamblock_net, input_size=(16, 3, 1024, 512))
    summary(steamblock_net, input_size=(16, 16, 256, 128))
    #保存为onnx
    save_onnx(steamblock_net,x,model_file_name)
    # #保存为onnx 有尺寸
    save_scale_onnx(model_file_name)
(4)手绘图实际网络对应的输入通道排布为[B,C,W,H],我手绘的图都是使用了[W,H,C]。
注意:DW_Conv2d的实现方式,通过nn.Conv2d函数中的groups参数设值来实现的
普通的Conv2d中groups=1
        self.dwconv1 = nn.Sequential(
            nn.Conv2d(
                in_chan, mid_chan, kernel_size=3, stride=2,
                padding=1, groups=in_chan, bias=False),
            nn.BatchNorm2d(mid_chan),
        )
1)原文中的两个模块
2)手绘图,其实一样的
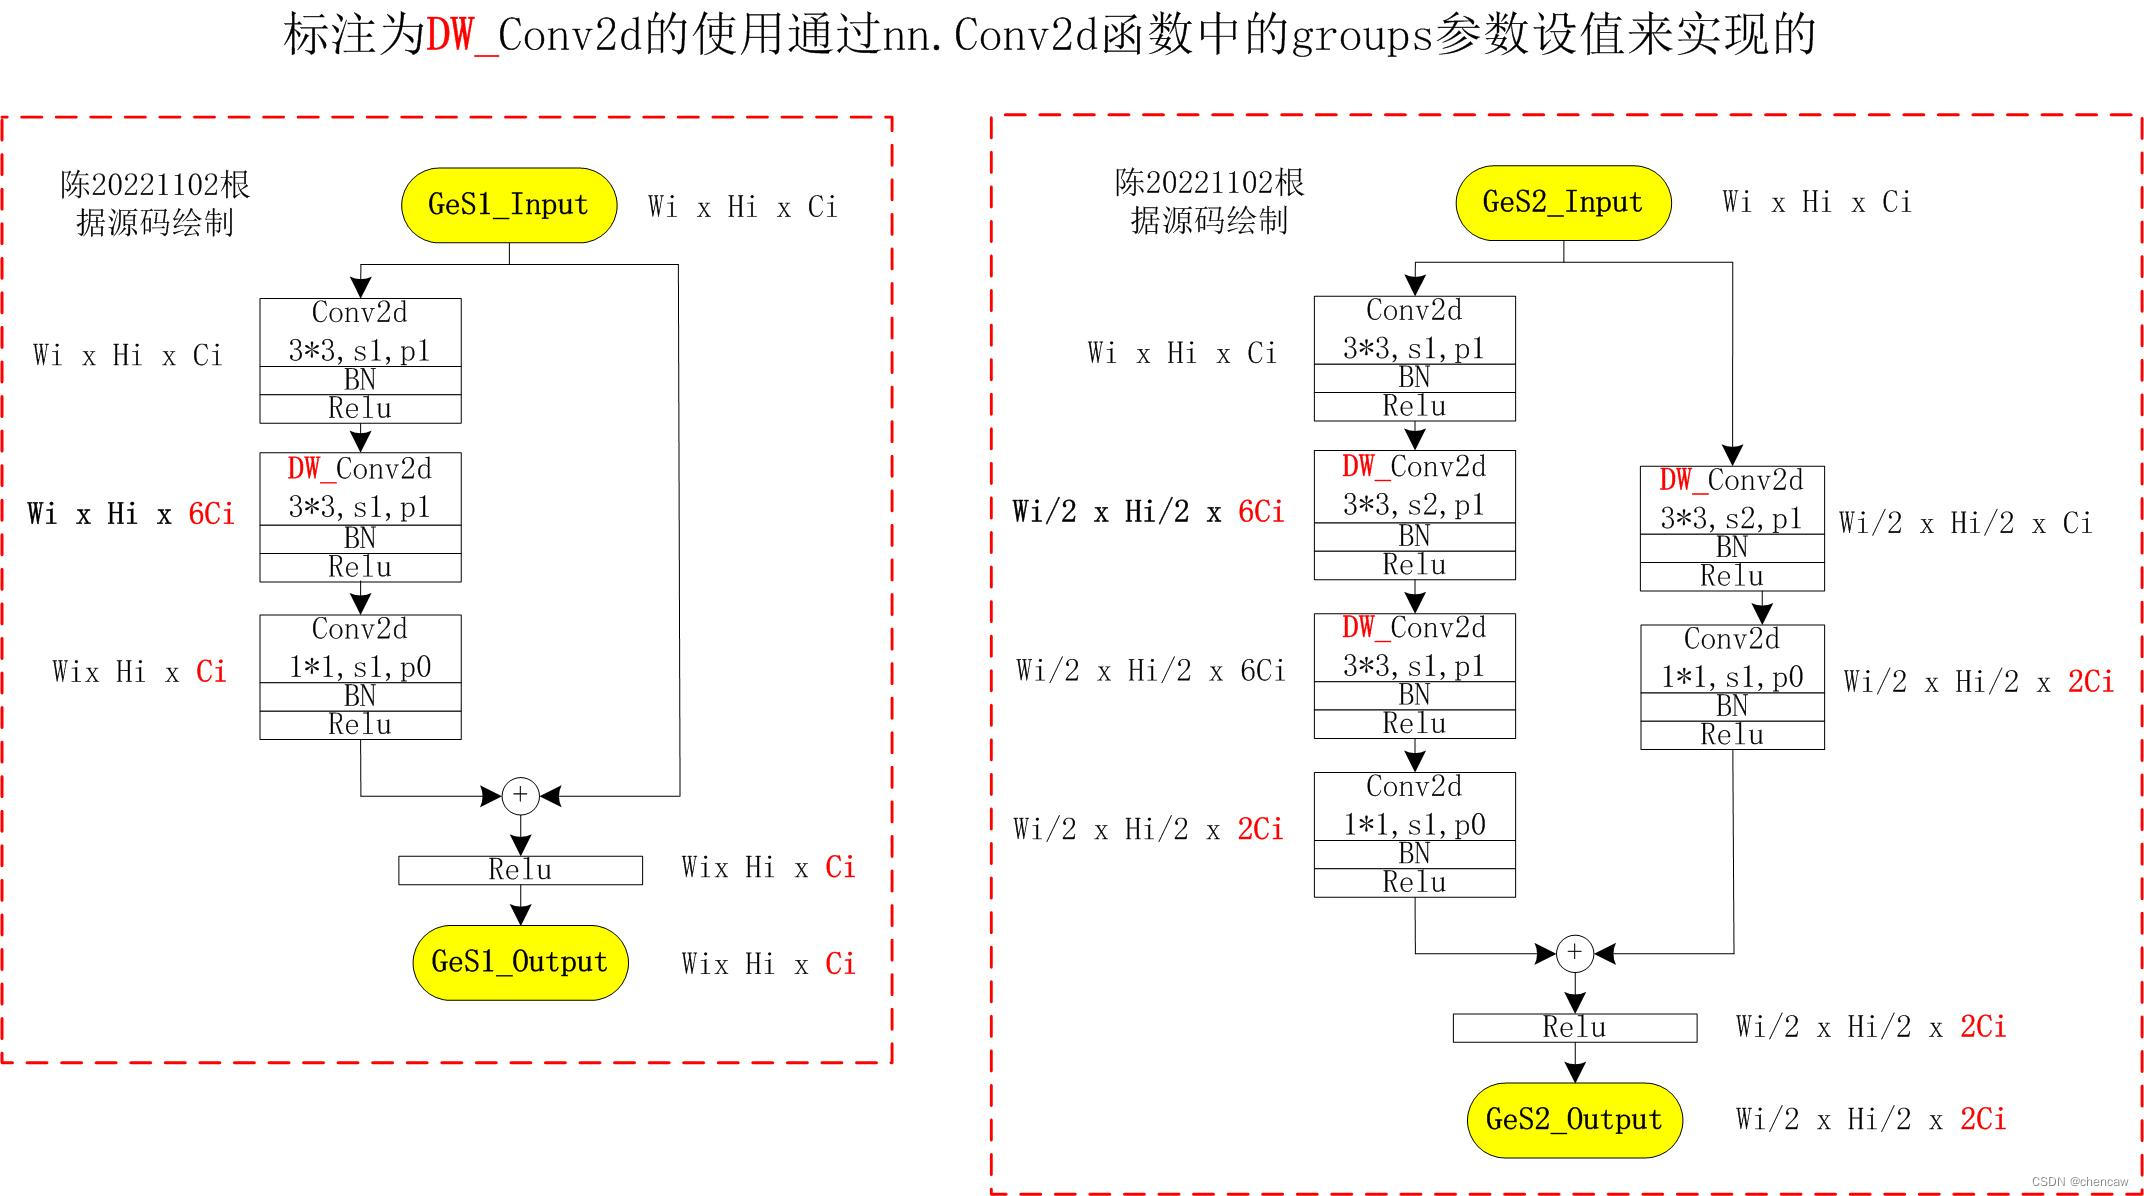
3)在网络结构图中的对应关系

4)netron导出的图

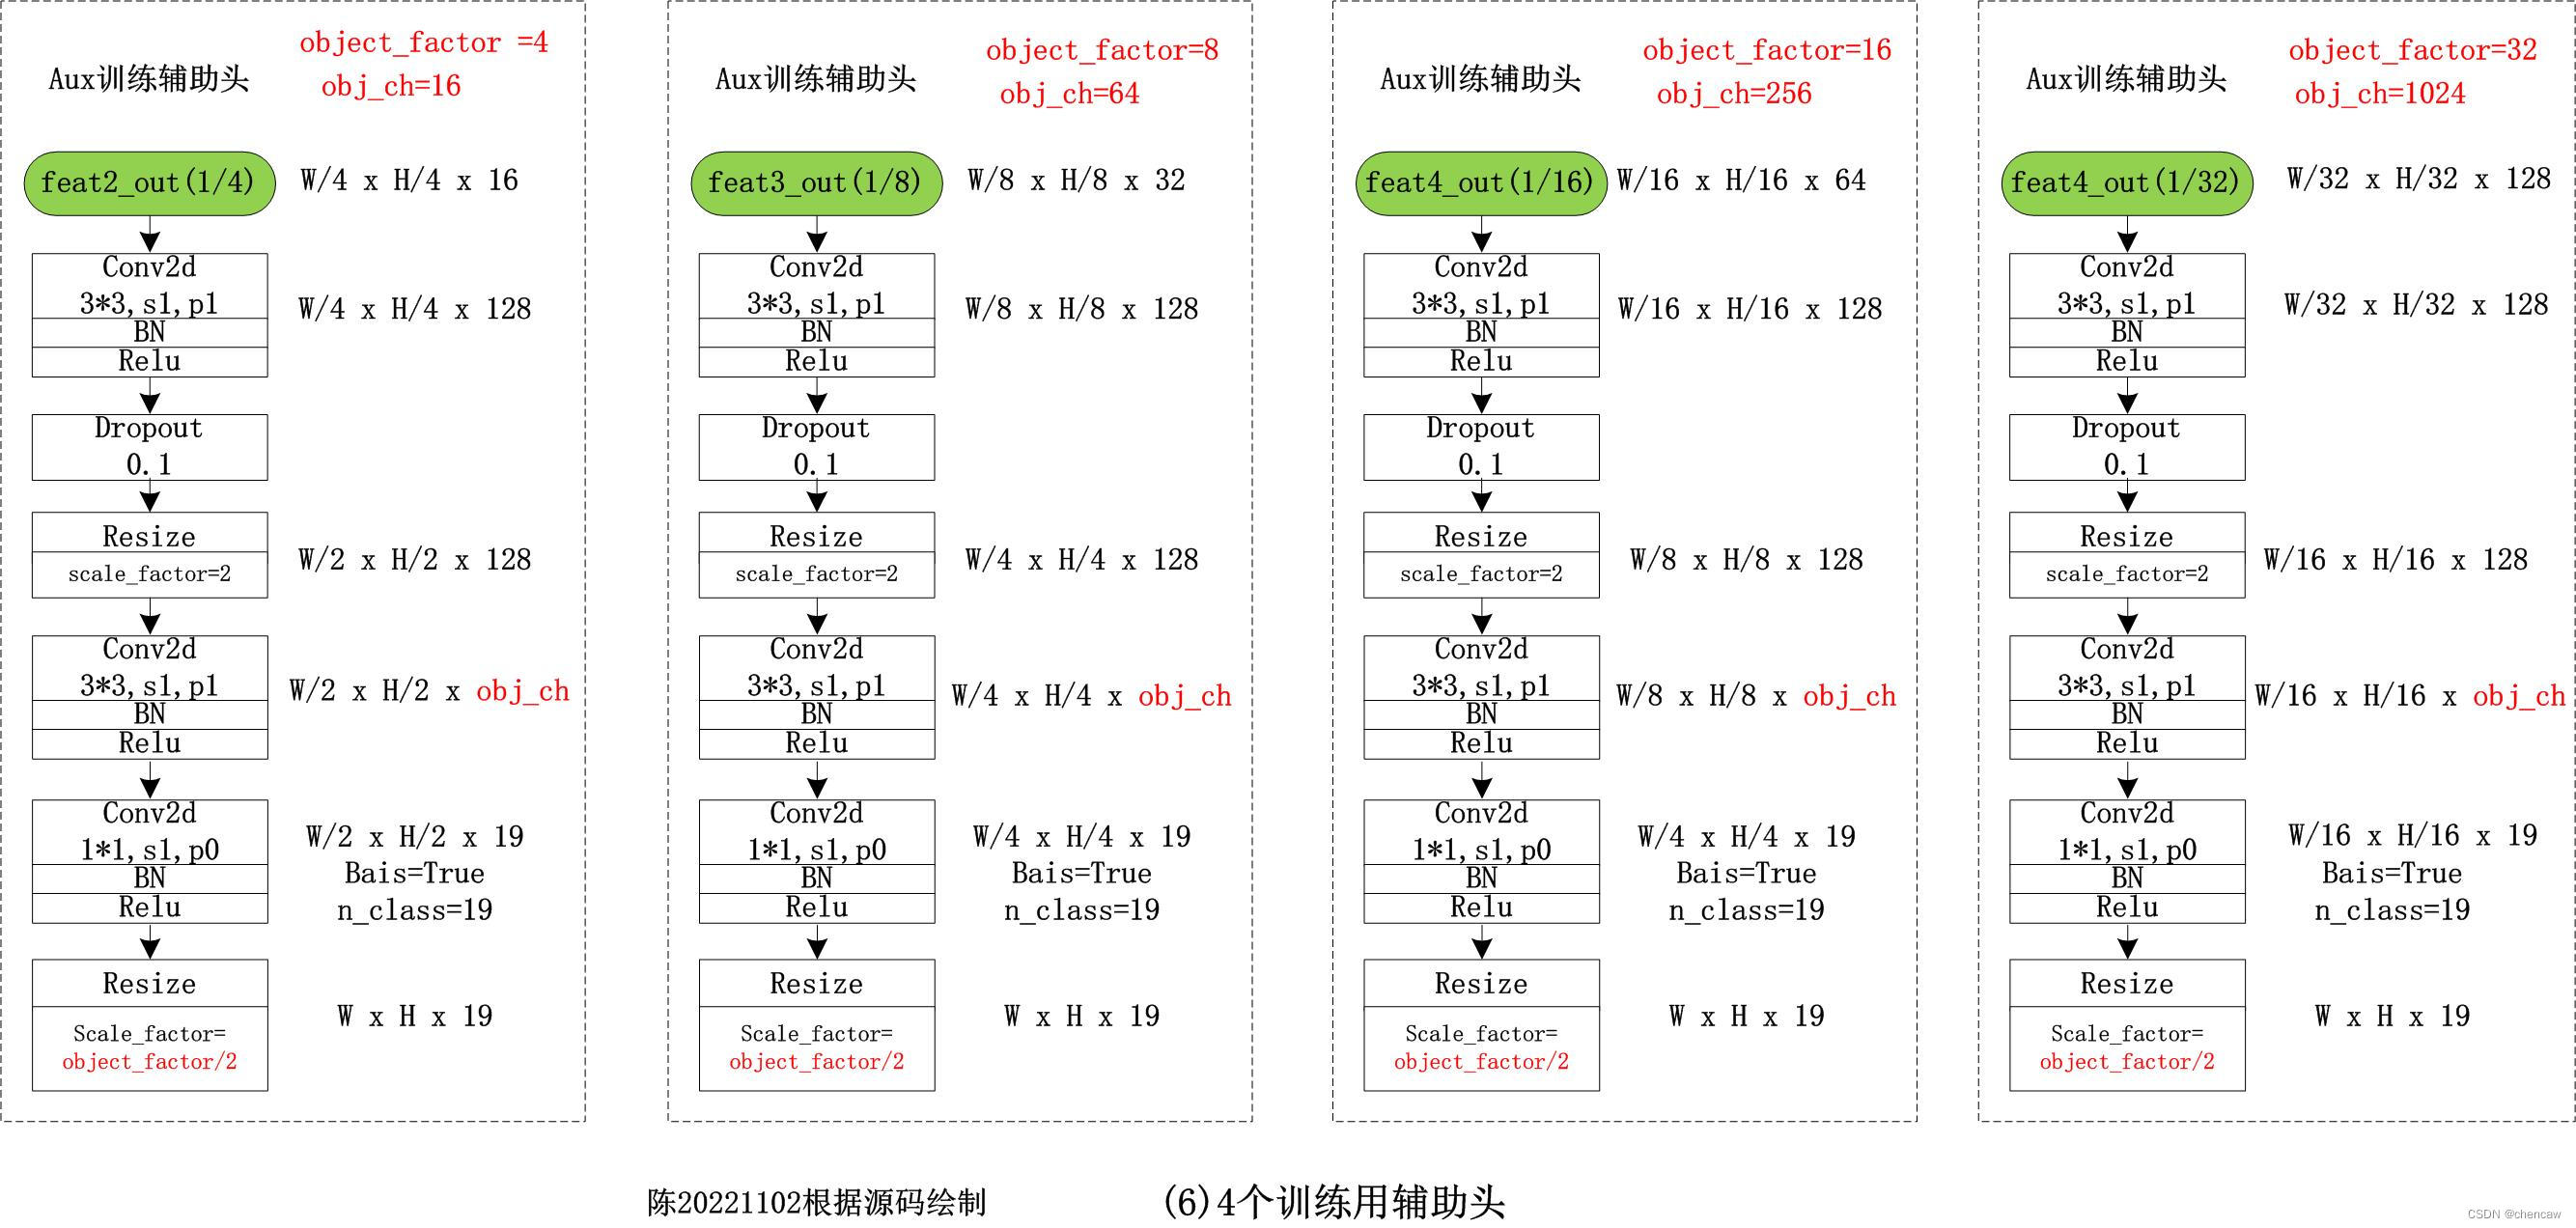
5.7.4训练用辅助头
(1)文中的结构
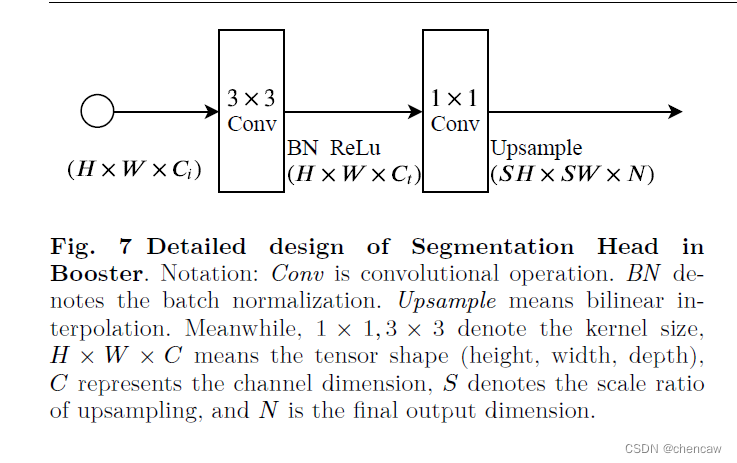
(2)对应网络中的位置,共5个,其中4个只在训练时使用
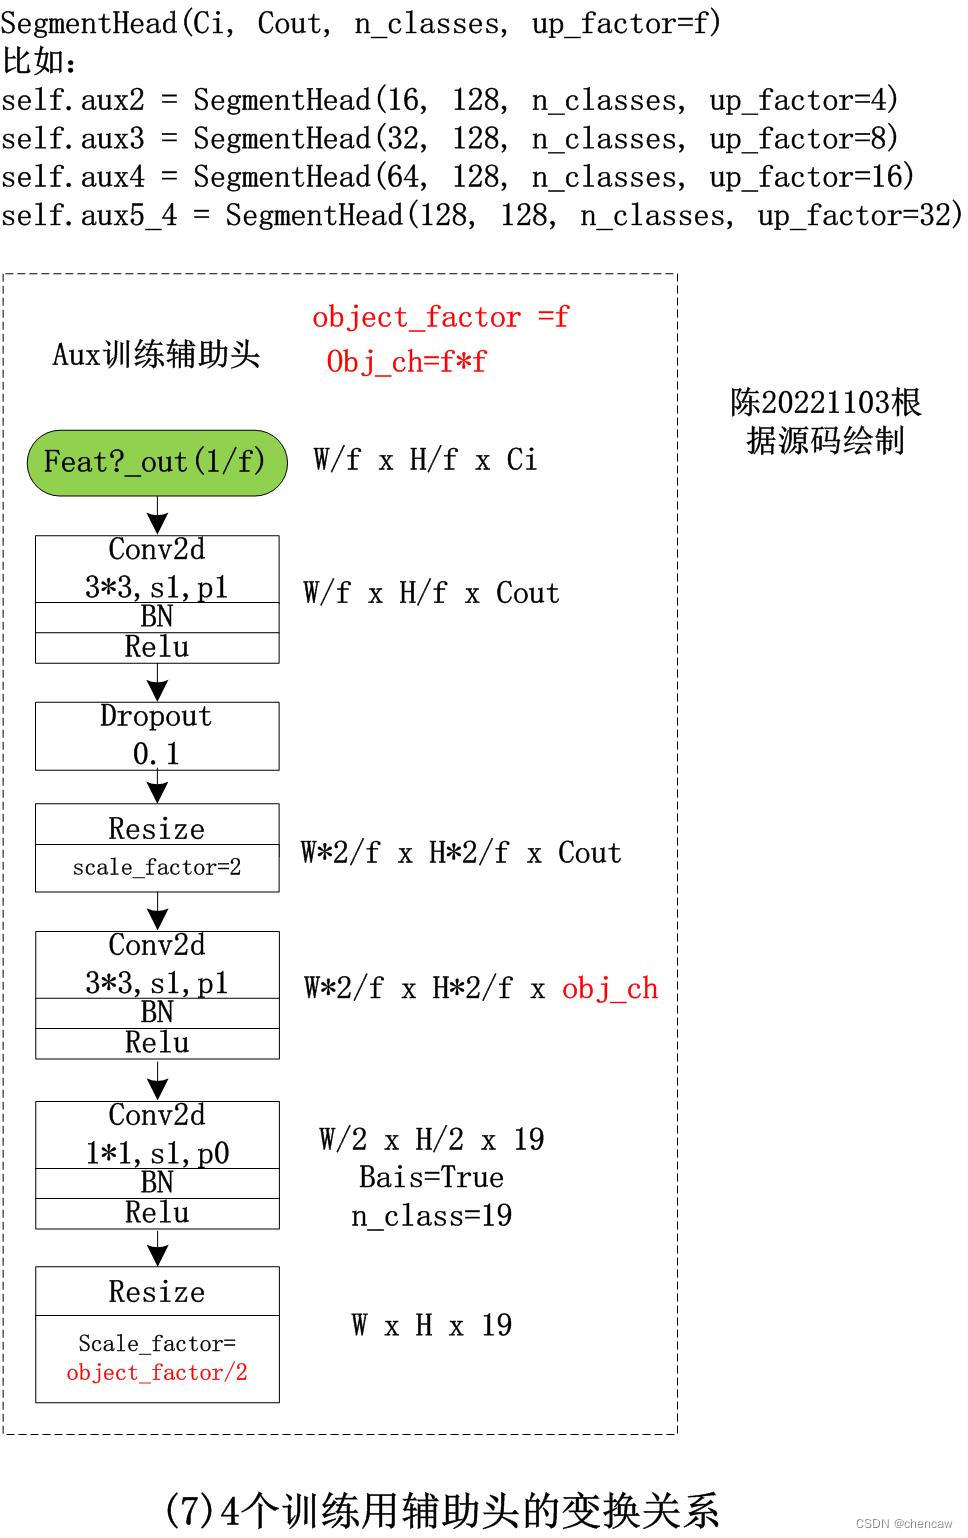
(3)手绘结构图
尤其注意:Resize的实现方法注意:只在训练用的4个辅助头
- (1)分2次上采样,第一次上采样2倍,第二次上采样剩下的object_factor/2倍;
- (2)channel调整为分类多少前面的那一层channel为:obj_ch=object_factor*object_factor
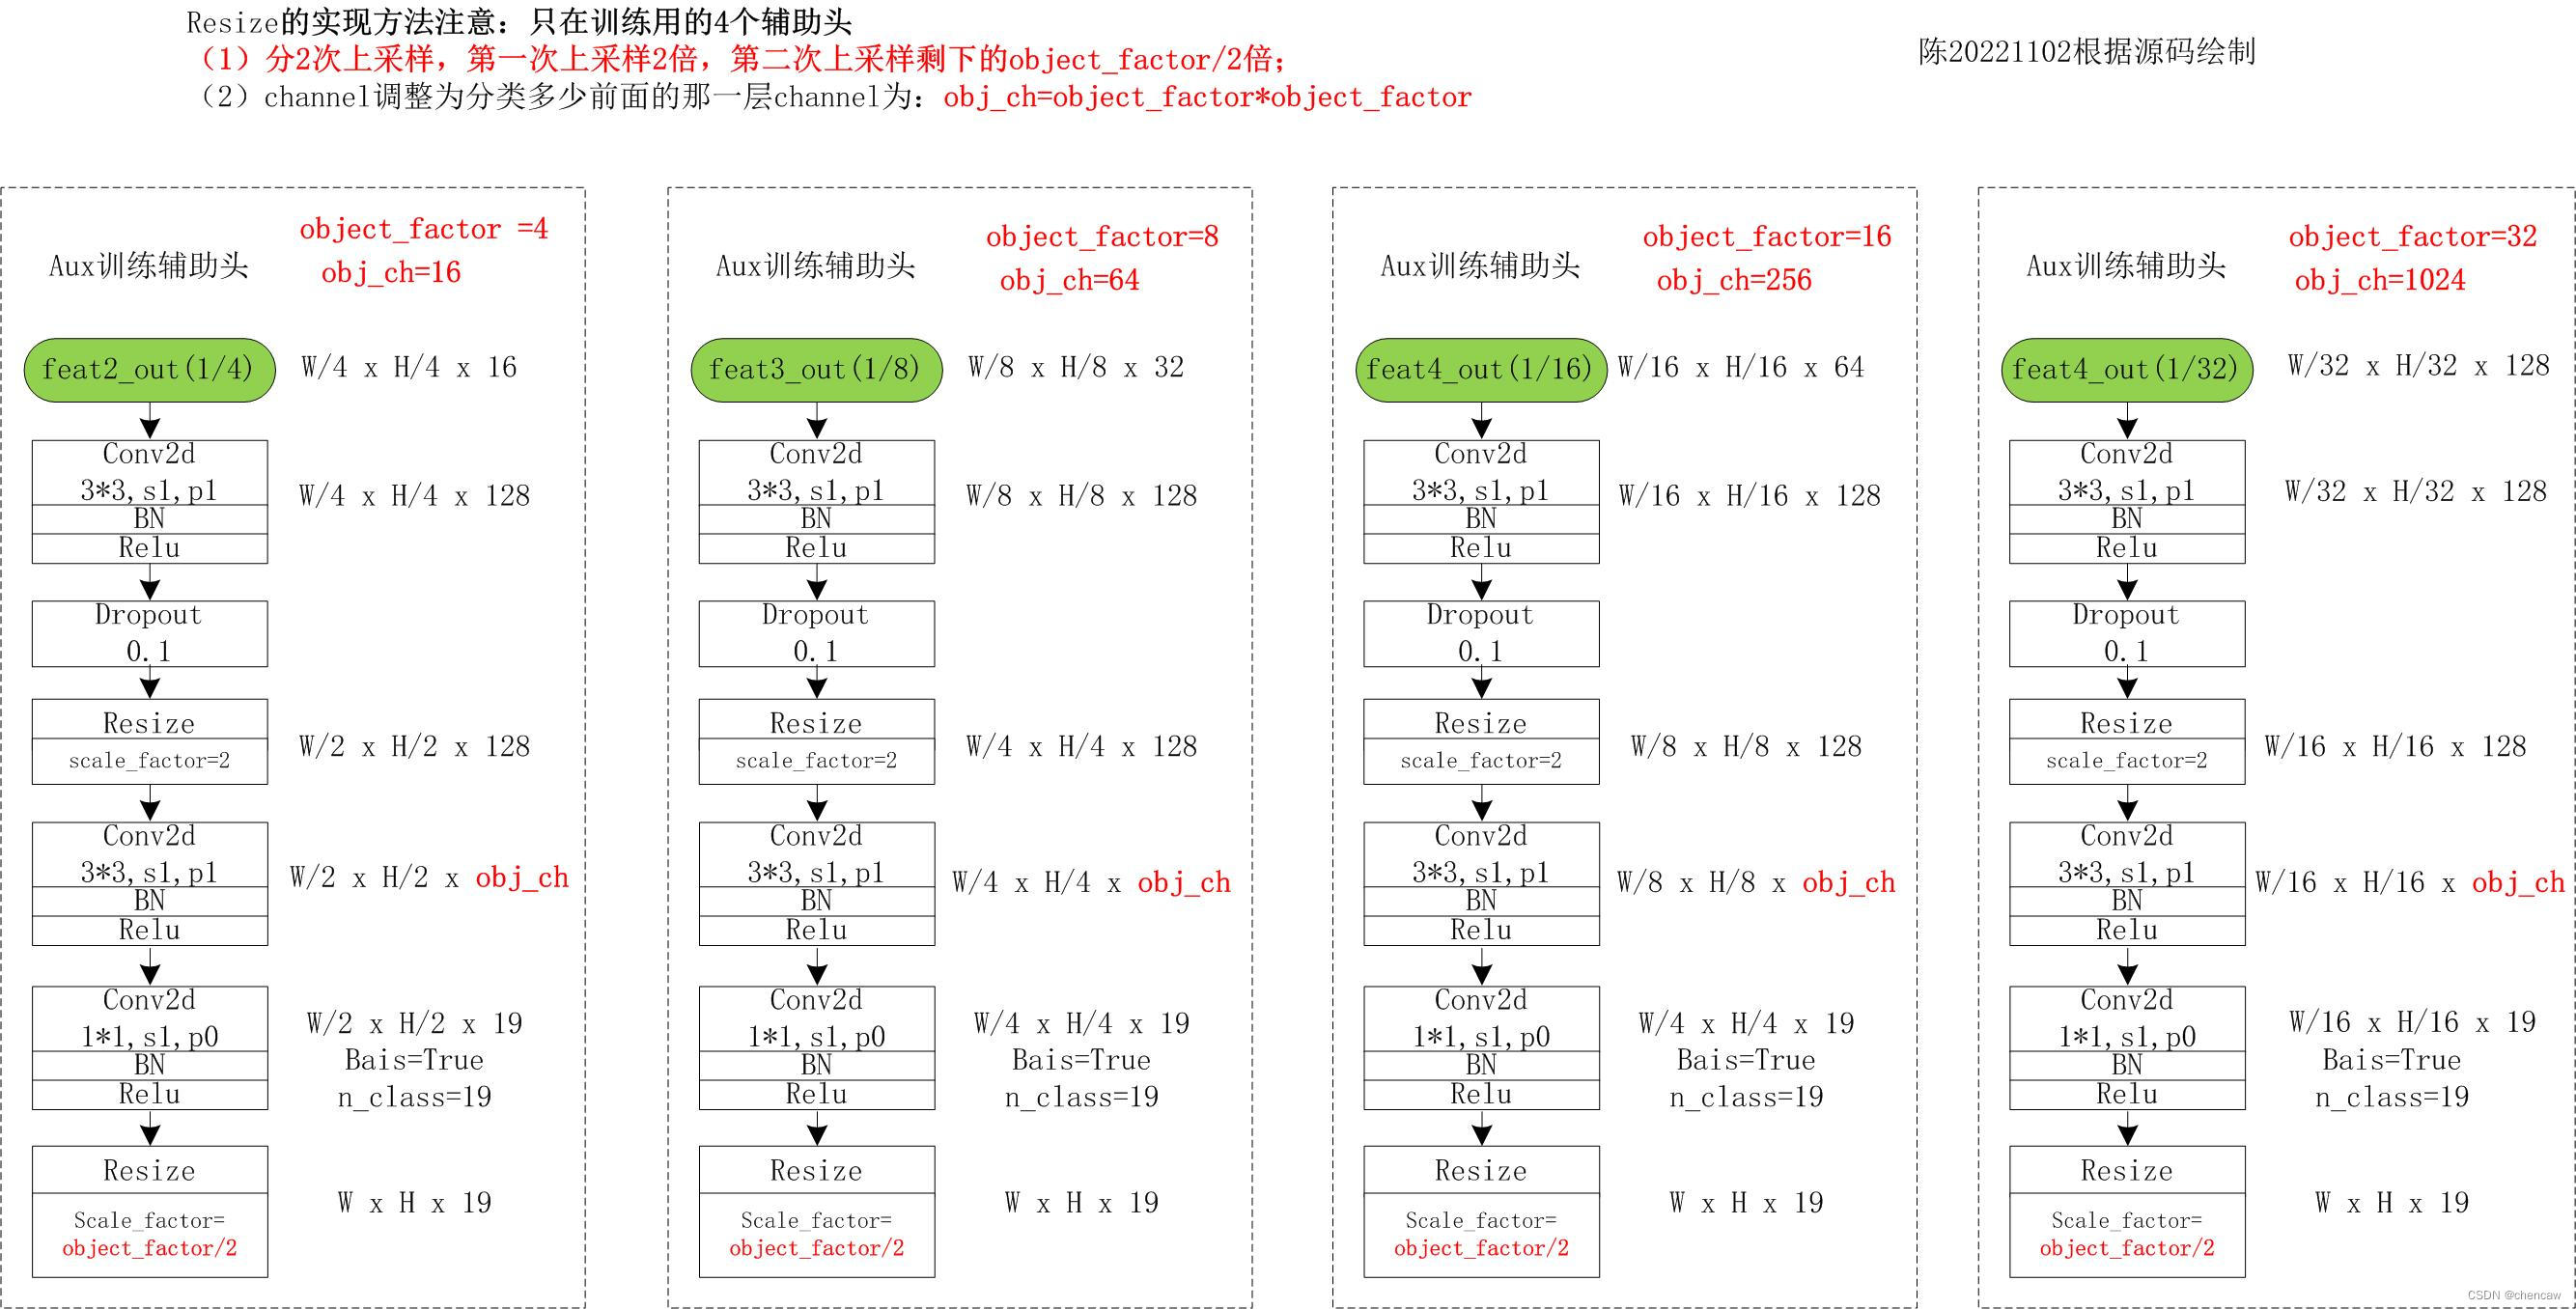
(4)上述4个只参与训练的辅助手测试代码如下
self.aux2 = SegmentHead(16, 128, n_classes, up_factor=4)
self.aux3 = SegmentHead(32, 128, n_classes, up_factor=8)
self.aux4 = SegmentHead(64, 128, n_classes, up_factor=16)
self.aux5_4 = SegmentHead(128, 128, n_classes, up_factor=32)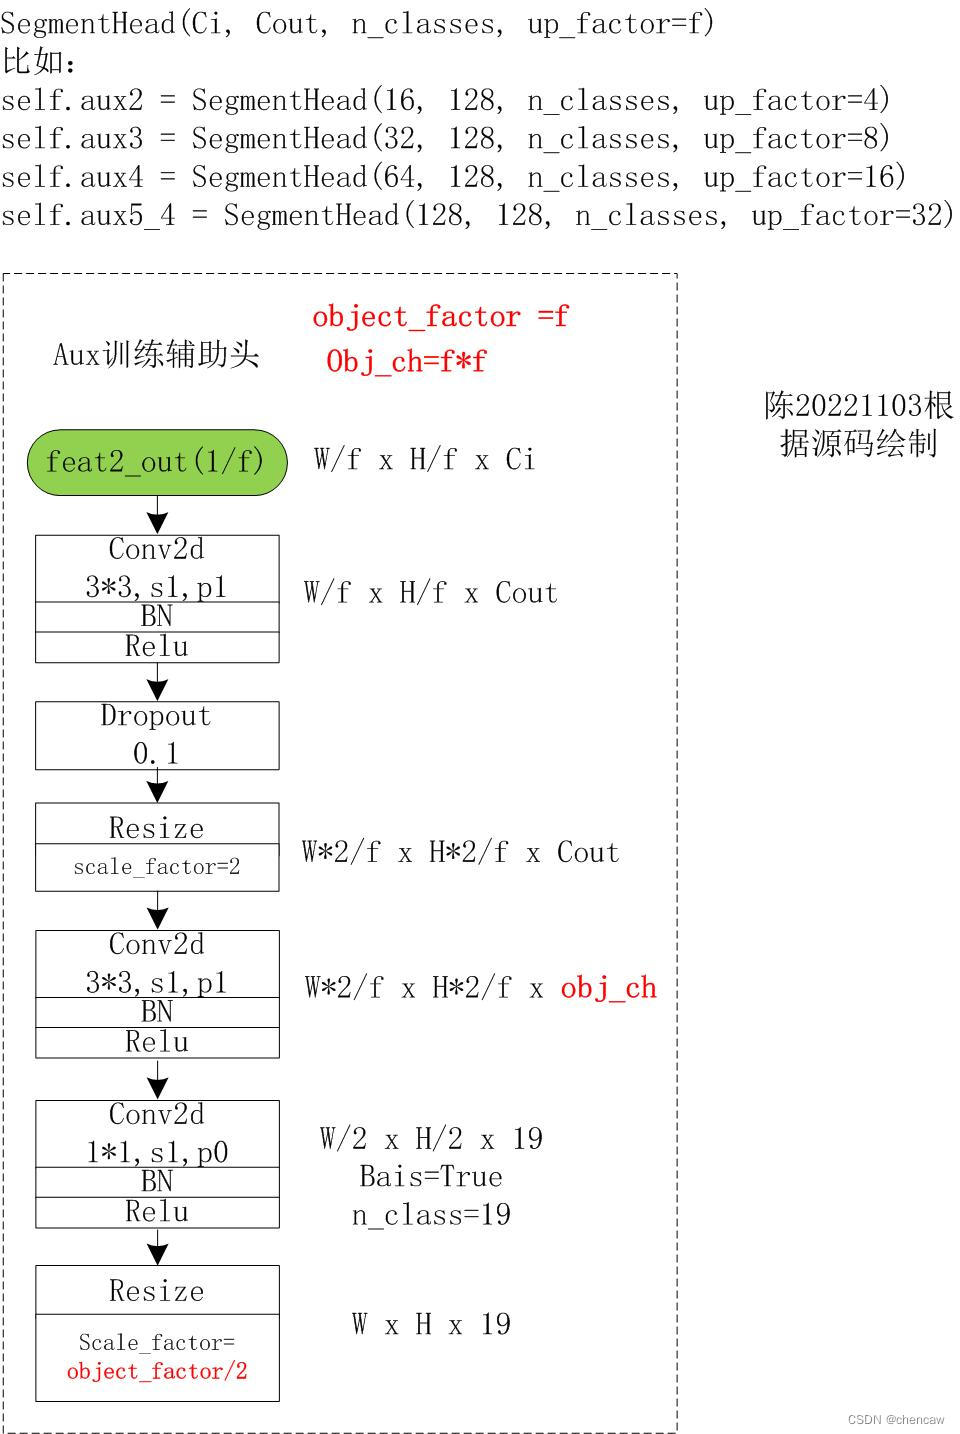
(5)模型最后输出的训练头(参与训练,也参与测试的),如下图所示。
注意:
- (1)最后一个训练头的输出,没有分成两次上采样,也没有使用中间模块的channel数是倍数的平方的策略。
- (2)使用1*1卷积核调整n_class通道厚度后,直接上采样8倍,还原为1024,512的分辨率
(6)测试代码
import torch
import torch.nn as nn
import torch.nn.functional as F
import torchvision

# from resnet import Resnet18

from torch.nn import BatchNorm2d

#清晰打印网络结构
from torchinfo import summary

#保存为onnx
import torch
import torch.onnx
from torch.autograd import Variable

#导出有尺寸
import onnx
# from onnx import shape_inference

class ConvBNReLU(nn.Module):

    def __init__(self, in_chan, out_chan, ks=3, stride=1, padding=1,
                 dilation=1, groups=1, bias=False):
        super(ConvBNReLU, self).__init__()
        self.conv = nn.Conv2d(
                in_chan, out_chan, kernel_size=ks, stride=stride,
                padding=padding, dilation=dilation,
                groups=groups, bias=bias)
        self.bn = nn.BatchNorm2d(out_chan)
        self.relu = nn.ReLU(inplace=True)

    def forward(self, x):
        feat = self.conv(x)
        feat = self.bn(feat)
        feat = self.relu(feat)
        return feat

class SegmentHead(nn.Module):

    def __init__(self, in_chan, mid_chan, n_classes, up_factor=8, aux=True):
        super(SegmentHead, self).__init__()
        self.conv = ConvBNReLU(in_chan, mid_chan, 3, stride=1)
        print("in_chan",in_chan,"mid_chan",mid_chan)
        self.drop = nn.Dropout(0.1)
        self.up_factor = up_factor
        print("mid_chan",mid_chan)
        print("up_factor",up_factor)
        out_chan = n_classes
        mid_chan2 = up_factor * up_factor if aux else mid_chan
        print("mid_chan2",mid_chan2)

        up_factor = up_factor // 2 if aux else up_factor
        self.conv_out = nn.Sequential(
            nn.Sequential(
                nn.Upsample(scale_factor=2),
                ConvBNReLU(mid_chan, mid_chan2, 3, stride=1)
                ) if aux else nn.Identity(),
            nn.Conv2d(mid_chan2, out_chan, 1, 1, 0, bias=True),
            nn.Upsample(scale_factor=up_factor, mode='bilinear', align_corners=False)
        )
        print("mid_chan2",mid_chan2,"out_chan",mid_chan)
        print("self.conv_out")
        print(self.conv_out)

    def forward(self, x):
        feat = self.conv(x)
        feat = self.drop(feat)
        feat = self.conv_out(feat)
        return feat


class ChenAuxBlock(nn.Module):

    def __init__(self,n_classes):
        super(ChenAuxBlock, self).__init__()
        self.head = SegmentHead(128, 1024, n_classes, up_factor=8, aux=False)
        # self.aux2 = SegmentHead(16, 128, n_classes, up_factor=4)
        # self.aux3 = SegmentHead(32, 128, n_classes, up_factor=8)
        # self.aux4 = SegmentHead(64, 128, n_classes, up_factor=16)
        # self.aux5_4 = SegmentHead(128, 128, n_classes, up_factor=32)

    def forward(self, x):
        # feat2 = self.S1S2(x)  #输出为[16,16,256,128]
        logits = self.head(x)
        # logits_aux2 = self.aux2(x)

        # logits_aux3 = self.aux3(feat3)
        # logits_aux4 = self.aux4(feat4)
        # logits_aux5_4 = self.aux5_4(feat5_4)
        # return  logits_aux2, logits_aux3, logits_aux4, logits_aux5_4
        # return  logits_aux2
        return  logits


def save_onnx(model,x,model_file_name):
    torch_out = torch.onnx.export(model, x,
                              model_file_name,
                               export_params=True,
                               verbose=True)

def save_scale_onnx(model_file_name):
    model = model_file_name
    onnx.save(onnx.shape_inference.infer_shapes(onnx.load(model)), model)

if __name__ == "__main__":
    steamblock_net = ChenAuxBlock(19)  #假设默认19个类
    # x = torch.randn(16, 3, 1024, 512)
    x = torch.randn(16, 128, 128, 64)
    dt_out = steamblock_net(x)
    print(dt_out.shape)


    # model_file_name = "D:/pytorch_learning2022/5chen_segement_test2022/BiSeNet/chentest_v2_print_mode/chen_aux.onnx"
    model_file_name = "D:/pytorch_learning2022/5chen_segement_test2022/BiSeNet/chentest_v2_print_mode/chen_aux_head.onnx"
    # #打印网络结构
    # summary(steamblock_net, input_size=(16, 3, 1024, 512))
    summary(steamblock_net, input_size=(16, 128, 256, 128))
    # 保存为onnx
    save_onnx(steamblock_net,x,model_file_name)
    # #保存为onnx 有尺寸
    save_scale_onnx(model_file_name)
5.7.4 语义分支的实现
PS注意:这一节暂未给出训练用的辅助分类头
(1)对应整体网络结构部分
(2)手绘实现
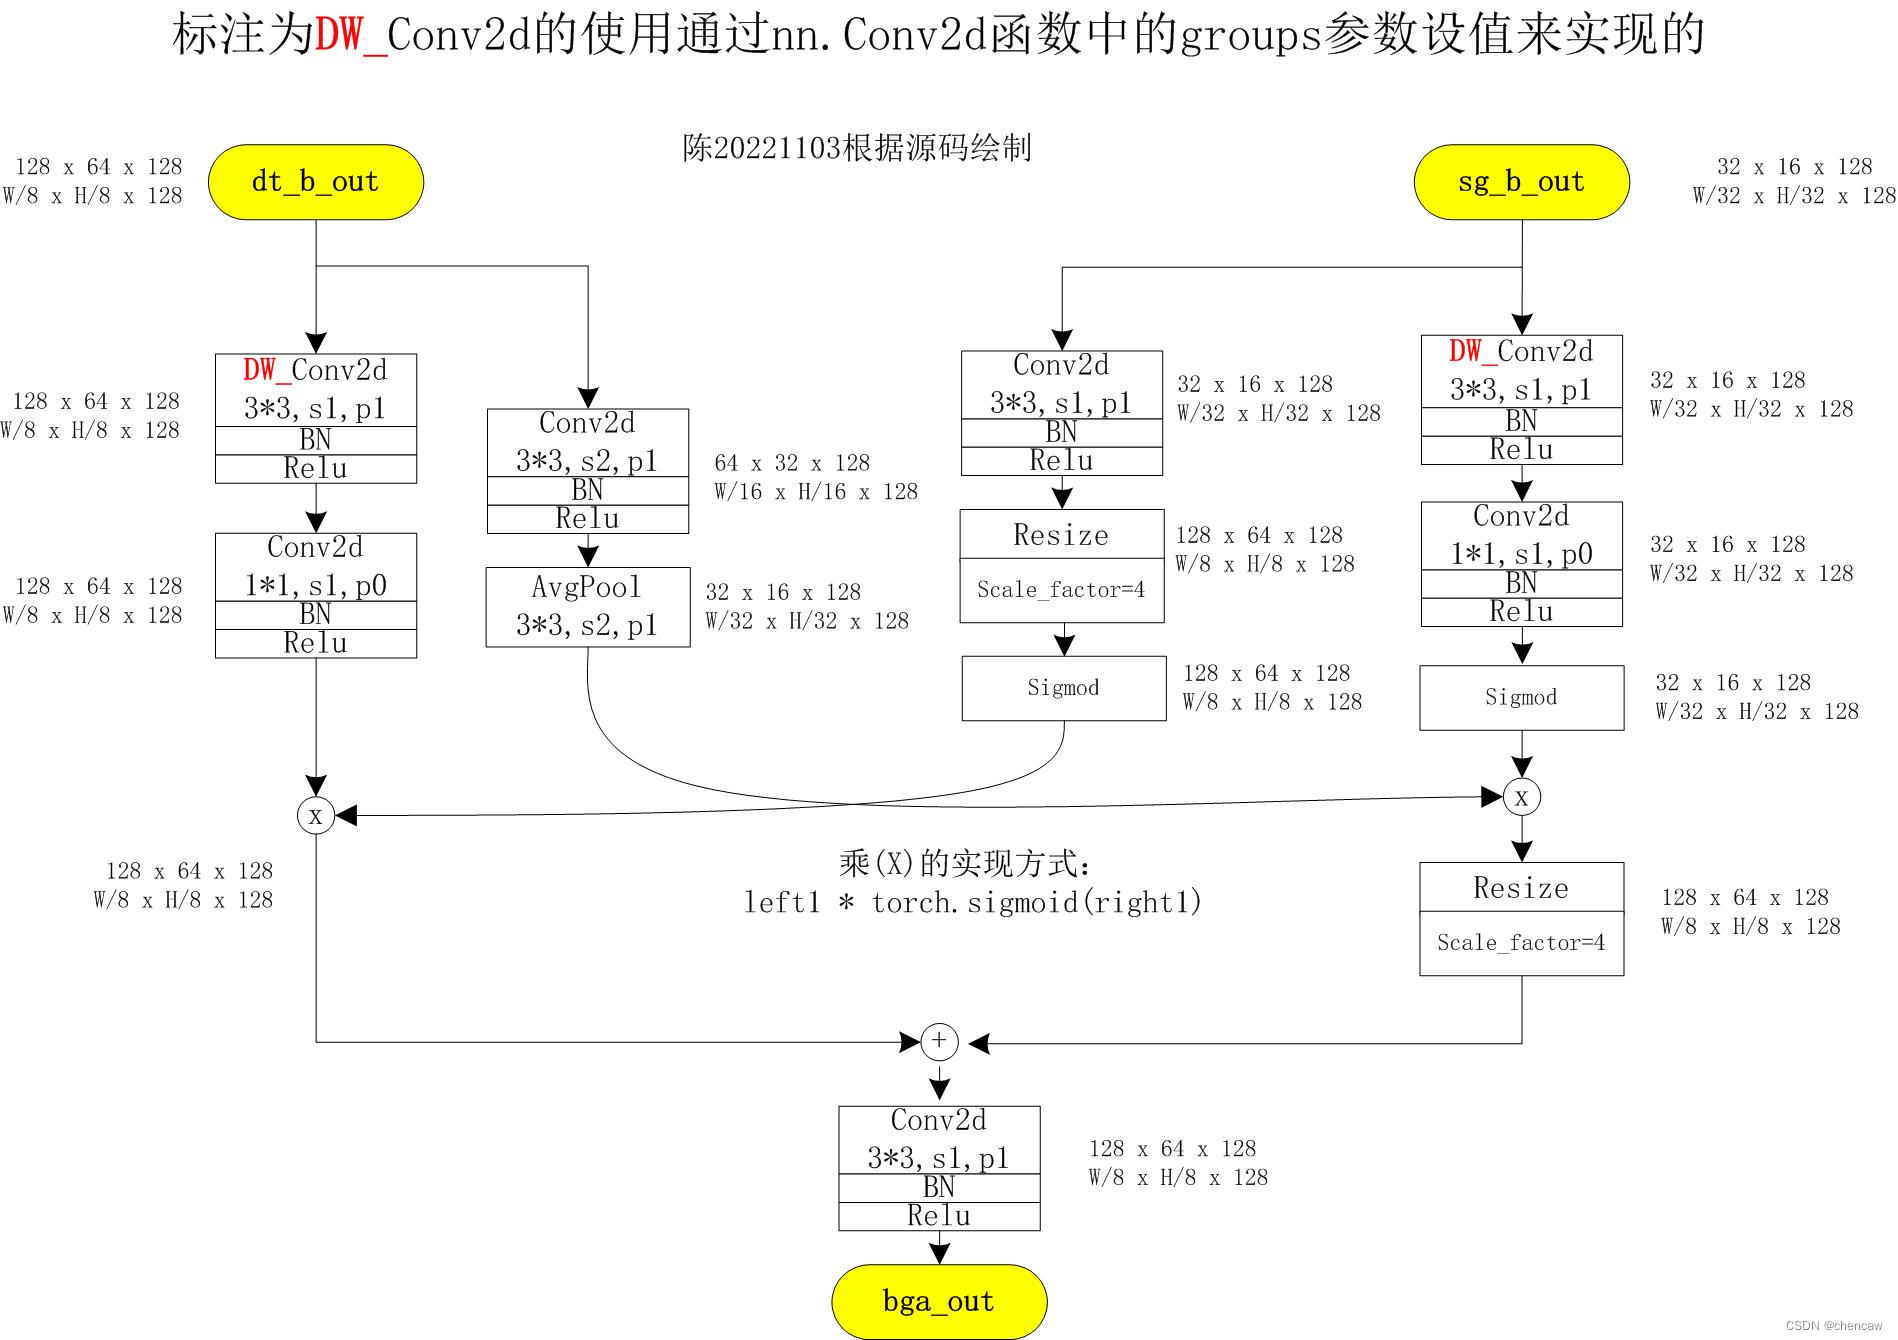
5.7.5聚合头
(1)原理:
细节分支和语义分支的特征表示是互补的,其中一个不知道另一个的信息。因此,设计了一个聚合层来合并这两种类型的特性表示。由于采用了快速下采样策略,语义分支的输出空间维度比细节分支小,所以需要对语义的输出特征图进行向上采样分支以匹配细节分支的输出。
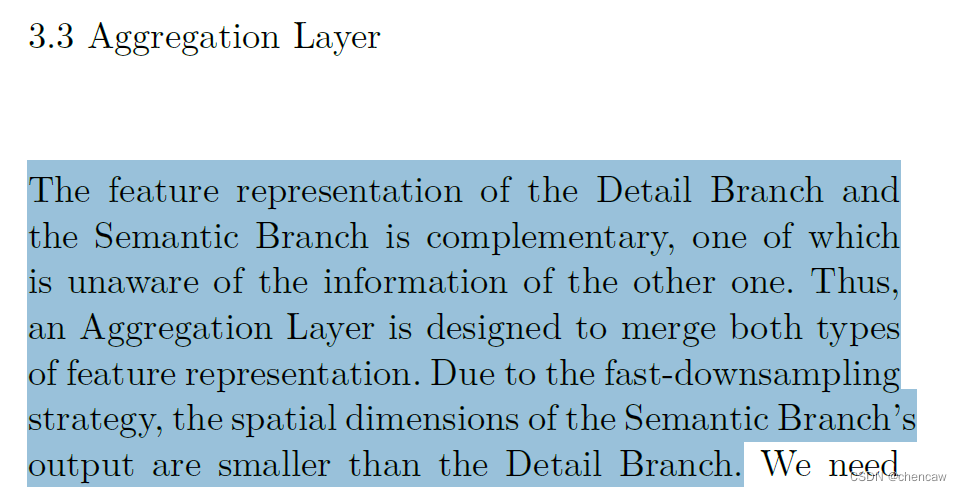
有一些不同的方式来合并两种类型的特征响应,即元素方式的求和和连接。但是,这两个分支的输出具有不同级别的特征表示。细节分支是低级的,而语义分支是高级的。因此,简单的组合忽略了这两类信息的多样性,导致性能下降和难以优化。
在观察的基础上,我们提出双边引导的聚合层融合来自两个分支的互补信息,如图所示。该层使用的是上下文信息语义分支用来指导细节分支的特征响应。通过不同的尺度指导,可以捕获不同的尺度特征表示,这些特征表示对多尺度信息进行了固有的编码。同时,与简单的组合方式相比,这种引导方式可以使两个分支之间进行有效的通信。
(2)网络结构
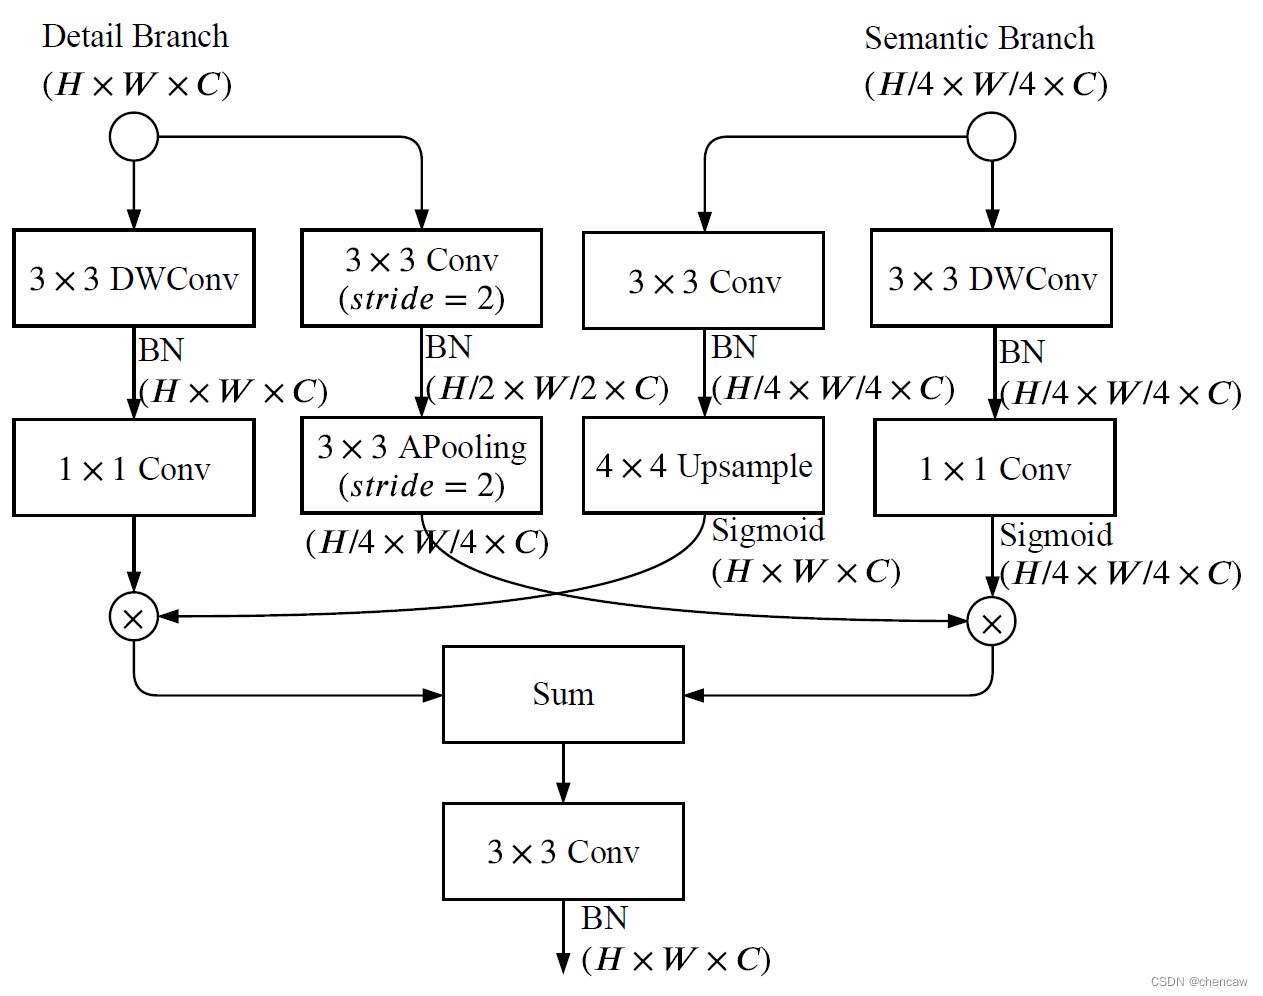
(3)手绘图
注意:原图中,右边的分支少了1次上采样4倍,然后在先加

(4)测试代码
import torch
import torch.nn as nn
import torch.nn.functional as F
import torchvision

# from resnet import Resnet18

from torch.nn import BatchNorm2d

#清晰打印网络结构
from torchinfo import summary

#保存为onnx
import torch
import torch.onnx
from torch.autograd import Variable

#导出有尺寸
import onnx
# from onnx import shape_inference

class ConvBNReLU(nn.Module):

    def __init__(self, in_chan, out_chan, ks=3, stride=1, padding=1,
                 dilation=1, groups=1, bias=False):
        super(ConvBNReLU, self).__init__()
        self.conv = nn.Conv2d(
                in_chan, out_chan, kernel_size=ks, stride=stride,
                padding=padding, dilation=dilation,
                groups=groups, bias=bias)
        self.bn = nn.BatchNorm2d(out_chan)
        self.relu = nn.ReLU(inplace=True)

    def forward(self, x):
        feat = self.conv(x)
        feat = self.bn(feat)
        feat = self.relu(feat)
        return feat


class BGALayer(nn.Module):
    def __init__(self):
        super(BGALayer, self).__init__()
        self.left1 = nn.Sequential(
            nn.Conv2d(
                128, 128, kernel_size=3, stride=1,
                padding=1, groups=128, bias=False),
            nn.BatchNorm2d(128),
            nn.Conv2d(
                128, 128, kernel_size=1, stride=1,
                padding=0, bias=False),
        )
        self.left2 = nn.Sequential(
            nn.Conv2d(
                128, 128, kernel_size=3, stride=2,
                padding=1, bias=False),
            nn.BatchNorm2d(128),
            nn.AvgPool2d(kernel_size=3, stride=2, padding=1, ceil_mode=False)
        )
        self.right1 = nn.Sequential(
            nn.Conv2d(
                128, 128, kernel_size=3, stride=1,
                padding=1, bias=False),
            nn.BatchNorm2d(128),
        )
        self.right2 = nn.Sequential(
            nn.Conv2d(
                128, 128, kernel_size=3, stride=1,
                padding=1, groups=128, bias=False),
            nn.BatchNorm2d(128),
            nn.Conv2d(
                128, 128, kernel_size=1, stride=1,
                padding=0, bias=False),
        )
        self.up1 = nn.Upsample(scale_factor=4)
        self.up2 = nn.Upsample(scale_factor=4)
        ##TODO: does this really has no relu?
        self.conv = nn.Sequential(
            nn.Conv2d(
                128, 128, kernel_size=3, stride=1,
                padding=1, bias=False),
            nn.BatchNorm2d(128),
            nn.ReLU(inplace=True), # not shown in paper
        )

    def forward(self, x_d, x_s):
        dsize = x_d.size()[2:]
        left1 = self.left1(x_d)
        left2 = self.left2(x_d)
        right1 = self.right1(x_s)
        right2 = self.right2(x_s)
        right1 = self.up1(right1)
        left = left1 * torch.sigmoid(right1)
        right = left2 * torch.sigmoid(right2)
        right = self.up2(right)
        out = self.conv(left + right)
        return out


# def save_onnx(model,x,model_file_name):
#     torch_out = torch.onnx.export(model, x,
#                               model_file_name,
#                                export_params=True,
#                                verbose=True)

def save_onnx(model,x1, x2,  model_file_name):
    torch_out = torch.onnx.export(model, (x1, x2),
                              model_file_name,
                               export_params=True,
                               verbose=True)


def save_scale_onnx(model_file_name):
    model = model_file_name
    onnx.save(onnx.shape_inference.infer_shapes(onnx.load(model)), model)

if __name__ == "__main__":

    bga_net = BGALayer()
    dt_b_out = torch.randn(16, 128, 128, 64)  #detail_branch_out
    sg_b_out = torch.randn(16, 128, 32, 16)   #segment_branch_out

    dt_out = bga_net(dt_b_out,sg_b_out)
    print(dt_out.shape)


    model_file_name = "D:/pytorch_learning2022/5chen_segement_test2022/BiSeNet/chentest_v2_print_mode/chen_bga.onnx"
    # #打印网络结构
    summary(bga_net, input_size=[(16, 128, 128, 64), (16, 128, 32, 16)])
    # #保存为onnx
    save_onnx(bga_net, dt_b_out, sg_b_out, model_file_name)
    # #保存为onnx 有尺寸
    save_scale_onnx(model_file_name)
(5)netron导出的图
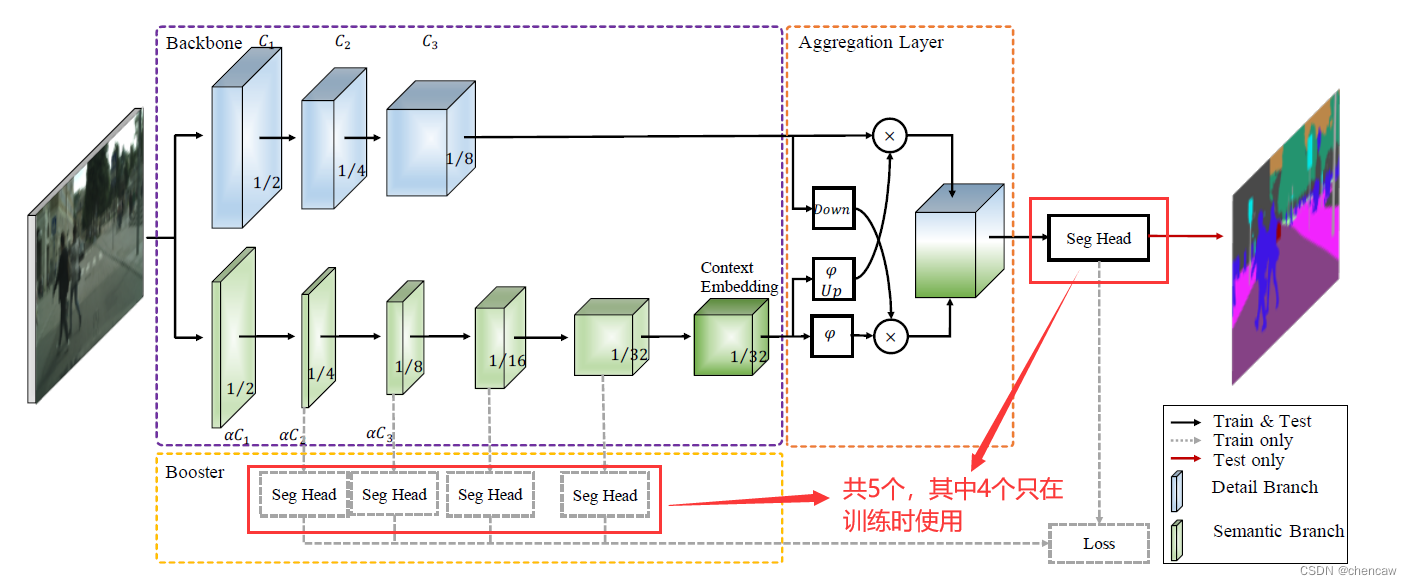
5.8 BiseNet V2的网络结构完整展示
基于github的代码,手绘。可能有误。
注意:
(1)实际网络对应的输入通道排布为[B,C,W,H],我手绘的图都是使用了[W,H,C]。
(2)其中的两个辅助输出头在训练的时候用到,推理测试的时候不用。
(3)测试的时候,最终输出需要加上
(4)DW_Conv2d的实现方式,通过nn.Conv2d函数中的groups参数设值来实现的
普通的Conv2d中groups=1
5.8.1 bisenetv2网络整体结构
5.8.2 细节分支detail branch的结构
5.8.3 语义分支segment branch的结构
5.8.4 语义分支segment branch的中steam的结构
5.8.5 语义分支segment branch中GeS1和GeS2的结构
标注为DW_Conv2d的使用通过nn.Conv2d函数中的groups参数设值来实现的

5.8.5 语义分支segment branch中连接的4个训练用辅助头
尤其注意:Resize的实现方法注意:只在训练用的4个辅助头
- (1)分2次上采样,第一次上采样2倍,第二次上采样剩下的object_factor/2倍;
- (2)channel调整为分类多少前面的那一层channel为:obj_ch=object_factor*object_factor
(1)
(2)四个训练用辅助头的变换关系
SegmentHead(Ci, Cout, n_classes, up_factor=f)
比如:
self.aux2 = SegmentHead(16, 128, n_classes, up_factor=4)
self.aux3 = SegmentHead(32, 128, n_classes, up_factor=8)
self.aux4 = SegmentHead(64, 128, n_classes, up_factor=16)
self.aux5_4 = SegmentHead(128, 128, n_classes, up_factor=32)
5.8.6 聚合头BGA
注意:这里相比于论文中的原图,右边的分支多了1次上采样4倍,然后再先加
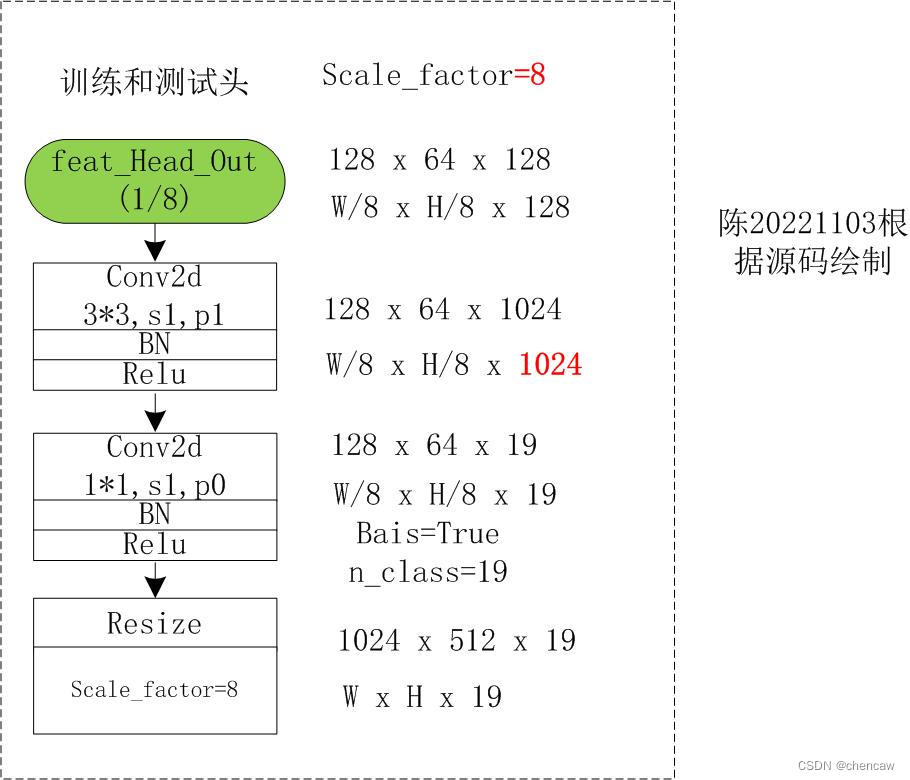
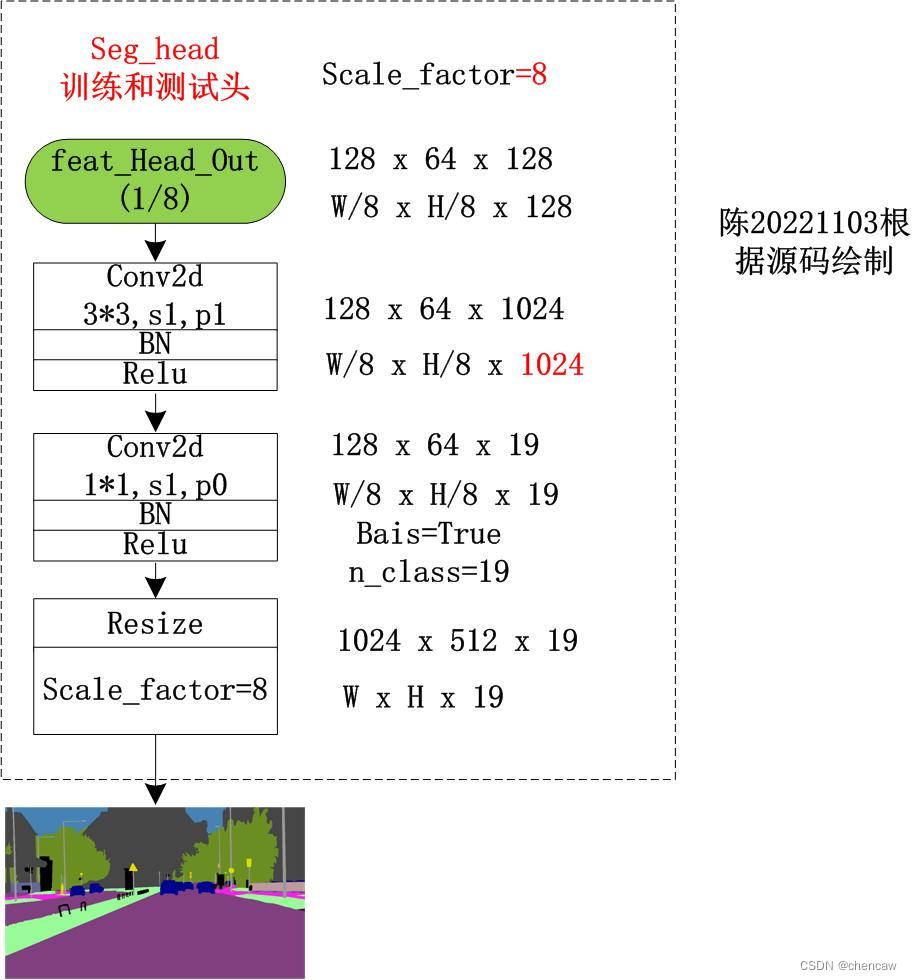
5.8.7 训练和测试都用到的head
该输出头在网络的最后,训练和测试中都用到,接着上面的bga_out
所有都写完了,visio画的图居然没保存:(


 1189
1189

 被折叠的 条评论
为什么被折叠?
被折叠的 条评论
为什么被折叠?
 到【灌水乐园】发言


