


 本文详细介绍了如何在Win10系统上无GPU环境下配置PyTorch环境,包括创建虚拟环境、安装PyTorch及关联PyCharm。此外,还深入探讨了数据扩增的方法及其在不同任务中的应用,如图像分类、物体检测和图像分割。
环境配置
win10系统 无GPU 已有Anaconda3
1.首先打开Anaconda Prompt,在Anaconda 中创建一个虚拟环境 取名torch
$conda create -n torch python=3.7
2.激活环境,安装pytorch
$activate torch
先添加清华镜像,这样下载快
$conda config --add channels https://mirrors.tuna.tsinghua.edu.cn/anaconda/pkgs/free/
$conda config --add channels https://mirrors.tuna.tsinghua.edu.cn/anaconda/pkgs/main/
$conda config --set show_channel_urls yes
#添加清华镜像
$conda config --add channels https://mirrors.tuna.tsinghua.edu.cn/anaconda/cloud/pytorch/
接着打开官网https://pytorch.org/get-started/locally/ 选择相应的配置
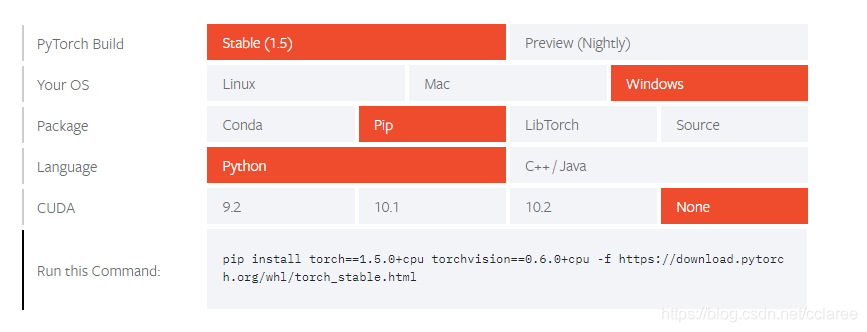 复制给出的命令,使用此命令进行安装
$pip install torch==1.5.0+cpu torchvision==0.6.0+cpu -f https://download.pytorch.org/whl/torch_stable.html
验证是否安装成功
$python
$import torch
$import torchvision
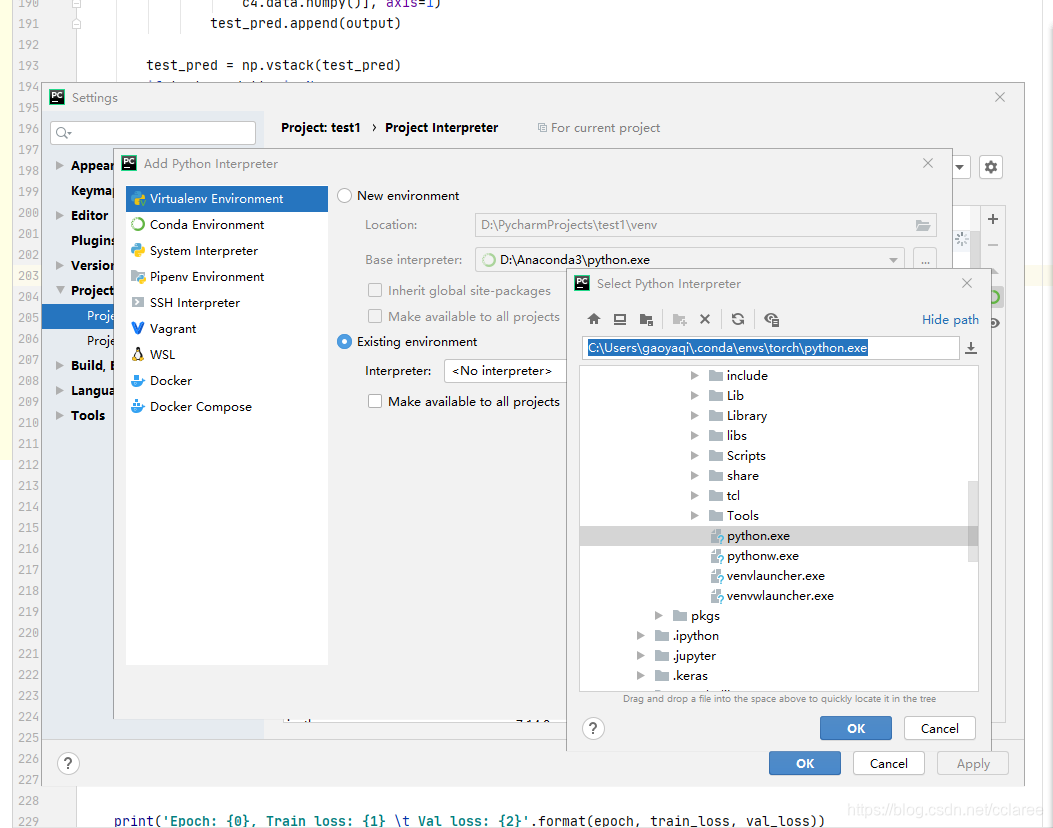
关联Pycharm
首先在Anaconda Prompt中查看新建的虚拟环境在哪个目录下:> conda env list
接着在pycharm中选择File->setting->Project:XXXX->Project Interperter->设置->add->existing environment 添加虚拟环境的路径即可
数据读取与扩增
在Pytorch中数据是通过Dataset进行封装,并通过DataLoder进行并行读取。所以只需要重载一下数据读取的逻辑就可以完成数据的读取。
数据扩增可以增加训练集的样本,同时也可以有效缓解模型过拟合的情况,也可以给模型带来的更强的泛化能力。
数据扩增方法有很多:从颜色空间、尺度空间到样本空间,同时根据不同任务数据扩增都有相应的区别。
对于图像分类,数据扩增一般不会改变标签;对于物体检测,数据扩增会改变物体坐标位置;对于图像分割,数据扩增会改变像素标签。
import os, sys, glob, shutil, json
import cv2

from PIL import Image
import numpy as np

import torch
from torch.utils.data.dataset import Dataset
import torchvision.transforms as transforms

class SVHNDataset(Dataset):
    def __init__(self, img_path, img_label, transform=None):
        self.img_path = img_path
        self.img_label = img_label
        if transform is not None:
            self.transform = transform
        else:
            self.transform = None

    def __getitem__(self, index):
        img = Image.open(self.img_path[index]).convert('RGB')

        if self.transform is not None:
            img = self.transform(img)

        # 原始SVHN中类别10为数字0
        lbl = np.array(self.img_label[index], dtype=np.int)
        lbl = list(lbl)  + (5 - len(lbl)) * [10]

        return img, torch.from_numpy(np.array(lbl[:5]))

    def __len__(self):
        return len(self.img_path)

train_path = glob.glob('../input/train/*.png')
train_path.sort()
train_json = json.load(open('../input/train.json'))
train_label = [train_json[x]['label'] for x in train_json]

train_loader = torch.utils.data.DataLoader(
        SVHNDataset(train_path, train_label,
                   transforms.Compose([
                       transforms.Resize((64, 128)),
                       transforms.ColorJitter(0.3, 0.3, 0.2),
                       transforms.RandomRotation(5),
                       transforms.ToTensor(),
                       transforms.Normalize([0.485, 0.456, 0.406], [0.229, 0.224, 0.225])
            ])),
    batch_size=10, # 每批样本个数
    shuffle=False, # 是否打乱顺序
    num_workers=10, # 读取的线程个数
)

for data in train_loader:
    break
参考文献
解决import torchvision 报错问题 DLL:找不到模块
安装Anaconda创建虚拟环境以及在pycharm中使用虚拟环境
Datawhale 零基础入门CV赛事-Task2 数据读取与数据扩增


 1258
1258

 被折叠的 条评论
为什么被折叠?
被折叠的 条评论
为什么被折叠?
 到【灌水乐园】发言


