


本设计基于FPGA开发板EP4CE10F17C8进行实验。
设计功能包括:通过按键设置时间和闹钟功能,数码管驱动、按键消抖和检测等功能通过PL端完成。
附带原工程下载链接,供读者参考。https://download.youkuaiyun.com/download/c_lllll_ll/92313672
1.打开Quartus新建工程。
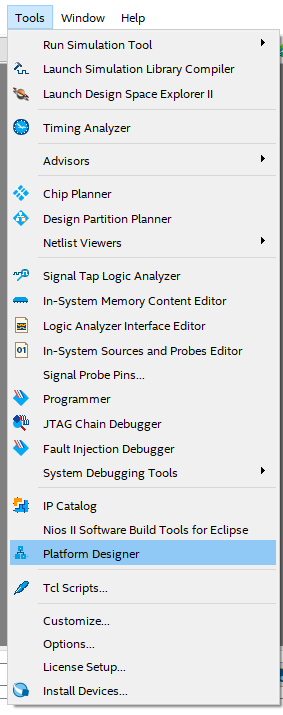
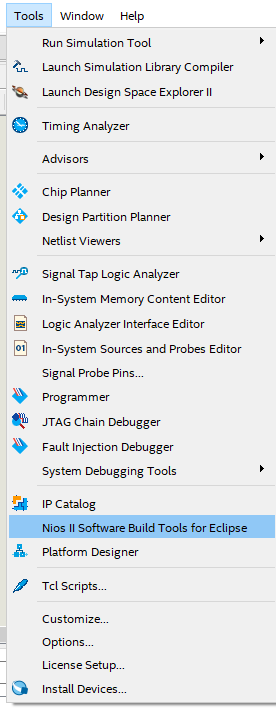
2.点击Tools—>Platform Designer
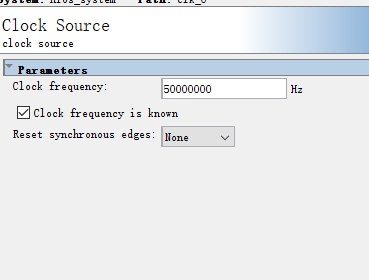
3.双击时钟,修改为50Mhz。

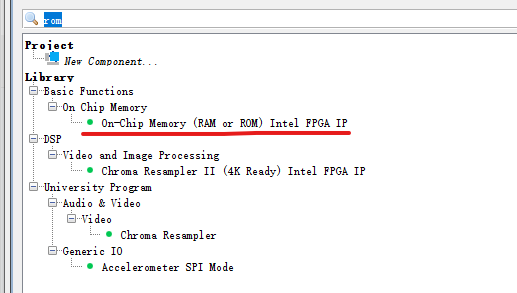
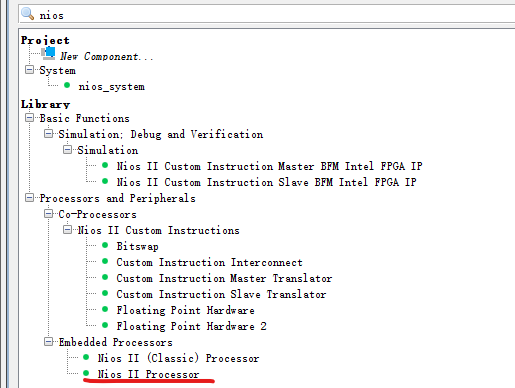
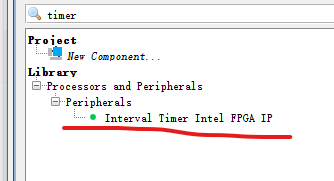
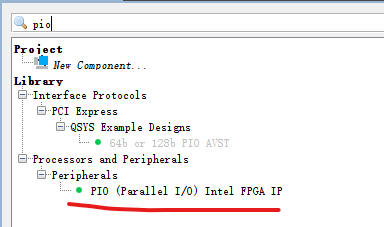
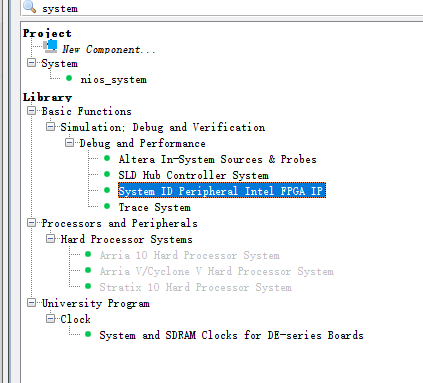
4.左上角搜索中进行输入名称,添加模块。
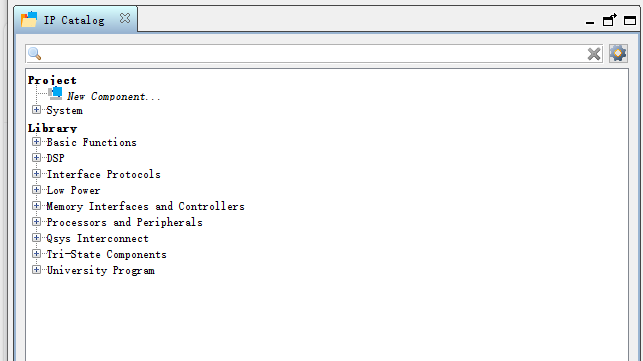
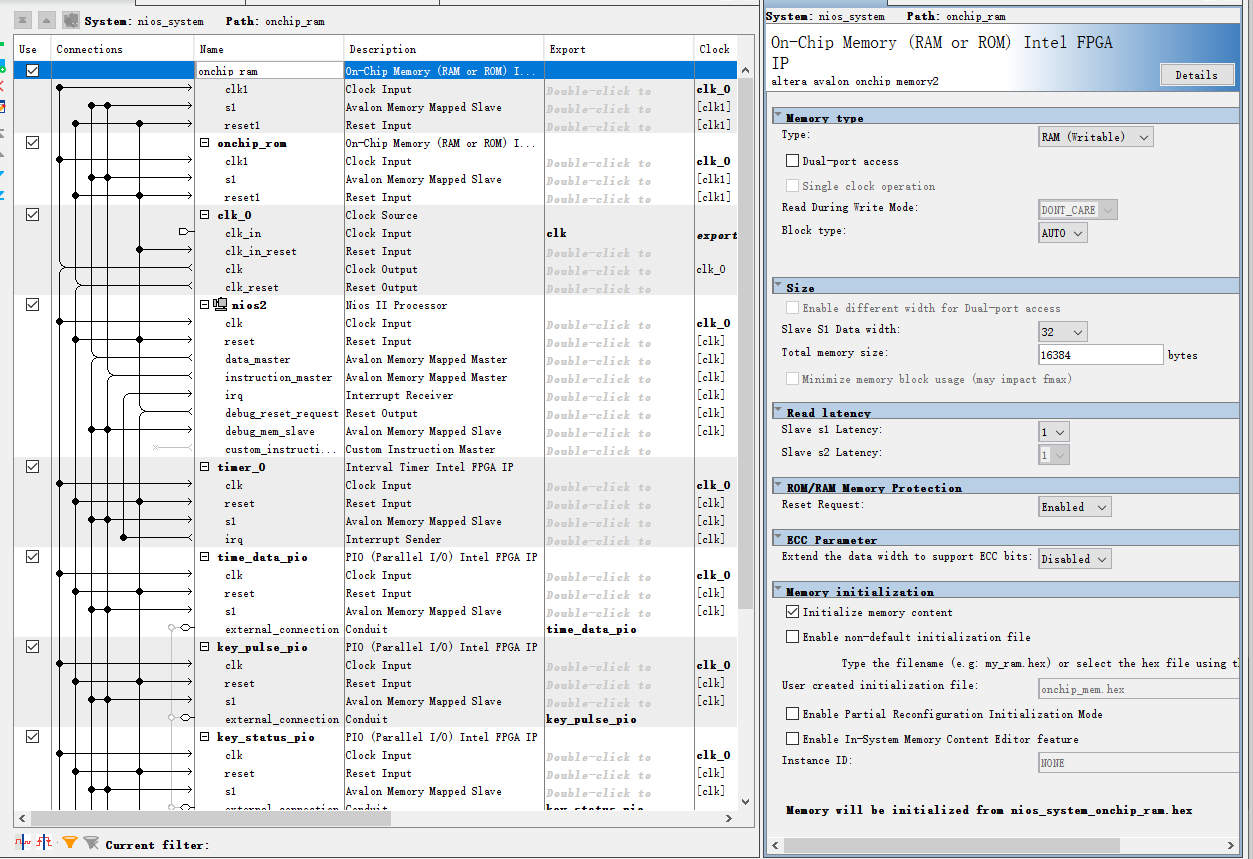
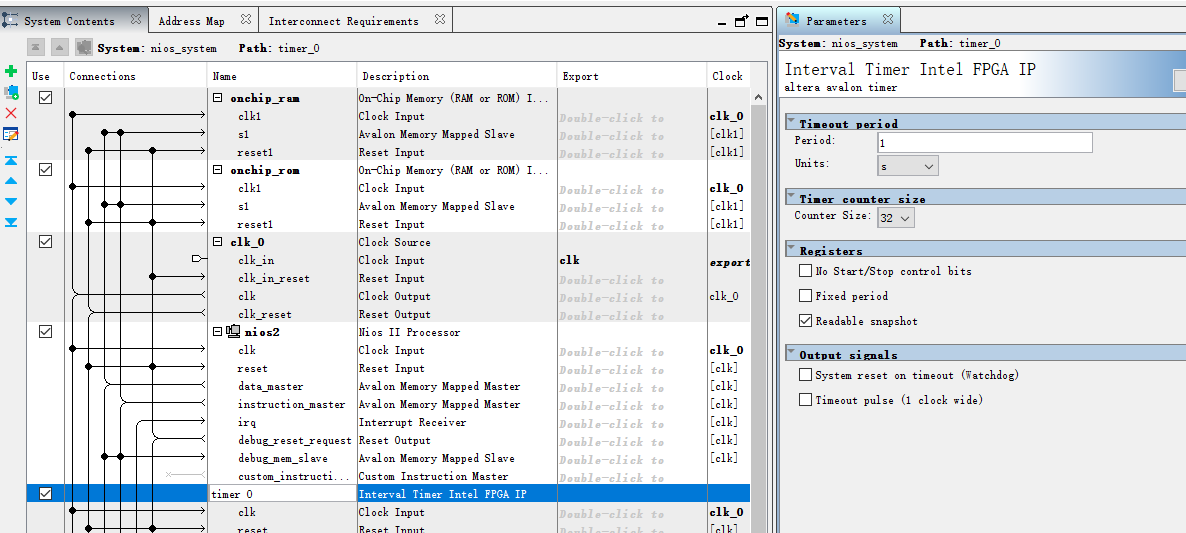
5.分别添加rom,ram,Nios II processer,timer,pio等模块。On Chip Meory添加两个,一个作为rom,一个作为ram,五个pio。
6.先改名,然后连线。
左端出来pio的输入或者输出引脚不连线,其他的点均连上,右边的NiosII 与timer定时器的 中断需要连线。

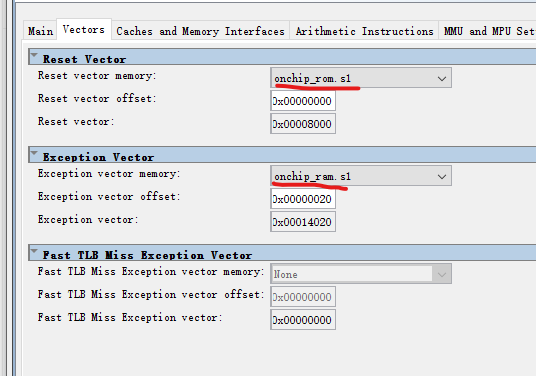
7.进行配置。
(1)onchip_ram
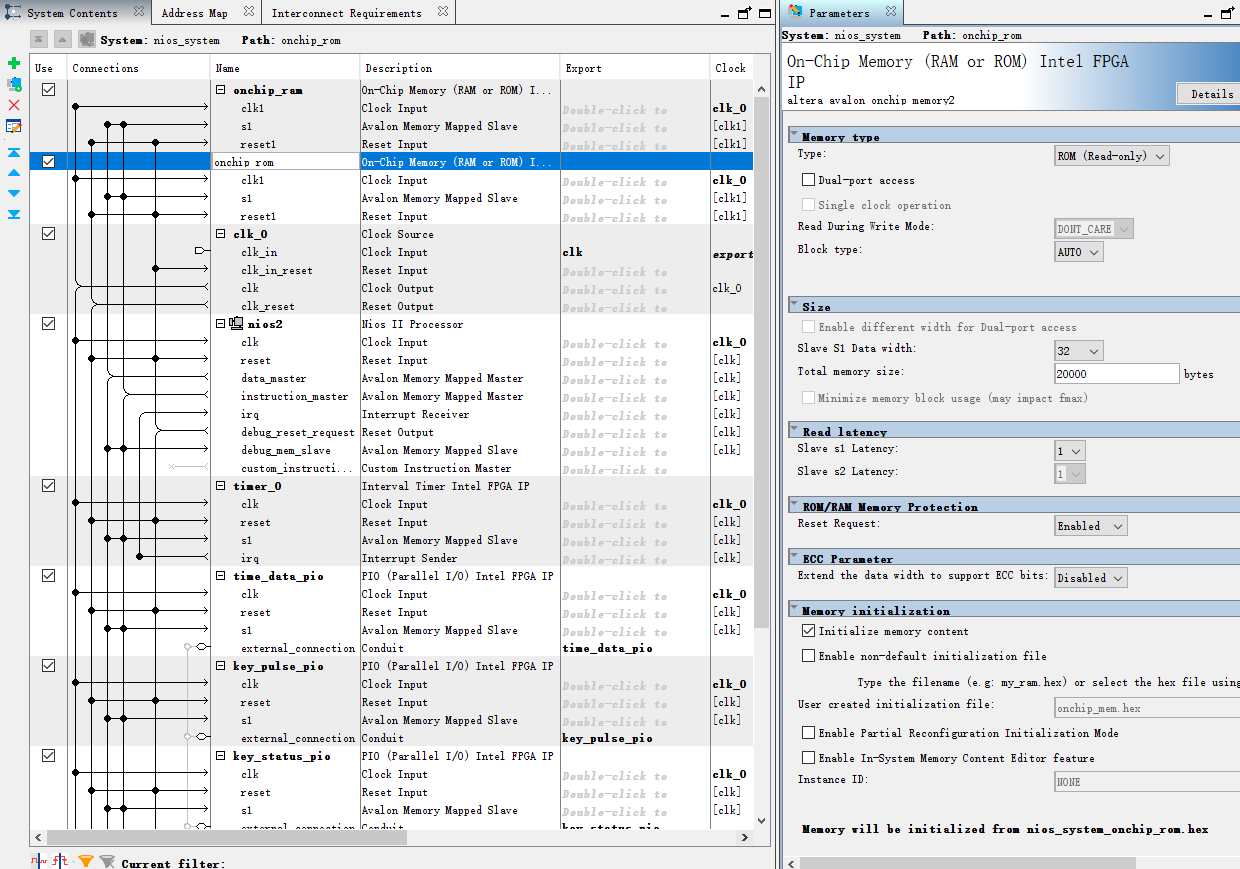
 (2)onchip_rom
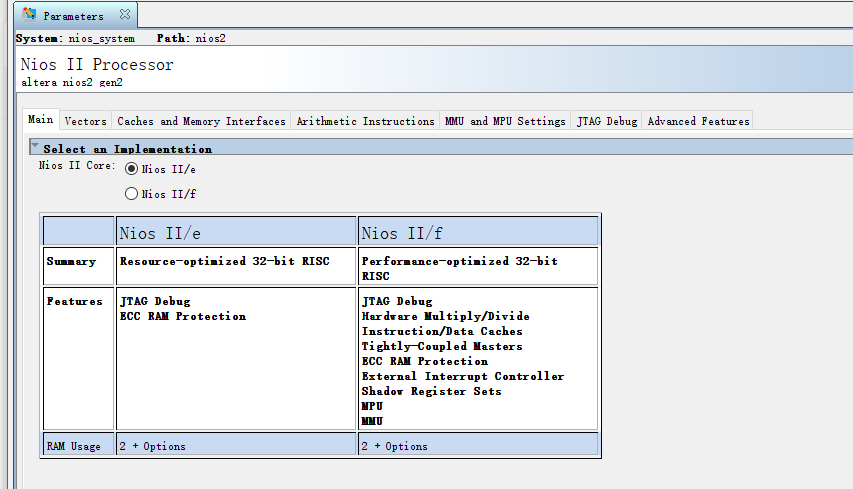
(3)Nios II,修改下面的,其他默认。
(4)定时器timer_0
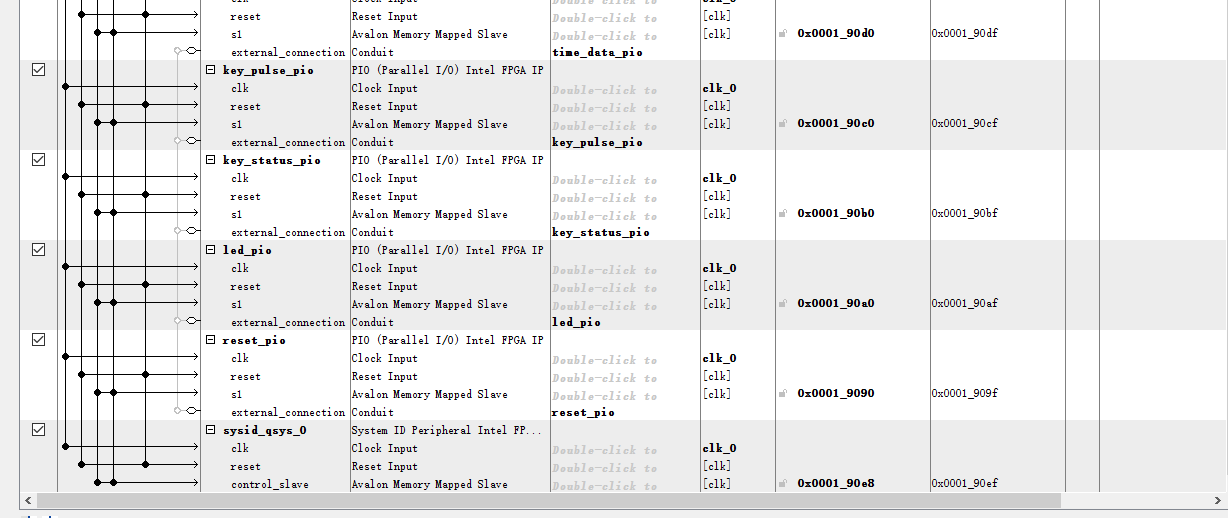
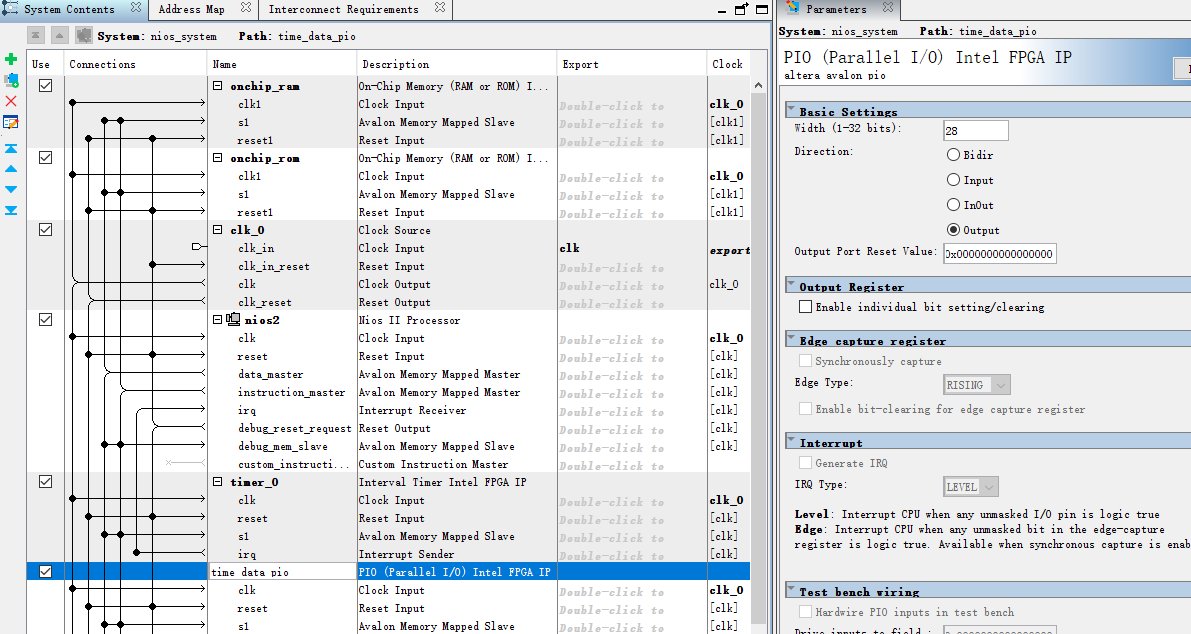
(5)time_data_pio
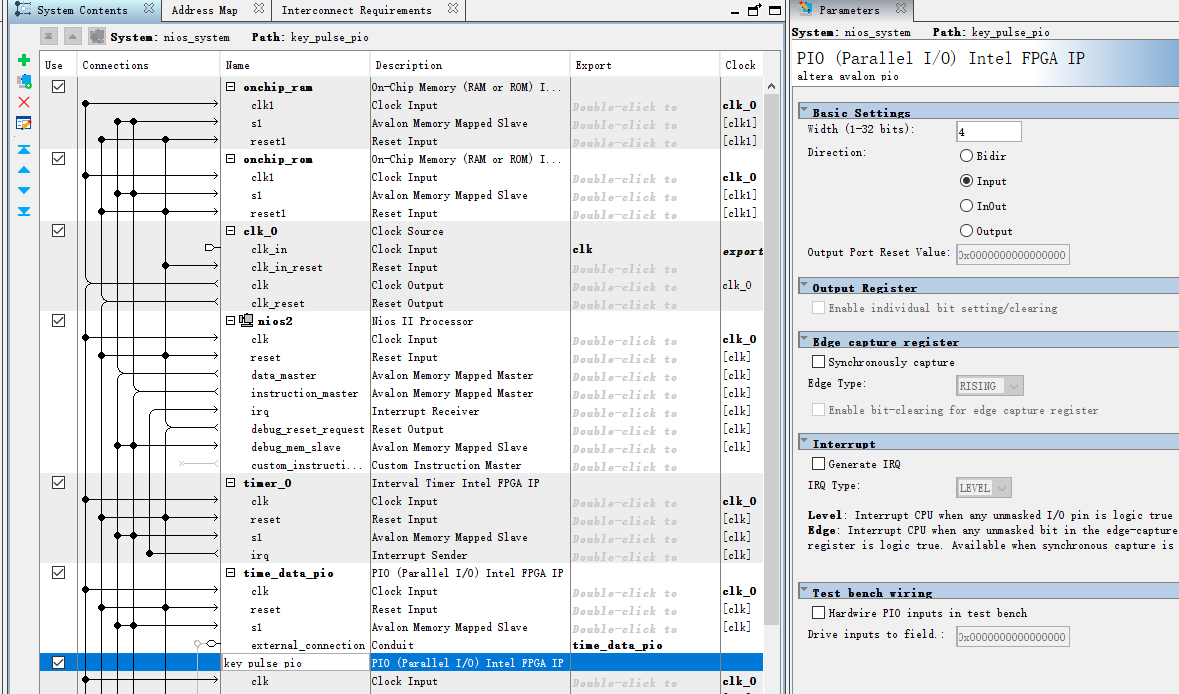
(6)key_pulse_pio
(7)key_status_pio
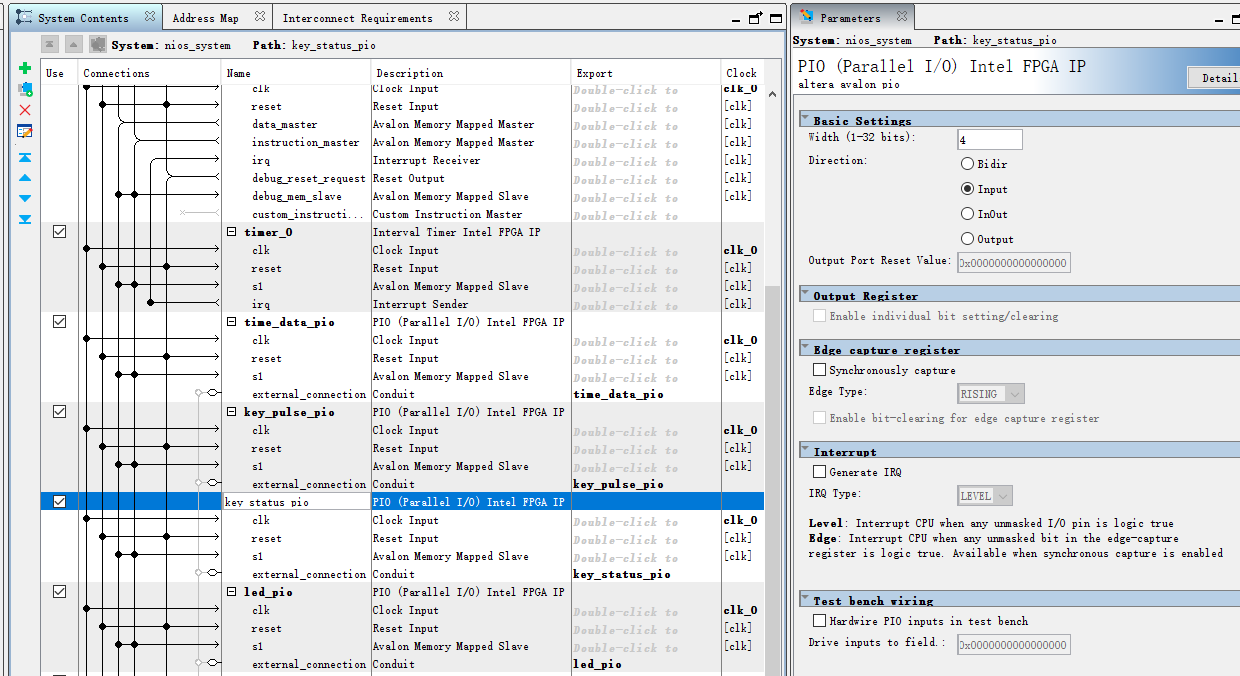
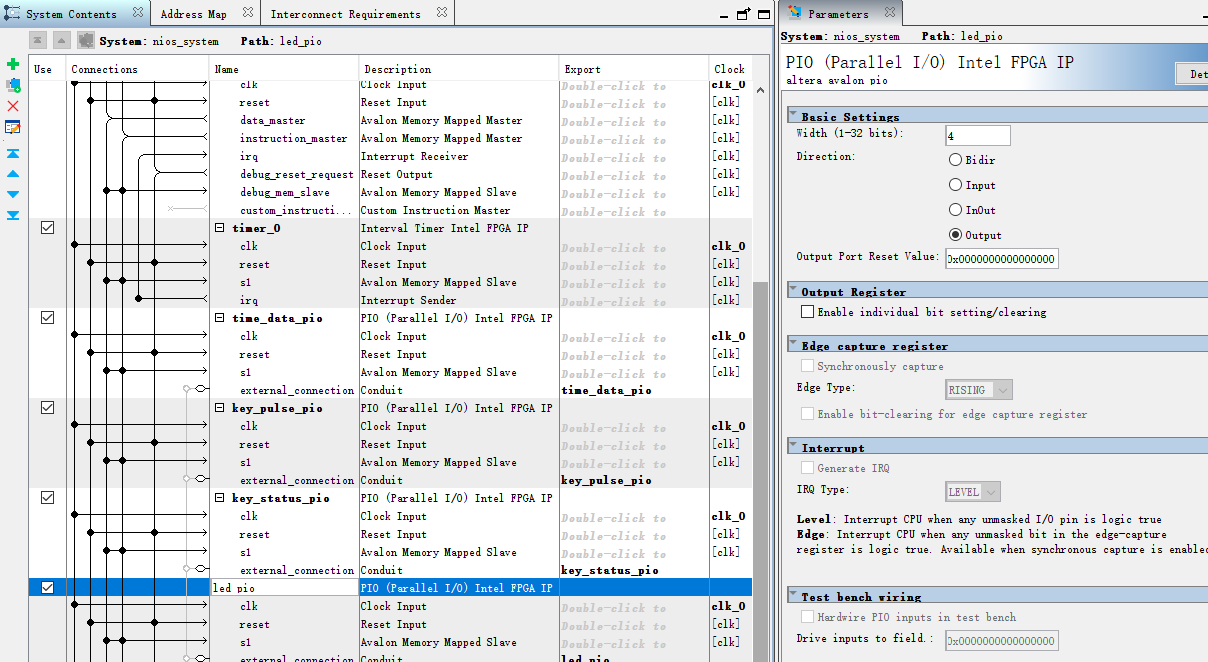
(8)闹钟响应采用流水灯效果。led_pio
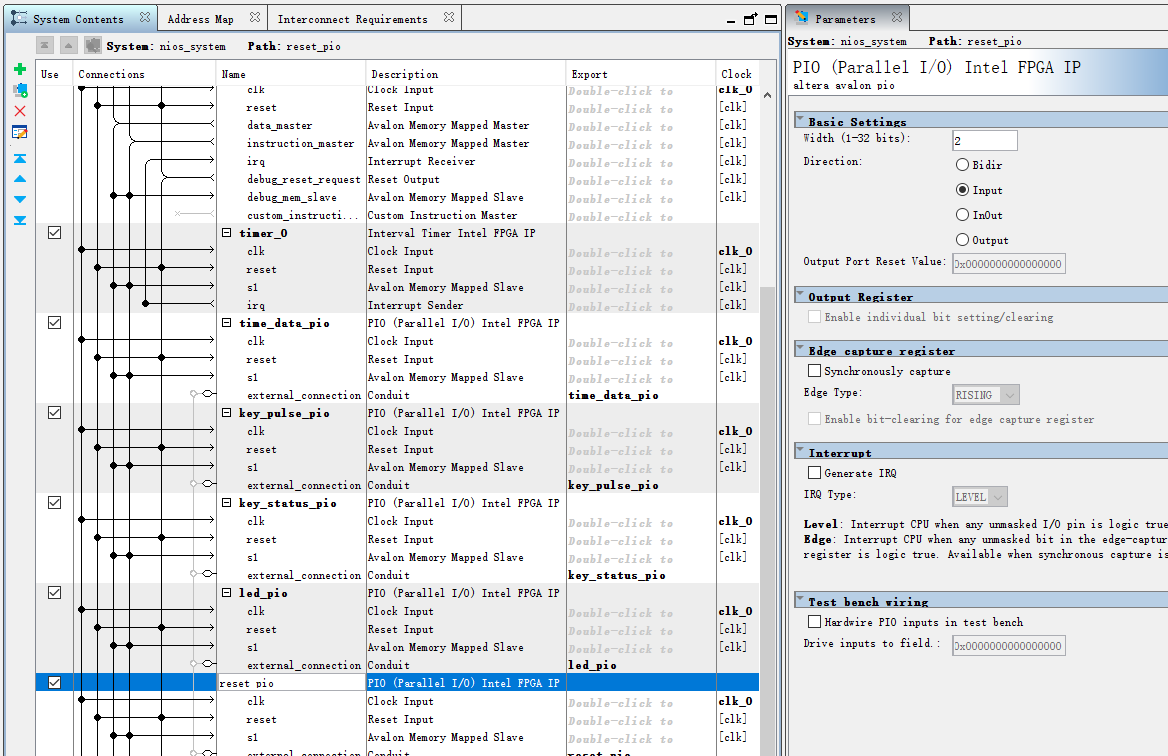
(9)reset_pio,用于ps端复位显示时间
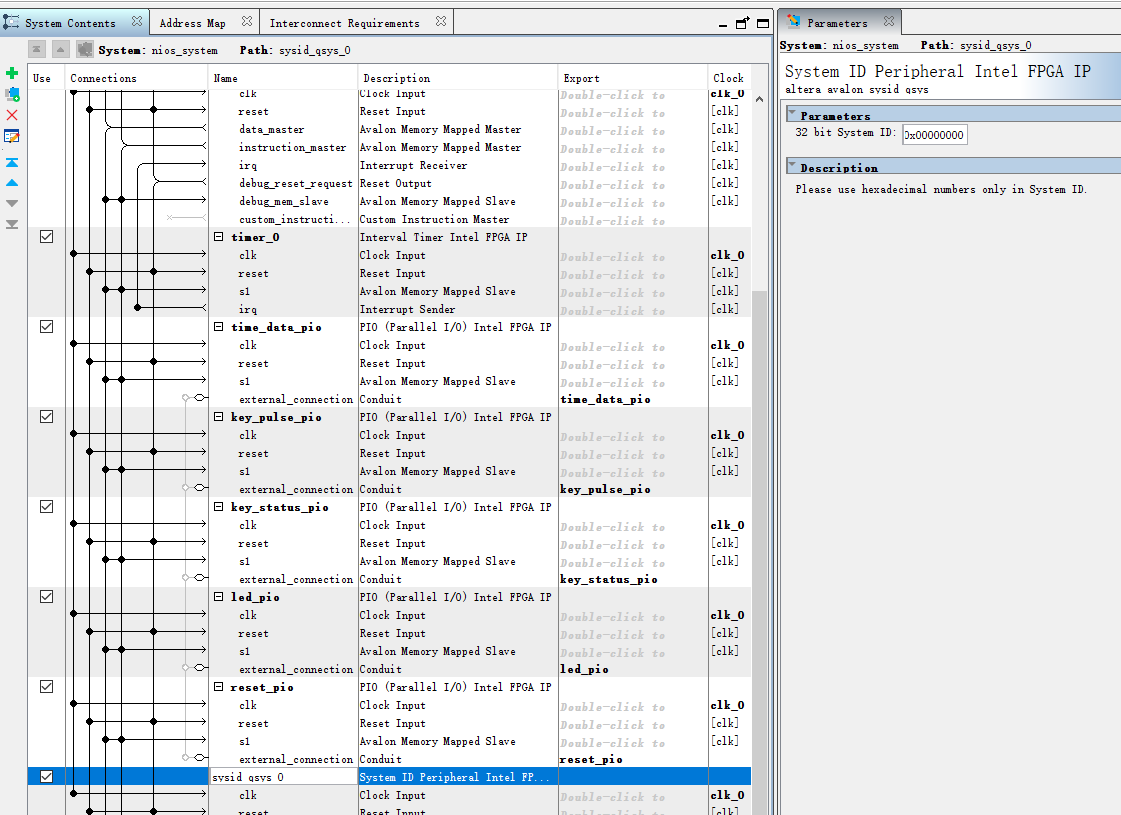
(10)系统id模块
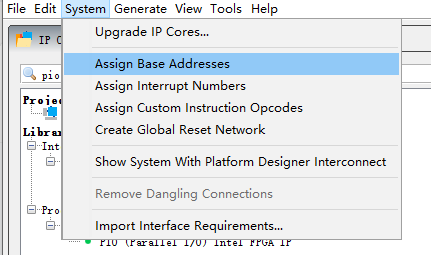
8.配置完成后,分配地址。
9.进行保存,ctrl+s。修改文件名为nios_system
10.进行编译。
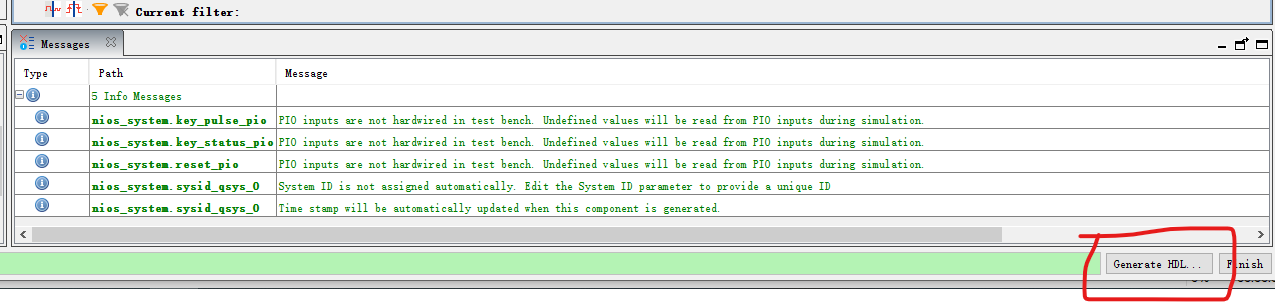
11.编译完后,关闭页面。
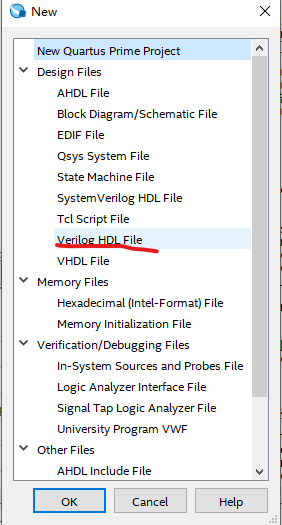
12.新建.v文件
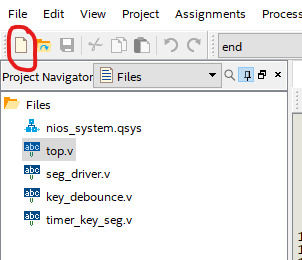
13.新建top.v文件。顶层文件。
// 顶层模块
//整合Qsys和pl_top模块
module top (
    input wire clk_50m,
    input wire rst_n,
    input wire [3:0] key,        // 4个按键
    // 数码管输出
    output wire [7:0] seg_data,  // 段选
    output wire [5:0] seg_sel,   // 位选
    // LED输出(4个流水灯)
    output wire [3:0] led        // LED输出
);

wire [3:0] hour_ten, hour_one;
wire [3:0] min_ten, min_one;
wire [3:0] sec_ten, sec_one;
wire [3:0] key_pulse, key_status;
wire [3:0] led_pio;

nios_system u_nios_system (
    .clk_clk(clk_50m),
    .time_data_pio_export({hour_ten, hour_one, min_ten, min_one, sec_ten, sec_one}),
    .key_pulse_pio_export(key_pulse),    // 按键脉冲
    .key_status_pio_export(key_status),  // 按键状态
    .led_pio_export(led_pio),            // LED输出PIO
	 .reset_pio_export(rst_n)
);

//数码管驱动,按键控制
timer_key_seg u_timer_key_seg (
    .clk(clk_50m),
    .rst_n(rst_n),
    .key(key),
    .seg_data(seg_data),
    .seg_sel(seg_sel),
    .hour_ten(hour_ten),
    .hour_one(hour_one),
    .min_ten(min_ten),
    .min_one(min_one),
    .sec_ten(sec_ten),
    .sec_one(sec_one),
    .key_pulse(key_pulse),
    .key_status(key_status)
);

// 闹钟响应,LED输出
assign led = led_pio;

endmodule
14.按键消抖模块,命名为key_debounce
// 按键消抖模块

module key_debounce (
    input wire clk,
    input wire rst_n,
    input wire [3:0] key_in,     //按键输入

    output reg [3:0] key_out,    // 消抖后的按键输出
    output reg [3:0] key_state   // 按键状态
);

parameter CNT_MAX = 24'd1000000;  // 消抖时间20ms

reg [23:0] cnt [3:0];
reg [3:0]  key_sync0;
reg [3:0]  key_sync1;
reg [3:0]  key_press;            // 按键按下标志
reg [3:0]  key_press_dly;        // 按键按下标志的延迟

// 打两拍
always @(posedge clk or negedge rst_n) begin
    if (!rst_n) begin
        key_sync0 <= 4'b1111;
        key_sync1 <= 4'b1111;
    end else begin
        key_sync0 <= key_in;
        key_sync1 <= key_sync0;
    end
end

// 按键消抖处理
genvar j;
generate
    for (j = 0; j < 4; j = j + 1) begin : key_debounce_gen
        always @(posedge clk or negedge rst_n) begin
            if (!rst_n) begin
                key_press[j] <= 1'b0;
                cnt[j] <= 24'd0;
            end
				else begin
                if (key_sync1[j] == 1'b0) begin
                    // 按键按下
                    if (cnt[j] < CNT_MAX) begin
                        cnt[j] <= cnt[j] + 1'b1;
                    end
						  else begin
                        // 消抖完成
                        key_press[j] <= 1'b1;
                    end
                end
					 else begin
                    key_press[j] <= 1'b0;// 按键释放
                    cnt[j] <= 24'd0;
                end
            end
        end
        // 检测key_press的上升沿
        always @(posedge clk or negedge rst_n) begin
            if (!rst_n) begin
                key_press_dly[j] <= 1'b0;
                key_out[j] <= 1'b0;
                key_state[j] <= 1'b0;
            end
				else begin
				key_press_dly[j] <= key_press[j];//延迟一个周期,用于检查上升沿
                if (key_press[j] && !key_press_dly[j]) begin
                    key_out[j] <= 1'b1;
                end
					 else begin
                    key_out[j] <= 1'b0;
                end
                key_state[j] <= key_press[j];// 按键状态输出
            end
        end
    end
endgenerate

endmodule
15.数码管驱动模块,seg_driver
// 数码管驱动模块

module seg_driver (
    input wire clk,
    input wire rst_n,
    // 时间数据输入
    input wire [3:0] hour_ten,
    input wire [3:0] hour_one,
    input wire [3:0] min_ten,
    input wire [3:0] min_one,
    input wire [3:0] sec_ten,
    input wire [3:0] sec_one,
    output reg [7:0] seg_data,   // 段选
    output reg [5:0] seg_sel     // 位选
);

reg [19:0] scan_cnt;             // 扫描计数器
reg [2:0]  sel_cnt;              // 位选计数器
reg [3:0]  bcd_data;             // 当前显示

// 扫描频率
always @(posedge clk or negedge rst_n) begin
    if (!rst_n) begin
        scan_cnt <= 20'd0;
    end else if (scan_cnt == 20'd5000) begin
        scan_cnt <= 20'd0;
    end else begin
        scan_cnt <= scan_cnt + 1'b1;
    end
end

// 位选计数器
always @(posedge clk or negedge rst_n) begin
    if (!rst_n) begin
        sel_cnt <= 3'd0;
    end else if (scan_cnt == 20'd5000) begin
        if (sel_cnt == 3'd5)
            sel_cnt <= 3'd0;
        else
            sel_cnt <= sel_cnt + 1'b1;
    end
end

// 位选信号
always @(posedge clk or negedge rst_n) begin
    if (!rst_n) begin
        seg_sel <= 6'b111111;
    end else begin
        case (sel_cnt)
            3'd0: seg_sel <= 6'b111110;  // 秒个位
            3'd1: seg_sel <= 6'b111101;  // 秒十位
            3'd2: seg_sel <= 6'b111011;  // 分个位
            3'd3: seg_sel <= 6'b110111;  // 分十位
            3'd4: seg_sel <= 6'b101111;  // 时个位
            3'd5: seg_sel <= 6'b011111;  // 时十位
            default: seg_sel <= 6'b111111;
        endcase
    end
end

// 位选对应的BCD数据
always @(*) begin
//    if (!rst_n) begin
        // 复位时显示全0
//        bcd_data = 4'd0;
//    end else begin
        case (sel_cnt)
            3'd0: bcd_data = sec_one;
            3'd1: bcd_data = sec_ten;
            3'd2: bcd_data = min_one;
            3'd3: bcd_data = min_ten;
            3'd4: bcd_data = hour_one;
            3'd5: bcd_data = hour_ten;
            default: bcd_data = 4'd0;
        endcase
//    end
end

//共阳极
always @(*) begin
    case (bcd_data)
        4'd0: seg_data = 8'b11000000;  // 0
        4'd1: seg_data = 8'b11111001;  // 1
        4'd2: seg_data = 8'b10100100;  // 2
        4'd3: seg_data = 8'b10110000;  // 3
        4'd4: seg_data = 8'b10011001;  // 4
        4'd5: seg_data = 8'b10010010;  // 5
        4'd6: seg_data = 8'b10000010;  // 6
        4'd7: seg_data = 8'b11111000;  // 7
        4'd8: seg_data = 8'b10000000;  // 8
        4'd9: seg_data = 8'b10010000;  // 9
        default: seg_data = 8'b11111111;
    endcase
end

endmodule
16.pl顶层模块,timer_key_seg
// PL顶层模块

module timer_key_seg (
    input wire clk,
    input wire rst_n,
    input wire [3:0] key,  //四个按键
    output wire [7:0] seg_data,  // 段选
    output wire [5:0] seg_sel,   // 位选
    // 与NiosII通过PIO连接
    input wire [3:0] hour_ten,
    input wire [3:0] hour_one,
    input wire [3:0] min_ten,
    input wire [3:0] min_one,
    input wire [3:0] sec_ten,
    input wire [3:0] sec_one,
    // 按键状态输出到NiosII
    output wire [3:0] key_pulse,
    output wire [3:0] key_status
);

//按键消抖模块
key_debounce u_key_debounce (
    .clk(clk),
    .rst_n(rst_n),
    .key_in(key),
    .key_out(key_pulse),
    .key_state(key_status)
);
//复位
//assign key_status = (!rst_n) ? 4'b1000 : key_status_debounced;

// 数码管驱动
seg_driver u_seg_driver (
    .clk(clk),
    .rst_n(rst_n),
    .hour_ten(hour_ten),
    .hour_one(hour_one),
    .min_ten(min_ten),
    .min_one(min_one),
    .sec_ten(sec_ten),
    .sec_one(sec_one),
    .seg_data(seg_data),
    .seg_sel(seg_sel)
);

endmodule
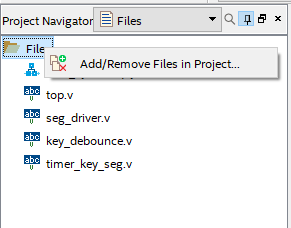
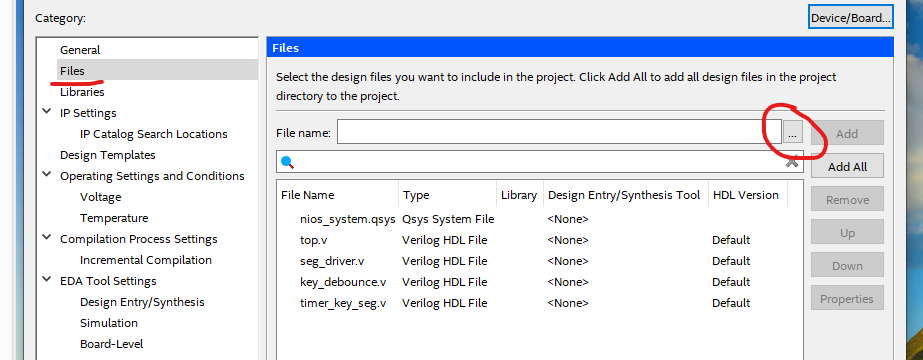
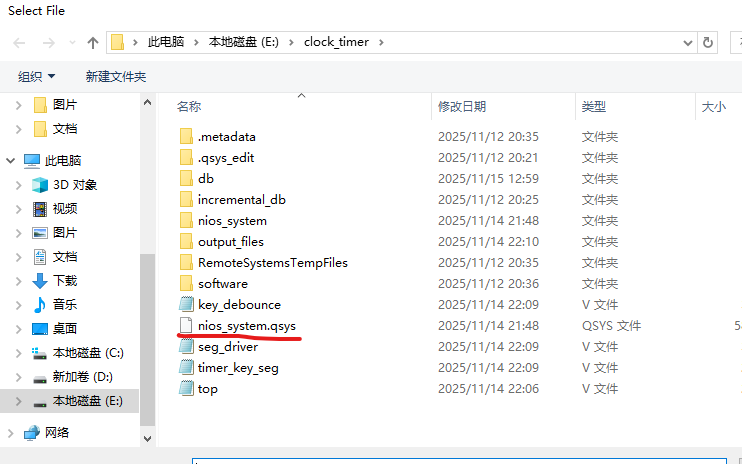
17.点击file,右键,添加文件
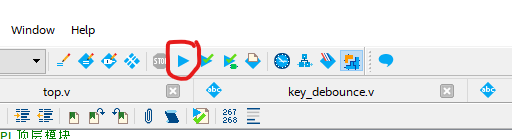
18.进行编译。
19.编译通过后,绑定引脚。

20.绑定完成后再次编译。
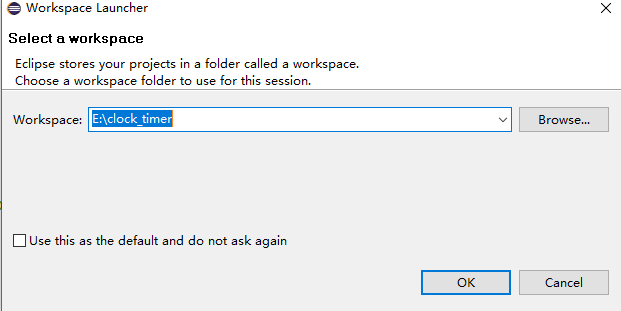
21.打开eclipse
22.选择刚刚项目的文件夹
23.新建工程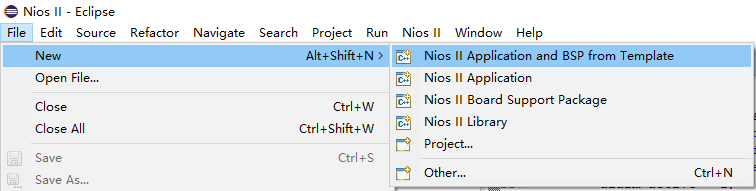
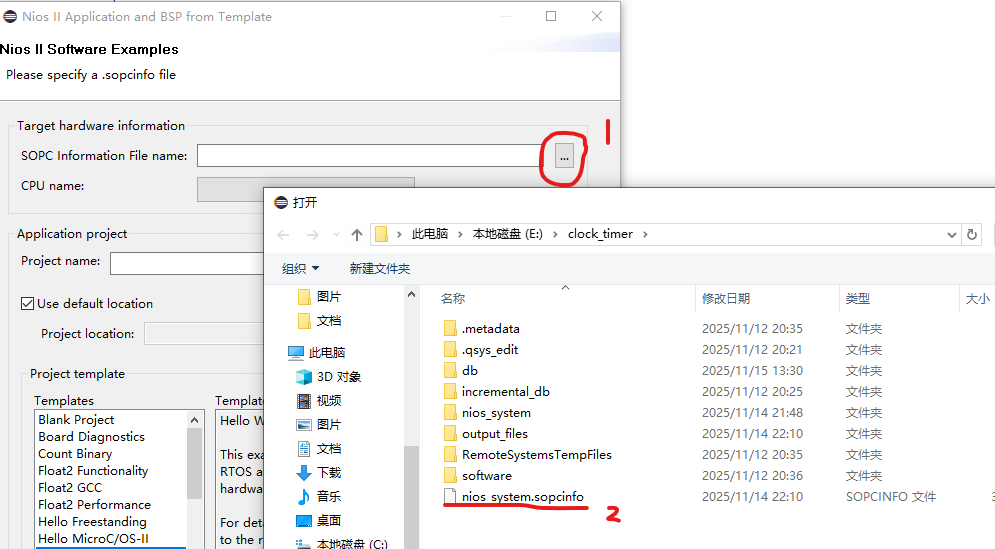
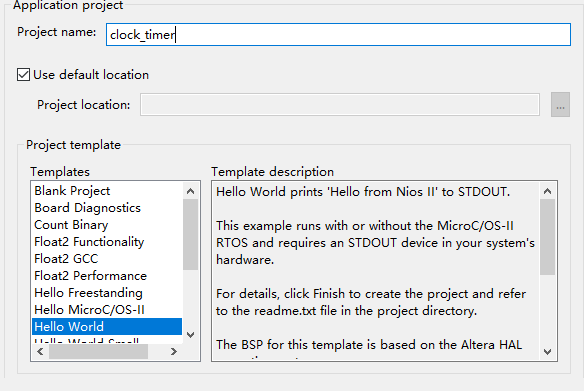
24.选择文件,填写工程名,选择helloworld
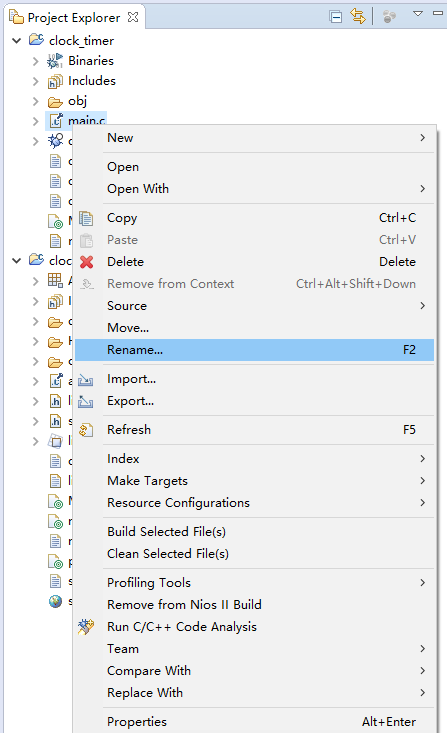
25.右键helloworld,修改名字为main.c
26.写入主函数。
#include <stdio.h>
#include <stdlib.h>
#include <unistd.h>
#include "system.h"
#include "alt_types.h"
#include "sys/alt_irq.h"
#include "altera_avalon_timer_regs.h"
#include "altera_avalon_pio_regs.h"
#ifndef RESET_PIO_BASE
#define RESET_PIO_BASE 0x19090UL
#endif
#ifndef NIOS2_EIC_PRESENT
#include "priv/alt_legacy_irq.h"
#endif
typedef struct {
unsigned char hour;
unsigned char minute;
unsigned char second;
} clock_time_t;
static clock_time_t current_time = {12, 0, 0}; // 当前时间
static clock_time_t alarm_time = {0, 0, 0}; // 闹钟时间
static int alarm_enable = 0;
static int setting_mode = 0; // 模式
static int setting_pos = 0; // 位置
void timer_isr(void* context);
void update_display(void);
void convert_to_bcd(unsigned char value, unsigned char* ten, unsigned char* one);
void handle_key(void);
void check_alarm(void);
int main(void) {
// 定时器初始化
const alt_u32 timer_period = (alt_u32)50000000UL;
const alt_u32 timer_base = TIMER_0_BASE;
IOWR_ALTERA_AVALON_TIMER_PERIODL(timer_base, (alt_u16)(timer_period & 0xFFFFU));
IOWR_ALTERA_AVALON_TIMER_PERIODH(timer_base, (alt_u16)((timer_period >> 16) & 0xFFFFU));
IOWR_ALTERA_AVALON_TIMER_CONTROL(timer_base,
(alt_u16)(ALTERA_AVALON_TIMER_CONTROL_ITO_MSK |
ALTERA_AVALON_TIMER_CONTROL_CONT_MSK |
ALTERA_AVALON_TIMER_CONTROL_START_MSK));
// 注册定时器中断
alt_irq_register(TIMER_0_IRQ, NULL, timer_isr);
// 初始化显示
update_display();
while(1) {
handle_key();
check_alarm();
usleep(5000);
}
return 0;
}
// 定时器中断函数
void timer_isr(void* context) {
const alt_u32 timer_base = TIMER_0_BASE;
IOWR_ALTERA_AVALON_TIMER_STATUS(timer_base, (alt_u16)0);
// 正常模式下更新时间
if (setting_mode == 0) {
current_time.second++;
if (current_time.second >= 60) {
current_time.second = 0;
current_time.minute++;
if (current_time.minute >= 60) {
current_time.minute = 0;
current_time.hour++;
if (current_time.hour >= 24) {
current_time.hour = 0;
}
}
}
update_display();
}
}
// 将时间数据转换为BCD码并通过PIO发送到PL端
void update_display(void) {
unsigned char hour_ten, hour_one;
unsigned char min_ten, min_one;
unsigned char sec_ten, sec_one;
// 选择当前时间还是闹钟时间
clock_time_t* display_time;
if (setting_mode == 2) {
// 闹钟模式
display_time = &alarm_time;
} else {
display_time = ¤t_time;
}
convert_to_bcd(display_time->hour, &hour_ten, &hour_one);
convert_to_bcd(display_time->minute, &min_ten, &min_one);
convert_to_bcd(display_time->second, &sec_ten, &sec_one);
const alt_u32 time_data = ((alt_u32)hour_ten << 20) | ((alt_u32)hour_one << 16) |
((alt_u32)min_ten << 12) | ((alt_u32)min_one << 8) |
((alt_u32)sec_ten << 4) | (alt_u32)sec_one;
const alt_u32 time_data_base = TIME_DATA_PIO_BASE;
IOWR_ALTERA_AVALON_PIO_DATA(time_data_base, time_data);
}
// 将十进制数转换为BCD码
void convert_to_bcd(unsigned char value, unsigned char* ten, unsigned char* one) {
*ten = value / 10;
*one = value % 10;
}
// 从PL端读取按键
void handle_key(void) {
static alt_u32 last_status = 0;
alt_u32 current_key;
alt_u32 current_status;
const alt_u32 key_pulse_base = KEY_PULSE_PIO_BASE;
const alt_u32 key_status_base = KEY_STATUS_PIO_BASE;
// 读取按键脉冲和状态信号
current_key = IORD_ALTERA_AVALON_PIO_DATA(key_pulse_base);
current_status = IORD_ALTERA_AVALON_PIO_DATA(key_status_base);
// 上升沿
if (current_key == 0) {
current_key = current_status & (~last_status);
}
last_status = current_status;
// KEY0,切换模式
if ((current_key & 0x01)) {
if (setting_mode == 0) {
setting_mode = 1;
setting_pos = 0;
} else if (setting_mode == 1) {
setting_mode = 2;
setting_pos = 0;
} else {
setting_mode = 0;
alarm_enable = 1;
setting_pos = 0;
}
}
// KEY1,增加数值
if ((current_key & 0x02)) {
if (setting_mode == 1) {
if (setting_pos == 0) current_time.hour = (current_time.hour + 1) % 24;
else if (setting_pos == 1) current_time.minute = (current_time.minute + 1) % 60;
else current_time.second = (current_time.second + 1) % 60;
update_display();
}
else if (setting_mode == 2) {
if (setting_pos == 0) alarm_time.hour = (alarm_time.hour + 1) % 24;
else if (setting_pos == 1) alarm_time.minute = (alarm_time.minute + 1) % 60;
else alarm_time.second = (alarm_time.second + 1) % 60;
update_display();
}
}
// KEY2,减少数值
if ((current_key & 0x04)) {
if (setting_mode == 1) {
if (setting_pos == 0) current_time.hour = (current_time.hour == 0) ? 23 : (current_time.hour - 1);
else if (setting_pos == 1) current_time.minute = (current_time.minute == 0) ? 59 : (current_time.minute - 1);
else current_time.second = (current_time.second == 0) ? 59 : (current_time.second - 1);
update_display();
}
else if (setting_mode == 2) {
if (setting_pos == 0) alarm_time.hour = (alarm_time.hour == 0) ? 23 : (alarm_time.hour - 1);
else if (setting_pos == 1) alarm_time.minute = (alarm_time.minute == 0) ? 59 : (alarm_time.minute - 1);
else alarm_time.second = (alarm_time.second == 0) ? 59 : (alarm_time.second - 1);
update_display();
}
}
// KEY3,切换时间位置
if ((current_key & 0x08)) {
if (setting_mode == 1 || setting_mode == 2) {
setting_pos = (setting_pos + 1) % 3;
}
}
}
// 闹钟
void check_alarm(void) {
static int alarm_active = 0;
static alt_u32 led_counter = 0;
static alt_u32 led_pattern = 0;
// 读取复位信号
alt_u32 reset_status = IORD_ALTERA_AVALON_PIO_DATA(RESET_PIO_BASE);
// 复位
if (reset_status == 0) {
current_time.hour = 0;
current_time.minute = 0;
current_time.second = 0;
alarm_time.hour = 0;
alarm_time.minute = 0;
alarm_time.second = 0;
// 清除闹钟
alarm_enable = 0;
alarm_active = 0;
// 回到正常显示模式
setting_mode = 0;
setting_pos = 0;
// 显示+关闭LED
update_display();
#ifdef LED_PIO_BASE
IOWR_ALTERA_AVALON_PIO_DATA(LED_PIO_BASE, 0);
#endif
led_counter = 0;
led_pattern = 0;
}
// 闹钟触发
else if (alarm_enable &&
current_time.hour == alarm_time.hour &&
current_time.minute == alarm_time.minute &&
current_time.second == alarm_time.second) {
alarm_active = 1;
}
// 闹钟激活,流水灯
if (alarm_active) {
led_counter++;
if (led_counter >= 50) {
led_counter = 0;
led_pattern = (led_pattern + 1) % 4; // 4个LED循环
alt_u32 led_value = 1 << led_pattern;
#ifdef LED_PIO_BASE
IOWR_ALTERA_AVALON_PIO_DATA(LED_PIO_BASE, led_value);
#endif
}
// 任意按键按下:关闭闹钟
alt_u32 key_status = IORD_ALTERA_AVALON_PIO_DATA(KEY_STATUS_PIO_BASE);
if (key_status != 0) {
alarm_active = 0;
#ifdef LED_PIO_BASE
IOWR_ALTERA_AVALON_PIO_DATA(LED_PIO_BASE, 0);
#endif
}
}
// 未激活时LED熄灭
else {
#ifdef LED_PIO_BASE
IOWR_ALTERA_AVALON_PIO_DATA(LED_PIO_BASE, 0);
#endif
led_counter = 0;
led_pattern = 0;
}
}
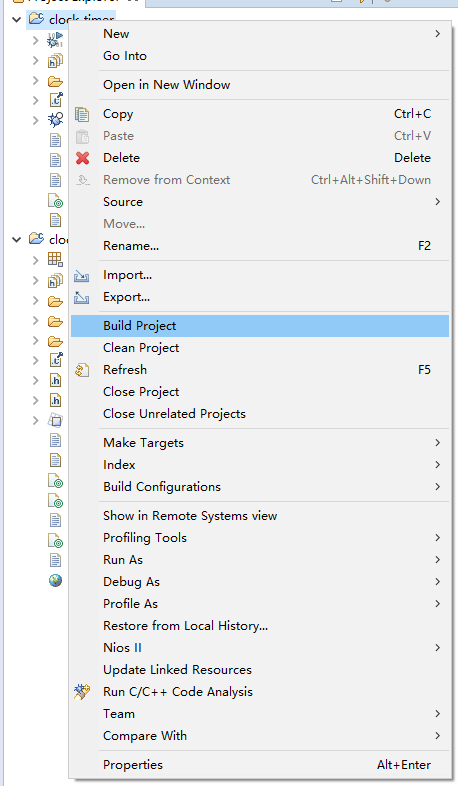
27.保存后,进行编译。
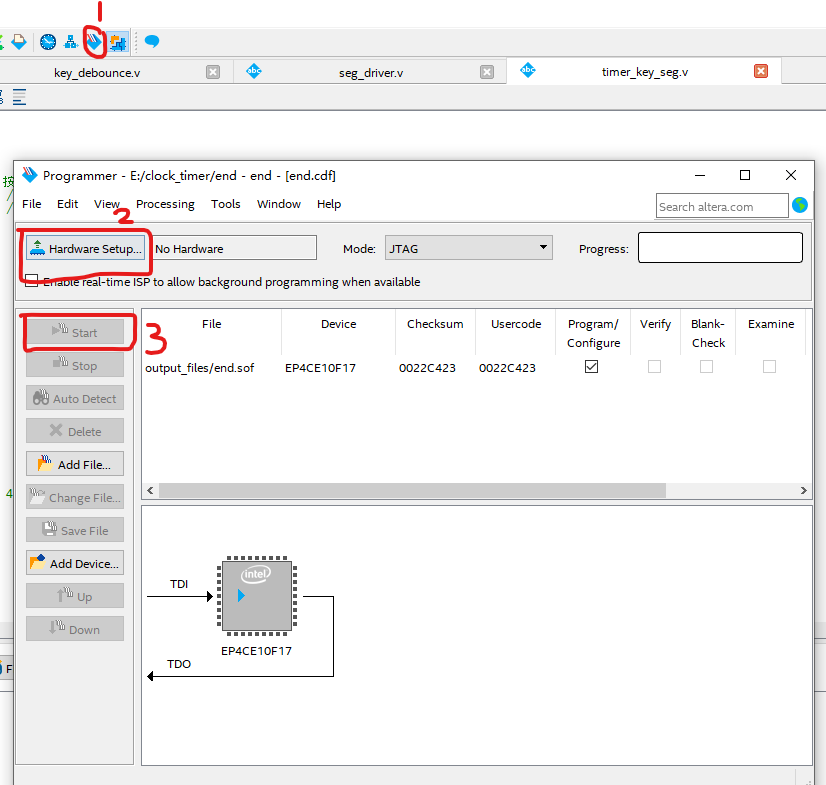
28.打开quartus烧录文件。
先打开页面,点击添加下载线,start烧录。
29.上面的操作完成后,数码管显示6个0.
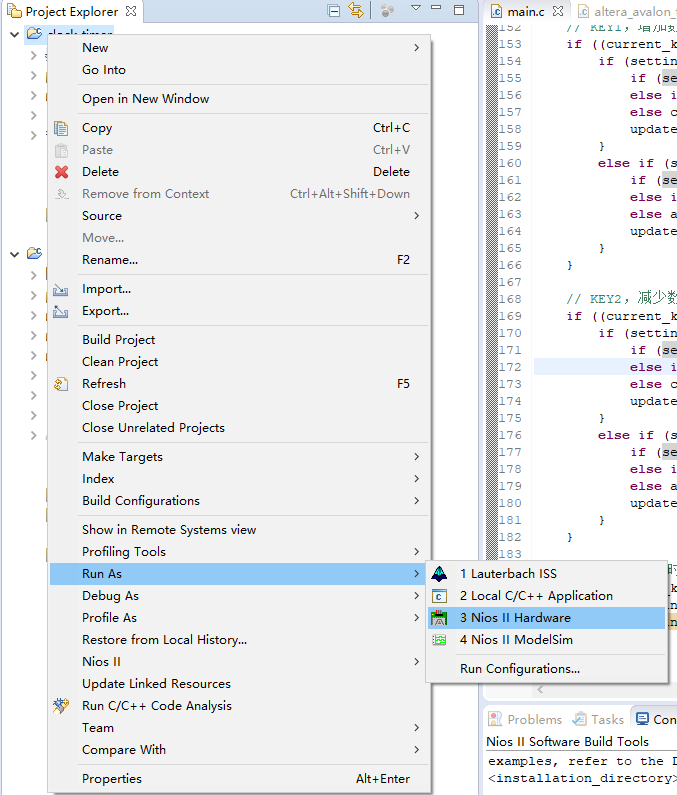
然后打开eclipse进行烧录文件。
30.烧录完成后,时钟启动。
(1)其中一个按键用于进入时间设置模式,按一下进入当前时间设置模式,按两下进入闹钟时间设置模式,按第三下退出闹钟设置模式,进入正常模式。
(2)一个按键用于时间位置选择,时->分->秒 进行选择
(3)两个按键分别用于增加时间或者减小时间
31.实验结束。


 被折叠的 条评论
为什么被折叠?
被折叠的 条评论
为什么被折叠?
 到【灌水乐园】发言


