


 本文详细解析了make_shared与直接使用shared_ptr构造函数的区别,重点讲解了make_shared如何高效分配内存、提供异常安全,以及其在性能提升上的优势。
make_shared剖析
引言
关于make_shared,大家都知道可以用它来初始化shared_ptr:
shared_ptr<string> sp = make_shared<string>();
那为何要使用它呢,我们都知道,也可以直接通过shared_ptr的构造函数来生成shared_ptr对象:
shared_ptr<string> sp1(new string());
这两者有何区别呢?首先来看看make_shared源码:
make_shared源码
template<class _Ty,	class... _Types> inline
shared_ptr<_Ty> make_shared(_Types&&... _Args)
{	// make a shared_ptr
	_Ref_count_obj<_Ty> *_Rx =  new _Ref_count_obj<_Ty>(_STD forward<_Types>(_Args)...);
	shared_ptr<_Ty> _Ret;
	_Ret._Resetp0(_Rx->_Getptr(), _Rx);
	return (_Ret);
}
从源码中可以看到,make_shared是一个模板函数,_Ty为所要创建的类型,_Args为_Ty构造函数的参数,关于&&和forward可以参考完美转发,make_shared的函数体执行可分为以下几个步骤:
1:
_Ref_count_obj<_Ty> *_Rx = new _Ref_count_obj<_Ty>(_STD forward<_Types>(_Args)...);
生成_Ref_count_obj对象,看看源码:
template<class _Ty>
class _Ref_count_obj: public _Ref_count_base
{	// handle reference counting for object in control block, no allocator
public:
	template<class... _Types>
	_Ref_count_obj(_Types&&... _Args: _Ref_count_base()
	{	// construct from argument list
		::new ((void *)&_Storage) _Ty(_STD forward<_Types>(_Args)...);
	}


	_Ty *_Getptr() const
	{	// get pointer
		return ((_Ty *)&_Storage);
	}

private:
	virtual void _Destroy() _NOEXCEPT
	{	// destroy managed resource
		_Getptr()->~_Ty();
	}

	virtual void _Delete_this() _NOEXCEPT
	{	// destroy self
		delete this;
	}

	typename aligned_union<1, _Ty>::type _Storage;
};
从源码中可以看到_Ref_count_obj继承自_Ref_count_base,当生成一个_Ref_count_obj对象时,其构造函数执行了:
::new ((void *)&_Storage) _Ty(_STD forward<_Types>(_Args)...);
前面说了_Ty即为智能指针要指向的对象类型,_Args即为该对象的构造函数所需要的参数。上面代码是不是看着很奇怪,实际上它是在已经分配好的内存空间_Storage中放置_Ty对象,这种用法大家可查阅Placement new,就是不需要我们自己申请内存空间了,在已经申请好的内存空间中放置对象就行。
2.
shared_ptr<_Ty> _Ret;
_Ret._Resetp0(_Rx->_Getptr(), _Rx);
定义shared_ptr,调用shared_ptr的_Resetp0方法:
template<class _Ux>
void _Resetp0(_Ux *_Px, _Ref_count_base *_Rx)
{	// release resource and take ownership of _Px
	this->_Reset0(_Px, _Rx);
	_Enable_shared(_Px, _Rx);
}
_Resetp0中又调用_Reset0方法
void _Reset0(_Ty *_Other_ptr, _Ref_count_base *_Other_rep)
{	// release resource and take new resource
	if (_Rep != 0)
		_Rep->_Decref();
	_Rep = _Other_rep;
	_Ptr = _Other_ptr;
}
说白了,就是将智能指针所指向的对象和引用计数对象进行赋值,最关键的还是传进来的参数,为_Rx->_Getptr()和_Rx对象,看看前面的_Ref_count_obj源码,Getptr()就是返回已经创建好内存的地址。
shared_ptr构造函数创建对象源码
有关shared_ptr具体如何实现的可以参考指针指针实现原理,下面只是抠出std实现的部分细节:
1、构造函数
template<class _Ux>
explicit shared_ptr(_Ux *_Px)
{	// construct shared_ptr object that owns _Px
	_Resetp(_Px);
}
2、_Resetp(_Px)
template<class _Ux>
void _Resetp(_Ux *_Px)
{	// release, take ownership of _Px
	_TRY_BEGIN	// allocate control block and reset
	_Resetp0(_Px, new _Ref_count<_Ux>(_Px));
	_CATCH_ALL	// allocation failed, delete resource
	delete _Px;
	_RERAISE;
	_CATCH_END
}
可以看到最终调用的还是_Resetp0方法,和make_shared不同的是:
区别
_Ret._Resetp0(_Rx->_Getptr(), _Rx); //make_shared调用方式
_Resetp0(_Px, new _Ref_count<_Ux>(_Px)); //shared_ptr构造函数调用方式
可以明显看到,make_shared传入的是_Ref_count_obj对象,而shared_ptr构造函数传入的是_Ref_count对象
template<class _Ty>
class _Ref_count: public _Ref_count_base
{	// handle reference counting for object without deleter
public:
	_Ref_count(_Ty *_Px): _Ref_count_base(), _Ptr(_Px)
	{	// construct
	}

private:
	virtual void _Destroy() _NOEXCEPT
	{	// destroy managed resource
		delete _Ptr;
	}

	virtual void _Delete_this() _NOEXCEPT
	{	// destroy self
		delete this;
	}
	_Ty * _Ptr;
};
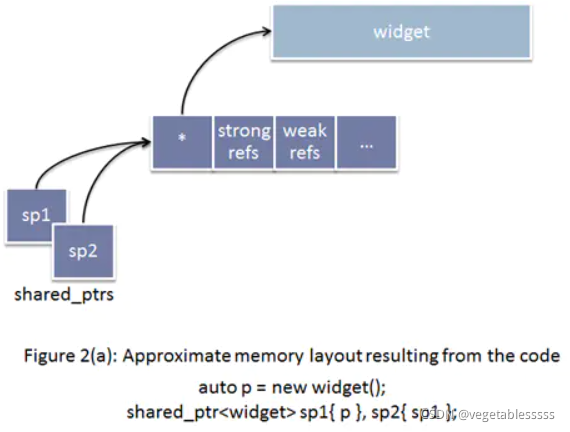
_Ref_count对象的构造函数只是将对象指针进行了简单的赋值,没有进行其他操作,这就是网上看到的图的由来:其实最本质的原因是_Ref_count_obj和_Ref_count的区别,_Ref_count_obj预先为对象分配好了内存,而_Ref_count只是存放了指针。

make_shared优势
1、提升性能
std::make_shared(比起直接使用new)的一个特性是能提升效率。使用std::make_shared允许编译器产生更小,更快的代码,产生的代码使用更简洁的数据结构。直接使用new实际上要分配两次内存,一块内存分配给指向对象,还要一块内存分配给_Ref_count。make_shared只分配一次内存Ref_count_obj,其中包含指向对象内存和引用计数对象。
2、异常安全
我们在调用processWidget的时候使用computePriority(),并且用new而不是std::make_shared:
processWidget(std::shared_ptr<Widget>(new Widget),  //潜在的资源泄露
              computePriority());
像注释指示的那样,上面的代码会导致new创造出来的Widget发生泄露。那么到底是怎么泄露的呢?调用代码和被调用函数都用到了std::shared_ptr,并且std::shared_ptr就是被设计来阻止资源泄露的。当最后一个指向这儿的std::shared_ptr消失时,它们会自动销毁它们指向的资源。如果每个人在每个地方都使用std::shared_ptr,那么这段代码是怎么导致资源泄露的呢?
答案和编译器的翻译有关,编译器把源代码翻译到目标代码,在运行期,函数的参数必须在函数被调用前被估值,所以在调用processWidget时,下面的事情肯定发生在processWidget能开始执行之前:
表达式“new Widget”必须被估值,也就是,一个Widget必须被创建在堆上。
std::shared_ptr(负责管理由new创建的指针)的构造函数必须被执行。
computePriority必须跑完。
编译器不需要必须产生这样顺序的代码。但“new Widget”必须在std::shared_ptr的构造函数被调用前执行,因为new的结构被用为构造函数的参数,但是computePriority可能在这两个调用前(后,或很奇怪地,中间)被执行。也就是,编译器可能产生出这样顺序的代码:
执行“new Widget”。
执行computePriority。
执行std::shared_ptr的构造函数。
如果这样的代码被产生出来,并且在运行期,computePriority产生了一个异常,则在第一步动态分配的Widget就会泄露了,因为它永远不会被存放到在第三步才开始管理它的std::shared_ptr中。
使用std::make_shared可以避免这样的问题。调用代码将看起来像这样:
processWidget(std::make_shared<Widget>(),       //没有资源泄露
              computePriority());
在运行期,不管std::make_shared或computePriority哪一个先被调用。如果std::make_shared先被调用,则在computePriority调用前,指向动态分配出来的Widget的原始指针能安全地被存放到被返回的std::shared_ptr中。如果computePriority之后产生一个异常,std::shared_ptr的析构函数将发现它持有的Widget需要被销毁。并且如果computePriority先被调用并产生一个异常,std::make_shared就不会被调用,因此这里就不需要考虑动态分配的Widget了。
如果使用std::unique_ptr和std::make_unique来替换std::shared_ptr和std::make_shared,事实上,会用到同样的理由。因此,使用std::make_unique代替new就和“使用std::make_shared来写出异常安全的代码”一样重要。


 6440
6440

 被折叠的 条评论
为什么被折叠?
被折叠的 条评论
为什么被折叠?
 到【灌水乐园】发言


