


Springboot分布式框架搭建+Kafka+redis+分页+shiro+Swagger2+Feign+一些坑处理+微服务
准备给即将做的一个项目搭建一个springboot的微服务架构,中间集成多种中间件,根据实际情况会优化中间件.
技术使用:springboot,Kafka,redis,shiro,swagger,Feign等.
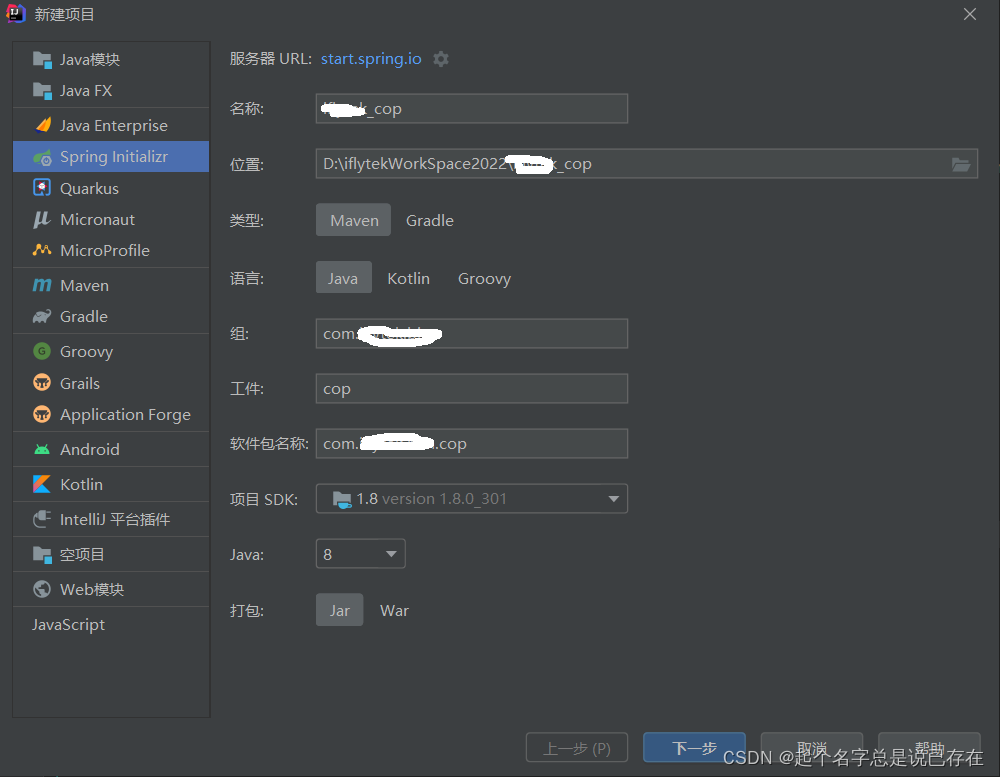
一. 通过IDEA新建一个SpringBoot项目
1.创建springboot项目
注:如果出现’https://start.spring.io’ 的初始化失败 请多刷新几次

2.添加启动类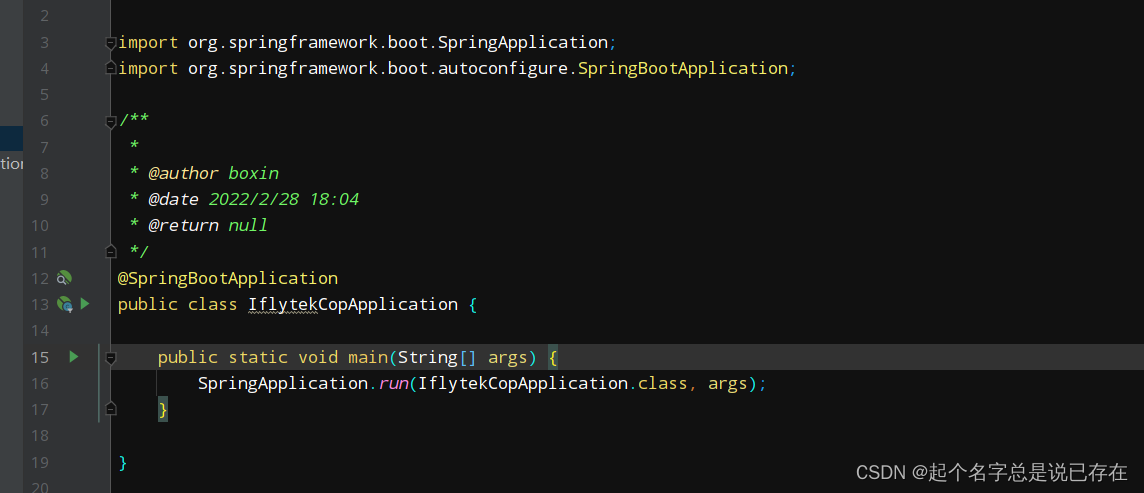
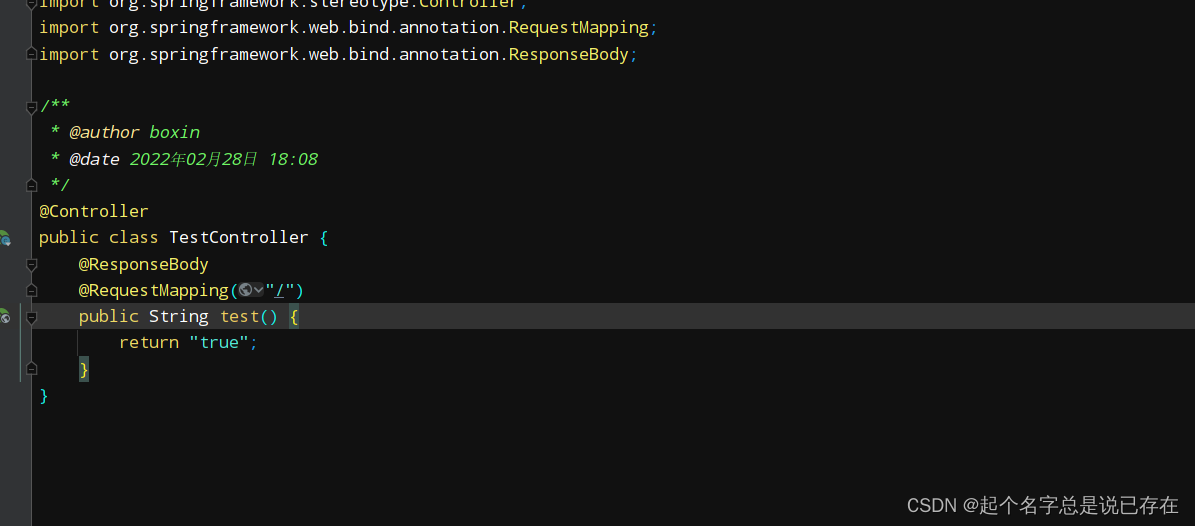
3.创建测试类TestController
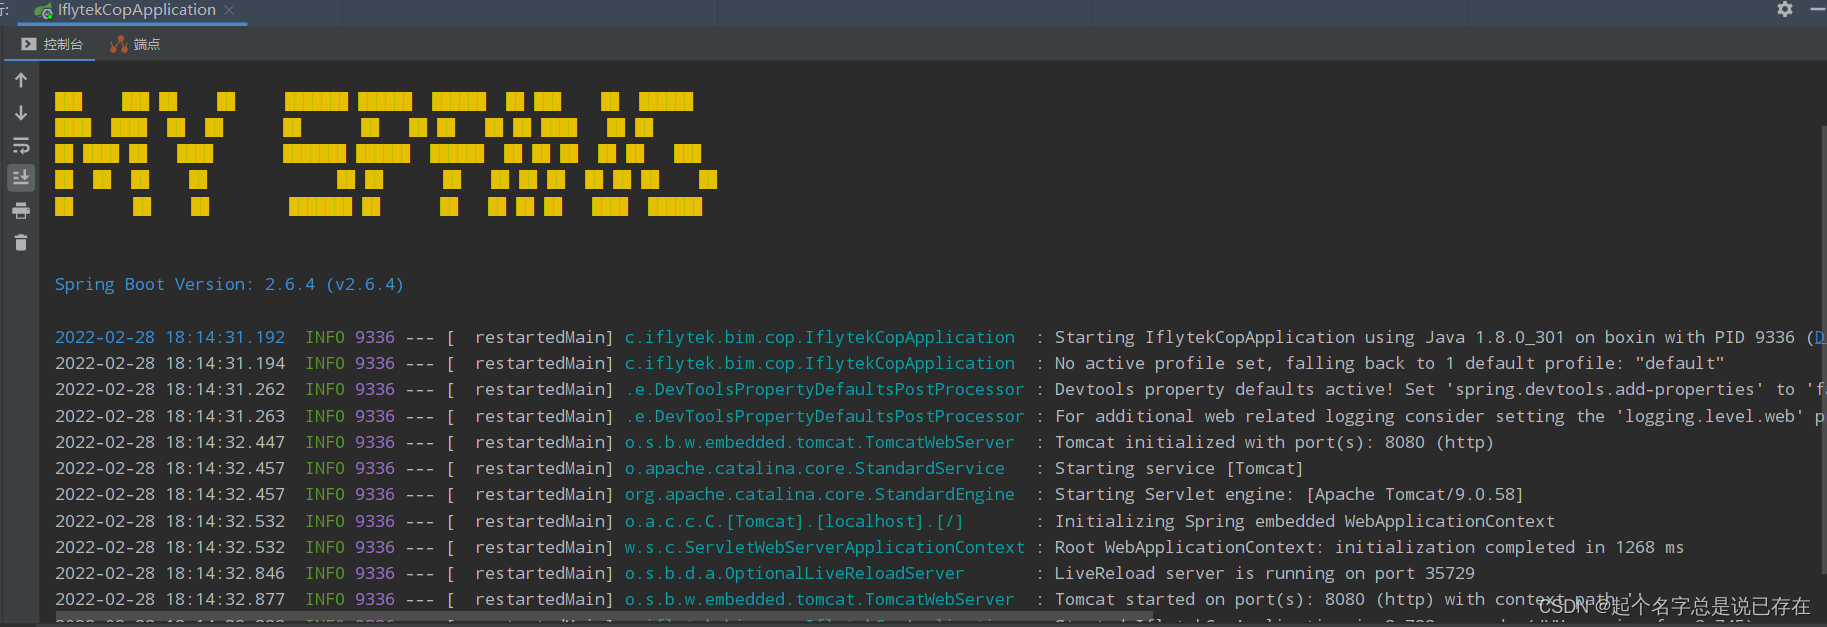
4.在入口类Application中启动项目,启动成功如下图
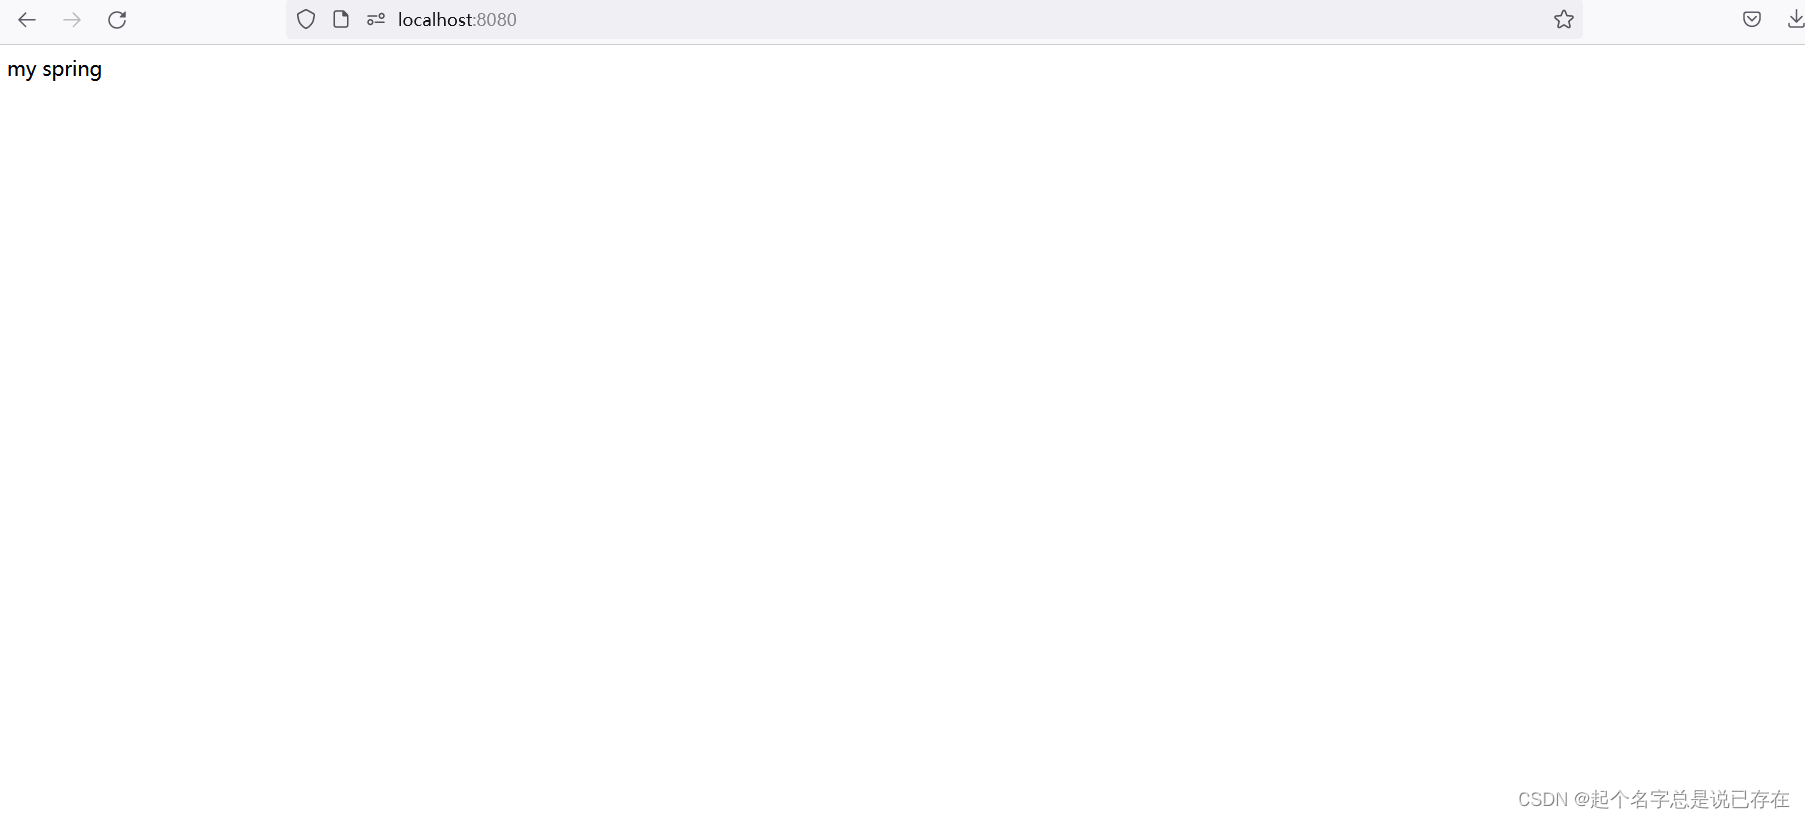
5.打开浏览器输入http://localhost:8080/,测试成功
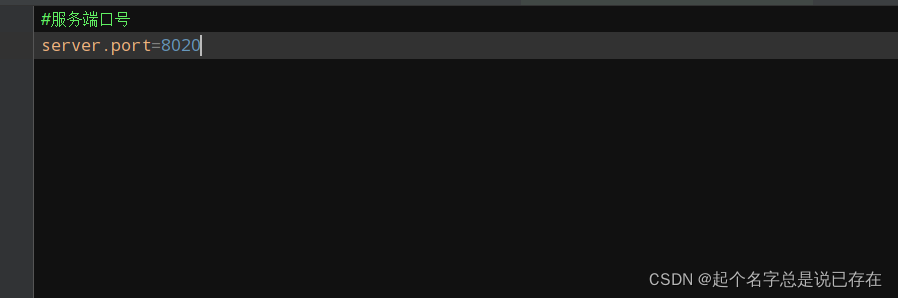
6.添加SpringBoot的配置文件application.properties,配置服务访问端口号
二. SpringBoot与mybatis整合
1.添加maven依赖
  <!--mysql驱动 -->
        <dependency>
            <groupId>mysql</groupId>
            <artifactId>mysql-connector-java</artifactId>
        </dependency>
        <!-- 阿里系的Druid依赖包 -->
        <dependency>
            <groupId>com.alibaba</groupId>
            <artifactId>druid-spring-boot-starter</artifactId>
            <version>1.1.9</version>
        </dependency>
        <!-- Druid 依赖 log4j包 -->
        <dependency>
            <groupId>log4j</groupId>
            <artifactId>log4j</artifactId>
            <version>1.2.17</version>
        </dependency>
        <!--jpa的jar包 ,操作数据库的,类似hibernate -->
        <dependency>
            <groupId>org.springframework.boot</groupId>
            <artifactId>spring-boot-starter-data-jpa</artifactId>
        </dependency>
        <!-- spring-boot整合mybatis -->
        <dependency>
            <groupId>org.mybatis.spring.boot</groupId>
            <artifactId>mybatis-spring-boot-starter</artifactId>
            <version>1.1.1</version>
        </dependency>
2.创建entity、service、dao
(1).User实体类
 import lombok.Getter;
import lombok.Setter;
import lombok.ToString;

import java.io.Serializable;

/**
 * @author boxin
 * @date 2022年02月28日 20:19
 */
@Getter
@Setter
@ToString
public class User implements Serializable {
    private static final long serialVersionUID = 15615615461561151L;
    private String loginName;
    private String password;
}
(2).Mapper接口类
import com.iflytek.bim.cop.domain.entity.User;
import java.util.List;

/**
 * @author boxin
 * @date 2022年02月28日 20:16
 */
public interface UserMapper {
    List<User> getAll();
}
(3).Service接口
import com.iflytek.bim.cop.domain.entity.User;

import java.util.List;

/**
 * @author boxin
 * @date 2022年02月28日 20:22
 */
public interface IUserService{

    List<User> getAll();
}
(4).Service实现类
import java.util.List;

/**
 * @author boxin
 * @date 2022年02月28日 20:23
 */
@Service
public class UserServiceImpl implements IUserService {
    @Autowired
    private UserMapper userMapper;

    public List<User> getAll() {
        return userMapper.getAll();
    }
}
3.在application.properties配置数据源以及mybatis
#数据源
jasypt.encryptor.password=EbfYkitulv73I2p0mXI50JMXoaxZTKJ7JCCT
spring.datasource.driverClassName=org.postgresql.Driver
spring.datasource.url=jdbc:postgresql://172.31.201.66:5432/test?useUnicode=true&characterEncoding=utf8
spring.datasource.username=postgres
spring.datasource.password=8989yyu

#阿里druid连接池驱动配置信息
spring.datasource.type=com.alibaba.druid.pool.DruidDataSource
#连接池的配置信息
#初始化大小,最小,最大
spring.datasource.initialSize=2
spring.datasource.minIdle=2
spring.datasource.maxActive=3
#配置获取连接等待超时的时间
spring.datasource.maxWait=6000
#配置间隔多久才进行一次检测,检测需要关闭的空闲连接,单位是毫秒
spring.datasource.timeBetweenEvictionRunsMillis=60000
#配置一个连接在池中最小生存的时间,单位是毫秒
spring.datasource.minEvictableIdleTimeMillis=300000
spring.datasource.validationQuery=SELECT 1 FROM DUAL
spring.datasource.testWhileIdle=true
spring.datasource.testOnBorrow=false
spring.datasource.testOnReturn=false
#打开PSCache,并且指定每个连接上PSCache的大小
spring.datasource.poolPreparedStatements=true
spring.datasource.maxPoolPreparedStatementPerConnectionSize=20
#配置监控统计拦截的filters,去掉后监控界面sql无法统计,'wall'用于防火墙
spring.datasource.filters=stat,wall,log4j
#通过connectProperties属性来打开mergeSql功能;慢SQL记录
spring.datasource.connectionProperties=druid.stat.mergeSql=true;druid.stat.slowSqlMillis=5000

#mybatis配置
#配置Mapper文件存放的路径
mybatis.mapper-locations=classpath:mapper/*Mapper.xml
4.在resources下新建mapper文件夹,然后创建UserMapper的接口映射文件UserMapper.xml

注:The injection point has the following annotations:
@org.springframework.beans.factory.annotation.Autowired(required=true)报错 出现扫描不到持久层的时候,可在application启动类加@MapperScan({"com....dao"})*
5.修改测试类测试
import com.iflytek.bim.cop.domain.entity.User;
import com.iflytek.bim.cop.service.IUserService;
import org.springframework.beans.factory.annotation.Autowired;
import org.springframework.stereotype.Controller;
import org.springframework.web.bind.annotation.RequestMapping;
import org.springframework.web.bind.annotation.ResponseBody;

import java.util.List;

/**
 * @author boxin
 * @date 2022年02月28日 18:08
 */
@Controller
public class TestController {
    @Autowired
    private IUserService userService;

    @ResponseBody
    @RequestMapping("/")
    public List<User> test() {
        return userService.getAll();
    }
}
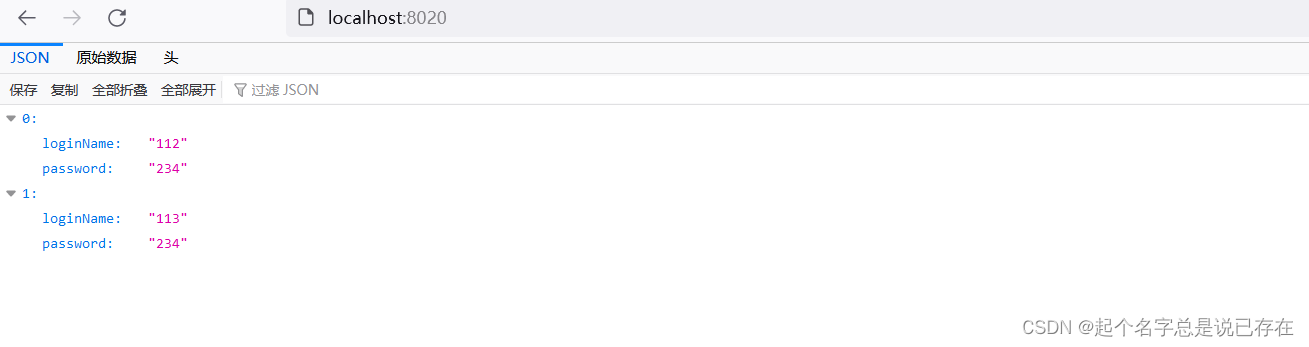
6.启动项目,在浏览器输入http://localhost:8020/,json数据成功返回,整合mybaties成功
三.整合Redis
1.添加redis-maven依赖
   <!-- redis包 -->
        <dependency>
            <groupId>org.springframework.boot</groupId>
            <artifactId>spring-boot-starter-data-redis</artifactId>
        </dependency>
        <!--spring2.0集成redis所需common-pool2-->
        <dependency>
            <groupId>org.apache.commons</groupId>
            <artifactId>commons-pool2</artifactId>
        </dependency>
2.配置文件中添加redis配置信息
# 缓存服务配置
spring.cache.type=redis
spring.redis.host=172.31.201.66
spring.redis.password=ENC(JrHjkKCEYDvsg2KhjPTv6j1LCQSYUAU4)
spring.redis.port=6379
spring.redis.database=0
spring.redis.pool.max-idle=8
spring.redis.pool.min-idle=0
spring.redis.pool.max-active=8
spring.redis.pool.max-wait=-1
redis.server.connectionTimeout=5000
redis.server.soTimeout=5000
redis.server.weight=1
redis.server.blockWhenExhausted=true
redis.server.maxWaitMillis=10000
redis.server.minIdle=50
redis.server.testWhileIdle=true
redis.server.numTestsPerEvictionRun=30
redis.server.testOnBorrow=true
redis.server.maxIdle=100
redis.server.maxTotal=1024
3.创建Redis服务接口以及实现类
public interface IRedisService {

    void setValue(String key,Object value);

    /**
     * 通过redis获取redis中的key
     * @param key
     * @return
     */
    Object getValue(String key);

    /**
     * 存入redis并设置有效期
     * @param key
     * @param value
     * @param exceed	有效期
     * @param timeType 	0:按天,1:按时,2:按分,3:按秒,4:按毫秒
     */
    void setValue(String key,Object value,Integer exceed,Integer timeType);
}
import org.springframework.beans.factory.annotation.Autowired;
import org.springframework.data.redis.core.RedisTemplate;
import org.springframework.stereotype.Service;

import java.util.concurrent.TimeUnit;

/**
 * @author boxin
 * @date 2022年03月01日 19:30
 */
@Service
public class RedisServiceImpl implements IRedisService {

    @Autowired
    private RedisTemplate redisTemplate;

    @SuppressWarnings("unchecked")
    @Override
    public void setValue(String key,Object value) {
        redisTemplate.opsForValue().set(key, value);
    }

    @SuppressWarnings("unchecked")
    @Override
    public Object getValue(String key) {
        if(!redisTemplate.hasKey(key)){
            return null;
        }else{
            return redisTemplate.opsForValue().get(key);
        }
    }

    @SuppressWarnings("unchecked")
    @Override
    public void setValue(String key, Object value, Integer exceed, Integer timeType) {
        switch (timeType) {
            case 0://天
                redisTemplate.opsForValue().set(key, value, exceed, TimeUnit.DAYS);
                break;
            case 1://小时
                redisTemplate.opsForValue().set(key, value, exceed, TimeUnit.HOURS);
                break;
            case 2:	//分钟
                redisTemplate.opsForValue().set(key, value, exceed, TimeUnit.MINUTES);
                break;
            case 3:	//秒
                redisTemplate.opsForValue().set(key, value, exceed, TimeUnit.SECONDS);
                break;
            case 4://毫秒
                redisTemplate.opsForValue().set(key, value, exceed, TimeUnit.MICROSECONDS);
                break;
        }
    }
}
4.测试Redis
import com.iflytek.bim.cop.domain.entity.User;
import com.iflytek.bim.cop.api.IUserService;
import com.iflytek.bim.cop.service.redis.IRedisService;
import org.springframework.beans.factory.annotation.Autowired;
import org.springframework.stereotype.Controller;
import org.springframework.web.bind.annotation.RequestMapping;
import org.springframework.web.bind.annotation.ResponseBody;

import java.util.List;

/**
 * @author boxin
 * @date 2022年02月28日 18:08
 */
@Controller
public class TestController {
private static final Logger logger = LoggerFactory.getLogger(TestController.class);
    @Autowired
    private IUserService userService;
    @Autowired
    private IRedisService redisService;
    @ResponseBody
    @RequestMapping("/")
    public List<User> test() {
        //存入redis并设置10秒的有效期
        redisService.setValue("redisKey", ccwwee, 3, 3);
       logger.info("redisKey的值 ==================》 " + redisService.getValue("redisKey"));
        try {
            Thread.sleep(5000);
           logger.info("等待5秒后的值 ==================》 " + redisService.getValue("redisKey"));
        } catch (InterruptedException e) {
            e.printStackTrace();
        }
        return userService.getAll();
    }
}
5.Redis测试结果

三. 整合PageHelper分页插件
1.在pom.xml文件中引入Pagehelper分页插件
  <!-- pagehelper分页插件-->
        <dependency>
            <groupId>com.github.pagehelper</groupId>
            <artifactId>pagehelper-spring-boot-starter</artifactId>
            <version>1.4.1</version>
        </dependency>
helperDialect :分页插件会自动检测当前的数据库链接,自动选择合适的分页方式。 你可以配置helperDialect 属性来指定分页插件使用哪种方言。配置时,可以使用下面的缩写值:oracle , mysql , mariadb , sqlite , hsqldb , postgresql , db2 , sqlserver , informix , h2 , sqlserver2012 , derby特别注意:使用 SqlServer2012 数据库时,需要手动指定为 sqlserver2012 ,否则会使用 SqlServer2005 的方式进行分页。你也可以实现 AbstractHelperDialect ,然后配置该属性为实现类的全限定名称即可使用自定义的实现方法。
offsetAsPageNum :默认值为 false ,该参数对使用 RowBounds 作为分页参数时有效。 当该参数设置为true 时,会将 RowBounds 中的 offset 参数当成 pageNum 使用,可以用页码和页面大小两个参数进行分页。
rowBoundsWithCount :默认值为 false ,该参数对使用 RowBounds 作为分页参数时有效。 当该参数设置为 true 时,使用 RowBounds 分页会进行 count 查询。
pageSizeZero :默认值为 false ,当该参数设置为 true 时,如果 pageSize=0 或者 RowBounds.limit =0 就会查询出全部的结果(相当于没有执行分页查询,但是返回结果仍然是 Page 类型)。
reasonable :分页合理化参数,默认值为 false 。当该参数设置为 true 时, pageNum<=0 时会查询第一页, pageNum>pages (超过总数时),会查询最后一页。默认 false 时,直接根据参数进行查询。
params :为了支持 startPage(Object params) 方法,增加了该参数来配置参数映射,用于从对象中根据属性名取值, 可以配置 pageNum,pageSize,count,pageSizeZero,reasonable ,不配置映射的用默认值, 默认值为pageNum=pageNum;pageSize=pageSize;count=countSql;reasonable=reasonable;pageSizeZero=pageSizeZero。
supportMethodsArguments :支持通过 Mapper 接口参数来传递分页参数,默认值 false ,分页插件会从查询方法的参数值中,自动根据上面 params 配置的字段中取值,查找到合适的值时就会自动分页。 使用方法可以参考测试代码中的 com.github.pagehelper.test.basic 包下的 ArgumentsMapTest 和ArgumentsObjTest 。
autoRuntimeDialect :默认值为 false 。设置为 true 时,允许在运行时根据多数据源自动识别对应方言的分页 (不支持自动选择 sqlserver2012 ,只能使用 sqlserver ),用法和注意事项参考下面的场景五。
closeConn :默认值为 true 。当使用运行时动态数据源或没有设置 helperDialect 属性自动获取数据库类型时,会自动获取一个数据库连接, 通过该属性来设置是否关闭获取的这个连接,默认 true 关闭,设置为false 后,不会关闭获取的连接,这个参数的设置要根据自己选择的数据源来决定
2.分页测试类
import com.github.pagehelper.PageHelper;
import com.github.pagehelper.PageInfo;
import com.iflytek.bim.cop.domain.entity.User;
import com.iflytek.bim.cop.api.IUserService;
import com.iflytek.bim.cop.service.redis.IRedisService;
import org.slf4j.Logger;
import org.slf4j.LoggerFactory;
import org.springframework.beans.factory.annotation.Autowired;
import org.springframework.stereotype.Controller;
import org.springframework.web.bind.annotation.RequestMapping;
import org.springframework.web.bind.annotation.ResponseBody;

import java.util.List;

/**
 * @author boxin
 * @date 2022年02月28日 18:08
 */
@Controller
public class TestController {
    private static final Logger logger = LoggerFactory.getLogger(TestController.class);
    @Autowired
    private IUserService userService;
    @Autowired
    private IRedisService redisService;
    @ResponseBody
    @RequestMapping("/")
    public PageInfo<User> test() {
        PageHelper.startPage(1, 10);
        //存入redis并设置10秒的有效期
        redisService.setValue("redisKey", 1, 3, 2);
        logger.info("redisKey的值 ==================》 " + redisService.getValue("redisKey"));
        try {
            Thread.sleep(5000);
            logger.info("redisKey 等待5秒后的值 ==================》 " + redisService.getValue("redisKey"));
        } catch (InterruptedException e) {
            e.printStackTrace();
        }
        List<User> userList = userService.getAll();
        PageInfo<User> pageInfo = new PageInfo<>(userList);
        return pageInfo;
    }
}
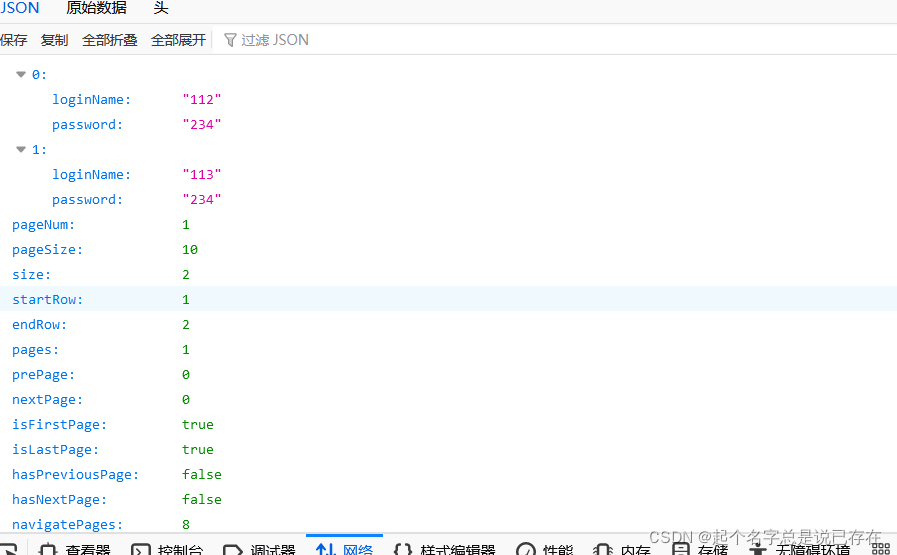
3.分页测试,浏览器访问http://localhost:8020/
注:注意com.github.pagehelper的版本,可能会在启动的时候报错
┌──->──┐
|  com.github.pagehelper.autoconfigure.PageHelperAutoConfiguration
└──<-──┘
五.集成kafka
1.引入kafka maven依赖
  <!-- kafka包 -->
        <dependency>
            <groupId>org.springframework.kafka</groupId>
            <artifactId>spring-kafka</artifactId>
        </dependency>
        <!-- fastjson -->
        <dependency>
            <groupId>com.alibaba</groupId>
            <artifactId>fastjson</artifactId>
            <version>1.2.47</version>
        </dependency>
        <!-- lang字符串工具 -->
        <dependency>
            <groupId>commons-lang</groupId>
            <artifactId>commons-lang</artifactId>
            <version>2.4</version>
            <scope>provided</scope>
        </dependency>
2.服务器安装Kafka
(1).下载kafka压缩包
https://kafka.apache.org/downloads
(2).安装Kafka

tar -zxvf kafka_2.13-3.0.0.tgz
(3).修改kafka的配置
#在公司内网部署 kafka 集群只需要用到 listeners,内外网需要作区分时 才需要用到advertised.listeners
listeners=PLAINTEXT://127.0.0.1:9092
advertised.listeners=PLAINTEXT://127.0.0.1:9092
log.dirs=/usr/local/kafka_2.11-0.9.0.1/kafka-logs//
(4).修改kafka内置zookeeper的配置
dataDir=/usr/local/kafka/zookeeper
dataLogDir=/usr/local/kafka/zookeeper-logs
# the port at which the clients will connect
clientPort=2181
# disable the per-ip limit on the number of connections since this is a non-production config
maxClientCnxns=100
tickTime=2000
initLimit=10
syncLimit=5
# Disable the admi
(5).开启zookeeper和kafka
bin/zookeeper-server-start.sh config/zookeeper.properties
bin/kafka-server-start.sh config/server.properties
为了方便可以自己创建一个启动脚本
进入kafka目录下 输入命令:vi  kafkaStart.sh

添加内容为:
#!/bin/bash
#启动zookeeper
/DATA/kafka/kafka_2.12-2.0.0/bin/zookeeper-server-start.sh /DATA/kafka/kafka_2.12-2.0.0/config/zookeeper.properties &
sleep 3  #默默等3秒后执行
#启动kafka
/DATA/kafka/kafka_2.12-2.0.0/bin/kafka-server-start.sh /DATA/kafka/kafka_2.12-2.0.0/config/server.properties &
启动结果
(6).创建topic主题
./kafka-topics.sh --create --topic test --bootstrap-server localhost:9092 -partitions 3 -replication-factor 1
(7).启动生产者连接主题
./kafka-console-producer.sh --broker-list localhost:9092 --topic test
(8).启动消费者连接主题
./kafka-console-consumer.sh --bootstrap-server localhost:9092 --topic test
3.springboot开始集成Kafka,添加配置
#kafka
spring.applicationname=kafka-tutorial
# 指定kafka 代理地址,可以多个
spring.kafka.bootstrap-servers=172.31.111.11:9092
spring.kafka.producer.retries: 0
# 每次批量发送消息的数量
spring.kafka.producer.batch-size: 16384
# 缓存容量
spring.kafka.producer.buffer-memory: 33554432
# 指定消息key和消息体的编解码方式
spring.kafka.producer.key-serializer: org.apache.kafka.common.serialization.StringSerializer
spring.kafka.producer.value-serializer: org.apache.kafka.common.serialization.StringSerializer
# 指定默认消费者group id
spring.kafka.consumer.group-id=demo
spring.kafka.consumer.auto-commit-interval=100
spring.kafka.consumer.auto-offset-reset=earliest
spring.kafka.consumer.enable-auto-commit=true
# 指定消息key和消息体的编解码方式
spring.kafka.consumer.key-deserializer=org.apache.kafka.common.serialization.StringDeserializer
spring.kafka.consumer.value-deserializer=org.apache.kafka.common.serialization.StringDeserializer
# 指定listener容器中的线程数,用于提高并发量
spring.kafka.listener.concurrency=3
4.创建测试bean包,创建kafka生产者与消费者
(1).创建生产者KafkaProduction
import com.alibaba.fastjson.JSON;
import org.slf4j.Logger;
import org.slf4j.LoggerFactory;
import org.springframework.beans.factory.annotation.Autowired;
import org.springframework.kafka.core.KafkaTemplate;
import org.springframework.kafka.support.SendResult;
import org.springframework.stereotype.Component;
import org.springframework.util.concurrent.ListenableFuture;
import org.springframework.util.concurrent.ListenableFutureCallback;

/**
 * kafka 生产者
 * @author boxin
 * @date 2022年03月02日 20:32
 */
@Component
public class KafkaProduction <T>{
    private Logger logger = LoggerFactory.getLogger(KafkaProduction.class);
    @Autowired
    private KafkaTemplate<String, Object> kafkaTemplate;
    /**
     * 发送消息
     * @param obj	消息体
     * @param topics  消息主题
     */
    public void send(T obj,String topics) {
        String jsonObj = JSON.toJSONString(obj);
        logger.info("----kafka---- message = {}", jsonObj);
        //发送消息
        ListenableFuture<SendResult<String, Object>> future = kafkaTemplate.send(topics, jsonObj);
        future.addCallback(new ListenableFutureCallback<SendResult<String, Object>>() {
            @Override
            public void onFailure(Throwable throwable) {
                logger.info("KafkaProduction: kafka to be sent:" + throwable.getMessage());
            }
            @Override
            public void onSuccess(SendResult<String, Object> stringObjectSendResult) {	//成功消费
                //TODO 业务处理
                logger.info("KafkaProduction: The message has be sent successfully:");
                logger.info("KafkaProduction: =============== result: " + stringObjectSendResult.toString());
            }
        });
    }
}
(2).创建KafkaTopicsConstant常量类
public interface IKafkaSenderService {
    /**
     * 发送主题为test的消息
     */
    public void send();
}
(3).创建消费者KafkaConsumer
import com.iflytek.bim.cop.contant.KafkaTopicsConstant;
import org.apache.kafka.clients.consumer.ConsumerRecord;
import org.slf4j.Logger;
import org.slf4j.LoggerFactory;
import org.springframework.kafka.annotation.KafkaListener;
import org.springframework.stereotype.Component;
import java.util.Optional;

@Component
public class KafkaConsumer {
        private Logger logger = LoggerFactory.getLogger(KafkaConsumer.class);
        /**
         * 监听kafka.tut 的topic为test_topics的消息
         * @param record
         */
        @KafkaListener(topics = KafkaTopicsConstant.TEST_TOPICS)
        public void listen(ConsumerRecord<?, ?> record) {
            Optional<?> kafkaMessage = Optional.ofNullable(record.value());

            if (kafkaMessage.isPresent()) {
                Object message = kafkaMessage.get();
                logger.info("KafkaConsumer  接收: ================= Topic:" + record.topic());
                logger.info("KafkaConsumer  接收: ================= Record:" + record);
                logger.info("KafkaConsumer  接收: ================= Message:" + message);
            }
        }
}
(4).发送实现
import com.iflytek.bim.cop.component.KafkaProduction;
import com.iflytek.bim.cop.contant.KafkaTopicsConstant;
import com.iflytek.bim.cop.domain.entity.User;
import org.springframework.beans.factory.annotation.Autowired;

/**
 * @author boxin
 * @date 2022年03月02日 20:50
 */
public class KafkaSenderServiceImpl implements IKafkaSenderService {
    @Autowired
    private KafkaProduction<User> kafkaProduction;

    @Override
    public void send() {
        User user = new User();
        user.setLoginName("I am is a panda");
        user.setPassword("5588996633");
        kafkaProduction.send(user, KafkaTopicsConstant.TEST_TOPICS);
    }
}
(5).测试Kafka
    @ResponseBody
    @RequestMapping("/")
    public void kafkatest() {
        kafkaSenderService.send();
    }
(6).Kafka测试结果

六.集成SpringCloud框架
1.搭建eruka:
1).新建一个maven工程项目,添加eruka依赖
  <dependency>
            <groupId>org.springframework.cloud</groupId>
            <artifactId>spring-cloud-dependencies</artifactId>
            <version>Brixton.RELEASE</version>
            <type>pom</type>
            <scope>import</scope>
        </dependency>
        <dependency>
            <groupId>junit</groupId>
            <artifactId>junit</artifactId>
            <version>3.8.1</version>
            <scope>test</scope>
        </dependency>
2).编写配置文件
server.port=8088

# 不向注册中心注册自己
eureka.client.register-with-eureka=false
# 不需要检索服务
eureka.client.fetch-registry=false
eureka.client.serviceUrl.defaultZone=http://localhost:${server.port}/eureka/


 1116
1116

 被折叠的 条评论
为什么被折叠?
被折叠的 条评论
为什么被折叠?
 到【灌水乐园】发言


