


前言
上一篇文章完成了使用.xacro描述机器人,并使用launch文件启动robot_state_publisher、joint_state_publisher以及rvize2,将机器人模型加载到了可视化工具rviz2中。这篇文章主要内容是完善机器人的碰撞体积、惯性矩阵等属性,在gazebo中创建一个房间模型,并将机器人模型加载到房间中,最后添加机器人控制插件,使用键盘控制机器人移动。
一、完善机器人的物理属性
之前我们建立的机器人模型只有最简单的外观属性(visual),想要对机器人进行仿真光有外观属性是不够的,还需要添加碰撞体积、惯性矩阵、摩擦力等参数。
(一)、添加虚拟部件——base_footprint
base_footprint的定义:它其实就是base_link的几何中心在地面上的投影。
base_footprint的作用:表示机器人的二维坐标(x,y)z=0,里程计的原点(odom)到base_footprint的变换表示机器人的位姿;兼容性,许多导航算法以base_footprint作为默认基准点坐标系。
添加base_footprint的方法很简单,在baselink描述中的</link>后面添加:
        <link name="base_footprint"/>
        <joint name="base_footprint_joint" type="fixed">
            <origin xyz="0.0 0.0 0.087" rpy="0.0 0.0 0.0"/>
            <parent link="base_footprint"/>
            <child link="base_link"/>
            <axis xyz="0.0 0.0 0.0"/>
        </joint>
base_footprint是虚拟部件link中并不需要描述形状,这里需要注意计算好baselink到地面的距离并且base_footprint是父连杆,base_link是子连杆。
(二)、添加碰撞体积
在上一篇文章《ROS2的使用中——创建机器人模型》讲解机器人的连杆时,简单提到过<collision>标签下机器人的碰撞体积的相关参数。接下来我们需要在代码中添加它。以base_link为例子需要再<link> </link>标签内添加以下代码:
           <collision>
                <origin xyz="0.0 0.0 0.0" rpy="0.0 0.0 0.0"/>
                <geometry>
                    <cylinder radius="${radius}" length="${length}"/>
                </geometry>
                 <material>
                    <color rgba="0.0 0.5 0.5 0.5"/>
                </material>
            </collision>
这段代码其实就是将<visual>里面的内容给粘贴了过来放到<collision>标签内,直接粘贴外观的内容表示:碰撞体积就像外观看看起来那样,实际上碰撞体积也可以设置的和外观不一样,使用简单的形状来代替复杂的结构,可以降低碰撞检测的计算量。在其他部位的描述文件中的link内也需要加入对应的<collision>,注意<collision>内容要和当前部件的<visual>内容保持一致。
(三)、添加惯性矩阵
1.将计算公式进行宏定义
不同的几何形状惯性矩阵的计算公式也不相同,每一个连杆形状都不相同每一次都单独计算很麻烦,将计算公式使用宏定义封装成可以复用的代码,将变量设为参数这样一来使用起来就会方便很多,在robot1文件夹下创建一个文件inertial.urdf.xacro将代码粘贴到其中:
<?xml version="1.0"?>
<robot xmlns:xacro="http://www.ros.org/wiki/xacro">
    <!-- 长方体的惯性矩阵 -->
    <xacro:macro name="box_inertial" params="m  w h d rpy xyz">
        <!-- Ixx=m/12(d*d+h*h)
        Iyy=m/12(w*w+d*d)
        Izz=m/12(w*w+h*h) -->
        <inertial>
            <mass value="${m}"/>
             <origin xyz="${xyz}" rpy="${rpy}"/>
            <inertia ixx="${m/12*(d*d+h*h)}" ixy="0.0" ixz="0.0" iyy="${m/12*(w*w+d*d)}" iyz="0.0" izz="${m/12*(w*w+h*h)}"/>
        </inertial>
    </xacro:macro>

    <!-- 圆柱体的惯性矩阵 -->
    <xacro:macro name="cylinder_inertial" params="m r h rpy xyz">
            <!-- Ixx=Iyy=m/12(3r*r+L*L)
                    Izz=m/2*r*r -->
        <inertial>
            <mass value="${m}"/>
             <origin xyz="${xyz}" rpy="${rpy}"/>
            <inertia ixx="${m*(3*r*r+h*h)/12}" ixy="0.0" ixz="0.0" iyy="${m*(3*r*r+h*h)/12}" iyz="0.0" izz="${m/2*r*r}"/>
        </inertial>
    </xacro:macro>

    <!-- 球体的惯性矩阵 -->
    <xacro:macro name="sphere_inertial" params="m r rpy xyz">
            <!-- Ixx=Iyy=Izz=2mr*r/5 -->
        <inertial>
            <mass value="${m}"/>
             <origin xyz="${xyz}" rpy="${rpy}"/>
            <inertia ixx="${(2*m*r*r)/5}" ixy="0.0" ixz="0.0" iyy="${(2*m*r*r)/5}" iyz="0.0" izz="${(2*m*r*r)/5}"/>
        </inertial>
    </xacro:macro>


</robot>
2.在各个部位描述文件中调用宏
以imu描述文件为例子:
<?xml version="1.0"?>
<robot xmlns:xacro="http://www.ros.org/wiki/xacro">
<xacro:include filename="$(find robot_sim)/urdf/robot1/inertial.urdf.xacro"/>
    <xacro:macro name="imu_xacro" params="xyz">
        <link name="imu_link">
            <visual name="">
                <origin xyz="0.0 0.0 0.0" rpy="0.0 0.0 0.0"/>
                <geometry>
                    <box size="0.05 0.05 0.05"/>
                </geometry>
                <material name="">
                    <color rgba="0.0 0.0 0.0 1.0"/>
                </material>
            </visual>
            <collision>
                <origin xyz="0.0 0.0 0.0" rpy="0.0 0.0 0.0"/>
                <geometry>
                    <box size="0.05 0.05 0.05"/>
                </geometry>
                <material name="">
                    <color rgba="0.0 0.0 0.0 1.0"/>
                </material>
            </collision>
            <xacro:box_inertial m="0.2"  w="0.05" h="0.05" d="0.05" rpy="0.0 0.0 0.0" xyz="0.0 0.0 0.0"/>
        </link>
        <joint name="imu_joint" type="fixed">
            <origin xyz="${xyz}" rpy="0.0 0.0 0.0"/>
            <parent link="base_link"/>
            <child link="imu_link"/>
        </joint>
    </xacro:macro>
</robot>
只需要在第二行后面添加
<xacro:include filename="$(find robot_sim)/urdf/robot1/inertial.urdf.xacro"/>
表示该文件插入了inertial.urdf.xacro文件的内容。
然后在link的最后一行调用宏并且传入参数即可
<xacro:box_inertial m="0.2" w="0.05" h="0.05" d="0.05" rpy="0.0 0.0 0.0" xyz="0.0 0.0 0.0"/>
注意这里不同的几何形状要调用不同的公式,m表示重量单位是千克,其他的参数和visual外观保持一致即可,参数不清楚的可以查看inertial.urdf.xacro文件的内容。
(四)、添加轮子的摩擦力等属性
添加的摩擦力等属性是添加给仿真软件gazebo读取的,告诉gazebo机器人轮子的各项属性。添加的位置是wheel.urdf.xacro以及caster.urdf.xacro文件的<joint>和</xacro:macro>之间即可。代码如下:
wheel.urdf.xacro:
        <gazebo reference="${name}_link">
        <!-- mu1表示切向摩擦系数,mu2表示法向摩擦系数,kd表示刚体接触系数,kp表示阻尼系数 -->
        <mu1 value="10.0"/>
        <mu2 value="10.0"/>
        <kd value="1000000000.0"/>
        <kp value="1.0"/>
        </gazebo>
caster.urdf.xacro:
        <gazebo reference="${name}_link">
        <!-- mu1表示切向摩擦系数,mu2表示法向摩擦系数,kd表示刚体接触系数,kp表示阻尼系数 -->
        <mu1 value="0.01"/>
        <mu2 value="0.01"/>
        <kd value="1000000000.0"/>
        <kp value="1.0"/>
        </gazebo>
说一下为什么支撑轮的摩擦系数这么小,主要是因为之前建模的时候将轮子设置成了两个固定关节的小球,摩擦系数设置的很小来模拟不影响小车移动方向的万向轮。这里的各项属性可以在使用键盘控制节点控制机器人移动的时候进行调试,我仿真的时候使用这组参数是没有问题的。
二、创建gazebo中的世界模型
在创建模型之前,我们需要先下载gazebo,gazebo仿真有点吃配置,部分使用虚拟机的同学在使用gazebo仿真时可能会卡顿。
安装gazebo
sudo apt install gazebo
下载模型需要使用git如果没有安装git的可以先安装
sudo apt update
sudo apt install git
下载gazebo中的模型:
mkdir -p ~/.gazebo
cd ~/.gazebo
git clone https://gitee.com/ohhuo/gazebao_models.git ~/.gazebo/models
rm -rf ~/.gazebo/models/.git #删除.git防止gazebo误识别为模型
(一)创建gazebo中的世界模型并保存
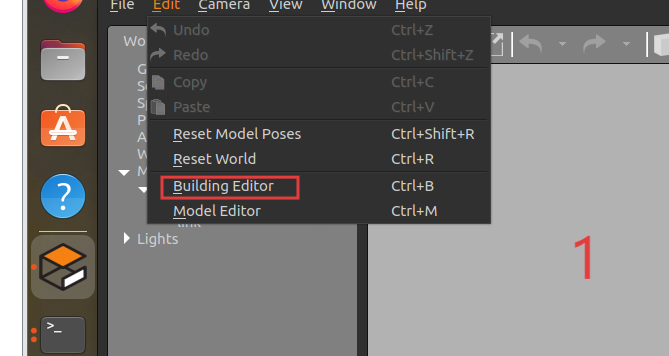
安装好gazebo后,在终端中输入 gazebo 打开gazebo软件。
点击左上角的Edit下的Building Editor
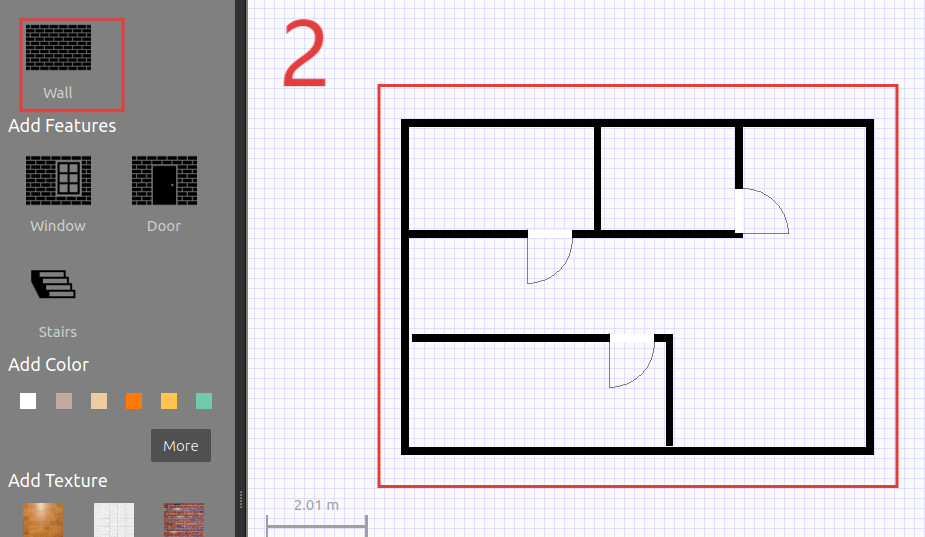
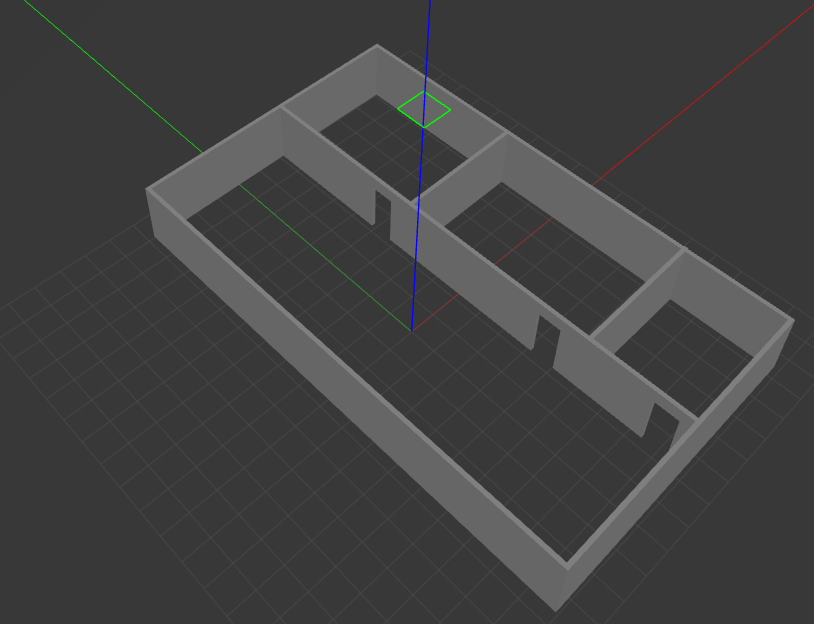
使用Wall画一个房间,黑色的线条表示墙体,这是俯视图,我这里只是演示,建议房间可以稍微画大一点。
点击退出编辑
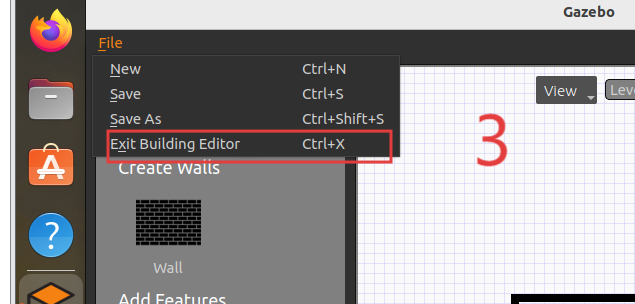
保存并退出
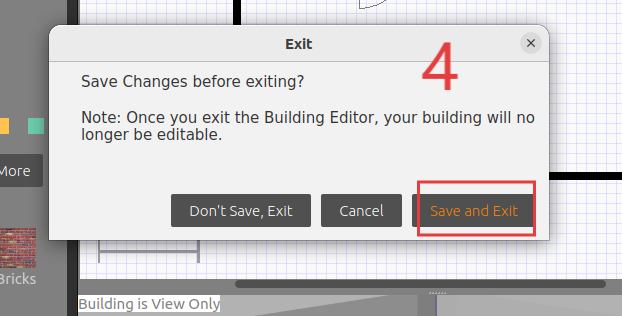
找到robot_sim功能包注意是工作空间下src目录下的功能包,在功能包下创建一个文件夹world,点击choose,保存文件名为room。

点击insert在房间中添加自己想要添加的模型,如方块桌子等
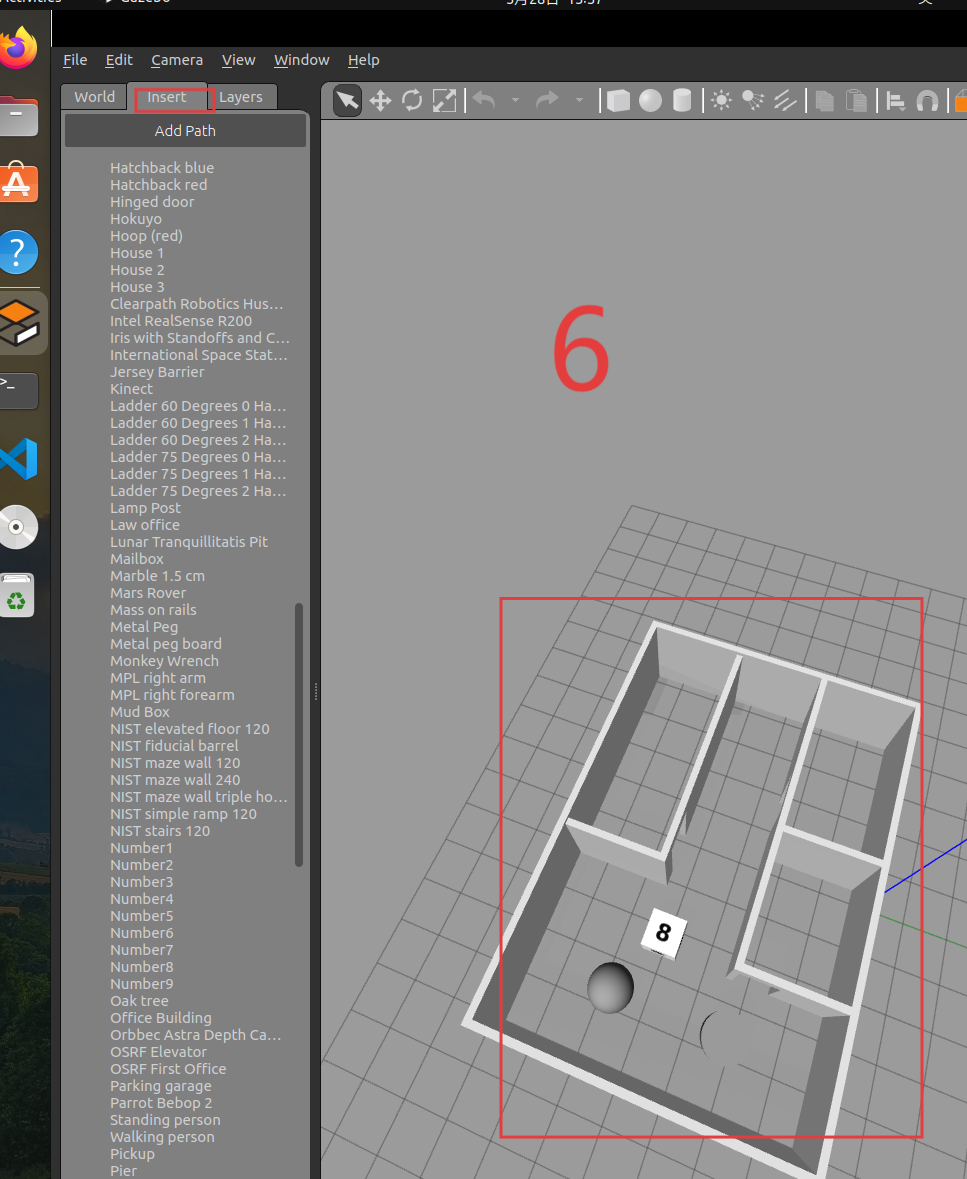
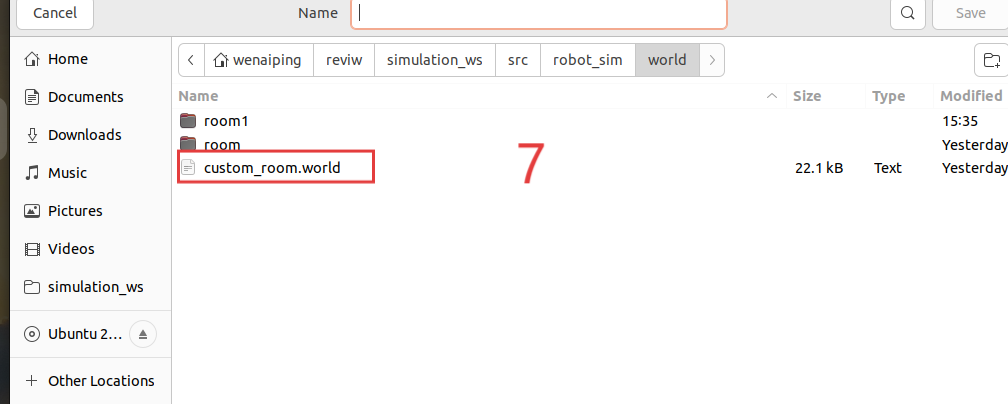
点击左上角的File下的Save as,存到和刚才一样的路径下,设置名字为cunstom_room.world,我已经保存过了如图中框起来的地方所示。
这样你就已经学会如何自己创建房间的模型,以及如何保存gazebao中的世界模型。
发现写漏了一步,补充一下:

这里需要再CmakeList文件的这个位置添加world,表示将新建的world文件也拷贝到install/share/robot_sim目录下,如果不加这一步,后面launch文件中拼接custom_room.world路径会出错。
(二)修改launch文件加载模型
接下来我们来修改之前创建好的launch文件,到达在gazebo中加载我们刚刚保存的世界模型的目的。在robot_sim功能包的launch文件加下新建一个文件gazebo_sim.launch.py,将robot_sim.launch.py的代码粘贴过去。
import launch
import launch.launch_description_sources
import launch_ros
import os
from ament_index_python import get_package_share_directory
import launch_ros.parameter_descriptions

def generate_launch_description():
    #获取文件路径
    package_path=get_package_share_directory('robot_sim')
    default_urdf_path=os.path.join(package_path,'urdf/robot1','robot1.urdf.xacro')
    default_world_path=os.path.join(package_path,'world','custom_room.world')
    #为了方便修改将路径设置为参数
    action_declare_arg_model_path=launch.actions.DeclareLaunchArgument(
        name="model",default_value=str(default_urdf_path),description='机器人模型描述文件的路径'
    )

    #通过路径获取文件的内容并且提供给robot_state
    robot_description_param=launch.substitutions.Command(
    ['xacro ', launch.substitutions.LaunchConfiguration('model')]
    )

    parameter_value=launch_ros.parameter_descriptions.ParameterValue(
        robot_description_param,value_type=str)
    print(parameter_value)

    robot_state_publisher=launch_ros.actions.Node(
        package='robot_state_publisher',
        executable='robot_state_publisher',
        parameters=[{'robot_description':parameter_value}],
    )

    action_gazebo_launch=launch.actions.IncludeLaunchDescription(
        launch.launch_description_sources.PythonLaunchDescriptionSource(
            [get_package_share_directory('gazebo_ros'),'/launch','/gazebo.launch.py']
        ),
        launch_arguments=[('world',default_world_path),('verbose','true')]
    )

    #使用gazebo发布关节状态,就不需要joint_state_publisher模拟参数了
    # joint_state_publisher=launch_ros.actions.Node(
    #     package="joint_state_publisher",
    #     executable="joint_state_publisher",
    # )

    return launch.LaunchDescription([
        action_declare_arg_model_path,
        robot_state_publisher,
        action_gazebo_launch,
        launch_spawn_entity,
    ]

    )
这里注释掉了joint_state_publisher启动的代码,使用gazebo仿真就可以不用joint_state来模拟关节状态了,rviz2的启动节点也删除了,新增加了
default_world_path=os.path.join(package_path,'world','custom_room.world')
拼接custom_room.world的文件路径
还需要安装一个功能包gazebo_ros,它的作用提供ROS和gazebo双向通讯,这里了用到的功能是使用gazebo.launch.py启动gazebo,后面还需要使用它提供的可执行文件加载机器人模型。
安装方法,终端中输入:
sudo apt install ros-$ROS_DISTRO-gazebo-ros-pkgs
还增加了
   action_gazebo_launch=launch.actions.IncludeLaunchDescription(
        launch.launch_description_sources.PythonLaunchDescriptionSource(
            [get_package_share_directory('gazebo_ros'),'/launch','/gazebo.launch.py']
        ),
        launch_arguments=[('world',default_world_path),('verbose','true')]
        )
这段代码中: IncludeLaunchDescription表示launch中包含launch文件,PythonLaunchDescriptionSource作为IncludeLaunchDescription的参数,描述launch文件的来源,[get_package_share_directory('gazebo_ros'),'/launch','/gazebo.launch.py']拼接launch文件的路径。launch_arguments=[('world',default_world_path),('verbose','true')]配置参数,('world',default_world_path)指定世界模型的文件路径,verbose,true输出详细日志信息。
编写好launch文件后保存,终端中跳转到工作空间下,输入 colcon build 构建代码,构建成功后输入
ros2 launch robot_sim robot1_gazebo_sim.launch.py
启动launch文件加载世界模型到gazebo中
三、使用键盘控制小车移动
(一)添加diff_drive插件
在robot_sim功能包下创建文件夹plugins(插件),plugins下创建gazebo_control_plugin.xacro文件,在文件内粘贴以下代码
<?xml version="1.0"?>
<robot xmlns:xacro="http://www.ros.org/wiki/xacro">
    <xacro:macro name="gazebo_control_plugins">
        <gazebo>
            <plugin name='diff_drive' filename='libgazebo_ros_diff_drive.so'>
                <ros>
                    <namespace>/</namespace>
                    <remapping>cmd_vel:=cmd_vel</remapping>
                    <remapping>odom:=odom</remapping>
                </ros>
                <update_rate>30</update_rate>
                <!-- wheels -->
                <left_joint>left_wheel_joint</left_joint>
                <right_joint>right_wheel_joint</right_joint>
                <!-- kinematics -->
                <wheel_separation>0.226</wheel_separation>
                <wheel_diameter>0.06</wheel_diameter>
                <!-- limits -->
                <max_wheel_torque>20</max_wheel_torque>
                <max_wheel_acceleration>1.0</max_wheel_acceleration>
                <!-- output -->
                <publish_odom>true</publish_odom>
                <publish_odom_tf>true</publish_odom_tf>
                <publish_wheel_tf>true</publish_wheel_tf>

                <odometry_frame>odom</odometry_frame>
                <robot_base_frame>base_footprint</robot_base_frame>

            </plugin>
        </gazebo>
    </xacro:macro>
</robot>
其中<gazebo>表示这些内容是给gazebo看的
指定了插件名以及动态链接库文件
<plugin name='diff_drive' filename='libgazebo_ros_diff_drive.so'>
给ros看的内容, <namespace>/</namespace>使用默认命名空间,<remapping>cmd_vel:=cmd_vel</remapping><remapping>odom:=odom</remapping>将cmd_vel、odom话题进行重映射,名字相同并未修改只是声明了参数进行占位。
                 <ros>
                    <namespace>/</namespace>
                    <remapping>cmd_vel:=cmd_vel</remapping>
                    <remapping>odom:=odom</remapping>
                </ros>
配置插件的参数, <update_rate>30</update_rate>将发布话题的频率设置为30hz
<update_rate>30</update_rate>
<left_joint>left_wheel_joint</left_joint> <right_joint>right_wheel_joint</right_joint>指定左右轮的关节名称,必须和机器人描述文件中的名称保持一致
                <!-- wheels -->
                <left_joint>left_wheel_joint</left_joint>
                <right_joint>right_wheel_joint</right_joint>
<wheel_separation>0.226</wheel_separation> <wheel_diameter>0.06</wheel_diameter>左右轮之间的距离以及轮子的直径,根据描述文件中的参数计算
                <!-- kinematics -->
                <wheel_separation>0.226</wheel_separation>
                <wheel_diameter>0.06</wheel_diameter>
<max_wheel_torque>20</max_wheel_torque> <max_wheel_acceleration>1.0</max_wheel_acceleration>设置轮子最大扭矩以及最大角加速度。
                <!-- limits -->
                <max_wheel_torque>20</max_wheel_torque>
                <max_wheel_acceleration>1.0</max_wheel_acceleration>
<publish_odom>true</publish_odom><publish_odom_tf>true</publish_odom_tf>
<publish_wheel_tf>true</publish_wheel_tf>是否发布里程计原点、里程计变换关系以及车轮状态
                <!-- output -->
                <publish_odom>true</publish_odom>
                <publish_odom_tf>true</publish_odom_tf>
                <publish_wheel_tf>true</publish_wheel_tf>
<odometry_frame>odom</odometry_frame> <robot_base_frame>base_footprint</robot_base_frame>配置里程计坐标系名称和机器人极坐标系名称。
<odometry_frame>odom</odometry_frame>
<robot_base_frame>base_footprint</robot_base_frame>
(二)启动键盘控制节点控制小车移动
在使用键盘控制小车移动前需要再launch中添加代码,将小车的模型加载到gazebo中。
    launch_spawn_entity=launch_ros.actions.Node(
        package='gazebo_ros',
        executable='spawn_entity.py',
        arguments=['-topic','robot_description','-entity','robot1'],
    )
这里启动了一个节点spawn_entity.py(生成实体),如何查看这个节点可配置哪些参数呢,只需要在终端中输入 ros2 run gazebo_ros spawn_entity.py点击回车,终端中就可以生成提示,如下

这里为什么要使用话题加载机器人呢,因为robot_state_publisher 发布了描述机器人的话题robot_description,订阅题来接收它即可。报错中提到:spawn_entity.py: error: the following arguments are required: -entity, -entity参数是必要的,那么参数配置中就必须跟上 -entity 和ENTITY_NAME(实体的名字),
最终的lunch文件如下
import launch
import launch.launch_description_sources
import launch_ros
import os
from ament_index_python import get_package_share_directory
import launch_ros.parameter_descriptions

def generate_launch_description():
    #获取文件路径
    package_path=get_package_share_directory('robot_sim')
    default_urdf_path=os.path.join(package_path,'urdf/robot1','robot1.urdf.xacro')
    default_world_path=os.path.join(package_path,'world','custom_room.world')
    #为了方便修改将路径设置为参数
    action_declare_arg_model_path=launch.actions.DeclareLaunchArgument(
        name="model",default_value=str(default_urdf_path),description='机器人模型描述文件的路径'
    )

    #通过路径获取文件的内容并且提供给robot_state
    robot_description_param=launch.substitutions.Command(
    ['xacro ', launch.substitutions.LaunchConfiguration('model')]
    )

    parameter_value=launch_ros.parameter_descriptions.ParameterValue(
        robot_description_param,value_type=str)
    print(parameter_value)

    robot_state_publisher=launch_ros.actions.Node(
        package='robot_state_publisher',
        executable='robot_state_publisher',
        parameters=[{'robot_description':parameter_value}],
    )

    action_gazebo_launch=launch.actions.IncludeLaunchDescription(
        launch.launch_description_sources.PythonLaunchDescriptionSource(
            [get_package_share_directory('gazebo_ros'),'/launch','/gazebo.launch.py']
        ),
        launch_arguments=[('world',default_world_path),('verbose','true')]
    )
    launch_spawn_entity=launch_ros.actions.Node(
        package='gazebo_ros',
        executable='spawn_entity.py',
        arguments=['-topic','robot_description','-entity','robot1'],
    )

    #使用gazebo发布关节状态,就不需要joint_state_publisher模拟参数了
    # joint_state_publisher=launch_ros.actions.Node(
    #     package="joint_state_publisher",
    #     executable="joint_state_publisher",
    # )

    return launch.LaunchDescription([
        action_declare_arg_model_path,
        robot_state_publisher,
        action_gazebo_launch,
        launch_spawn_entity,
    ]

    )
编写完成之后就可以,在终端中工作空间下输入 colcon build 构建功能包,构建完成输入
ros2 launch robot_sim robot1_gazebo_sim.launch.py
启动launch,这时机器人就成功加载到世界中了,按住ctrl alt t 打开一个新的终端输入
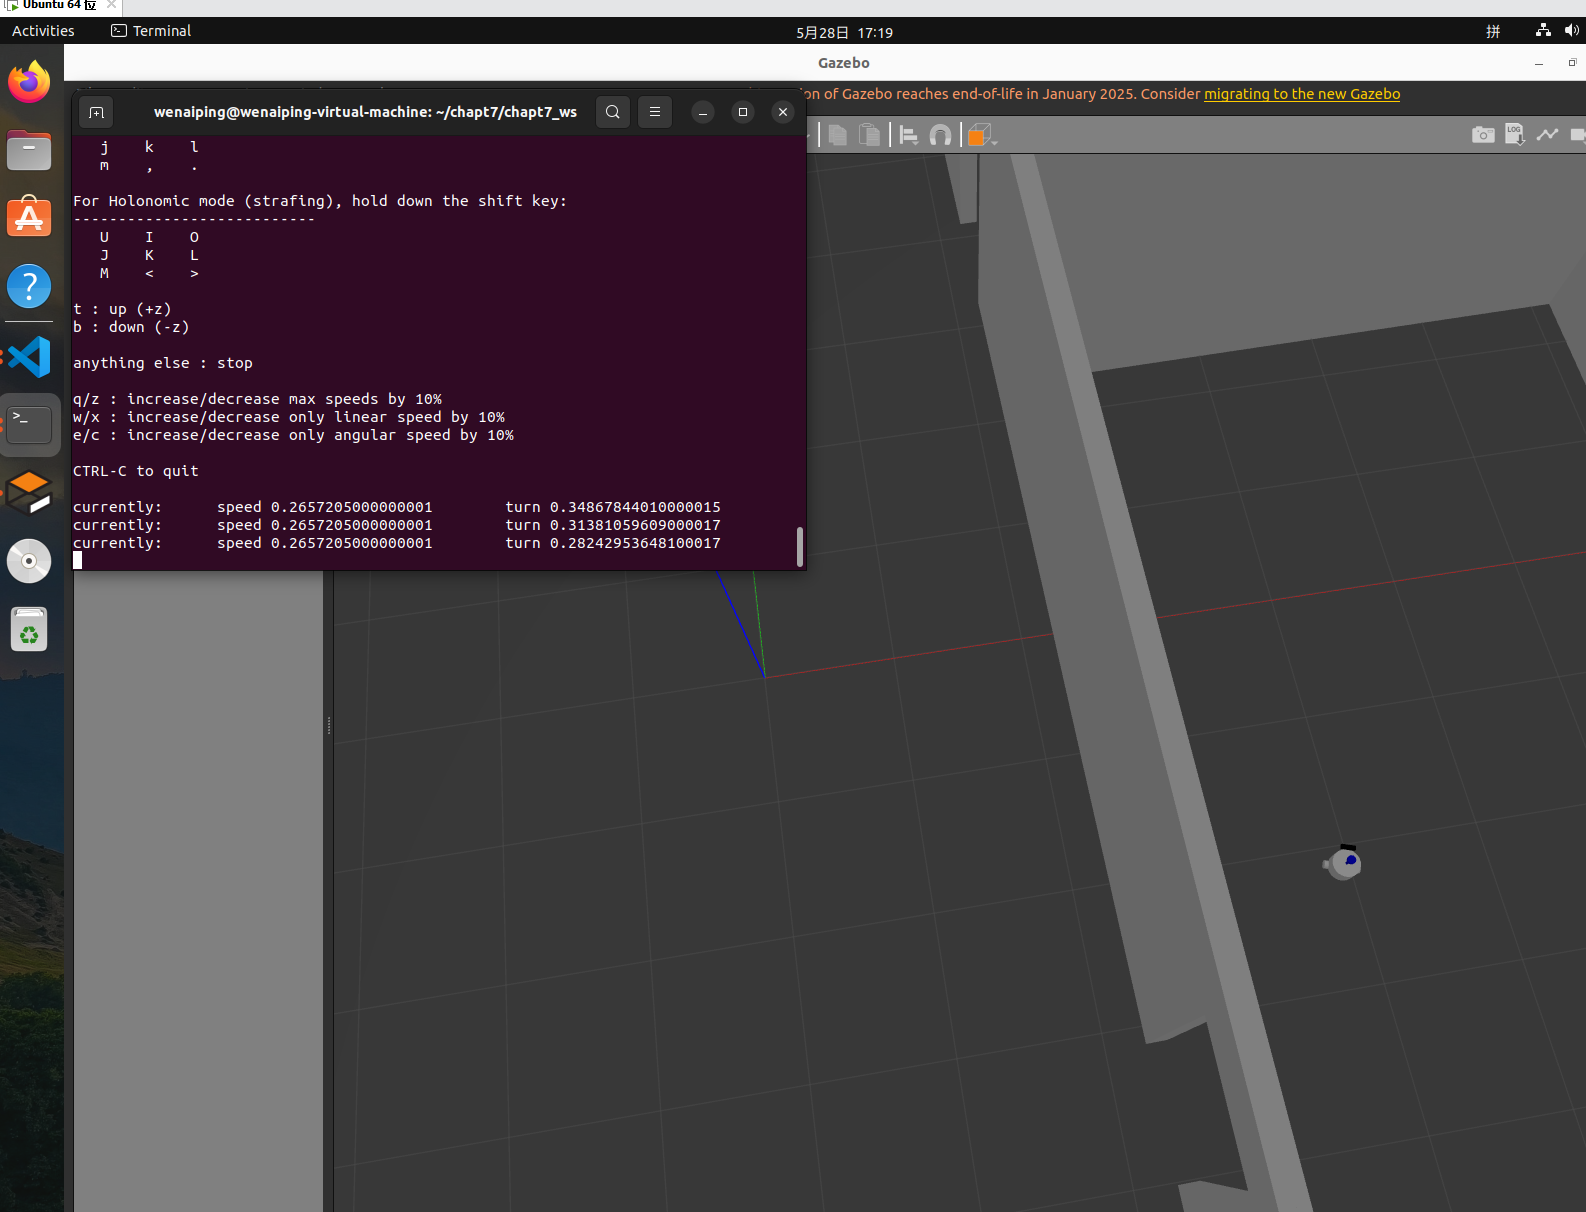
ros2 run teleop_twist_keyboard teleop_twist_keyboard
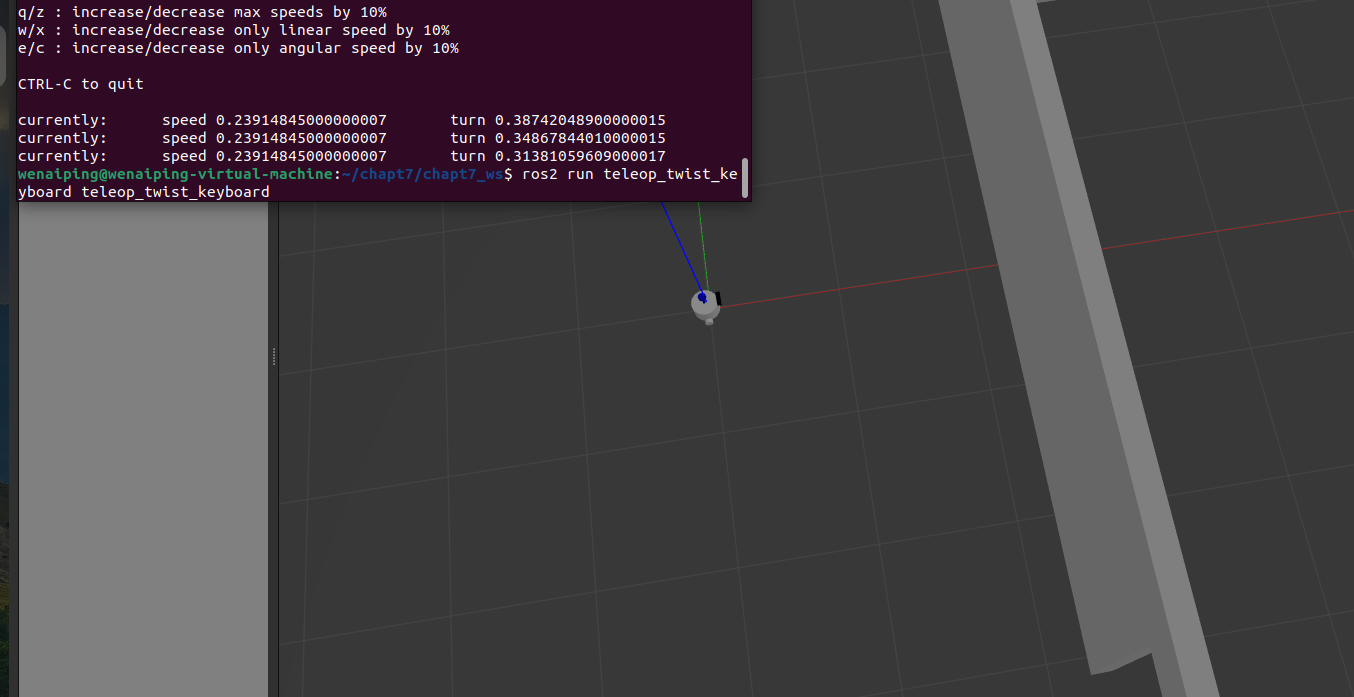
注意键盘控制节点的终端要和gazebo同时打开,回车启动键盘控制节点,按x键和c键减小机器人直线和转动的速度,按i键控制机器人前进,按m后退,k停止,j左转,l右转。这样你就可以控制机器人在你创建的房间中移动了,如果机器人移动效果不好,不平稳等需要调节轮子关节位置以及轮子的大小等参数。 如果机器人转动方向与键盘方向相反那么很可能是在机器人描述文件中你把机器人的轮子的位置设置反了,机器人的左轮在y轴的正反向,右轮在负方向。
参考代码机器人描述文件参考代码(插件代码上面放过了就不放了):
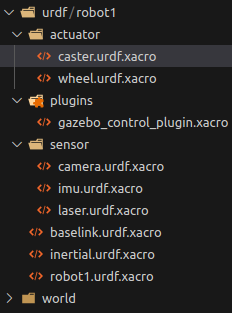
caster.urdf.xacro(支撑轮):
<?xml version="1.0"?>
<robot xmlns:xacro="http://www.ros.org/wiki/xacro">
<xacro:include filename="$(find robot_sim)/urdf/robot1/inertial.urdf.xacro"/>
    <xacro:macro name="caster_xacro" params="name xyz">
        <link name="${name}_link">
            <visual name="">
                <origin xyz="0.0 0.0 0.0" rpy="0.0 0.0 0.0"/>
                <geometry>
                    <sphere radius="0.015"/>
                </geometry>
                <material name="">
                    <color rgba="0.0 0.0 0.0 1.0"/>
                </material>
            </visual>
            <collision>
                <origin xyz="0.0 0.0 0.0" rpy="0.0 0.0 0.0"/>
                <geometry>
                    <sphere radius="0.015"/>
                </geometry>
                <material name="">
                    <color rgba="0.0 0.0 0.0 1.0"/>
                </material>
            </collision>
            <xacro:sphere_inertial m="0.06" r="0.015" rpy="0.0 0.0 0.0" xyz="0.0 0.0 0.0" />
        </link>
        <joint name="${name}_joint" type="fixed">
            <origin xyz="${xyz}" rpy="0.0 0.0 0.0"/>
            <parent link="base_link"/>
            <child link="${name}_link"/>
        </joint>
        <gazebo reference="${name}_link">
        <!-- mu1表示切向摩擦系数,mu2表示法向摩擦系数,kd表示刚体接触系数,kp表示阻尼系数 -->
        <mu1 value="0.01"/>
        <mu2 value="0.01"/>
        <kd value="1000000000.0"/>
        <kp value="1.0"/>
        </gazebo>
    </xacro:macro>
</robot>
wheel.urdf.xacro(驱动轮):
<?xml version="1.0"?>
<robot xmlns:xacro="http://www.ros.org/wiki/xacro">
<xacro:include filename="$(find robot_sim)/urdf/robot1/inertial.urdf.xacro"/>
    <xacro:macro name="wheel_xacro" params="name xyz">
        <link name="${name}_link">
            <visual name="">
                <origin xyz="0.0 0.0 0.0" rpy="1.5709 0.0 0.0"/>
                <geometry>
                    <cylinder radius="0.03" length="0.03"/>
                </geometry>
                <material name="">
                    <color rgba="0.0 0.0 0.66 1.0"/>
                </material>
            </visual>
            <collision>
                <origin xyz="0.0 0.0 0.0" rpy="1.5709 0.0 0.0"/>
                <geometry>
                    <cylinder radius="0.03" length="0.03"/>
                </geometry>
                <material name="">
                    <color rgba="0.0 0.0 0.66 1.0"/>
                </material>
            </collision>
            <xacro:cylinder_inertial m="0.2" r="0.03" h="0.03" rpy="1.5709 0.0 0.0" xyz="0.0 0.0 0.0" />
        </link>
        <joint name="${name}_joint" type="continuous">
            <origin xyz="${xyz}" rpy="0.0 0.0 0.0"/>
            <parent link="base_link"/>
            <child link="${name}_link"/>
            <axis xyz="0.0 1.0 0.0"/>
        </joint>
        <gazebo reference="${name}_link">
        <!-- mu1表示切向摩擦系数,mu2表示法向摩擦系数,kd表示刚体接触系数,kp表示阻尼系数 -->
        <mu1 value="10.0"/>
        <mu2 value="10.0"/>
        <kd value="1000000000.0"/>
        <kp value="1.0"/>
        </gazebo>
    </xacro:macro>
</robot>
camera.urdf.xacro(相机):
<?xml version="1.0"?>
<robot xmlns:xacro="http://www.ros.org/wiki/xacro">
<xacro:include filename="$(find robot_sim)/urdf/robot1/inertial.urdf.xacro"/>
    <xacro:macro name="camera_xacro" params="xyz">
        <link name="camera_link">
            <visual name="">
                <origin xyz="0.0 0.0 0.0" rpy="0.0 0.0 0.0"/>
                <geometry>
                    <box size="0.03 0.1 0.03"/>
                </geometry>
                <material name="">
                    <color rgba="0.0 0.0 0.0 1.0"/>
                </material>
            </visual>
            <collision>
                <origin xyz="0.0 0.0 0.0" rpy="0.0 0.0 0.0"/>
                <geometry>
                    <box size="0.03 0.1 0.03"/>
                </geometry>
                <material name="">
                    <color rgba="0.0 0.0 0.0 1.0"/>
                </material>
            </collision>
            <xacro:box_inertial m="0.1"  w="0.03" h="0.1" d="0.03" rpy="0.0 0.0 0.0" xyz="0.0 0.0 0.0"/>
        </link>
        <joint name="camera_joint" type="fixed">
            <origin xyz="${xyz}" rpy="0.0 0.0 0.0"/>
            <parent link="base_link"/>
            <child link="camera_link"/>
        </joint>
        <gazebo reference="camera_link">
            <material>Gazebo/Black</material>
        </gazebo>
    </xacro:macro>
</robot>
imu.urdf.xacro(惯性测量单元):
<?xml version="1.0"?>
<robot xmlns:xacro="http://www.ros.org/wiki/xacro">
<xacro:include filename="$(find robot_sim)/urdf/robot1/inertial.urdf.xacro"/>
    <xacro:macro name="imu_xacro" params="xyz">
        <link name="imu_link">
            <visual name="">
                <origin xyz="0.0 0.0 0.0" rpy="0.0 0.0 0.0"/>
                <geometry>
                    <box size="0.05 0.05 0.05"/>
                </geometry>
                <material name="">
                    <color rgba="0.0 0.0 0.0 1.0"/>
                </material>
            </visual>
            <collision>
                <origin xyz="0.0 0.0 0.0" rpy="0.0 0.0 0.0"/>
                <geometry>
                    <box size="0.05 0.05 0.05"/>
                </geometry>
                <material name="">
                    <color rgba="0.0 0.0 0.0 1.0"/>
                </material>
            </collision>
            <xacro:box_inertial m="0.2"  w="0.05" h="0.05" d="0.05" rpy="0.0 0.0 0.0" xyz="0.0 0.0 0.0"/>
        </link>
        <joint name="imu_joint" type="fixed">
            <origin xyz="${xyz}" rpy="0.0 0.0 0.0"/>
            <parent link="base_link"/>
            <child link="imu_link"/>
        </joint>
    </xacro:macro>
</robot>
laser.urdf.xacro(雷达):
<?xml version="1.0"?>
<robot xmlns:xacro="http://www.ros.org/wiki/xacro">
<xacro:include filename="$(find robot_sim)/urdf/robot1/inertial.urdf.xacro"/>
    <xacro:macro name="laser_xacro">
        <link name="laser_pole_link">
            <visual name="">
                <origin xyz="0.0 0.0 0.0" rpy="0.0 0.0 0.0"/>
                <geometry>
                    <cylinder radius="0.01" length="0.1"/>
                </geometry>
                <material name="">
                    <color rgba="0.5 0.5 0.0 0.5"/>
                </material>
            </visual>
            <collision>
                <origin xyz="0.0 0.0 0.0" rpy="0.0 0.0 0.0"/>
                <geometry>
                    <cylinder radius="0.01" length="0.1"/>
                </geometry>
                <material>
                    <color rgba="0.5 0.5 0.0 0.5"/>
                </material>
            </collision>
            <xacro:cylinder_inertial m="0.1" r="0.01" h="0.1" rpy="0.0 0.0 0.0" xyz="0.0 0.0 0.0"/>
        </link>
        <joint name="laser_pole_joint" type="fixed">
            <origin xyz="0.0 0.0 0.11" rpy="0.0 0.0 0.0"/>
            <parent link="base_link"/>
            <child link="laser_pole_link"/>
        </joint>

        <link name="laser_link">
            <visual name="">
                <origin xyz="0.0 0.0 0.0" rpy="0.0 0.0 0.0"/>
                <geometry>
                    <cylinder radius="0.03" length="0.02"/>
                </geometry>
                <material name="">
                    <color rgba="0.0 0.0 0.0 1.0"/>
                </material>
            </visual>
            <collision>
                <origin xyz="0.0 0.0 0.0" rpy="0.0 0.0 0.0"/>
                <geometry>
                    <cylinder radius="0.03" length="0.02"/>
                </geometry>
                <material name="">
                    <color rgba="0.0 0.0 0.0 1.0"/>
                </material>
            </collision>
            <xacro:cylinder_inertial m="0.15" r="0.03" h="0.02" rpy="0.0 0.0 0.0" xyz="0.0 0.0 0.0" />
        </link>
        <joint name="laser_joint" type="fixed">
            <origin xyz="0.0 0.0 0.05" rpy="0.0 0.0 0.0"/>
            <parent link="laser_pole_link"/>
            <child link="laser_link"/>
        </joint>
        <gazebo reference="laser_pole_link">
            <material>Gazebo/Blue</material>
        </gazebo>
        <gazebo reference="laser_link">
            <material>Gazebo/Blue</material>
        </gazebo>
    </xacro:macro>
</robot>
baselink.urdf.xacro(机器人的身体):
<?xml version="1.0"?>
<robot xmlns:xacro="http://www.ros.org/wiki/xacro">
<xacro:include filename="$(find robot_sim)/urdf/robot1/inertial.urdf.xacro"/>
    <xacro:macro name="base_xacro" params="length radius">
        <link name="base_link">
            <visual>
                <origin xyz="0.0 0.0 0.0" rpy="0.0 0.0 0.0"/>
                <geometry>
                    <cylinder radius="${radius}" length="${length}"/>
                </geometry>
                <material name="">
                    <color rgba="0.0 0.5 0.5 0.5"/>
                </material>
            </visual>
            <collision>
                <origin xyz="0.0 0.0 0.0" rpy="0.0 0.0 0.0"/>
                <geometry>
                    <cylinder radius="${radius}" length="${length}"/>
                </geometry>
            </collision>
            <xacro:cylinder_inertial m="1.0" r="${radius}" h="${length}" rpy="0.0 0.0 0.0" xyz="0.0 0.0 0.0" />
        </link>
        <link name="base_footprint"/>
        <joint name="base_footprint_joint" type="fixed">
            <origin xyz="0.0 0.0 0.089" rpy="0.0 0.0 0.0"/>
            <parent link="base_footprint"/>
            <child link="base_link"/>
            <axis xyz="0.0 0.0 0.0"/>
        </joint>
    </xacro:macro>
</robot>
robot1.urdf.xacro(调用各部件):
<?xml version="1.0"?>
<robot xmlns:xacro="http://www.ros.org/wiki/xacro" name="robot1">
<xacro:include filename="$(find robot_sim)/urdf/robot1/baselink.urdf.xacro"/>
<xacro:include filename="$(find robot_sim)/urdf/robot1/sensor/laser.urdf.xacro"/>
<xacro:include filename="$(find robot_sim)/urdf/robot1/sensor/camera.urdf.xacro"/>
<xacro:include filename="$(find robot_sim)/urdf/robot1/sensor/imu.urdf.xacro"/>
<xacro:include filename="$(find robot_sim)/urdf/robot1/actuator/wheel.urdf.xacro"/>
<xacro:include filename="$(find robot_sim)/urdf/robot1/actuator/caster.urdf.xacro"/>
<xacro:include filename="$(find robot_sim)/urdf/robot1/plugins/gazebo_control_plugin.xacro"/>

<!-- 插件 -->
<xacro:gazebo_control_plugins/>


<xacro:base_xacro length="0.12" radius="0.10"/>
<xacro:laser_xacro/>
<xacro:camera_xacro xyz="0.11 0.0 0.08"/>
<xacro:imu_xacro xyz="0.0 0.0 0.0"/>
<xacro:wheel_xacro name="left_wheel" xyz="0.0 0.113 -0.06"/>
<xacro:wheel_xacro name="right_wheel" xyz="0.0 -0.113 -0.06"/>
<xacro:caster_xacro name="ahead_caster" xyz="0.08 0.0 -0.075"/>
<xacro:caster_xacro name="back_caster" xyz="-0.08 0.0 -0.075"/>

</robot>
代码仅供参考,可以在不断的调试机器人参数时收获的更多,学习就是要不断的实践的过程中积累知识。
总结
通过以上的学习和实践,你已经成功的完成了在gazebo中创建一个房间的模型,保存自己定义的世界模型文件,通过launch文件包含gazebo_ros包中的gazebo.launch.py并且配置启动参数从而在gazebo中加载保存好的世界模型,启动spawn_entity.py节点接收话题/robot_descripton的内容将机器人模型加载到gazebo的世界模型中。此外你已经了解了如何配置diff_drive插件的参数,并且使用键盘控制节点通过插件来控制机器人在gazebo世界模型中移动。


 803
803

 被折叠的 条评论
为什么被折叠?
被折叠的 条评论
为什么被折叠?
 到【灌水乐园】发言


