


引用:
GitHub - apache/hive: Apache Hive
https://15721.courses.cs.cmu.edu/spring2017/papers/15-optimizer2/p337-soliman.pdf
GitHub - greenplum-db/gporca: A modular query optimizer for big data

备份:
Columbia Query Optimizer
The Columbia Query Optimization Project is a joint research project of David Maier from the Oregon Graduate Institute and Leonard Shapiro from Portland State University . It is part of the "Query Optimization Engineering" project funded by the National Science Foundation, to Portland State University (NSF # IRI-9610013) and to Oregon Graduate Institute (NSF #IRI-9619977). This site introduces the Columbia project and provides access to its documentation and source code.
- Contents
- Introduction(why do we need Query Optimizers)
- Reading material on Columbia and related research
- Obtaining the source code
- Using the Columbia Optimizer
- References
- Glossary
- Frequently Asked Questions
Introduction to Query Optimization
(Chapter 13 of [Ram97])
When a query is presented to a database system, the system should have a mechanism to produce a good plan for that query using the resources available, e.g., the catalogs,indexes etc. By good plan we mean that the plan produced thereby is correct and has low cost according to the cost model. This is important because the cost difference between a good versus a bad plan can be substantial. This is where the use of query optimizers gains significance. Even though research on optimizers has been going on for more than a decade, making an extensible and efficient optimizer is still a complex task.
- Brief History of Optimizers (Chapter 3 of [Xu98])
Query Optimization research has gone through several phases. The System R [SAC+79] optimizer, and its successor Starburst, used a bottom-up, dynamic programming algorithm. Exodus,Volcano and Cascades used a variety of top-down algorithms.
- The Columbia Query Optimizer
The Columbia query optimizer is based on the Cascades code. Its purpose is to provide a testbed for investigating performance techniques. These techniques include:
- Aggressive pruning of the search space
- Rule set statistics
- Memory consumption
- Algebraic unnesting techniques
- Multiple query optimization within the query optimizer
- Various performance techniques
Reading material on Columbia and related research
In order to understand Columbia, one should look at the following documents in the order that they are listed.
Collectively Keith Billing's [Bil97] thesis and Yongwen Xu's [Xu98] thesis are a good and easy reading to understand the working and evolution of Columbia especially the following sections:
- The first three chapters of Keith Billing's thesis give an overview of the working of Cascades.
This thesis describes a model (called Model D) developed under the Cascades Optimizer Framework to support the queries specified in the TPC-D [Transaction Processing Performance Council 95] benchmark. Chapter 2 motivates and explains query optimization. Chapter 3 introduces the terminology necessary to describe the Cascades architecture. People conversant in optimization terminology will want to skim over these sections, just enough to see the particular terminology used in the rest of the thesis.
This material is useful in understanding Columbia as well because Columbia is based on Cascades.- Yongwen Xu's thesis describes the terminology and fundamental concepts which are used in the description of the design and implementation of Columbia. More detailed terminology is discussed in Chapter 4 of Xu's thesis, along with a comparison with Cascades.
- Source code Documentation
The source code itself is extensively commented. A UML based guide to the source code is also available. It consists of a class diagram of all classes in the Columbia source and was generated using Rational Rose. To view the top level packages in the class diagram , click on Logical View | Main. Clicking on any of the figures on the right, which represent the modules, will lead you to the classes comprising that module. To see the complete overview of all the classes and their dependencies, go to Logical View | VC++ Reverse Engineered | wcol | wcol Model Update Overview.
"The Cascades Framework for Query Optimization" paper by Goetz Graefe [Gra95] gives an insight into the workings of Cascades, the predecessor of Columbia.
"Exploiting Upper and Lower Bounds in Top-Down Query Optimization" [LD01], with David Maier et al. This paper compares the performance of top-down and bottom-up optimizers, as measured by the number of plans generated during optimization and claims that on this dimension, top-down optimizers are superior because they can use upper and lower bounds to avoid generating groups of plans
Obtaining the source code
- System requirements
To be able to work with Columbia, one needs to install Microsoft Visual C++ version 5.0 or greater. Also you'll need approximately 40 mega-bytes of disk space to fully compile and run the Columbia project. On a 128 MB RAM machine, you can easily run optimization of chain queries of up to 13 joins and star queries up to 12 joins.
- Downloading the Source Code
The source code can be downloaded and stored collectively under a project workspace folder named say 'Columbia'. The workspace folder will hold the project definition files and all the source code. The project definition includes:-
- A project name e.g. Columbia
- A list of all the source files
- Header files (Columbia/*.h)
- C++ code files (Columbia/*.cpp)
- VC++ specific files
- Wcol.dsp file which contains information about how the program is to be created from the files in the project workspace and is produced when the project workspace is created
- Wcol.opt file which contains the settings for the project workspace.
- Wcol.dsw ( used to store further information about the 'Columbia' workspace. In Microsoft Visual C++, the Project Workspace is a container for the development projects. Project Workspace window is used to view and access the various elements of our projects.
In addition to the above there are a few files which Columbia depends on externally. These files are in text format and are organized in different mnemonic subfolders such as Columbia/Queries/..., Columbia/RuleSets/, Columbia/Catalogs/ etc.
The whole package (Columbia source code and the externally dependent files)can be downloaded here in a zip format.
Using the Columbia Optimizer
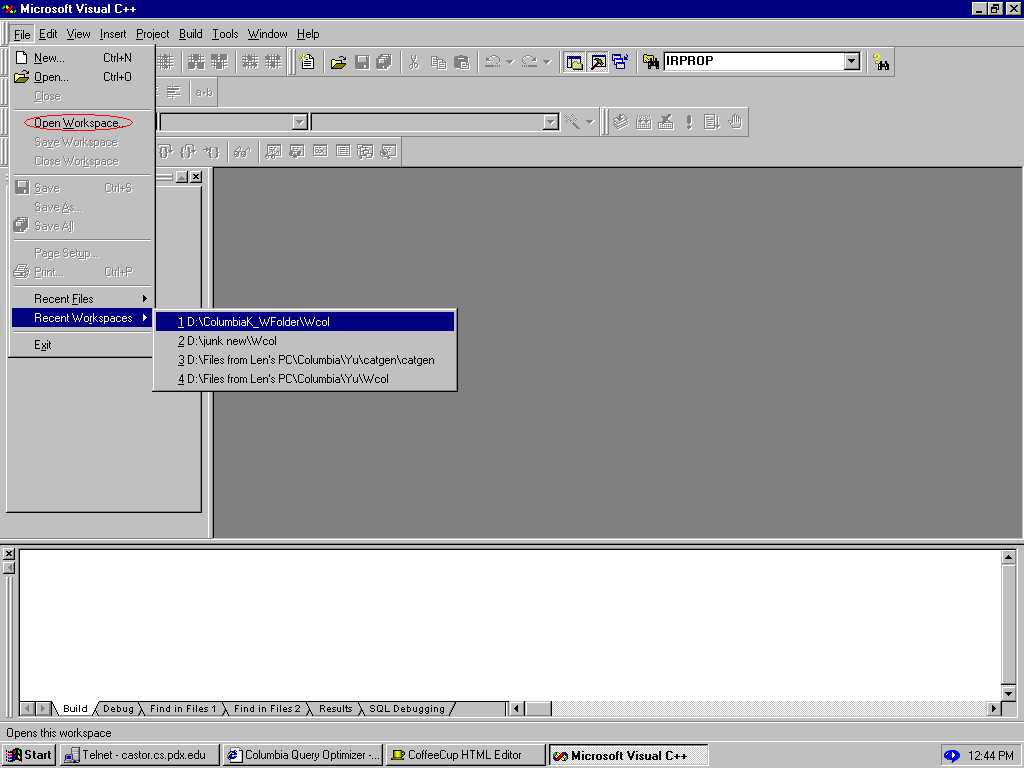
- Opening the Columbia project space
After you have unzipped the Columbia project in a folder successfully, start VC++ and click on File | open workspace(Fig 1.1). A File selection dialog box pops up which we use to reach the folder where we have saved Columbia code related files. Once there click on Wcol.dsw.
- Choosing the precompiler settings
Click on Project | settings. A project settings(Fig 1.2) box opens. Choose the C/C++ tab(on the top right side) on this box and look under the preprocessor definitions.
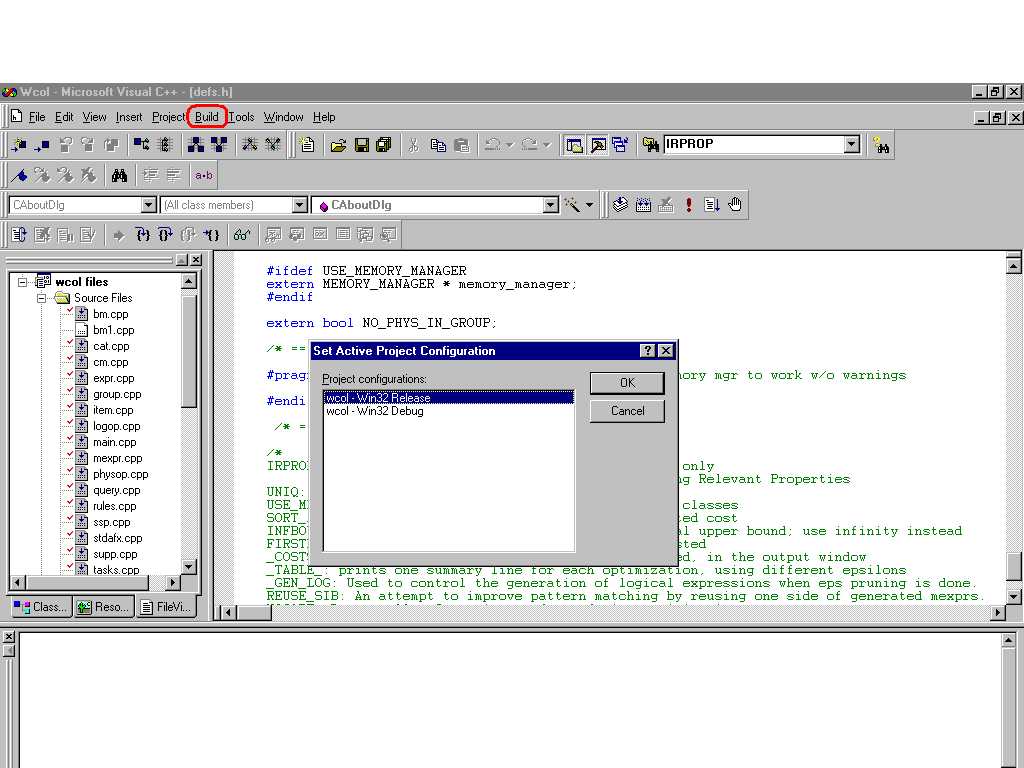
A list of flags appear here which gives us an idea of the current set of flags that Columbia is working under. Some of these flags are Columbia related and can be removed and re-added over here as and when desired. For a detailed explanation of these flags, look in file defs.h (around line 280) in the source code. But some of the flags like WIN32, _WINDOWS, _DEBUG, are not Columbia related and should not be deleted.Click Build | set active configuration(Fig 1.3) | debug or release depending on what you want to do. The default is debug. Be sure to use Release when gathering performance statistics. Do not try to change modes using Project | Settings | Settings For: (on the top left side of the Project Settings dialog box ) or Build | Configuration because these options only allow you to see the configurations available for the code and add or delete configurations if one wishes to, but not change them. To insure that the settings have been correctly set after a change, click Build | Rebuild All. Also look at FAQ # 1.4
- Compiling
Now we're set to build /rebuild the code.
Click on Build(Fig 1.4) | .exe. The last line of the display should read Wcol.exe(Fig 1.4) - 0 error(s), 0 warning(s) at the bottom of the screen. If not, something is wrong and needs to be looked into before proceeding further. There could be several reasons behind errors. Some of the common errors are:
If your compiler error is mysterious, do Build | Rebuild All instead of just doing ! or Build | Build or Build | Execute. Also look at FAQ # 1.7
stdafx.h is a crucial file as it contains several critical #includes. Be sure it has not been trashed. Also look at FAQ # 1.6
If you made any changes to the code, they might have introduced common programming errors which could be debugged using the Microsoft VC++ debugger. To use the debugger change the setting, as explained above of the code to debug, if the code is in release mode. Then click Build | Start Debug | Go to start the debugger. Be sure to check that the code has been set to the debug mode, else you'll get queer error messages, if you try to run the debugger in release mode.
If you're getting lots of warning messages, the reason behind this could be that the warning levels have been set incorrectly. The warning levels should be set at 3 and the way to do this is by going to Project | Settings | C/C++ (tab on the right top side) and changing the warning level to 3 if it is not already the case. Don't forget to Build | Rebuild All after making these changes. Also look at FAQ # 1.1
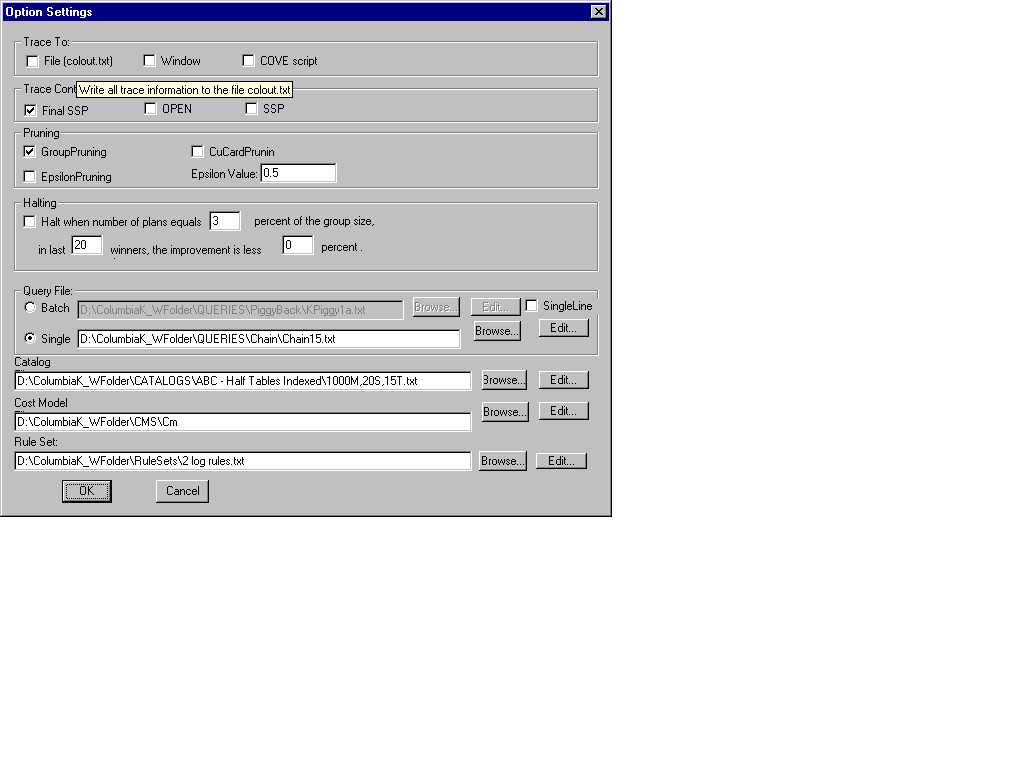
If everything is OK choose build | Execute (Fig 1.4) .exe (or use the bang (!) icon to accomplish this in one step). This will take us to the Columbia Optimizer window where we click on Optimizer | Option to get to the Options Settings window(Fig 2.1).
- Runtime settings in the Options window
For more detailed information about the text below read chapter 4 of [Xu98].
If you let the cursor linger on some of the checkboxes in the Option window, a tooltip explaining the purpose of that box, appears for a short while.
Trace To
Buttons in this area produce the trace or a trace like script. Since the behaviour of the optimizer is complicated, it is difficult to debug or verify the process of optimization. Tracing information provided by the optimizer during the optimization process is one way to let users look into the optimization process and see how the optimizer works.
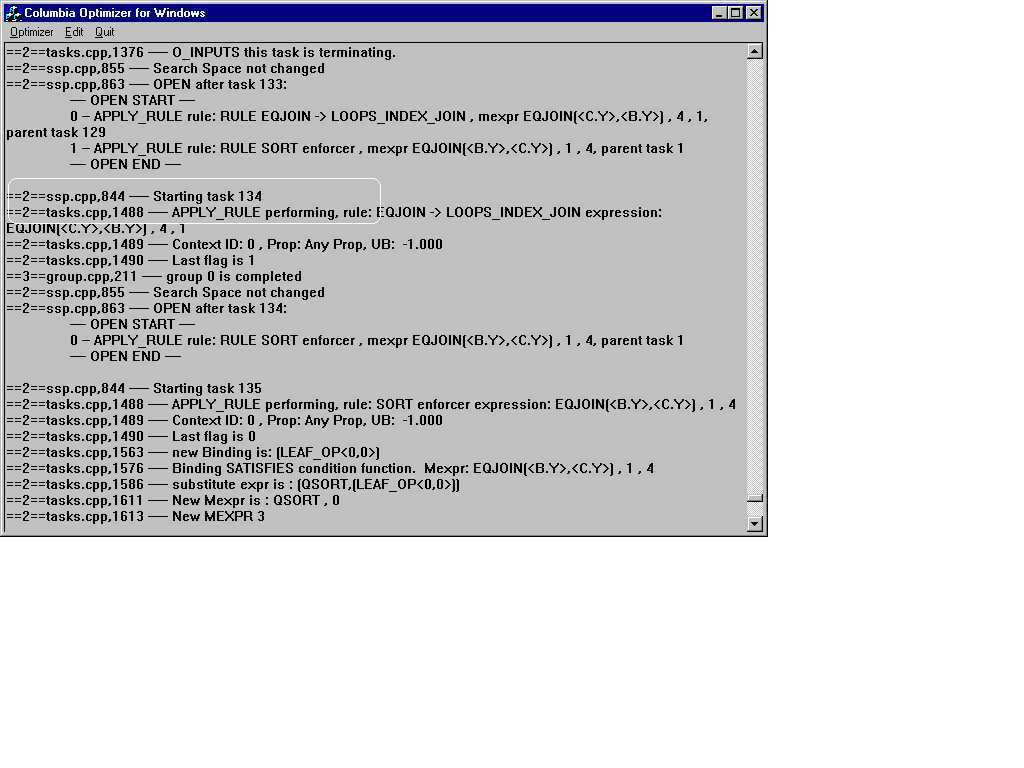
But this information can get very extensive. For users who are interested in only a part of the tracing result, Columbia provides a way to control the settings of the tracing options for the optimizer. The trace(Fig 2.2) provides an insight into the way Columbia assigns tasks, how it schedules, operates on and prunes various tasks to produce the optimal plan. In the midst of the trace file are pointers(Fig 2.2) to the file name and the line number of the portion of the code being executed at that time, so that one can examine more closely the route the code is taking.
- File The trace is saved in a text file named colout.txt
- Window The trace is presented in the window
- COVE script In addition to the trace, Columbia saves a script for use by the Columbia Optimizer Visualization Environment (COVE). The last release of COVE code is not current with the latest release of Columbia.
Trace Content
Next come the check boxes labelled summarily as Trace Content. Each of the three check boxes under this label provide us a different view of the trace saved in file colout.txt.
- Final SSP Only the details of the winner plan for the query (queries in case of a batch) are written out to colout.txt. The details include the description of the winner plan, the physical operators that this plan uses and their costs. Appendix D of [Xu98] shows a sample of final search space in the tracing result.
- OPEN The entire list of tasks that the optimizer schedules while optimizing the query is copied into colout.txt. Not all of these tasks run to completion because some of them cross the cost upper bound, nevertheless this option provides us a view of how tasks are pushed into the stack and how rules like associativity are applied. Appendix E of [Xu98] shows a sample of some OPEN stacks in the tracing result.
- SSP Copies the search space after each task in the stack of tasks is completed. Some tasks introduce new groups into the search space whereas others leave it unchanged.
- These options allow users to control the tracing and provide them a convenient way to debug and verify the behaviour of the optimizer.
Pruning
Contains different pruning techniques provided by Columbia. Pruning enhances Columbia's efficiency because it prevents the entire gamut of plans from being enumerated, only the cost efficient ones, hence saving space.
- GroupPruning (Section 4.2.1.3 of [Xu98]) All the groups whose lower bound is greater than the current cost of optimization are pruned.
- CuCardPrun (Section 4.3.1 of [Xu98])Avoids input group expansions as much as possible, similar to group pruning. The difference being that even when there is no winner for an input group, it stores the input group's Greatest Lower Bound in the entry for input cost, whereas in group pruning, InputCost[] entries only store the winner costs of inputs, if the input has a winner for the optimizing context.
- EpsilonPruning(Section 4.3.2 of [Xu98])If a plan costs less than some global epsilon value, it is accepted as a final winner and the optimization terminates.
Halting
Halt optimizes the group when either
- the number of plans since the last winner is greater than the estimated total number of plans for that group
- OR
- the improvement in last window size for checking the improvement is less than 20%
Query File(Section 4.1.1 of [Xu98])
Here we can enter the query that we want the optimizer to optimize.We can choose between a batch of queries or a single query to be processed at a time by using the radio button and another query or a different type of query, like chain, star e.t.c. , by using the browse button. Also we can look into or edit a single file or create a new one using the edit button. These query files are in the Queries sub folder.Catalog File(Section 4.1.3 and Appendix A of [Xu98])
This is where we enter our choice of catalog. We can change to a different catalog using the browse button or look into a single file using the edit button. Make sure that the catalog chosen has the all the tables and respective attributes being used in the current query or batch of queries being used.Cost Model(Section 4.1.3 and Appendix B of [Xu98] )
Here in we choose the cost model information which is provided as text file.Rule Set(Section 4.2.2. and Appendix C of [Xu98] )
The rule set is the set of rules that the optimizer uses.Viewing the output
After choosing runtime settings and closing the Option's Settings window with OK, click Optimizer | Begin to optimize the query.
- Typical runtime errors include
If you get an error message like 'Cannot open file 'name of the file which can't be opened':name of the file in the source code where the error was caught, line...' file, there is a possibility that there was a typo or a file with that name does not exist. This error message guides you as to where the error could have originated from. Use that information to correct the error. Also look at FAQ # 2.1.1
'Assertion failure' error message with a pointer to file logop.cpp's ' Expression:CollProp!= NULL', could have been caused by using a catalog which is not adequate for the query/queries that we are trying to optimize. In other words, if a query uses attributes say A, B, C, ... K, but the catalog has attributes only from A to H, then we need to use a catalog big enough to have all the attributes that our query/queries is/are using. Also look at FAQ # 2.1.2
There are quite a few parsing errors, which are caught by the query parser and the error message they provide are very helpful in guessing the source of the problem. For example, 'ERROR:last right_bracket not found or mismatch, file:query.cpp, line ...' has been caused exactly by what the parser is complaining about, a missing right bracket. Also look at FAQ # 2.1.3
If execution is successful, you will see the output (Fig 2.3)window which has the optimal plan that the Columbia optimizer has produced for the query (or plans in case of a batch of queries), against the catalog, cost-model and rule-sets that we entered in the option's (fig 2.1) window.
Viewing the trace
The trace output was set as a runtime setting in the Options Setting window. You can view information about trace in more detail here. For larger queries, be aware that the trace information, as saved in colout.txt or presented in the window, can get quite bulky and take a long time to load, sometimes even hang. Look at FAQ # 2.2 for more details.
figures
References
Glossary
Group
The group is the fundamental data structure in Cascades and Columbia query optimizer. A group contains a collection of logically equivalent logical and physical multi-expressions. Look up Section 3 of [Bil97] and Section 4.2.1.3 of [Xu98] for more details.Pruning
Pruning is a method to limit or reduce the search space so that only the groups relevant to the optimal plan are retained, rest are weeded out. The criteria of relevance can vary with the application of different pruning techniques. Information on pruning in more detail is given in Section 5.1 of [Bil97] and Section 4.3 of [Xu98].SSP
In query optimization, the problem is to find the cheapest plan for a given query, subject to a certain context. A search space typically consists of a collection of possible solutions to the problem and its sub problems. In Columbia, a structure similar to the Cascades' MEMO structure is used to represent the search space, namely an instance of class SSP. More information on SSP is available at Section 5.1 of [Bil97] and Section 4.2.1.1 of [Xu98]Trace
Since the behavior of the Columbia optimizer is complicated, it is difficult to debug or verify the process of optimization. Tracing information provided by the optimizer during the optimization process is one way to let users look into the optimization process and see how the optimizer works. Section 4.4.2 of [Xu98] has more on Trace.Tasks
A task is an activity within the search process. At any time during the optimization there is a stack of tasks waiting to be performed. The act of performing a task may result in more tasks being placed on the stack. The detailed functioning of Task structure is explained in Section 5.1 of [Bil97] andSection 4.2.3 of [Xu98]
Frequently Asked Questions
- Answers to Frequently Asked Questions
Contact: Kavita


 被折叠的 条评论
为什么被折叠?
被折叠的 条评论
为什么被折叠?
 到【灌水乐园】发言


