


 本文介绍了在Windows上使用Python结合PyQt5进行GUI编程的基础操作,包括使用pip安装PyQt5,创建Hello World程序,添加按钮,显示消息盒子,以及应用格子布局和输入框。
Windows+Python使用PyQt5----安装、简单样例
使用pip安装PyQt5
pip install PyQt5 -i https://pypi.douban.com/simple
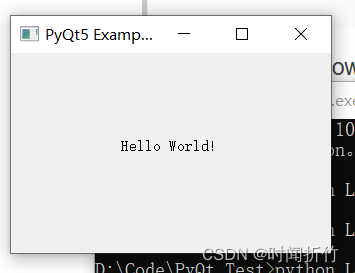
PyQt Hello World
import sys
from PyQt5.QtWidgets import QApplication, QWidget, QLabel
from PyQt5.QtGui import QIcon
from PyQt5.QtCore import pyqtSlot

def window():
   # 初始化PyQT应用
   app = QApplication(sys.argv)
   # 初始化PyQT的呈现窗口
   widget = QWidget()

   # 实例化Lable,设置文本和位置
   textLabel = QLabel(widget)
   textLabel.setText("Hello World!")
   textLabel.move(110,85)

   # 设置UI窗口的位置(相对于屏幕左上角)
   # 设置UI窗口的大小
   widget.setGeometry(250,250,320,200)
   # 设置UI窗口的标题
   widget.setWindowTitle("PyQt5 Example")
   # 开始展现
   widget.show()
   sys.exit(app.exec_())

if __name__ == '__main__':
   window()
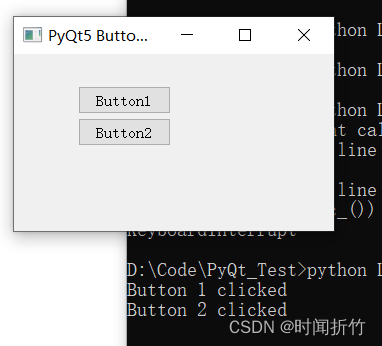
使用PyQt按钮
import sys
from PyQt5.QtWidgets import QApplication, QWidget, QPushButton
from PyQt5.QtGui import QIcon
from PyQt5.QtCore import pyqtSlot

def window():
   app = QApplication(sys.argv)
   widget = QWidget()

   button1 = QPushButton(widget)
   button1.setText("Button1")
   button1.move(64,32)
   # 绑定按钮事件
   button1.clicked.connect(button1_clicked)

   button2 = QPushButton(widget)
   button2.setText("Button2")
   button2.move(64,64)
   button2.clicked.connect(button2_clicked)

   widget.setGeometry(250,250,320,200)
   widget.setWindowTitle("PyQt5 Button Click Example")
   widget.show()
   sys.exit(app.exec_())

# 按钮1的响应函数
def button1_clicked():
   print("Button 1 clicked")

def button2_clicked():
   print("Button 2 clicked")

if __name__ == '__main__':
   window()
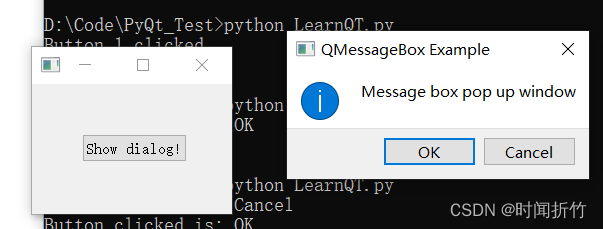
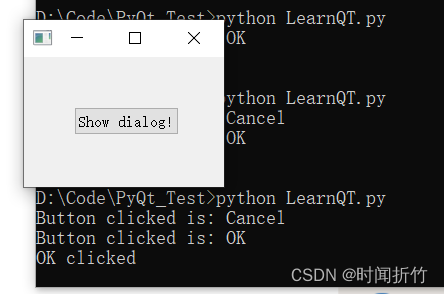
使用PyQt消息盒子
import sys
from PyQt5.QtWidgets import QApplication, QWidget, QPushButton, QMessageBox
from PyQt5.QtGui import QIcon
from PyQt5.QtCore import pyqtSlot

def window():
   app = QApplication(sys.argv)
   win = QWidget()
   button1 = QPushButton(win)
   button1.setText("Show dialog!")
   button1.move(50,50)
   button1.clicked.connect(showDialog)
   win.setWindowTitle("Click button")
   win.show()
   sys.exit(app.exec_())

def showDialog():
   # 初始化信息盒子
   msgBox = QMessageBox()
   # 设置图标、内容和标题
   msgBox.setIcon(QMessageBox.Information)
   msgBox.setText("Message box pop up window")
   msgBox.setWindowTitle("QMessageBox Example")
   # 设置消息盒子的选项
   msgBox.setStandardButtons(QMessageBox.Ok | QMessageBox.Cancel)
   # 点击消息盒子后的响应函数
   msgBox.buttonClicked.connect(msgButtonClick)

   returnValue = msgBox.exec()
   if returnValue == QMessageBox.Ok:
      print('OK clicked')

def msgButtonClick(i):
   print("Button clicked is:",i.text())

if __name__ == '__main__':
   window()
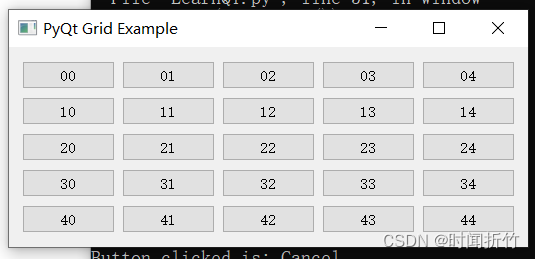
使用PyQT格子布局
import sys
from PyQt5.QtWidgets import QApplication, QWidget, QLabel, QGridLayout, QPushButton
from PyQt5.QtGui import QIcon
from PyQt5.QtCore import pyqtSlot

def window():
   app = QApplication(sys.argv)
   win = QWidget()
   # 实例化格子
   grid = QGridLayout()
   # 通过循环遍历,给格子赋予内容
   for i in range(0,5):
      for j in range(0,5):
      	 # 将组件添加到grid中
         grid.addWidget(QPushButton(str(i)+str(j)),i,j)

   # 格子需要设置布局
   win.setLayout(grid)
   win.setWindowTitle("PyQt Grid Example")
   win.setGeometry(250,250,200,200)
   win.show()
   sys.exit(app.exec_())

if __name__ == '__main__':
   window()
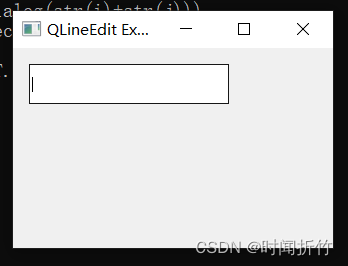
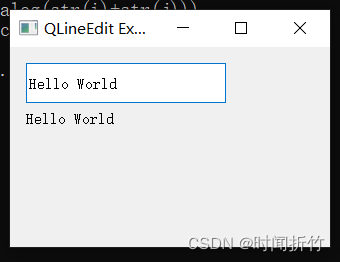
使用PyQT输入框
port sys
from PyQt5.QtWidgets import QApplication, QMainWindow, QLabel, QLineEdit, QPushButton

class Example(QMainWindow):

    def __init__(self):
        super().__init__()

        # 实例化输入框,设置位置和大小
        self.lineEntry = QLineEdit(self)
        self.lineEntry.move(16,16)
        self.lineEntry.resize(200,40)

        self.qlabel = QLabel(self)
        self.qlabel.move(16,64)

        # 当用户输入文字到输入框时,会调用响应函数
        self.lineEntry.textChanged.connect(self.onChanged)

        self.setGeometry(250,250,320,200)
        self.setWindowTitle("QLineEdit Example")
        self.show()

    # 响应函数设置label的文字内容,并调整尺寸
    def onChanged(self, text):
        self.qlabel.setText(text)
        self.qlabel.adjustSize()

if __name__ == '__main__':
    app = QApplication(sys.argv)
    ex = Example()
    sys.exit(app.exec_())


 1108
1108

 被折叠的 条评论
为什么被折叠?
被折叠的 条评论
为什么被折叠?
 到【灌水乐园】发言


