SNPE提供了Benchmark工具评估模型在骁龙平台上的性能,能够测模型运行时每一层的耗时,以方便评估模型在CPU、GPU、DSP、HTP、AIP上的性能
Benchmark工具
SNPE SDK 中的Benchmark工具由一组python脚本组成,在Android手机上运行网络并收集性能指标
从脚本中可以看出,snpe_bench.py是调用snpe-net-run在目标设备上推理DLC模型,然后将收集性能指标,最后整理成方便阅读的.csv 或者 json格式。
- 工具:snpe-1.65.0.3676/benchmarks/snpe_bench.py
- 文档:https://developer.qualcomm.com/sites/default/files/docs/snpe/benchmarking.html
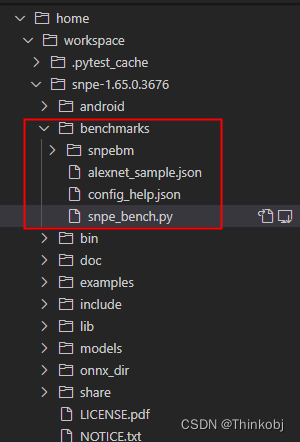
╭─ /home/workspace/snpe-1.65.0.3676/benchmarks
╰─ tree
├── alexnet_sample.json
├── config_help.json
├── snpe_bench.py
└── snpebm
benchmark脚本的输入是一个JSON配置文件。
config.json的配置选项
{
"Name":"AlexNet", // 这个json配置的名字
"HostRootPath": "alexnet", // 主机电脑上的输出文件夹。它可以是一个绝对路径或当前工作目录的相对路径。
"HostResultsDir":"alexnet/results", // 存放所有benchmark结果的目录
"DevicePath":"/data/local/tmp/snpebm",// 手机设备上放置所有benchmark有关的数据、库、模型等的文件夹
"Devices":["454d40f3"], // 运行benchmark手机的序列号,目前只支持一个手机。如果为空,则自动选择。
"HostName": "localhost", //【可选项】手机设备所连接的远程机器名或者IP
"Runs":2, // 模型推理的次数,每个加速硬件,每个测量指标
"Model": { //模型和数据在主机电脑上的存放位置
"Name": "ALEXNET",
"Dlc": "../models/alexnet/dlc/bvlc_alexnet.dlc",
"InputList": "../models/alexnet/data/target_raw_list.txt",
"Data": [
"../models/alexnet/data/cropped"
]
},
"Runtimes":["GPU", "CPU"], // 想要测试的加速硬件,包括"CPU","GPU","GPU_s","GPU_FP16","DSP","AIP","AIP_ACT16"
"Measurements": ["timing", "mem"], // Timing 表示测试时间,mem表示测试使用的内存
"CpuFallback": True, //【可选项】表示当一个层在其他硬件不能跑时,网络是否可以回退到CPU上,默认为false
"BufferTypes": ["ub_float", "ub_tf8", "ub_tf16"], //【可选项】制定需要测量的输入数据的方式,如果为空,则会测量所有可能选项
注意:ub_tf8只在DSP,AIP,AIP_ACT16运行时上支持,对于其他运行时它会被忽略,ub_tf16只在AIP,AIP_ACT16运行时上支持,对于其他运行时它会被忽略。
对于AIP_ACT16运行时,如果没有指定BufferTypes,则默认考虑[float, ub_float, ub_tf16]。
"PlatformOptions": ["unsignedPD:ON" ], //【可选项】SNPE的Platform Option, 如果是商用手机,这个unsignedPD:ON是必选项
/*【可选项】配置 performance 模式,也可以通过命令行配置, -p PERFPROFILE, --perfprofile PERFPROFILE
balanced, default, sustained_high_performance, high_performance, power_saver, system_settings */
"PerfProfile": "burst",
//【可选项】配置 profiling level,也可以通过命令行配置. -l PROFILINGLEVEL, --profilinglevel PROFILINGLEVEL,
// Level mode (off, basic, moderate, detailed), 默认是basic。Detailed 会显示每一层的耗时。
"ProfilingLevel": "detailed"
}
snpe_bench.py的参数
可以通过snpe_bench.py --help 来查看选项,这里介绍几个广泛使用的选项。
╰─ python /opt/snpe/benchmarks/snpe_bench.py -h
usage: /opt/snpe/benchmarks/snpe_bench.py [-h] -c CONFIG_FILE
[-o OUTPUT_BASE_DIR_OVERRIDE]
Option | 描述 | 手机选项 |
---|---|---|
-c, --config_file CONFIG_FILE | 有效配置文件的路径 | |
-a, | 在所有连接的设备上运行 | |
-t, --device_os_type_override DEVICE_OS_TYPE_OVERRIDE | 指定目标操作系统类型 | [‘android’, ‘android-aarch64’] |
-b, --userbuffer_mode USERBUFFER_MODE | 启用input userbuffer模式,默认为float模式 | [‘ub_float’, ‘ub_tf8’, ‘ub_tf16’] |
-p, --perfprofile PERFPROFILE | 设置performance 模式 | balanced, high_performance, power_saver, system_settings |
-l,–profilinglevelPROFILINGLEVEL | 设置profiling 等级 | [off, basic, moderate, detailed] |
Benchmark Res-unet
准备config json文件
{
"Name": "res-unet",
"HostRootPath": "/home/workspace/snpe-1.65.0.3676/models/matting/bm_resunet",
"HostResultsDir": "/home/workspace/snpe-1.65.0.3676/models/matting/bm_resunet",
"DevicePath": "/data/local/tmp/snpebm/",
"Devices": [],
"Runs": 3,
"Model": {
"Name": "res-unet",
"Dlc": "../models/matting/res-unet_quant.dlc",
"InputList": "../models/matting/raw_list.txt",
"Data": [
"../models/matting/data"
]
},
"Runtimes": [
"CPU",
"GPU",
"DSP"
],
"Measurements": [
"timing",
"mem"
],
"CpuFallback": true,
"PerfProfile": "default",
"BufferTypes": [
"float",
"ub_float",
"ub_tf8"
],
"PlatformOptions": []
}
准备raw_list.txt
./data/000038.raw
./data/000030.raw
...
./data/000001.raw
./data/000045.raw
执行benchmark程序
python snpe_bench.py -c config.json -a -t "android" -l "detailed"
2022-10-13 08:28:34,290 - INFO - snpe_bench: Running on CPU_timing
2022-10-13 08:28:34,290 - INFO - snpe_bench: Run 1
Interpreting file serialized with Flatbuffer
2022-10-13 08:29:04,043 - INFO - snpe_bench: Run 2
Interpreting file serialized with Flatbuffer
2022-10-13 08:29:37,312 - INFO - snpe_bench: Run 3
Interpreting file serialized with Flatbuffer
2022-10-13 08:30:05,943 - INFO - snpe_bench: Running on CPU_mem
2022-10-13 08:30:05,943 - INFO - snpe_bench: Run 1
2022-10-13 08:30:06,071 - INFO - snpebm.snpebm_device: starting memory capture in a parallel process
2022-10-13 08:30:06,071 - INFO - snpebm.snpebm_device: Android platform
2022-10-13 08:30:37,493 - INFO - snpebm.snpebm_device: memory capture is terminated
2022-10-13 08:30:39,683 - INFO - snpe_bench: Run 2
2022-10-13 08:30:39,923 - INFO - snpebm.snpebm_device: starting memory capture in a parallel process
2022-10-13 08:30:39,923 - INFO - snpebm.snpebm_device: Android platform
2022-10-13 08:31:10,867 - INFO - snpebm.snpebm_device: memory capture is terminated
2022-10-13 08:31:11,953 - INFO - snpe_bench: Run 3
2022-10-13 08:31:12,096 - INFO - snpebm.snpebm_device: starting memory capture in a parallel process
2022-10-13 08:31:12,096 - INFO - snpebm.snpebm_device: Android platform
2022-10-13 08:31:43,661 - INFO - snpebm.snpebm_device: memory capture is terminated
2022-10-13 08:31:44,573 - INFO - snpe_bench: Running on CPU_ub_float_timing
2022-10-13 08:31:44,573 - INFO - snpe_bench: Run
.......
在这里插入图片描述
文档参考:https://zhuanlan.zhihu.com/p/447804052
使用Benchmark工具查看tensorflow中的deeplab模型
配置SNPE+Tensorflow的环境
安装tensorflow
python -m pip install --upgrade pip
pip install tensorflow==2.3.0 -i https://pypi.tuna.tsinghua.edu.cn/simple --no-cache-dir
pip show -f tensorflow | grep Location
设置TensorFlow SNPE环境
source bin/envsetup.sh -t $TENSORFLOW_DIR
source bin/envsetup.sh -t /usr/local/lib/python3.6/dist-packages/tensorflow/
测试是否配置成功,如果打印出help,则完成配置
snpe-tensorflow-to-dlc -h
Benchmark DeeplabV3
准备模型和数据
# 模型下载 解压
wget http://download.tensorflow.org/models/deeplabv3_mnv2_pascal_train_aug_2018_01_29.tar.gz
tar -xvf deeplabv3_mnv2_pascal_train_aug_2018_01_29.tar.gz
# 转成DLC模型,这里选择1x513x513x3作为输入大小,得到deeplabv3.dlc
snpe-tensorflow-to-dlc --input_network deeplabv3_mnv2_pascal_train_aug/frozen_inference_graph.pb --input_dim sub_7 1,513,513,3 --out_node ArgMax --output_path deeplabv3.dlc
生成raw数据
import numpy as np
filename = './data/'
for i in range(5):
raw_data = np.random.randint(-1, 1, size=(1, 513, 513, 3))
save_file_name = "{}.raw".format(filename+str(i))
raw_data.tofile(save_file_name)
将raw数据生成txt文件,对应的scripts目录可以从VGG/scripts中找,然后再将里面的数据改成开发板上的相对路径
python scripts/create_file_list.py -i ./data -o raw_list.txt -e *.raw
cat raw_list.txt
./data/3.raw
./data/1.raw
./data/2.raw
./data/4.raw
./data/0.raw
对模型进行量化
snpe-dlc-quantize --input_dlc deeplabv3.dlc --input_list raw_list.txt --enable_htp --htp_socs sm8350 --output_dlc deeplabv3_quantized.dlc --act_bitwidth=8
执行benchmark程序
python snpe_bench.py -c config.json -a -t "android" -l "detailed"
于是可以在"HostResultsDir"路径下找到对应csv文件
snpe-dlc-quantize --input_dlc res-unet-slim-cutchannel-pool.dlc --input_list raw_list.txt --output_dlc res-unet-slim-cutchannel-pool_quant_hta.dlc --enable_hta
Benchmark 结果解读
benchmark_stats_xxx.csv 文件打开之后如下所示。不同的profiling 等级,详细程度会不同
1. 配置参数
**【1】**主要是benchmark是配置的参数,也就是config.json里面的和bench.py脚本跑的时候的参数。
2. 初始化指标度量
**【2】**主要是模型推理初始化的各项指标的度量,会根据设置的profiling level的不同,测量的内容会不一样。
指标 | 描述 | 备注 |
---|---|---|
Load | 加载模型需要的时间 | |
Deserialize | 反序列化加载的模型需要的时间 | |
Create | 创建SNPE网络和初始化给定模型的所有层所花费的时间 | profiling 设置为detailed 会更详细的分解为下列内容 |
Init | 这个时间包括测量加载、反序列化和创建的时间 | |
De-Init | 卸载SNPE的时间 | |
Create Network(s) | 创建所有网络所需的总时间 | 如果网络被分段,会创建多个网络 |
RPC Init Time | RPC初始化和加速器启动时间 | 仅适用于DSP和AIP |
Snpe Accelerator Init Time | 准备数据的总时间 | 仅适用于DSP和AIP |
Accelerator Init Time | 仅启动加速器硬件的总时间 | 仅适用于DSP和AIP |
3. 模型推理度量
**【3】**是模型的一次推理时间的平均度量。
指标 | 描述 | 备注 |
---|---|---|
Total Inference Time | 一次推理的全部时间 | 包括输入输出的准备和处理 |
Forward Propagate | 排除硬件加速器上的overhead | 比如仅在GPU内核上的执行时间 |
RPC Execute | SNPE调用RPC和加速器上花费的全部时间 | 仅适用于DSP和AIP |
Snpe Accelerator | SNPE调用硬件加速推理的时间 | 仅适用于DSP和AIP |
Accelerator | 仅在硬件加速器上花费的时间 | 仅适用于DSP和AIP |
Misc Accelerator | 推理中加速器优化带来的时间,比如DSP为了实现最佳性能而增加的附加层所花费的时间。 | 仅适用于DSP和AIP |
4、5. 模型每一层的度量
**【4、5】**每一行度量了模型中每一层的执行时间。
avg 平均值 | max 最大值 | min 最小值 | runtime 加速单元 |
---|---|---|---|
- 对于GPU,DSP,如果设定了 “CpuFallback”:true, 那么可能有些不支持的层会运行在CPU上,然后runtime显示是CPU。比如deeplabV3中的最后一层layer_108 (Name:ArgMax Type:argmax).
- 对于DSP,AIP,有些层的数值是0,那么表示这层和下一层在执行是融合为一个层。比如Conv+ReLu.
- 对于888和778等新一代平台HTP(DSP),每一层的数值不在是us,而是cycles,简单来说就是DSP跑了多少个周期。(Time = Cycles/ Frequency)
bug汇总
找不到common_utils
ModuleNotFoundError: No module named 'common_utils'
解决参考 https://developer.qualcomm.com/forum/qdn-forums/software/qualcomm-neural-processing-sdk/68160
如果在$SNPE_ROOT/lib/python中可以找到对应的common_utils文件夹
export PYTHONPATH=/home/workspace/snpe-1.65.0.3676/lib/python/
adb 问题
2022-10-10 08:05:59,843 - ERROR - common_utils.protocol.adb: Invalid path for adb: adb.
adb not in PATH
解决参考https://blog.youkuaiyun.com/daida2008/article/details/125242757
在容器中安装adb即可
name 'artifact’未定义
问题分析:snpebm_config.py中Config类中__default_artifact_path中的artifact未定义
解决方法,把artifact
改成'artifact'
raise ConfigError("Environment variables 'SNPE_ROOT' and 'ZDL_ROOT' are not defined, absolute path is needed for " + 'artifact' + " in snpebm_artifacts.json")
onnx环境变量问题
Configuration Error: ConfigError("Environment variables 'SNPE_ROOT' and 'ZDL_ROOT' are not defined, absolute path is needed for snpe-net-run in snpebm_artifacts.json",)
解决思路:使用export定义环境变量
cd $SNPE_ROOT # SNPE SDK安装路径
source bin/envsetup.sh -o onnx_dir # ONNX 安装路径