


一、参考资料
源码库:
GitHub - COVESA/vsomeip: An implementation of Scalable service-Oriented MiddlewarE over IP
GitHub - COVESA/capicxx-core-runtime: Common API C++ core runtime
GitHub - COVESA/capicxx-someip-runtime: Common API C++ SOMEIP runtime
GitHub - COVESA/capicxx-core-tools: Common API C++ core tools
介绍文档:
Home · COVESA/capicxx-core-tools Wiki · GitHub
用户指导手册:
二、vsomeip简介
SOME/IP简介
SOME/IP是基于IP协议的可扩展面向服务的中间件(Scalable service-Oriented middlewarE over IP)的缩写。是车载以太网通信引入的一个概念,位于OSI 7层模型的层4之上。SOME/IP协议于2011年由BMW集团的Lars Völker设计,并于2013年纳入AUTOSAR 4.1规范。它的一个公开可访问的规范可以在http://some-ip.com/上找到。
传输格式
理论上,SOME/IP通信是由通过IP协议在设备间或订阅者间发送的消息组成的。参考下图:
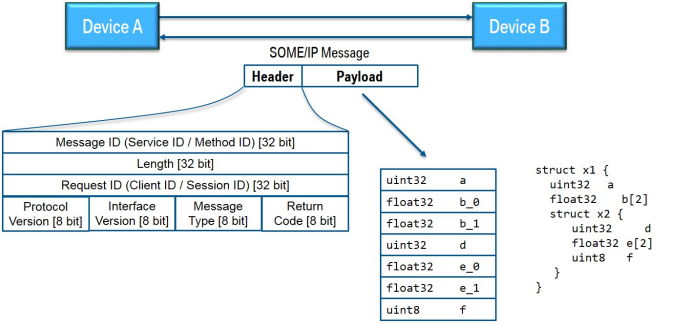
设备A发送SOME/IP消息给设备B并获得一个消息返回。底层传输协议可以是TCP或UDP,对于消息本身来说,这并没有什么不同。现在我们假设在设备B上运行着一个服务,它提供了一个功能,这个功能通过该消息从设备A发出调用,返回的消息就是应答。
SOME/IP消息有两部分:报头(header)和负载(payload)。在上图中,你可以看到报头主要由标识符组成:
Service ID:每个服务的唯一标识符
Method ID:0-32767表示方法,32768-65535表示事件
Length:负载的字节长度
Client ID:ECU内部呼叫客户端的唯一标识符;在整个车辆中必须是唯一的
Session ID:会话处理的标识符;每次调用都要递增
Protocol Version:0x01
Interface Version:服务接口主版本
Message Type:-- REQUEST (0x00) 一个请求并期望响应 -- REQUEST_NO_RETURN (0x01) 一个触发就不管了的请求(fire&forget) -- NOTIFICATION (0x02) 一个不需要响应的通知/事件回调请求 -- RESPONSE (0x80) 响应消息
Return Code:-- E_OK (0x00) 无错误 -- E_NOT_OK (0x01) 未知错误 -- E_WRONG_INTERFACE_VERSION (0x08) 接口版本不匹配 -- E_MALFORMED_MESSAGE (0x09) 反序列化错误,使负载不能反序列化 -- E_WRONG_MESSAGE_TYPE (0x0A) 收到意外的消息类型(例如:本来为REQUEST_NO_RETURN的方法定义成REQUEST)
我们看到,对于普通函数调用有“REQUESTs”和“RESPONSEs”,对于客户端订阅的事件有“notification”消息。错误报告为正常的响应或通知,但有适当的返回代码。
负载包含序列化的数据。图中显示了简单情况下的序列化,即传输的数据结构是只有基本数据类型的嵌套结构。这种情况很简单:struct元素只是扁平化的,这意味着它们只是一个接一个地写入有效负载中。
SOME/IP协议
如上所述,底层传输协议可以是UDP或TCP。在UDP的情况下,SOME/IP消息不是分片的,通常一个UDP包中有多个消息,但一条消息不能超过一个UDP包的长度(最多1400字节)。较大的消息必须通过TCP传输,在这种情况下,TCP具有更好的鲁棒性,如果TCP流发生同步错误,SOME/IP规范允许所谓的magic cookies,以便再次找到下一个消息的开始。
请注意,必须实例化服务接口,因为同一个接口可能有多个实例,所以必须为定义的实例提供一个额外的标识符(instance ID),但是instance ID不是SOME/IP消息头的一部分。该实例通过传输协议的端口号识别,这意味着在同一个端口上提供同一个接口的多个实例是不可能的。
下面的图片显示了一些基本的SOME/IP通信模式:
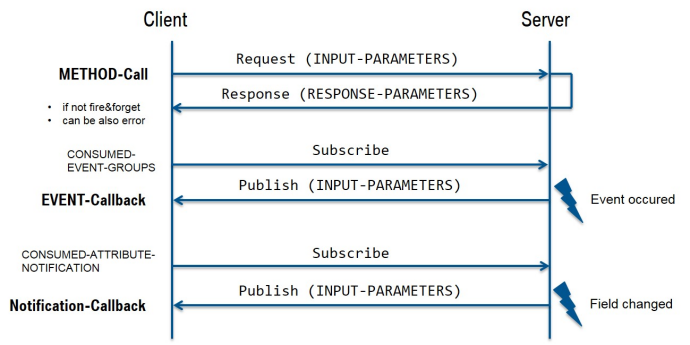
除了用于远程过程调用的标准REQUEST/RESPONSE机制外,还有用于事件的PUBLISH/SUBSCRIBE模式。注意,SOME/IP协议中的事件总是分组在一个事件组中,因此,只能订阅事件组,而不能订阅事件本身。SOME/IP规范也支持字段(fields),在这种情况下,setter/getter方法遵循REQUEST/RESPONSE模式且字段更改的通知消息属于事件。订阅本身是通过SOME/IP服务发现完成的。
SOME/IP服务发现(Service discovery)
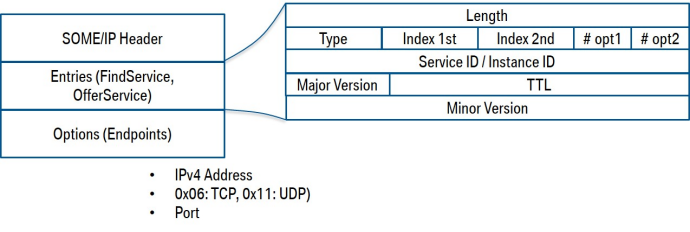
SOME/IP服务发现用于定位服务实例,并检测服务实例是否正在运行,以及实现PUBLISH/SUBSCRIBE处理。这主要是通过所谓的提供消息(offer messages)实现的,每个设备广播(多播)包含该设备提供的所有服务的消息。SOME/IP SD消息是通过UDP发送的。如果客户端应用程序需要服务端,但目前还没有提供,那么还可以发送“查找消息”。其他SOME/IP SD消息可以用于发布或订阅事件组。
下图显示了SOME/IP SD消息的一般结构。
vsomeip简短概述
在我们开始实现这个介绍性的例子之前,让我们简要地看一下SOME/IP的GENIVI实现的基本结构,它被称为vsomeip。
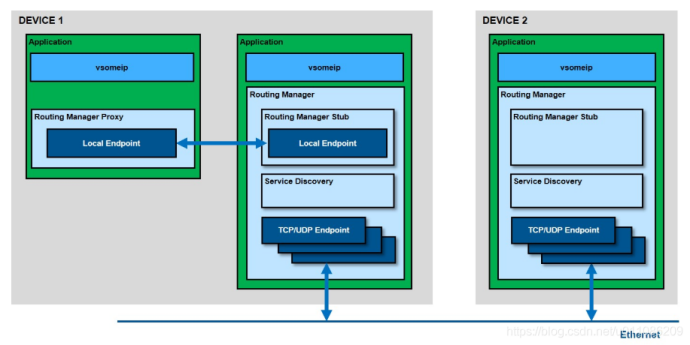
如图所示,vsomeip不仅包括设备之间的SOME/IP通信(外部通信),还包括内部进程间的通信。两台设备通过所谓的通信端点进行通信,通信端点决定了所使用的传输协议(TCP或UDP)及其参数如端口号或其他参数。这些参数都是配置参数,可以在vsomeip配置文件(json文件,参见vsomeip用户指南)中设置。内部通信是通过使用Boost.Asio库的unix域套接字实现的本地端点来完成的。由于这种内部通信不是通过中心组件(例如D-Bus守护进程)路由,所以它非常快。
中央vsomeip路由管理器只在必须发送到外部设备的情况下接收消息,并分发来自外部的消息。每个设备只有一个路由管理器,如果没有配置任何内容,第一个运行的vsomeip应用程序也会启动路由管理器。
vsomeip没有实现数据结构的序列化,这是由CommonAPI的SOME/IP绑定覆盖的。vsomeip只涵盖了SOME/IP协议和服务发现。
准备/先决条件
正如前面提到的,vsomeip需要Boost.Asio库,因此请确保你在系统上安装了BOOST(至少是1.55版本)。当Boost成功安装后,你可以轻松地构建vsomeip:
Shell $ cd vsomeip <.>/vsomeip$ mkdir build <.>/vsomeip$ cd build <.>/vsomeip/build$ cmake .. <.>/vsomeip/build$ make |
这是可行的,但是为了避免一些特殊的问题,我建议在你的CMake调用中添加至少一个参数:
Shell <.>/vsomeip/build$ cmake -DENABLE_SIGNAL_HANDLING=1 .. |
这个参数确保你可以毫无问题地终止您的vsomeip应用程序(否则,当你用Ctrl-C停止应用程序时,可能没有正确地删除共享内存段/dev/shm/vsomeip)。
第一个应用程序
service-example.cpp
C++ #include <vsomeip/vsomeip.hpp> std::shared_ptr< vsomeip::application > app; int main() { app = vsomeip::runtime::get()->create_application("World"); app->init(); app->start(); } |
必须首先创建一个应用程序对象,然后初始化并启动它。在创建vsomeip应用程序后,必须首先调用init方法,并且会执行以下初始化步骤:
加载配置
确定路由配置和路由初始化
安装信号处理程序
为了启动消息处理,必须在init之后调用start方法。接收到的消息通过sockets进行处理,并使用已注册的回调函数将它们传递给用户应用程序。
CMakeLists.txt (Example)
Erlang cmake_minimum_required (VERSION 2.8) set (CMAKE_CXX_FLAGS "-g -std=c++0x") find_package (vsomeip 2.6.0 REQUIRED) find_package( Boost 1.55 COMPONENTS system thread log REQUIRED ) include_directories ( ${Boost_INCLUDE_DIR} ${VSOMEIP_INCLUDE_DIRS} ) add_executable(service-example ../src/service-example.cpp) target_link_libraries(service-example vsomeip ${Boost_LIBRARIES}) |
Console output:
Shell 2017-03-20 10:38:20.885390 [info] Parsed vsomeip configuration in 0ms 2017-03-20 10:38:20.889637 [info] Default configuration module loaded. 2017-03-20 10:38:20.889797 [info] Initializing vsomeip application "World". 2017-03-20 10:38:20.890120 [info] SOME/IP client identifier configured. Using 0001 (was: 0000) 2017-03-20 10:38:20.890259 [info] No routing manager configured. Using auto-configuration. 2017-03-20 10:38:20.890367 [info] Instantiating routing manager [Host]. 2017-03-20 10:38:20.890641 [info] init_routing_endpoint Routing endpoint at /tmp/vsomeip-0 2017-03-20 10:38:20.890894 [info] Client [1] is connecting to [0] at /tmp/vsomeip-0 2017-03-20 10:38:20.891039 [info] Service Discovery enabled. Trying to load module. 2017-03-20 10:38:20.891647 [info] Service Discovery module loaded. 2017-03-20 10:38:20.892045 [info] Application(World, 1001) is initialized (11, 100). 2017-03-20 10:38:20.892210 [info] Starting vsomeip application "World" using 2 threads 2017-03-20 10:38:20.892668 [info] Watchdog is disabled! 2017-03-20 10:38:20.893312 [info] Network interface "lo" is up and running. 2017-03-20 10:38:20.898471 [info] vSomeIP 2.6.2 2017-03-20 10:38:20.898708 [info] Sent READY to systemd watchdog 2017-03-20 10:38:20.898854 [info] SOME/IP routing ready. |
注意:
这些步骤对于服务端和客户端是相同的没有区别。都只是一个vsomeip应用程序。
直到现在还不需要任何配置文件。
讨论一些细节:
没有配置文件,因此使用默认配置。
你没有为应用程序配置客户端ID,因此vsomeip会自动配置,找到一个合适的客户端ID。第一个数字是0x0001。
路由管理器也没有配置,因此,路由管理器会随着系统中的第一个vsomeip应用程序自动启动。
默认情况下启用了服务发现,没有静态路由。这将需要一些配置参数。
调用init()最后的输出是Application(World, 1) is initialized (11, 100),末尾的两个数字意味着,如果回调时间超过100ms,vsomeip使用的最大dispatchers数量是11。这些参数均可配置。
默认情况下,会创建两个线程来接收SOME/IP消息,这允许vsomeip并行处理长消息。
然后你会看到当前的vsomeip版本,并且SOME/IP路由已经准备好。
Availability
到目前为止,应用程序没有做太多的工作,并且客户端和服务端之间没有区别。现在,让我们假设我们的服务示例就是服务端,我们想要编写一个使用该服务的客户端。在第一步中,我们必须触发应用程序来提供一个服务实例。这可以通过在第一个例子中添加一个offer_service命令来实现:
service-example.cpp with offer
C++ #include <vsomeip/vsomeip.hpp> #define SAMPLE_SERVICE_ID 0x1234 #define SAMPLE_INSTANCE_ID 0x5678 std::shared_ptr< vsomeip::application > app; int main() { app = vsomeip::runtime::get()->create_application("World"); app->init(); app->offer_service(SAMPLE_SERVICE_ID, SAMPLE_INSTANCE_ID); app->start(); } |
在下一步中,我们将编写一个应用程序来检查正在运行的“World”应用程序是否可用。考虑以下客户端示例代码,它创建了一个名为“Hello”的应用程序:
client-example.cpp
C++ #include <iomanip> #include <iostream> #include <vsomeip/vsomeip.hpp> #define SAMPLE_SERVICE_ID 0x1234 #define SAMPLE_INSTANCE_ID 0x5678 std::shared_ptr< vsomeip::application > app; void on_availability(vsomeip::service_t _service, vsomeip::instance_t _instance, bool _is_available) { std::cout << "Service [" << std::setw(4) << std::setfill('0') << std::hex << _service << "." << _instance << "] is " << (_is_available ? "available." : "NOT available.") << std::endl; } int main() { app = vsomeip::runtime::get()->create_application("Hello"); app->init(); app->register_availability_handler(SAMPLE_SERVICE_ID, SAMPLE_INSTANCE_ID, on_availability); app->request_service(SAMPLE_SERVICE_ID, SAMPLE_INSTANCE_ID); app->start(); } |
为了使其尽可能简单,我们省略了所有可能的检查,例如注册是否成功。作为客户端,你必须告诉vsomeip你想使用这个服务,你需要注册一个回调以便在服务可用时获得一个调用。客户端输出现在看起来应该像这样:
Shell Service [1234.5678] is NOT available. 2017-03-21 04:14:37.720313 [info] REQUEST(0002): [1234.5678:255.4294967295] Service [1234.5678] is available. |
是否可用的回调函数会在调用app->start()启动vsomeip事件循环时调用。
服务端的输出会增加这一行:
Shell 2017-03-21 04:14:33.850964 [info] OFFER(0001): [1234.5678:0.0] |
Request / Response
从一个常见的vsomeip应用程序开始,我们创建了一个服务,它提供了一个服务接口的实例和一个想要使用这个接口的客户端。下一步是在服务端实现客户端可以调用的功能。
服务示例必须为接收消息做好准备,这可以通过注册消息处理程序来实现。请看下面的代码:
service-example.cpp with offer and message handler
C++ #include <iomanip> #include <iostream> #include <sstream> #include <vsomeip/vsomeip.hpp> #define SAMPLE_SERVICE_ID 0x1234 #define SAMPLE_INSTANCE_ID 0x5678 #define SAMPLE_METHOD_ID 0x0421 std::shared_ptr<vsomeip::application> app; void on_message(const std::shared_ptr<vsomeip::message> &_request) { std::shared_ptr<vsomeip::payload> its_payload = _request->get_payload(); vsomeip::length_t l = its_payload->get_length(); // Get payload std::stringstream ss; for (vsomeip::length_t i=0; i<l; i++) { ss << std::setw(2) << std::setfill('0') << std::hex << (int)*(its_payload->get_data()+i) << " "; } std::cout << "SERVICE: Received message with Client/Session [" << std::setw(4) << std::setfill('0') << std::hex << _request->get_client() << "/" << std::setw(4) << std::setfill('0') << std::hex << _request->get_session() << "] " << ss.str() << std::endl; // Create response std::shared_ptr<vsomeip::message> its_response = vsomeip::runtime::get()->create_response(_request); its_payload = vsomeip::runtime::get()->create_payload(); std::vector<vsomeip::byte_t> its_payload_data; for (int i=9; i>=0; i--) { its_payload_data.push_back(i % 256); } its_payload->set_data(its_payload_data); its_response->set_payload(its_payload); app->send(its_response, true); } int main() { app = vsomeip::runtime::get()->create_application("World"); app->init(); app->register_message_handler(SAMPLE_SERVICE_ID, SAMPLE_INSTANCE_ID, SAMPLE_METHOD_ID, on_message); app->offer_service(SAMPLE_SERVICE_ID, SAMPLE_INSTANCE_ID); app->start(); } |
客户端有点复杂:
client-example.cpp with message handler and send function
C++ #include <iomanip> #include <iostream> #include <sstream> #include <condition_variable> #include <thread> #include <vsomeip/vsomeip.hpp> #define SAMPLE_SERVICE_ID 0x1234 #define SAMPLE_INSTANCE_ID 0x5678 #define SAMPLE_METHOD_ID 0x0421 std::shared_ptr< vsomeip::application > app; std::mutex mutex; std::condition_variable condition; void run() { std::unique_lock<std::mutex> its_lock(mutex); condition.wait(its_lock); std::shared_ptr< vsomeip::message > request; request = vsomeip::runtime::get()->create_request(); request->set_service(SAMPLE_SERVICE_ID); request->set_instance(SAMPLE_INSTANCE_ID); request->set_method(SAMPLE_METHOD_ID); std::shared_ptr< vsomeip::payload > its_payload = vsomeip::runtime::get()->create_payload(); std::vector< vsomeip::byte_t > its_payload_data; for (vsomeip::byte_t i=0; i<10; i++) { its_payload_data.push_back(i % 256); } its_payload->set_data(its_payload_data); request->set_payload(its_payload); app->send(request, true); } void on_message(const std::shared_ptr<vsomeip::message> &_response) { std::shared_ptr<vsomeip::payload> its_payload = _response->get_payload(); vsomeip::length_t l = its_payload->get_length(); // Get payload std::stringstream ss; for (vsomeip::length_t i=0; i<l; i++) { ss << std::setw(2) << std::setfill('0') << std::hex << (int)*(its_payload->get_data()+i) << " "; } std::cout << "CLIENT: Received message with Client/Session [" << std::setw(4) << std::setfill('0') << std::hex << _response->get_client() << "/" << std::setw(4) << std::setfill('0') << std::hex << _response->get_session() << "] " << ss.str() << std::endl; } void on_availability(vsomeip::service_t _service, vsomeip::instance_t _instance, bool _is_available) { std::cout << "CLIENT: Service [" << std::setw(4) << std::setfill('0') << std::hex << _service << "." << _instance << "] is " << (_is_available ? "available." : "NOT available.") << std::endl; condition.notify_one(); } int main() { app = vsomeip::runtime::get()->create_application("Hello"); app->init(); app->register_availability_handler(SAMPLE_SERVICE_ID, SAMPLE_INSTANCE_ID, on_availability); app->request_service(SAMPLE_SERVICE_ID, SAMPLE_INSTANCE_ID); app->register_message_handler(SAMPLE_SERVICE_ID, SAMPLE_INSTANCE_ID, SAMPLE_METHOD_ID, on_message); std::thread sender(run); app->start(); } |
与服务端一样,我们需要注册一个消息处理程序来接收调用的响应。原则上,创建发送消息(request)是非常容易的。只需通过调用create_request()获取请求对象,设置服务ID、实例ID和方法ID,并在最后将序列化的数据写入负载。在该例中,我们将从0到9的值写入负载(std::vector< vsomeip::byte_t >)。
当我们试图从客户端向服务端发送请求时,就会遇到一个小问题。在我们可以发送消息之前,应用程序必须被启动(app->start()),因为我们需要一个正在运行的事件循环来处理消息。但是方法app->start()没有返回,因为它内部有正在运行的事件循环。因此,我们启动一个线程(run),在调用app->send(request, true)之前,在这个线程中等待availability回调函数的返回。
现在会得到如下输出(先启动了服务端):
Shell 2017-03-21 08:08:08.033710 [info] REQUEST(1002): [1234.5678:255.4294967295] CLIENT: Service [1234.5678] is available. 2017-03-21 08:08:08.034182 [info] Client [1002] is connecting to [1001] at /tmp/vsomeip-1001 SERVICE: Received message with Client/Session [1002/0001] 00 01 02 03 04 05 06 07 08 09 CLIENT: Received message with Client/Session [1002/0001] 09 08 07 06 05 04 03 02 01 00 |
Subscribe / Notify
到目前为止,我们已经创建了实现方法的服务端和调用此方法的客户端。但这不是所有的可能情况。SOME/IP规范还描述了事件处理。这意味着,如果订阅者感兴趣,应用程序可以向订阅者发送事件。通过定义setter和getter方法,可以实现提供属性的服务。
为了让它不太复杂,我们在示例中删除了方法调用的实现,但实现了事件处理。首先让我们看看服务端。
在main函数下添加:
C++ const vsomeip::byte_t its_data[] = { 0x10 }; payload = vsomeip::runtime::get()->create_payload(); payload->set_data(its_data, sizeof(its_data)); std::set<vsomeip::eventgroup_t> its_groups; its_groups.insert(SAMPLE_EVENTGROUP_ID); app->offer_event(SAMPLE_SERVICE_ID, SAMPLE_INSTANCE_ID, SAMPLE_EVENT_ID, its_groups, true); app->notify(SAMPLE_SERVICE_ID, SAMPLE_INSTANCE_ID, SAMPLE_EVENT_ID, payload); |
注意:
你必须提供该事件,以便向外界宣布该事件的存在。
使用notify方法,您可以将事件发送给任何已订阅的人。
每个事件都属于一个事件组!但它也可同属于几个事件组。
事件并不独立于服务而存在;如果没有提供服务端,则服务端对客户端不可用,客户端无法订阅。
在客户端实现以下内容(为了更好地理解,我省略了之前讨论过的所有内容):
C++ ... void run() { std::unique_lock<std::mutex> its_lock(mutex); condition.wait(its_lock); std::set<vsomeip::eventgroup_t> its_groups; its_groups.insert(SAMPLE_EVENTGROUP_ID); app->request_event(SAMPLE_SERVICE_ID, SAMPLE_INSTANCE_ID, SAMPLE_EVENT_ID, its_groups, true); app->subscribe(SAMPLE_SERVICE_ID, SAMPLE_INSTANCE_ID, SAMPLE_EVENTGROUP_ID); } void on_message(const std::shared_ptr<vsomeip::message> &_response) { std::stringstream its_message; its_message << "CLIENT: received a notification for event [" << std::setw(4) << std::setfill('0') << std::hex << _response->get_service() << "." << std::setw(4) << std::setfill('0') << std::hex << _response->get_instance() << "." << std::setw(4) << std::setfill('0') << std::hex << _response->get_method() << "] to Client/Session [" << std::setw(4) << std::setfill('0') << std::hex << _response->get_client() << "/" << std::setw(4) << std::setfill('0') << std::hex << _response->get_session() << "] = "; std::shared_ptr<vsomeip::payload> its_payload = _response->get_payload(); its_message << "(" << std::dec << its_payload->get_length() << ") "; for (uint32_t i = 0; i < its_payload->get_length(); ++i) its_message << std::hex << std::setw(2) << std::setfill('0') << (int) its_payload->get_data()[i] << " "; std::cout << its_message.str() << std::endl; } ... int main() { app = vsomeip::runtime::get()->create_application("Hello"); app->init(); app->register_availability_handler(SAMPLE_SERVICE_ID, SAMPLE_INSTANCE_ID, on_availability); app->request_service(SAMPLE_SERVICE_ID, SAMPLE_INSTANCE_ID); app->register_message_handler(vsomeip::ANY_SERVICE, vsomeip::ANY_INSTANCE, vsomeip::ANY_METHOD, on_message); std::thread sender(run); app->start(); } |
实现起来没有任何困难:
同样,您需要事件组来订阅事件。
在您可以订阅之前,您必须请求该事件。
为了接收事件,只需注册一个标准的消息处理程序;在这种情况下,您可以使用非常方便的通配符。
在控制台中,你现在应该看到以下行:
Shell 2017-04-06 03:47:46.424942 [info] REGISTER EVENT(0001): [1234.5678.8778:is_provider=true] 2017-04-06 03:47:51.851654 [info] REGISTER EVENT(0002): [1234.5678.8778:is_provider=false] ... 2017-04-06 03:47:51.856821 [info] SUBSCRIBE(0002): [1234.5678.4465:ffff:0] 2017-04-06 03:47:51.861330 [info] SUBSCRIBE ACK(0001): [1234.5678.4465.ffff] |
圆括号中的数字是客户端id;我首先启动了服务端,因此服务端从自动配置中获得了数字1,客户端获得了数字2。
两个设备之间的通信
SOME/IP并不是为了在一个设备(例如D-Bus)内的进程间通信而发明的,而是为了在多个设备之间基于IP的通信而发明的。如果你想使用到目前为止为两个设备之间的通信而开发的示例,不需要更改c++代码;但是您必须编写vsomeip配置文件。详情请参阅vsomeip用户指南;这里我们只讨论让您的系统运行的要点。
配置文件使用json格式。
json文件的标准文件夹是/etc/vsomeip。
也可以通过设置环境变量VSOMEIP_CONFIGURATION来更改此文件夹或定义单个配置文件。
也可以将配置文件复制到包含可执行应用程序的文件夹中。
对于下面的配置示例,我假设服务运行在一个地址为172.17.0.2的设备上,客户端地址为172.17.0.1。
首先,让我们看一个服务端配置的示例。
JSON { "unicast" : "172.17.0.2", "logging" : { "level" : "debug", "console" : "true", "file" : { "enable" : "false", "path" : "/tmp/vsomeip.log" }, "dlt" : "false" }, "applications" : [ { "name" : "World", "id" : "0x1212" } ], "services" : [ { "service" : "0x1234", "instance" : "0x5678", "unreliable" : "30509" } ], "routing" : "World", "service-discovery" : { "enable" : "true", "multicast" : "224.224.224.245", "port" : "30490", "protocol" : "udp", "initial_delay_min" : "10", "initial_delay_max" : "100", "repetitions_base_delay" : "200", "repetitions_max" : "3", "ttl" : "3", "cyclic_offer_delay" : "2000", "request_response_delay" : "1500" } } |
对于通过IP进行通信,单播地址是必须的。让我们来讨论其他条目:
logging:这些设置是可选的,设置"console"=true以便在控制台上查看日志消息。
applications:您可以为每个应用程序(通过create_application(<name>)创建)定义一个固定的客户端ID,而不是由自动配置确定。这将帮助你之后跟踪识别应用程序。这里必须设置客户端ID,因为客户端ID在您的网络中必须是唯一的。如果你不设置clientID,自动配置会将每个设备clientID设置为1,将无法通信。
services:对于每个服务实例,必须定义它可以获取的端口。如果端口是“不可靠的”,它是UDP端口,如果它是“可靠的”,TCP将作为传输层。
routing:每个设备只有一个路由管理器。这个路由管理器将被附加到第一个启动的vsomeip应用程序或这里定义的应用程序。
service-discovery:所有这些参数只有在启用服务发现时才有意义。在这种情况下,必选参数是用于发送服务发现消息的多播地址、端口和协议。其他参数决定提供消息的发送频率、延迟时间等。请查阅用户指南或SOME/IP规范。
确保你的设备已经配置为接收多播消息(例如通过route add -nv 224.224.224.245 dev eth0或其他方式;这取决于以太网设备的名称)。
以下是客户端的配置:
JSON { "unicast" : "172.17.0.1", "logging" : { "level" : "debug", "console" : "true", "file" : { "enable" : "false", "path" : "/var/log/vsomeip.log" }, "dlt" : "false" }, "applications" : [ { "name" : "Hello", "id" : "0x1313" } ], "routing" : "Hello", "service-discovery" : { "enable" : "true", "multicast" : "224.224.224.245", "port" : "30490", "protocol" : "udp", "initial_delay_min" : "10", "initial_delay_max" : "100", "repetitions_base_delay" : "200", "repetitions_max" : "3", "ttl" : "3", "cyclic_offer_delay" : "2000", "request_response_delay" : "1500" } } |
因为客户端不提供服务,所以“服务”设置是不必要的。
三、CommonAPI简介
Step 1: Preparation / Prerequisites
请注意,代码生成器需要java 8运行时环境。
您可能还需要安装以下软件包(debian/ubuntu名称):cmake cmake-qt-gui libexpatt -dev expat default-jre
Step 2: Build the CommonAPI Runtime Library
Shell $ git clone https://github.com/GENIVI/capicxx-core-runtime.git $ cd capicxx-core-runtime/ <.>/capicxx-core-runtime$ mkdir build <.>/capicxx-core-runtime$ cd build <.>/capicxx-core-runtime/build$ cmake .. |
Step 3: Build the CommonAPI SOME/IP Runtime Library
构建CommonAPI C++ SOME/IP之前需要先构建安装vsomeip。
Shell $ git clone https://github.com/GENIVI/capicxx-someip-runtime.git $ cd capicxx-someip-runtime <.>/capicxx-someip-runtime$ mkdir build <.>/capicxx-someip-runtime$ cd build <.>/capicxx-someip-runtime/build$ cmake -DUSE_INSTALLED_COMMONAPI=OFF .. <.>/capicxx-someip-runtime/build$ make |
Step 4: Write the Franca file and generate code
在所有这些准备工作之后,我们开始认真地编写一个真正的CommonAPI应用程序(更准确地说,是两个应用程序)。我们需要编写一个提供sayHello方法的服务端和一个调用该方法的客户端。对于CommonAPI服务,所提供的接口的描述是通过Franca IDL实现的。
HelloWorld.fidl:
Nginx package commonapi interface HelloWorld { version {major 1 minor 0} method sayHello { in { String name } out { String message } } } |
下一步是生成代码。为此,我们需要代码生成器。
Groovy <.>/project$ ./cgen/commonapi-generator/commonapi-generator-linux-x86 -sk ./fidl/HelloWorld.fidl |
如果一切正常,生成的代码将位于新目录src-gen中。选项-sk在服务端生成接口实例的默认实现。
但是SOME/IP规范还要求定义服务和方法标识符,Franca IDL通过所谓的Franca部署文件提供了这种IPC框架特定参数的可能性。这些部署文件以.fdepl结尾,并具有类似franca的语法(部署参数文件)。准确的内容(必须提供哪些部署参数)也必须在fdepl-file(部署规范文件)中指定。由CommonAPI C++ SOME/IP规范实现的部署规范文件可以在SOME/IP代码生成器项目中找到。
基于这个部署规范,可以编写部署参数文件,通常我们称它为fdepl文件。
HelloWorld.fdepl:
TypeScript import "platform:/plugin/org.genivi.commonapi.someip/deployment/CommonAPI-SOMEIP_deployment_spec.fdepl" import "HelloWorld.fidl" define org.genivi.commonapi.someip.deployment for interface commonapi.HelloWorld { SomeIpServiceID = 4660 method sayHello { SomeIpMethodID = 123 } } define org.genivi.commonapi.someip.deployment for provider MyService { instance commonapi.HelloWorld { InstanceId = "test" SomeIpInstanceID = 22136 } } |
现在你需要SOME/IP代码生成器。
Shell <.>/project$ ./cgen/commonapi_someip_generator/commonapi-someip-generator-linux-x86 ./fidl/HelloWorld.fdepl |
进入生成源代码的目录并查看:
Shell $ cd src-gen/v1/commonapi <.>/src-gen/v1/commonapi$ ls HelloWorld.hpp HelloWorldSomeIPDeployment.cpp HelloWorldSomeIPProxy.hpp HelloWorldStubDefault.cpp HelloWorldProxyBase.hpp HelloWorldSomeIPDeployment.hpp HelloWorldSomeIPStubAdapter.cpp HelloWorldStubDefault.hpp HelloWorldProxy.hpp HelloWorldSomeIPProxy.cpp HelloWorldSomeIPStubAdapter.hpp HelloWorldStub.hpp |
Step 5: Write the client and the service application
现在我们可以开始编写Hello World应用程序了。创建4个文件:客户端代码HelloWorldClient.cpp,一个实现主要功能的服务端代码HelloWorldService.cpp,和两个文件(头文件和源源文件)stub生成框架的实现(我们称之为HelloWorldStubImpl.hpp和HelloWorldStubImpl.cpp)。
HelloWorldClient.cpp
C++ // HelloWorldClient.cpp #include <iostream> #include <string> #include <unistd.h> #include <CommonAPI/CommonAPI.hpp> #include <v1/commonapi/HelloWorldProxy.hpp> using namespace v1_0::commonapi; int main() { std::shared_ptr < CommonAPI::Runtime > runtime = CommonAPI::Runtime::get(); std::shared_ptr<HelloWorldProxy<>> myProxy = runtime->buildProxy<HelloWorldProxy>("local", "test"); std::cout << "Checking availability!" << std::endl; while (!myProxy->isAvailable()) usleep(10); std::cout << "Available..." << std::endl; CommonAPI::CallStatus callStatus; std::string returnMessage; myProxy->sayHello("Bob", callStatus, returnMessage); std::cout << "Got message: '" << returnMessage << "'\n"; return 0; } |
在每个CommonAPI应用程序开始时,都需要获得一个指向通用运行时对象的指针。运行时是创建代理(proxy)和存根(stub)所必需的。客户端应用程序必须调用服务端应用程序中接口实例的函数。为了能够调用这些函数,我们必须在客户端为这个接口创建一个代理。接口名是buildProxy方法的模板参数;此外,我们为某个实例构建代理;实例名是buildProxy方法中的第二个参数。原则上,可以在不同的域(第一个参数)中区分实例,但我们现在不想深入讨论这个问题,总是将域取为“local”。
代理提供了函数isAvailable,如果先启动服务,那么isAvailable总是返回true。也可以在服务可用时再注册回调,但我们在这里尽量保持简单。
现在我们调用函数sayHello,它已经在fidl文件中定义。该函数有一个传入参数(string)和一个传出参数(也是string)。请查看HelloWorldPorxy.hpp,以获得如何准确调用函数sayHello的信息。在这重要的是要知道,可以调用这个函数的同步版本(我们在这里所做的),也可以调用稍微复杂一些的异步版本(sayHelloAsync)。其中一个返回值是CallStatus,它向我们提供了调用是否成功的信息。同样,为了保持简单,我们不检查CallStatus并希望一切正常。
我们现在继续编写服务端。创建一个新文件HelloWorldService.cpp:
C++ // HelloWorldService.cpp #include <iostream> #include <thread> #include <CommonAPI/CommonAPI.hpp> #include "HelloWorldStubImpl.hpp" using namespace std; int main() { std::shared_ptr<CommonAPI::Runtime> runtime = CommonAPI::Runtime::get(); std::shared_ptr<HelloWorldStubImpl> myService = std::make_shared<HelloWorldStubImpl>(); runtime->registerService("local", "test", myService); std::cout << "Successfully Registered Service!" << std::endl; while (true) { std::cout << "Waiting for calls... (Abort with CTRL+C)" << std::endl; std::this_thread::sleep_for(std::chrono::seconds(30)); } return 0; } |
服务端的主要功能比客户端的主要功能更为简单,因为接口功能的实现在stub的实现中。同样,我们需要指向运行时环境的指针,然后我们实例化stub的实现,并通过使用实例名调用registerService来注册接口的这个实例。服务端应该永远运行并响应函数调用,直到它被杀死,因此,我们需要在main函数的末尾使用while循环。
最后我们需要stub的实现,我们通过创建stub实现类来实现它,这个类继承自stub默认实现。头文件是:
C++ // HelloWorldStubImpl.hpp #ifndef HELLOWORLDSTUBIMPL_H_ #define HELLOWORLDSTUBIMPL_H_ #include <CommonAPI/CommonAPI.hpp> #include <v1/commonapi/HelloWorldStubDefault.hpp> class HelloWorldStubImpl: public v1_0::commonapi::HelloWorldStubDefault { public: HelloWorldStubImpl(); virtual ~HelloWorldStubImpl(); virtual void sayHello(const std::shared_ptr<CommonAPI::ClientId> _client, std::string _name, sayHelloReply_t _return); }; #endif /* HELLOWORLDSTUBIMPL_H_ */ |
实现在cpp文件中:
C++ // HelloWorldStubImpl.cpp #include "HelloWorldStubImpl.hpp" HelloWorldStubImpl::HelloWorldStubImpl() { } HelloWorldStubImpl::~HelloWorldStubImpl() { } void HelloWorldStubImpl::sayHello(const std::shared_ptr<CommonAPI::ClientId> _client, std::string _name, sayHelloReply_t _reply) { std::stringstream messageStream; messageStream << "Hello " << _name << "!"; std::cout << "sayHello('" << _name << "'): '" << messageStream.str() << "'\n"; _reply(messageStream.str()); }; |
函数sayHello的功能是在传入参数_name前添加“Hello”,返回参数不是像在fidl文件中定义的那样直接是字符串,它是一个标准的函数对象,将返回的参数作为传入参数。这样做的原因是在此函数的实现中提供了不是同步应答的可能性,是将应答委托给另一个线程。
四、调试总结
依赖库
libvsomeip.so:SOME/IP的共享库。
libvsomeip-sd.so:SOME/IP的服务发现共享库,当服务发现开启时会在运行时动态加载。
注:由于是在运行时动态加载,应用程序不需要显式地链接vsomeip-sd库,vsomeip的库依赖boost库,但是没有设置任何rpath,应用程序设置的rpath不能用于vsomeip库的查找,所以必须在启动应用程序之前设置环境变量:export LD_LIBRARY_PATH=${boost_lib}
环境变量
Bash # 设置vsomeip应用名称,方便vsomeip的log跟踪 export VSOMEIP_APPLICATION_NAME=my_vsomeip_client # 设置vsomeip使用的json配置文件路径 export VSOMEIP_CONFIGURATION=my_settings.json |
设置环境变量VSOMEIP_APPLICATION_NAME和在C++代码中调用create_application()时传入一个字符串(应用名称)等价。
配置文件
vsomeip使用JSON格式的配置文件,若未设置上述环境变量VSOMEIP_CONFIGURATION,将使用默认路径下的vsomeip.json作为配置文件(一般放在程序可执行文件目录下)。跨主机通信需要配置文件,位于同一主机上的两个程序不需配置文件。官方文档vsomeipUserGuide对配置项有详细介绍。跨主机通信需要注意点如下:
跨主机通信,配置文件“unicast”字段填写本机ip地址。
服务端和客户端应用名称需要通过环境变量或程序代码指定,并且配置文件中“applications”段需添加相应的应用。若未设置,跨主机通信可能失败。
C++代码中调用offer_service()的一方为服务端,服务端需要在配置文件中“services”段添加对应的服务,且serviceId和instanceId与代码中一致。
“service”使用“unreliable”即UDP通信时,如果传输的数据大小超过UDP负载的大小限制1400字节,需要在对应服务下面添加字段“someip-tp”,“service-to-client”填写对应的eventId或methodId。
“routing”段需要定义,和启动的任一个application名称相同即可。
“service-discovery”段需要定义,服务端和客户端相同。
疑难杂症
若配置均正确却还无法建立连接,考虑删除/tmp下的vsomeip相关文件夹:rm -rvf /tmp/vsomeip*。或在编译vsomeip库时添加参数-DENABLE_SIGNAL_HANDLING=1。
虚拟机网卡设置桥接模式。


 96
96

 被折叠的 条评论
为什么被折叠?
被折叠的 条评论
为什么被折叠?
 到【灌水乐园】发言


